
Hole-Free Gusset Pick Up and Decreases for Perfectly Fitting Socks
September 22, 2025
How to Embroider on Knits: Pro Tips & Techniques
October 4, 2025Complete Foot and Wedge Toe Sock Guide: Measuring, Sizing & Decreasing

Originally published on September 25, 2025
So, this is the final lesson in this sock knitting course, and let me tell you, I had so much fun writing it!! I truly hope that many people in the future will find it helpful for knitting their own socks.
This step-by-step sock knitting tutorial covers everything you need to create a perfectly fitted sock: How long to knit the foot before starting the wedge toe decreases, how to measure it correctly, and how to calculate the decrease rounds for your wedge toe, and the simplest decrease techniques - including finishing with the Kitchener stitch. Whether you are a beginner or ready to fine-tune your skills, this step-by-step sock knitting tutorial will help you achieve a beautiful, comfortable fit.
Watch the full video tutorial here
 | Complete Foot and Wedge Toe Sock Guide: Perfect Fitting Socks Every Time |
Table of Contents
-
When to Start Toe Decreases in Sock Knitting
-
How to Measure Your Sock Foot Correctly
- Accounting for Sock Stretch
- The 10% Adjustment Rule
- Example Measurements and Formula
-
-
How to Calculate Wedge Toe Decreases for Perfect Sock Fit
- Determining Toe Length
- Finding Your Row Gauge
- Total Round Calculation
- Decrease and Plain Round Planning
- Example Calculations-
Spacing Decrease and Plain Rounds for Toe Shaping
- Distributing Plain Rounds
- Options for Round Placement
-
Why Wedge Toes Work for Any Feet
Because our feet are as unique as we are, it's important to customize your sock toes for the best possible fit. Today, let's explore the classic wedge toe, including how it works, how you can modify it, and why personal landmarks matter.
Usually, you will read or hear that you should start working your decreases when you reach the end of your little toe. I followed this advice as a beginner, but it didn’t work out as planned - my little toe is a bit longer, so there isn’t much distance between the tips of my little and big toes. That meant my socks didn’t fit as well as I hoped.
A really good guideline is to start the decreases where your foot begins to get narrower. Measure from that point to the tip of your big toe, and you will know how much toe length you need, and how to space out your decrease rounds for your sock toe.
There’s also another common method: knit the foot until it’s about 4–5 cm (about 1.5–2 inches) shorter than your full foot length. I find this is a better indicator for most people. It’s more reliable than just using the little toe as a landmark, especially if your toes are shaped a bit differently than average.
Measuring for a Perfect Sock Toe
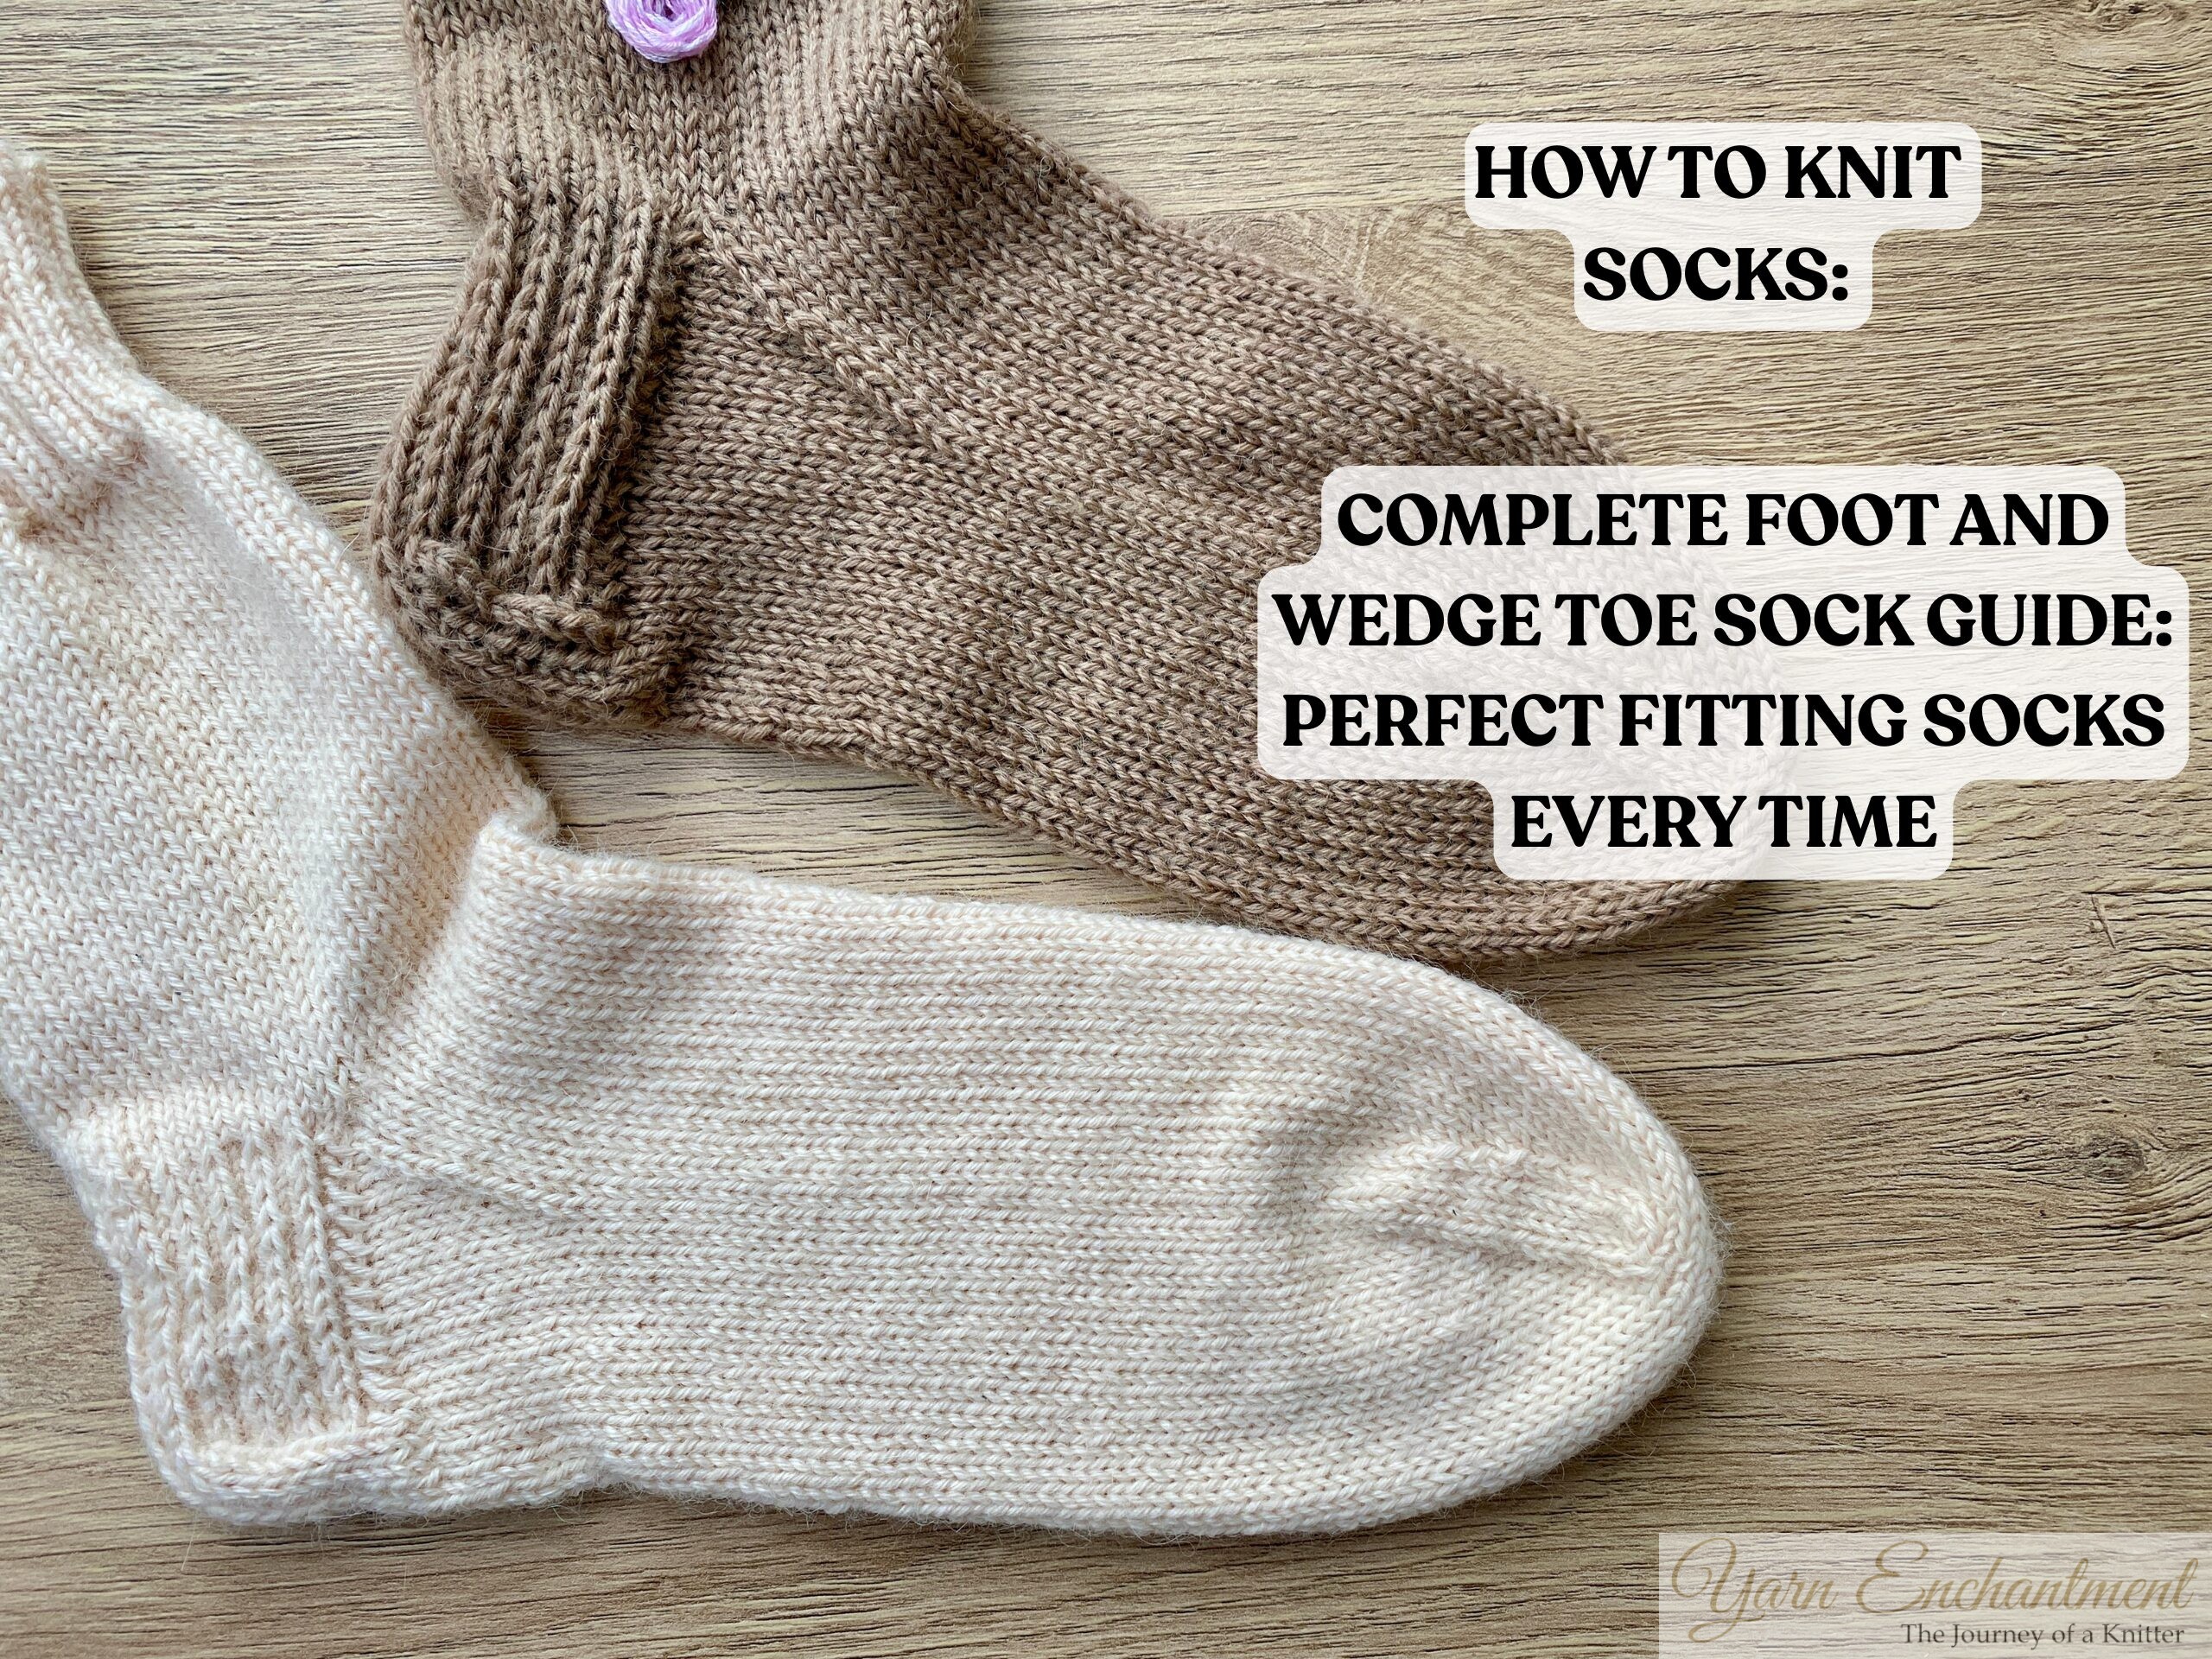
Before jumping in, it’s helpful to understand that not all feet are shaped the same - and that’s absolutely normal! The image below shows four common foot shapes, each with a different toe length and toe alignment. (I really tried my best with the drawing, but I think you get the idea.😊)
 | Different foot shapes change which toe is the longest and how much the length varies between toes. This affects where you should measure and how you calculate your toe shaping for a perfect fit. |

Quick Guide:
- If the big toe is the longest (shape 1), measure from the tip of the big toe.
- If your second toe is longest (shape 3), measure from there instead.
- If all your toes are almost the same (shape 2), you may want a rounder, roomier sock toe.
This visual helps explain why following just one “rule” (like always measuring to the little toe) doesn’t work for everyone. Note: I am someone who always tries to show different approaches to a technique, because I strongly believe that what works for me doesn’t necessarily work for you. That’s why you will find, in almost all of my tutorials, more than one way to do something.
When to Start Toe Decreases in Sock Knitting
Before starting your toe decreases, you’ll need to decide how long the main foot section of your sock should be. There are a couple of simple ways to figure out when to start your toe shaping, pick whichever makes the most sense for you, or combine them for best results.
-
The Measurement Method: Try on your sock as you go. Begin your decreases when the knitting reaches the point where your foot narrows before the toes, or where the sock covers the base/middle of your smallest toe.
-
The Distance Method: Knit the foot until it measures about 4–5 cm (1½–2 inches) less than the total foot length you want. This gap allows enough space for your toe shaping and gives a cozy, customized finish.
-
For the most accurate fit, count how many decrease rounds you’ll need for your chosen toe and subtract this from your total rounds to know when to begin (see below for the math).
Both techniques can be used together: Try on the sock AND measure from your landmark to be sure. Using either approach, you can achieve a personalized fit for any foot shape.
How to Measure Your Sock Foot Correctly
When it comes to measuring socks, it’s so easy to make a little mistake. I remember when I knitted my first pair, I didn’t think about how much the finished socks would stretch, and they ended up far too long! I’m mentioning this because, from what I’ve seen, many beginners are surprised by how much give a finished sock really has. It’s such an easy detail to miss, but it truly shapes the fit and comfort of your socks.
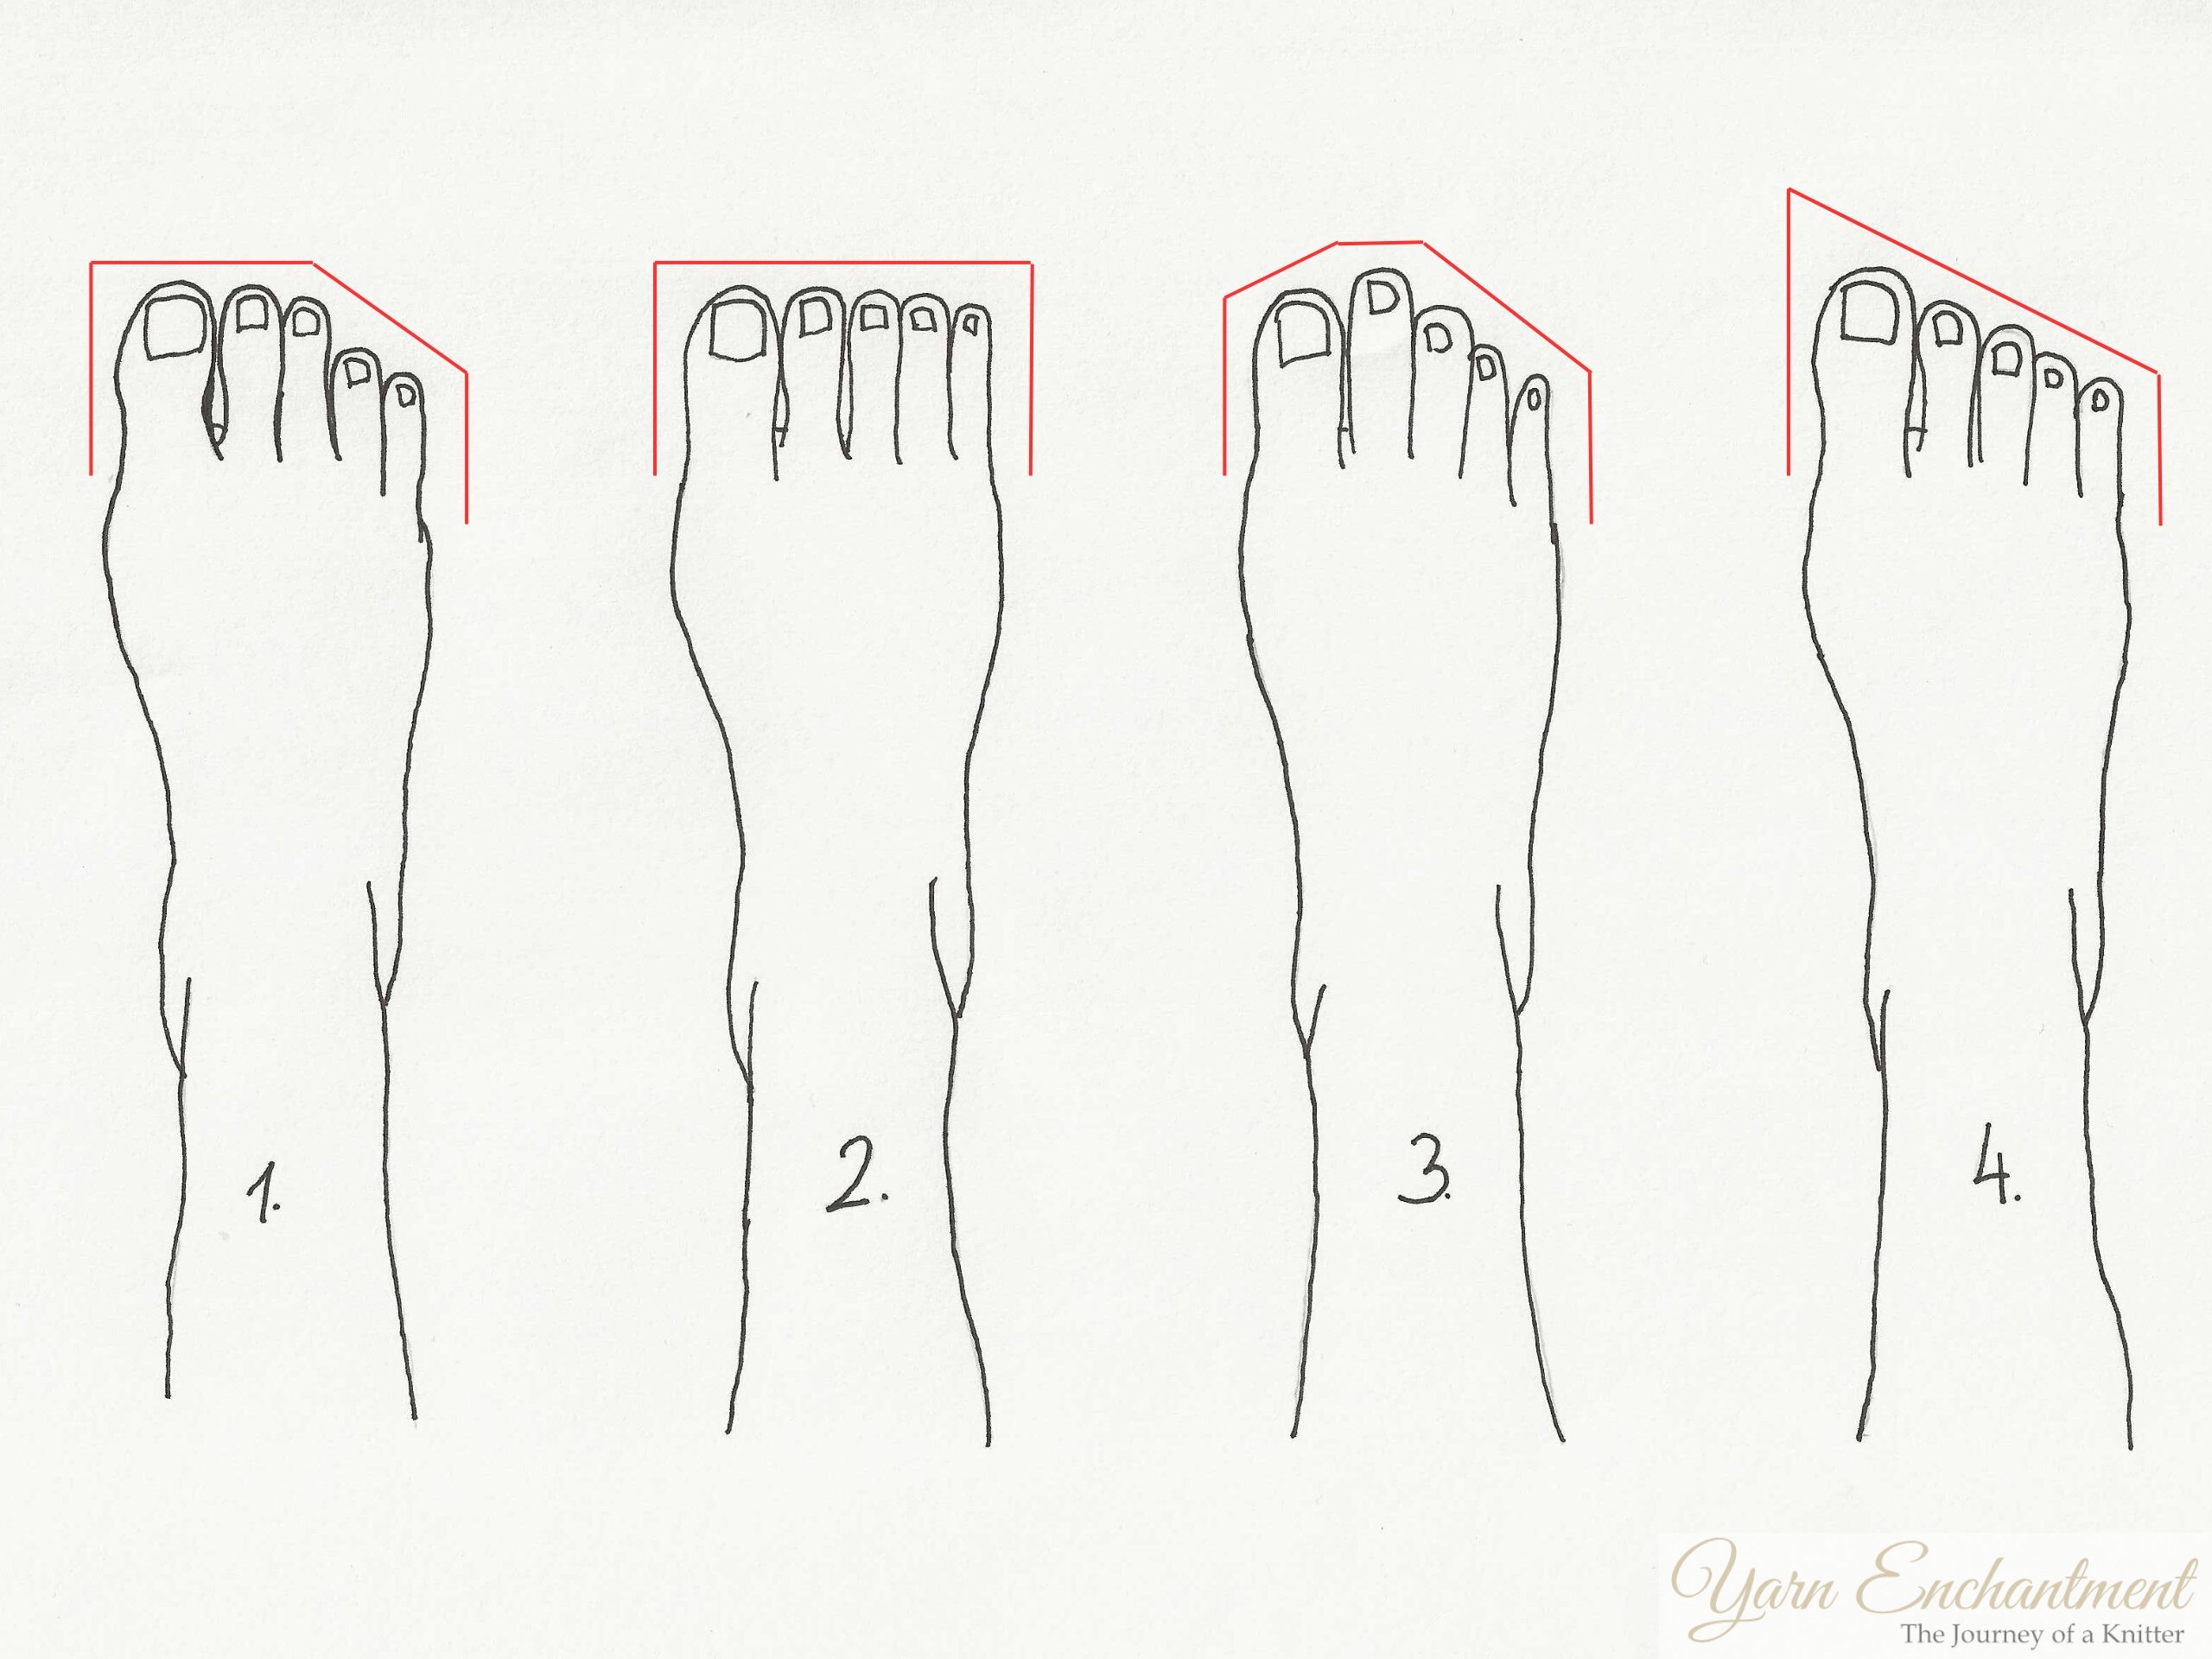
Later, I learned an important lesson: knitted fabric always stretches, so it’s important to keep that in mind when you measure. In fact, it’s just as easy to overstretch your sock while checking measurements, which can make things confusing. After some experimenting, I found a little trick that works well for me, subtracting 10% from the foot length before starting my toe decreases.
For example:
My foot length is 25.5 cm (10 inches).
I know I need about 4 cm (1.6 inches) for the toe decreases, which leaves 21.5 cm (8.5 inches) for the main foot section.
Instead of knitting all 21.5 cm in unstretched fabric, I subtract 10%.
21.5 cm (8.5 inches) × 0.9 = 19.5 cm (7.7 inches)
That means I stop knitting the foot part when it measures about 19.5 cm (7.7 inches) unstretched. Once the sock is worn, the fabric stretches neatly to the correct length and fits perfectly.
So, the general formula I use is:
Foot length before toe decreases × 0.9
This simple adjustment helps avoiding socks that are too long, or having stretched out stitches.
We need to do a little bit of math, but don't worry, it's easy, I promise! You only need these calculations if you want to customize the fit of your sock toes. You can also simply knit the foot about 4 - 5 cm (1.6 - 2 inches) shorter than your actual foot length, then start your decreases. Jump to the section below for step-by-step instructions.
 | 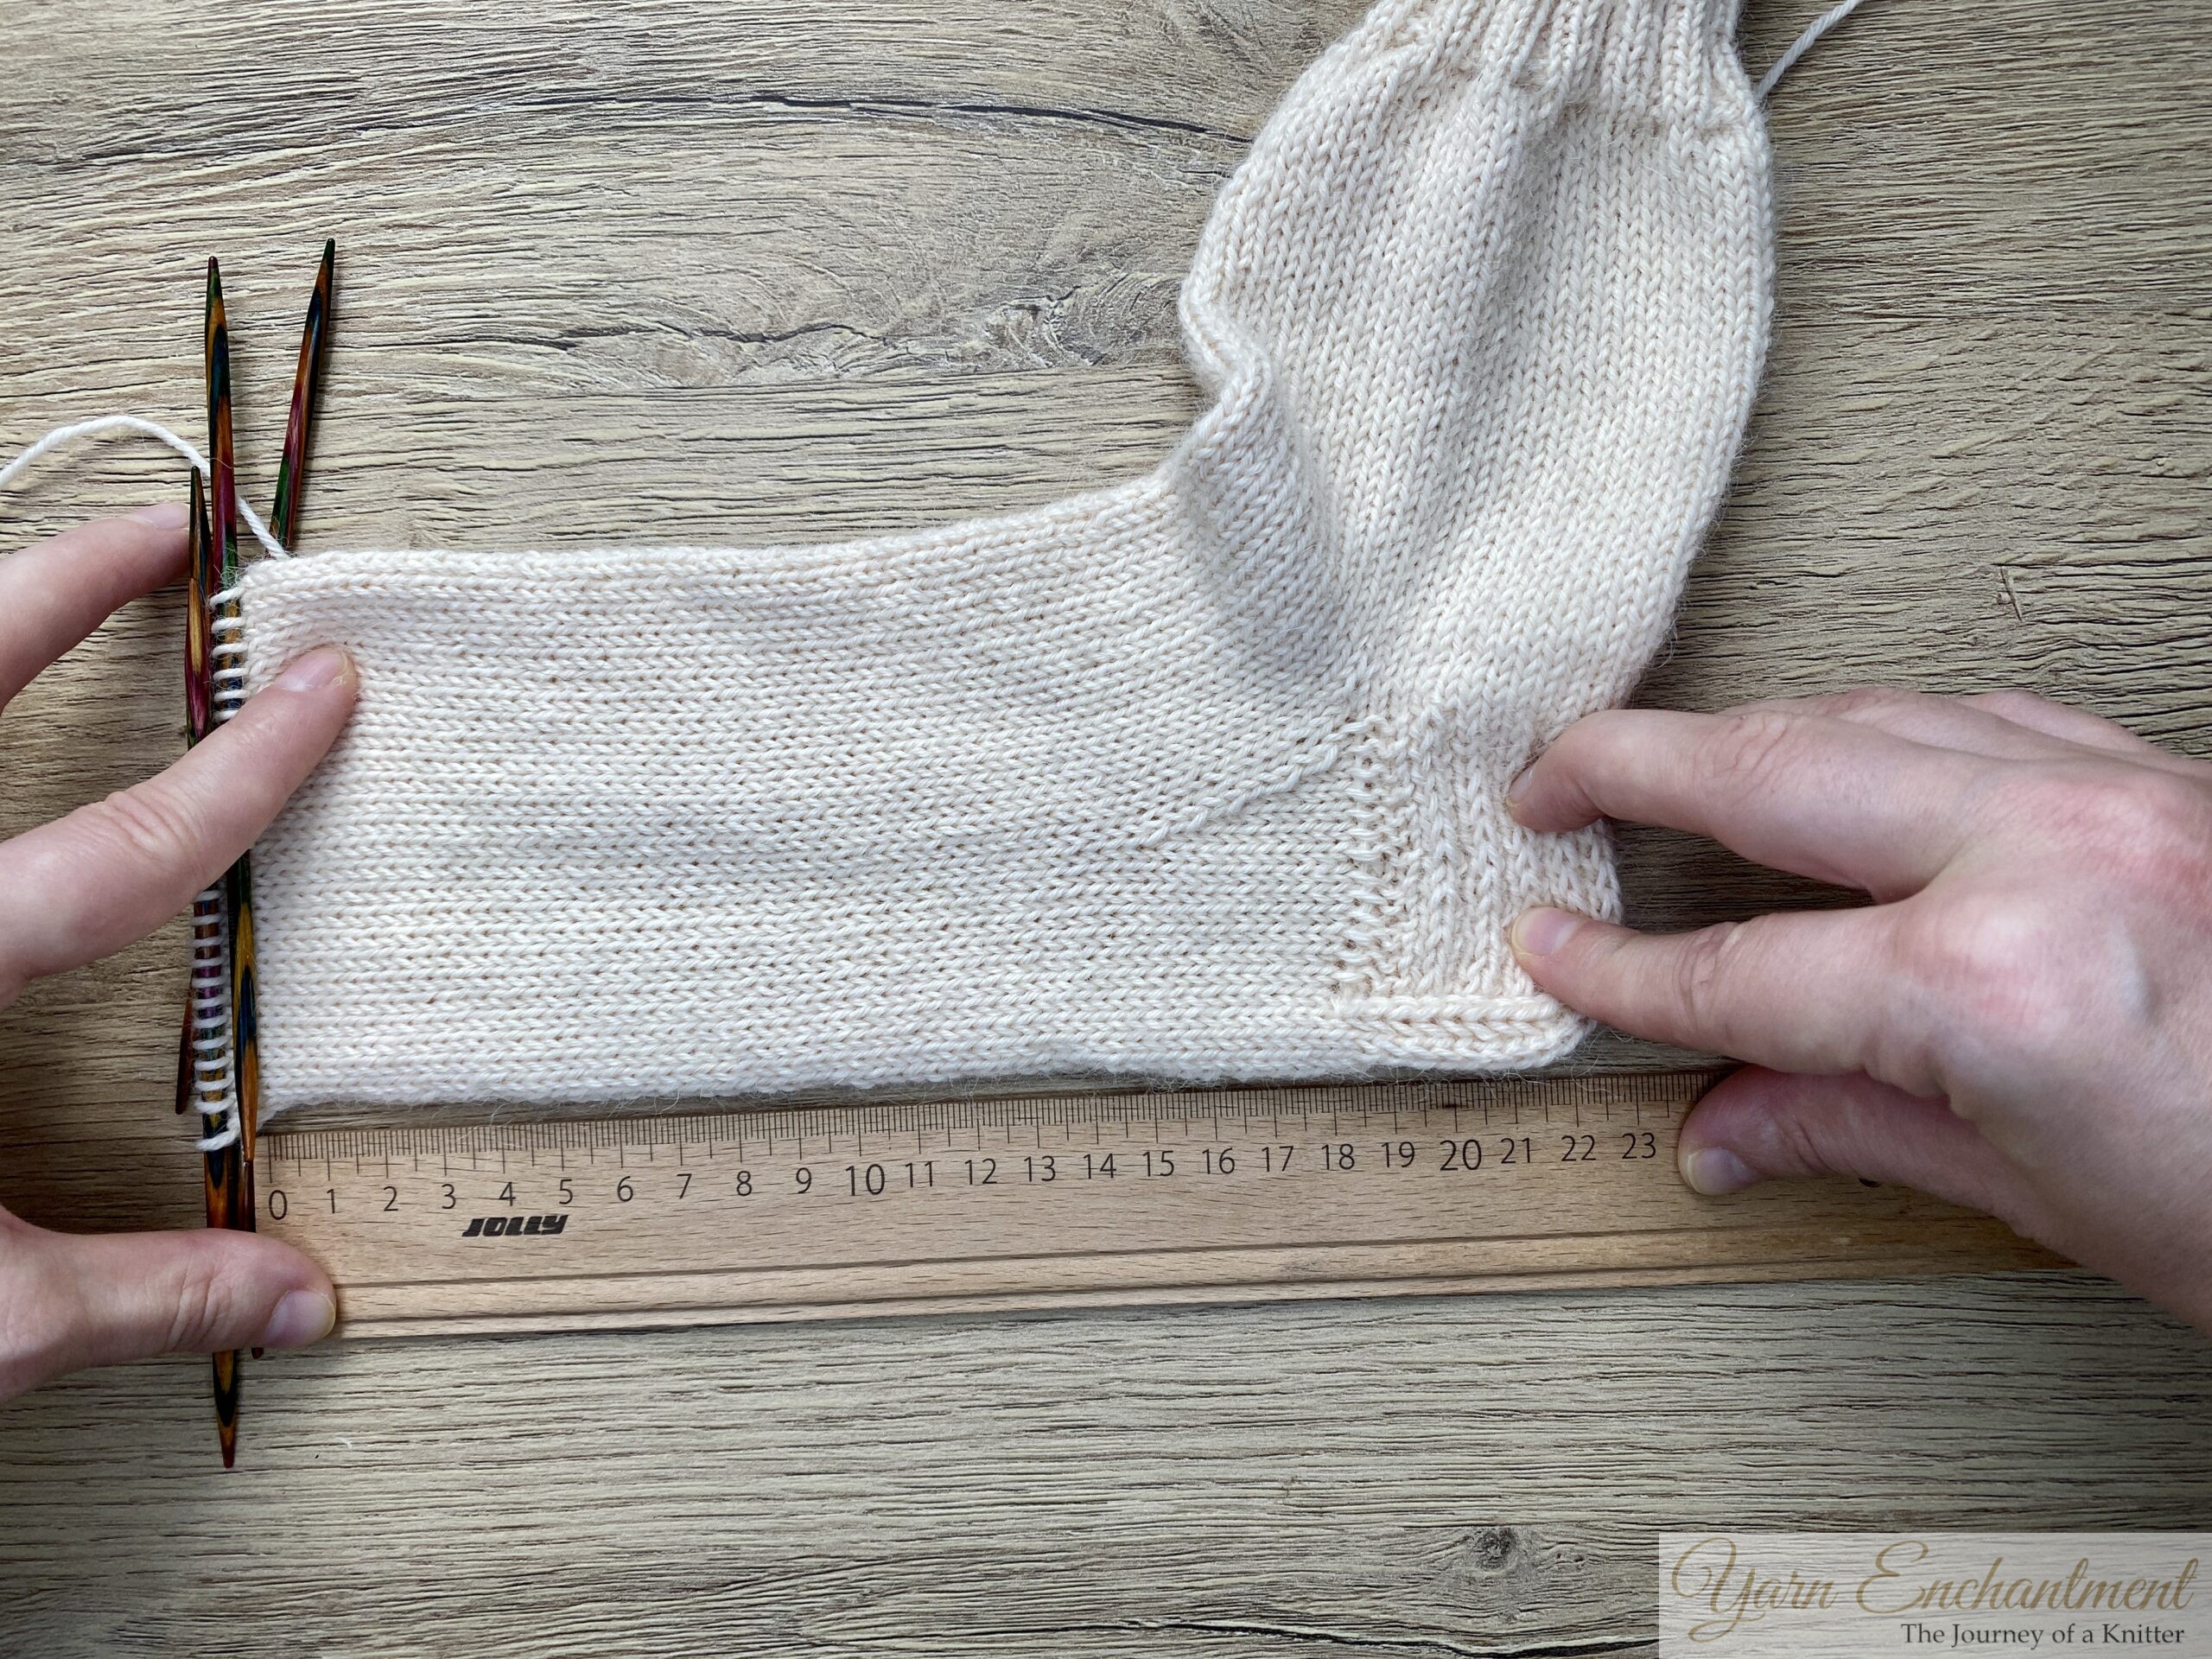 | 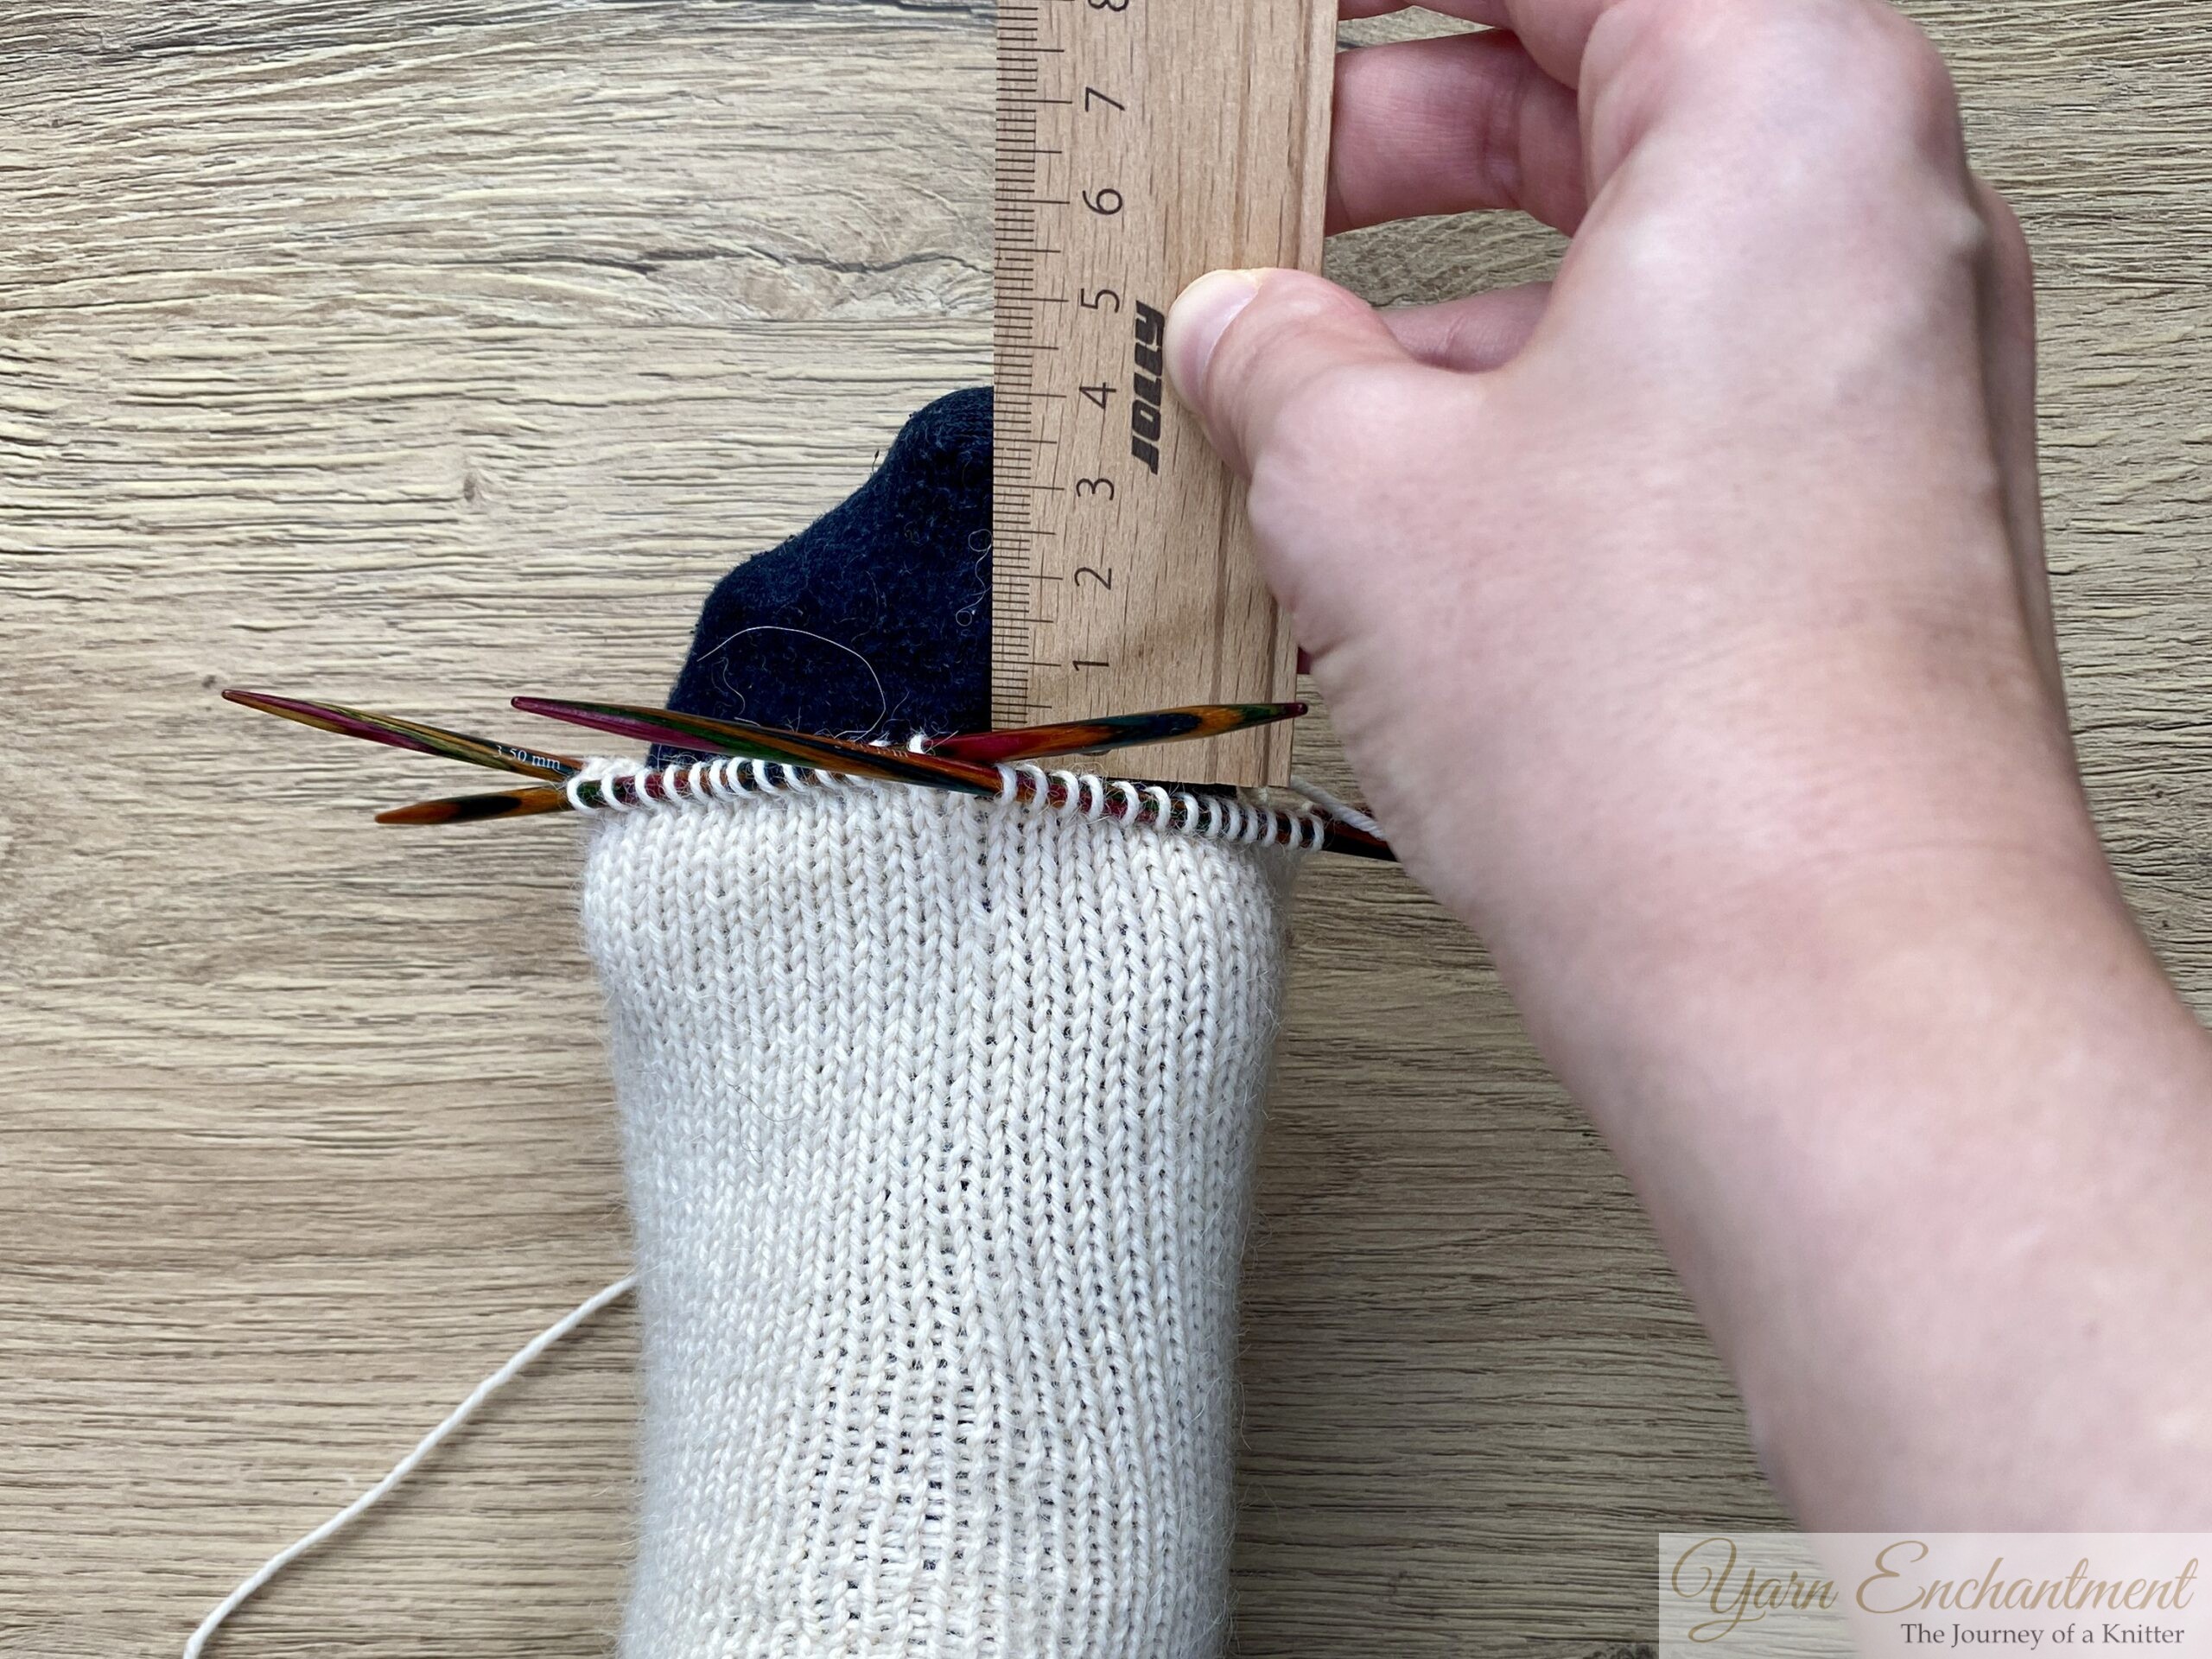 | My sock lays flat on the table, without being stretched. You can see that it measures around 19.5 cm (about 7.7 inches). | When I gently stretch the sock, it easily measures up to 21.5 cm (about 8.5 inches). | And when I try the sock on, I have exactly 4 cm left for my toe decreases. |


How to Calculate Wedge Toe Decreases for Perfect Sock Fit
Sock toe fit depends on correct calculation and decrease distribution, for a truly custom, comfortable result.
Measure the Toe Length Needed:
Use a ruler to measure from where your foot starts to narrow (at the base of your big toe) to the tip of your big toe, or decide how long you want the toe area.
- Find Your Row Gauge:
Determine how many rows (rounds) you knit per centimeter or inch - you can find this by knitting a small swatch and measuring how many rows fit into one cm/inch. - Calculate Total Rounds Needed:
Multiply your desired toe length by your row gauge.- Example in cm: If you want a 4 cm toe and your gauge is 3.8 rows per cm, you need about 15 rounds (4 × 3.8 = 15.2).
- Example in inches: If you want a 1.57 inch toe and your gauge is 9.7 rows per inch, you need about 15 rounds (1.57 × 9.7 = 15.2)
- Plan Your Decreases:
Most wedge toes are worked until about one third of your starting stitches remain.- For 52 stitches, one third is about 17 stitches (52 ÷ 3 = ~17).
- Each decrease round reduces the stitch count by 4 (one on each side of instep and sole).
- Calculate how many decrease rounds you need: (Starting stitches - Target stitches) ÷ 4.
- For 52 to 17: (52 - 17) ÷ 4 = 8.75, round up to 9 decrease rounds.
- Add Plain Rounds As Needed:
If your total rounds (from step 3) is more than your decrease rounds, add plain (no decrease) rounds between decrease rounds - these are usually placed at the start for a rounder toe.
For Example
My sock: 52 stitches, toe length 4 cm (1.6 inches), row gauge 3.8 rows/cm (9.7 rows/inch) → 15 rounds total. Target end: about 17 stitches. Decrease rounds: (52 - 17) ÷ 4 = 9 rounds. Plain rounds: 15 total rounds minus 9 decrease rounds = 6 plain rounds (spread these out early in the toe).
If you have 60 stitches, want a 6.4 cm (2.5-inch) toe, and a gauge of 10 rows per inch (3.9 rows/cm):
- Total rounds: 25.
- Decrease rounds: (60 - 20) ÷ 4 = 10.
- Plain rounds: 15 (usually placed between the first decrease rounds).
Spacing Decrease and Plain Rounds for Toe Shaping
- Count Total Rounds:
Calculate the number of total toe rounds you need (toe length × row gauge). - Count Decrease Rounds:
Work out how many decrease rounds you’ll need [(starting stitches - ending stitches) ÷ 4]. - Find the Number of Plain Rounds:
Subtract decrease rounds from total rounds. The result is your number of plain (non-decrease) rounds. - Distribute Plain Rounds:
Place most or all plain rounds at the start of your toe shaping for a rounder effect. For an evenly tapered or classic wedge toe, alternate decrease and plain rounds at first (e.g., decrease round, plain round, decrease round, plain round), then switch to working decrease rounds every round as you near the tip of the toe for a more natural curve.
Example Distribution
- Say you need 15 total rounds and 9 decrease rounds.
- 6 plain rounds are needed (15 - 9).
Option A:
- Work a plain round after each decrease round for the first 6 rounds:
(Decrease, plain, decrease, plain... for six pairs) - Then finish with only decrease rounds for the remaining rows.
Option B:
- If you want a rounder toe, put more plain rounds at the start (e.g., 2 plain rounds between the first few decreases, then alternate, then only decreases as you finish).
Knitters often create a small chart or written plan listing each round as "D" (decrease) or "P" (plain) to keep track. (on that note I will definitely redo my sock knitting progress tracker)
Spreading out the plain rounds at the beginning, and decreasing more frequently toward the end, helps the toe look natural and fit the foot better.
Sock Toe Decrease Chart Example
| Round | Action |
|---|---|
| 1 | Decrease |
| 2 | Plain |
| 3 | Decrease |
| 4 | Plain |
| 5 | Decrease |
| 6 | Plain |
| 7 | Decrease |
| 8 | Plain |
| 9 | Decrease |
| 10 | Plain |
| 11 | Decrease |
| 12 | Plain |
| 13 | Decrease |
| 14 | Decrease |
| 15 | Decrease |
Note: I’m adding a simple chart to the sock knitting progress keeper to help you plan your own decrease rounds.
Step-by-Step: Knitting the Wedge Toe
Step 1:Knit the foot length:
Continue knitting until you reach the narrowest part of your foot (just before the toes), or until the sock is about 4–5 cm (1.5–2 inches) shorter than your actual foot length. Place a stitch marker to help keep track of your rounds/rows on the foot section.
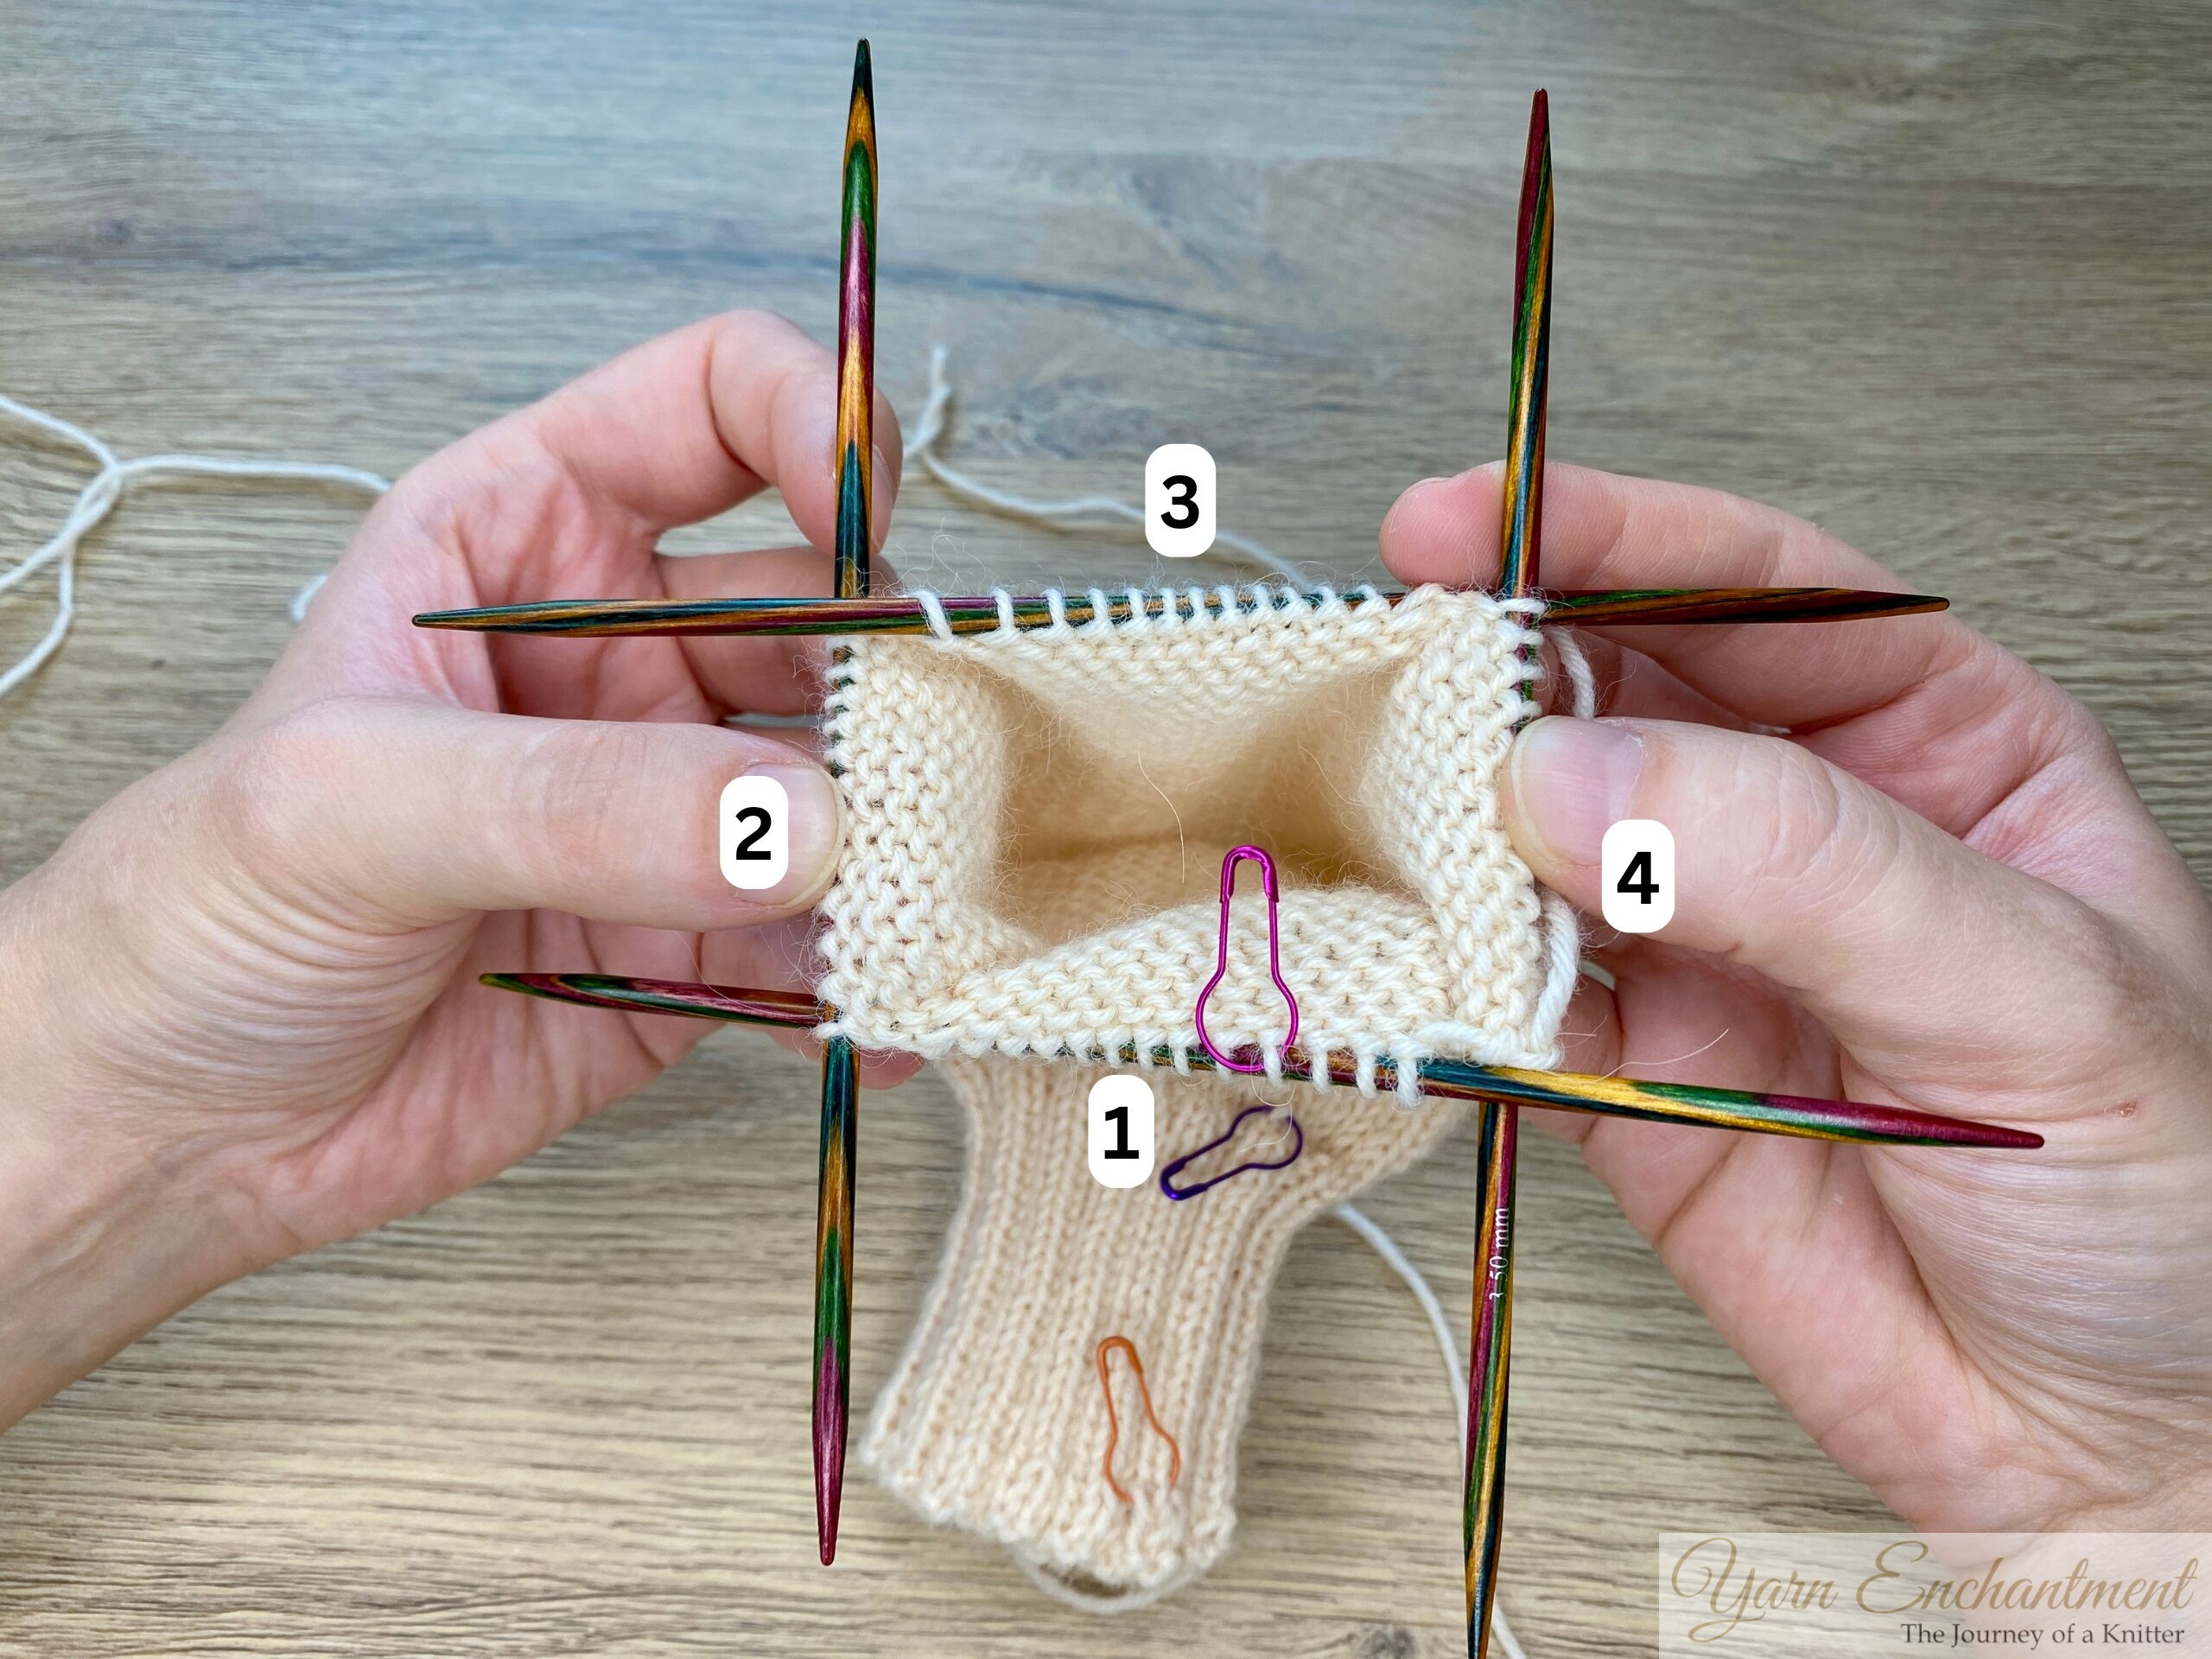 | Just like before, the stitch marker marks the start of needle 1. From there, count your needles clockwise: needle 2 comes next, then needle 3, followed by needle 4. |

Step 2 Begin decreases:
Repeat the following two rounds:
Decrease Round:
- Needles 1 and 3: Knit to the last 3 stitches, knit 2 together (k2tog), knit 1.
 |  |  | The orange marker marks the beginning of the round. On needles 1 and 3, we will... | ...knit to the last 3 stitches. | Knit 2 together (k2tog), knit the last stitch. |


- Needles 2 and 4: Knit 1, slip slip knit (ssk), then knit to the end of the needle.
 |  |  | On needles 2 and 4, work the following... | Knit 1 | Then work a slip slip knit (ssk), and knit to the end of the needle. |


Step 3 Plain Round:
- Knit all stitches with no decreases.
Step 4 Repeat:
Repeat these two rounds (alternating decrease and plain rounds) until you have about one-third of your original stitches remaining. 💡Tip: If your stitch count isn’t exactly divisible by three, you can work only three decreases on the last decrease round.
For example: instead of decreasing to 17 stitches for my Kitchener stitch, I will decrease to 18 stitches.
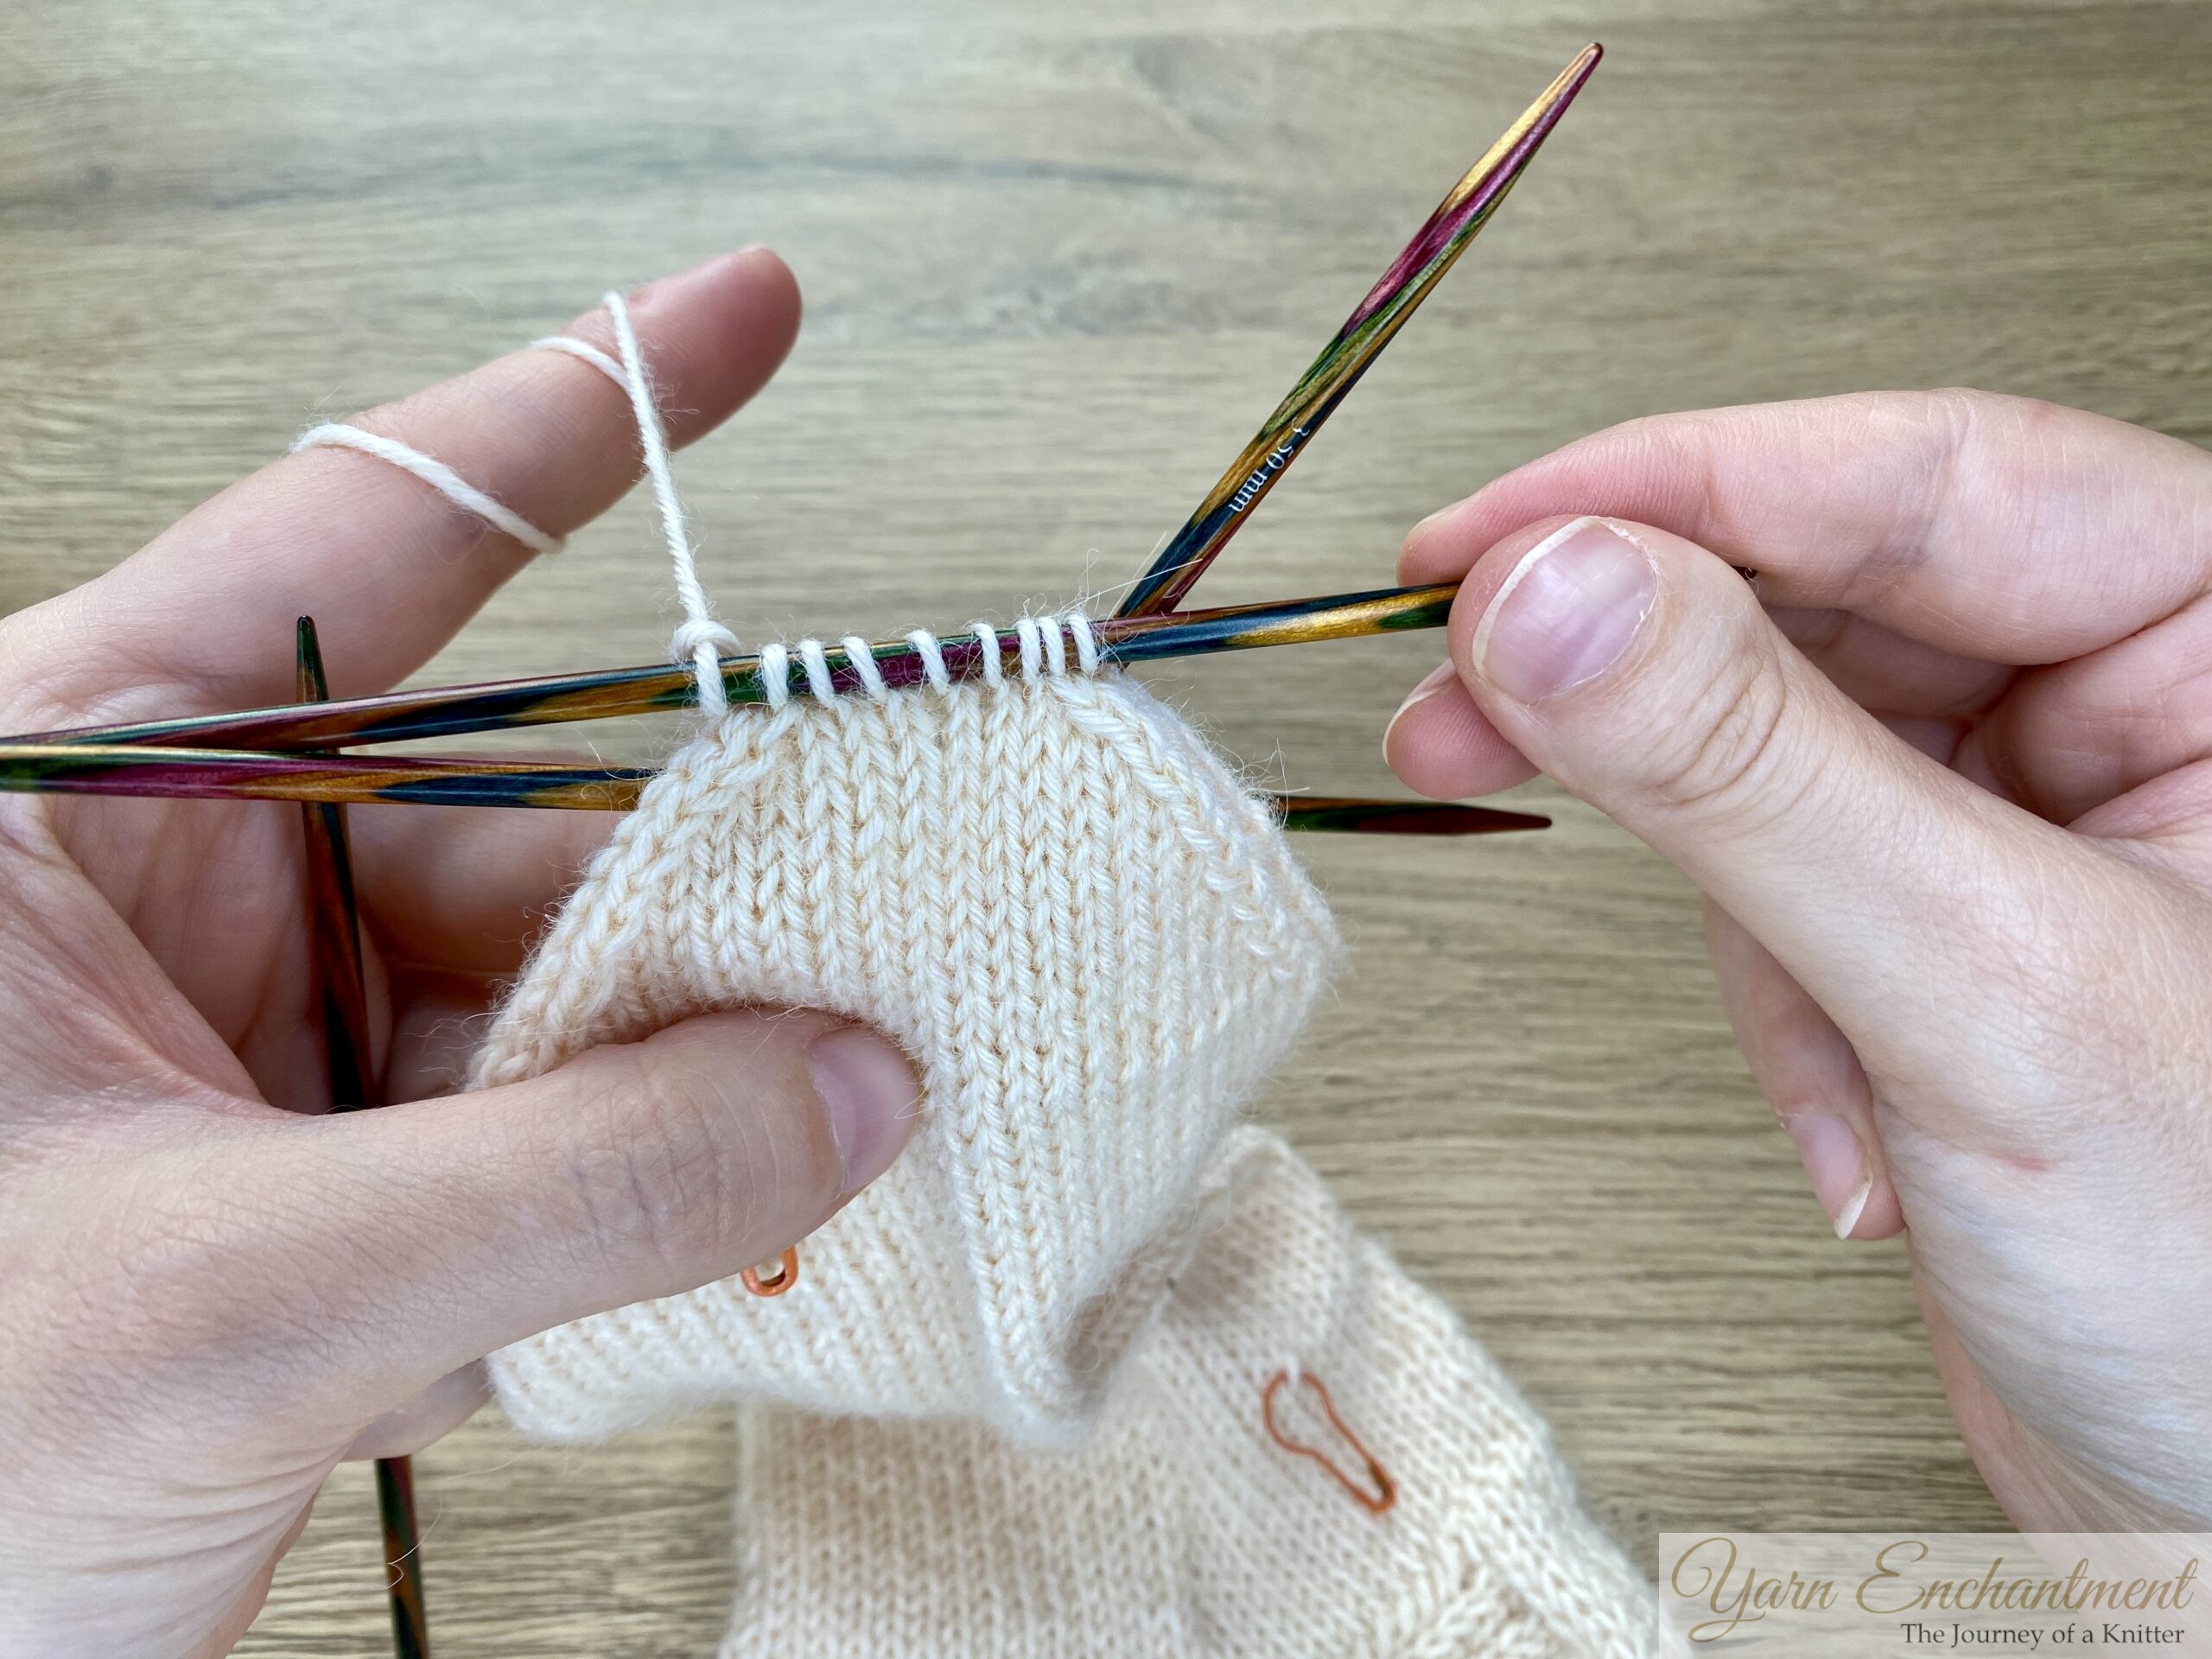
 | Here you can see the finished decreases on the wedge toe, just before working the Kitchener stitch. All the stitches are lined up and ready for the last bit of magic to close the toe. |

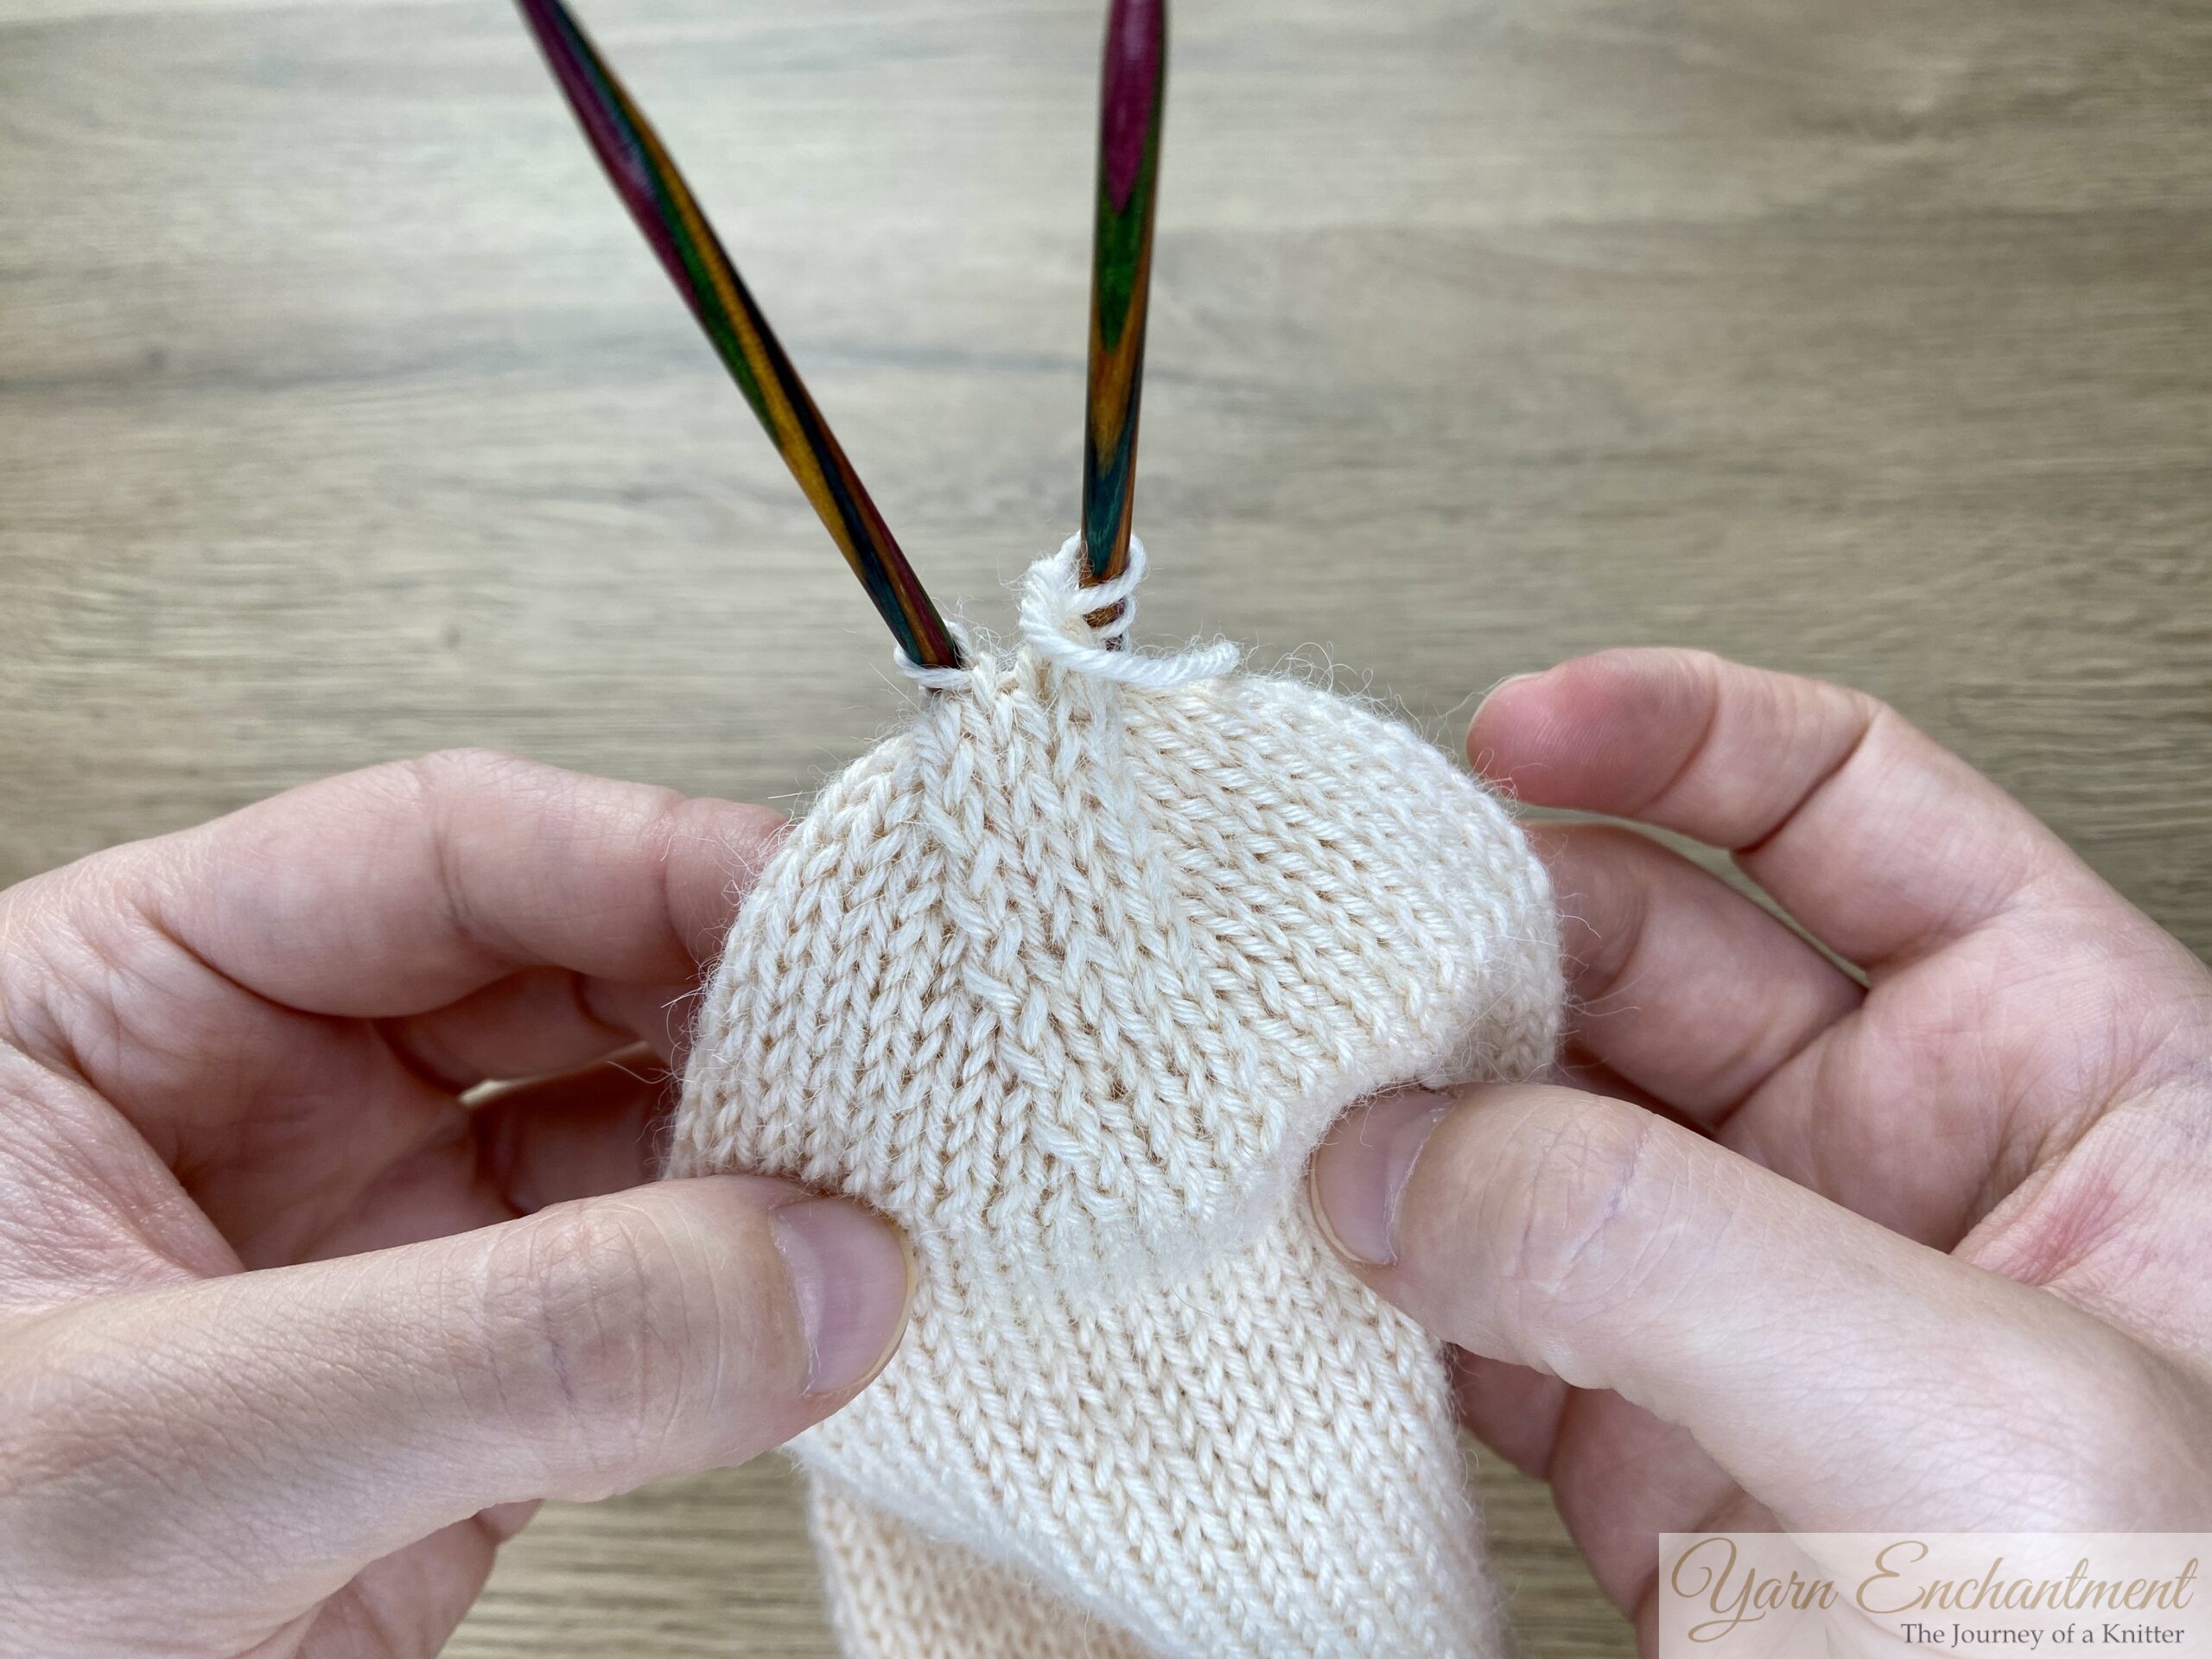
Step 5: Preparing for the Kitchener Stitch
When you have the final number of stitches remaining - typically about one third of your original stitch count - you are ready to set up for finishing the toe.
-
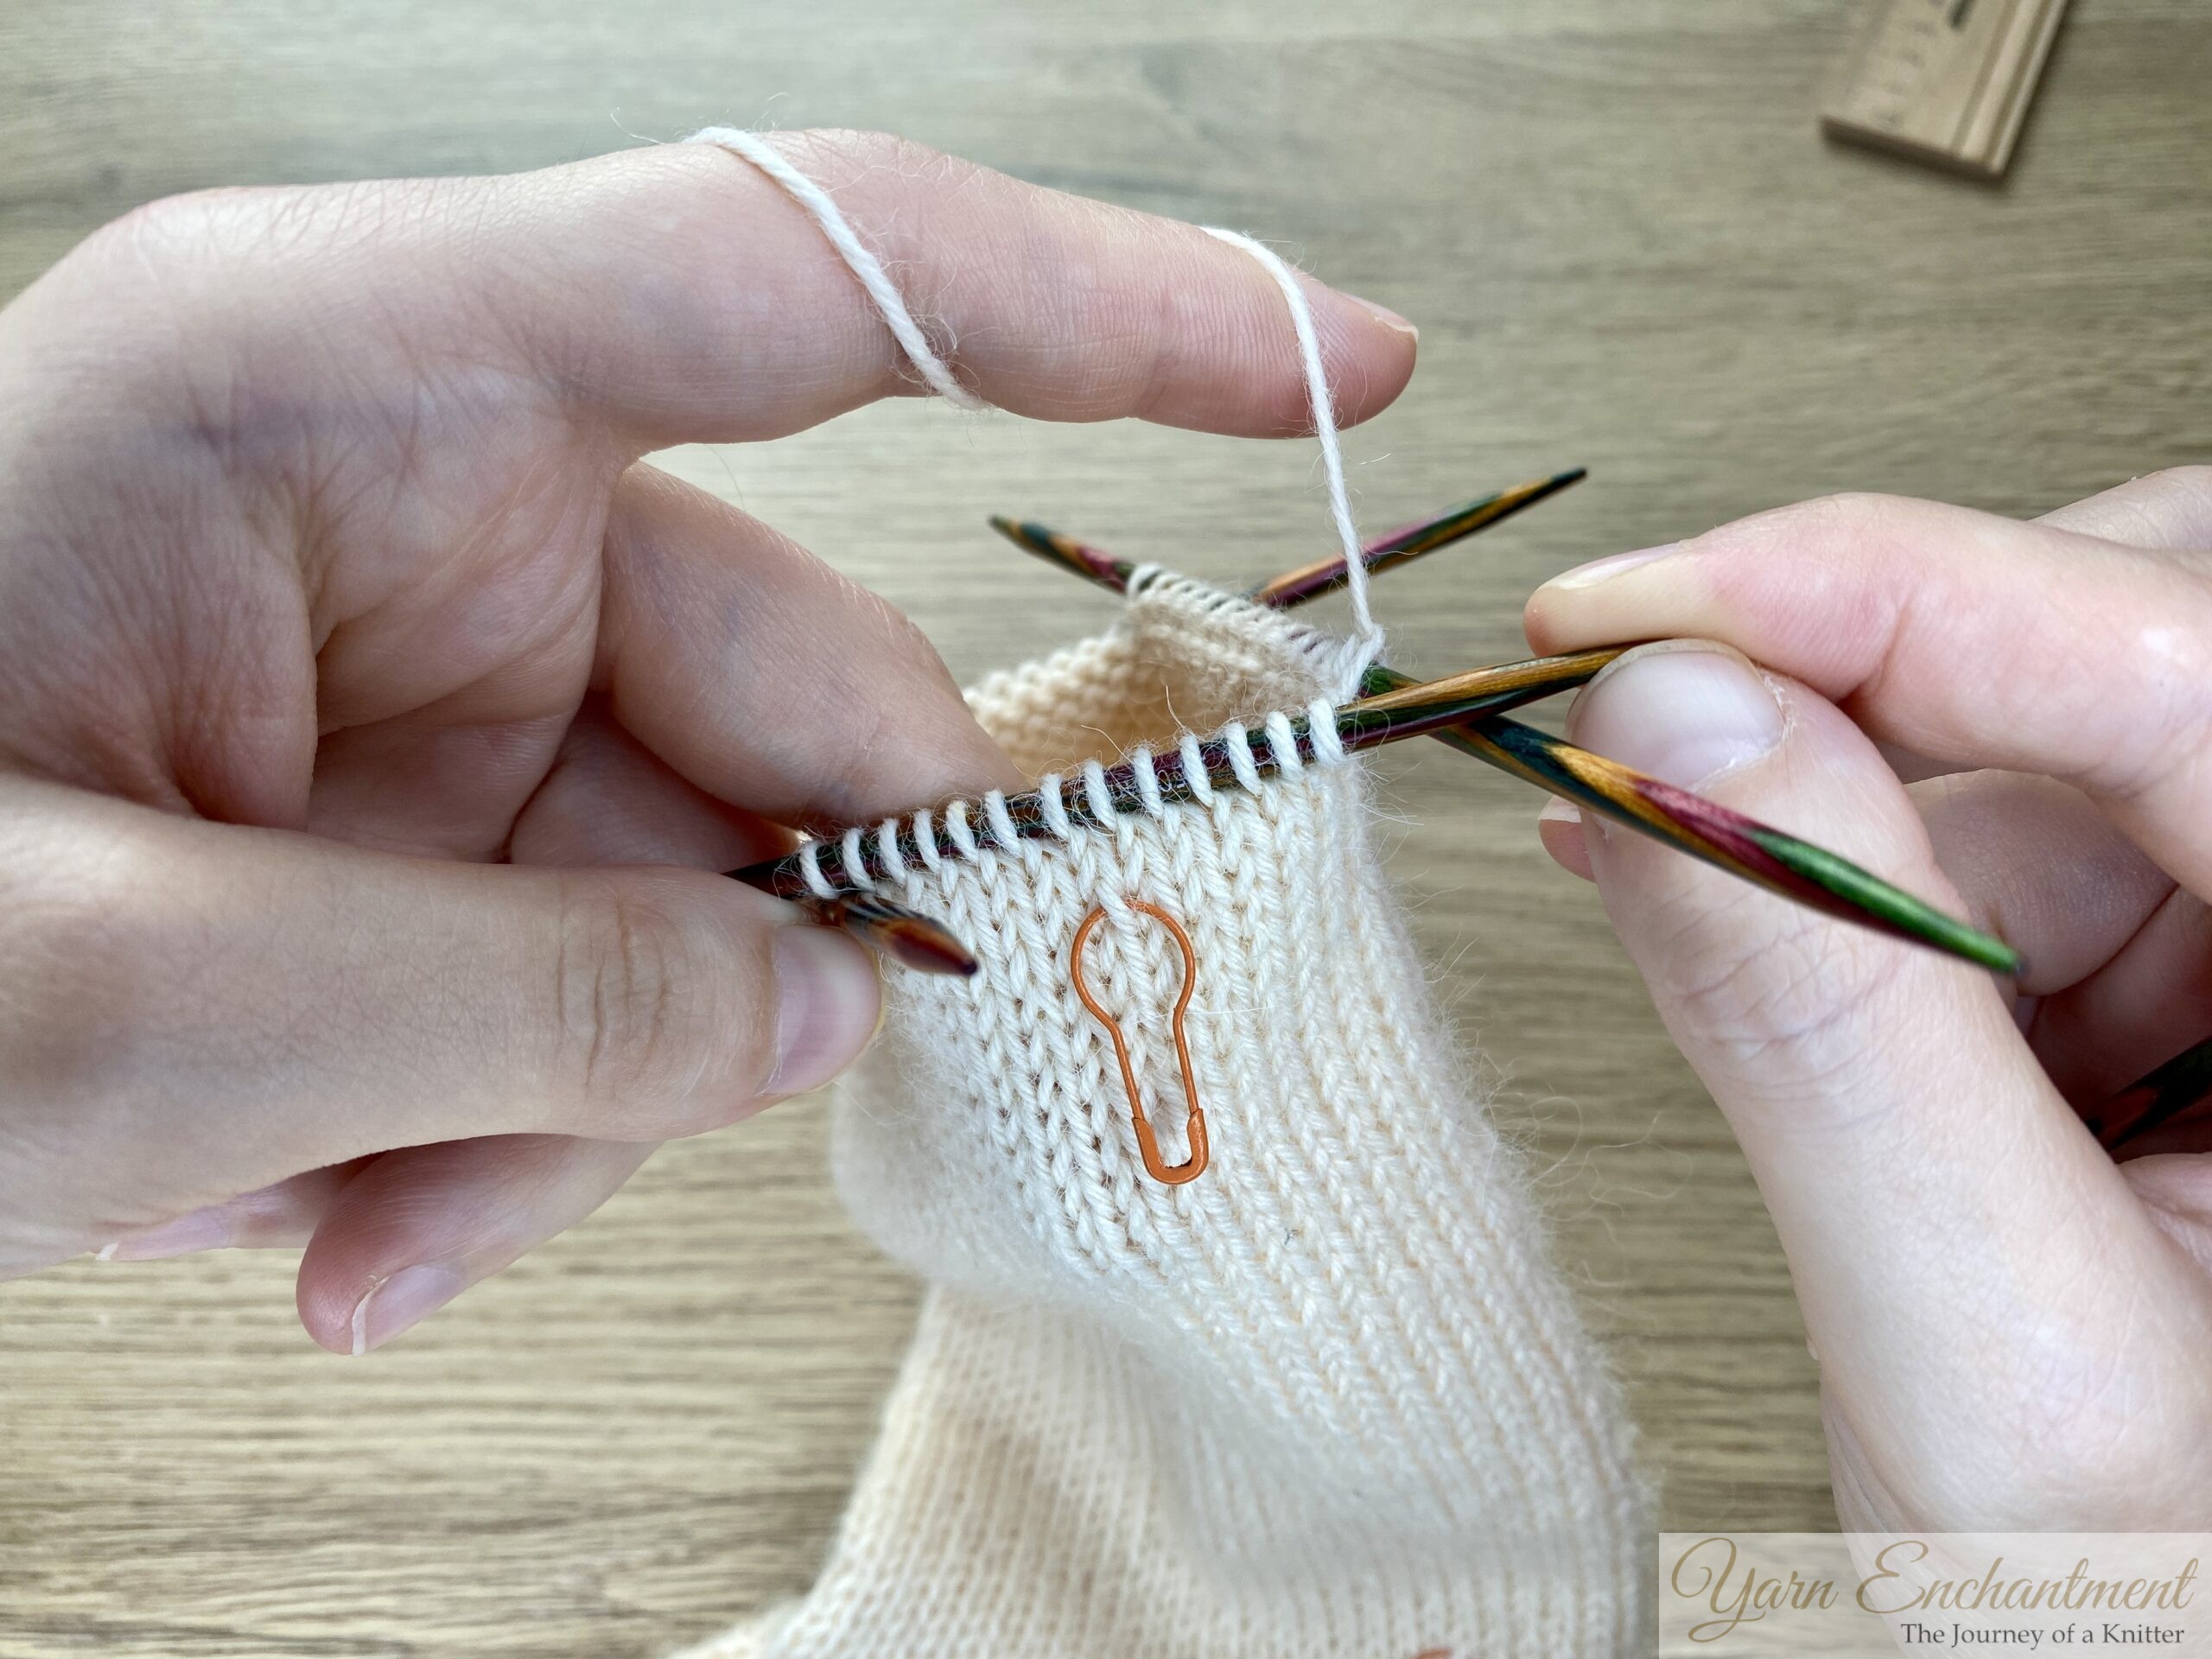
Arrange all sole stitches onto one needle (typically Needles 1 and 4 together).
-
Place all instep stitches onto the second needle (Needles 2 and 3 together).
-
This way, the sole will be on the needle closest to you, and the instep on the needle farther away.
-
For example, if you have 16 stitches remaining:
-
Slip or knit the stitches from Needles 1 and 4 onto one needle (8 stitches total for the sole).
-
Slip or knit the stitches from Needles 2 and 3 onto another needle (8 stitches total for the instep).
-
-
- Hold the needles parallel, with the working yarn coming from the right stitch on the back needle.
-
Cut the yarn, leaving a tail about three times the width of the toe.
- Thread your yarn on a blunt sewing needle
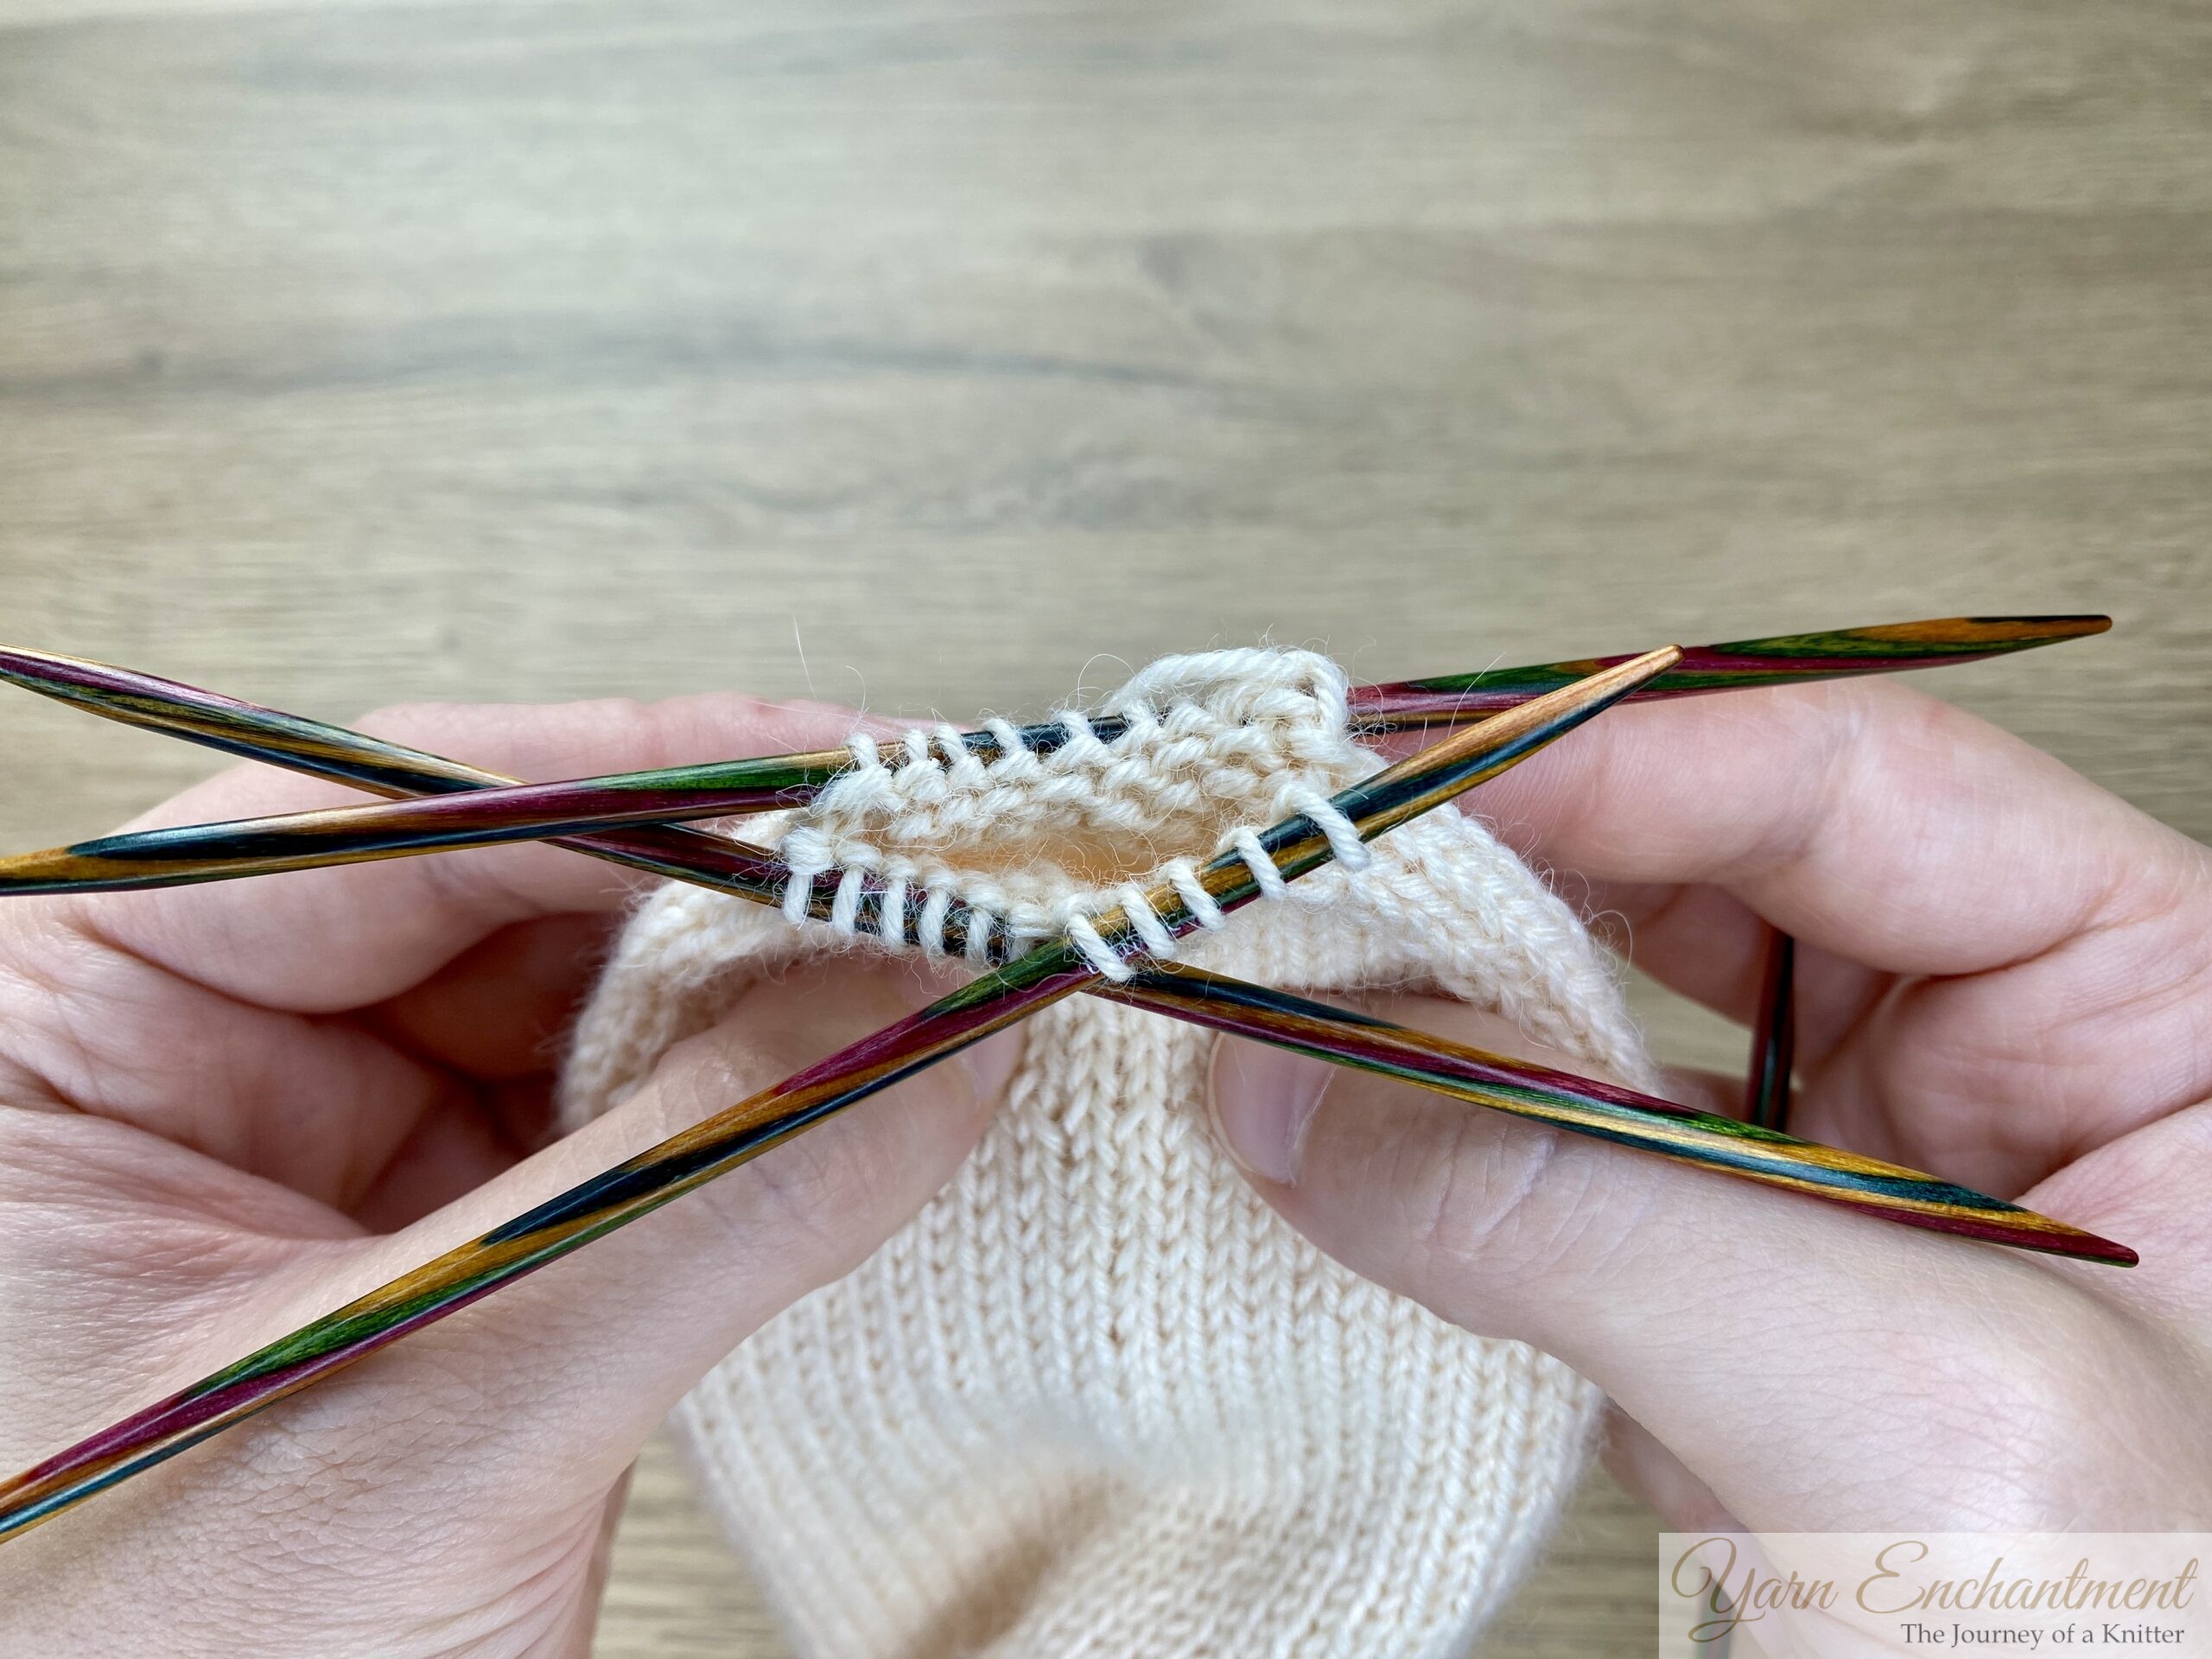
Sole Stitches:
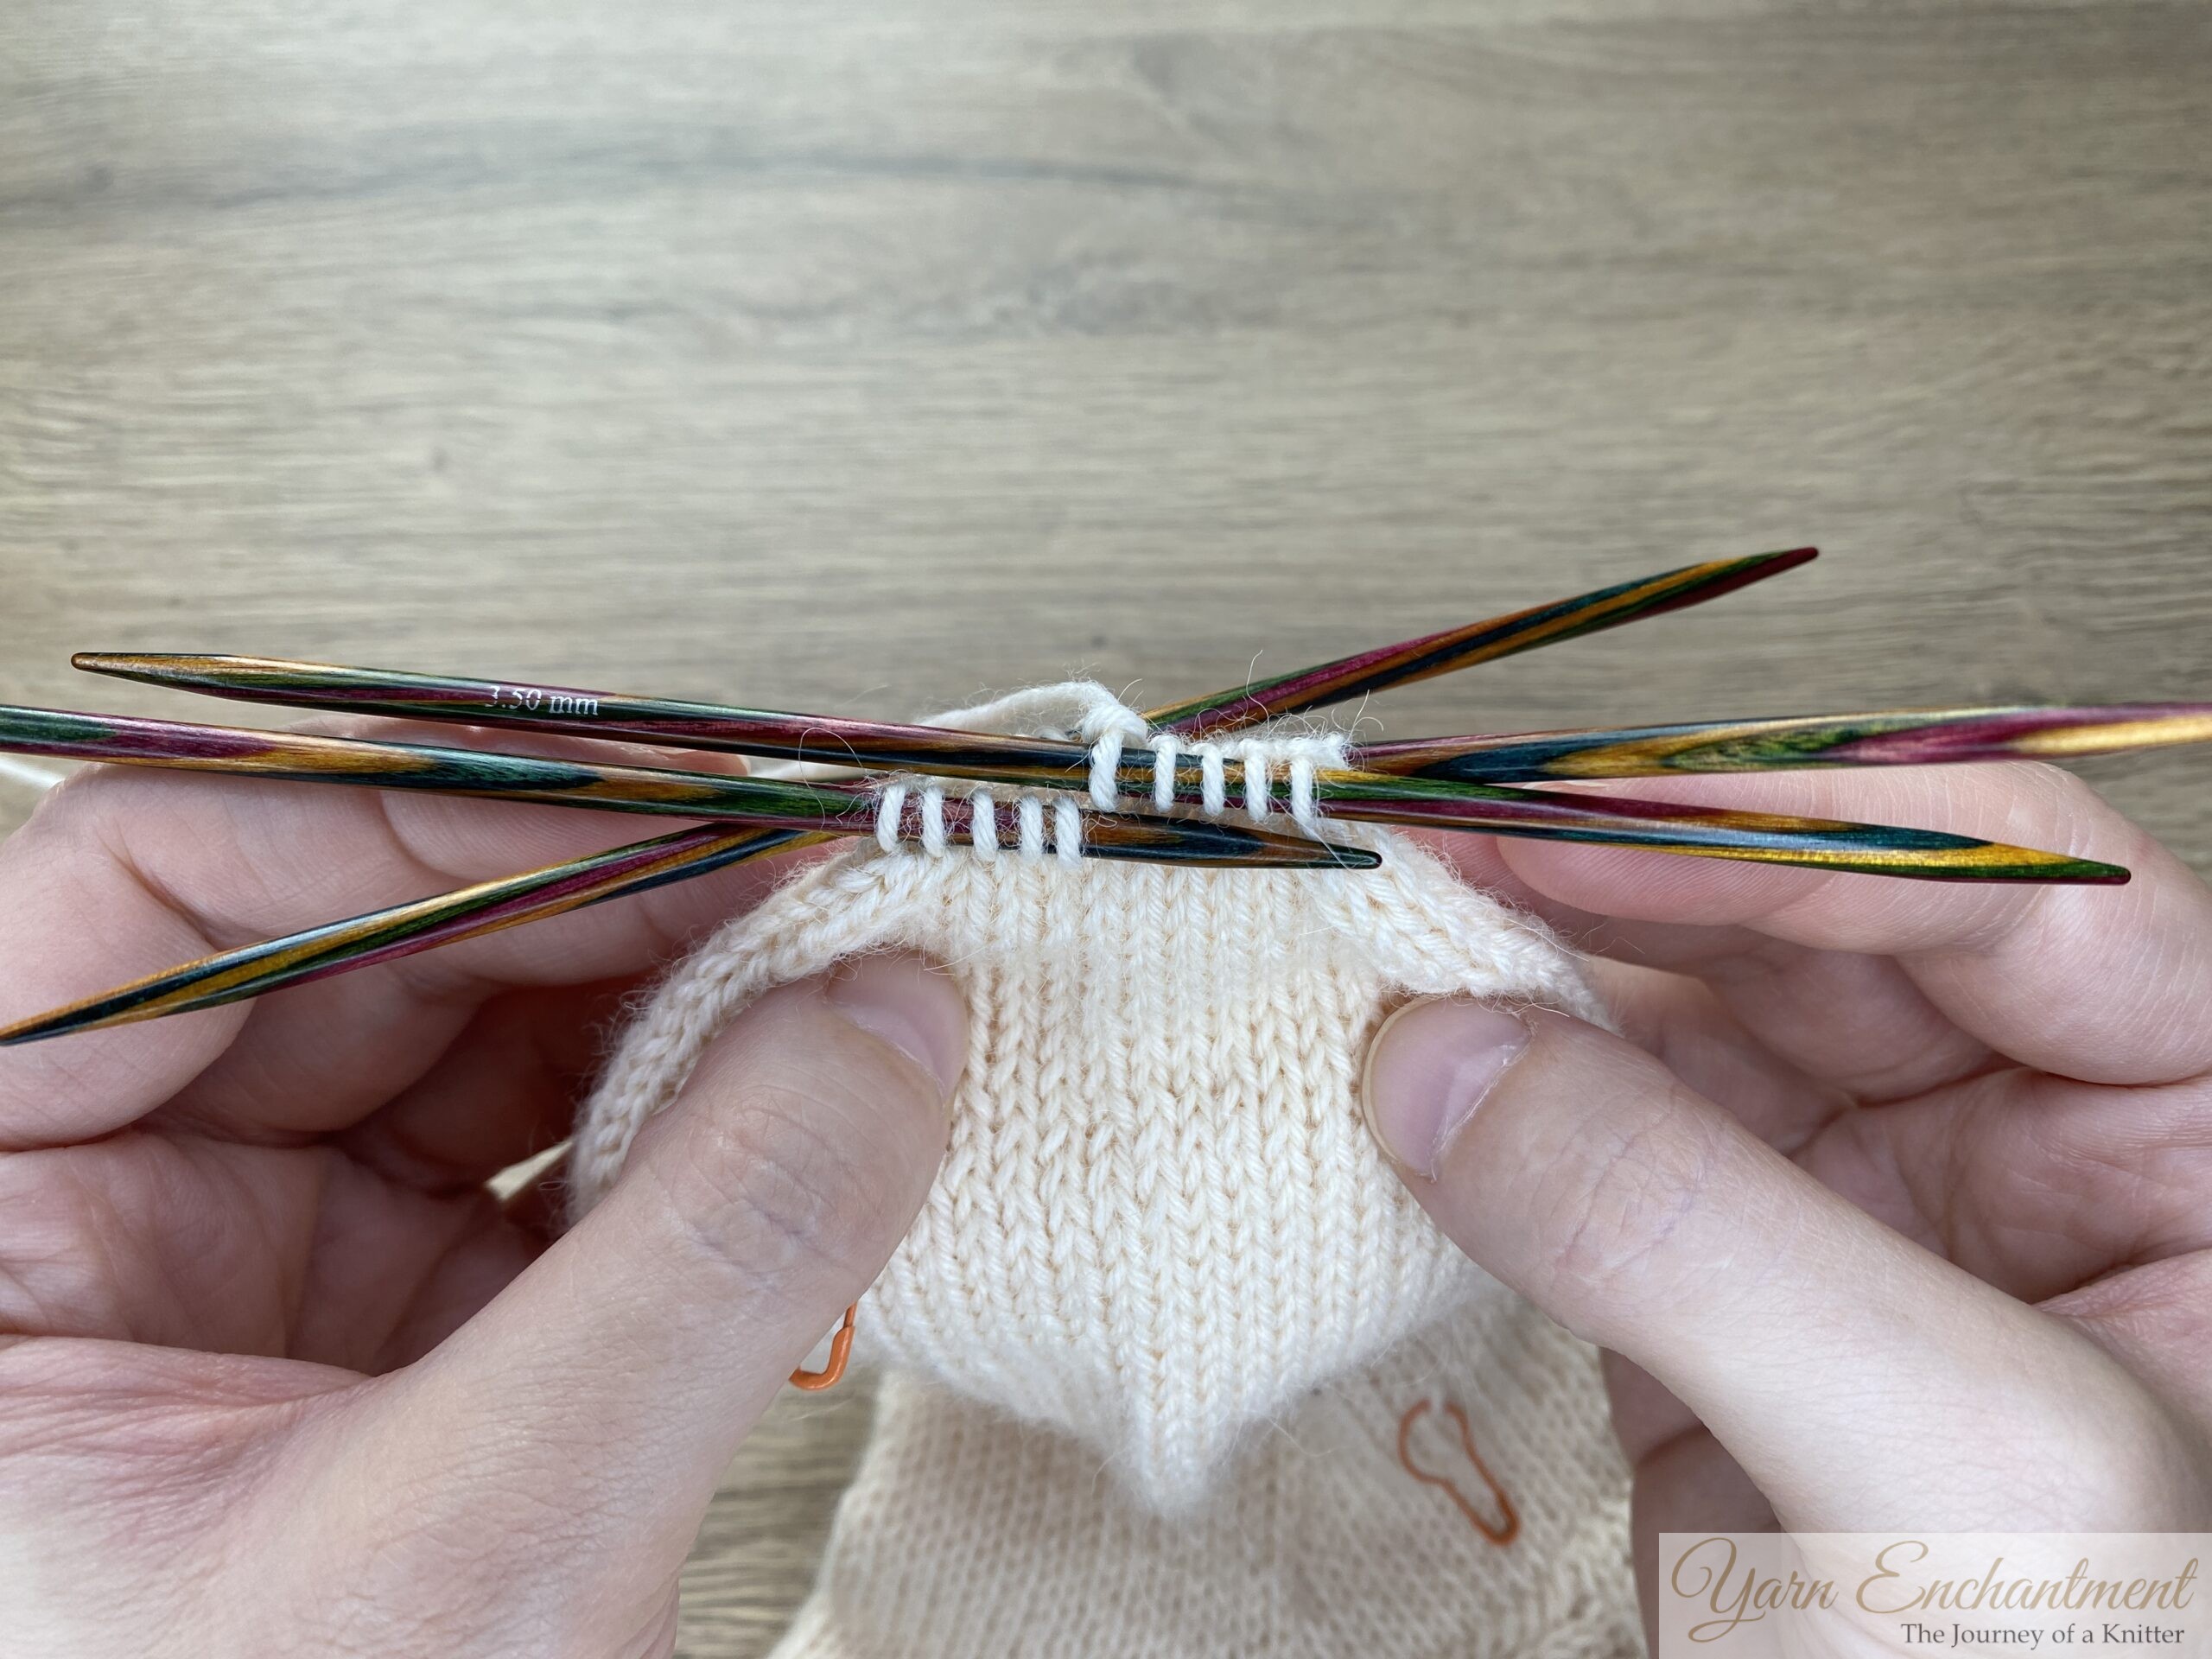 |  |  | I am knitting the stitches from needles 4 and 1... | ...together onto a single needle so that this needle... | ...will hold all of my sole stitches. |


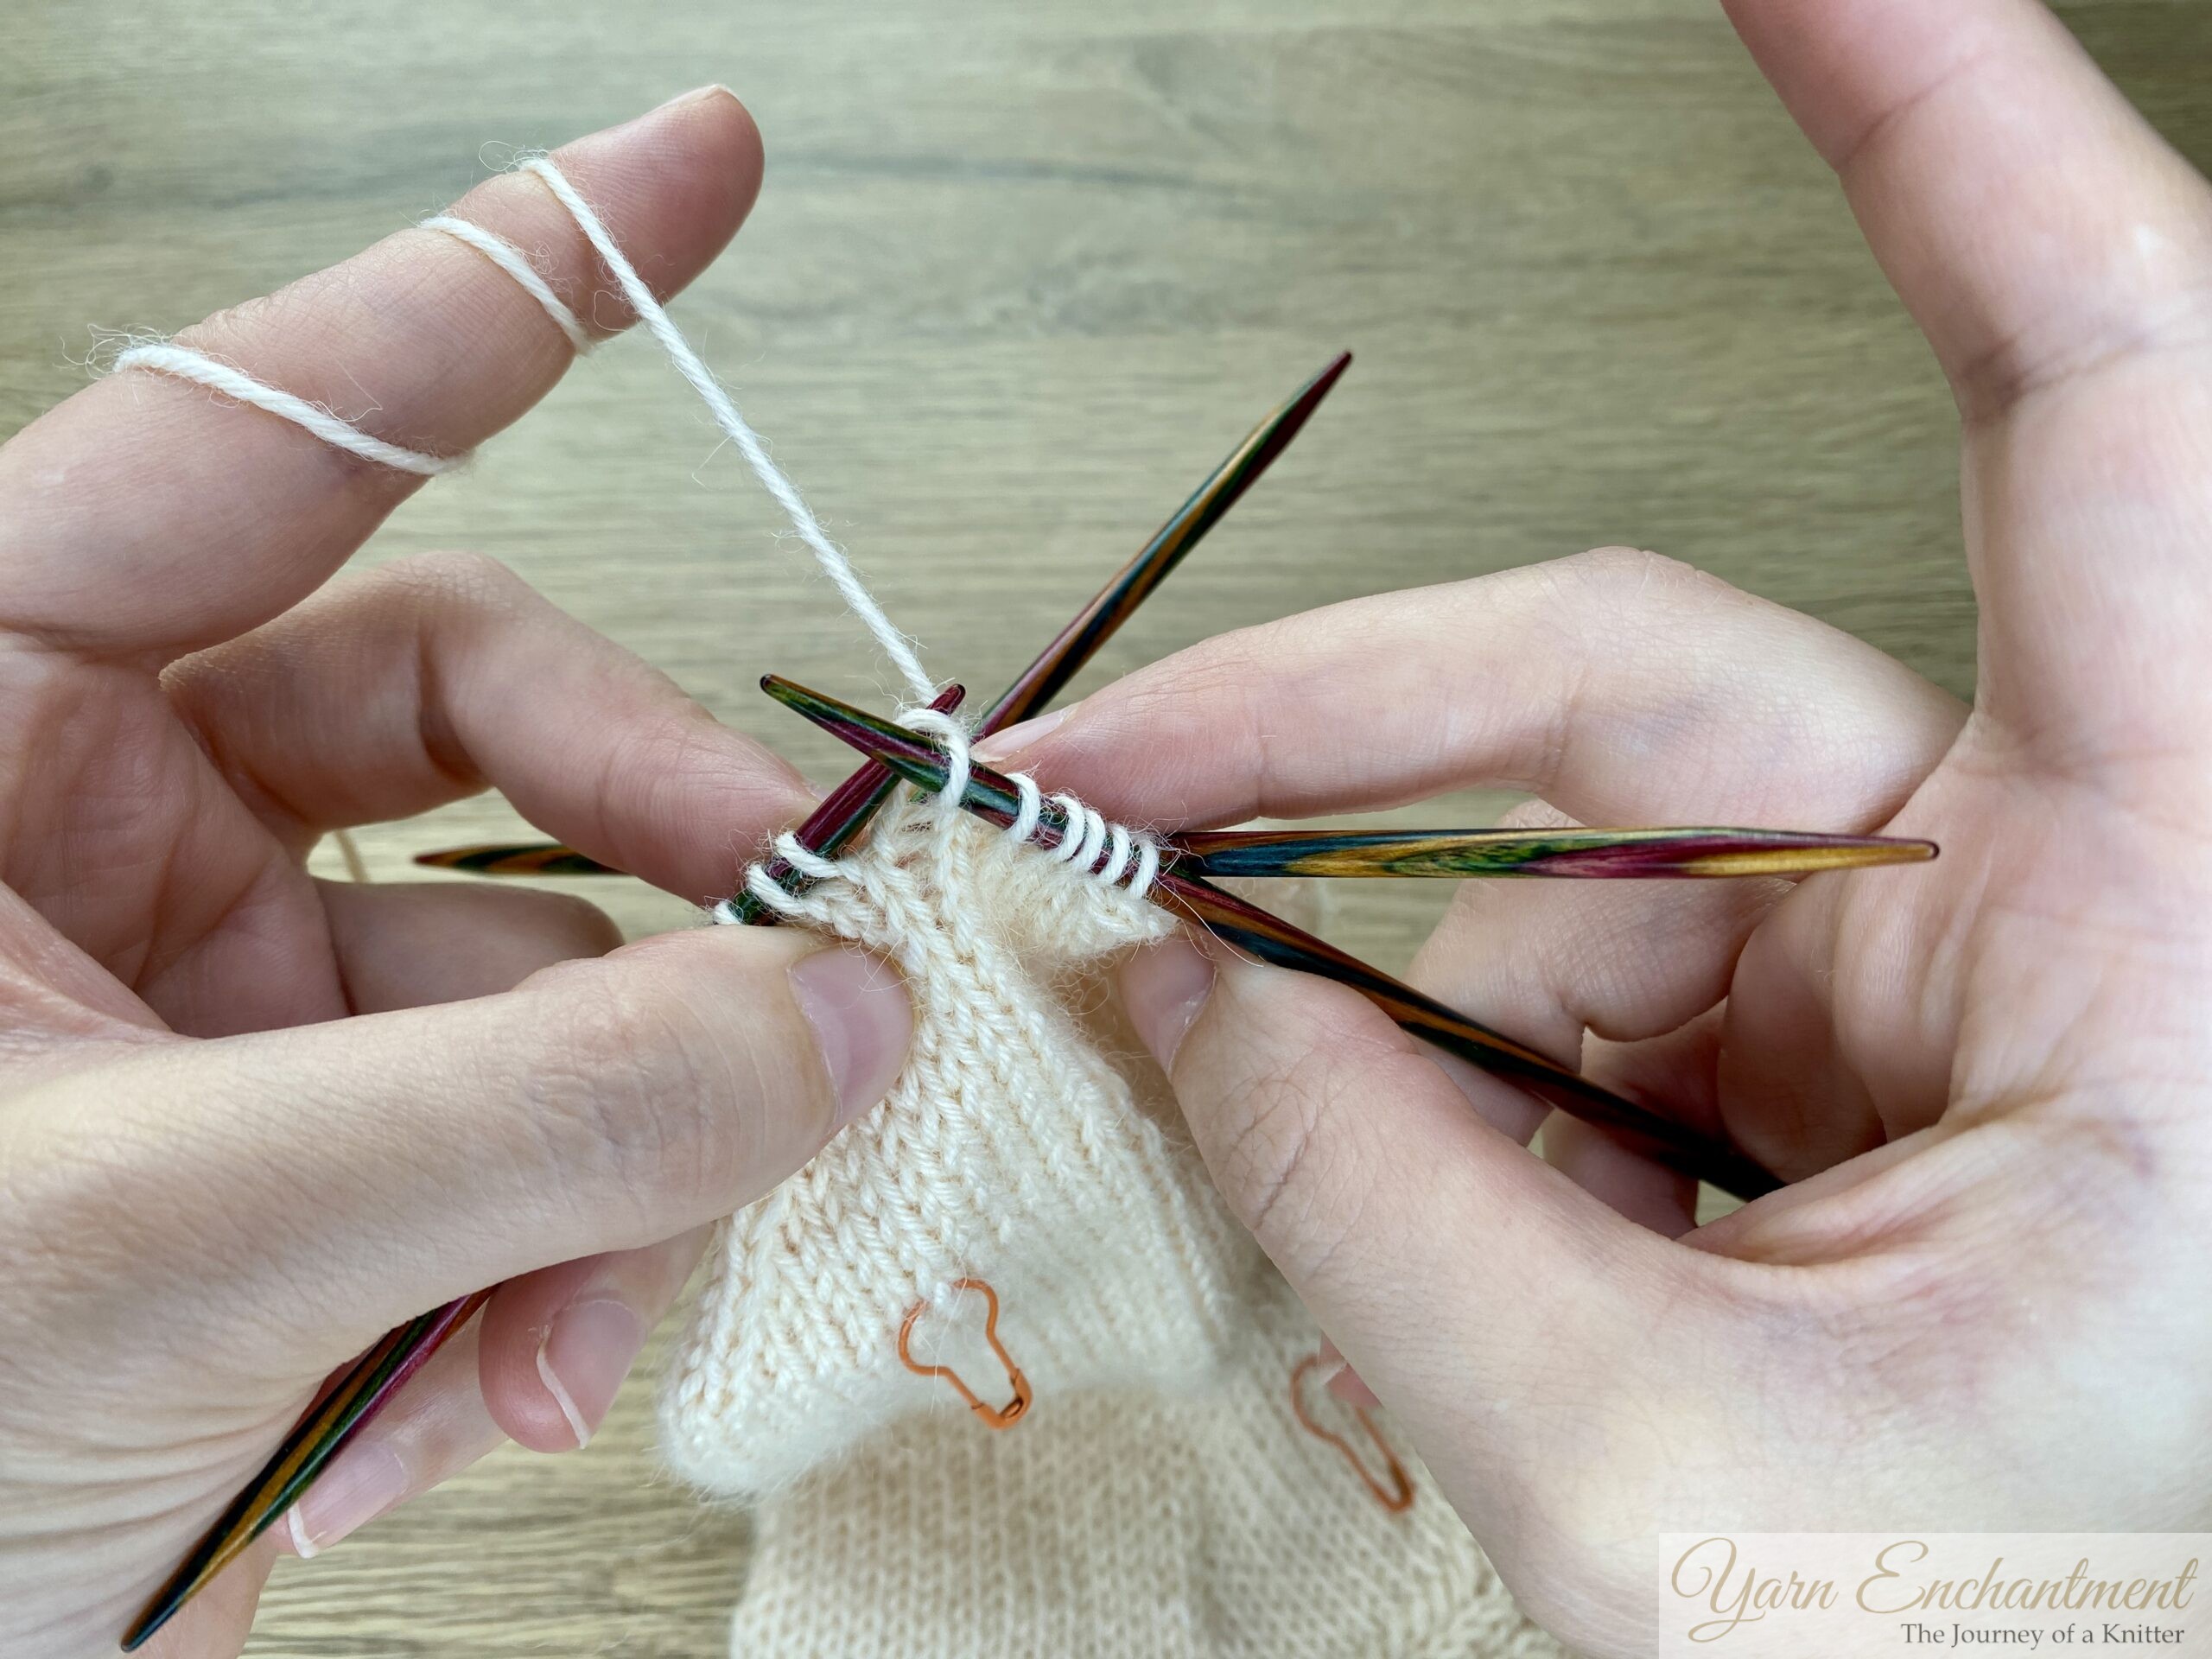
Instep Stitches
 |  |  | For the instep stitches... | ...knit the stitches from needle 2 and needle 3 together onto one needle. | Make sure your working yarn is at the back needle; this will give you the correct setup for the Kitchener stitch. |


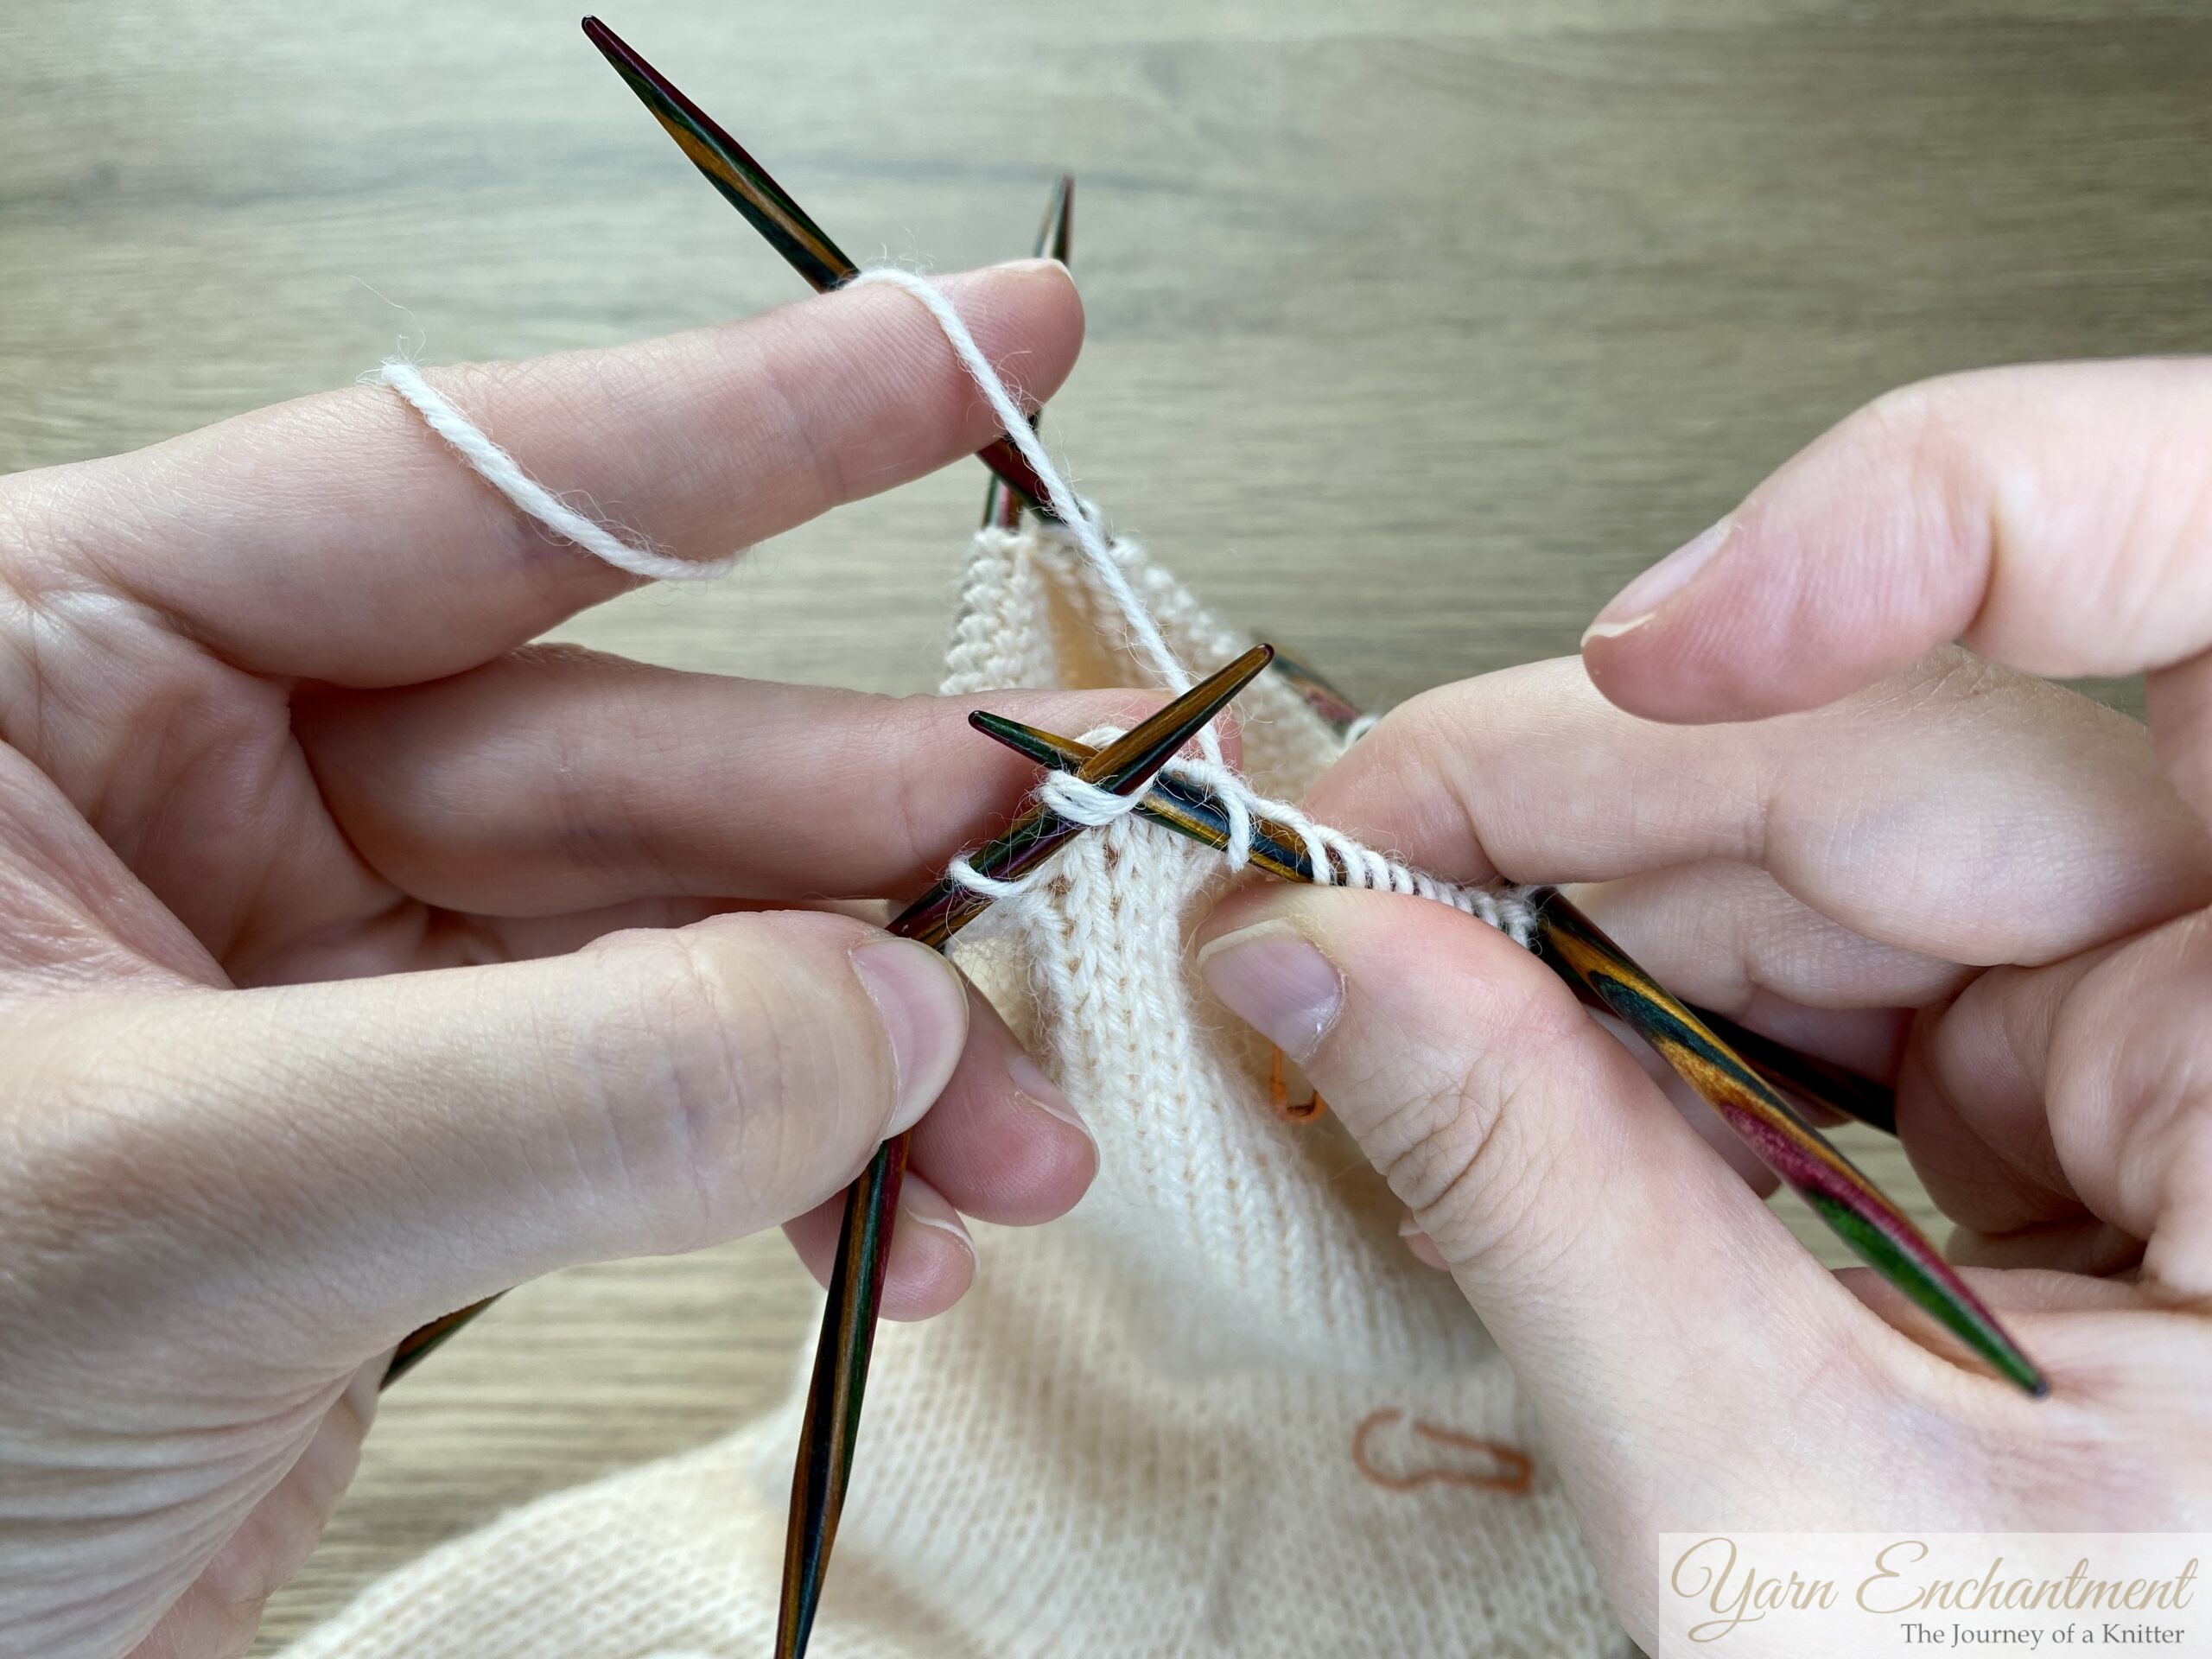
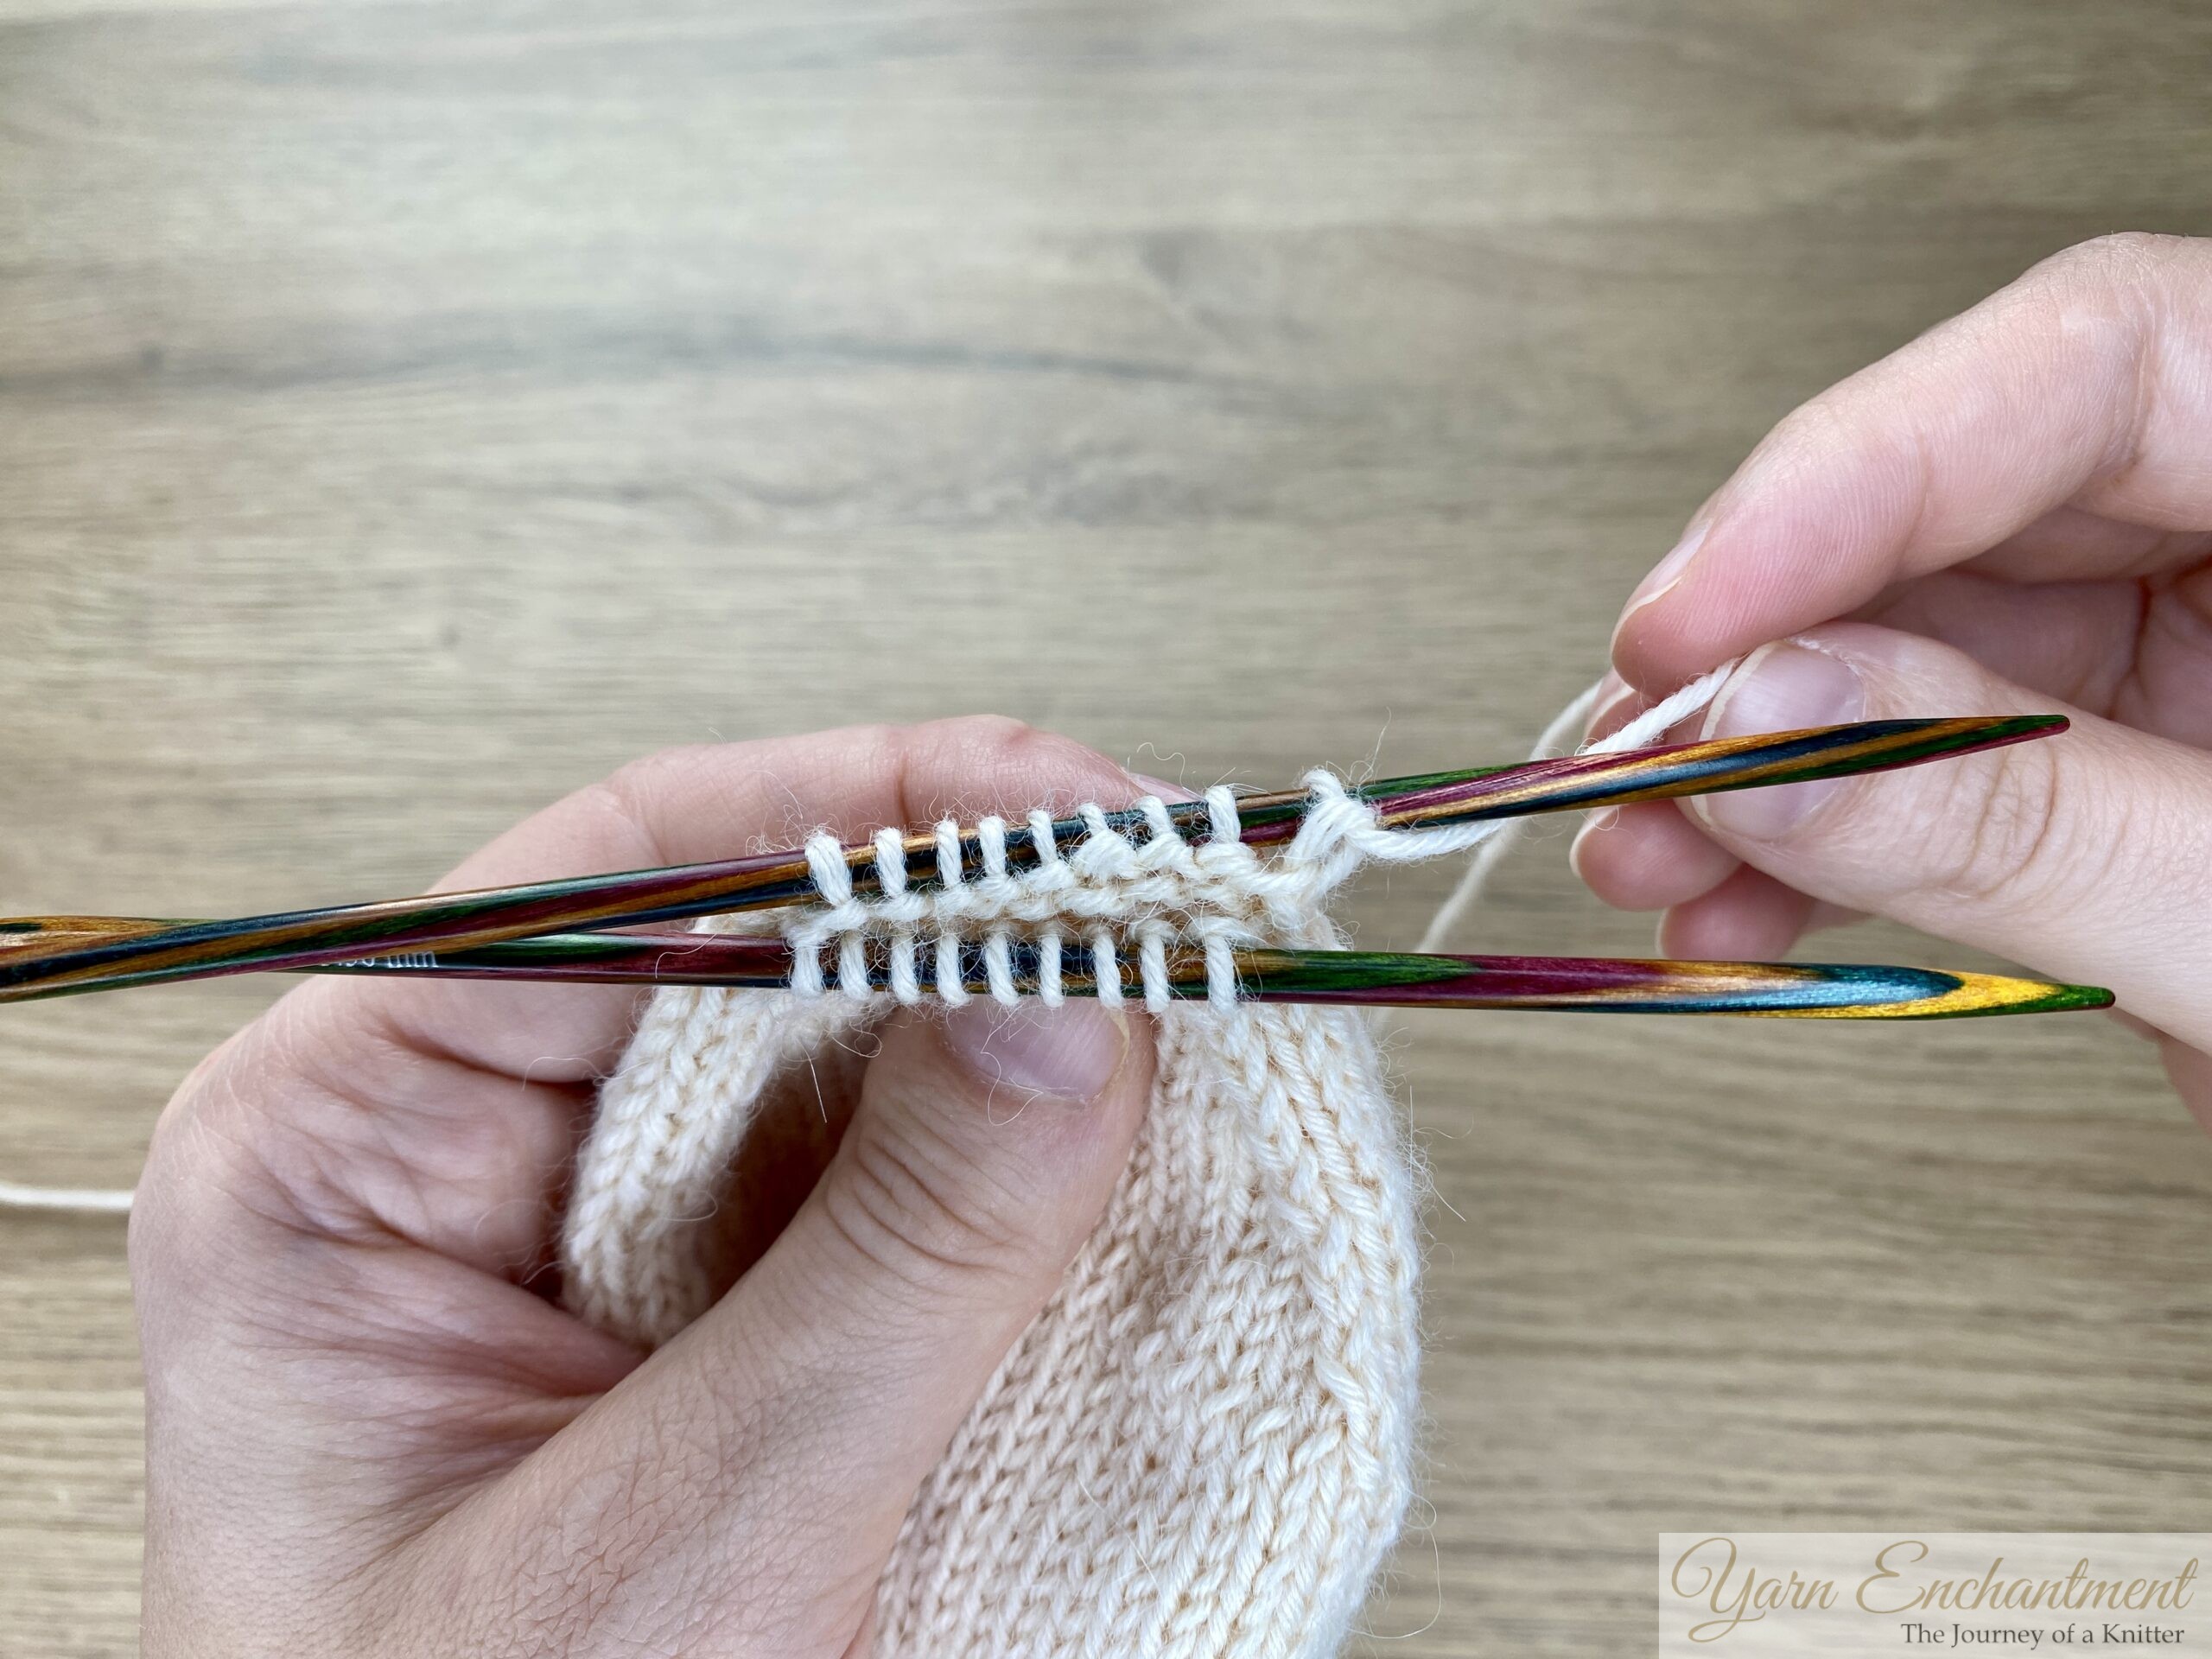
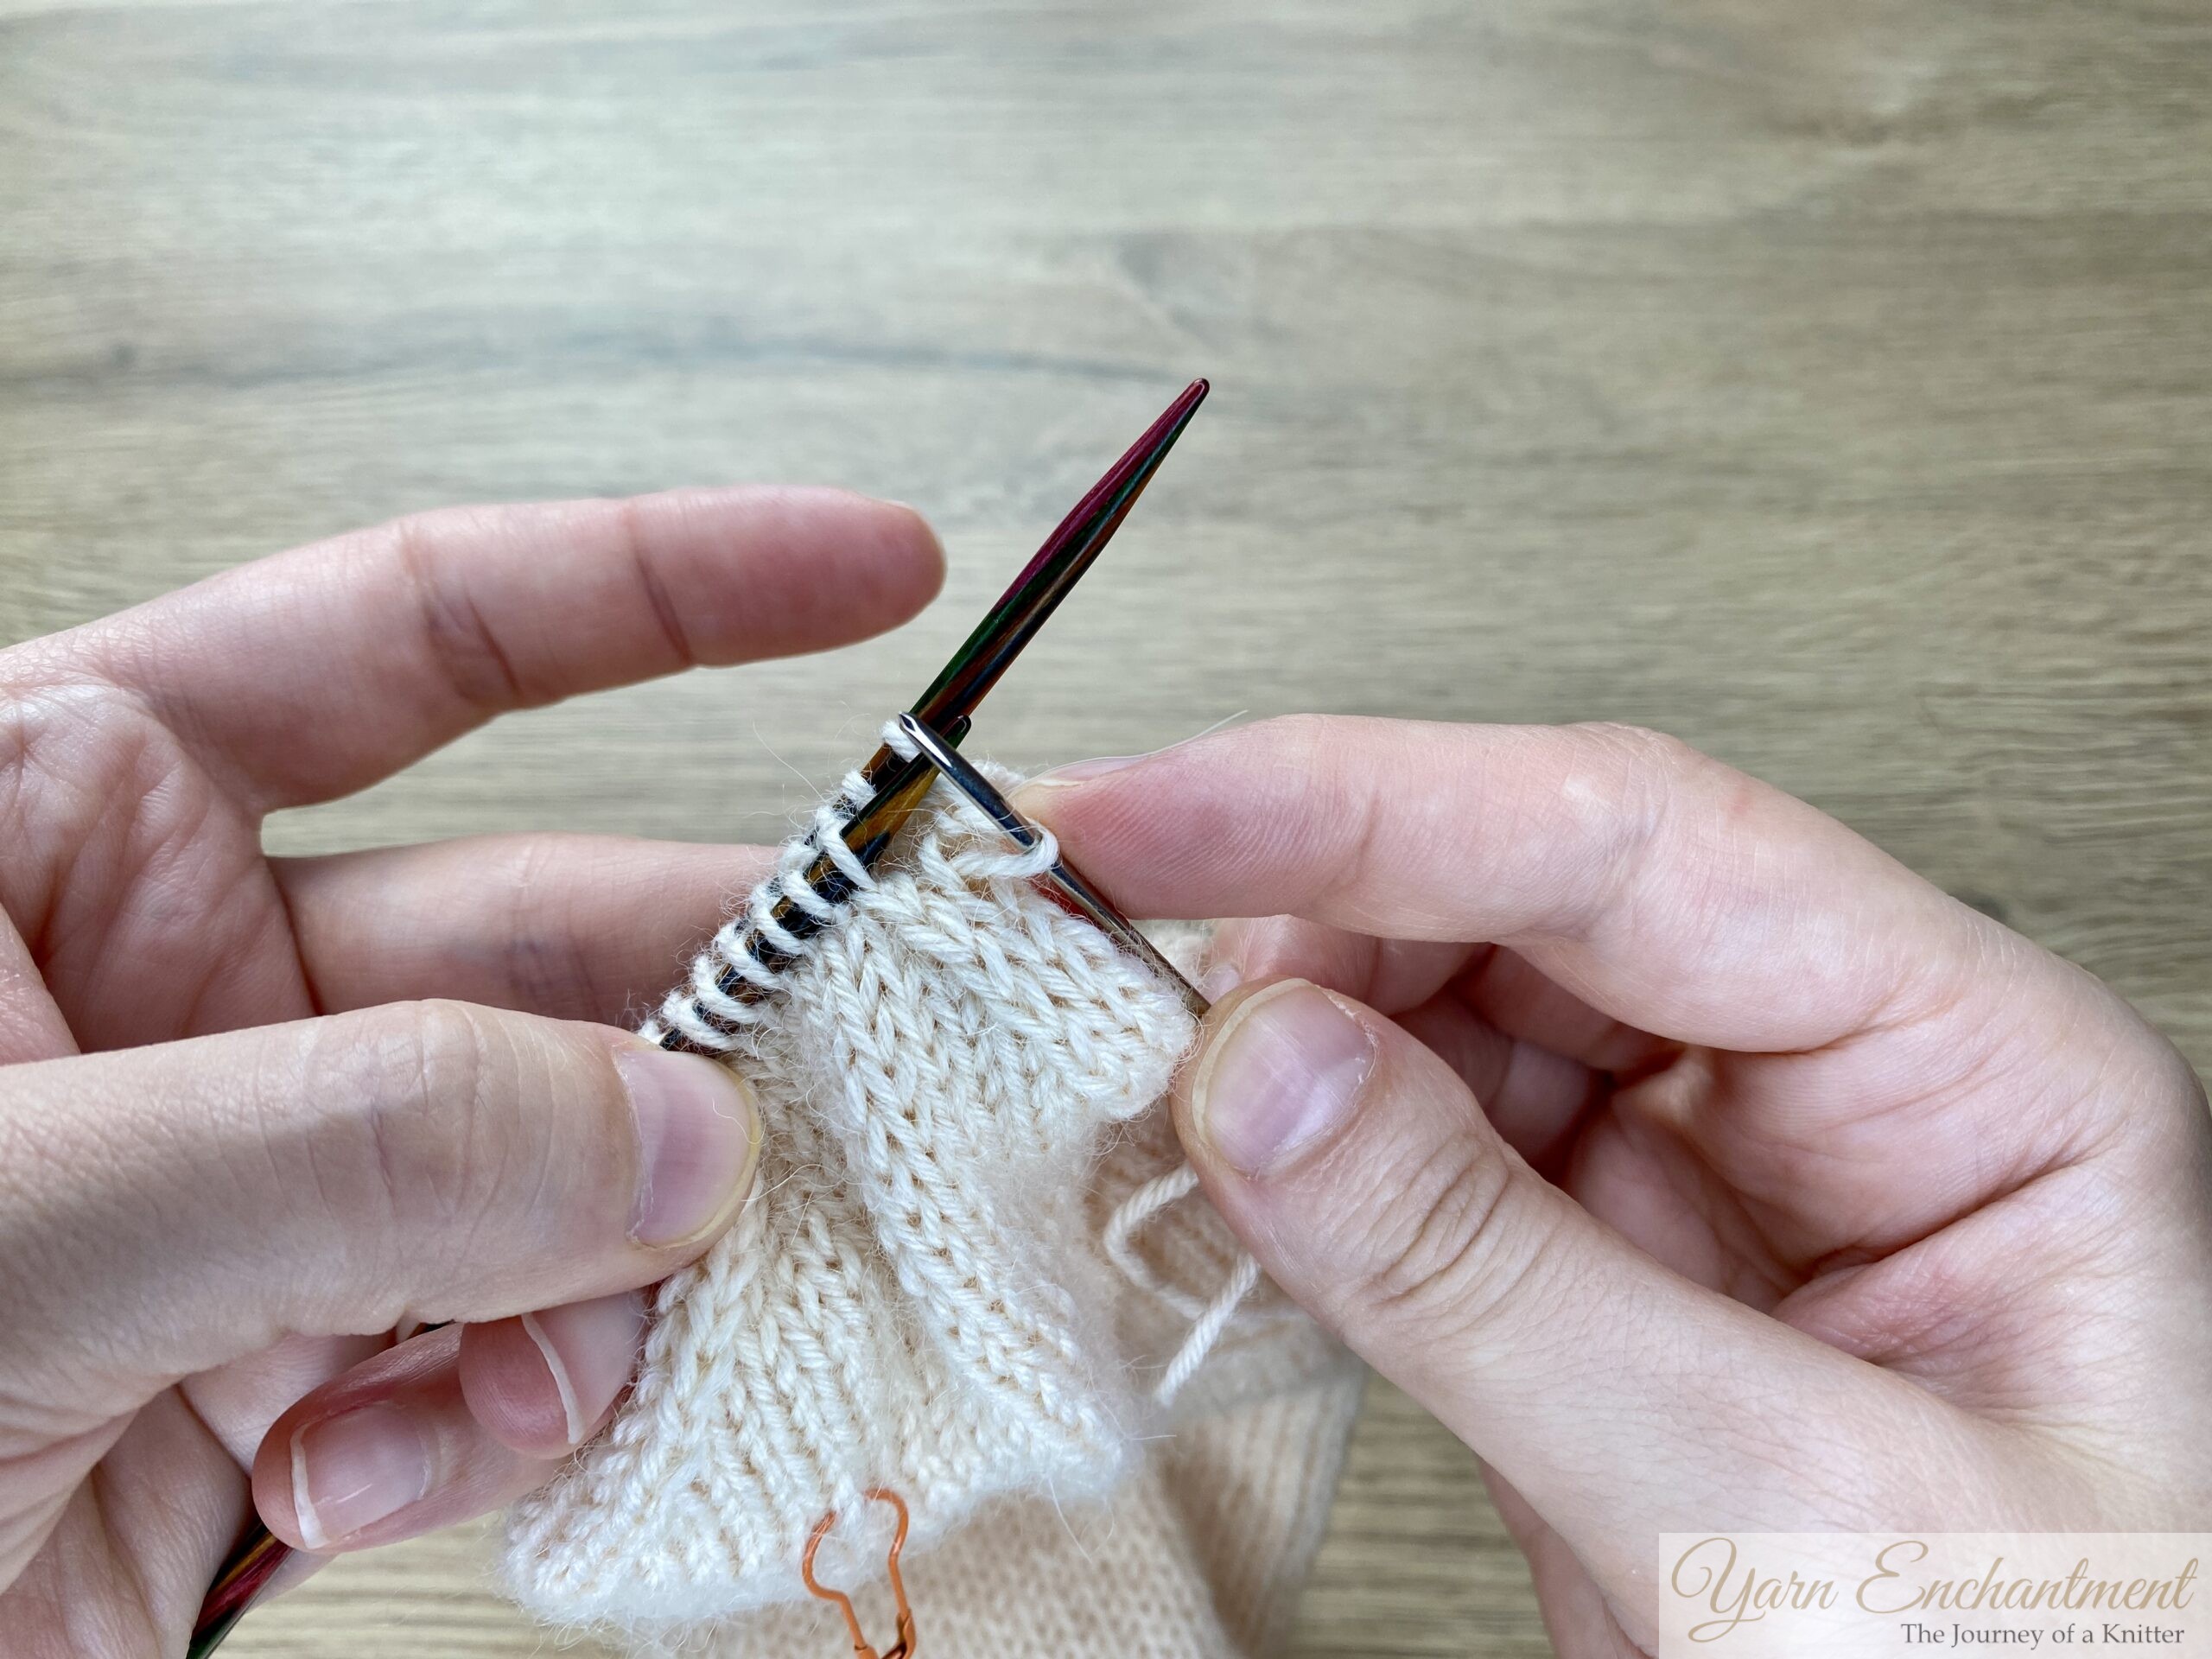
Kitchener Stitch for Sock Toes: Step-by-Step
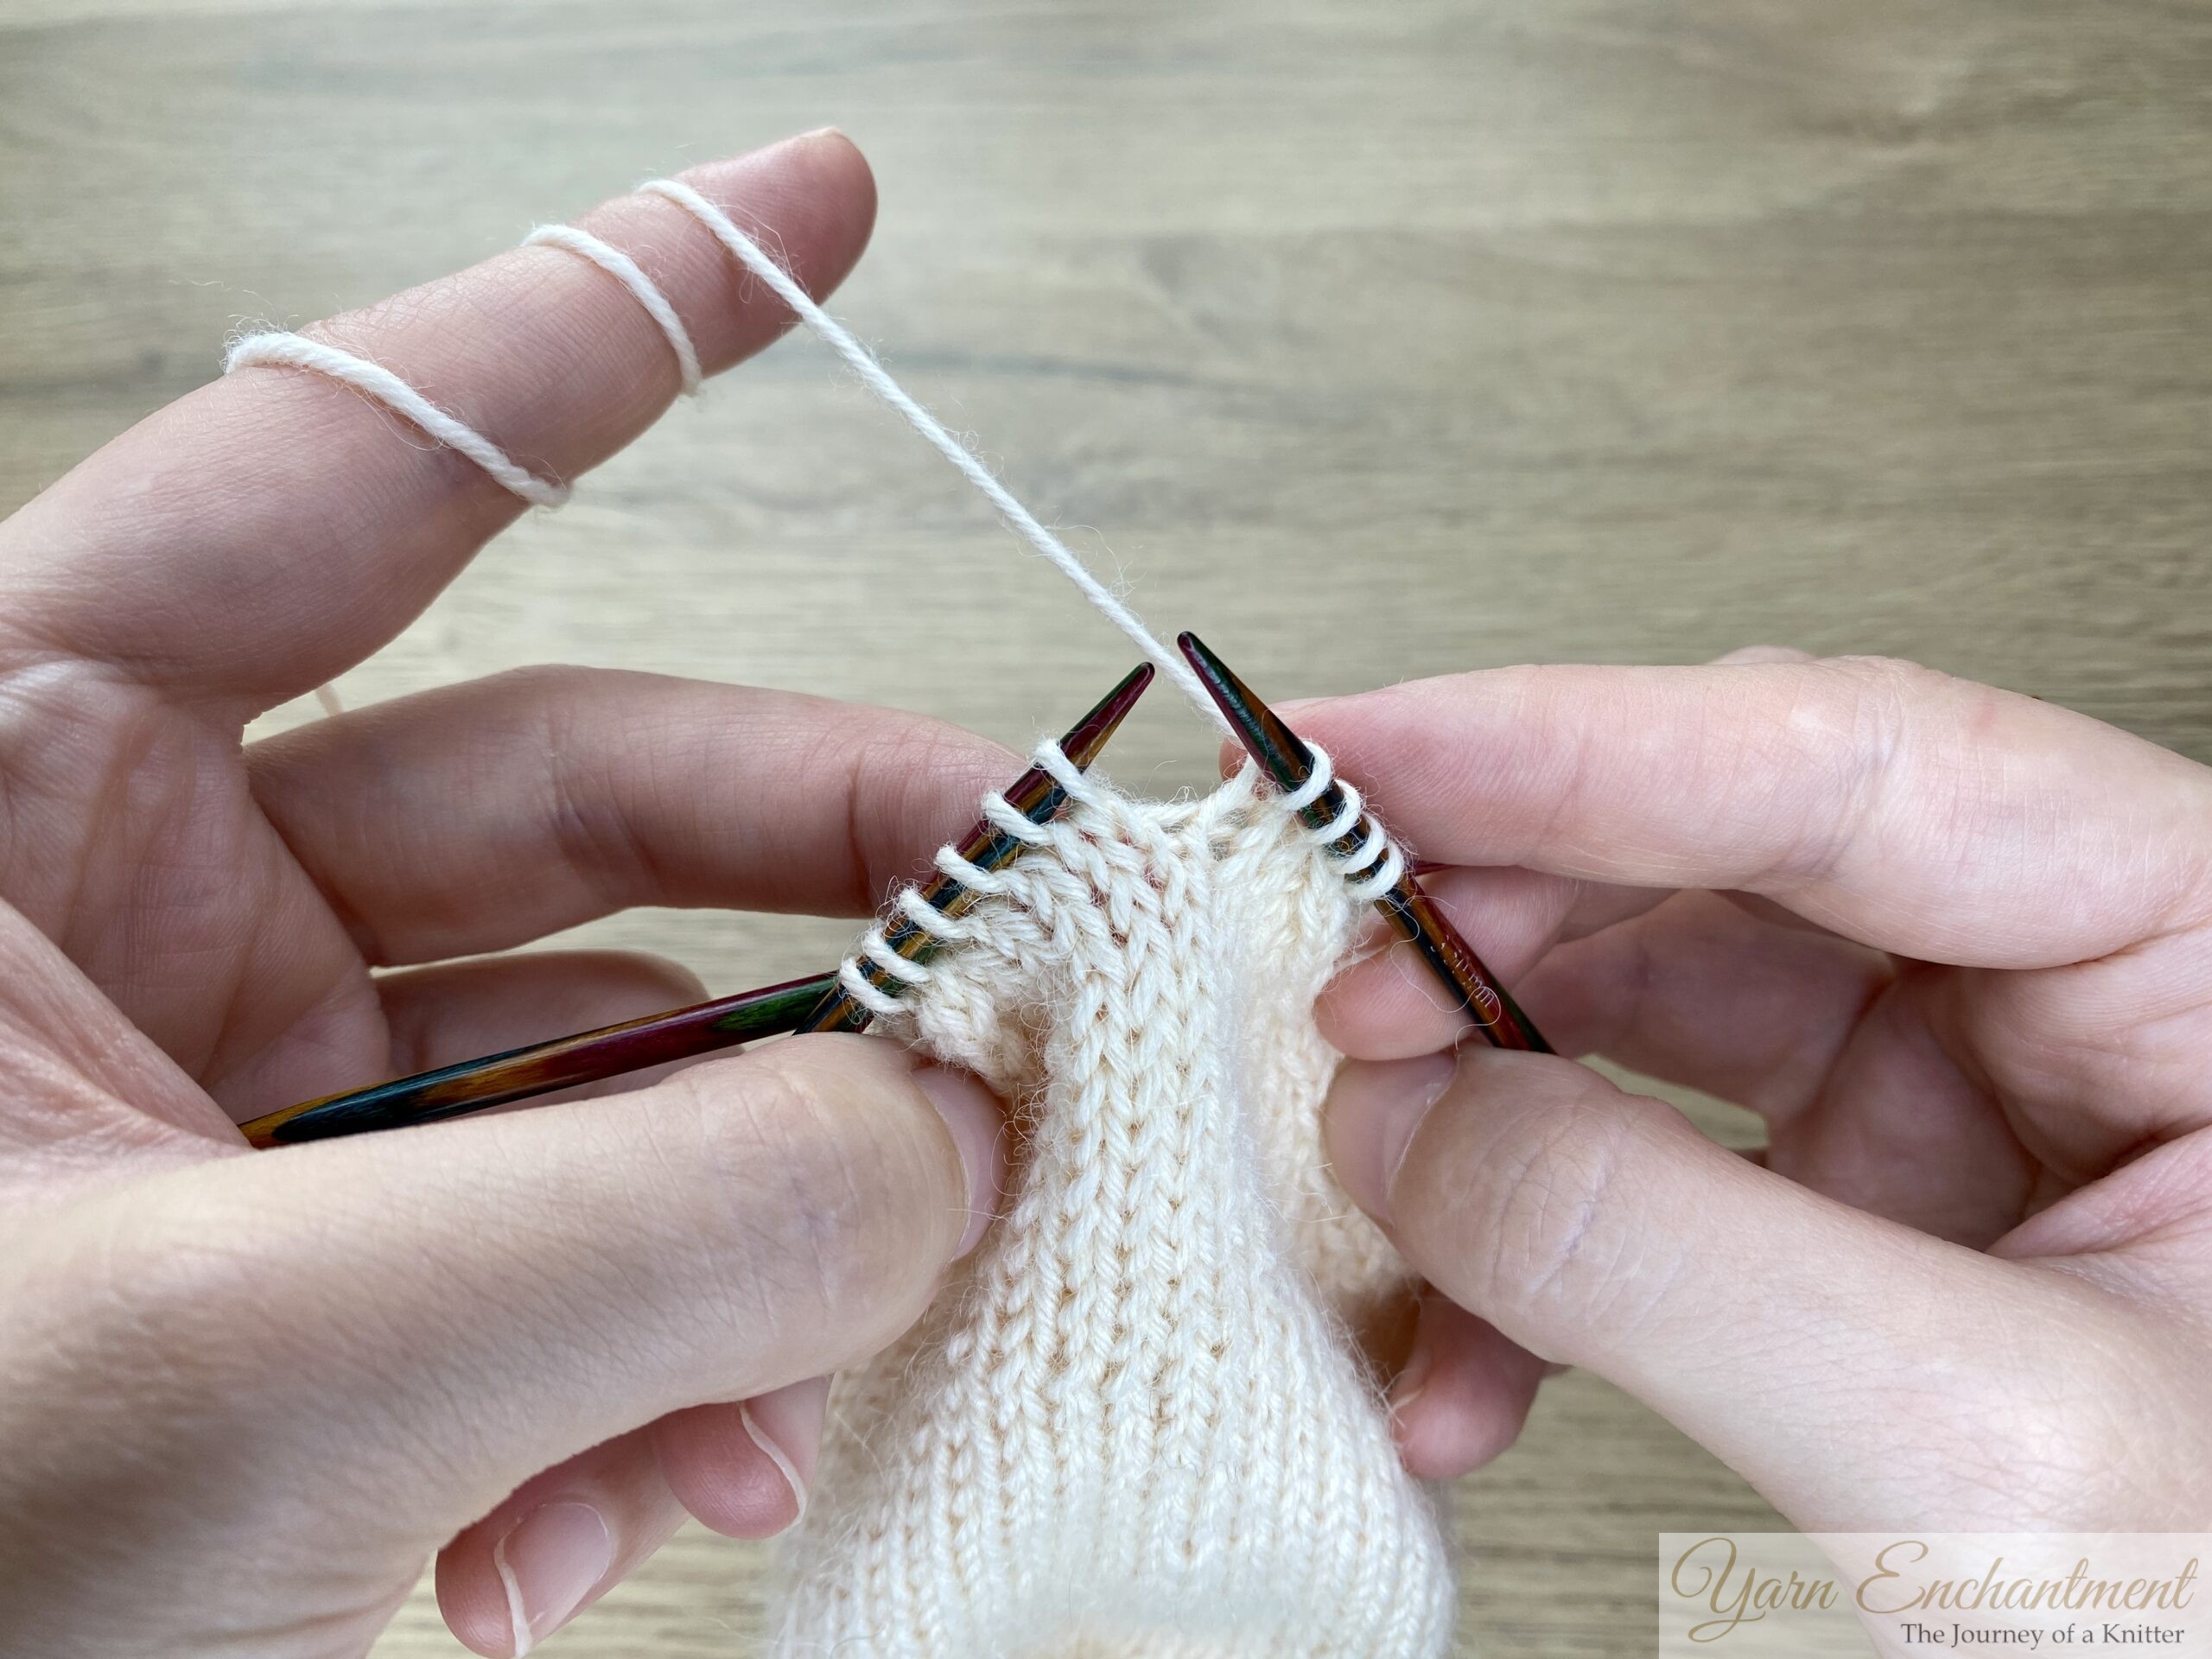
Step 1: The Setup Stitches
-
Front Needle: Insert the tapestry needle through the first stitch on the front needle as if to purl (from back to front). Pull the yarn through, leaving the stitch on the needle.
-
Back Needle: Insert the tapestry needle through the first stitch on the back needle as if to knit (from front to back). Pull the yarn through, leaving the stitch on the needle.
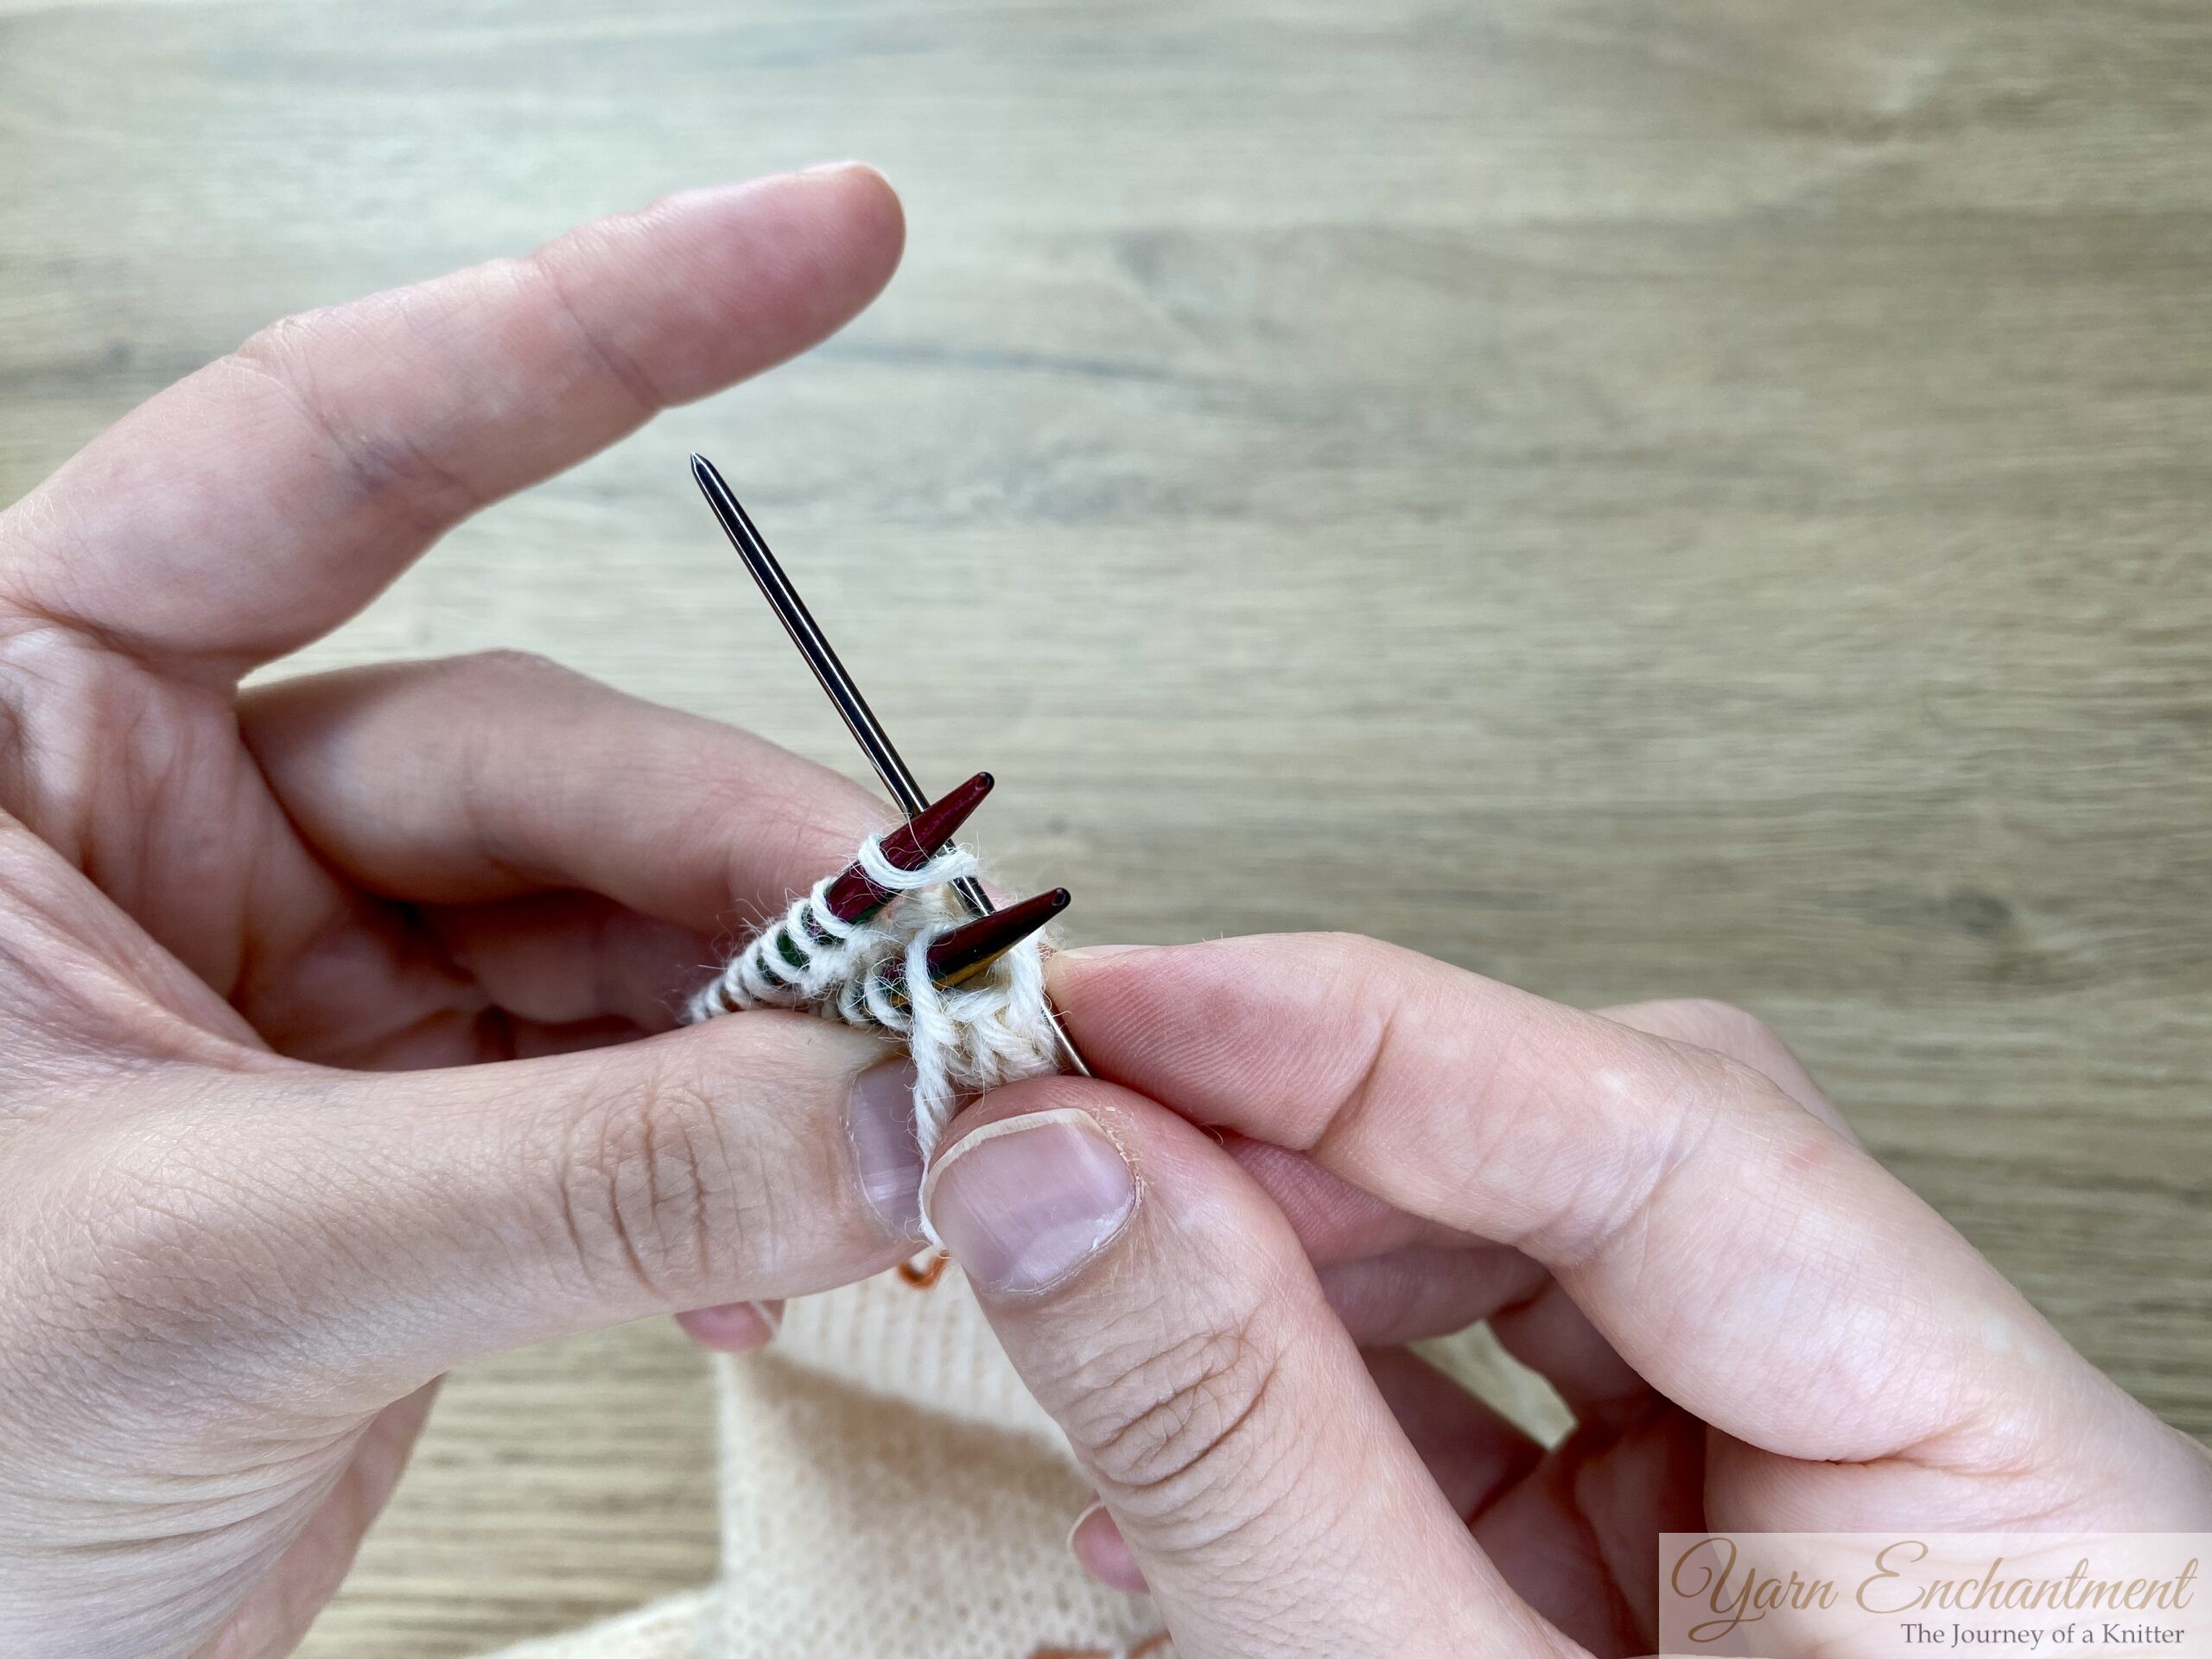
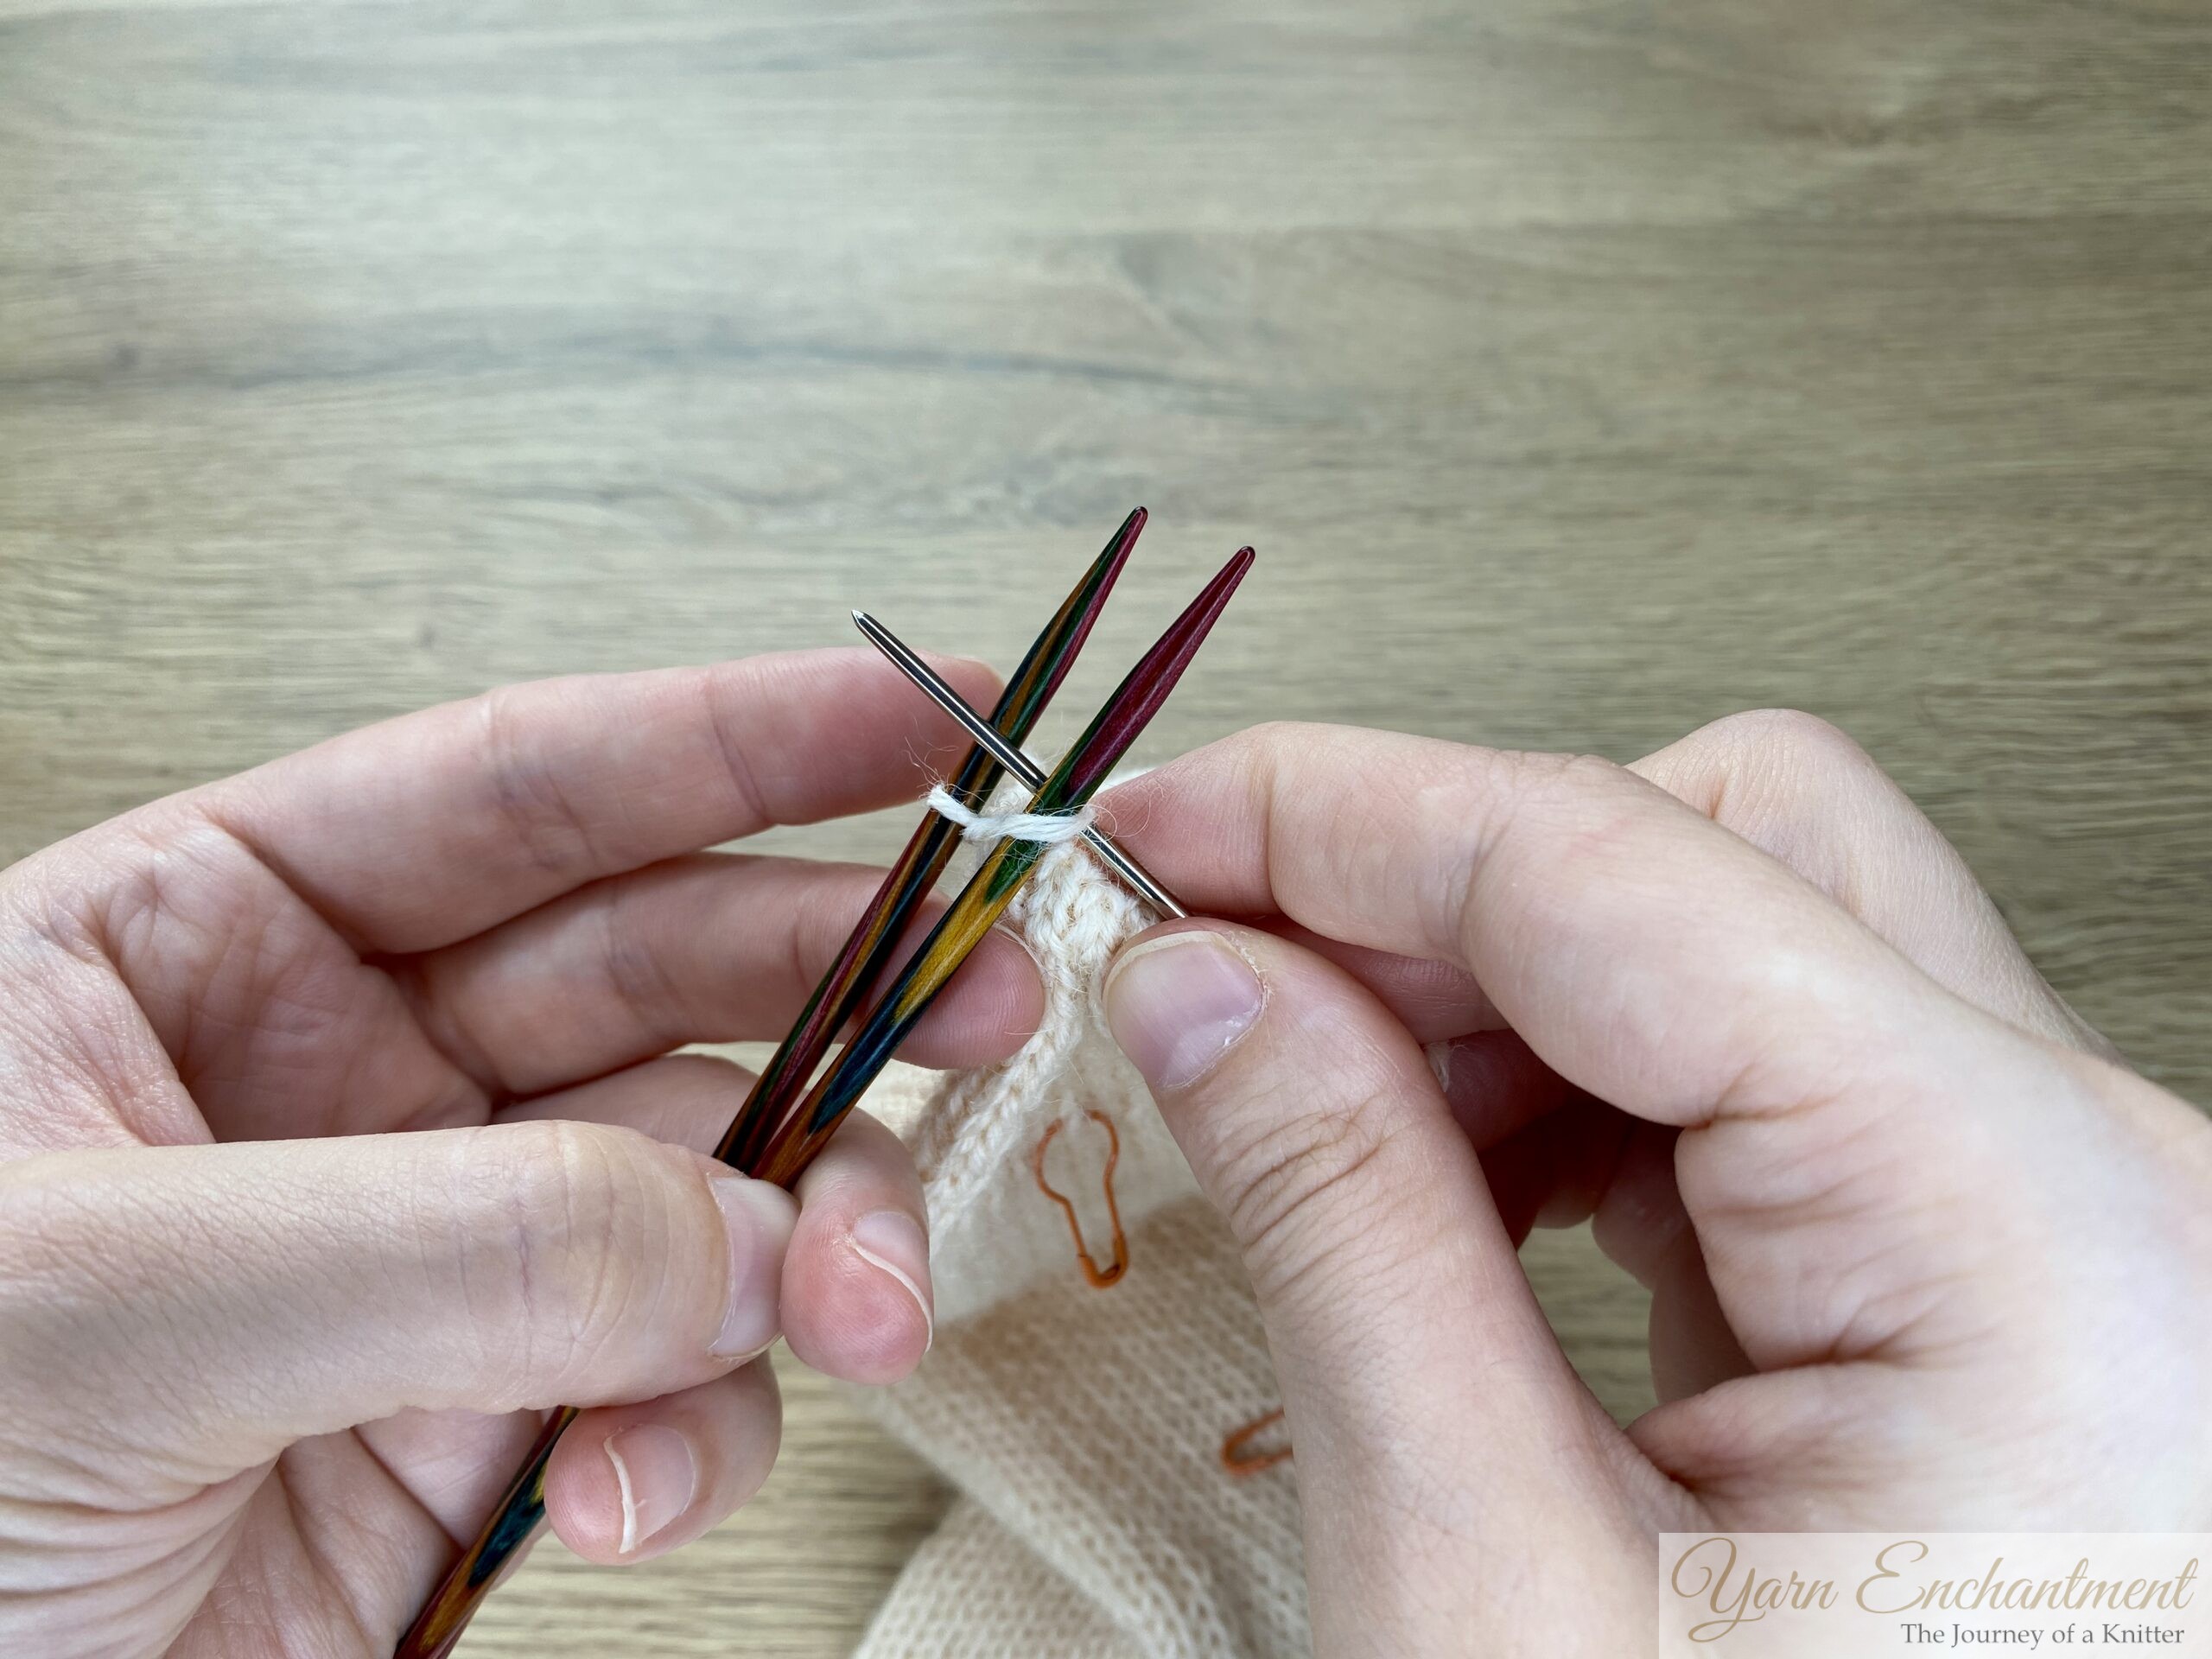
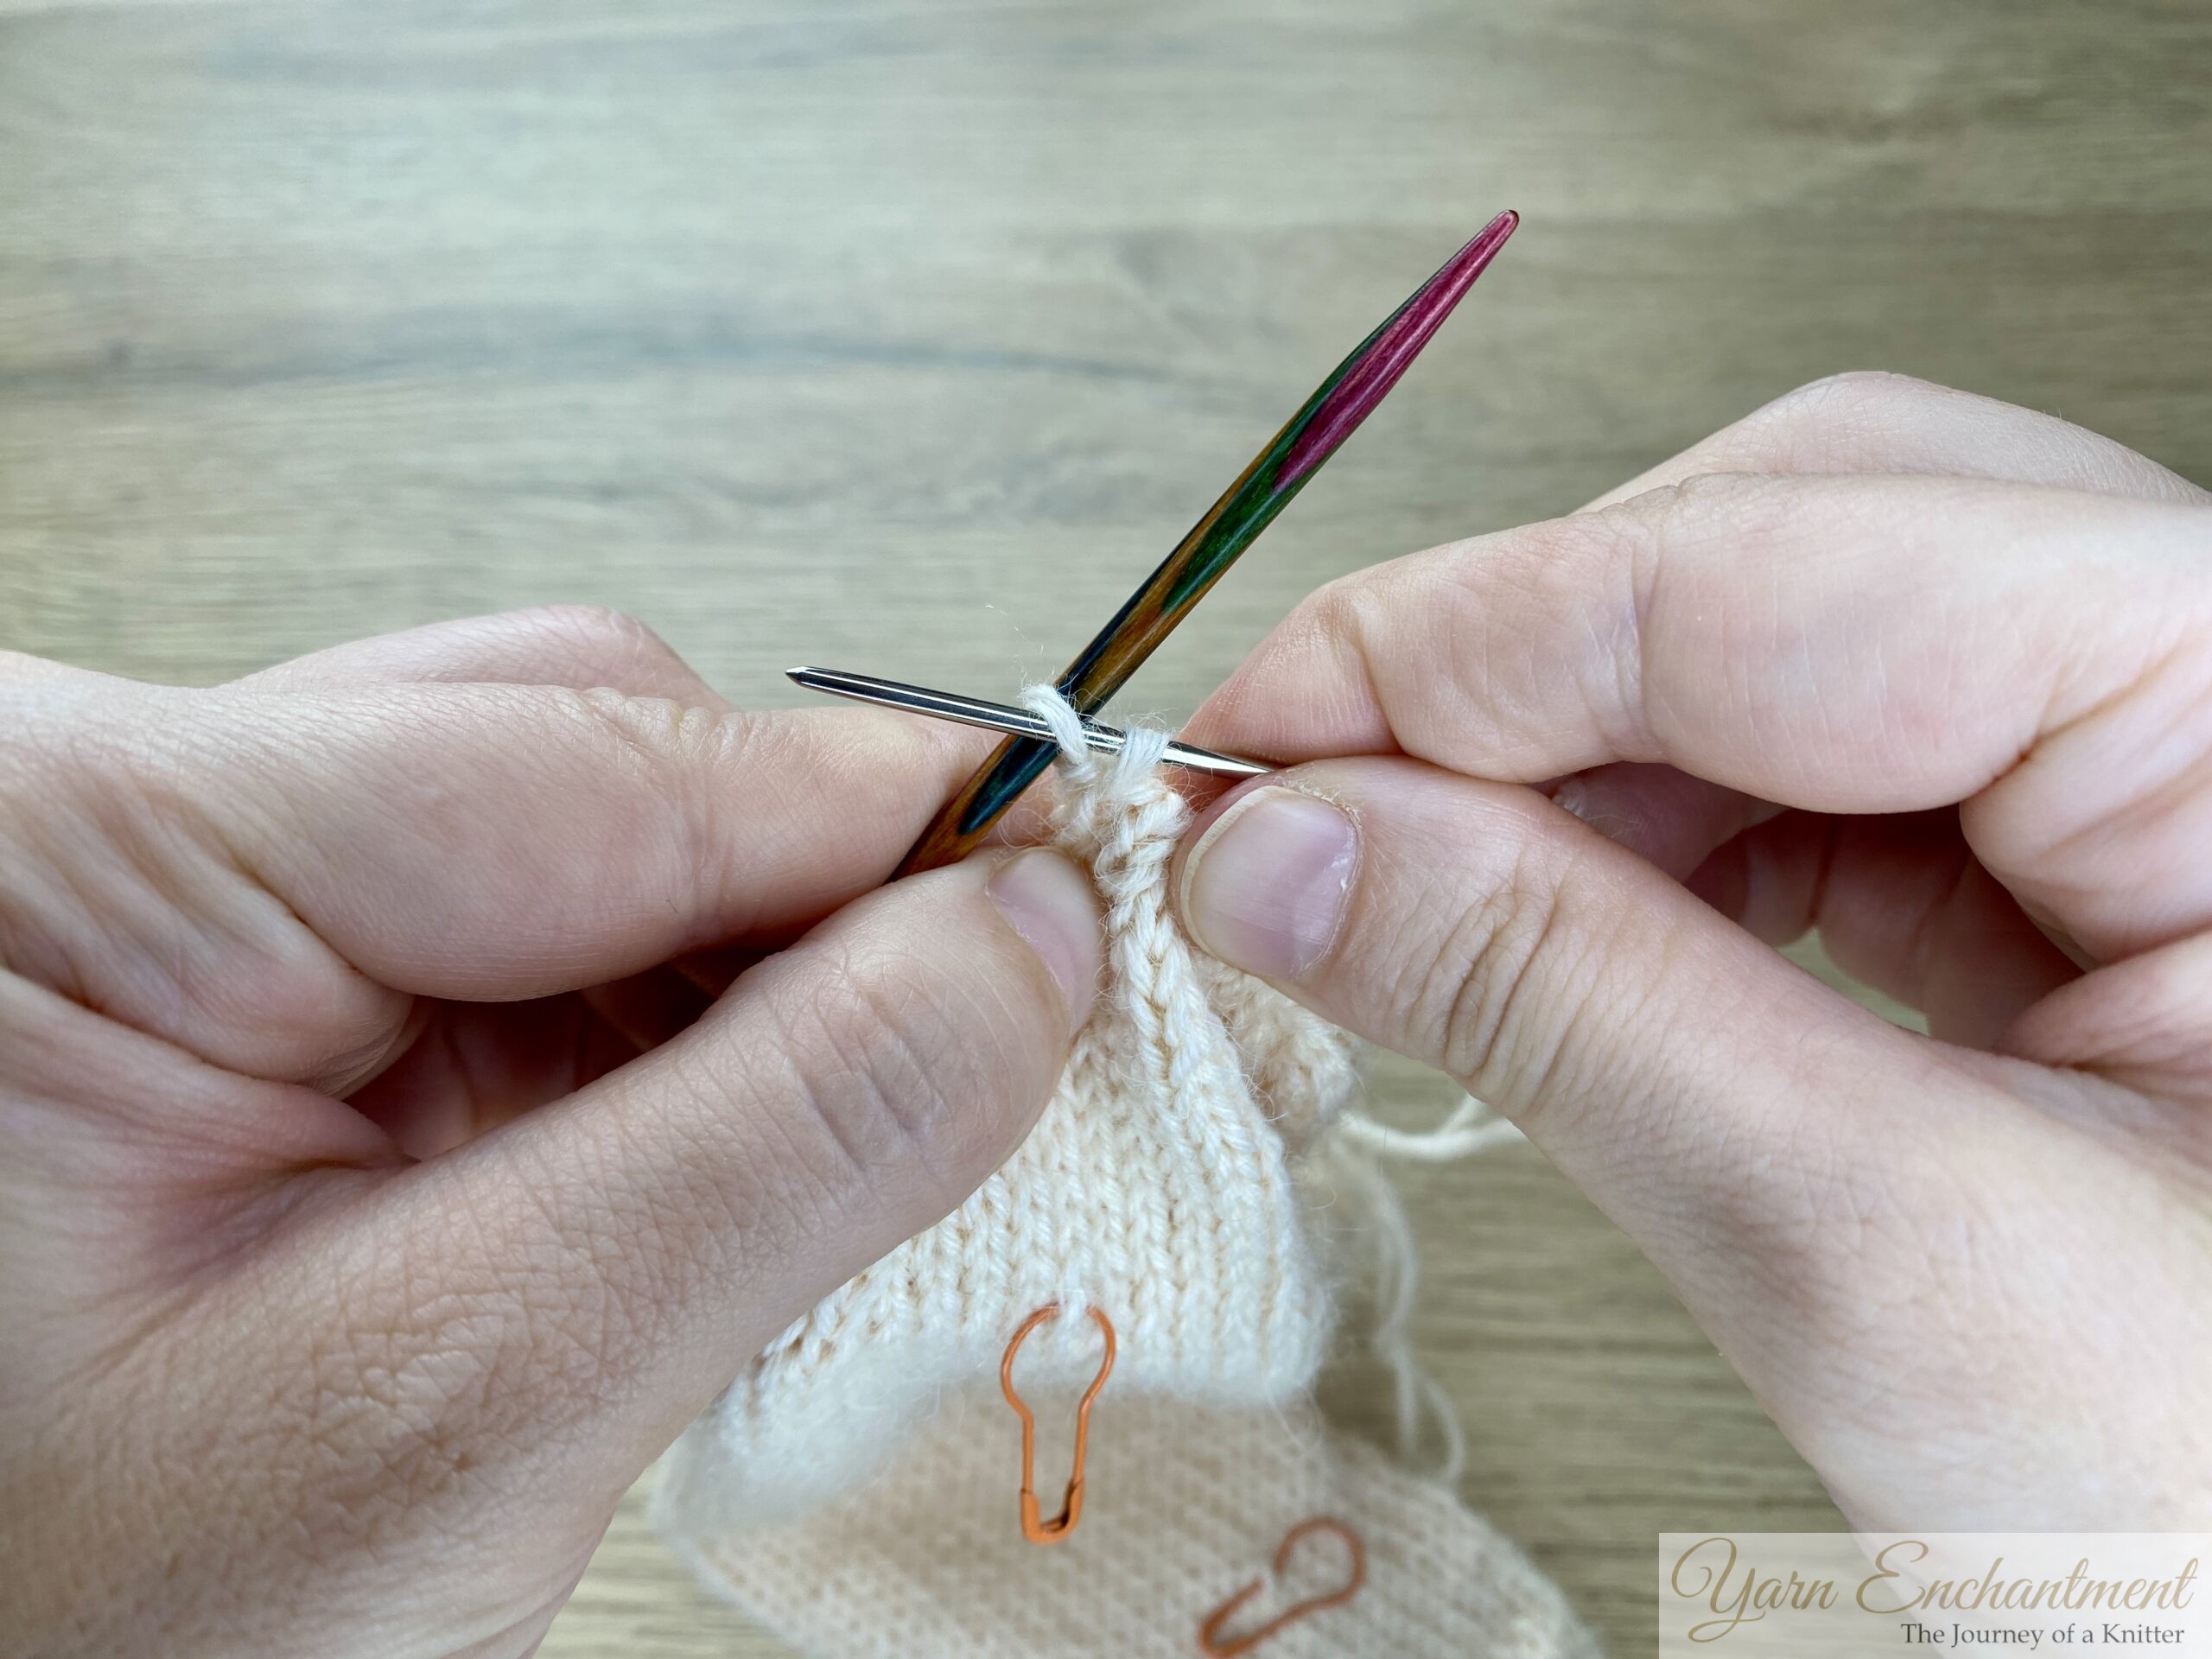
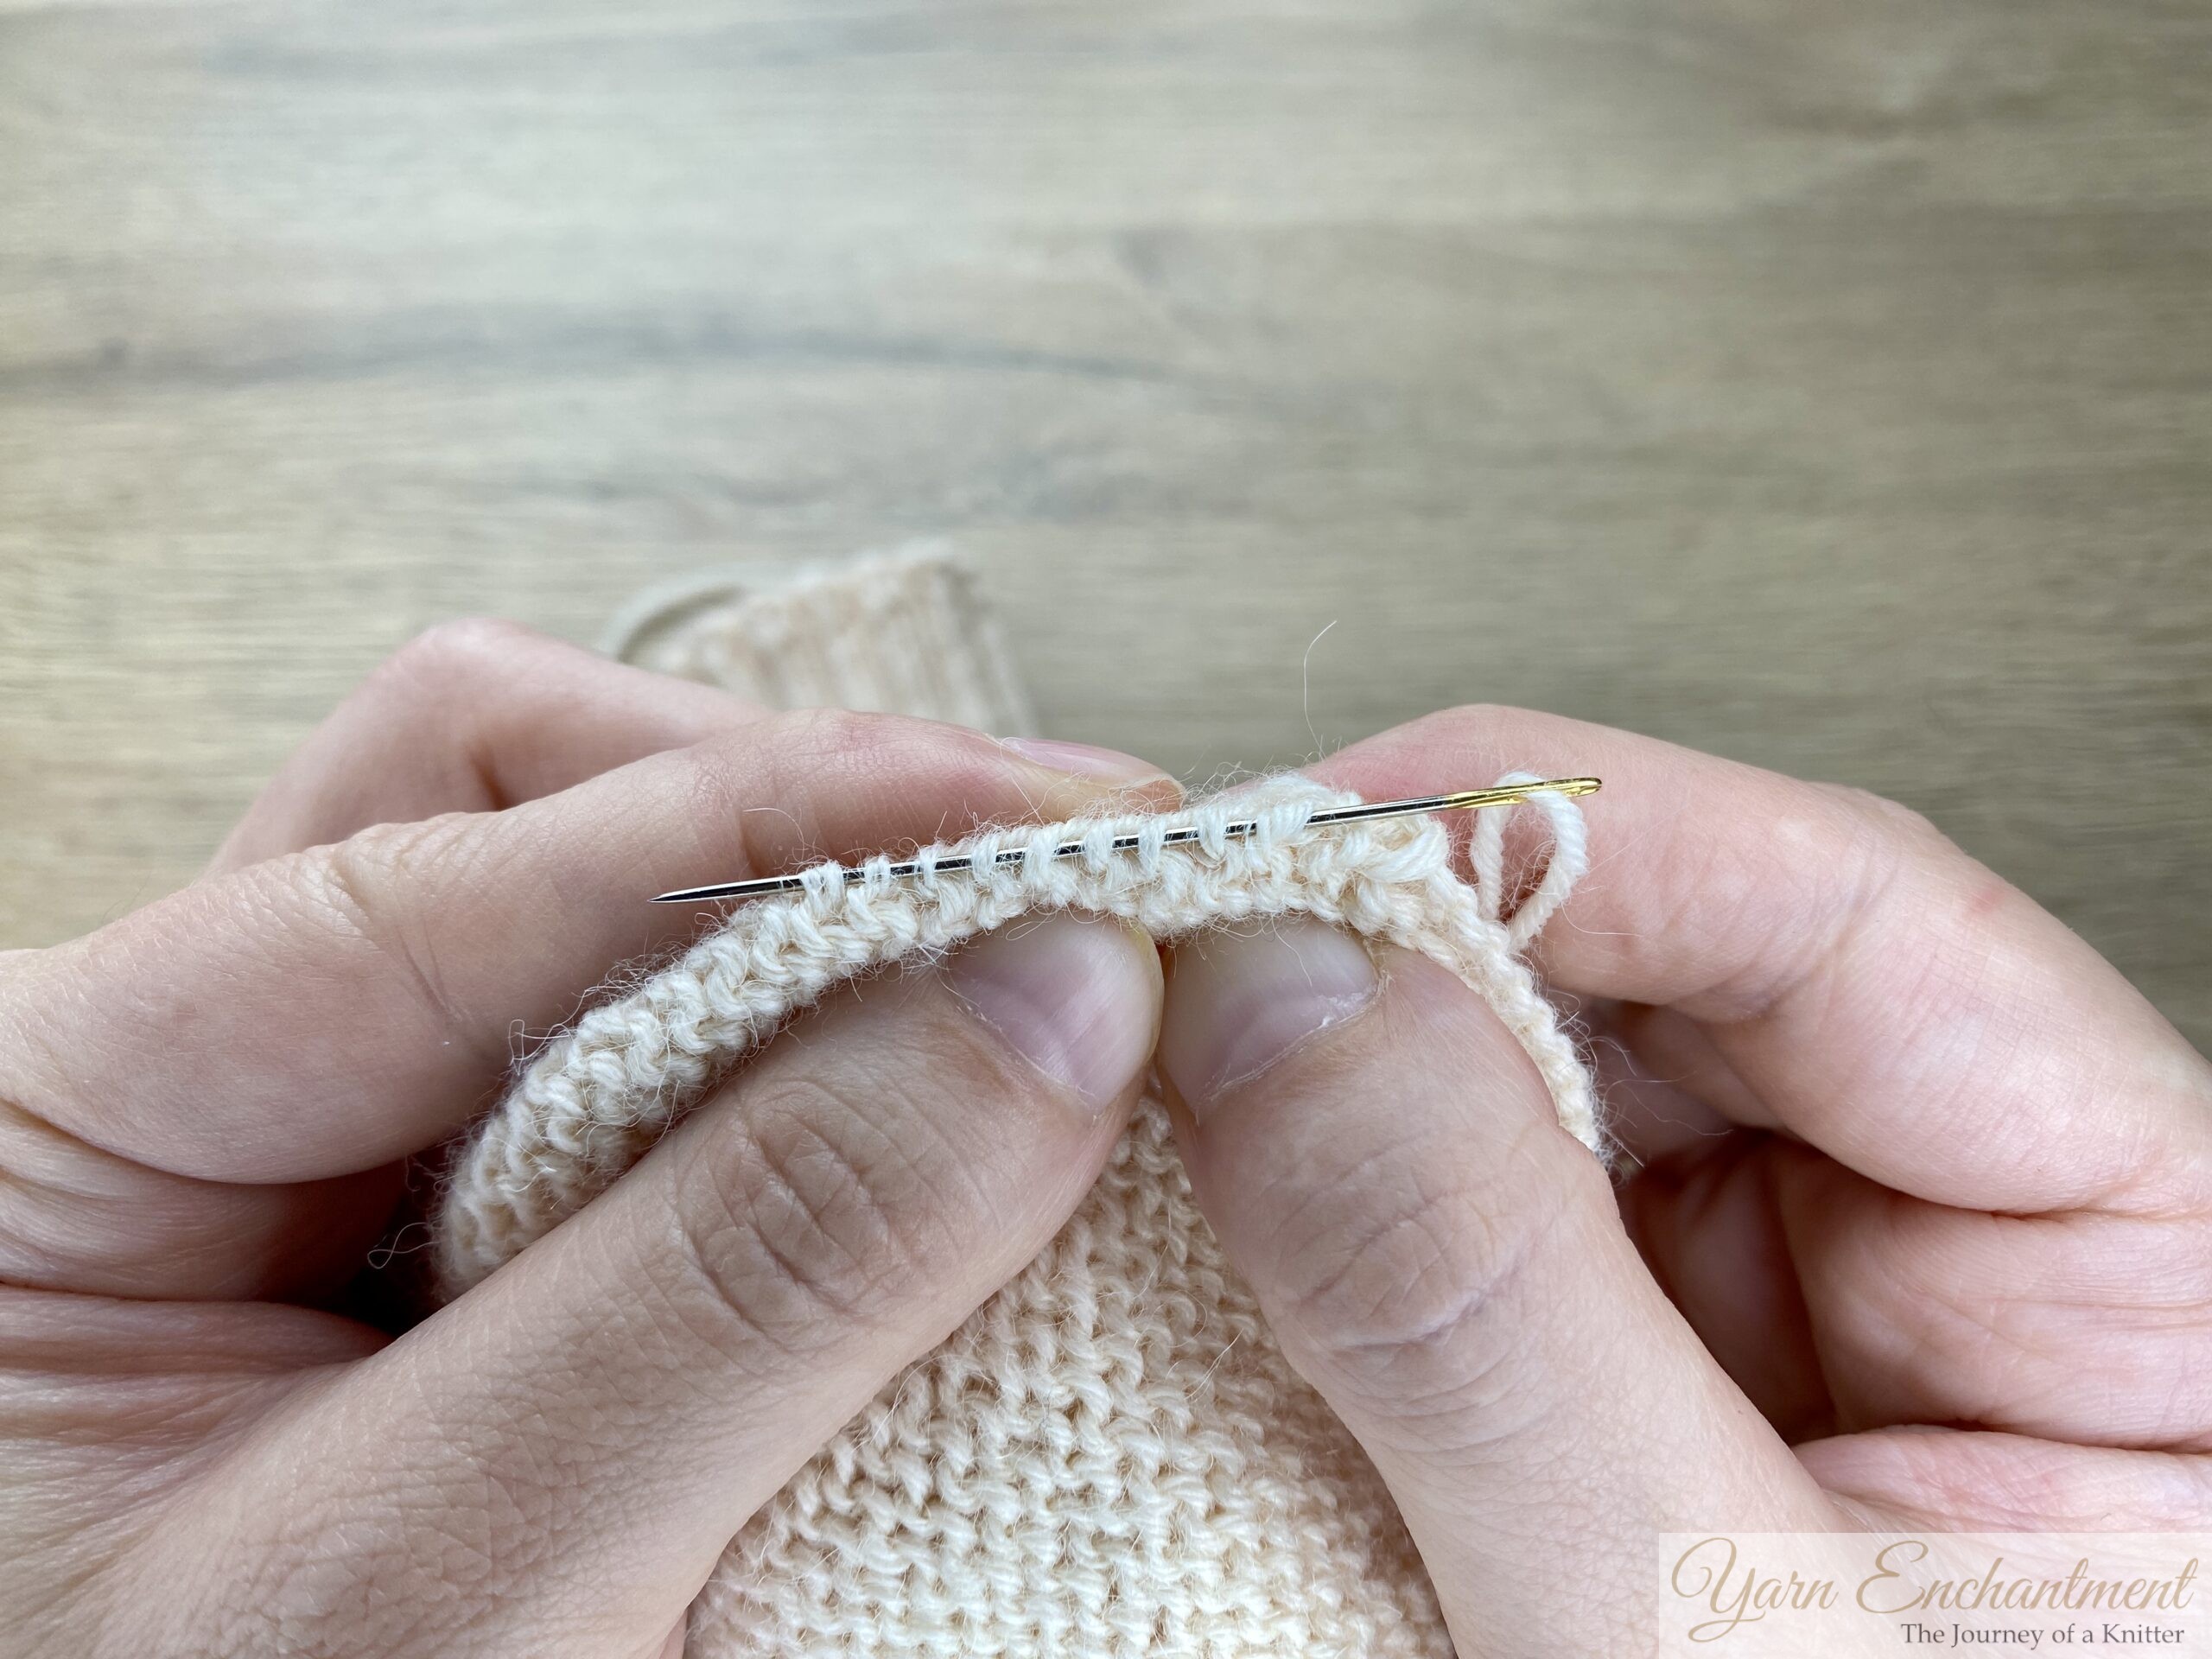
 |  |  | Front needle: Insert the tapestry needle through the first stitch on the front needle as if to purl (from back to front). Pull the yarn through, leaving the stitch on the needle. | Back Needle: Insert the tapestry needle through the first stitch on the back needle as if to knit (from front to back). Pull the yarn through, leaving the stitch on the needle. | Give it a good tug (without breaking the yarn) to pull the last stitch on the back needle tighter. When the yarn was cut, that stitch became loose, so to avoid any holes, pull firmly on the working yarn to snug it up |


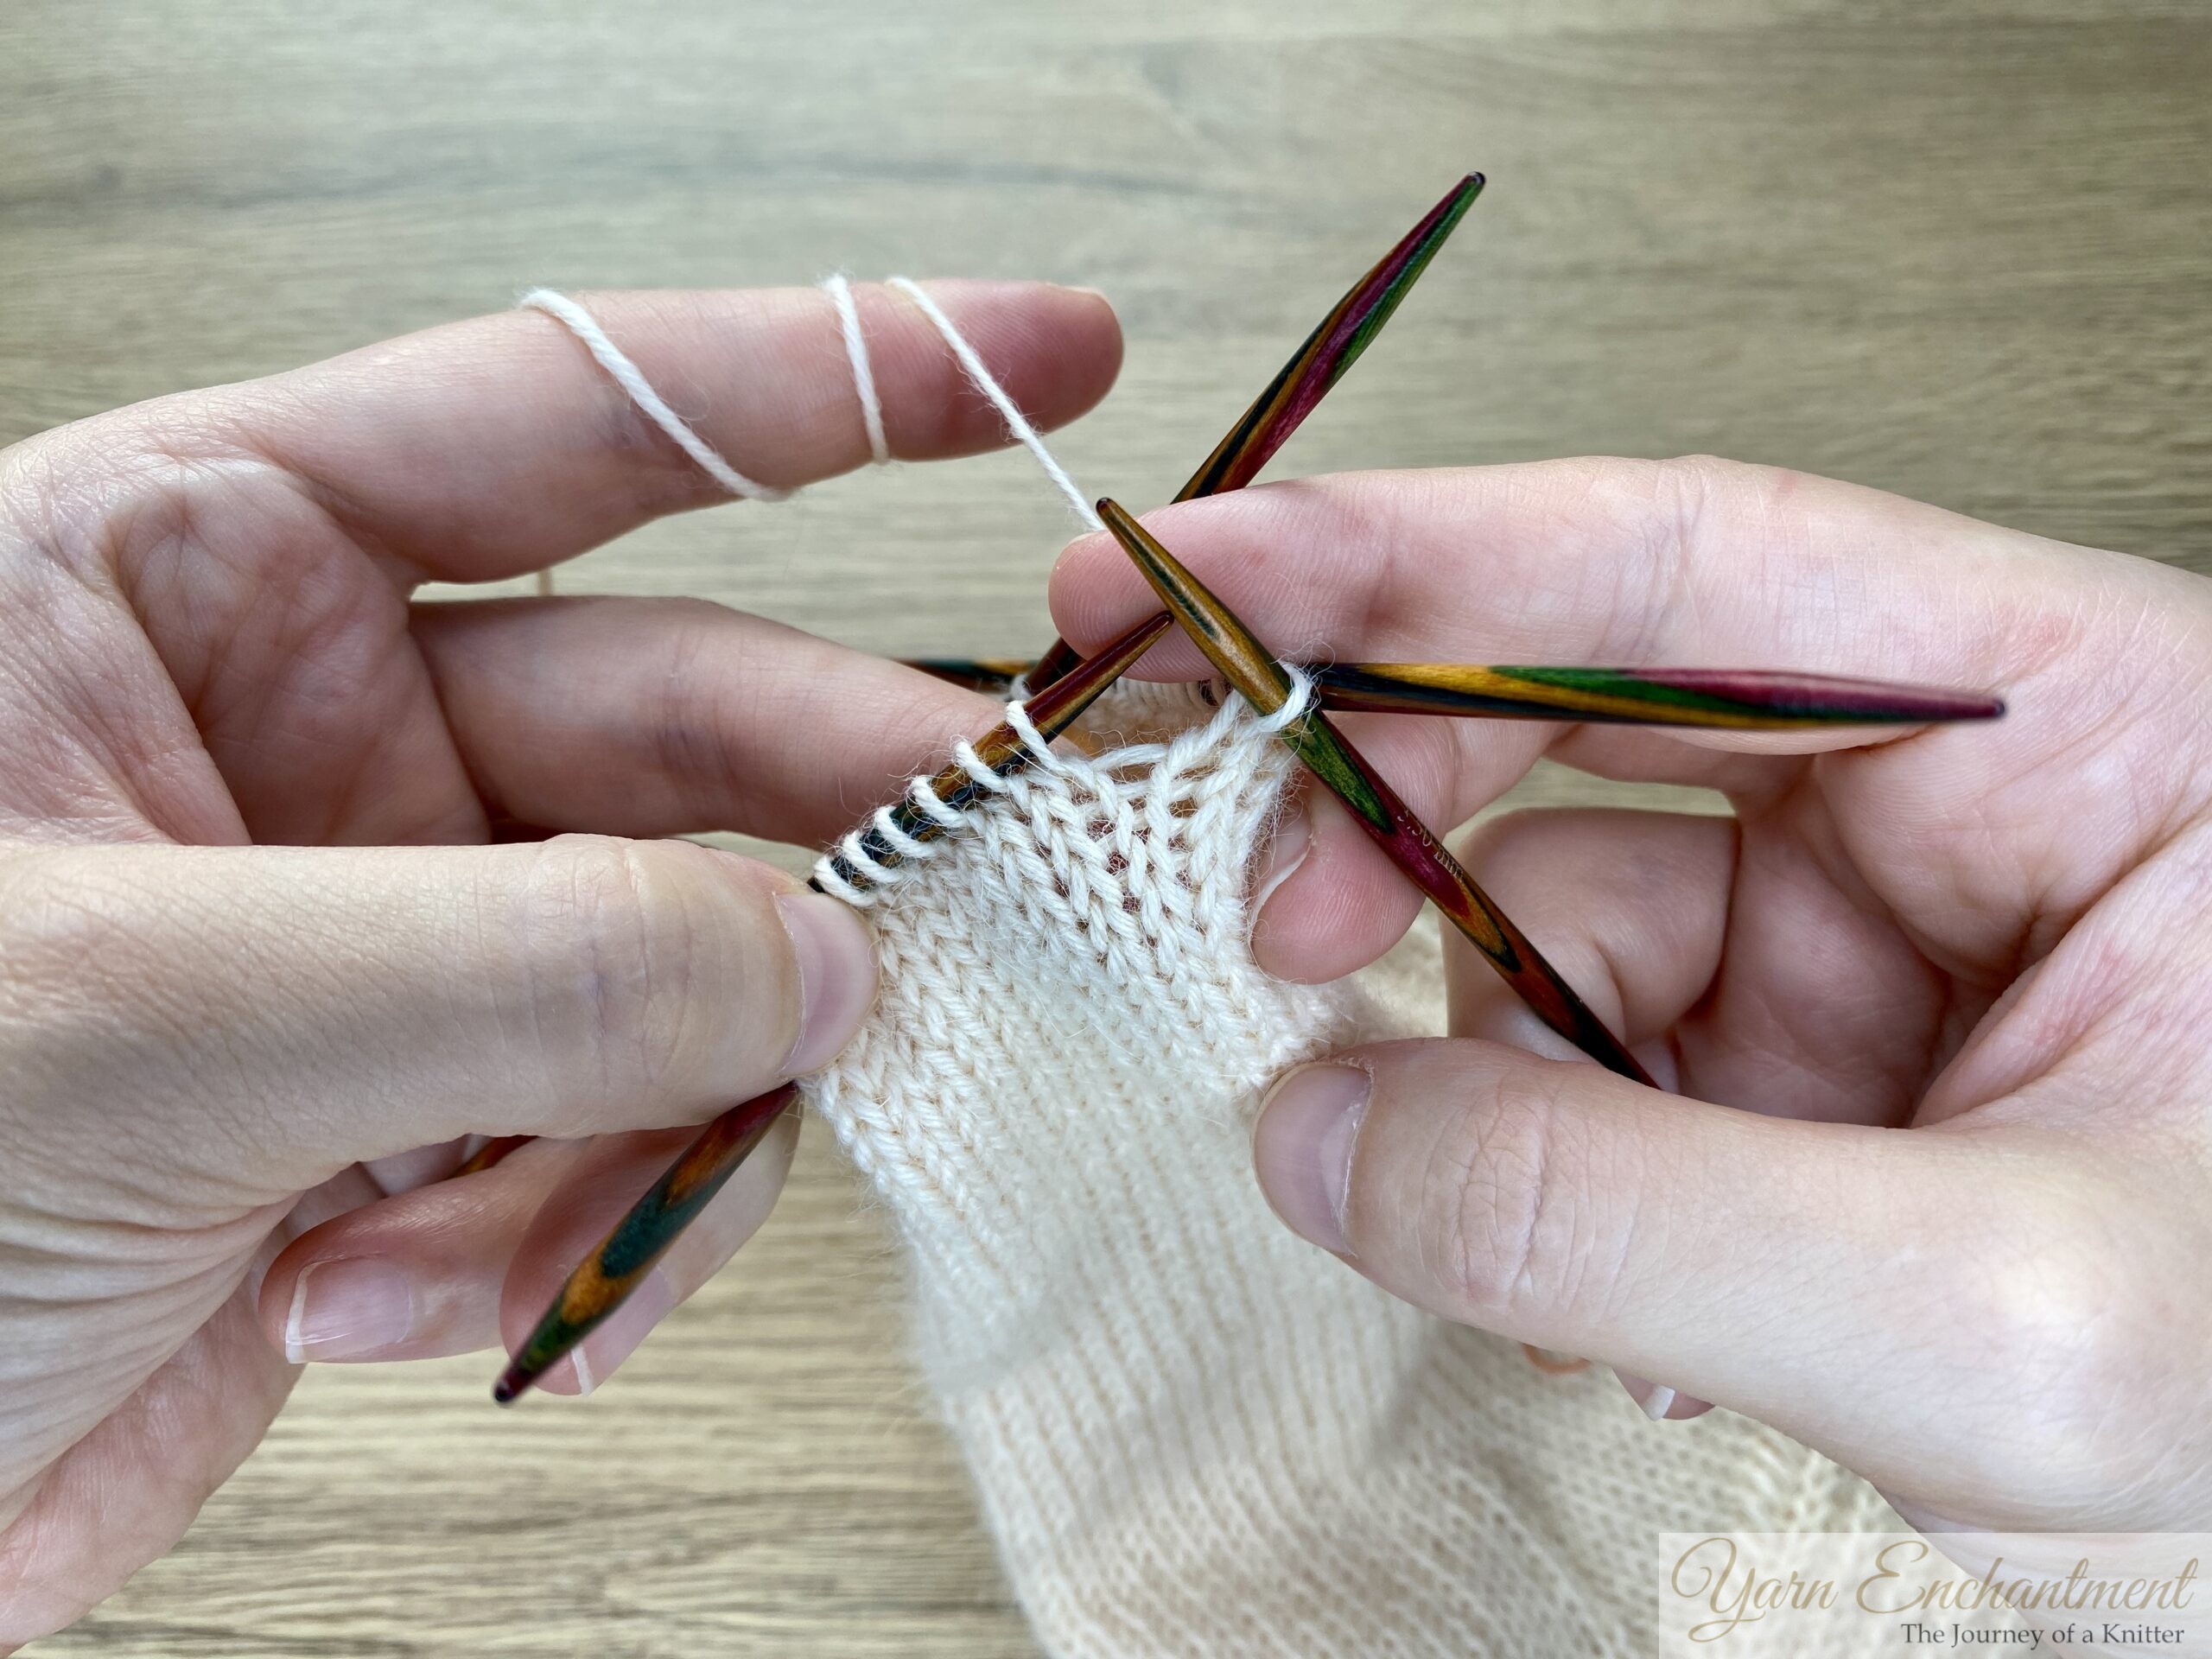
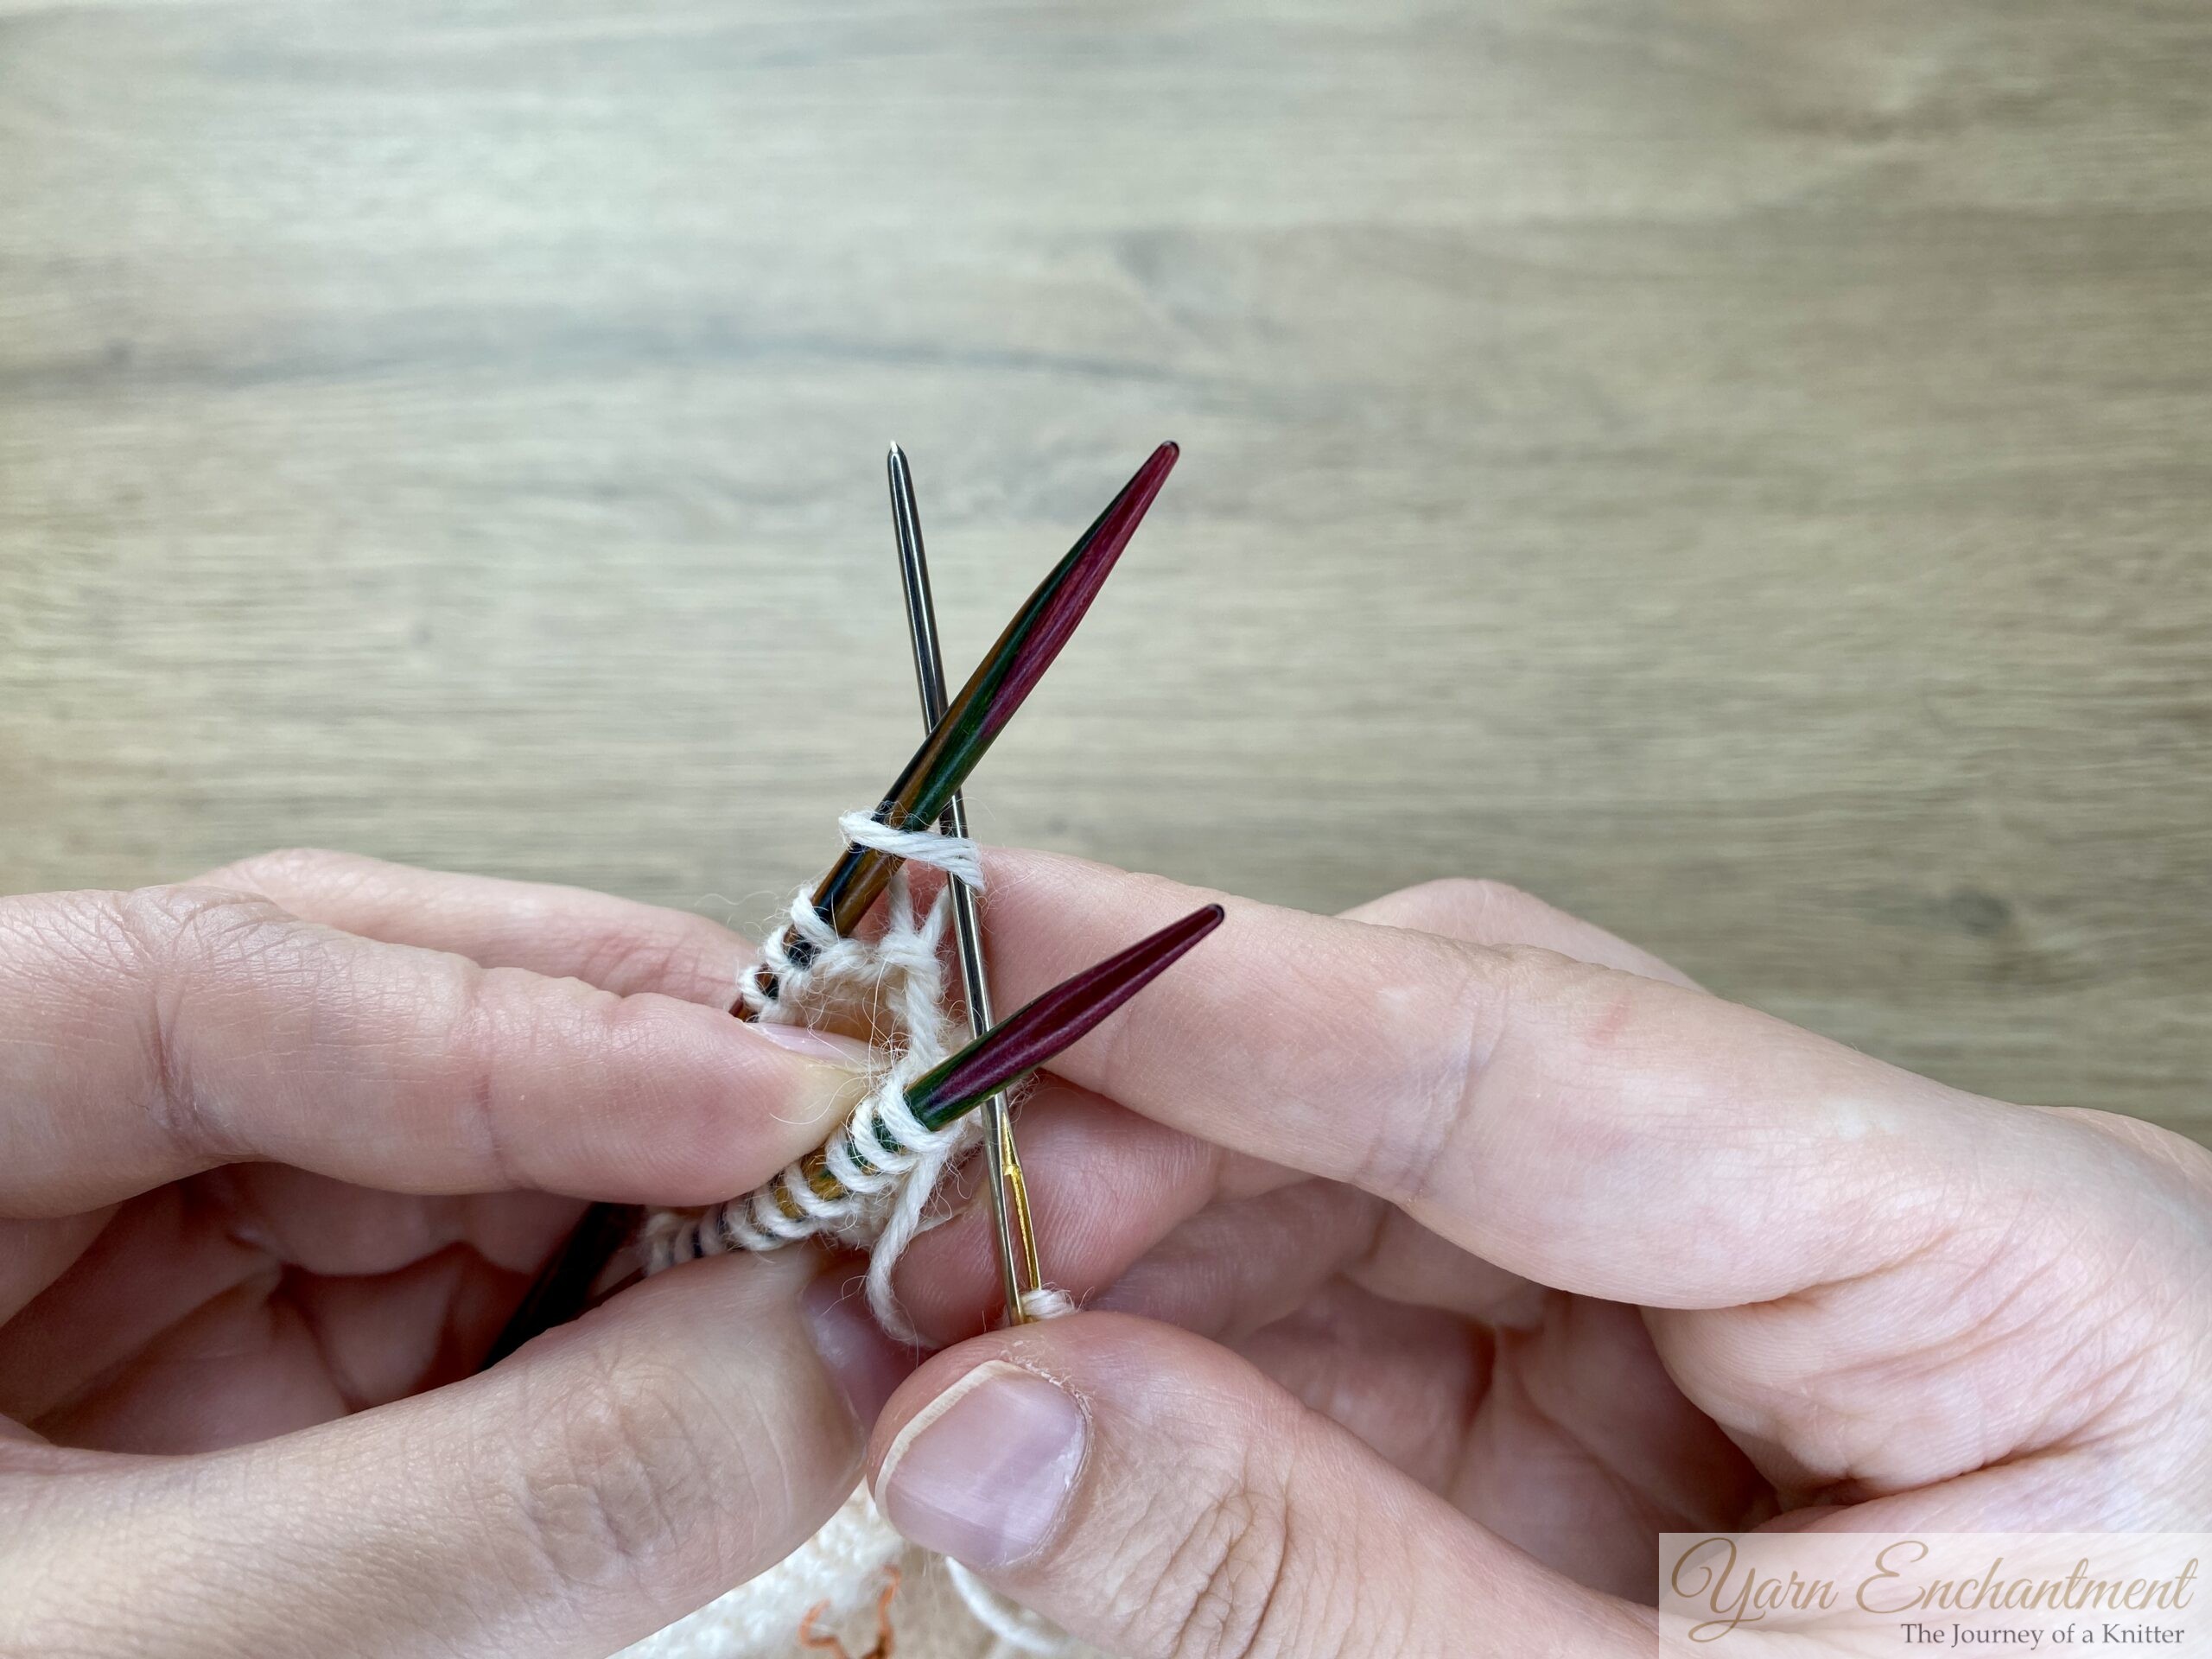
Step 3 The Kitchener Stitch Repeat
Repeat the following steps until all stitches are grafted:
-
- Step 1 (Front Needle): Insert the tapestry needle through the first stitch on the front needle as if to knit. Pull the yarn through and slip this stitch off the needle.
- Step 2 (Front Needle): Insert the tapestry needle through the next stitch on the front needle as if to purl. Pull the yarn through, but leave this stitch on the needle.
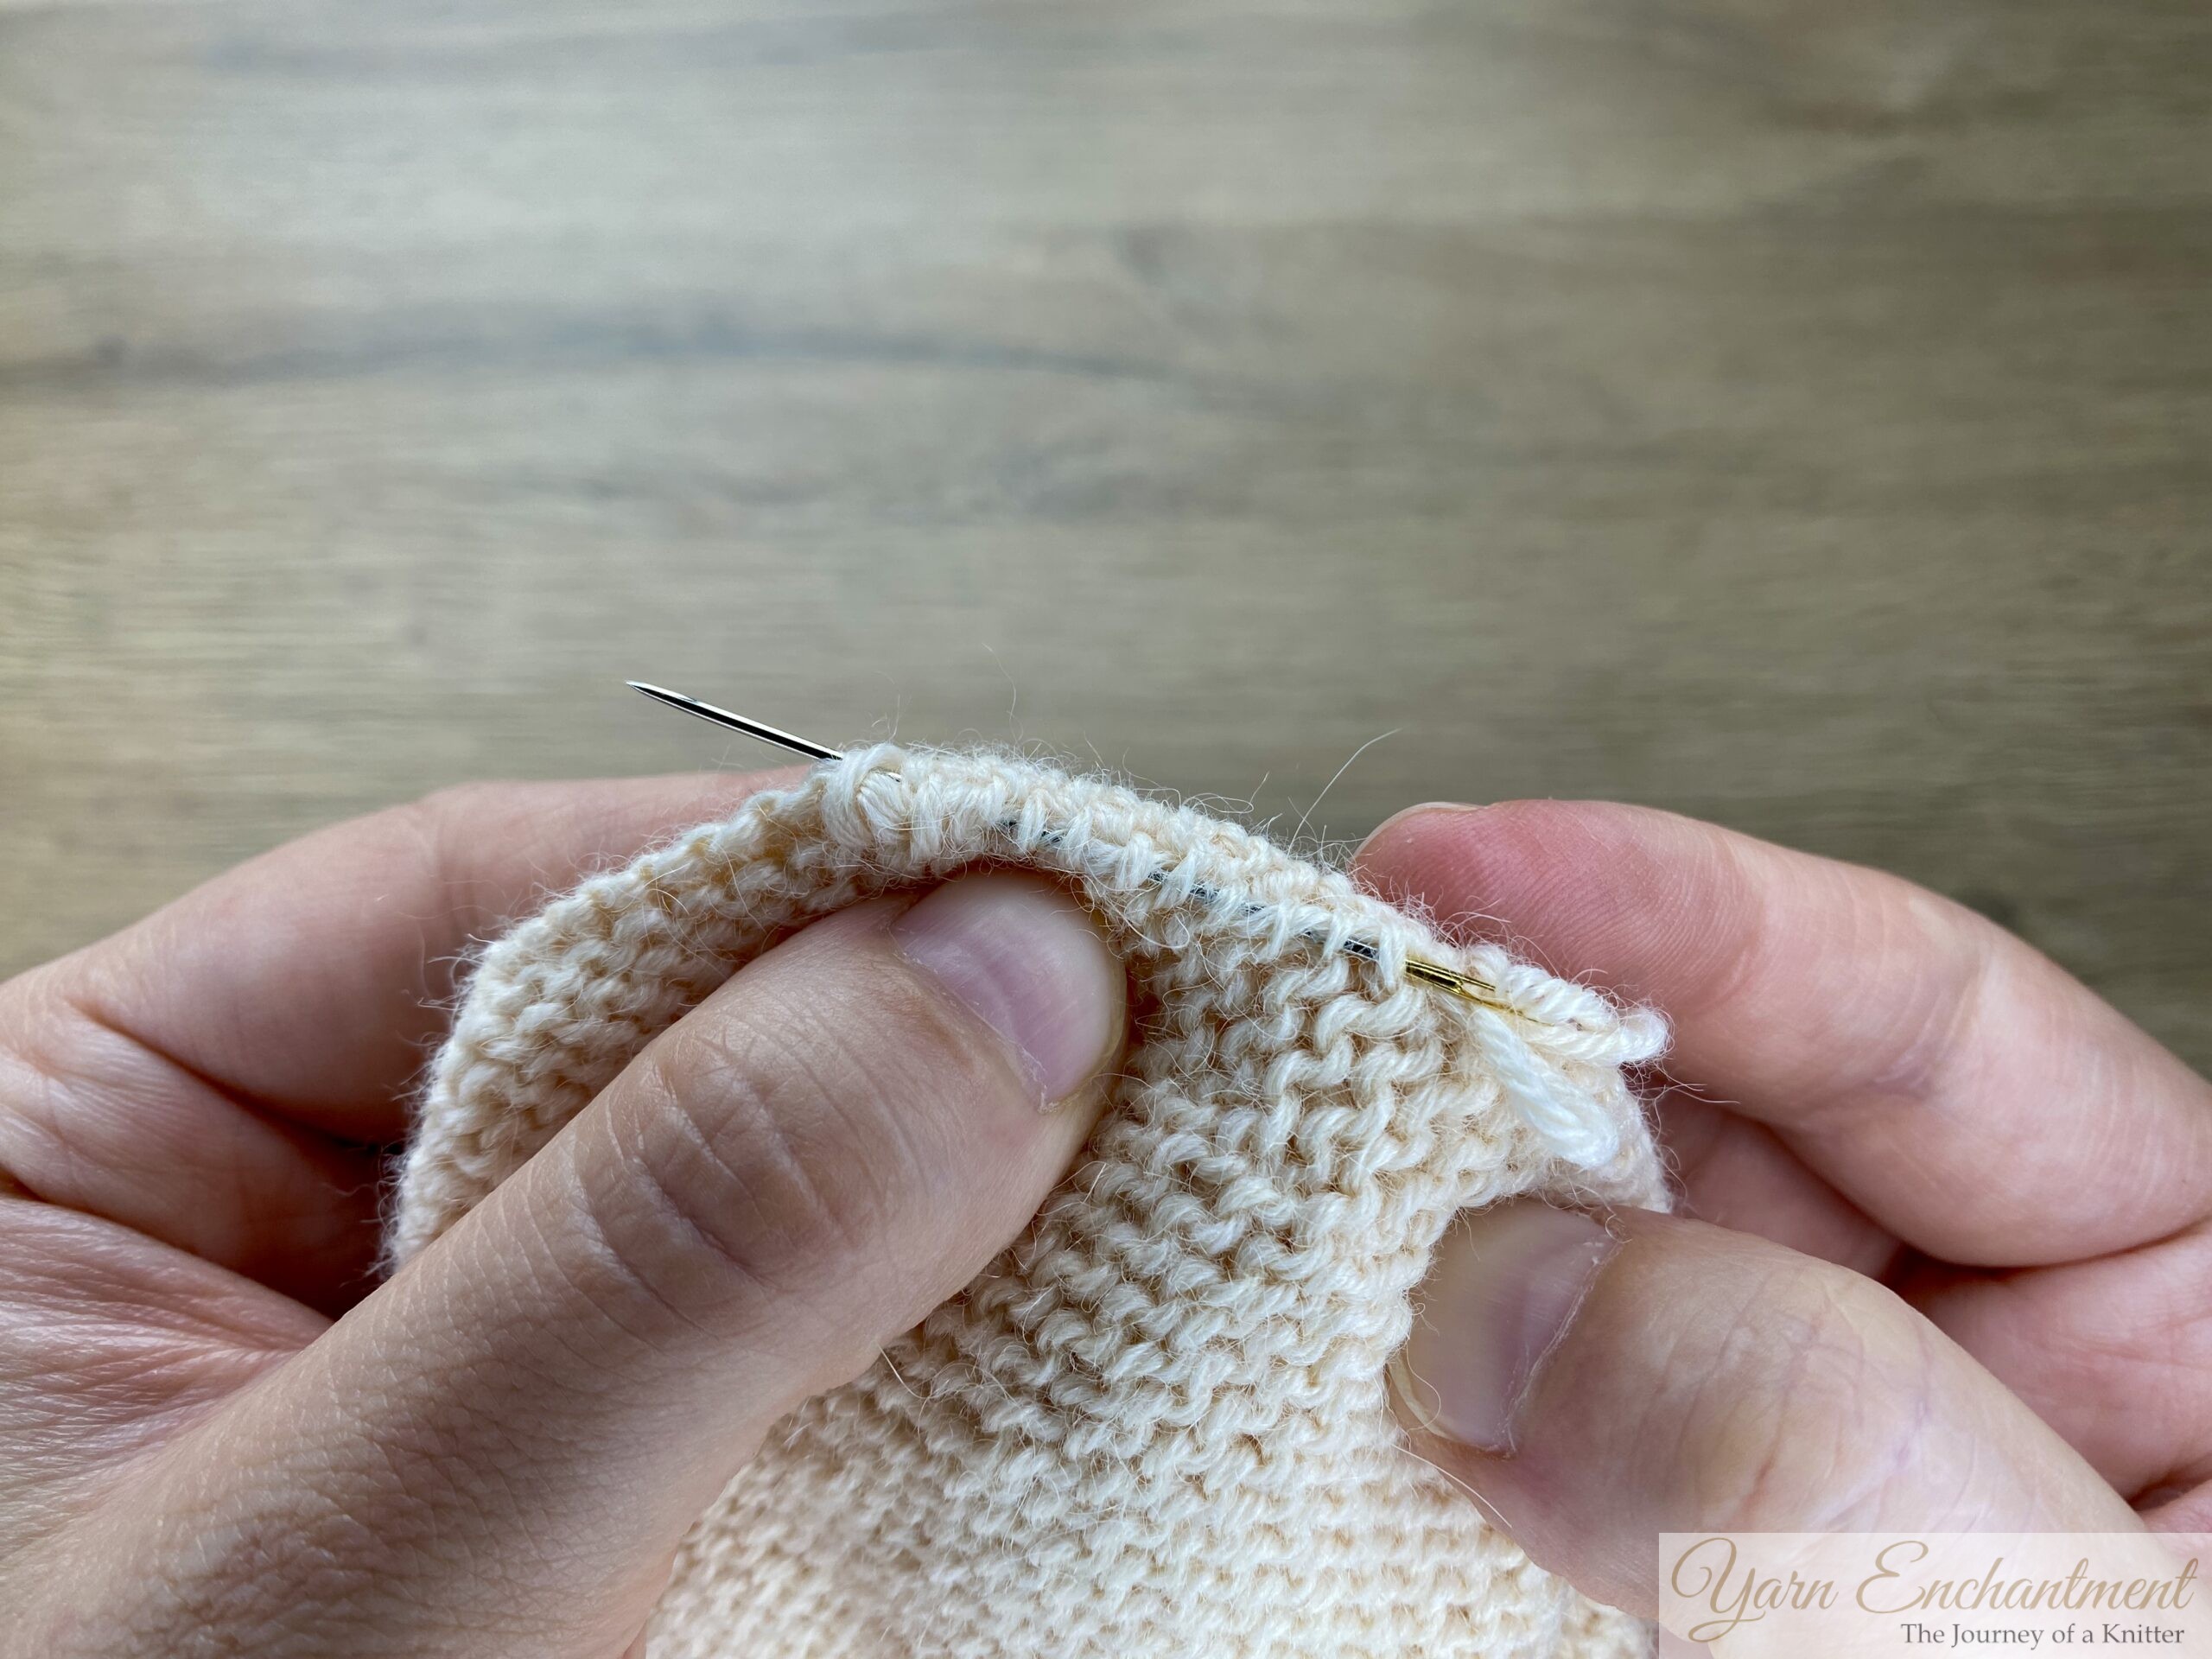
 |  | 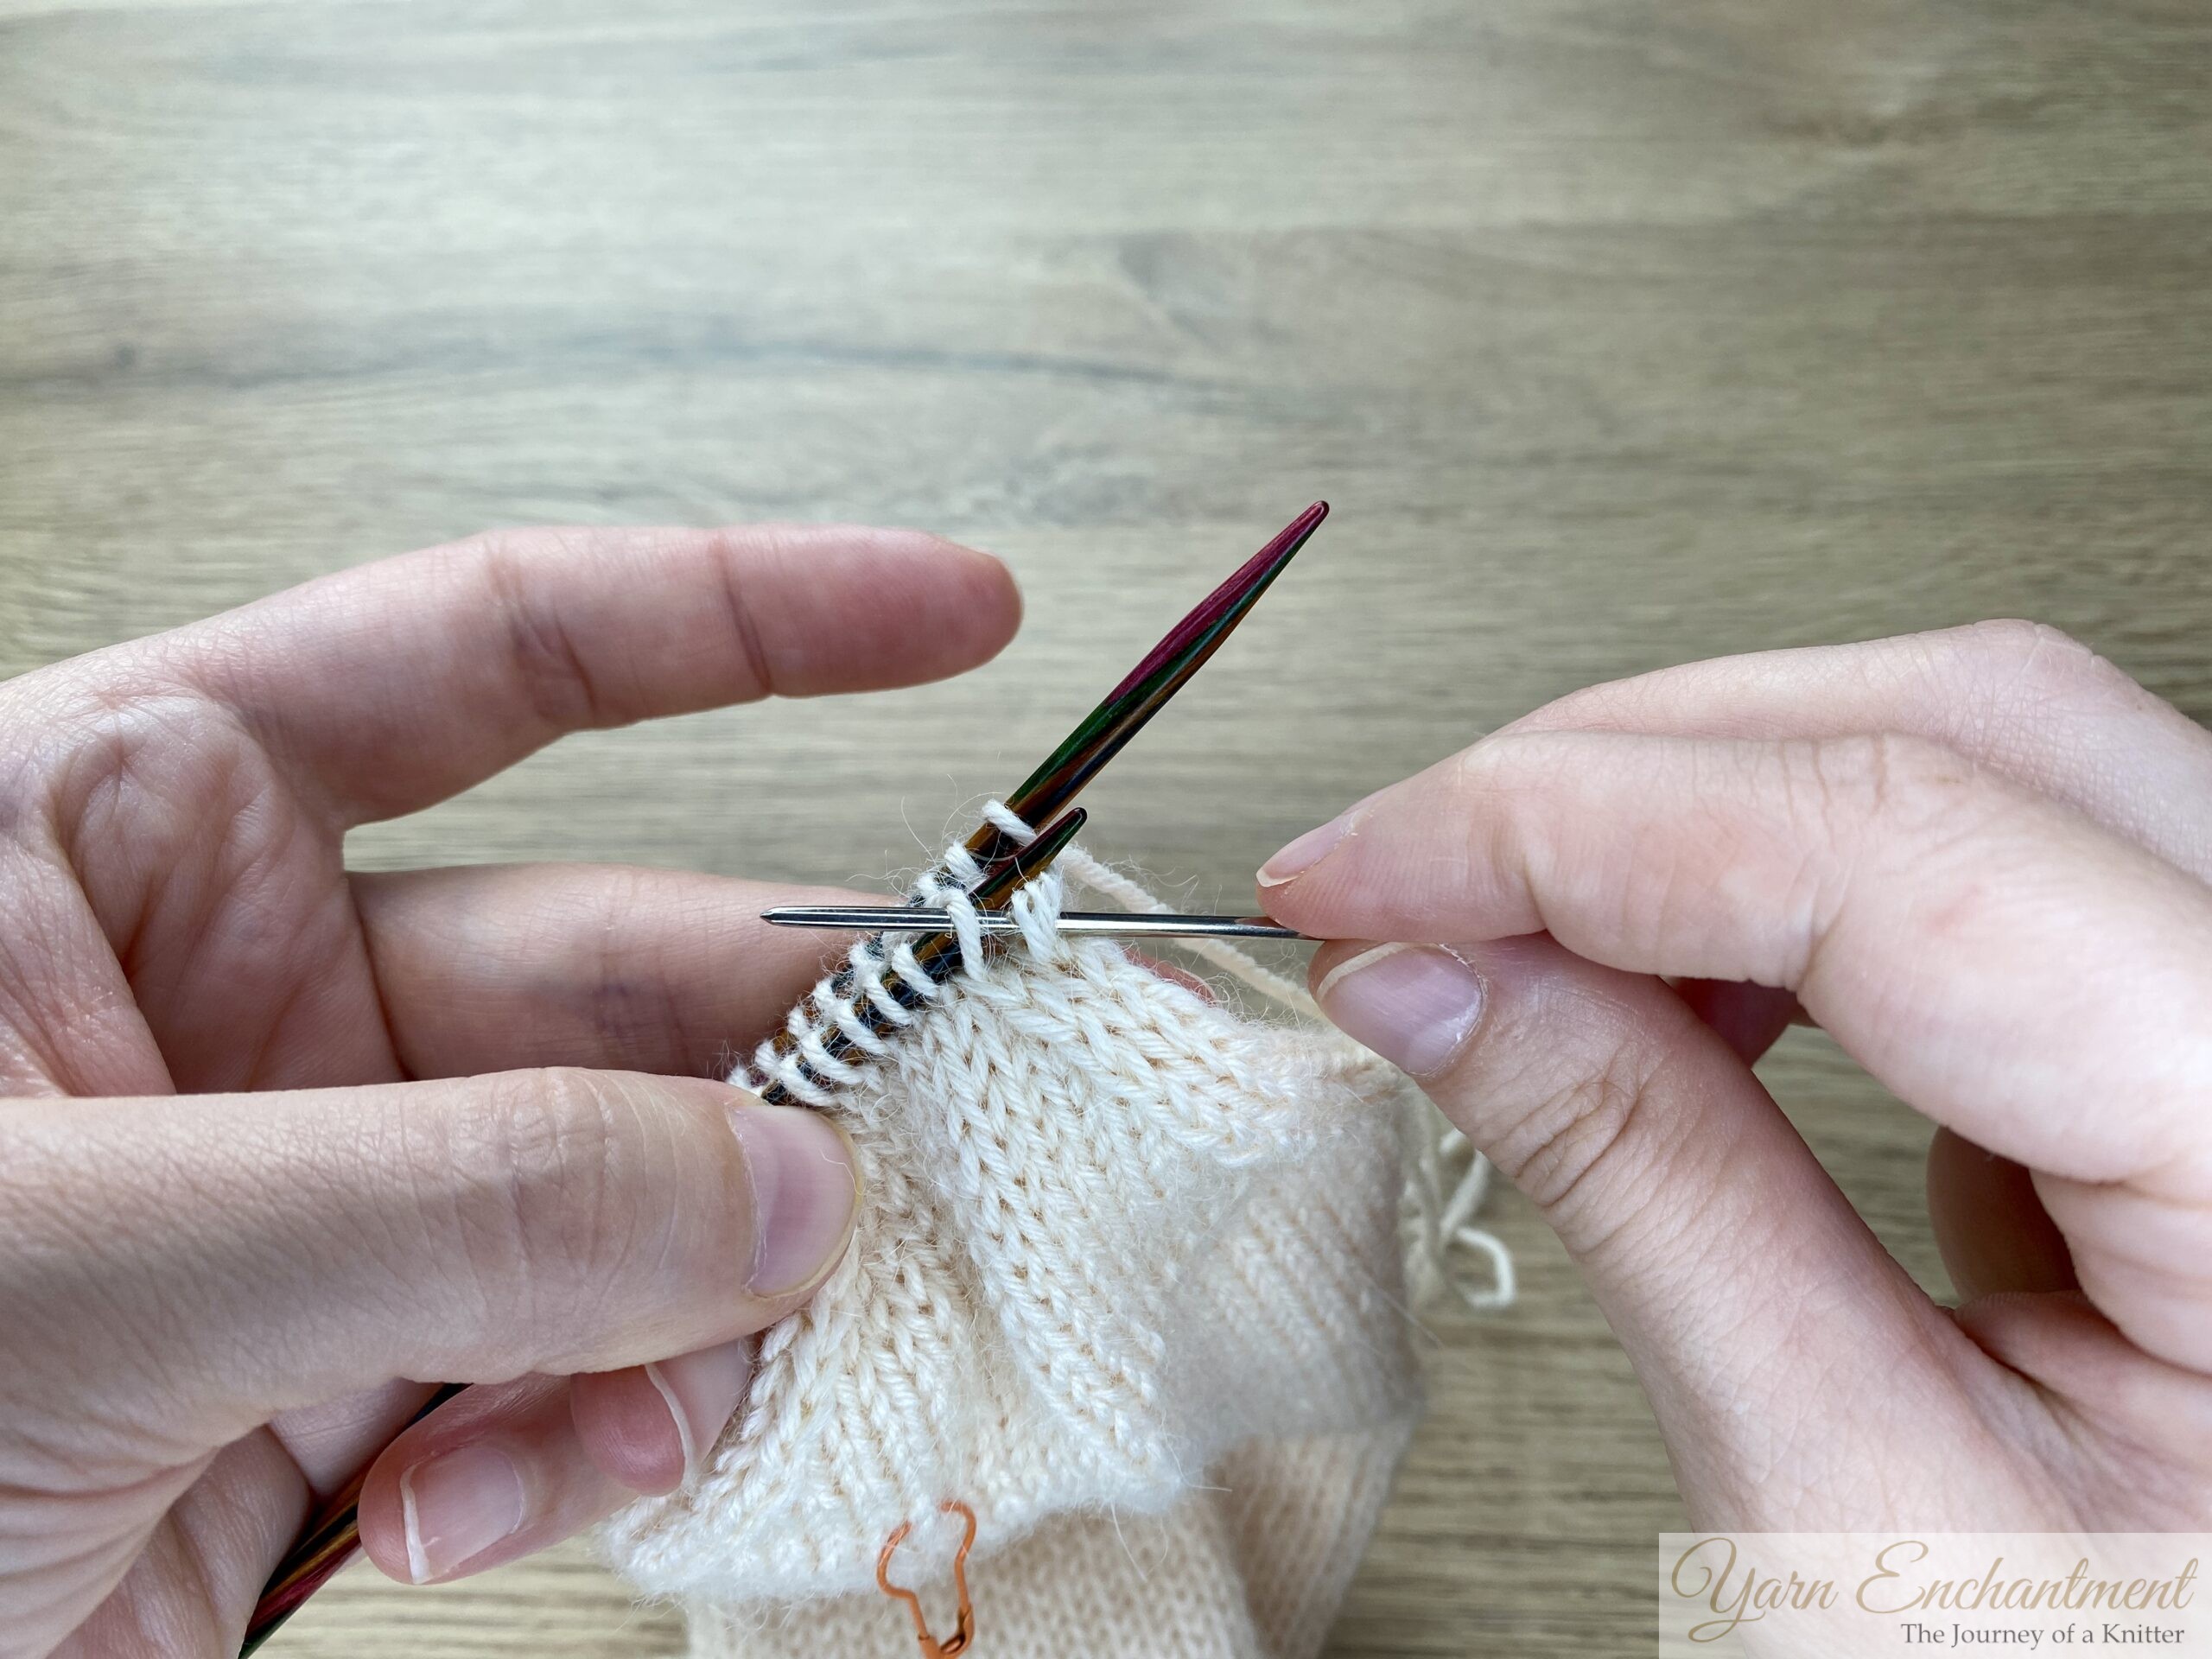 | Insert the tapestry needle through the first stitch on the front needle as if to knit | Pull the yarn through and slip this stitch off the needle. | Insert the tapestry needle through the next stitch on the front needle as if to purl. Pull the yarn through, but leave this stitch on the needle. |


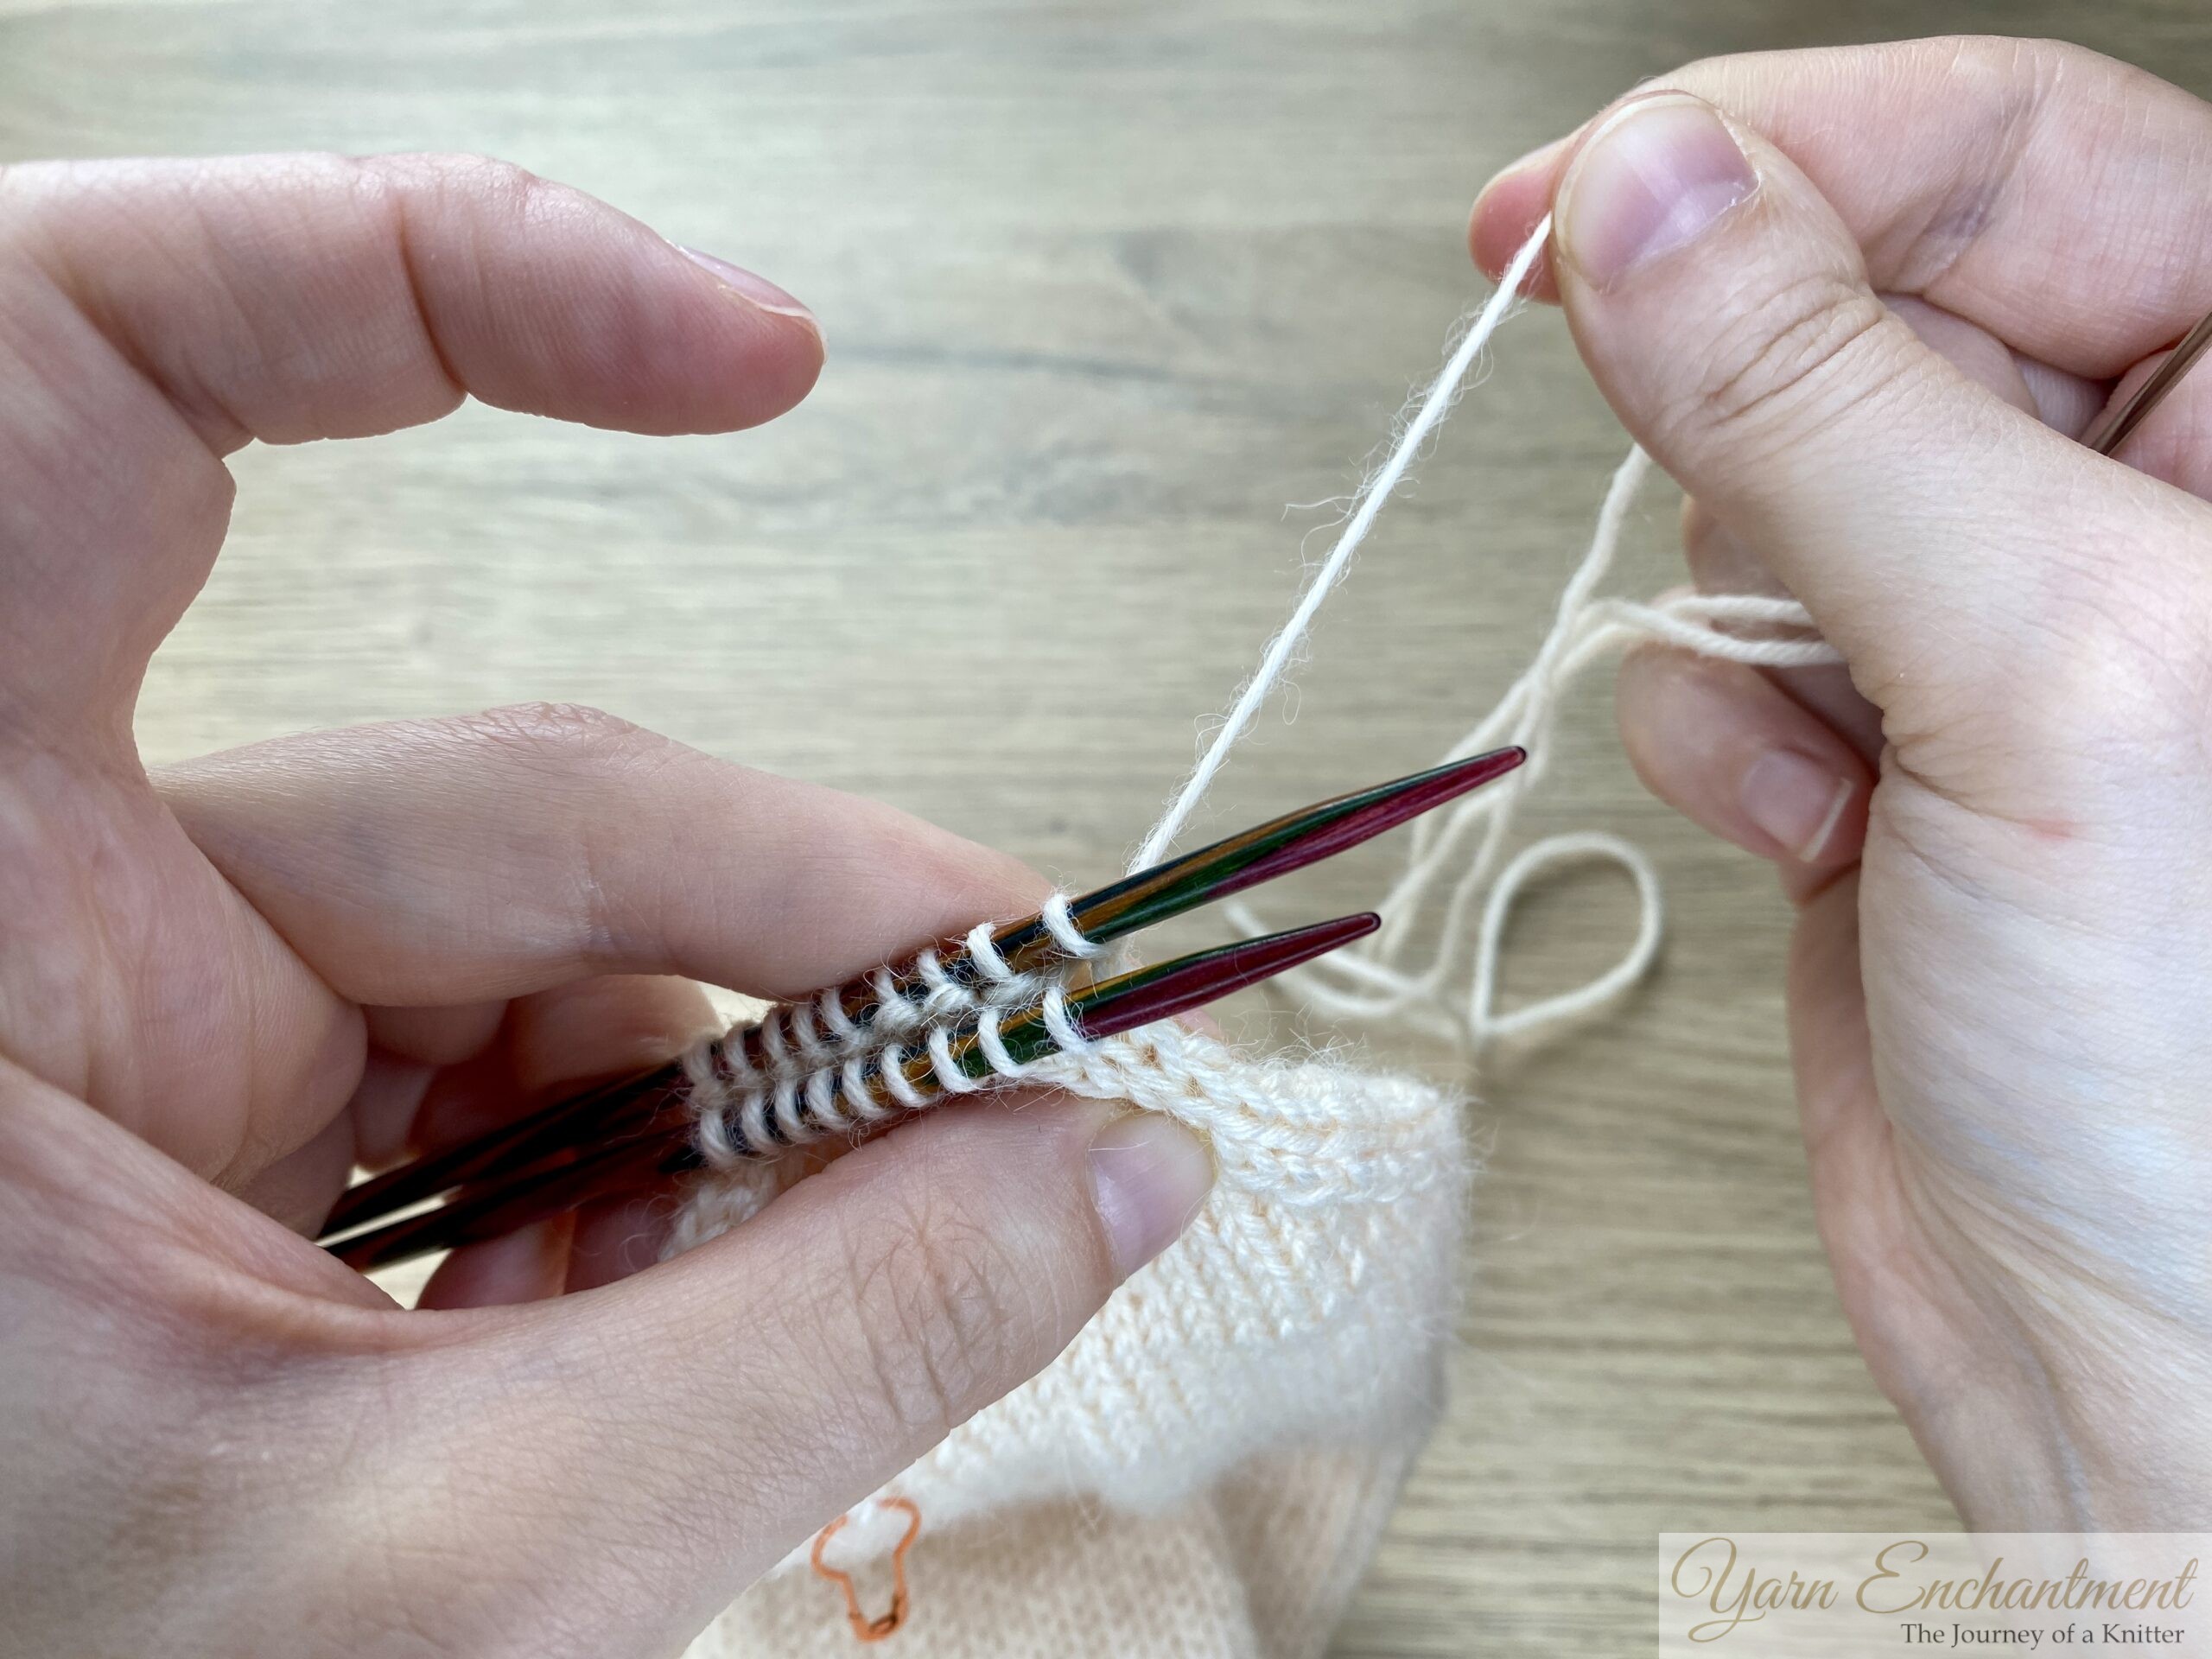
-
- Step 3 (Back Needle): Insert the tapestry needle through the first stitch on the back needle as if to purl. Pull the yarn through and slip this stitch off the needle.
- Step 4 (Back Needle): Insert the tapestry needle through the next stitch on the back needle as if to knit. Pull the yarn through, but leave this stitch on the needle.
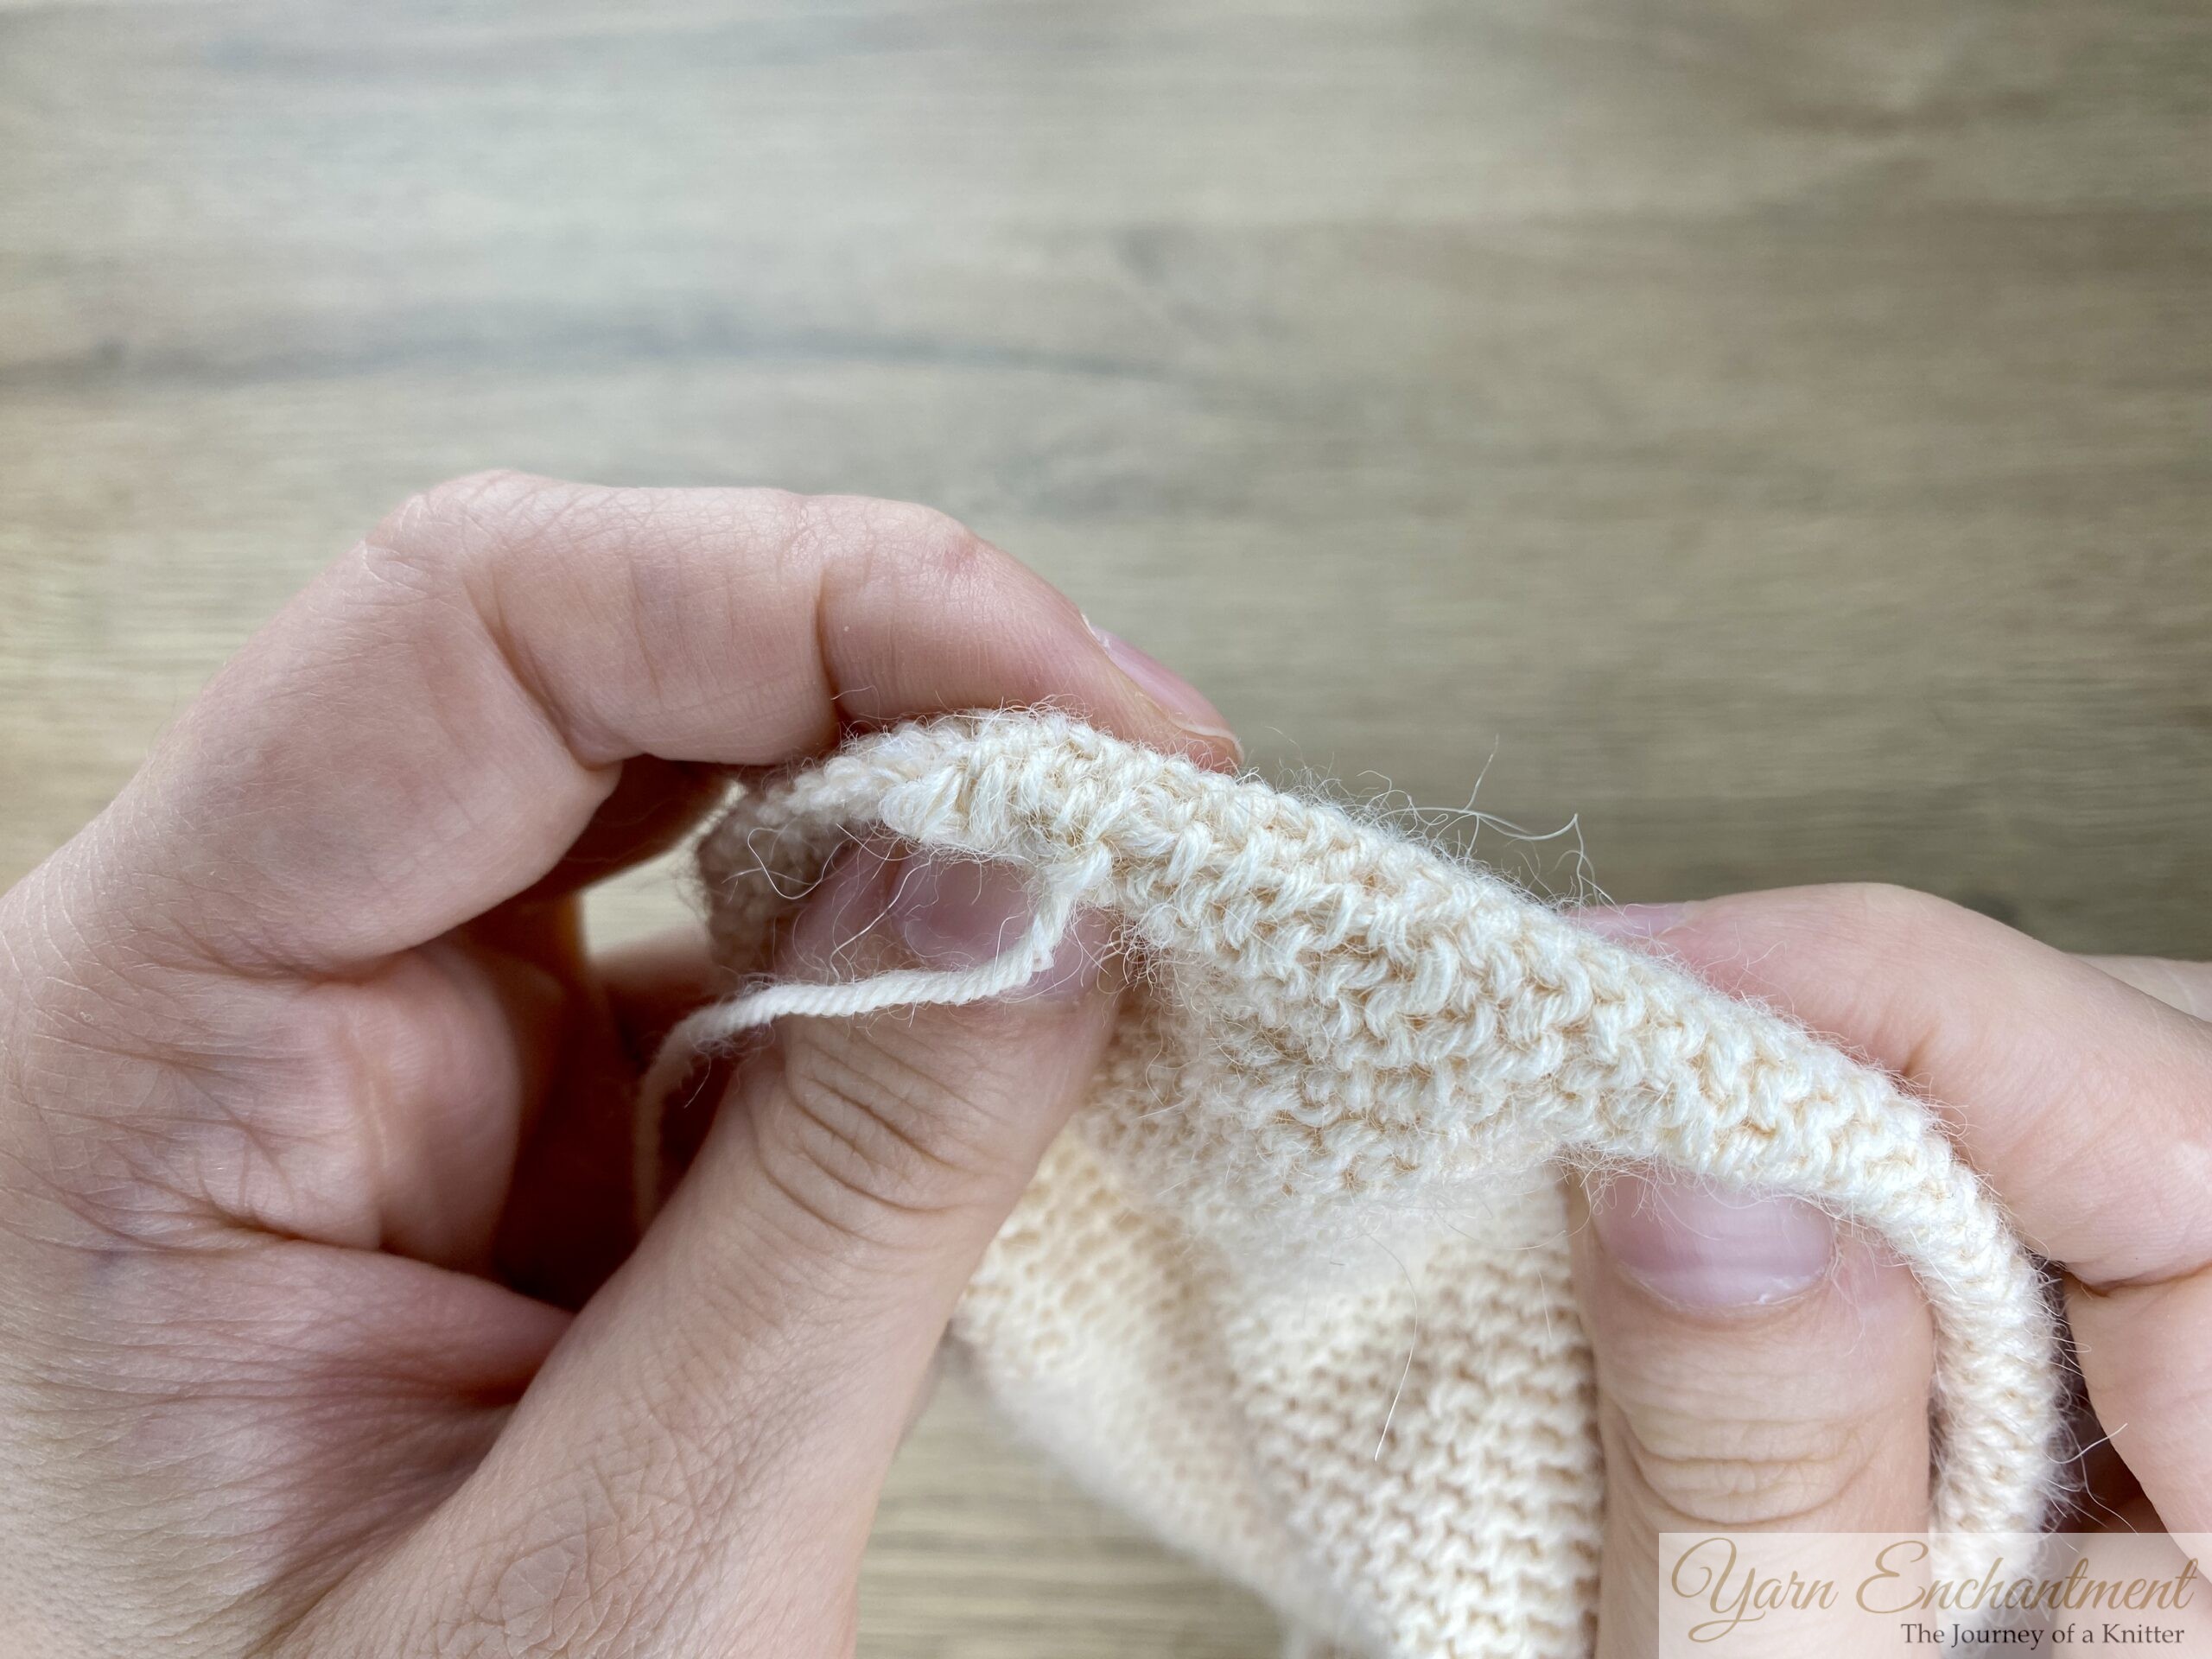
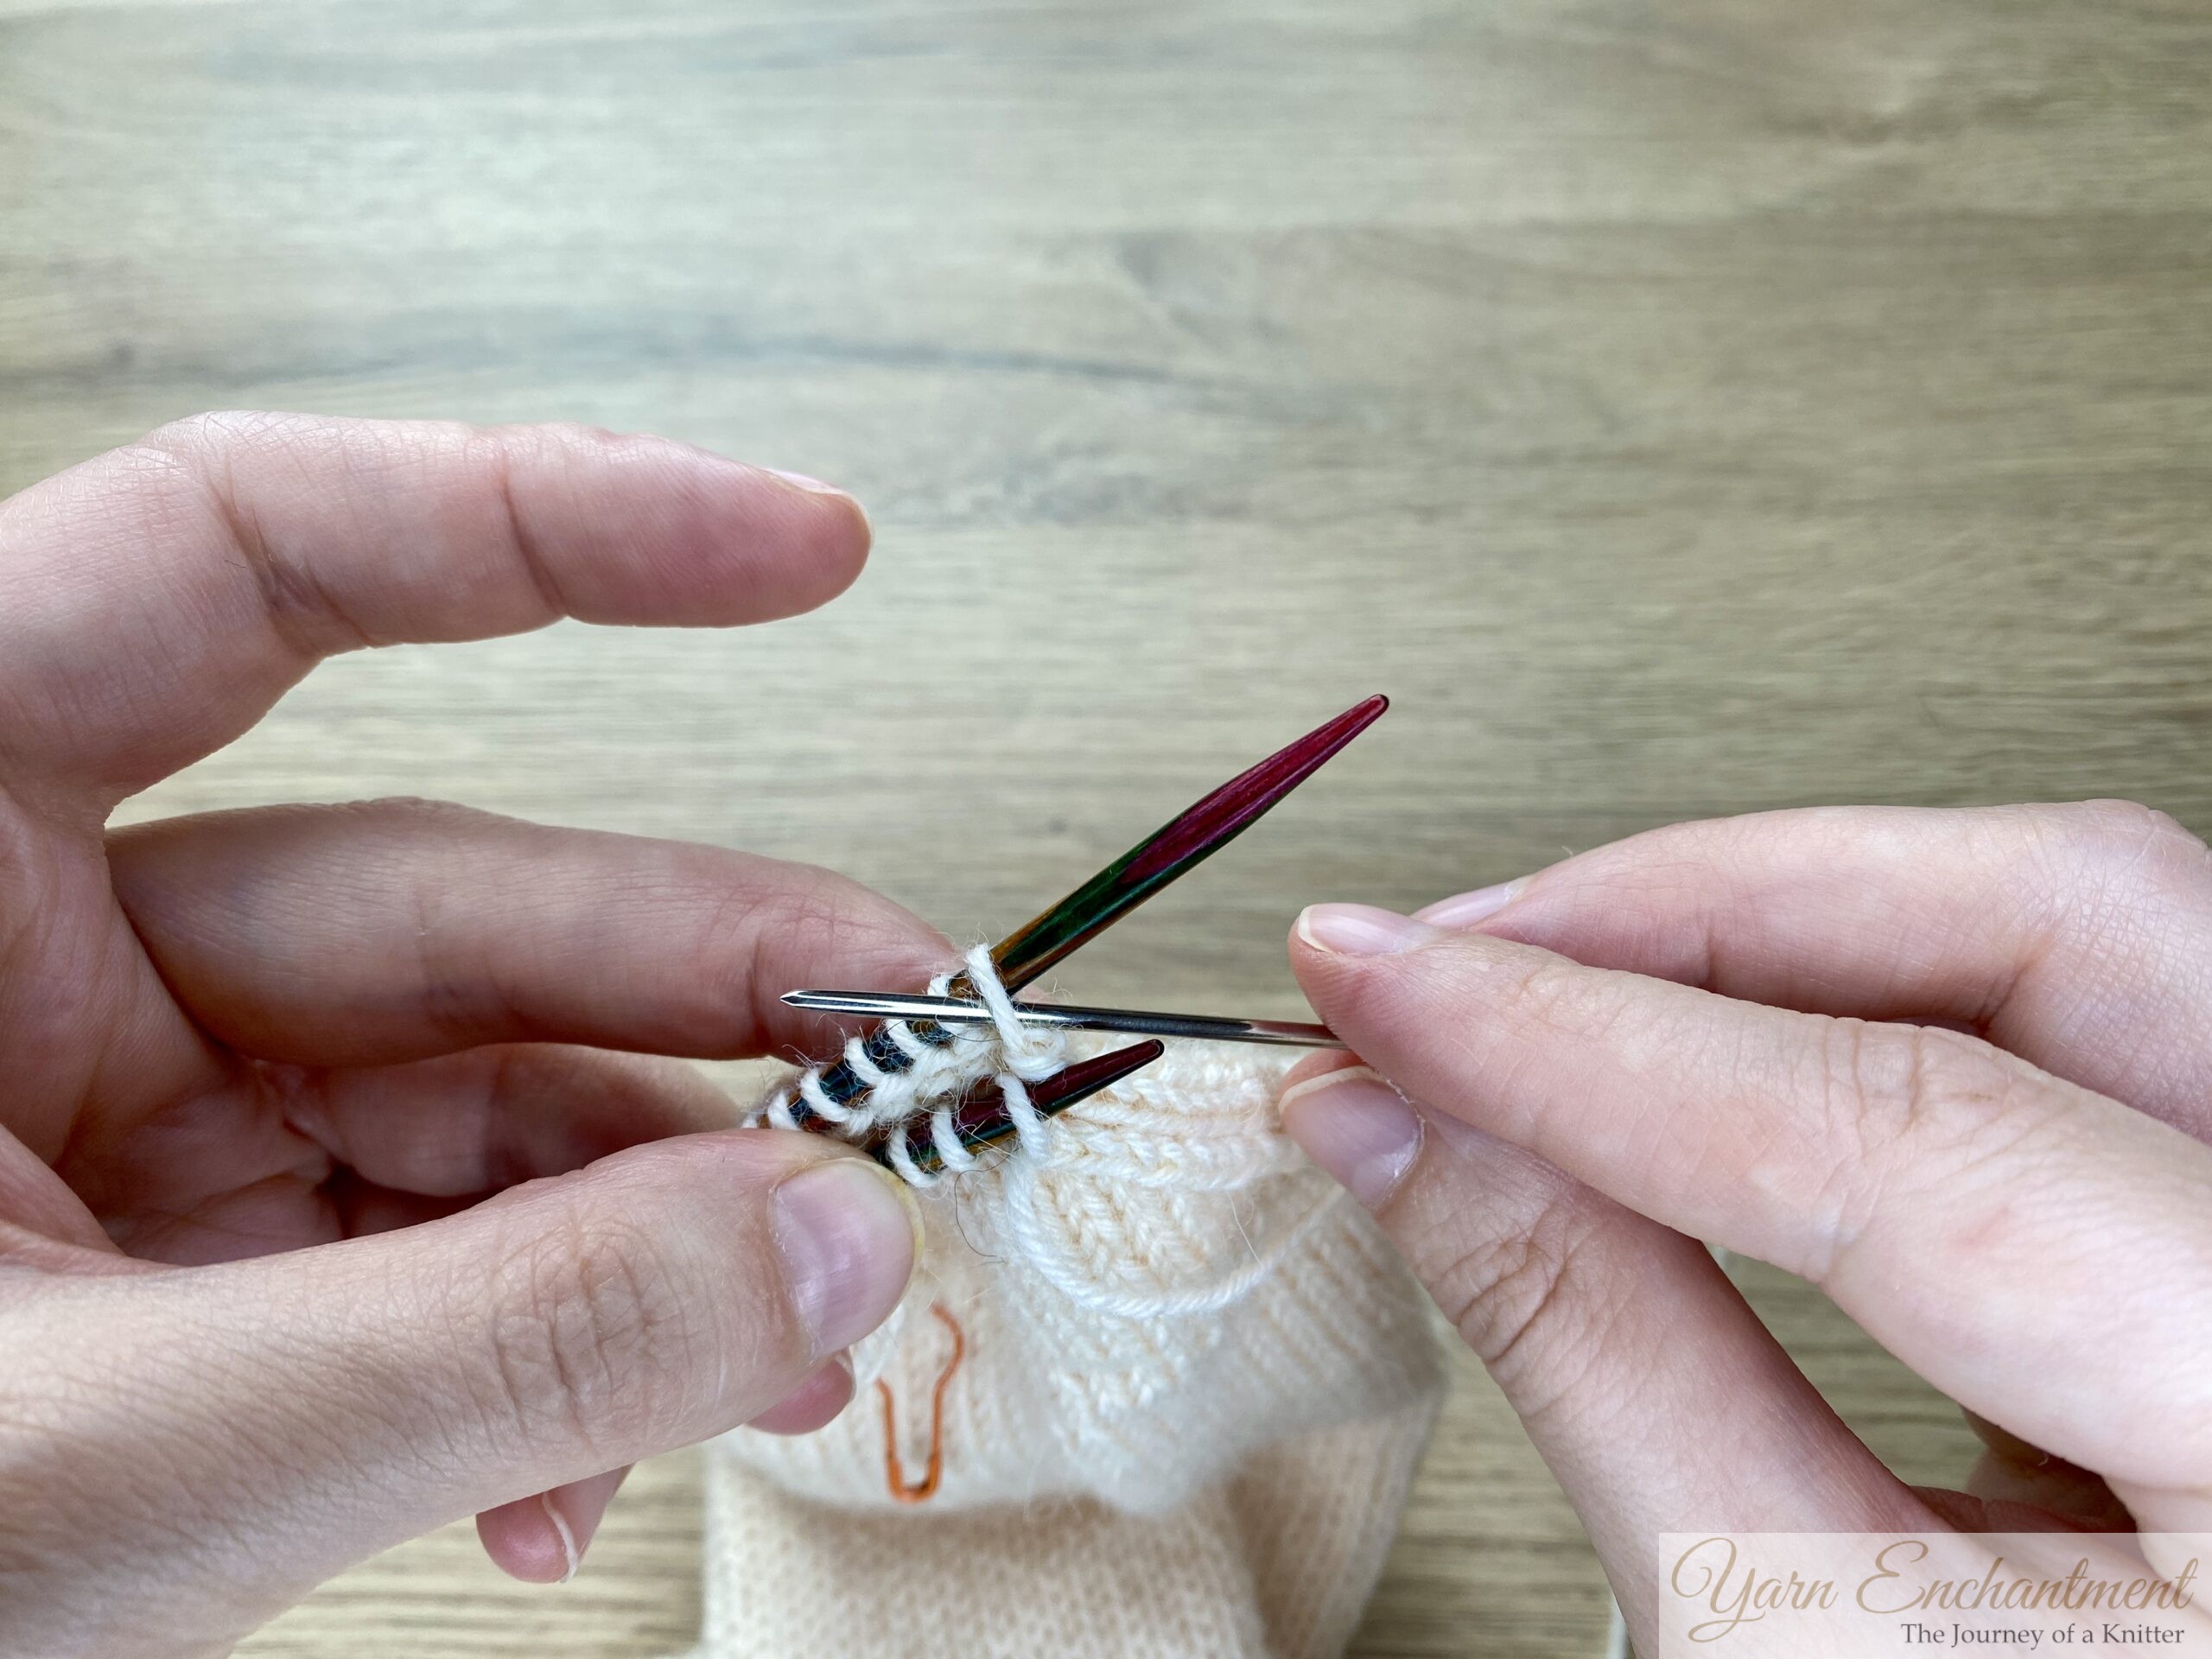 |  |  | Insert the tapestry needle through the first stitch on the back needle as if to purl. | Pull the yarn through and slip this stitch off the needle. | Insert the tapestry needle through the next stitch on the back needle as if to knit. Pull the yarn through, but leave this stitch on the needle. |


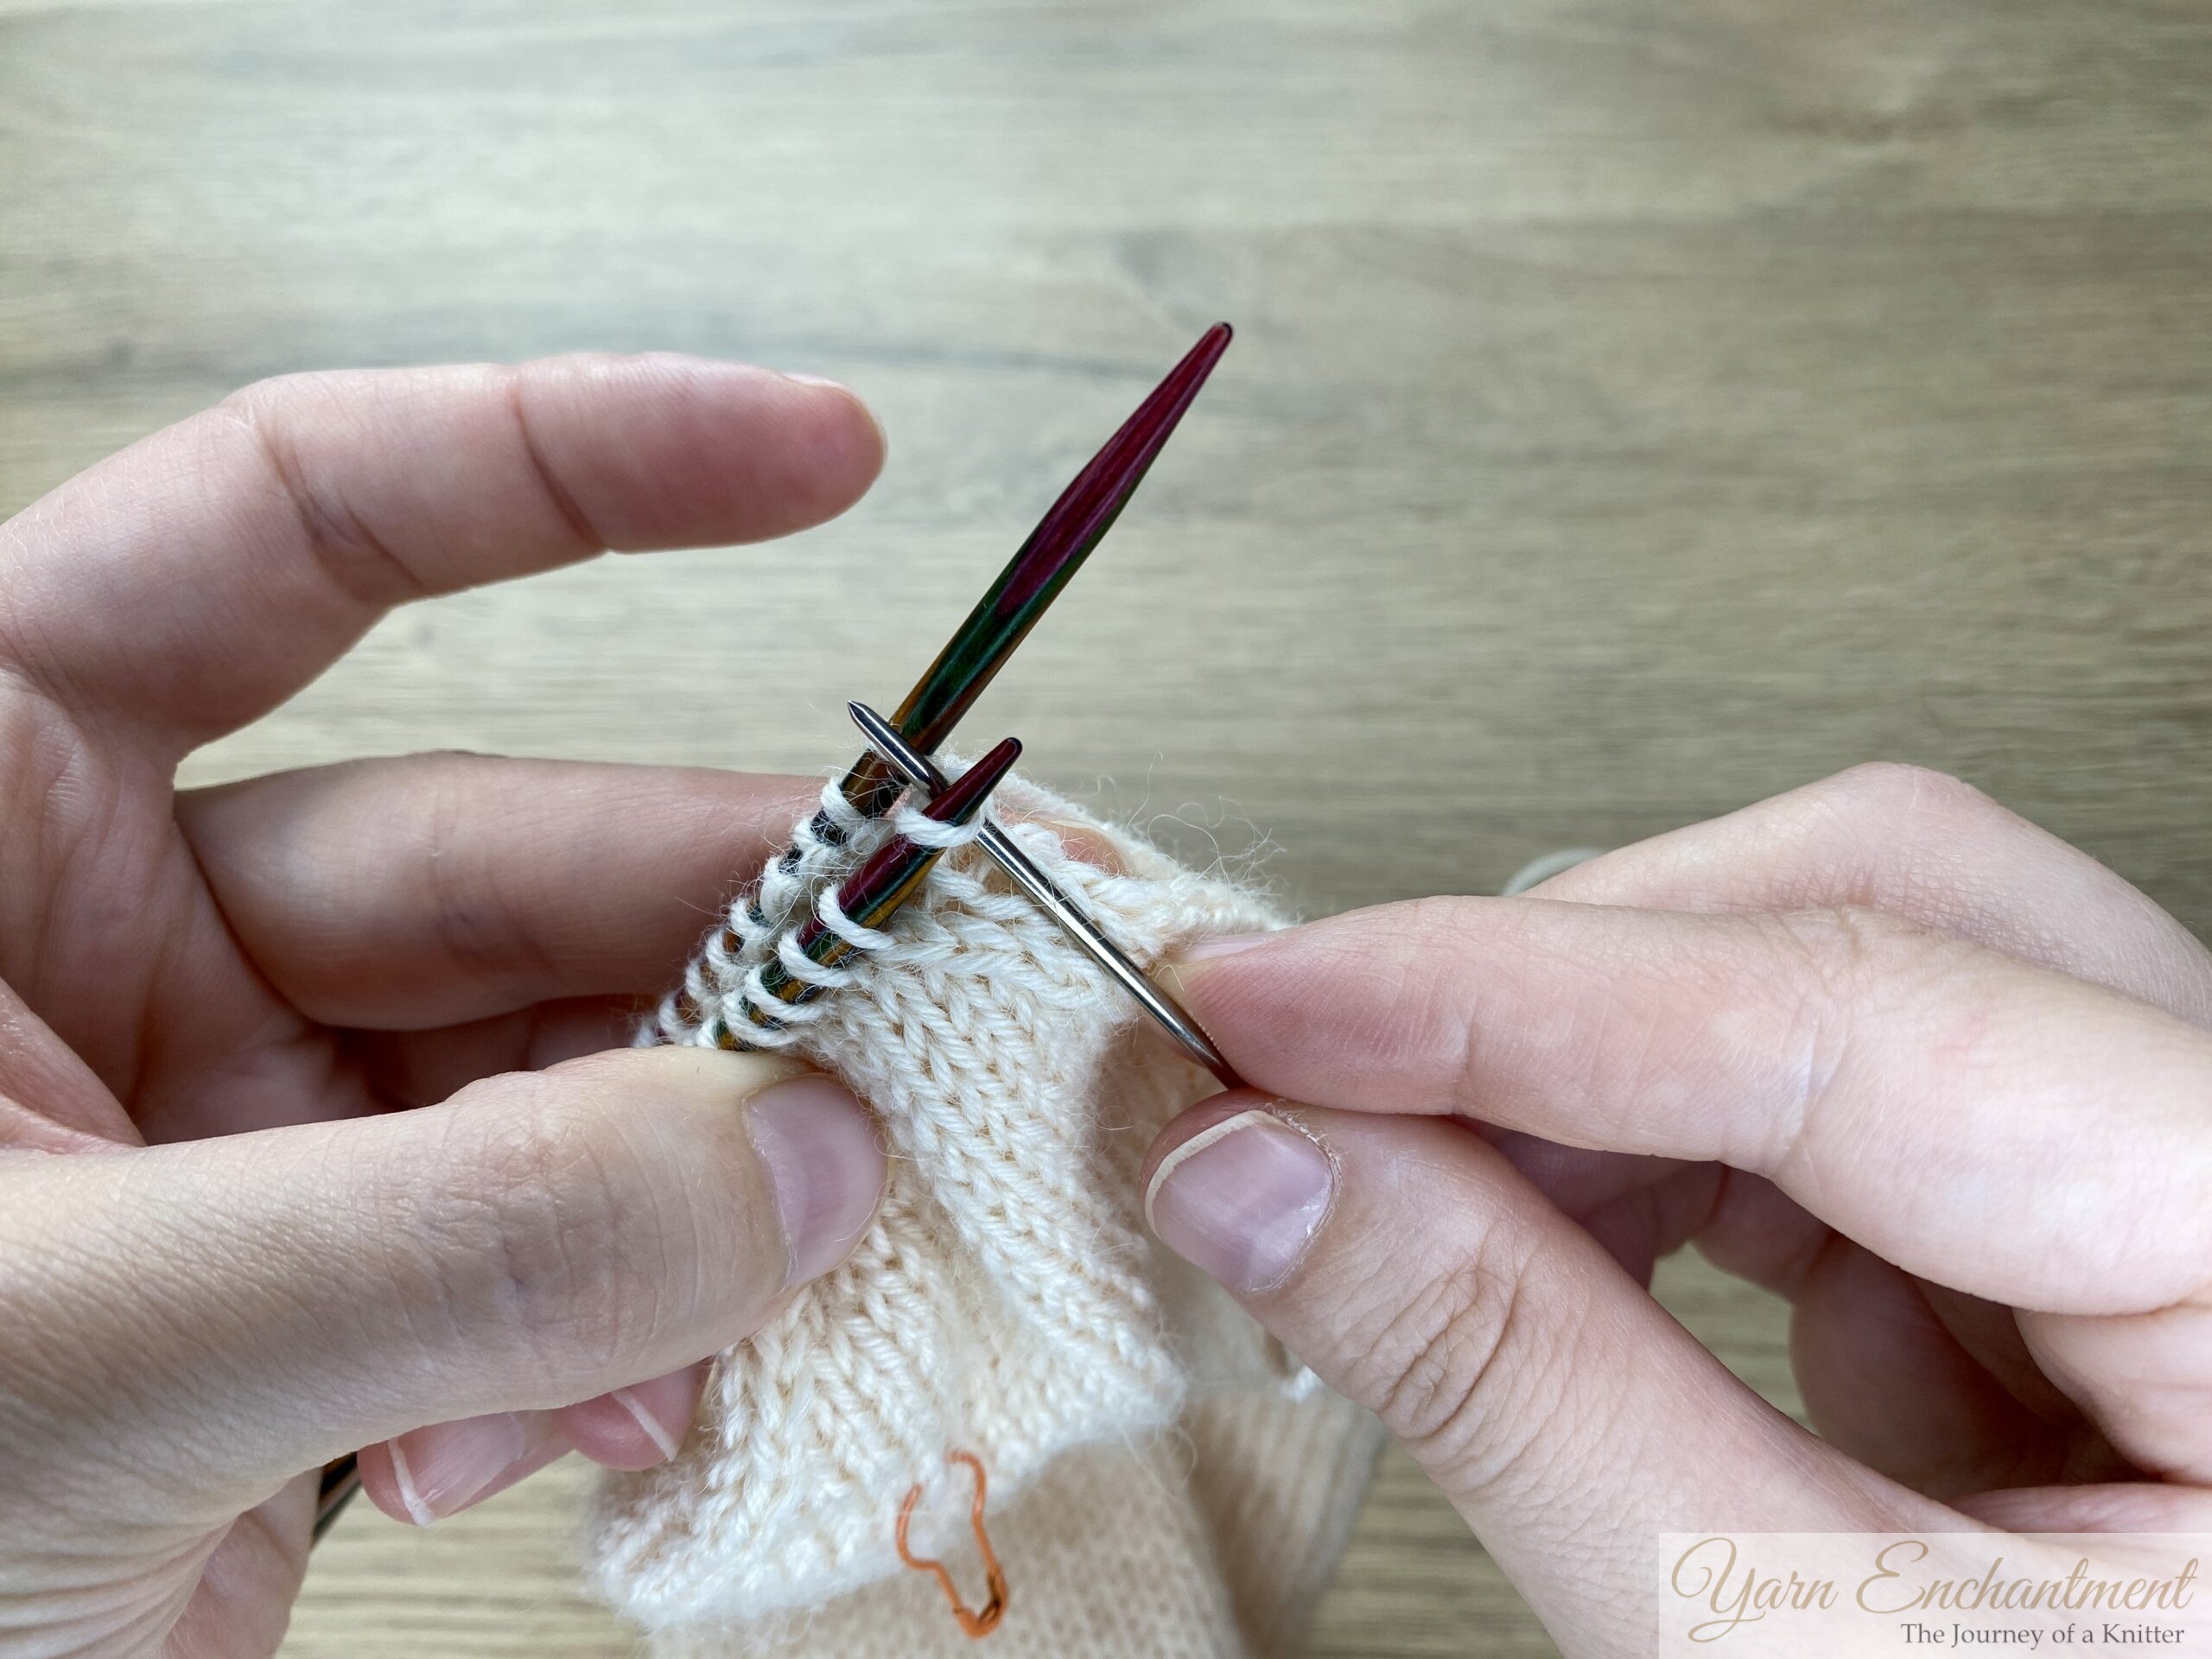
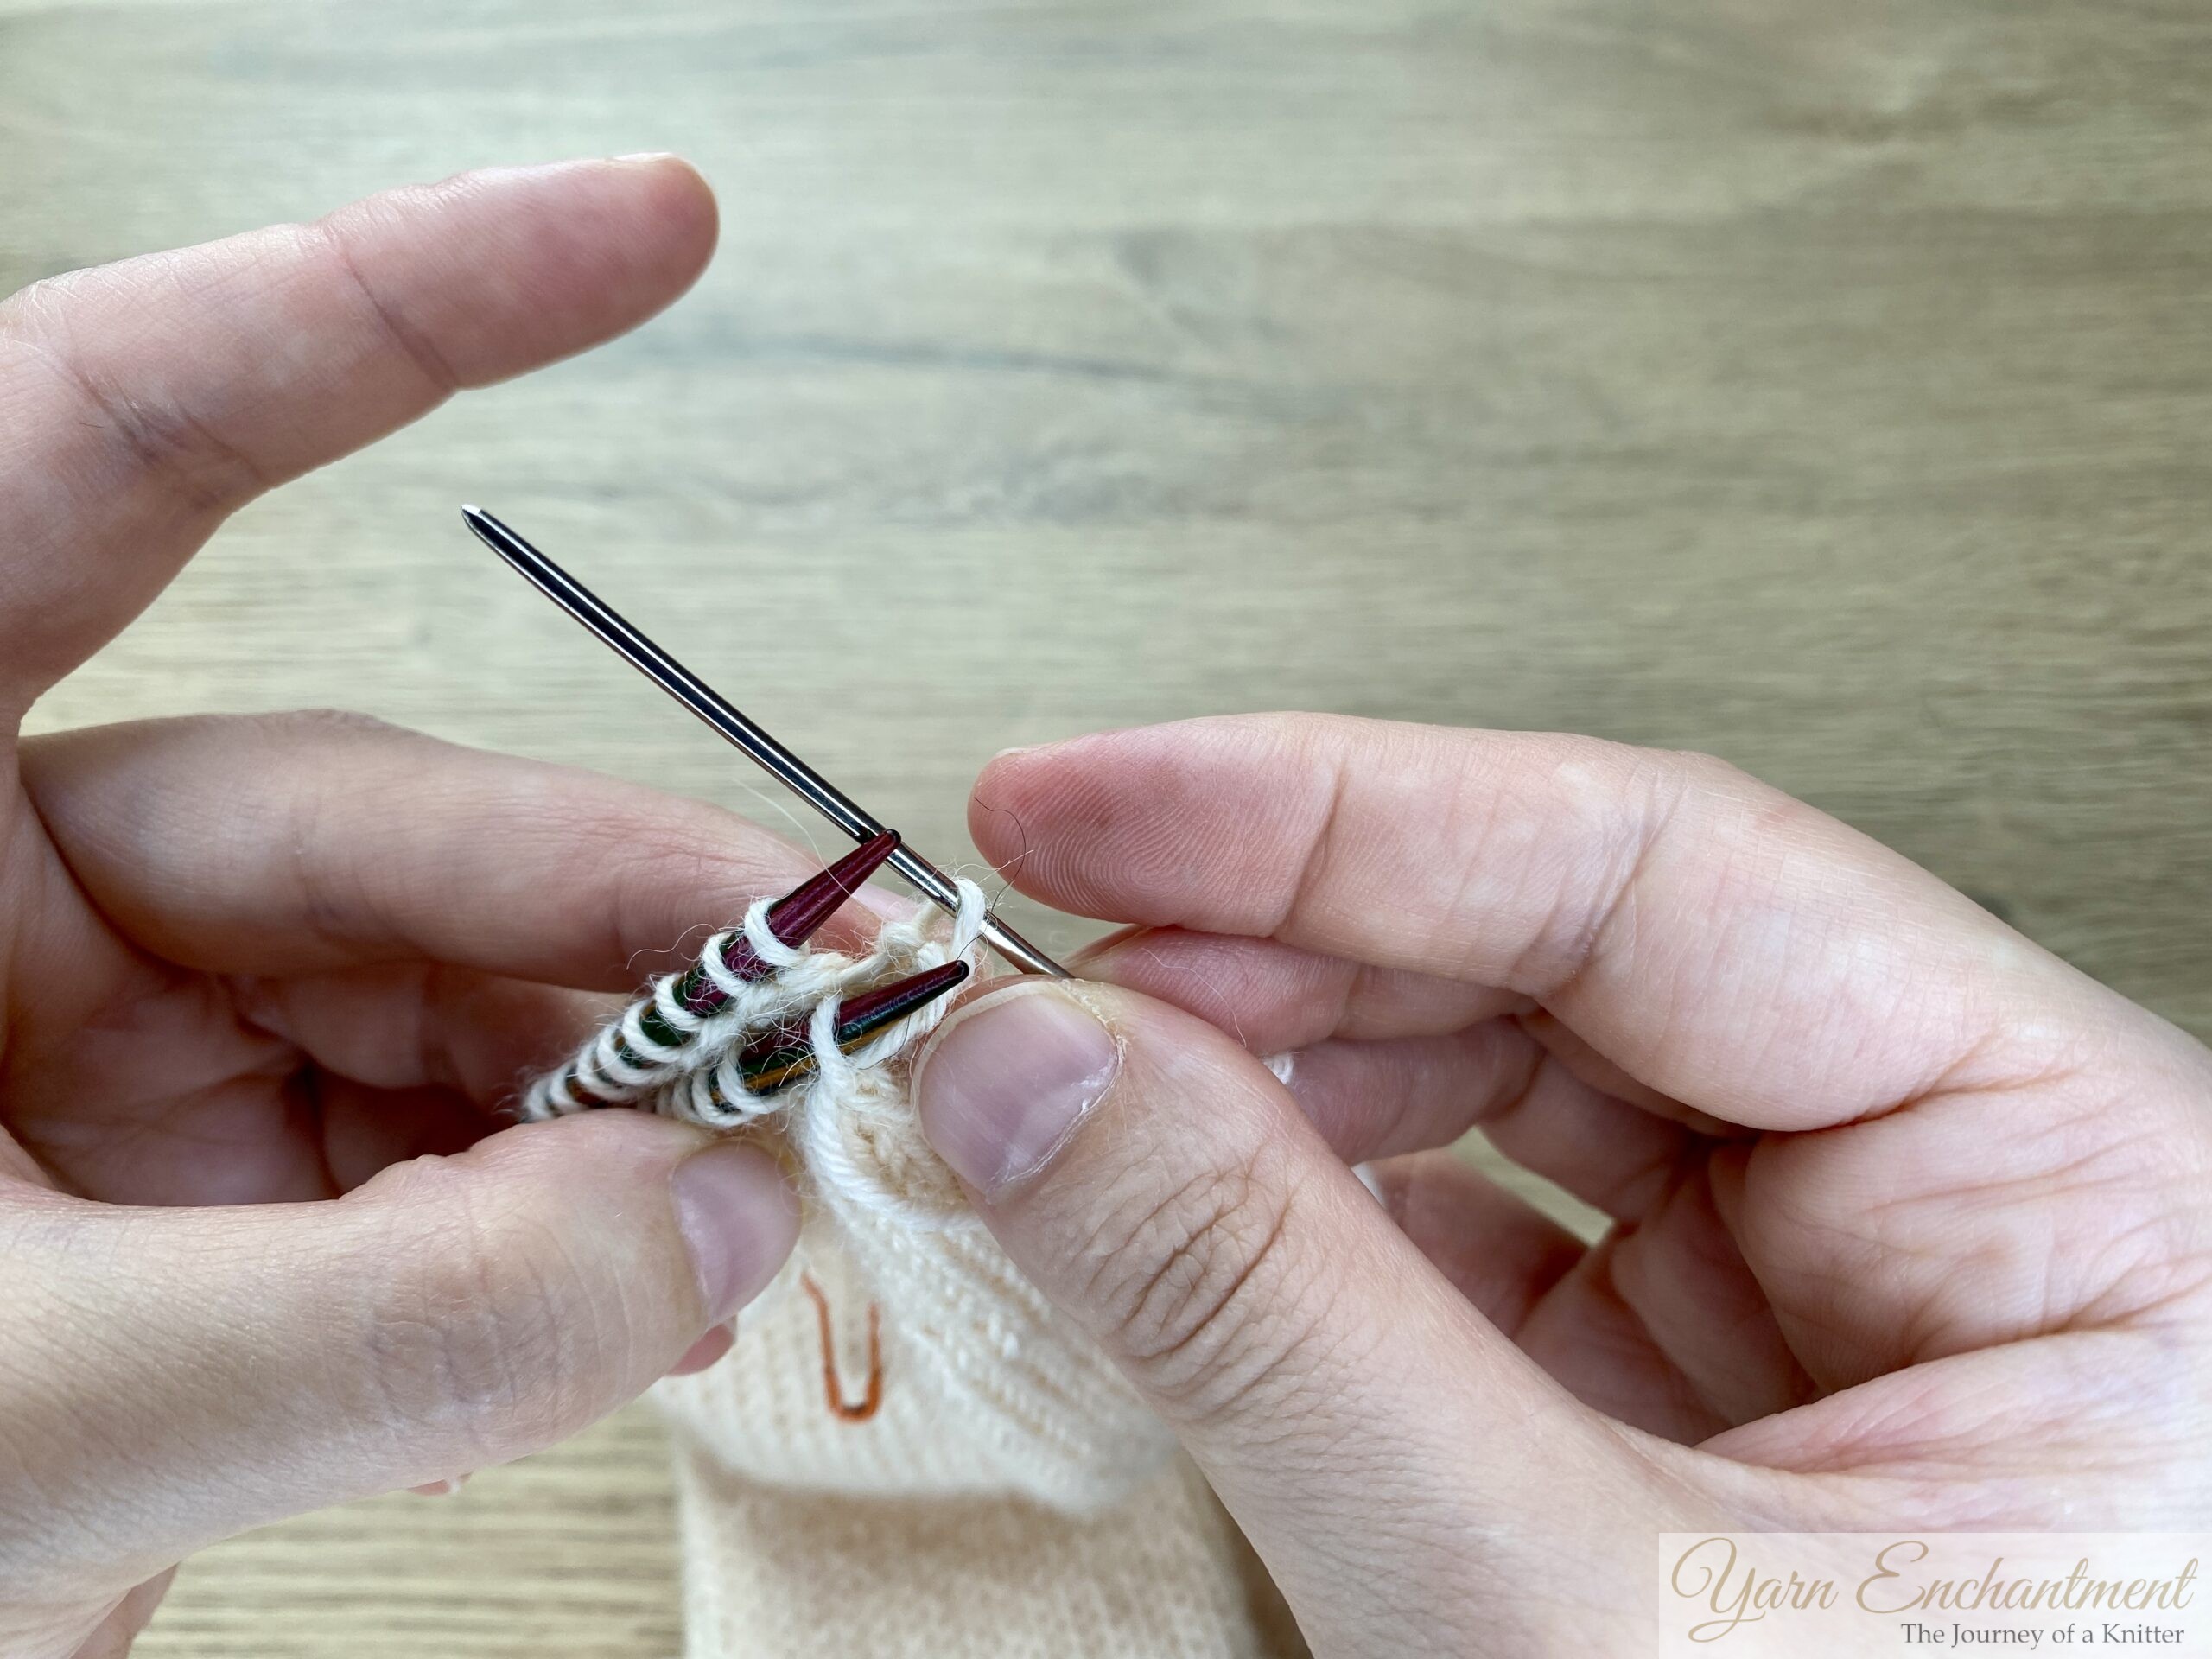
Continue repeating steps 1 - 4 until all stitches have been worked. There will be one stitch left on each needle; finish with steps 1 and 3 one last time to remove the last two stitches.
 |  | Insert the tapestry needle through the last stitch on the front needle as if to knit, slip this stitch off the needle. | Insert the tapestry needle through the last stitch on the back needle as if to purl, slip this stitch off the needle. |


Step 4. Finishing Up
- Weave in the yarn tail securely inside the sock toe.
Note: Thread your yarn onto a sharp sewing needle. This makes it much easier to secure the yarn ends, especially when using slippery yarns, nothing will slip out because the sharp tip lets you split the yarn strands as you weave in the tail. Splitting the yarn with a sharp needle helps anchor the tail securely because it catches individual fibers or plies inside the knitted fabric, rather than just passing through the spaces between stitches. This creates more friction and holds the tail in place, making it much less likely for the yarn end to work itself free over time, especially with smoother yarns.
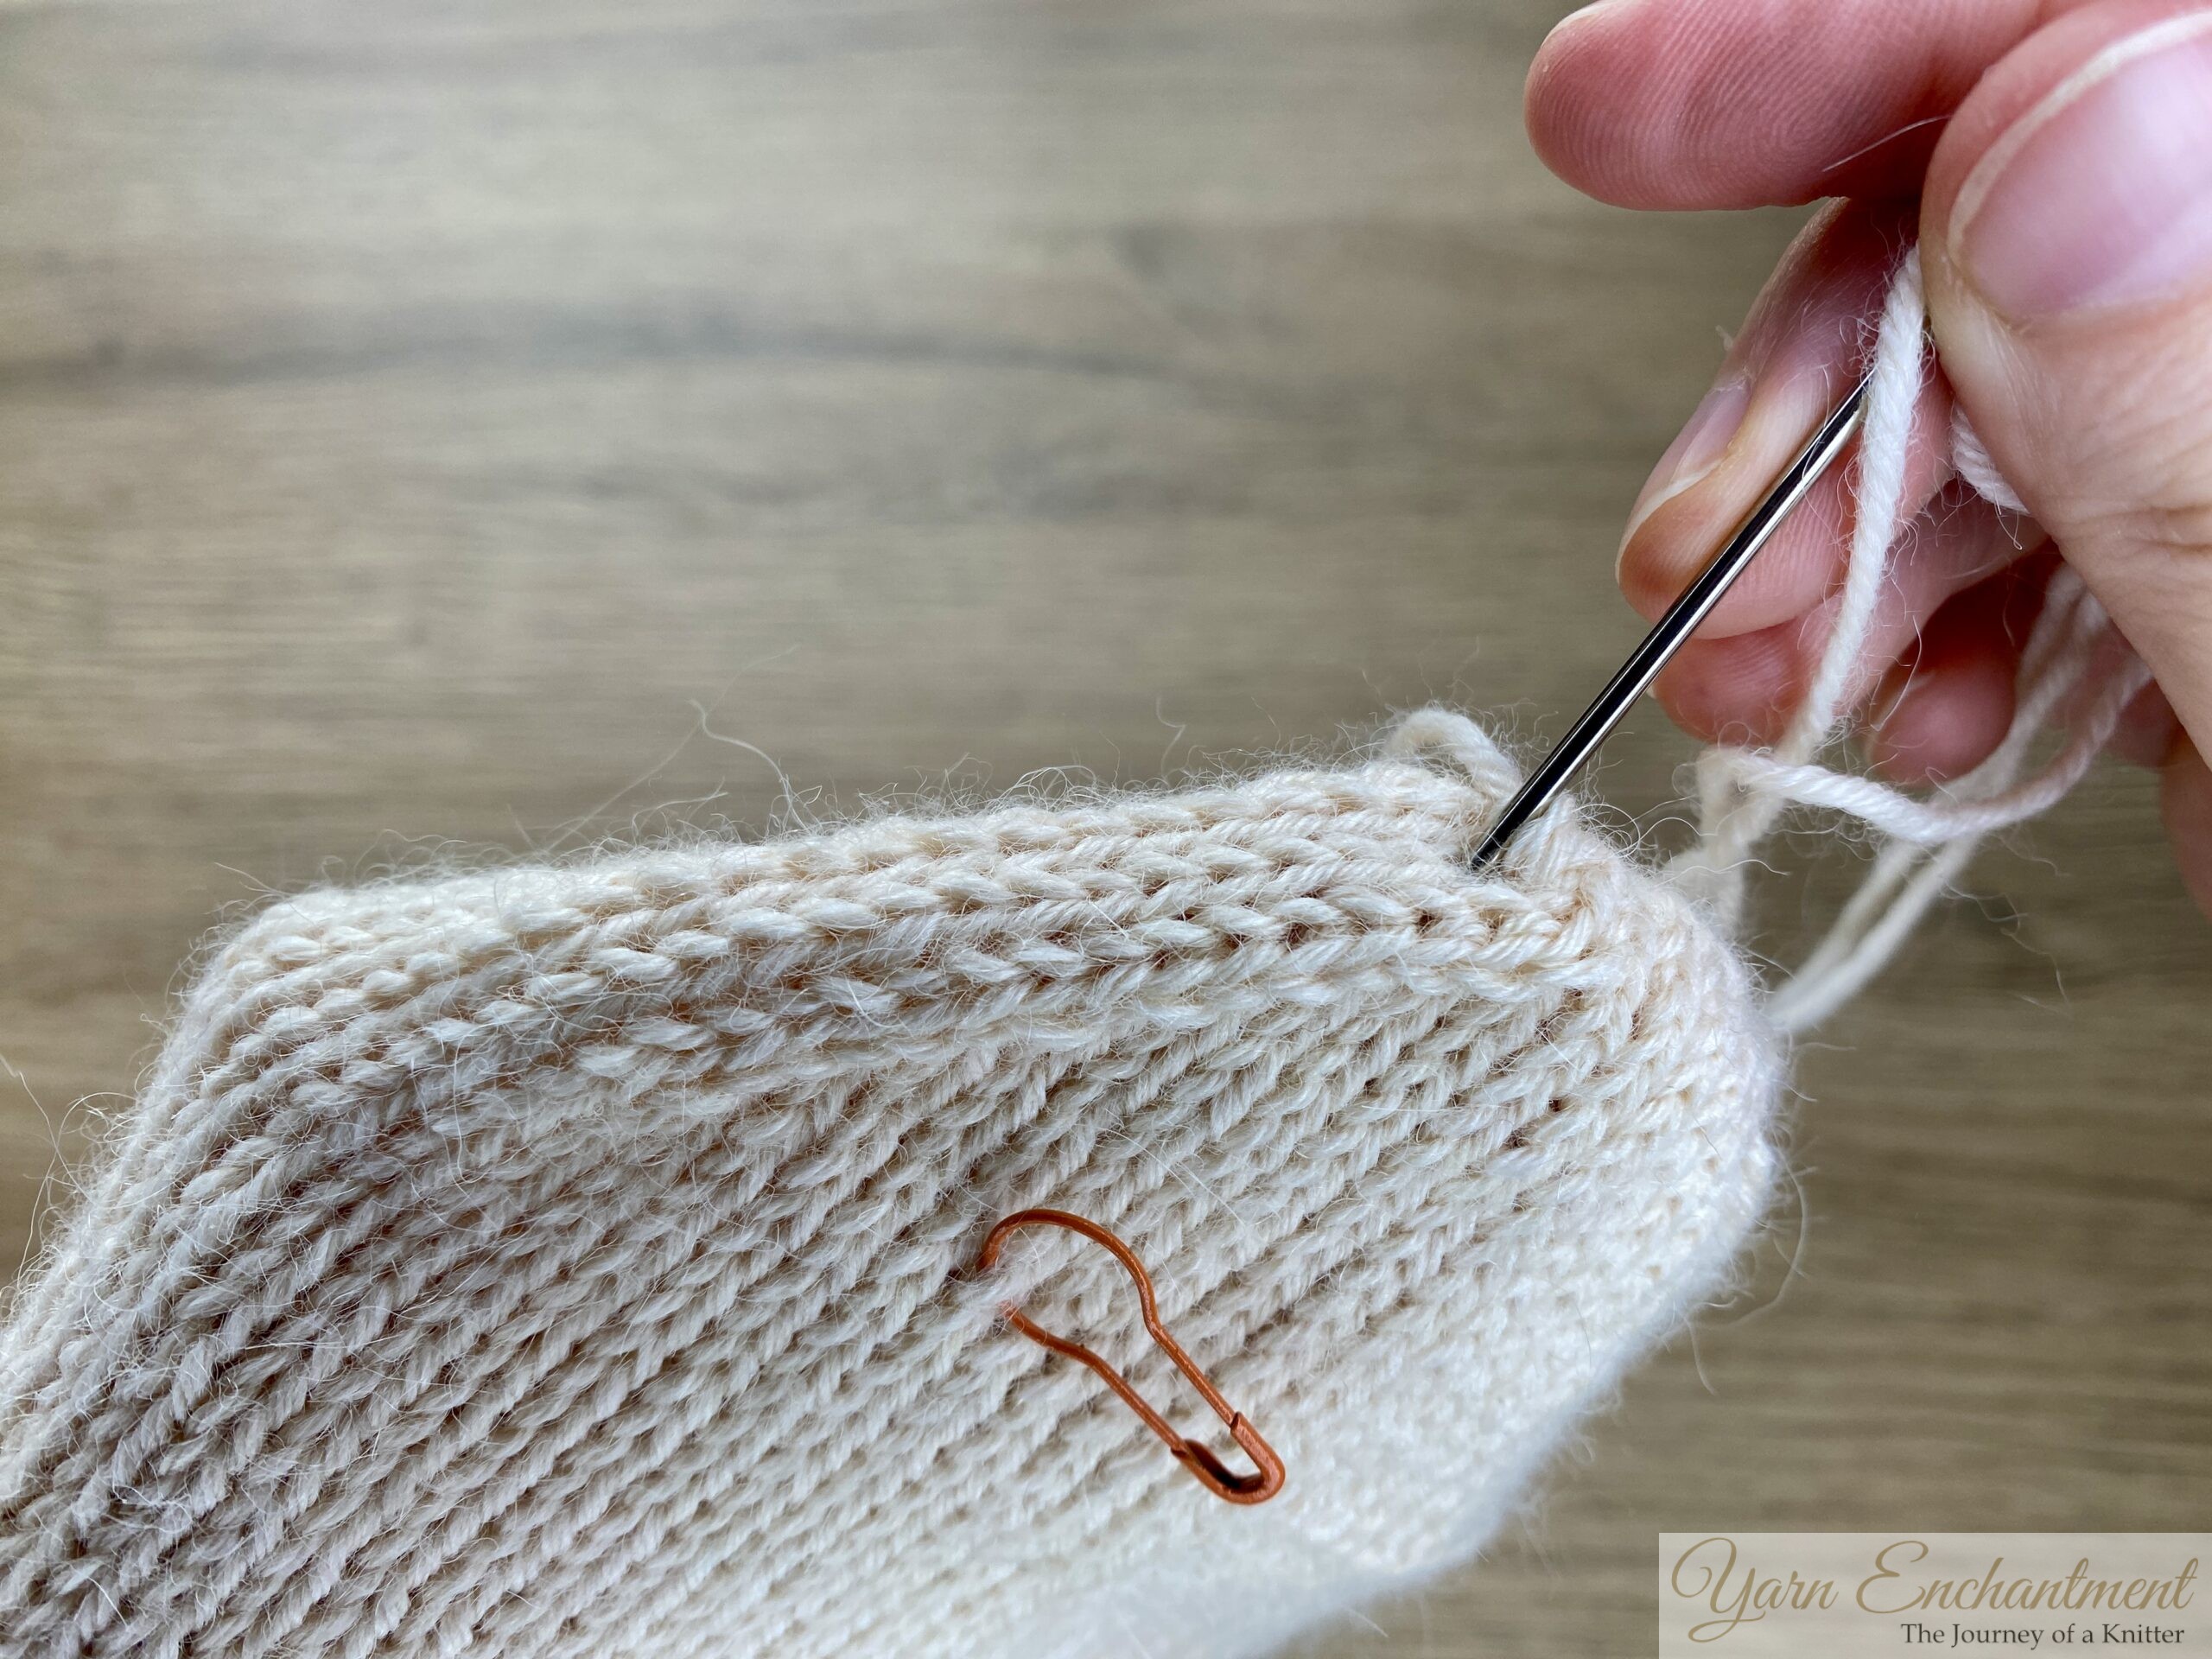 |  |  | Bring your yarn tail to the inside of your sock, and turn your sock around to the wrong side (switch from a blunt tapestry needle to a sharp sewing needle). | Using your sewing needle, weave the yarn through the small purl bumps on the wrong side, intentionally splitting the stitches to anchor the yarn securely. Work in one direction... | then reverse and sew back through the same area, catching both the yarn stitches and the tail you have already woven in. This back-and-forth motion helps lock the yarn in place and makes it less likely to come loose over time... |


This is how your work looks after closing your toe with the Kitchener Stitch and securing the yarn ends, both from the right side and from the wrong side.
 | 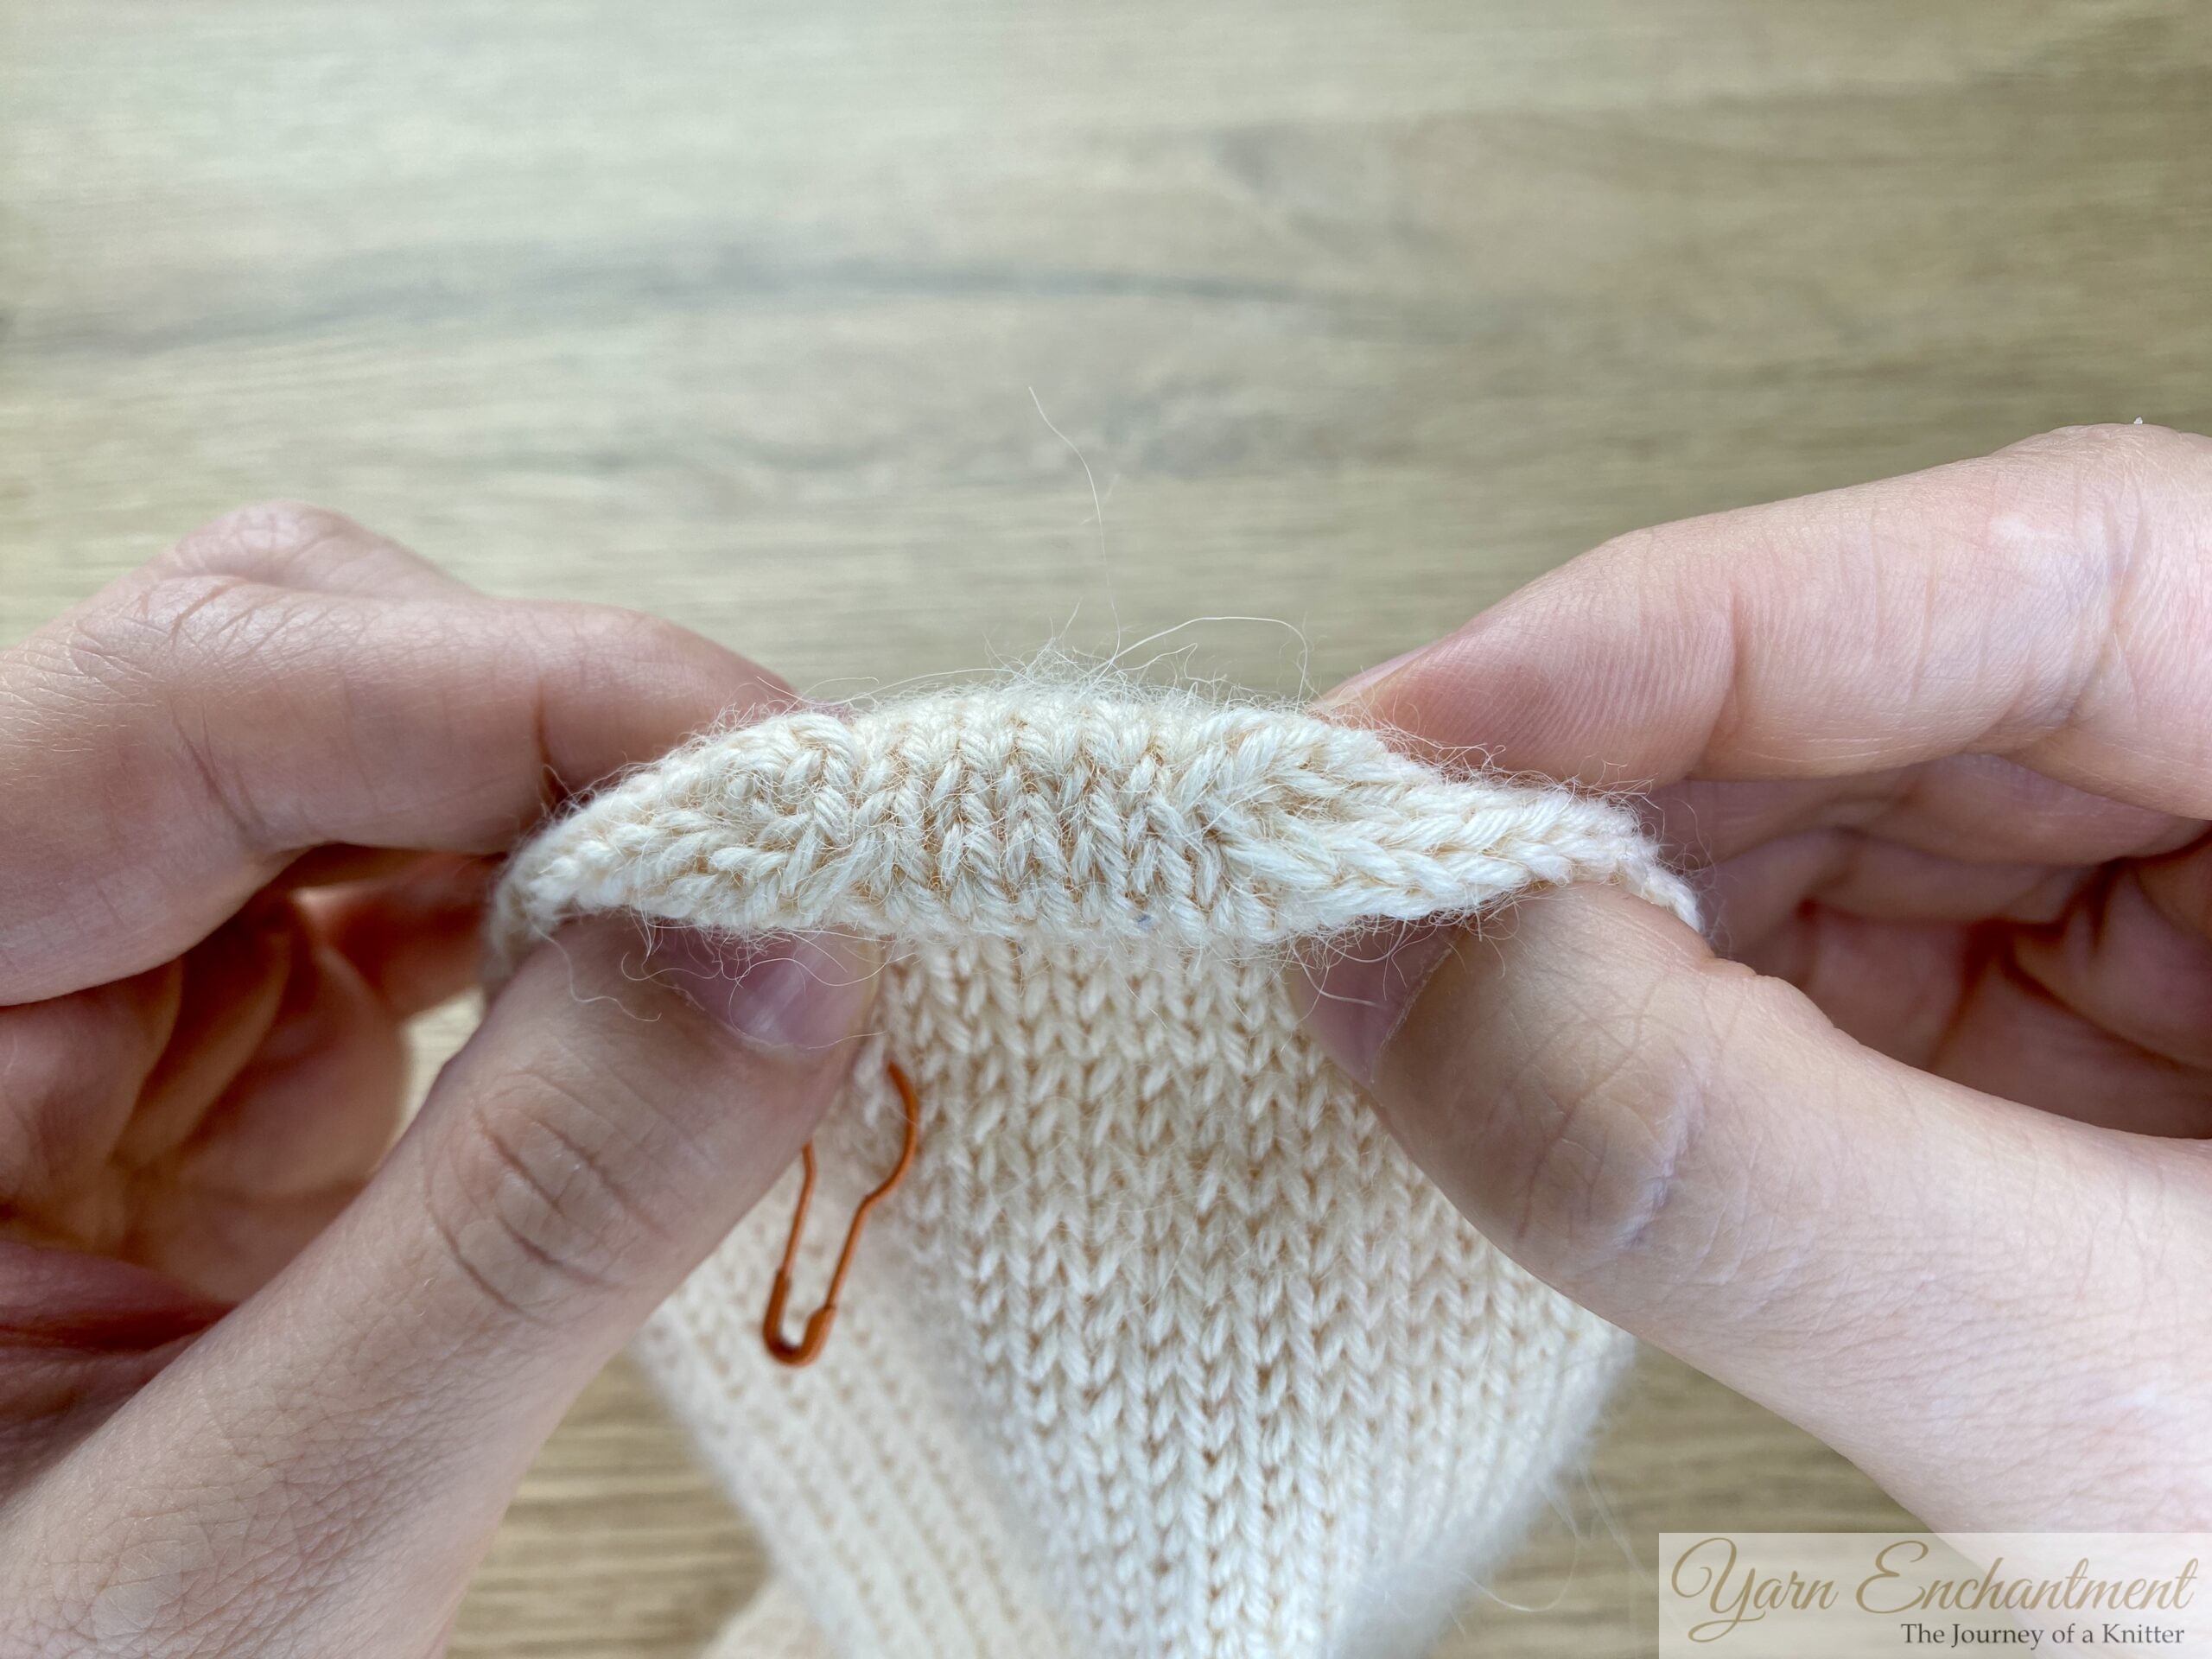 |  | The wrong side | And here’s the finished toe after the Kitchener stitch - neat, and comfortably! | These are the finished decreases of the wedge toe - all the shaping is done, and now the sock has a lovely, tidy tip that’s ready for those first steps. |


Joining the Cuff Gap: Sewing Steps
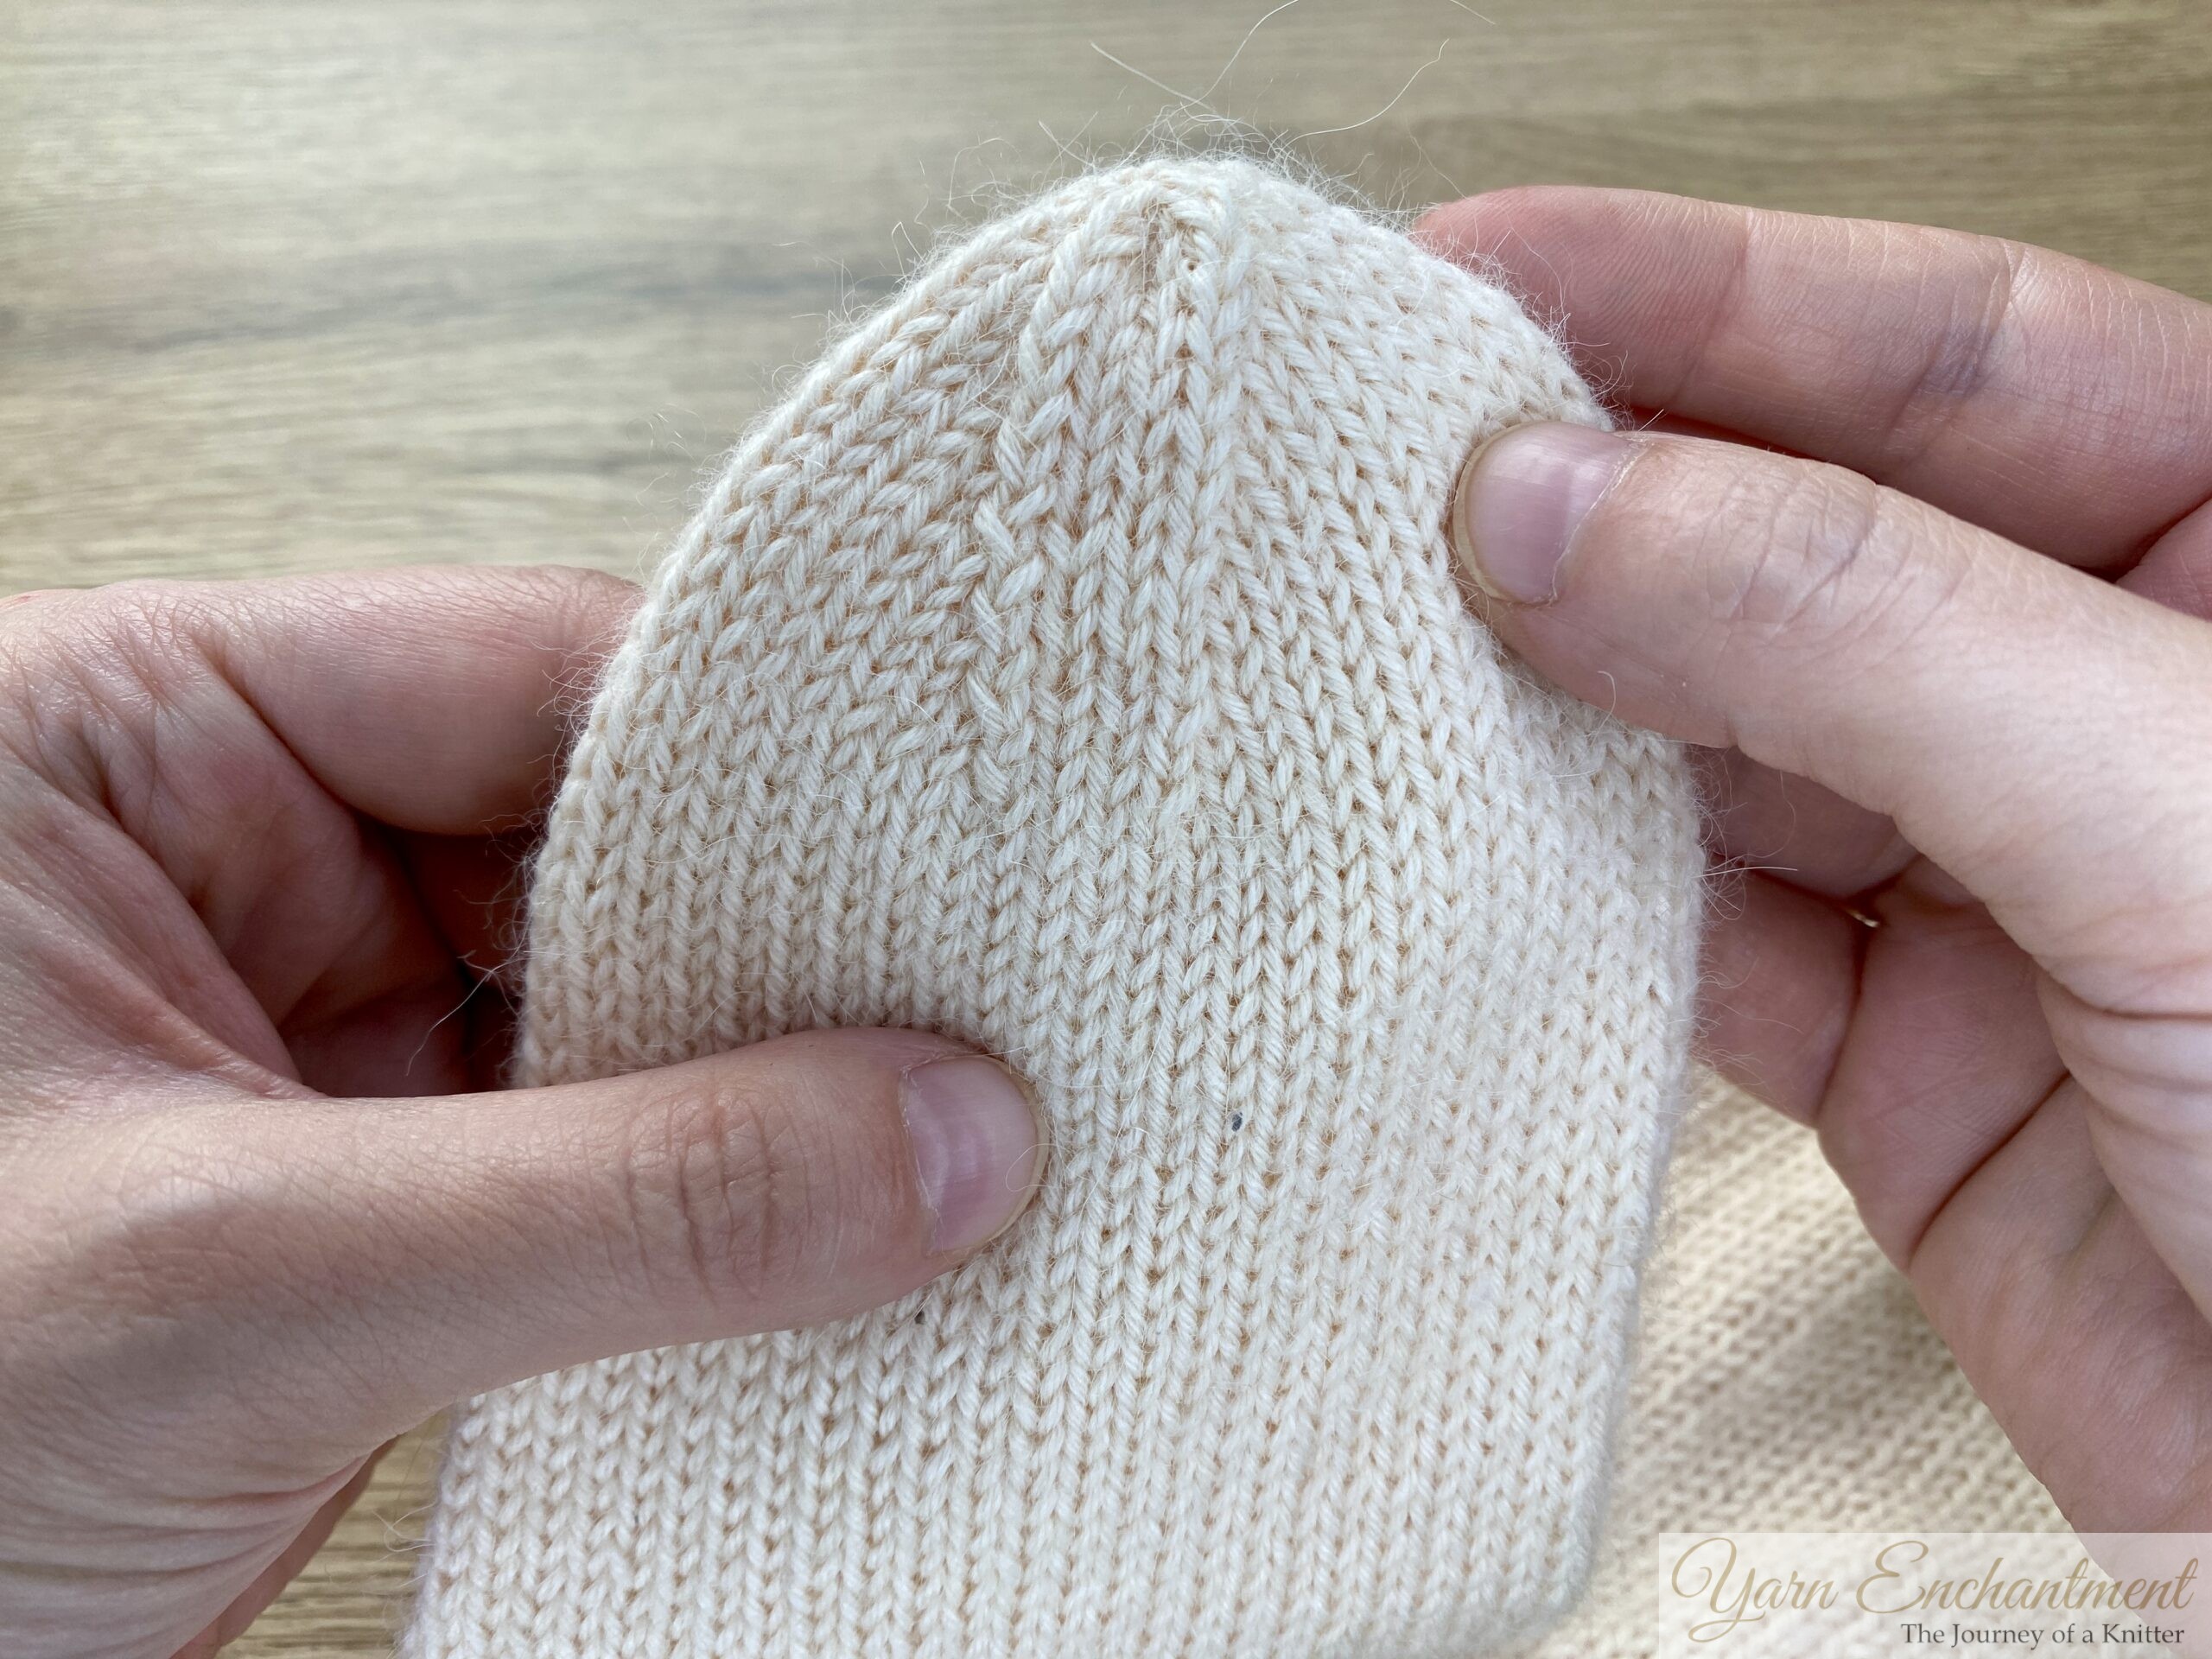
There’s still a small gap at the cuff of your sock. After closing your cuff to the round, let’s finish by closing this gap together.
-
To sew the gap neatly, thread your yarn tail onto a sharp sewing needle.
-
When sewing the gap closed, make sure the inside (wrong side) of your work is facing you.
-
Begin at one side of the gap and bring your thread from left to right, picking up the first stitch along the edge.
-
Next, reverse direction: bring the needle from right to left, sewing back along the same gap, again carefully picking up the edge stitches
-
Finally, sew one last time from left to right to make sure the seam is snug and the gap is fully closed.
-
To finish, weave the yarn tail back and forth through the ribbing stitches to anchor it securely. This will keep the seam tidy, strong, and help prevent it from unraveling over time.
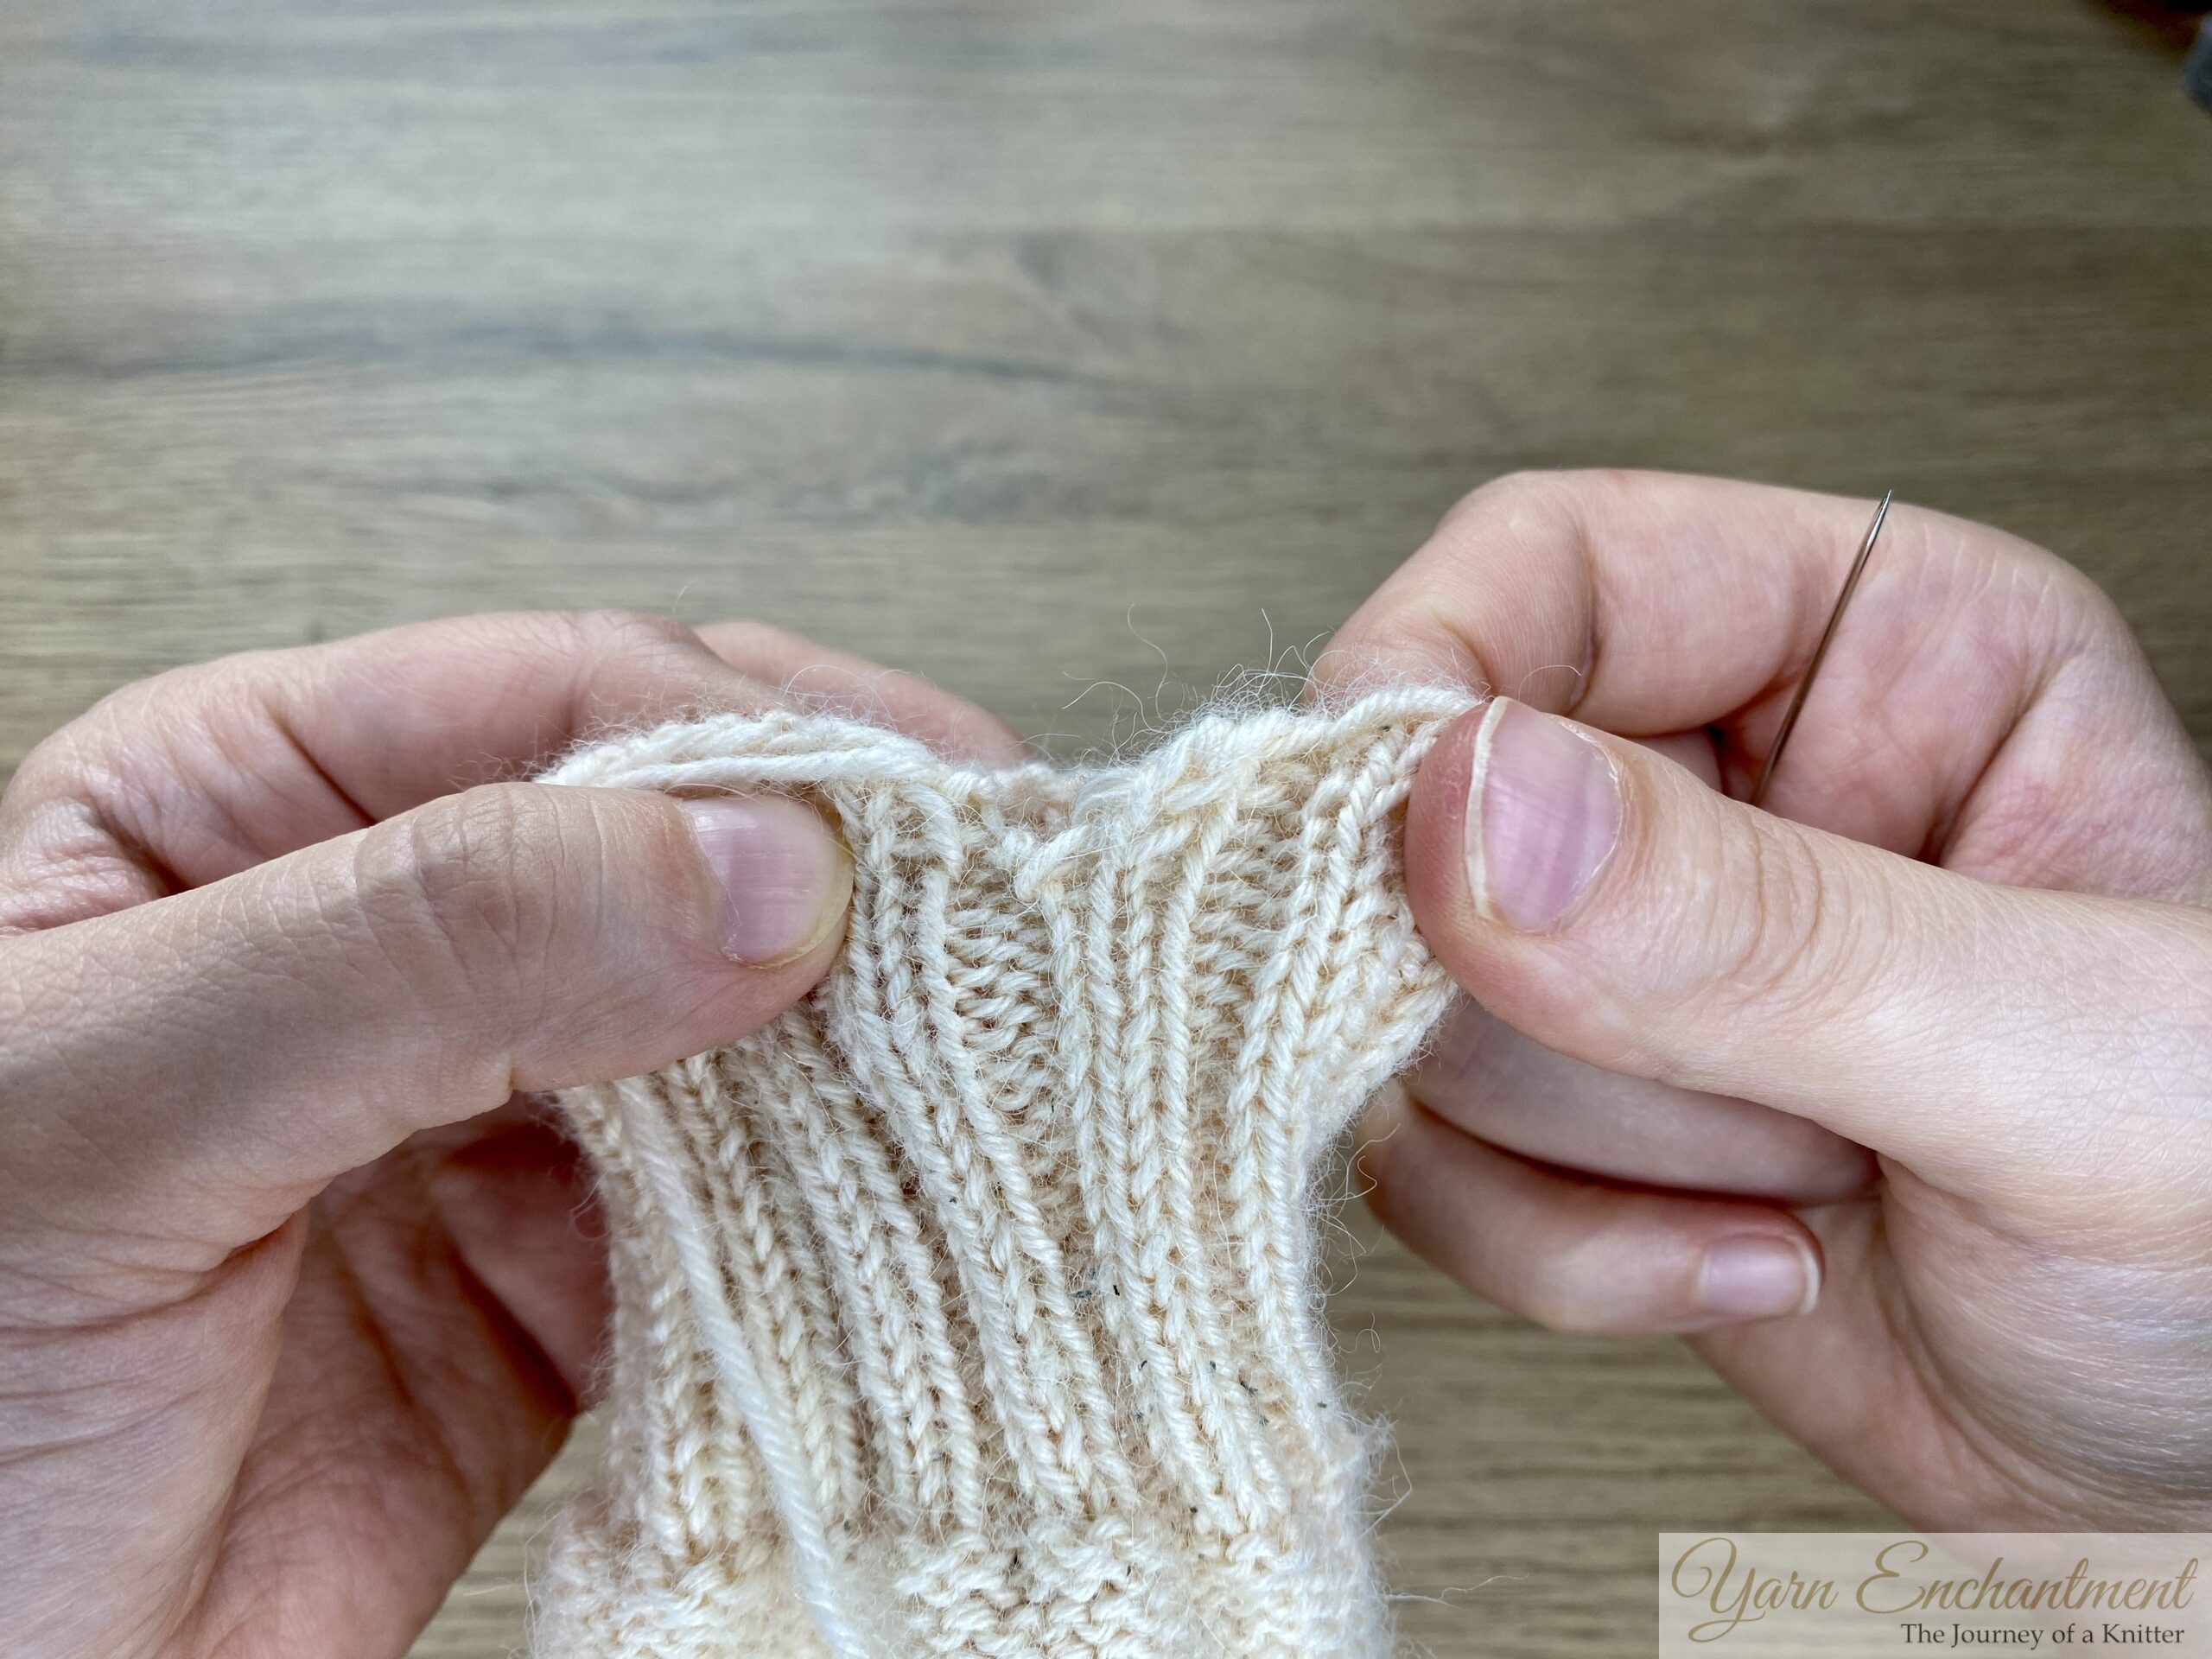 | 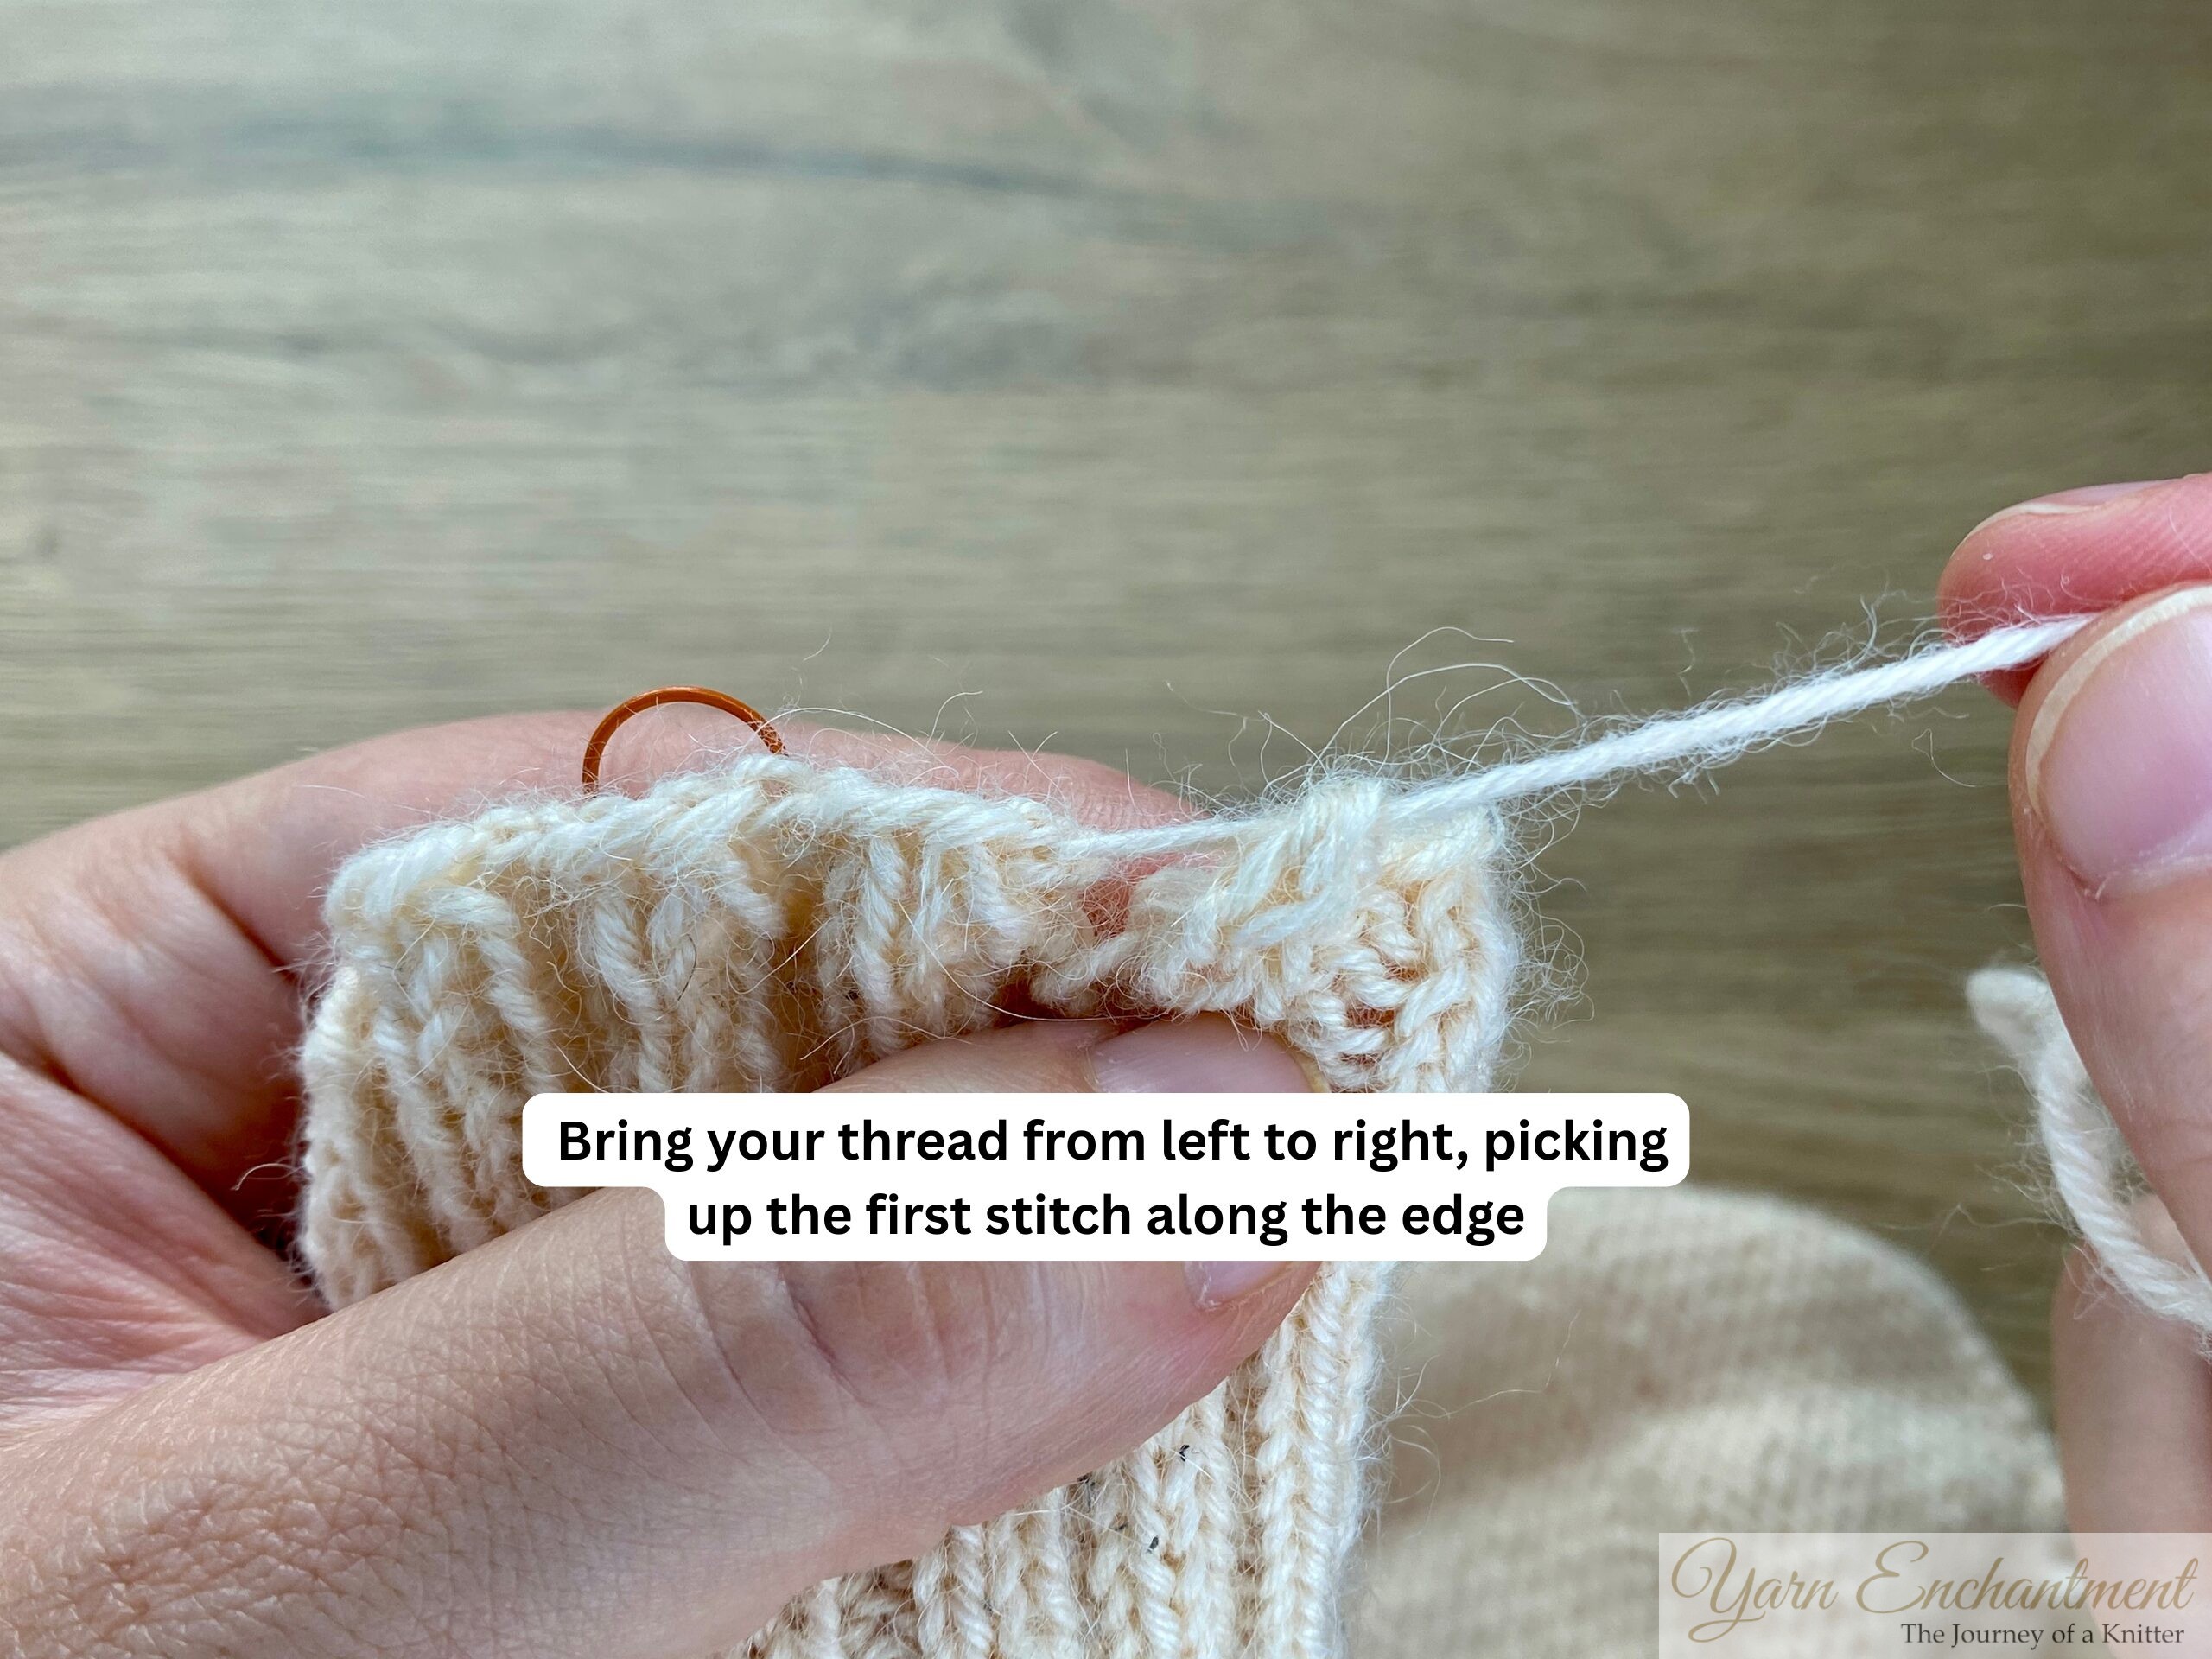 | 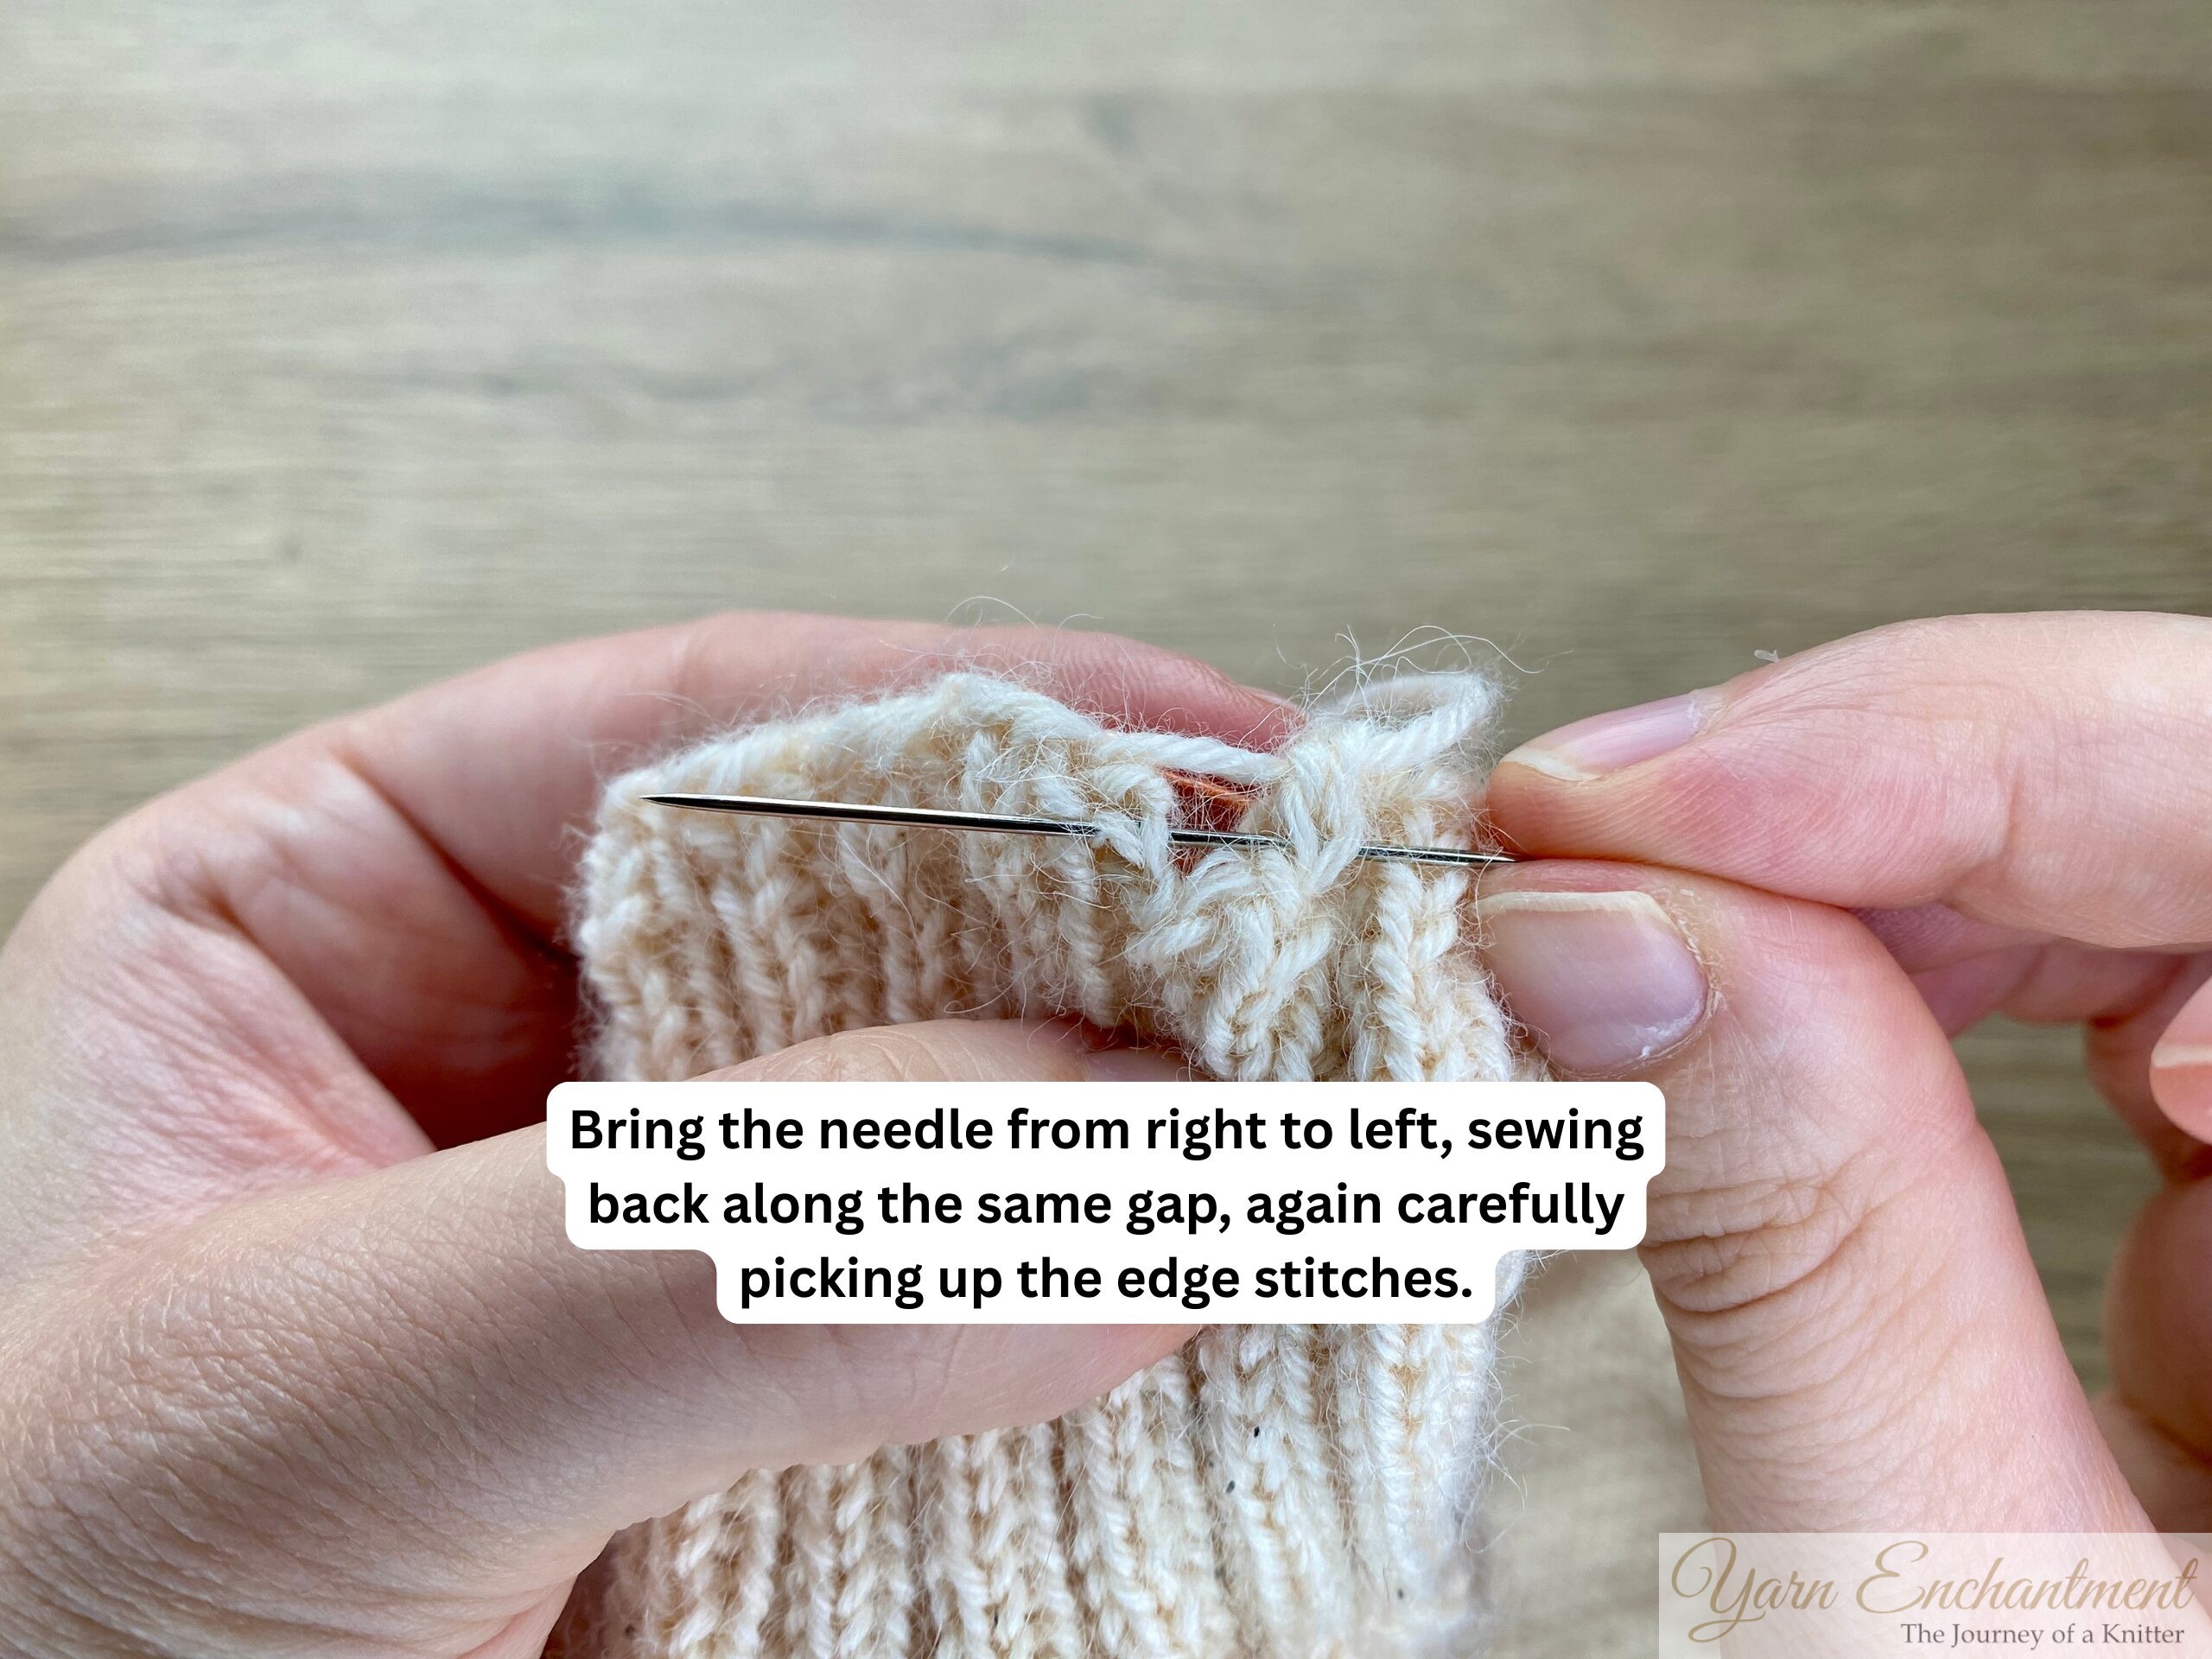 | To sew the gap neatly, thread your yarn tail onto a sharp sewing needle. When sewing the gap closed, make sure the inside (wrong side) of your work is facing you. | Begin at one side of the gap and bring your thread from left to right, picking up the first stitch along the edge. | Next, reverse direction: bring the needle from right to left, sewing back along the same gap, again carefully picking up the edge stitches |


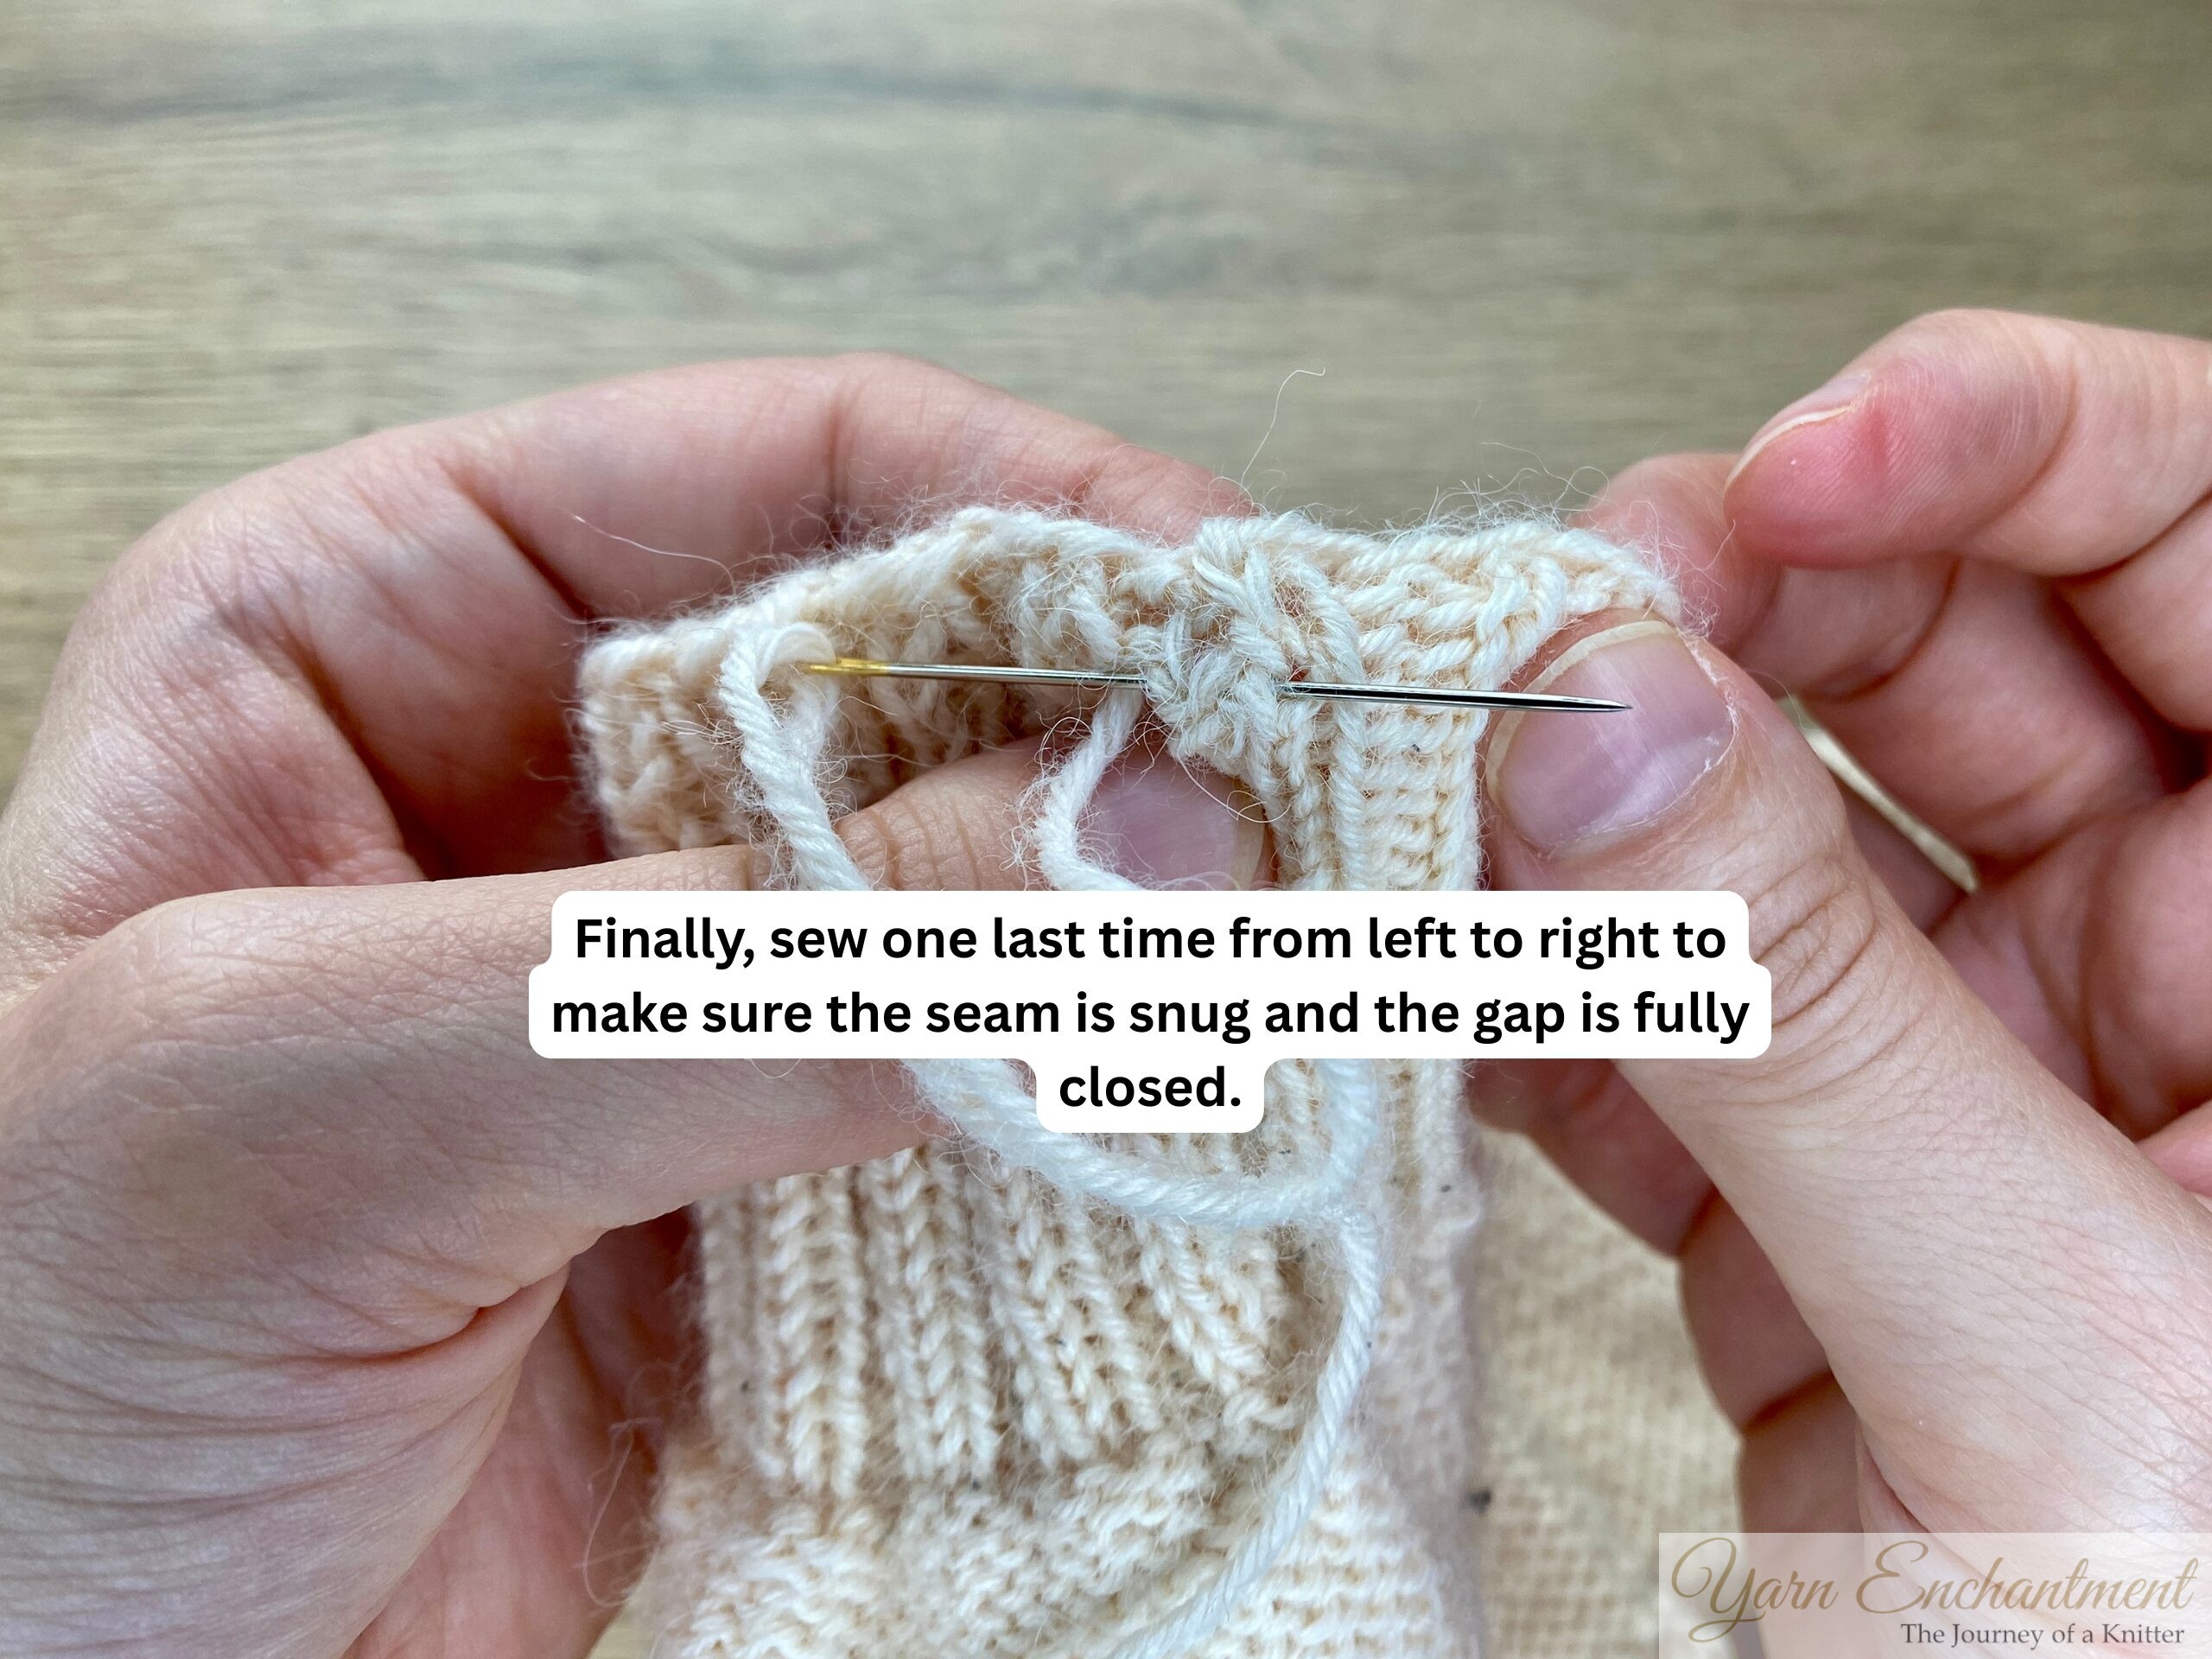 | 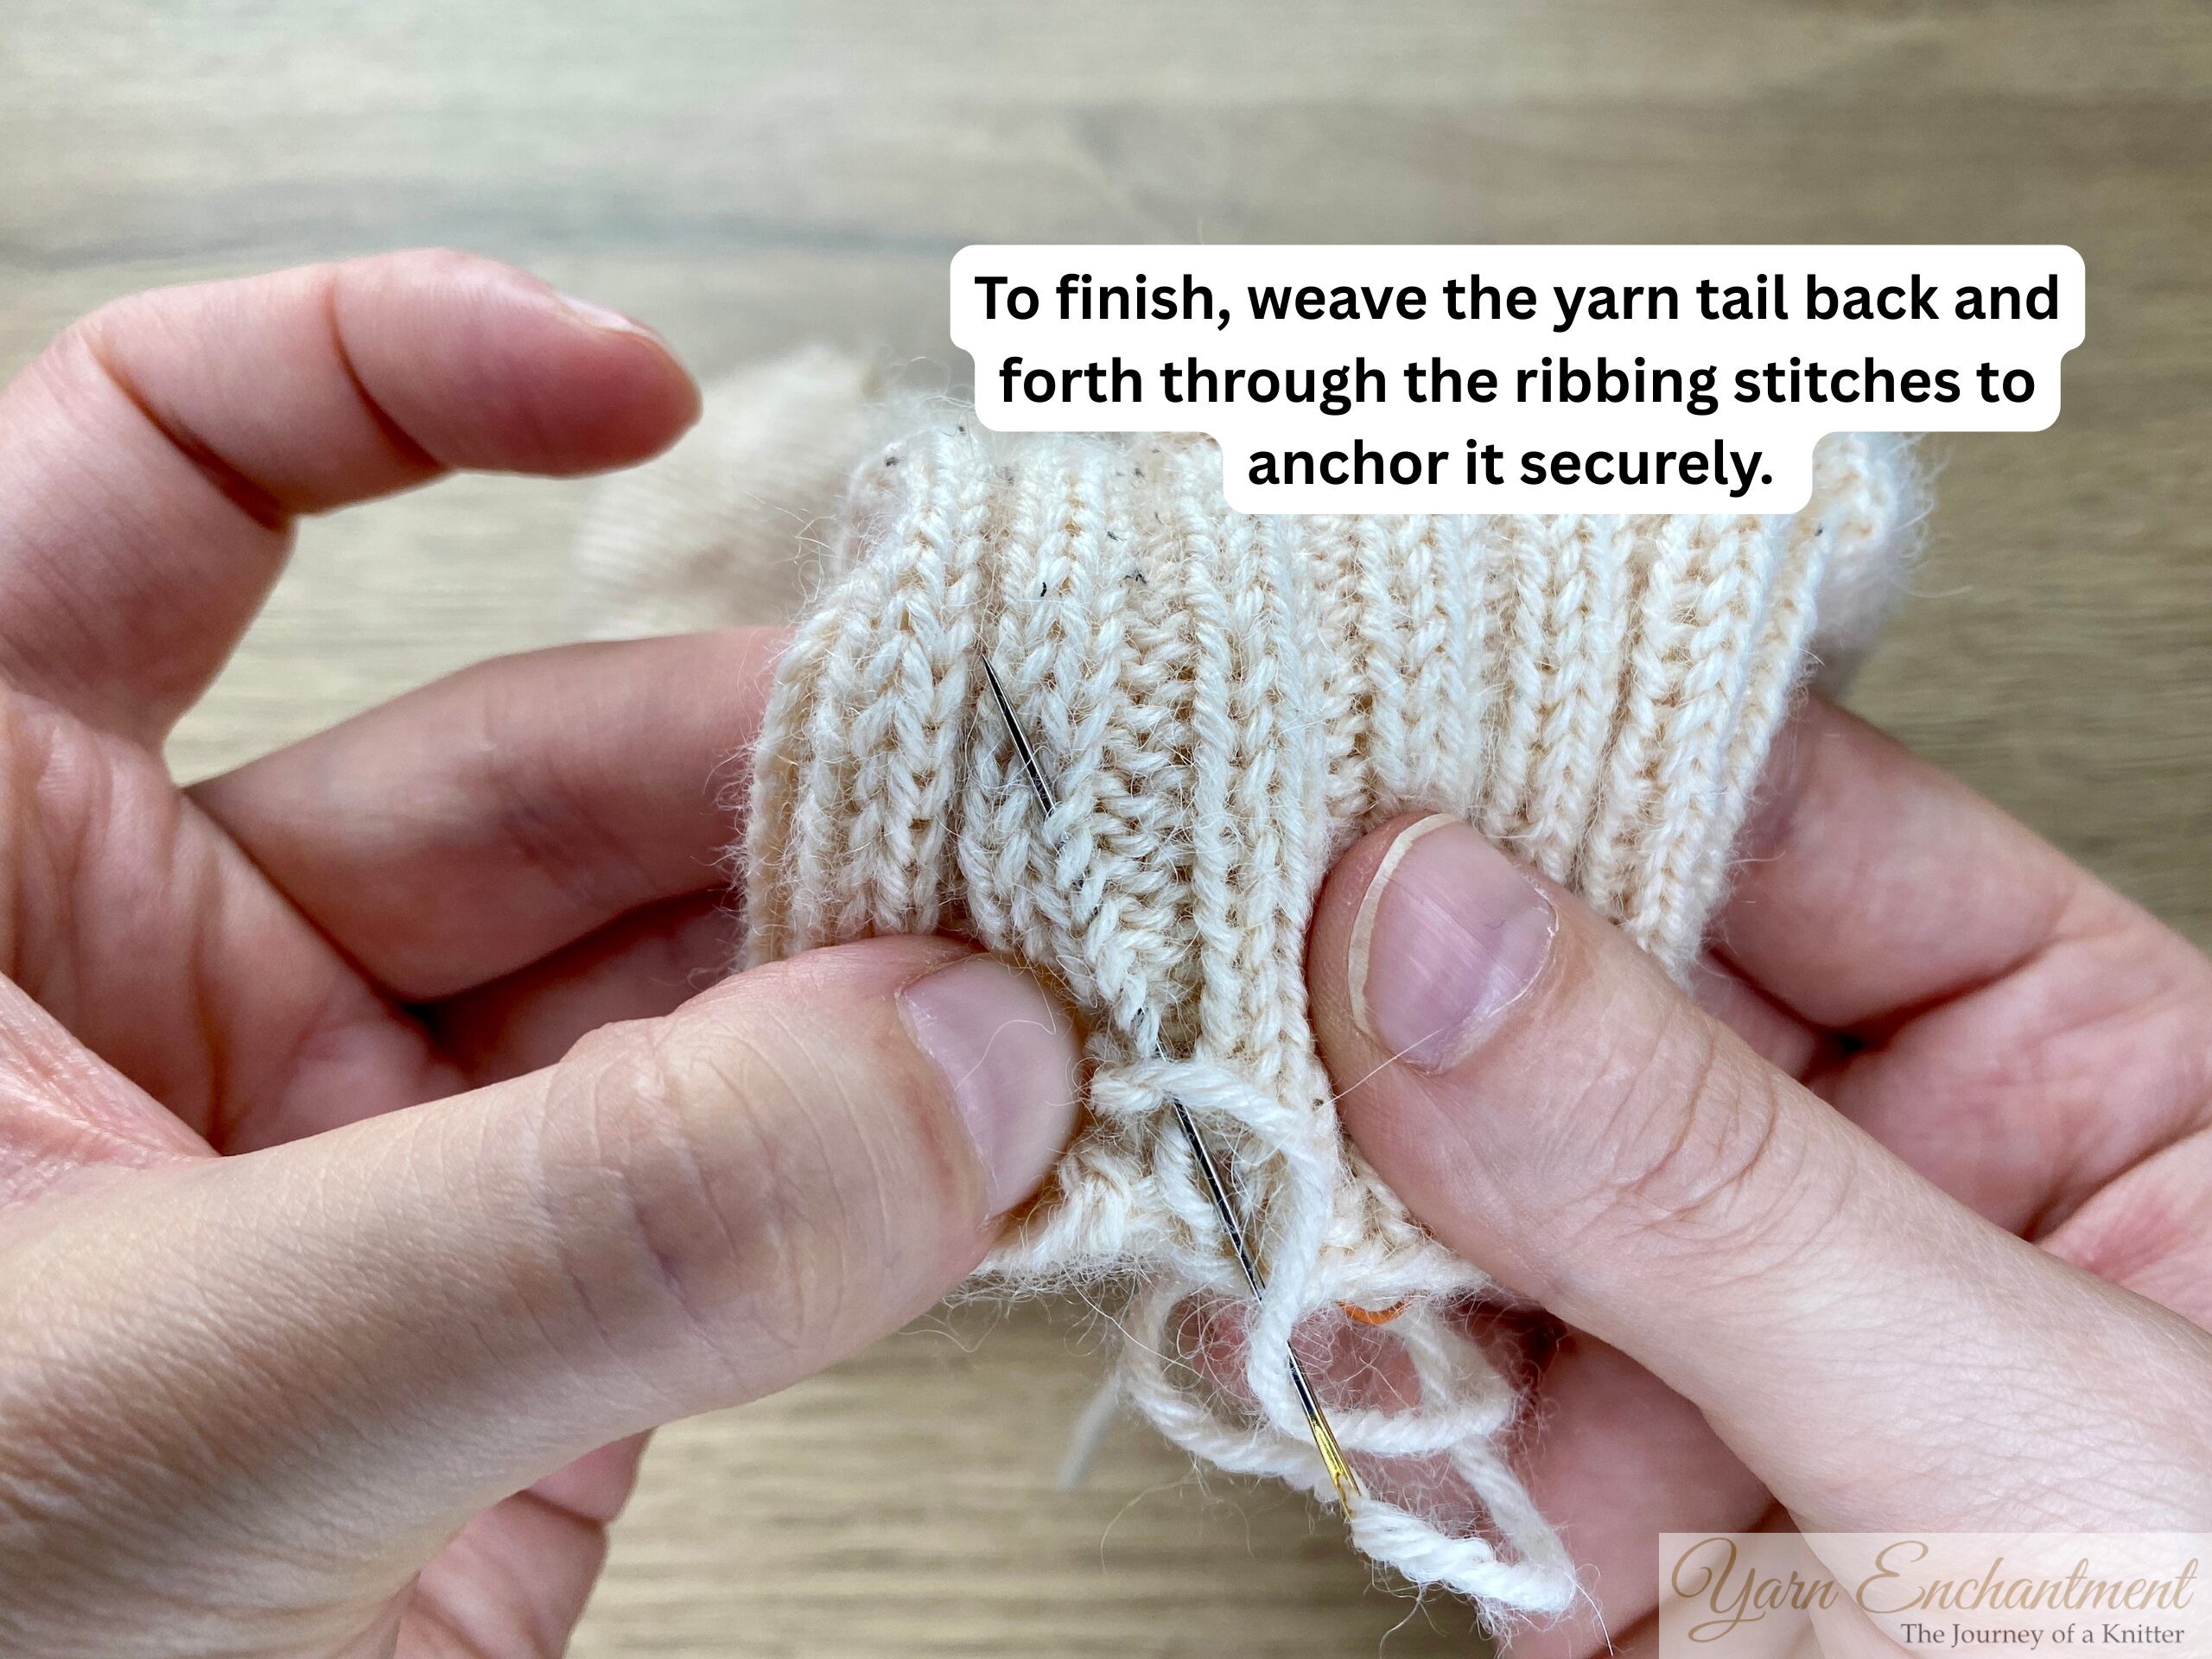 | 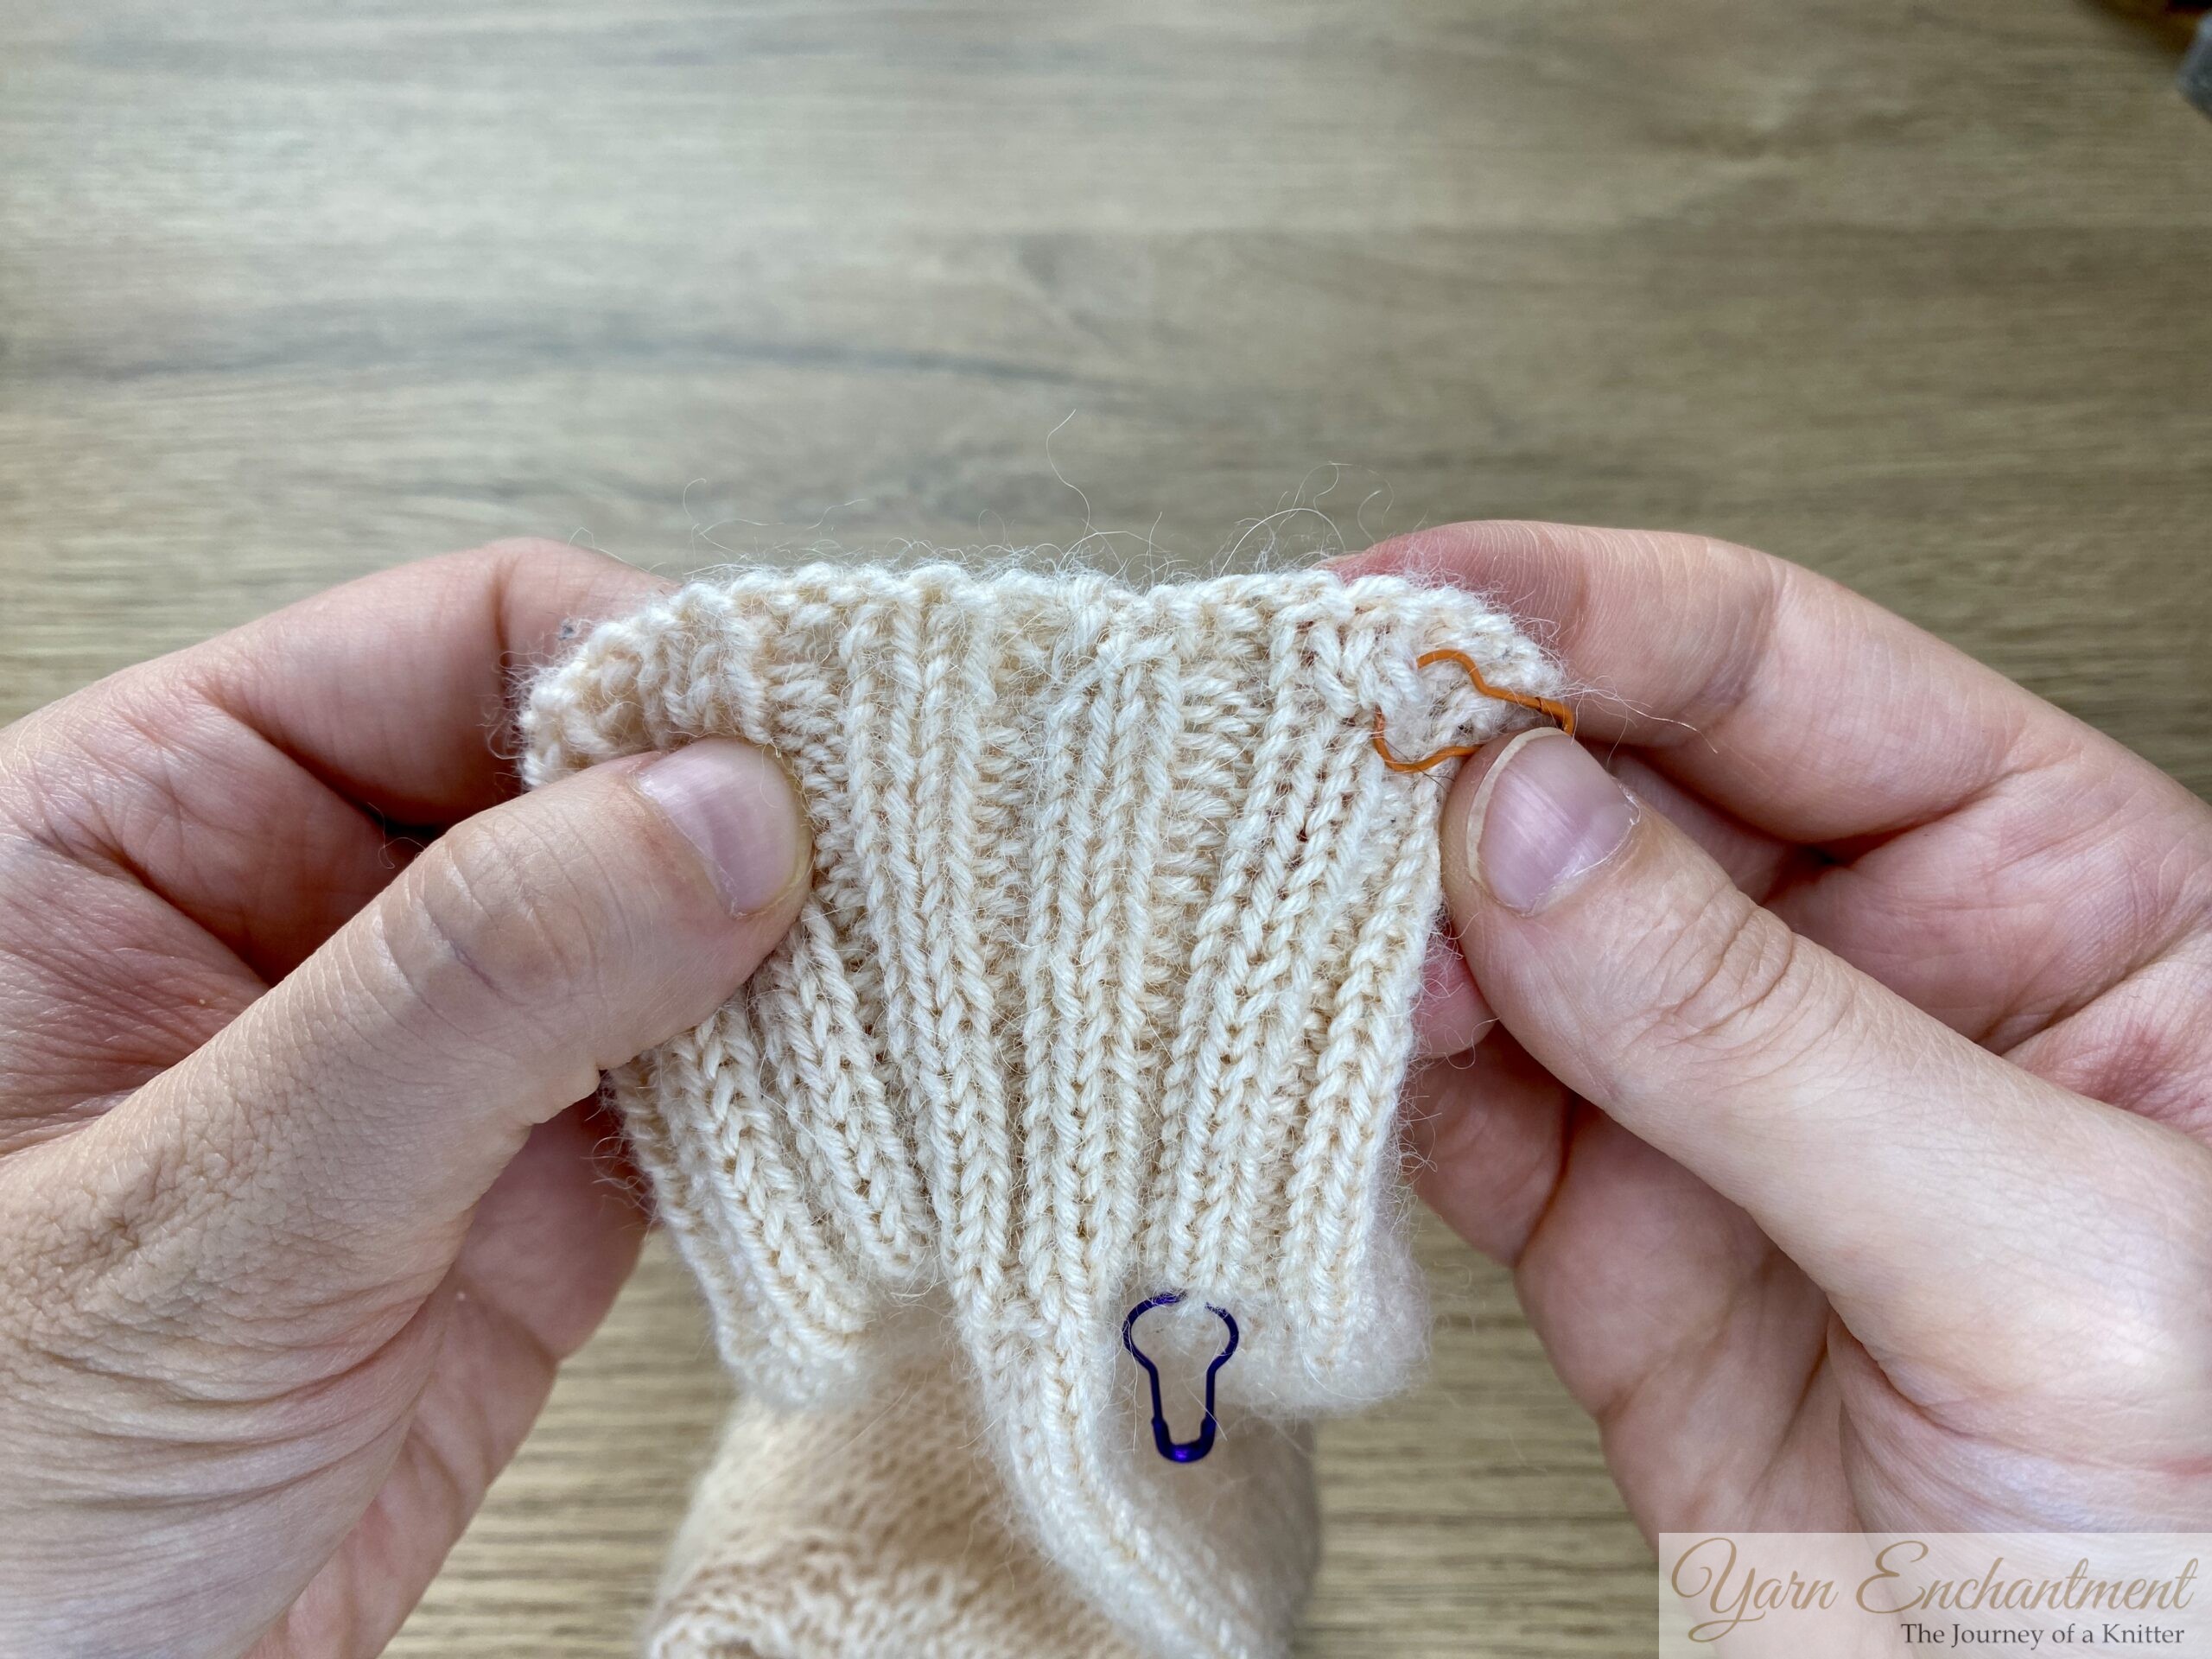 | Finally, sew one last time from left to right to make sure the seam is snug and the gap is fully closed. | To finish, weave the yarn tail back and forth through the ribbing stitches to anchor it securely. This will keep the seam tidy, strong, and help prevent it from unraveling over time. | Here’s the finished cuff! The seam blends right in with the rest of the ribbing - you can barely see where the join is. |


Frequently Asked Questions: Leg and Wedge Toe Sock Knitting
How do I measure my foot for the perfect sock fit?
To measure your foot for a perfectly fitted sock, use a ruler to measure from the heel to the tip of your longest toe, often the big toe, but this may vary depending on foot shape. For sock toes, it’s best to also measure from the point where your foot starts to narrow toward the toe.
When should I start toe decreases for my sock?
The best time to begin toe decreases is when your sock foot is about 4–5 cm (1.5–2 inches) shorter than your full foot length, or when the knitting reaches the point where your foot narrows before the toes. Trying the sock on and measuring provides the most customized fit.
What is a wedge toe, and why choose it?
A wedge toe is a classic sock toe shape created by evenly spaced decreases along the sides of the sock, giving a gently tapered, symmetrical finish. It fits most foot shapes, is easy for beginners, and is commonly finished with the Kitchener stitch for a seamless result.
How do I calculate the number of toe decrease rounds I need?
First, measure your desired toe length (from the narrowing point to the tip of the toe) and multiply by your row gauge (rounds per cm or inch). Subtract the target stitch count (about 1/3 of your starting stitches) from your cast-on number, divide by four (since each decrease round removes four stitches), and adjust for your total rounds.
How can I avoid socks that are too long or loose after wearing?
Knitted socks stretch. To avoid socks that end up too long, subtract about 10% from the required foot length when knitting the main foot section. This negative ease ensures a snug, comfortable fit after your sock stretches with wear.
What if my toe shape is different from most patterns?
Not all feet are shaped alike! If your second toe is longer, or if your toes are nearly even, you may need to adjust where you measure or use a rounder toe shape. Customizing the toe section based on your actual foot ensures a perfect fit for your specific foot shape.
How do I finish a wedge toe with the Kitchener stitch?
Once you reach about one-third of your original stitch count, divide stitches equally for the sole and instep. Use a tapestry needle to graft the stitches together using the Kitchener stitch, following a knit-purl sequence for a seamless finish.
Can I use this toe method for all sock yarn types?
Yes, the wedge toe technique works with most sock yarns, including merino, blends, and even mohair mixtures. Adjust your measurements for yarn elasticity and check your row gauge for best results.
How should I weave in yarn ends for a durable finish?
Use a sharp sewing needle to split the yarn fibers while weaving in ends on the inside of your sock. Splitting the yarn helps anchor the tail and keeps it from slipping out over time, even with smooth yarns
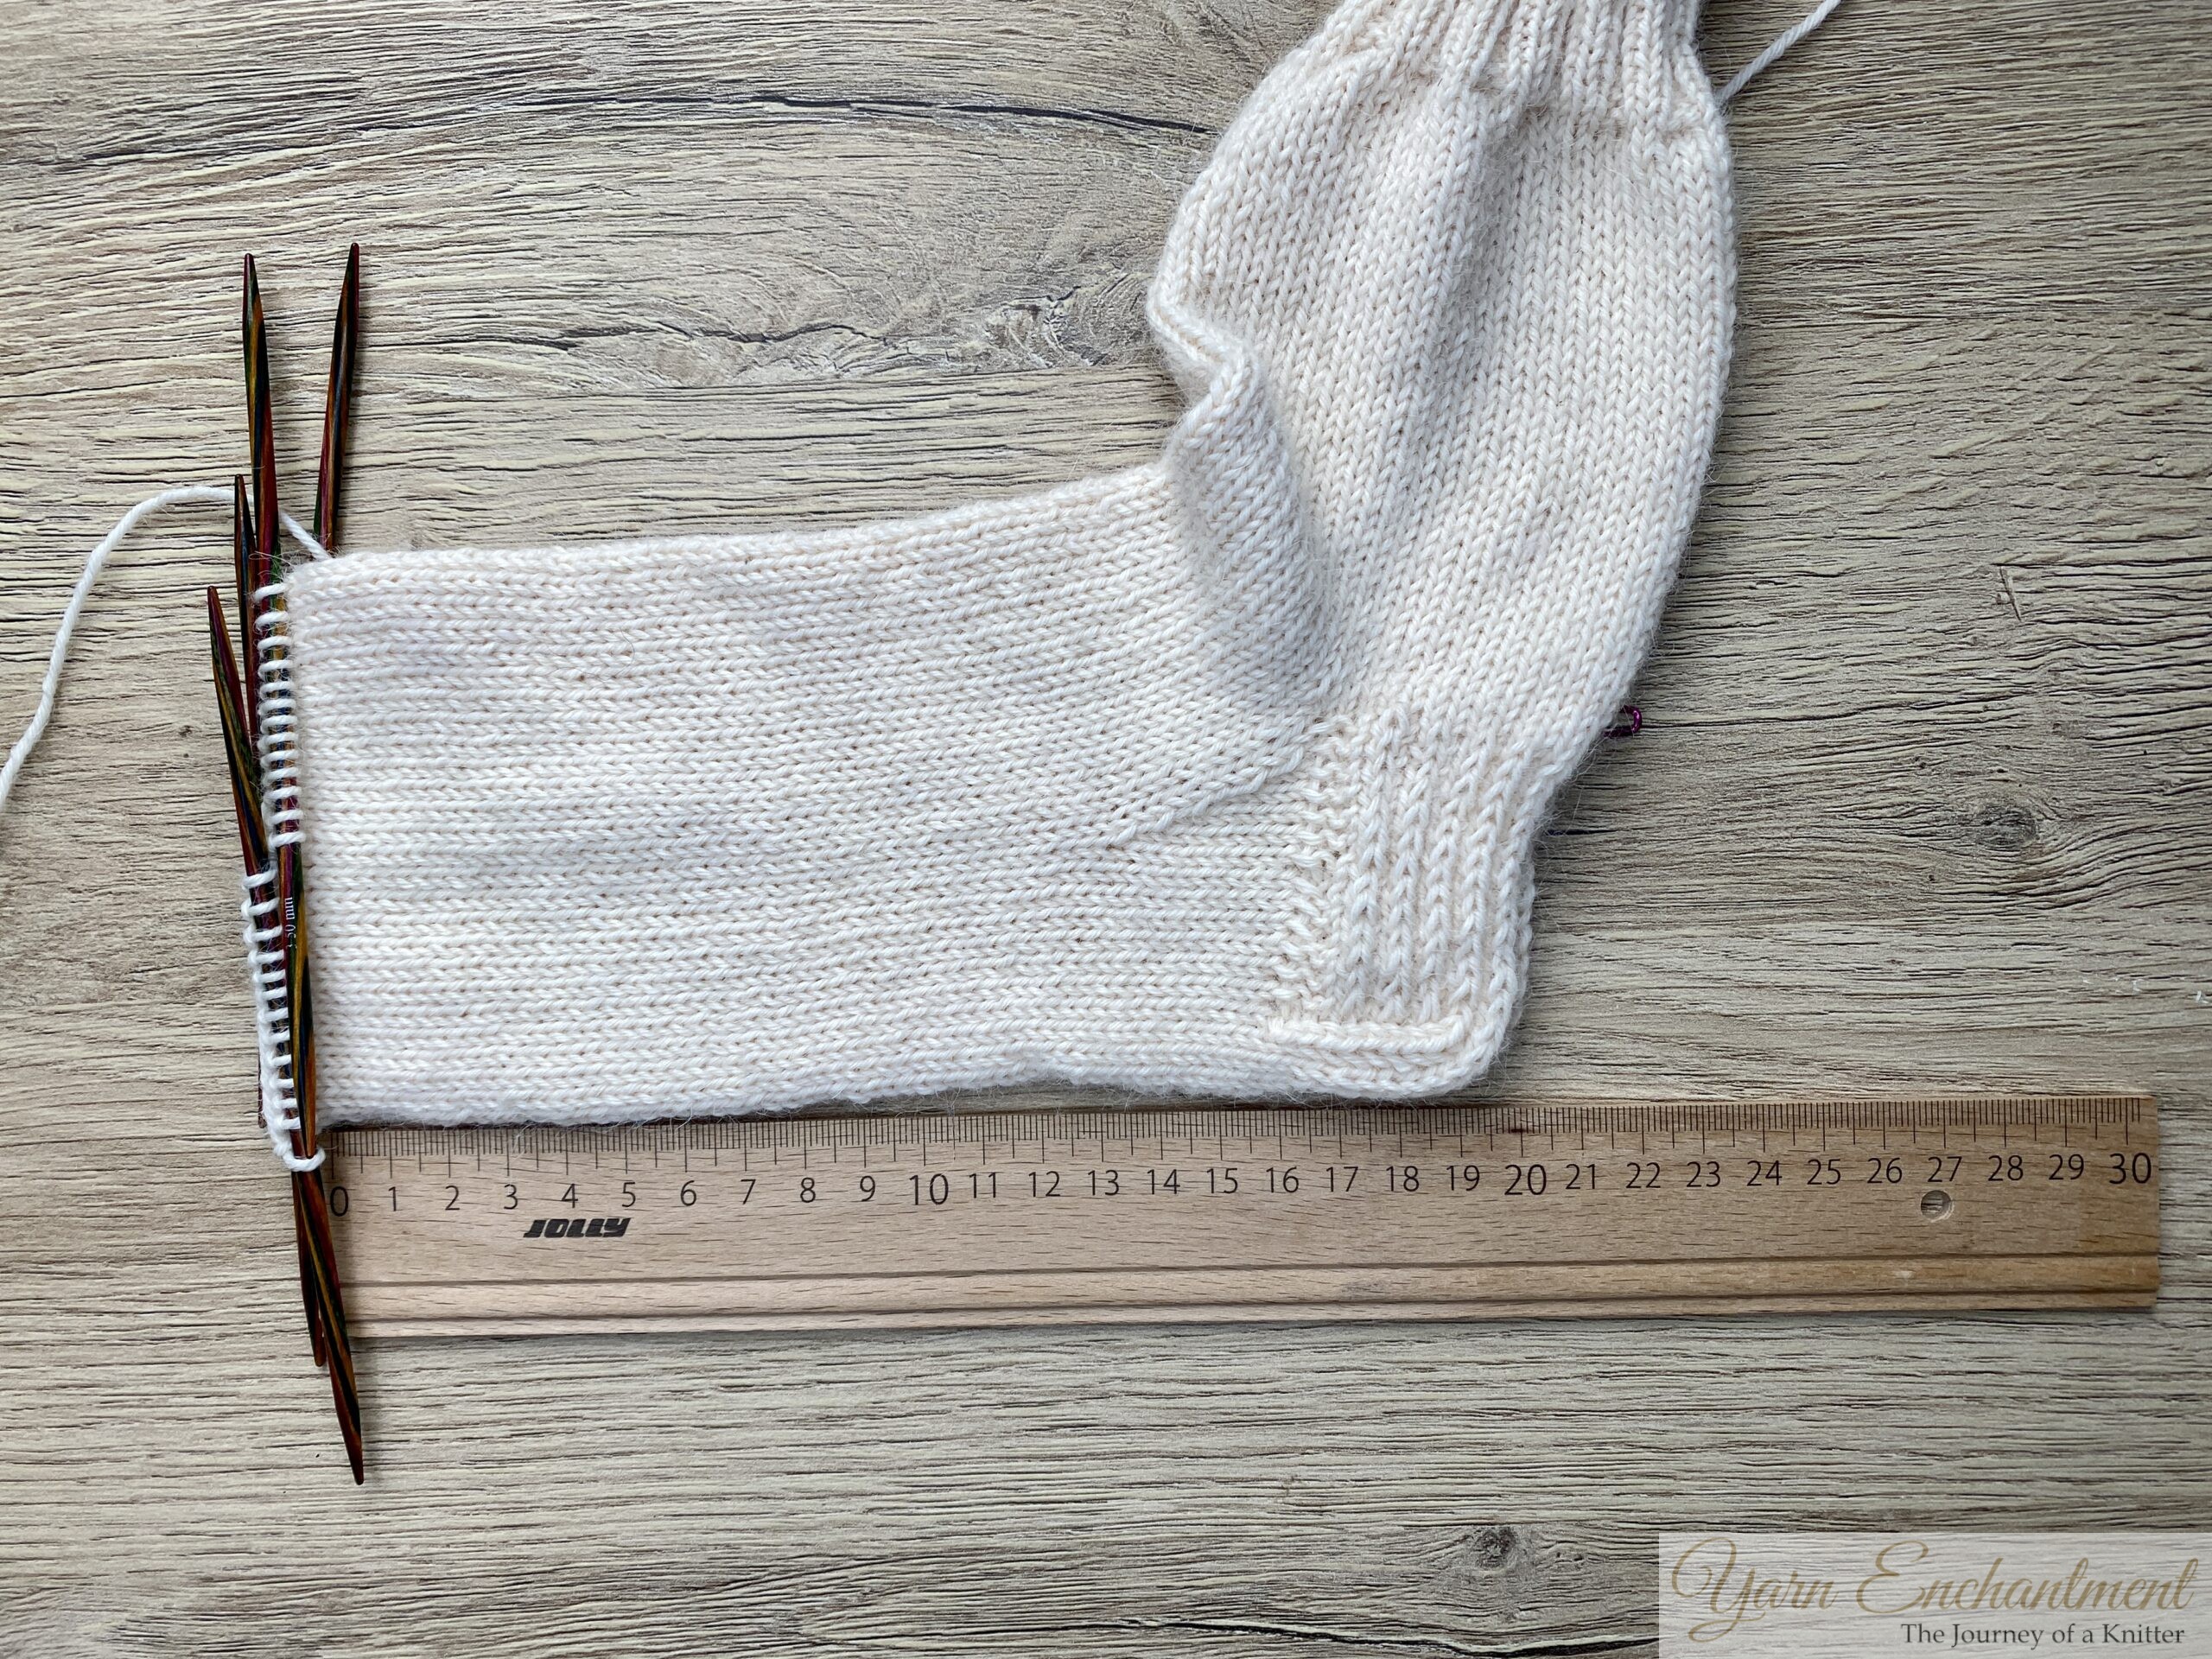
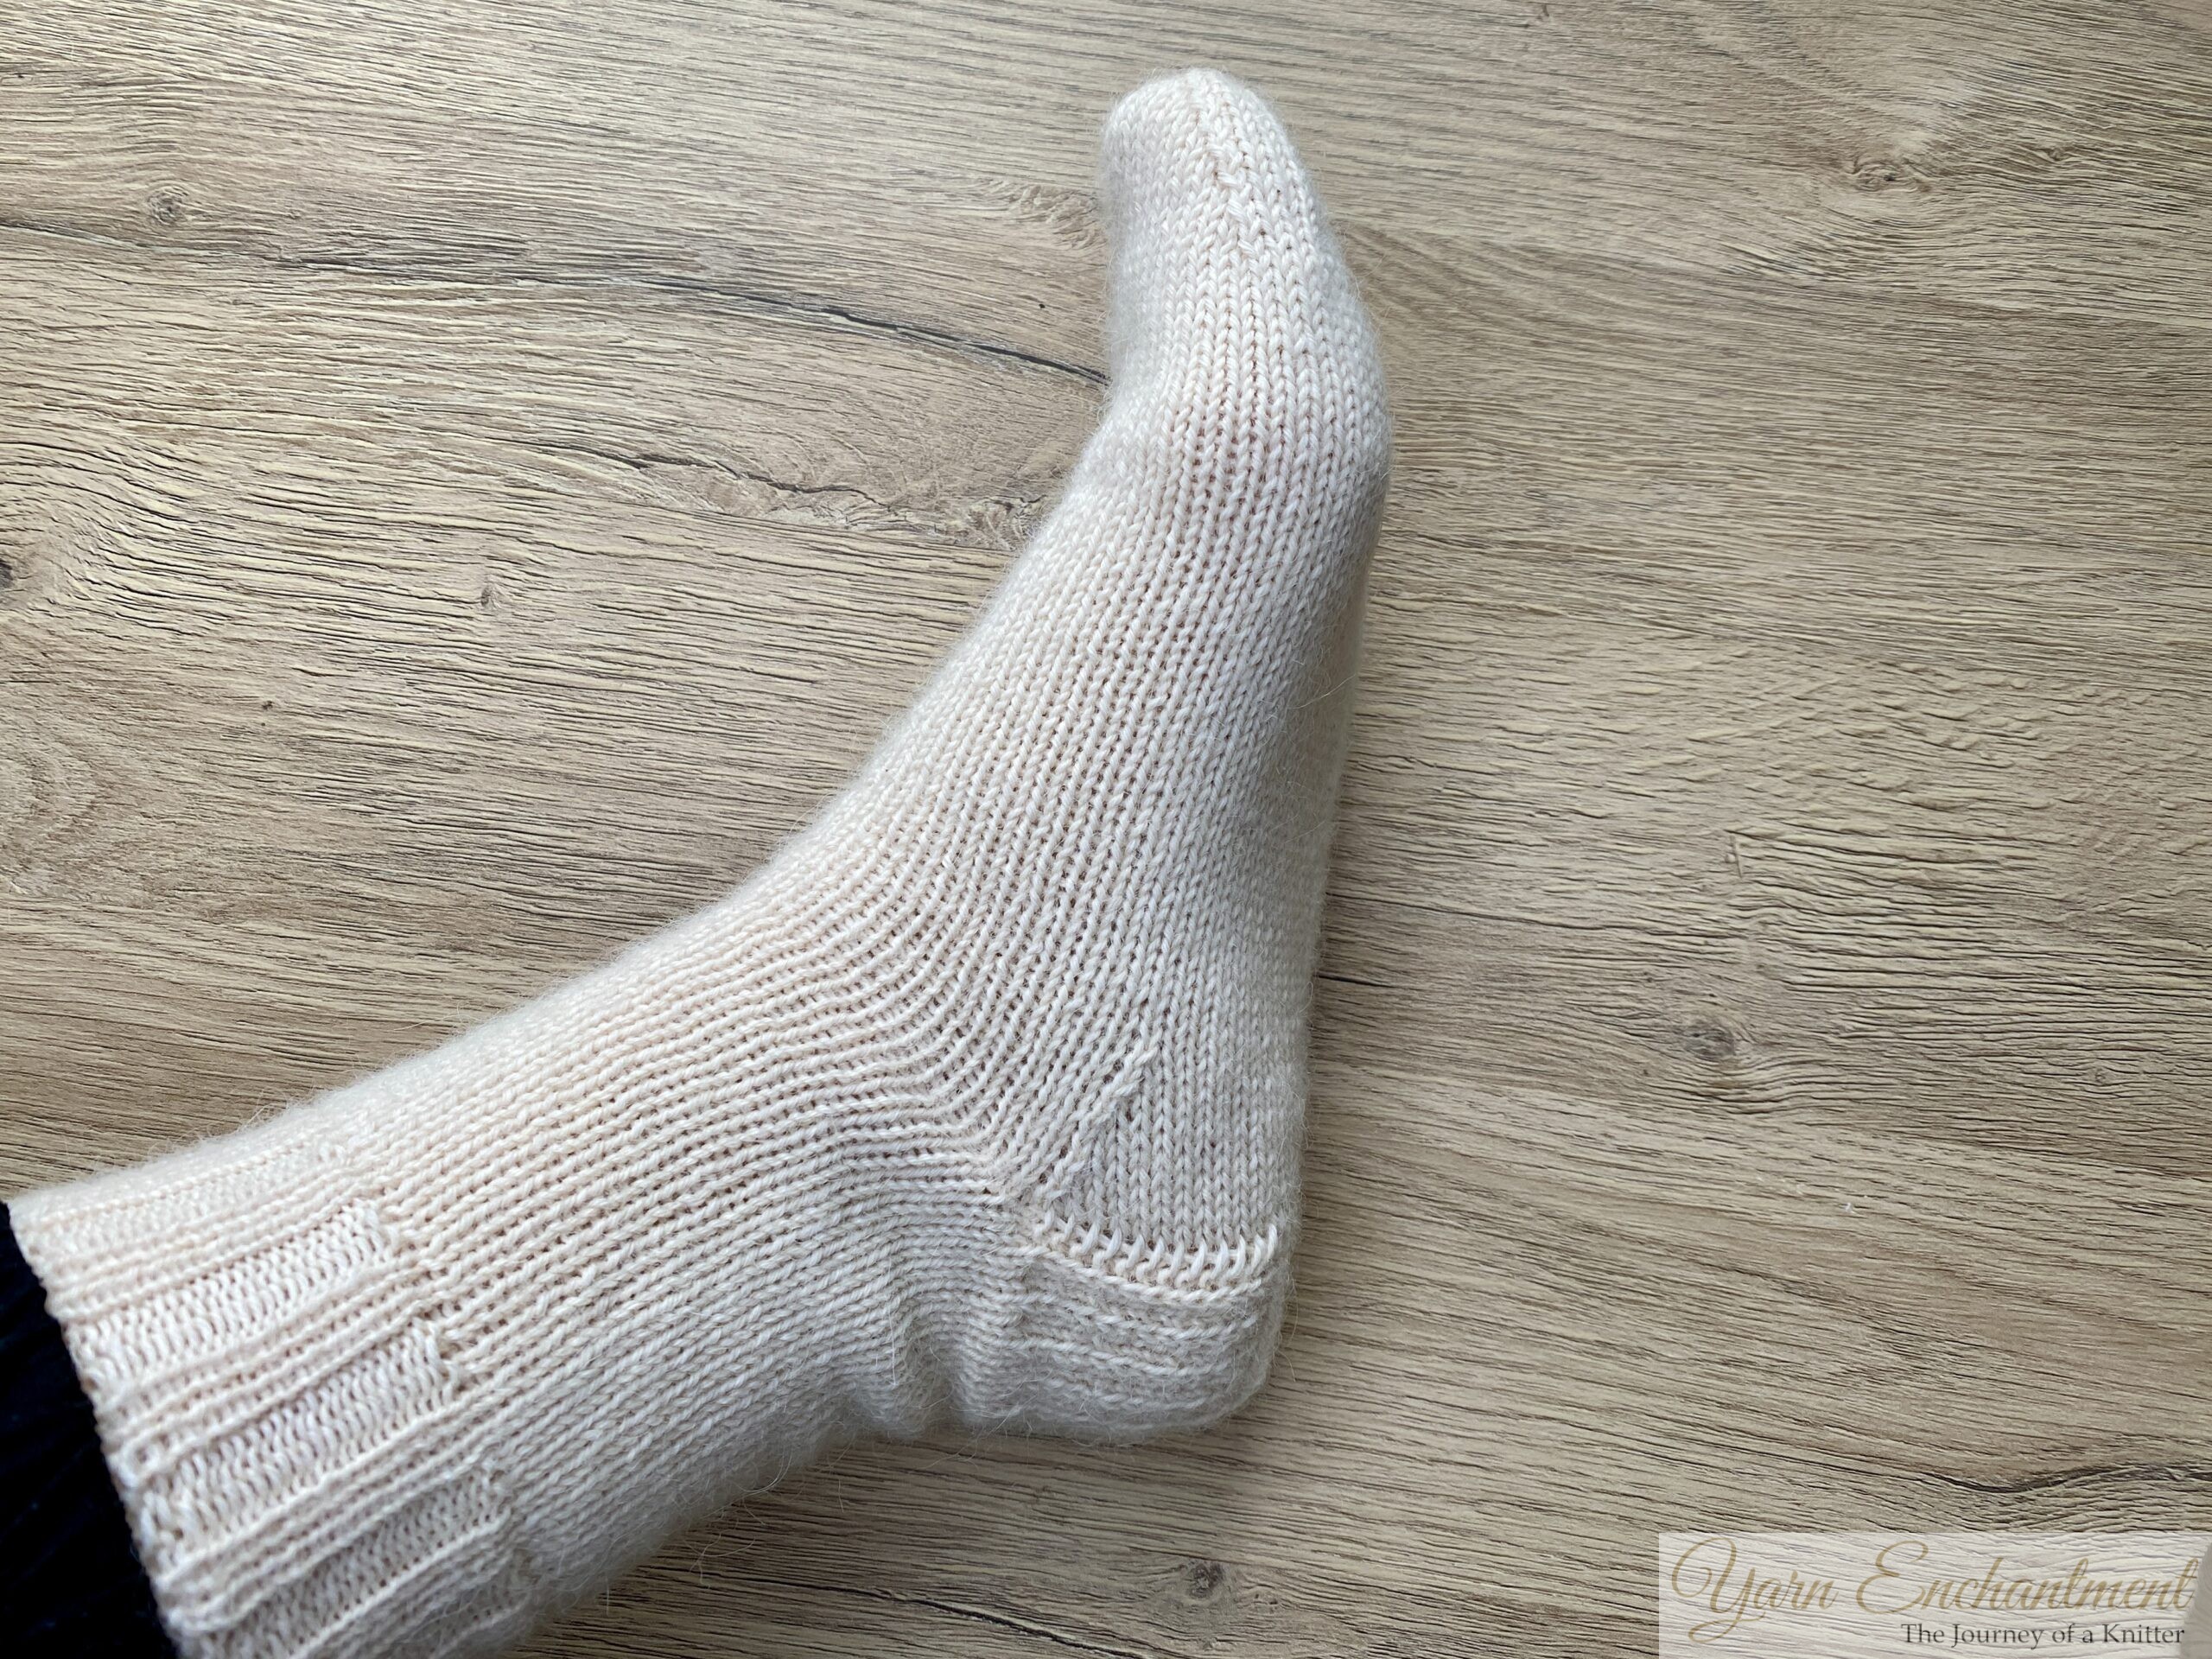 | Here’s my finished sock on, and I have to say, it fits like a dream! The wool feels so soft and cozy; I wish you could reach through the screen and feel it for yourself. Once I knit the second sock, I’ll post some even nicer photos so you can really see the whole pair.I’m planning a detailed video tutorials as I knit the second one, so you can join me for every step from start to finish and pick up all my favorite tips and techniques along the way. |

Wrapping Up Our Sock Adventure
Thank you so much for joining me on this complete sock knitting journey! Working on this tutorial series has truly brought me a lot of joy, and I hope it’s made your own sock adventures more creative and rewarding.
If you’ve finished a pair of socks using these lessons, I’d absolutely love to see your handiwork. Let’s celebrate your achievement, feel free to send me photos of your finished socks by email sarah@yarn-enchantment.com. With your permission, I’ll be curating a “Knitter’s Spotlight” right here on the blog, so everyone can admire and be inspired by your creations. Every pair is special, whether it’s your first attempt or your hundredth.
As a thank you for being part of this journey, I’m planning a special surprise for the holiday season: I’ll be turning this entire sock knitting course into a free eBook (EPUB) for you to download and enjoy. It will be available as a Christmas present to all readers, a way to give back to this wonderful, creative community. Please bear with me while I put it together; I’ll announce it here as soon as it’s ready!
Stay tuned for updates, and until then, happy knitting, and thank you for helping make yarn-enchantment.com such a warm and welcoming place to learn, share, and grow together!
Until next time, happy knitting!
Feeling ready for more sock fun?
Jump into the next parts of my Free Sock Knitting Course! Explore topics like:
-
Sock Knitting Needles & Accessories: Complete Guide for Beginners
- How to Measure Your Foot & Calculate Sock Cast-On Size (Knitting Tutorial)
-
Hole-Free Gusset Pick Up and Decreases for Perfectly Fitting Socks
-
Complete Foot and Wedge Toe Sock Guide: Measuring, Sizing & Decreasing
A Little Way to Say Thanks
You Might Also Like


 |
|
Join the Cozy Corner Newsletter!
Hey there, creative soul! Welcome to the Yarn Enchantment Newsletter, where we celebrate all things cozy, crafty, and full of heart. Think of this as your friendly crafting companion - a little dose of inspiration delivered straight to your inbox, just for you. Inside, you’ll find: ✨ Exclusive patterns & tutorials - ideas you won’t find anywhere else (just for us!) 📚 Bookish crafts that bring your favorite stories to life 🧶 Tips and tricks to make your crafting journey smoother (and more fun!) 💌 Heartfelt musings on life, creativity, and the magic of making something with your own two hands Whether you’re knitting by the fire, brainstorming your next DIY project, or just looking for a little creative pick-me-up, this newsletter is here to cheer you on. Because let’s be honest - crafting isn’t just about the finished project; it’s about the joy, peace, and stories we create along the way. So grab a cup of tea, cozy up, and join me. Together, we’ll weave a little magic into everyday life - one stitch, one story, and one email at a time. P.S. I’m so glad you’re here. Let’s make something beautiful together! (Note: If you're using an ad blocker, you may encounter issues subscribing to the newsletter. To subscribe, please consider disabling your ad blocker.)
|
