

My First Knit Sweater
January 28, 2025
Jade Serenity Spa Set | Headband
February 4, 2025How to Work SSK in Knitting: Tidy Decreases & Best Alternatives

Originally published on January 30, 2025
Decreases are just as important in knitting as increases - they shape our projects, add structure, and create those beautiful finishing details that make handmade pieces stand out. One of the most common decreases you’ll use is the SSK (Slip, Slip, Knit), which forms a smooth, left-leaning line.
If you’ve been knitting for a while, you’ve probably already worked this stitch - it’s just as essential as K2tog, M1L, or M1R. These techniques are the foundation for shaping sweaters, lacework, and accessories.
Yet, many knitters find that their SSK stitches look a little looser or bulkier than they’d like. The good news? With a few easy adjustments and alternative methods, you can achieve beautifully tidy results. In this guide, you’ll learn how to work an SSK correctly, understand why it sometimes looks uneven, and explore the best variations to make your decreases look perfectly balanced every time.
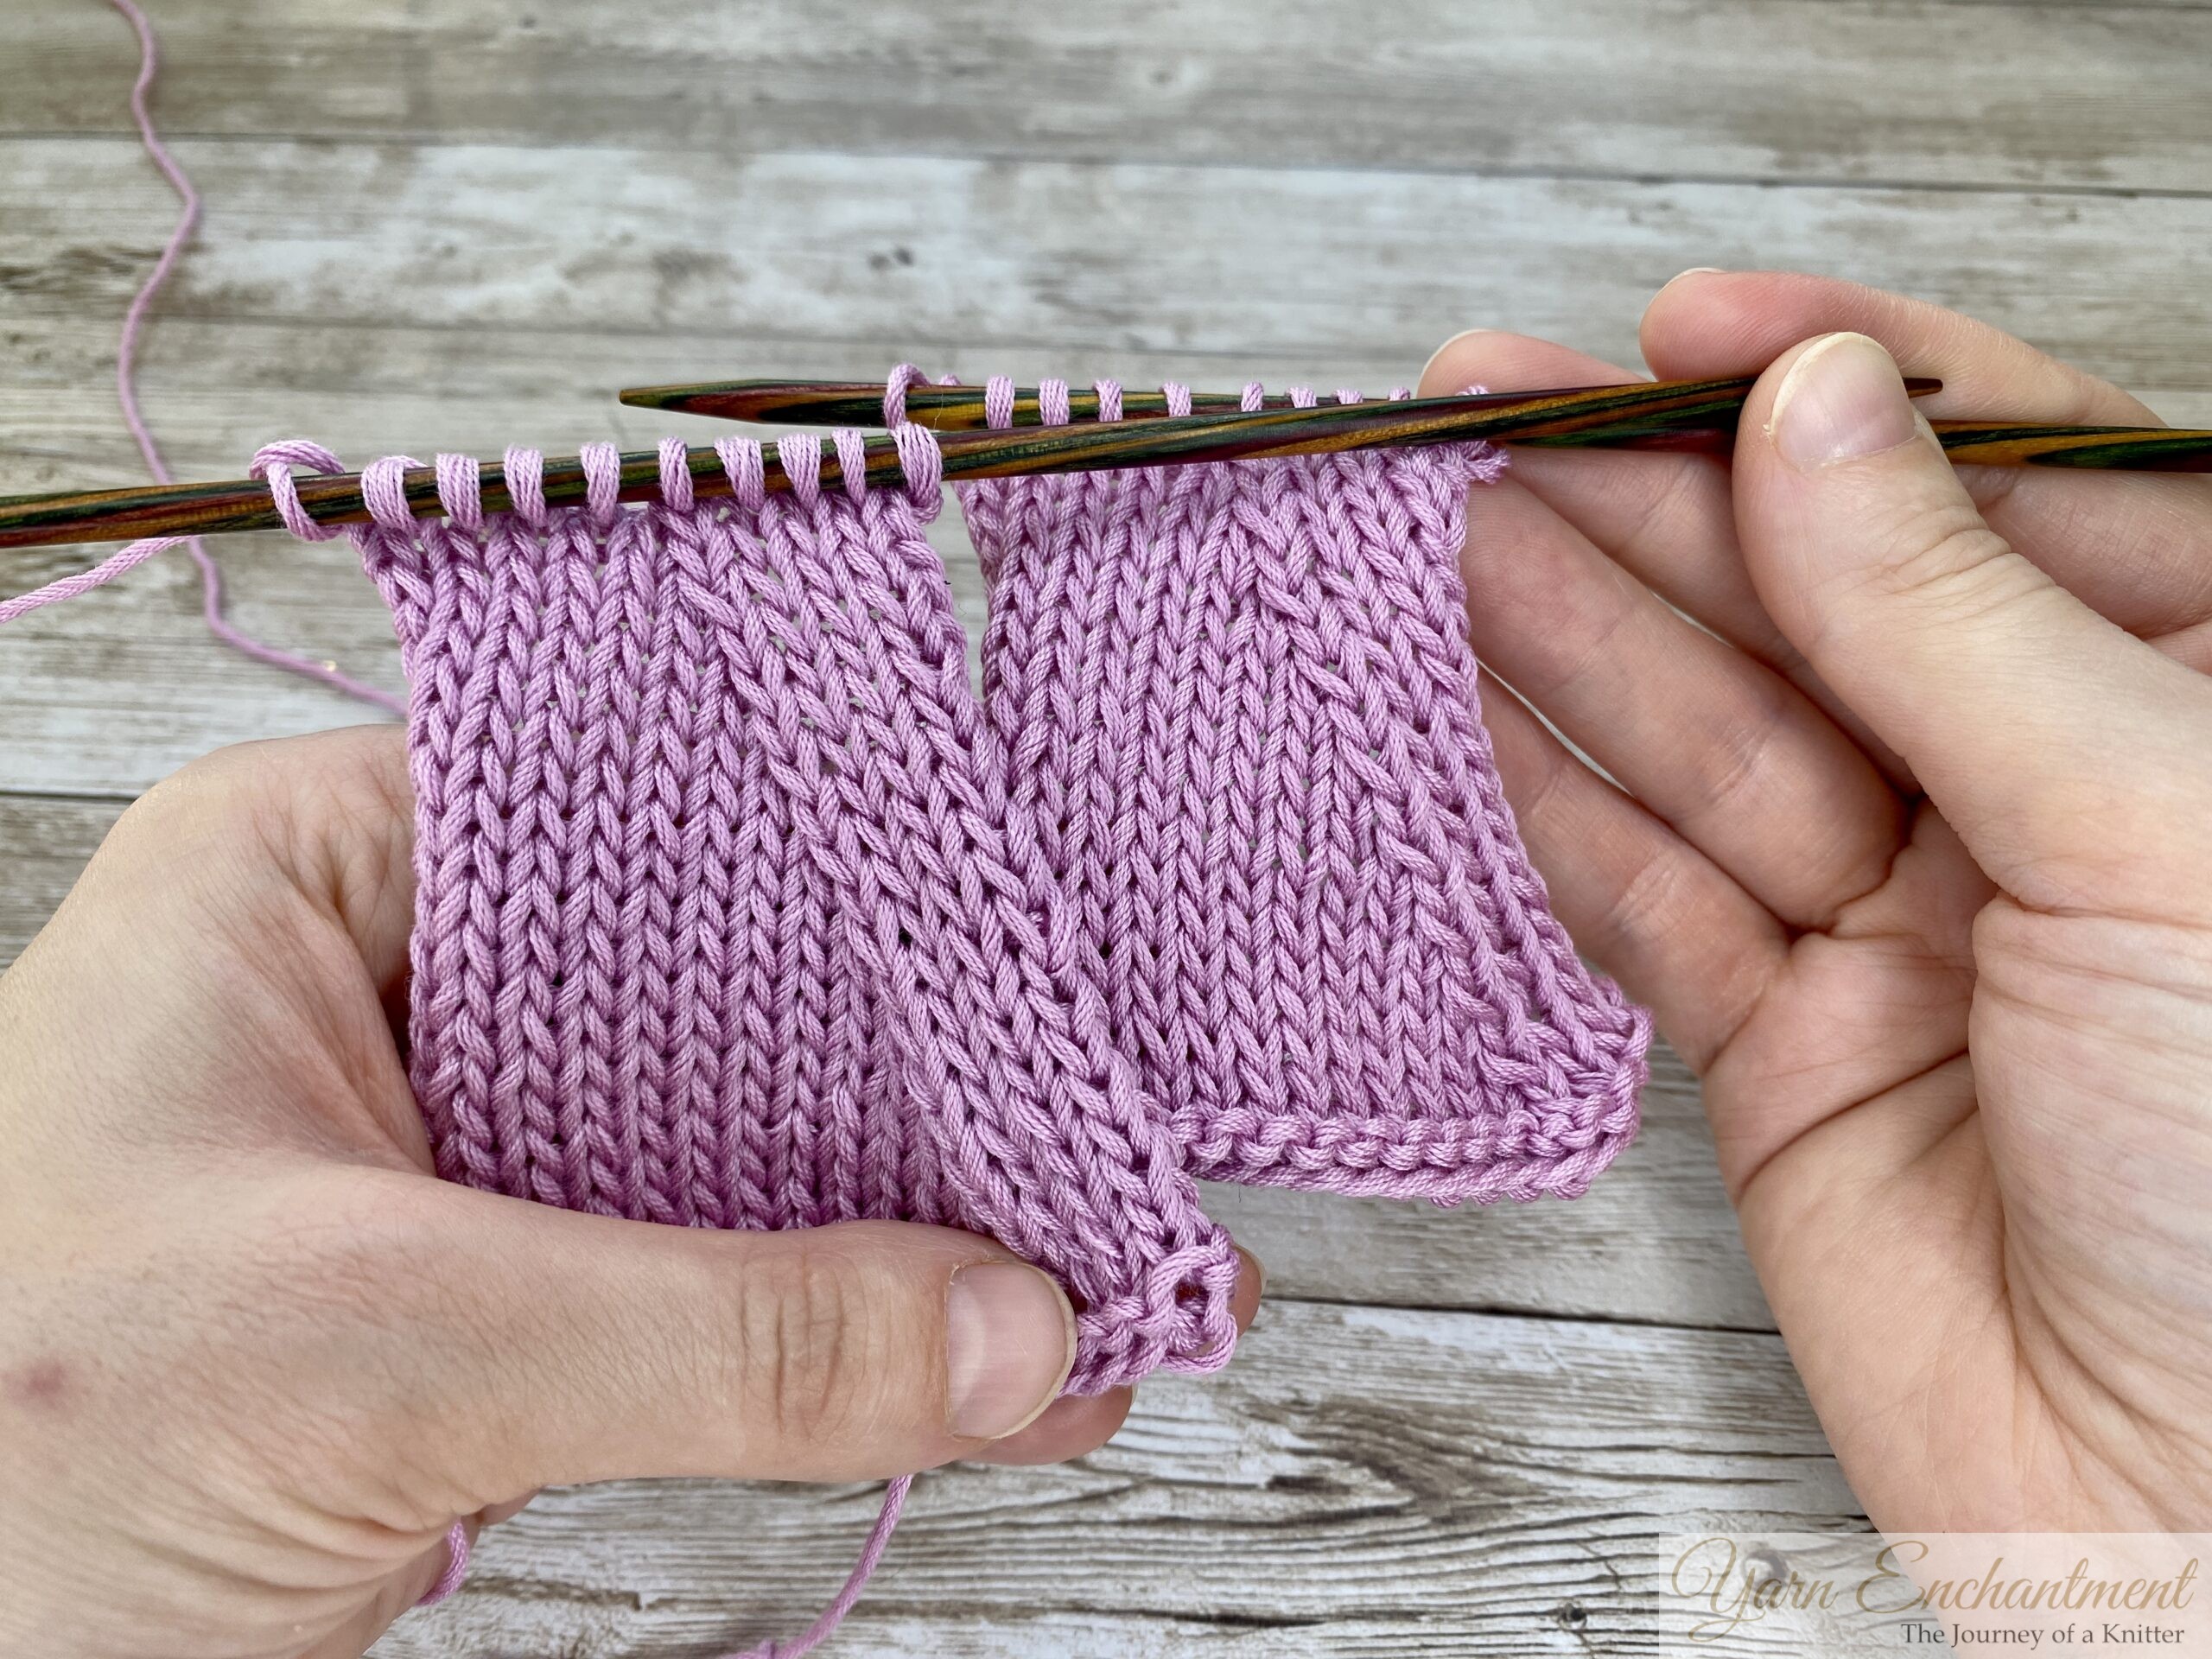
 | Slip Slip Knit swatches |

Table of Contents
- What is SSK in Knitting?
- Why SSK Looks Loose - Common Problems
- How to Work a Standard SSK Step-by-Step
- Tips for Tidy, Professional SSKs
- Best Alternatives to SSK
- SSK in Lace and Garment Shaping
- SSK vs K2tog - Which Decrease is Best?
- Frequently Asked Questions (FAQs)
What is a Slip Slip Knit (SSK) decrease in Knitting?
An SSK is a simple decrease that turns two stitches into one, creating a clean, left-leaning slant. It’s the perfect mirror to the K2tog decrease, which leans to the right. You’ll often see SSKs used in pairs with K2togs to shape areas like necklines, raglan seams, and lace patterns so that both sides of your work look balanced and professional.
In lace knitting, SSKs are especially important because they help form those graceful, directional lines that define each motif. When used alongside right-leaning decreases, they keep your stitch count consistent and your fabric symmetrical. Without them, lace designs wouldn’t have that crisp structure and visual harmony that make them so beautiful.
 | Decreases like SSK and K2tog were used here to form this beautiful leaf pattern. |

Why SSK Looks Loose - Common Problems
There are two main reasons why this decrease can appear larger or less tidy than other decreases:
-
Loss of Yarn Twist
When you slip stitches knitwise, the yarn untwists slightly. This untwisting changes the orientation of the stitch, making it sit differently on the needle. As a result, slack develops in the yarn, which gets pulled into the slipped stitch, making it look looser and larger. -
Stretching the Stitches
Many knitters accidentally stretch the stitches by working on the thicker part of the needles. This enlarges the stitches and makes the decrease look even bulkier.
These two factors combined - untwisting and stretching - are why SSKs can sometimes look less tidy than K2togs.
 | The stitch will untwist if you slip it knitwise. |

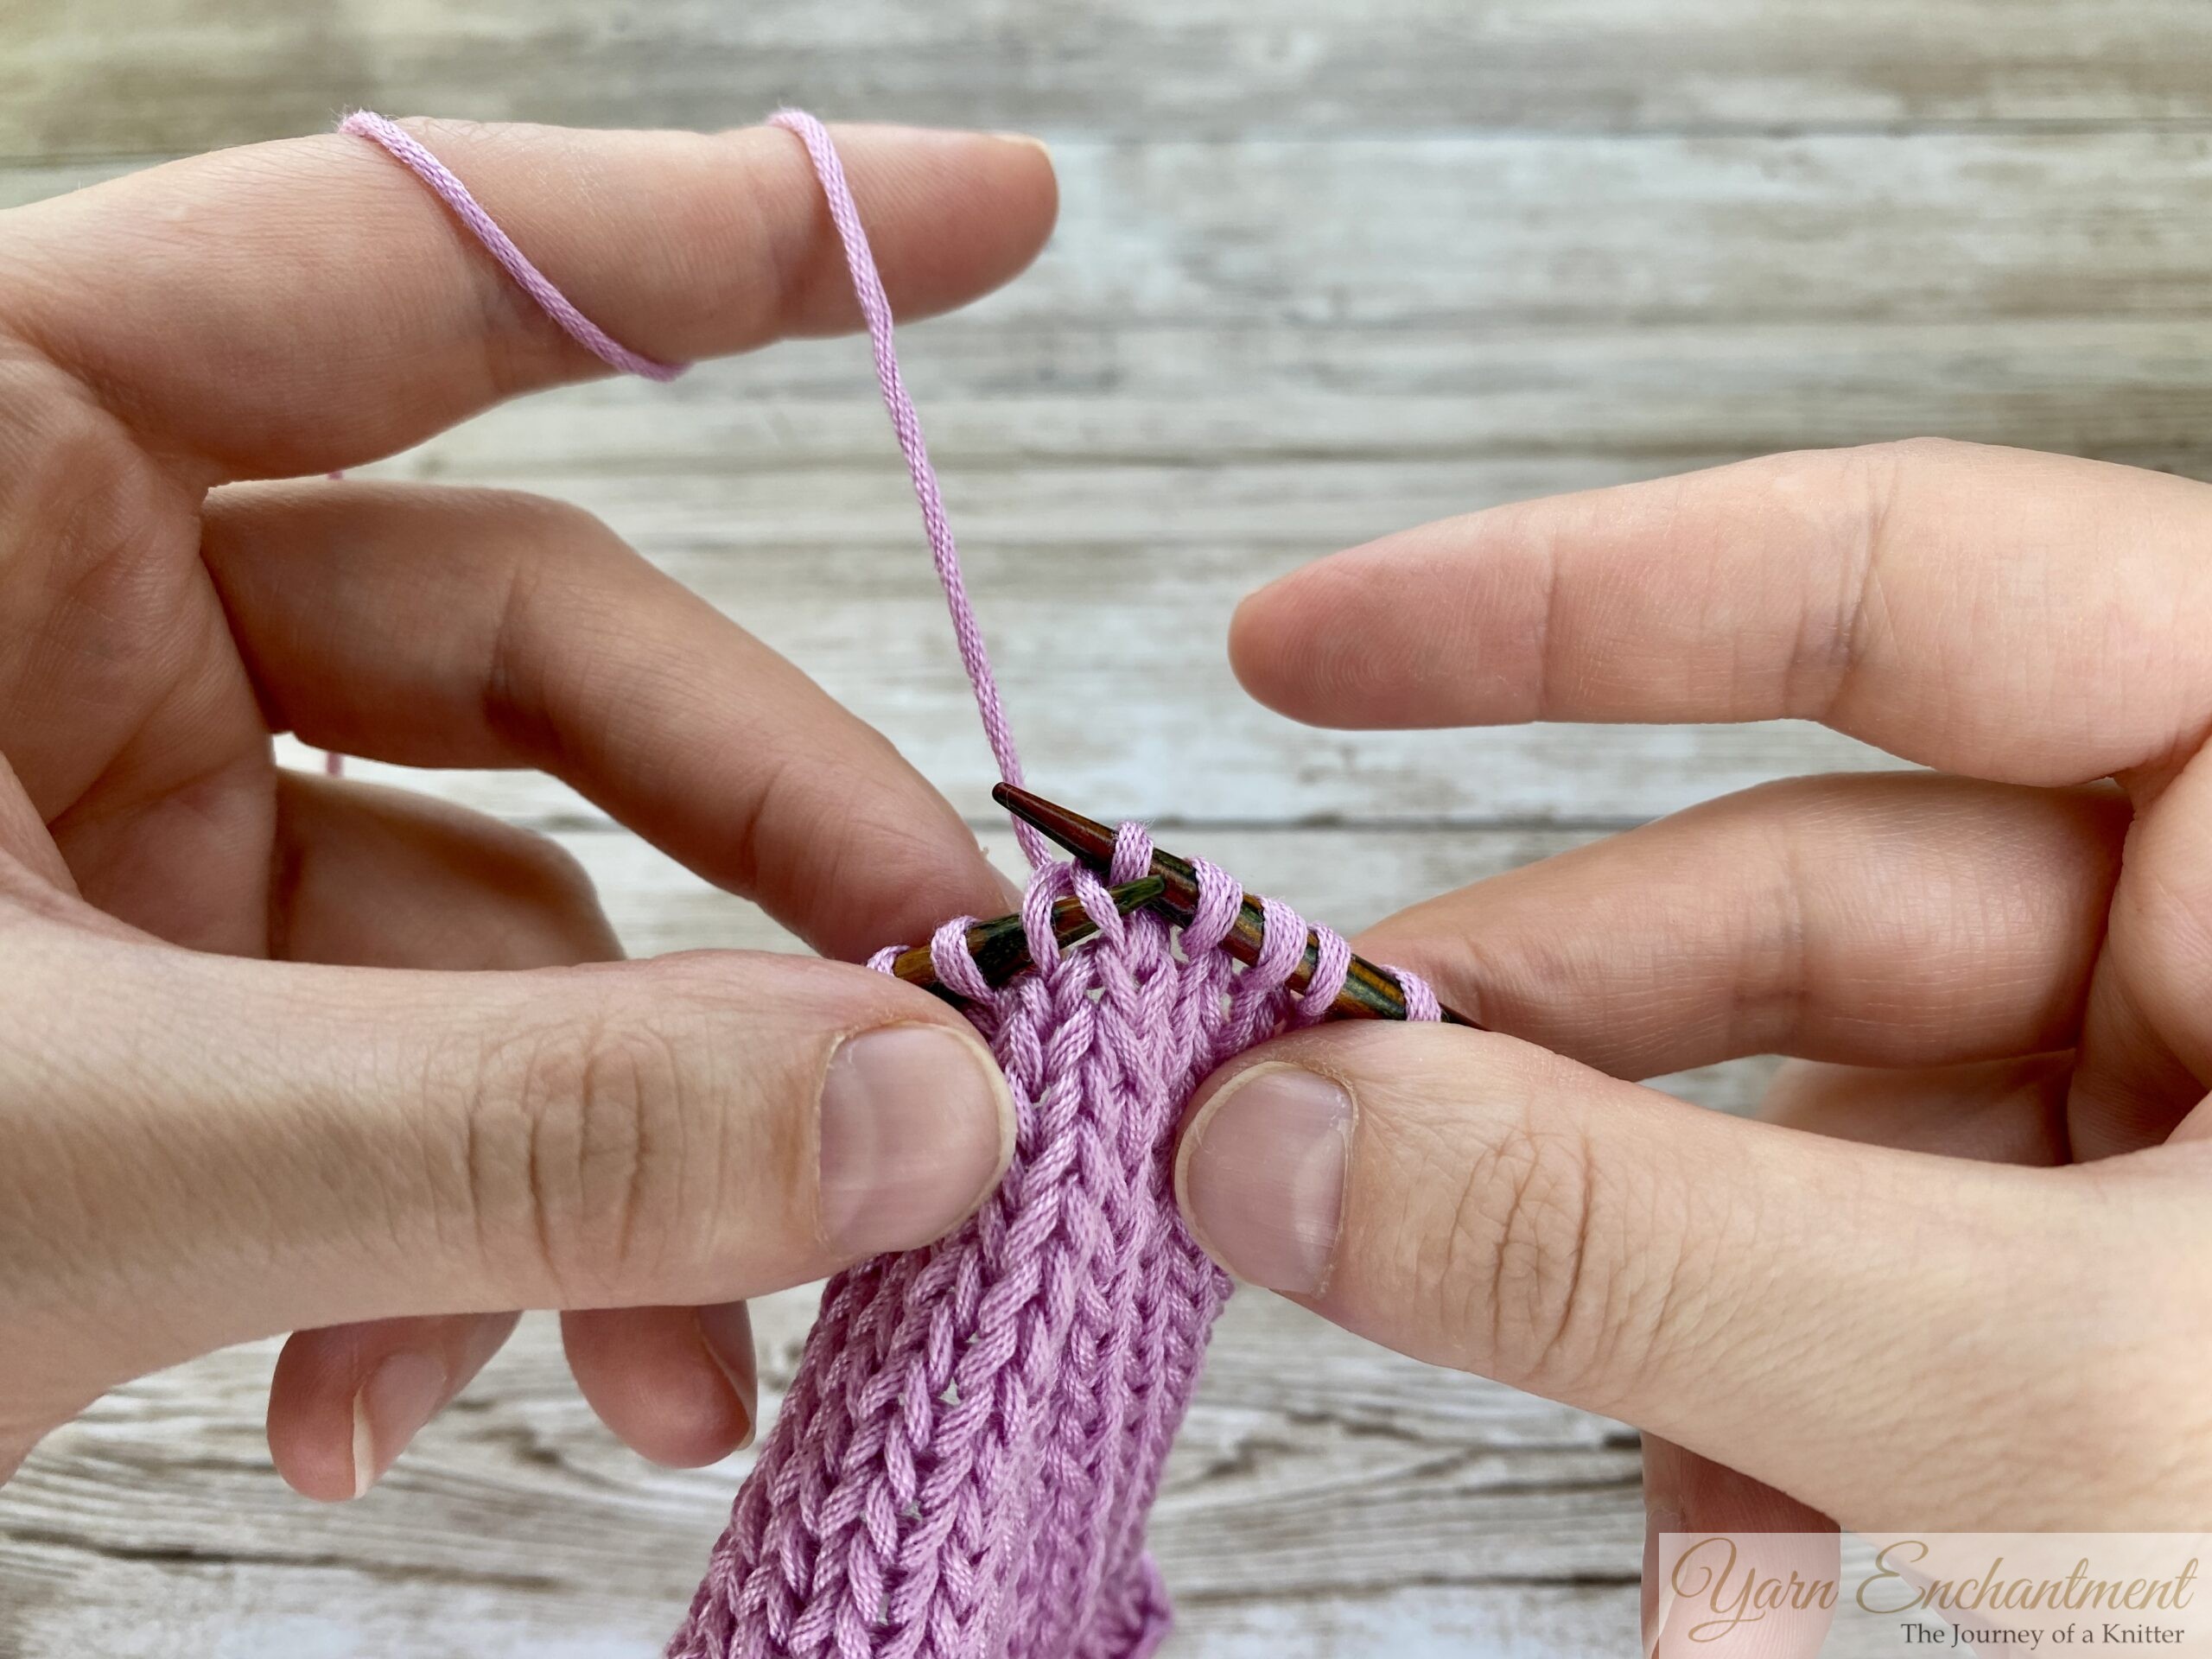
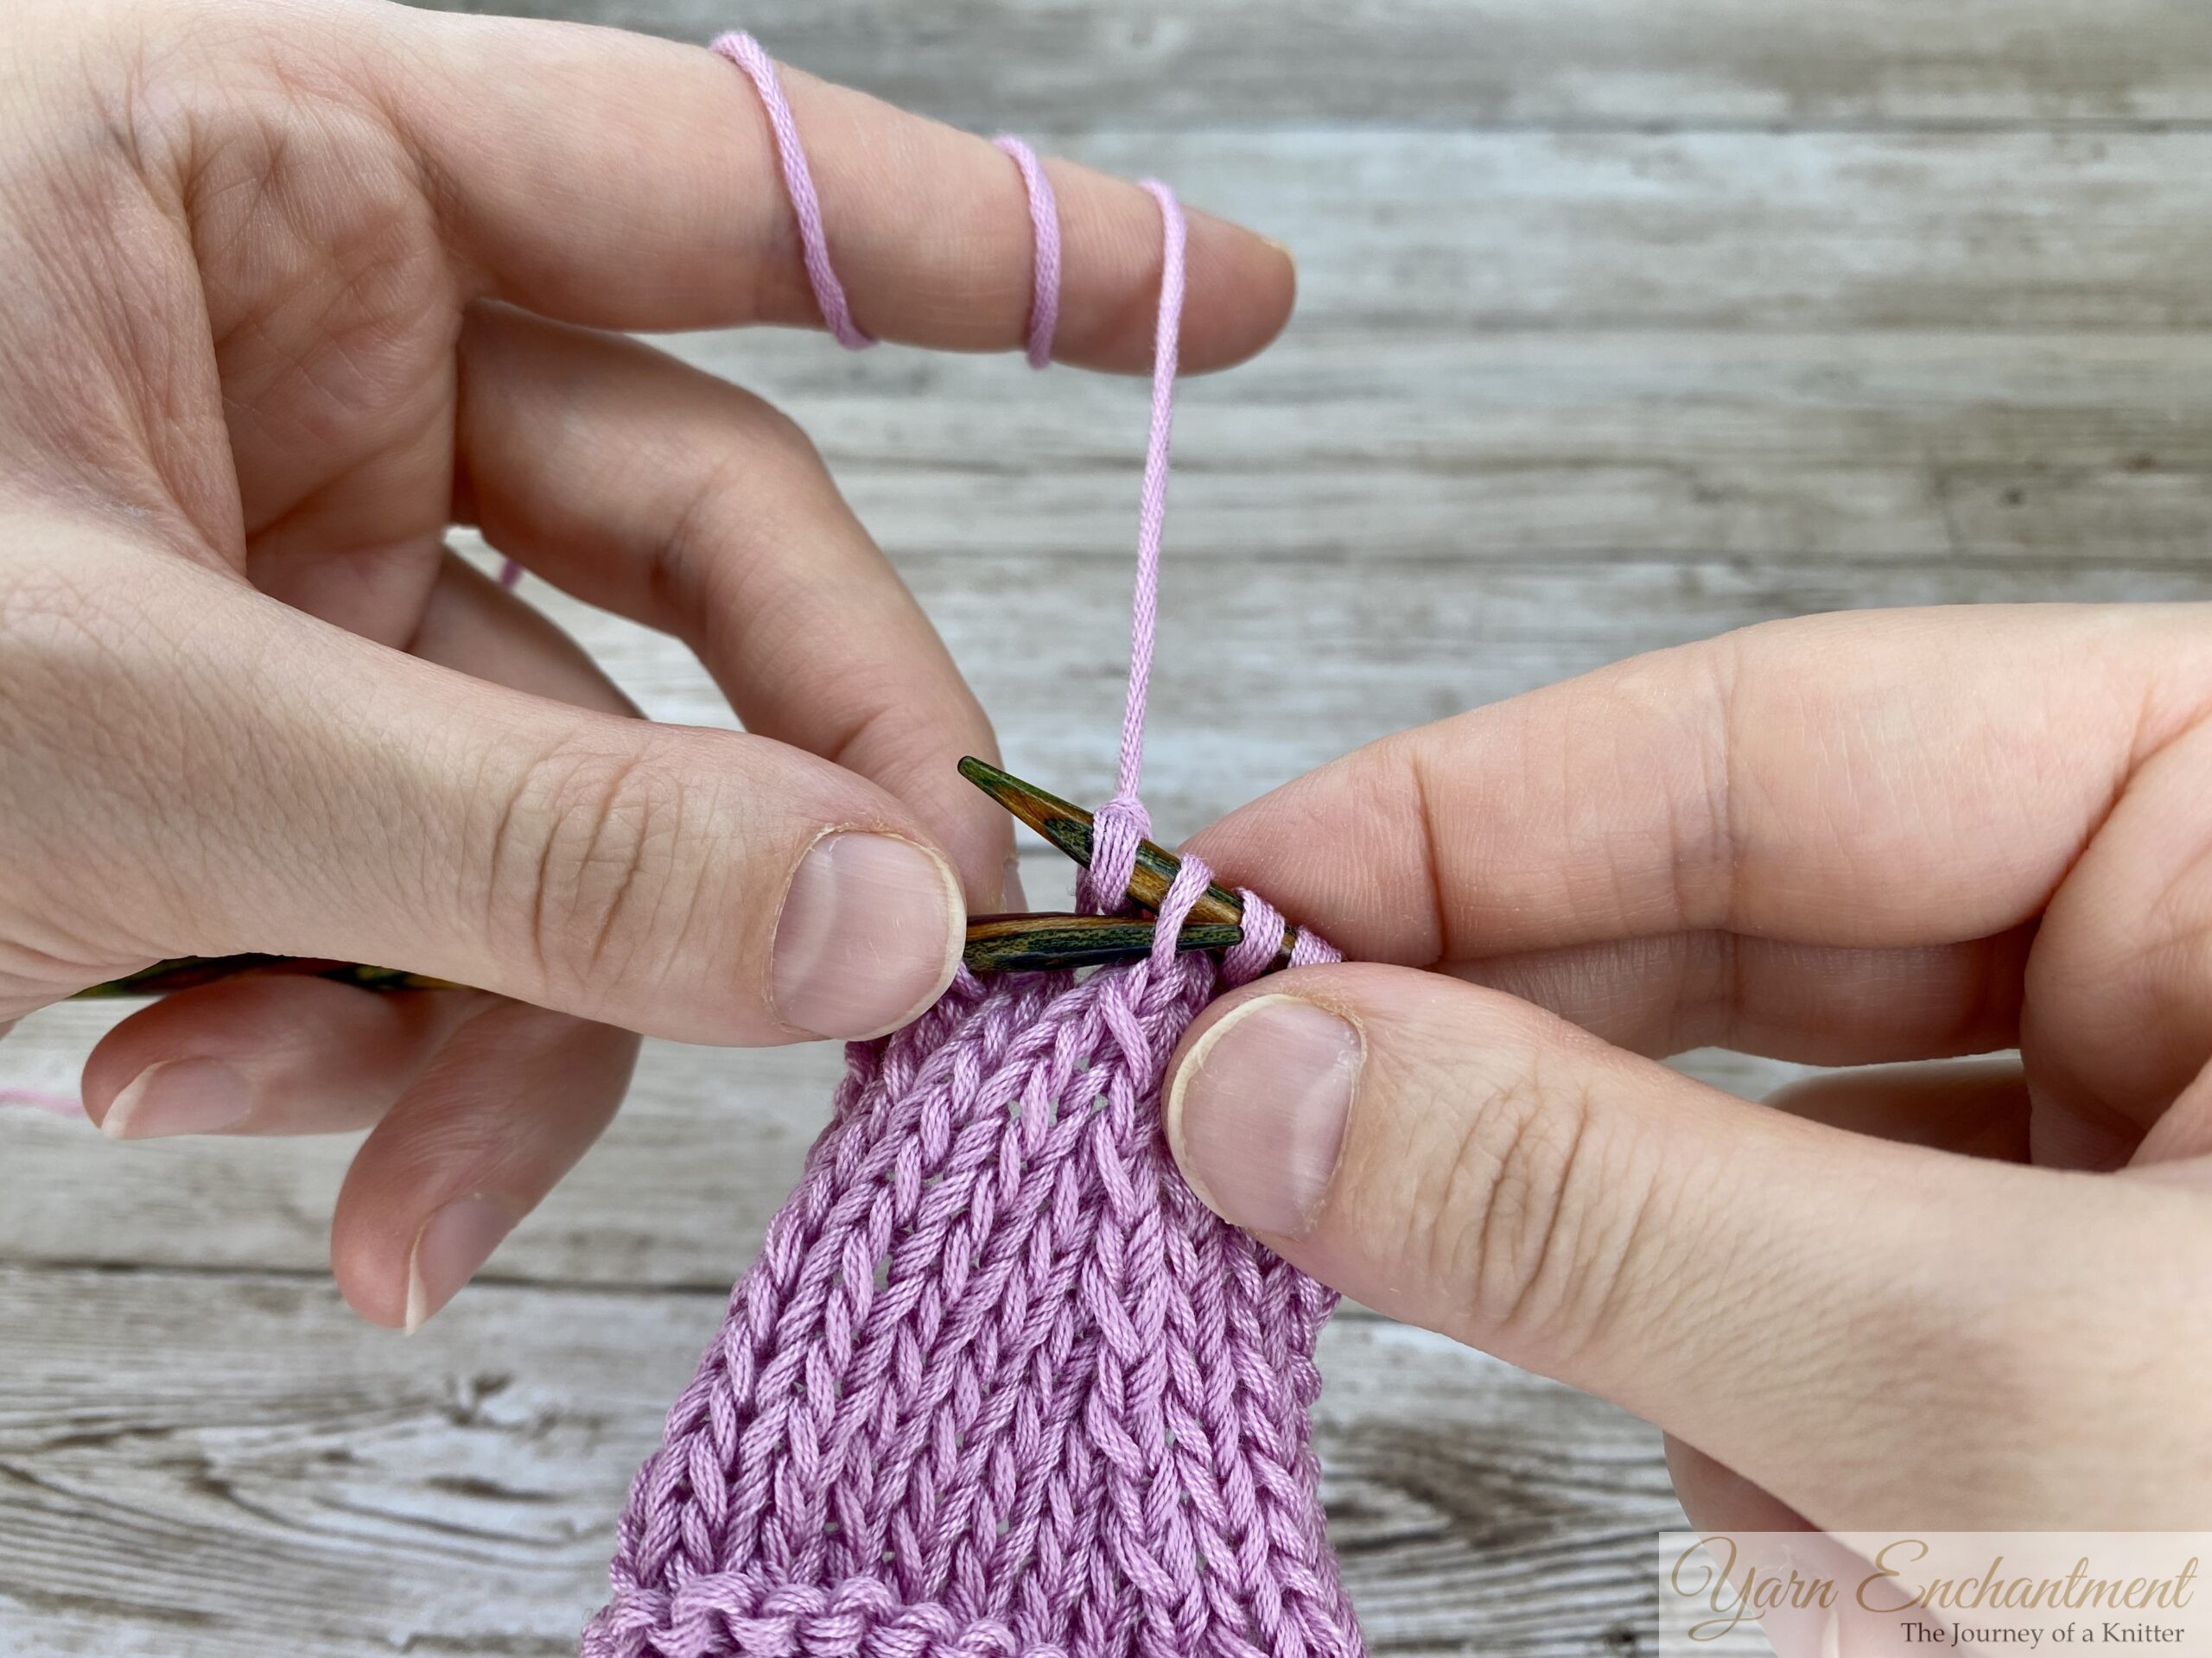
How to Work a Standard SSK
-
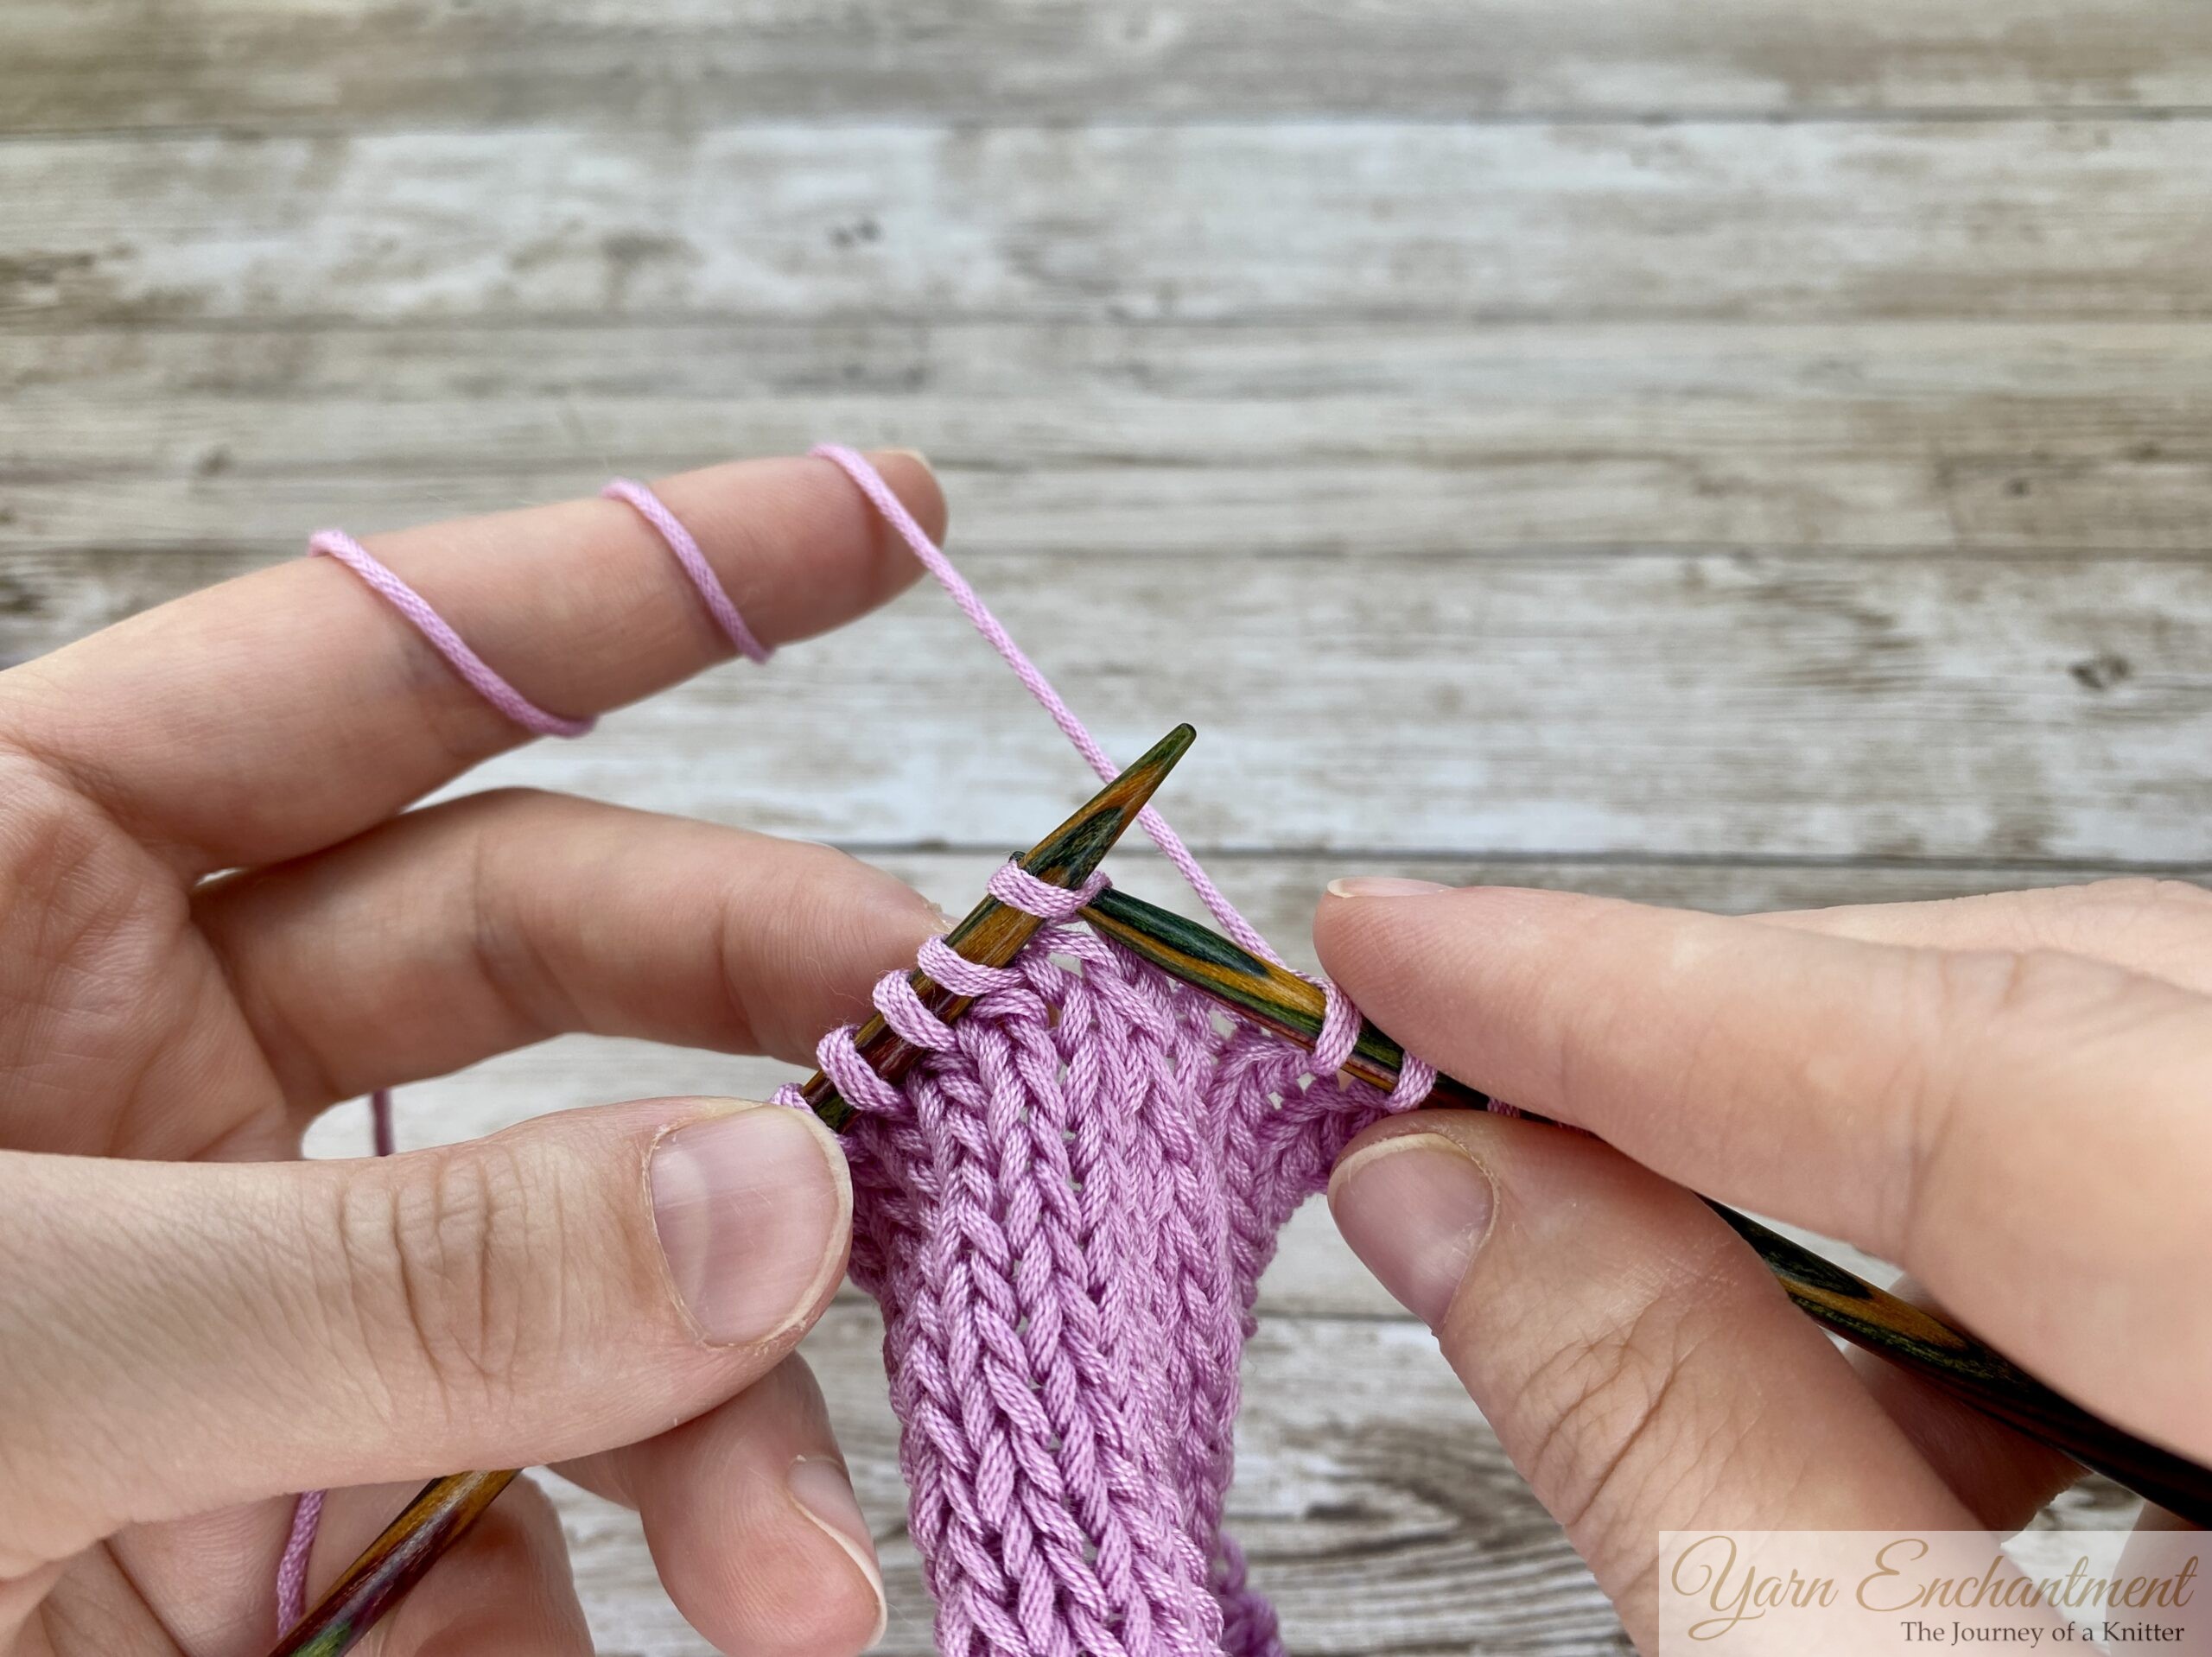
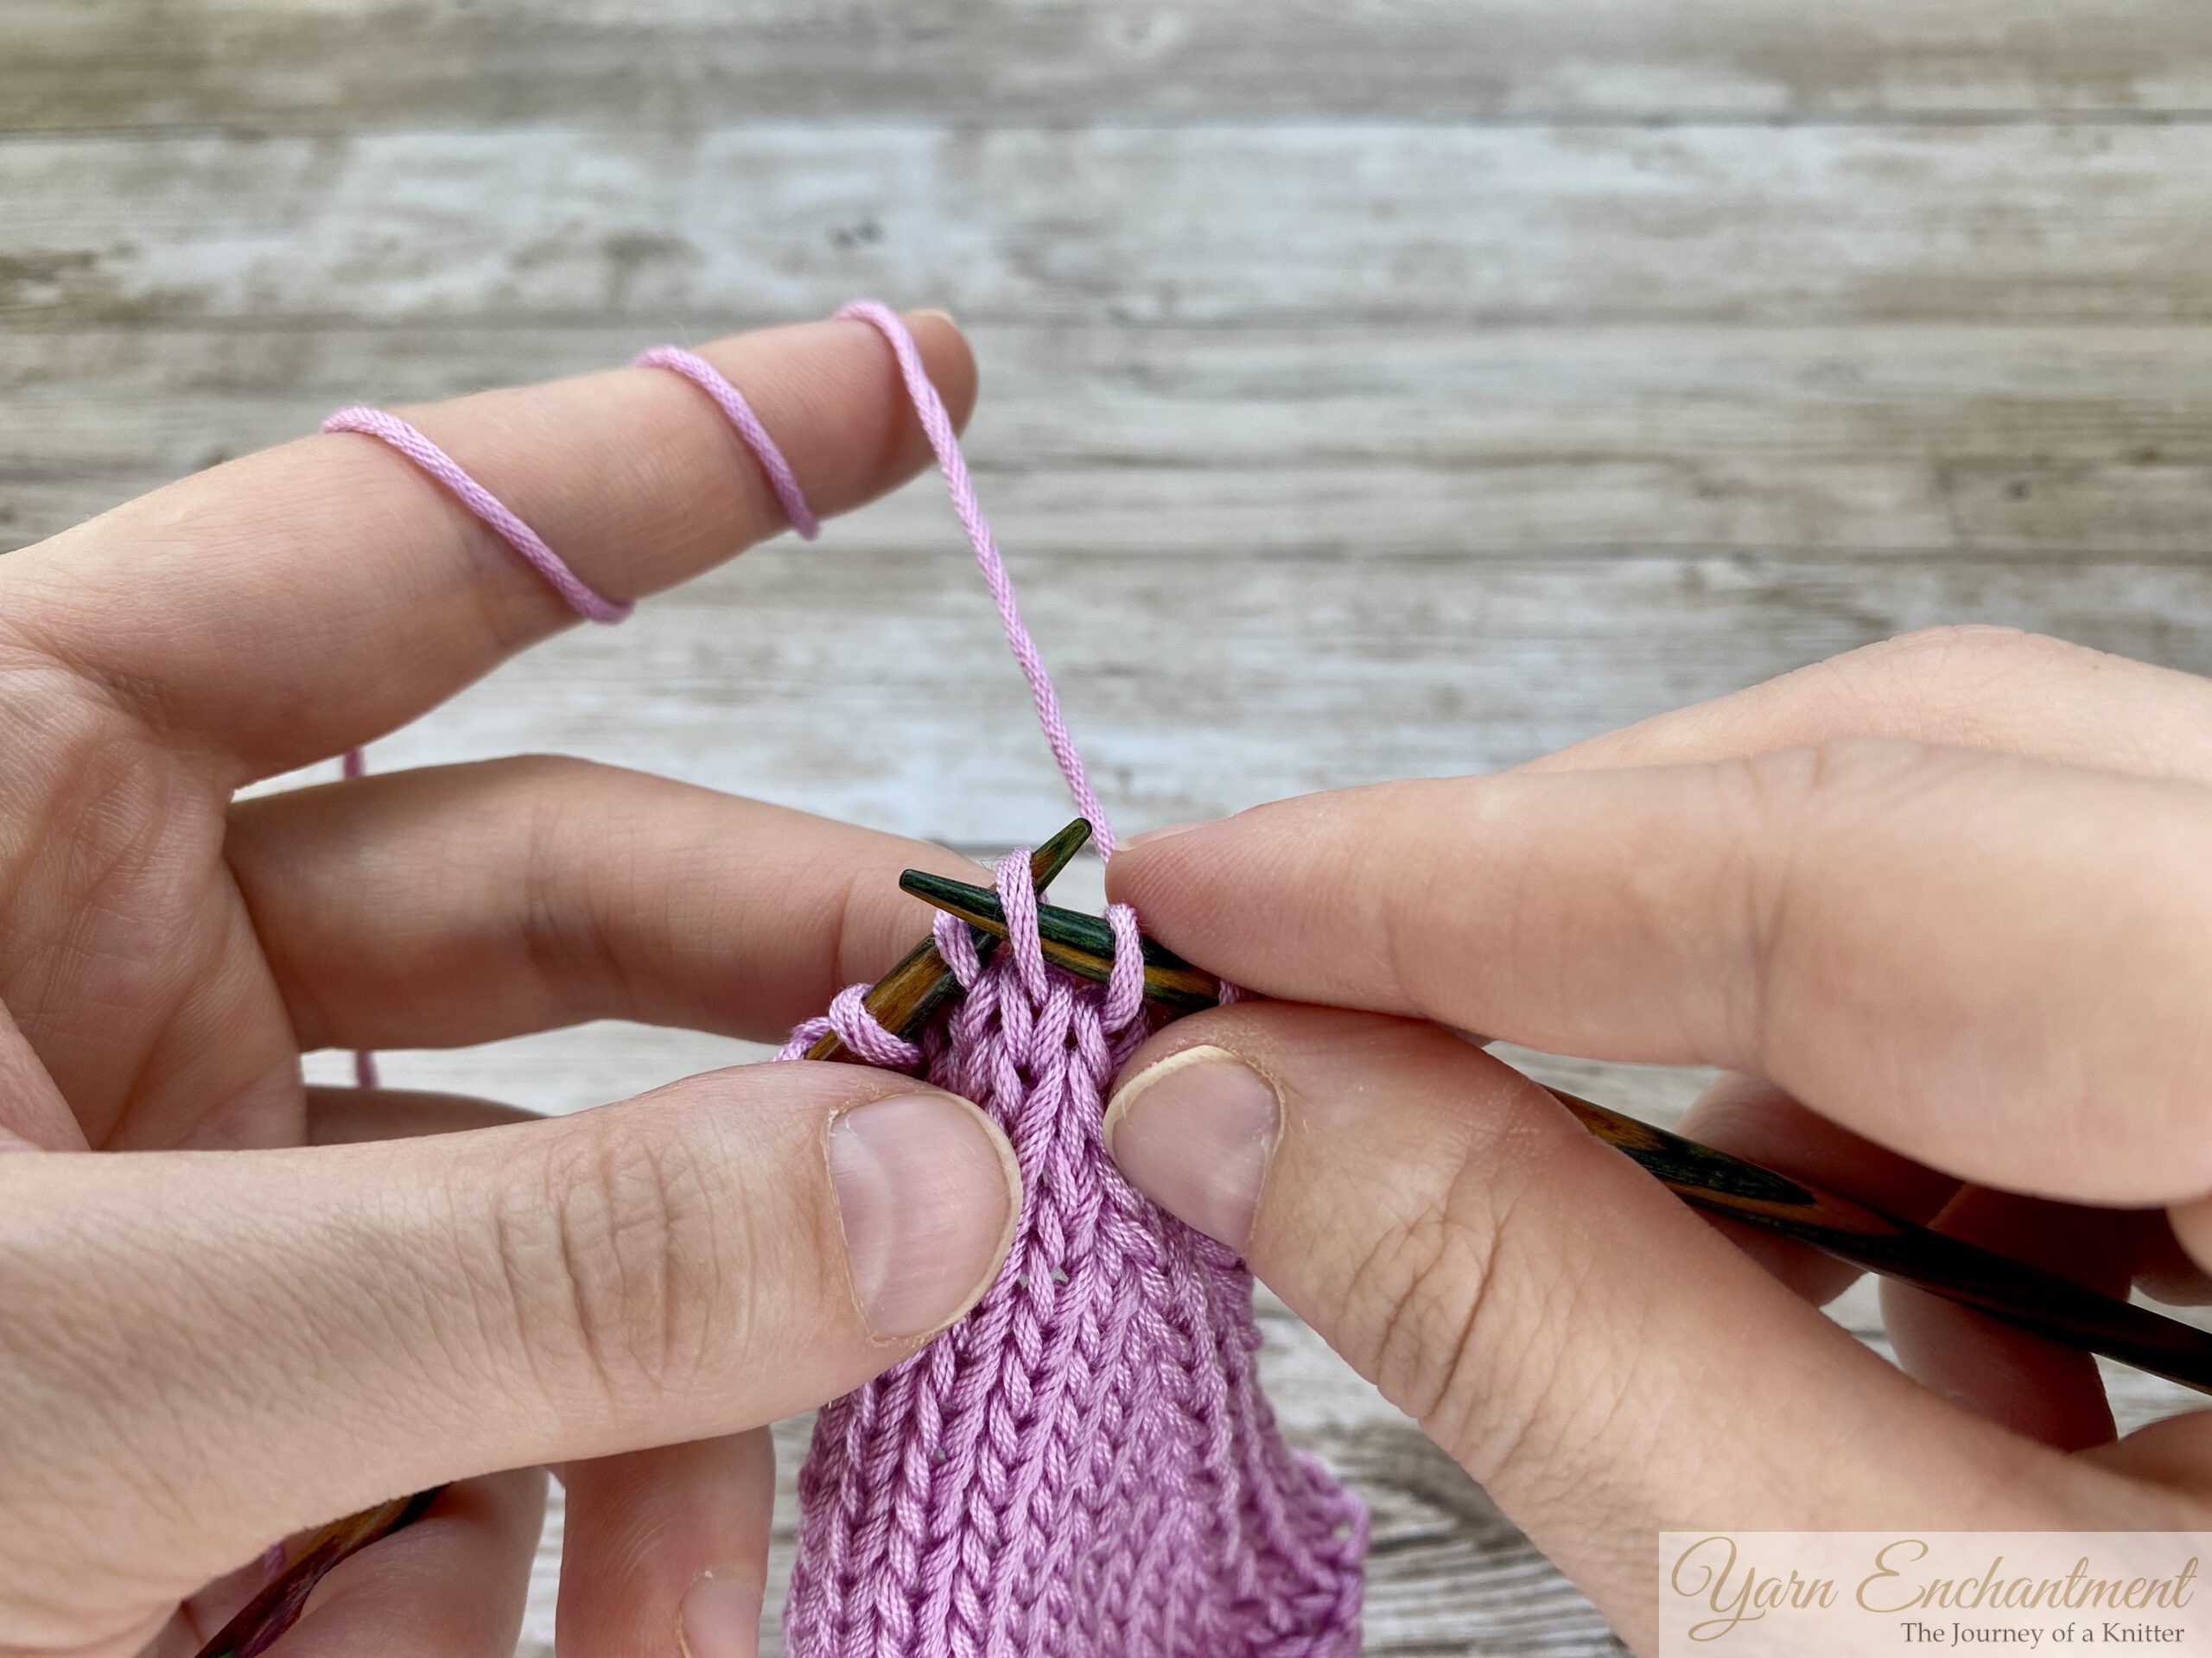
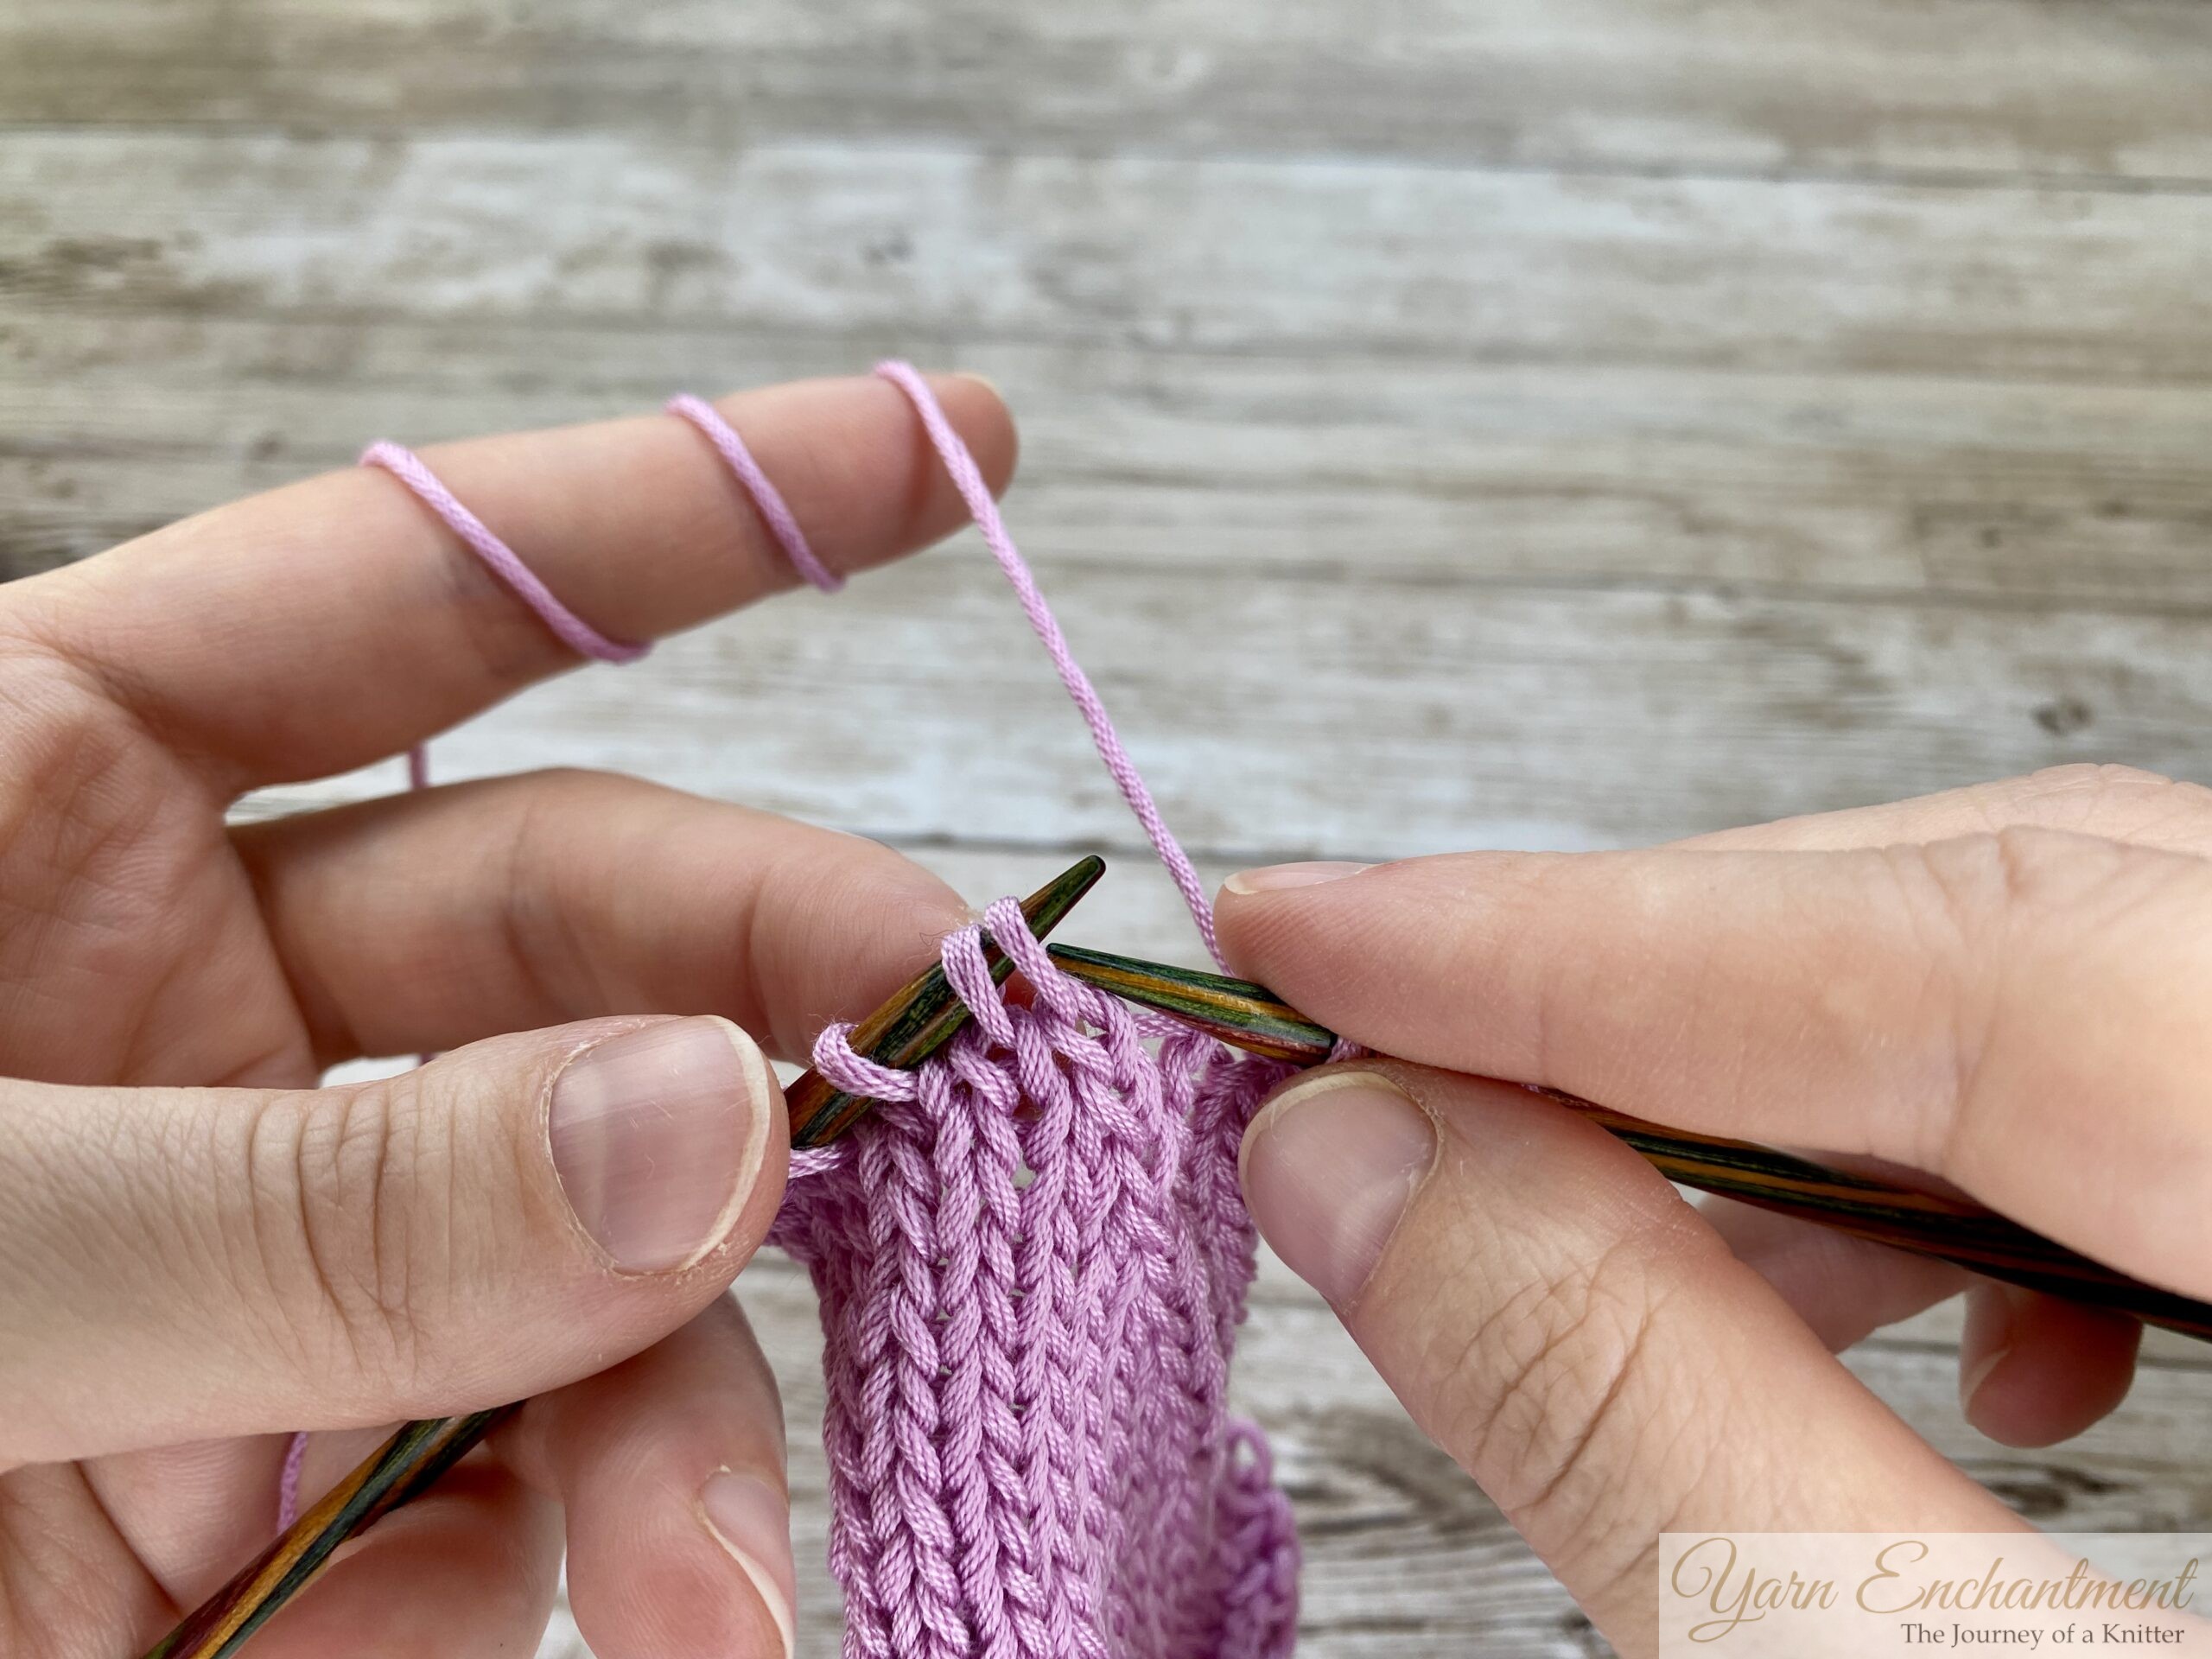
Slip the first stitch knitwise onto the right-hand needle.
-
Slip the second stitch knitwise onto the right-hand needle.
-
Insert the left-hand needle into the front of the two slipped stitches.
-
Knit the two stitches together through the back loop.
 |  |  | Slip the first stitch knitwise onto the right-hand needle. | Slip the second stitch knitwise onto the right-hand needle. | Insert the left-hand needle into the front of the two slipped stitches. |


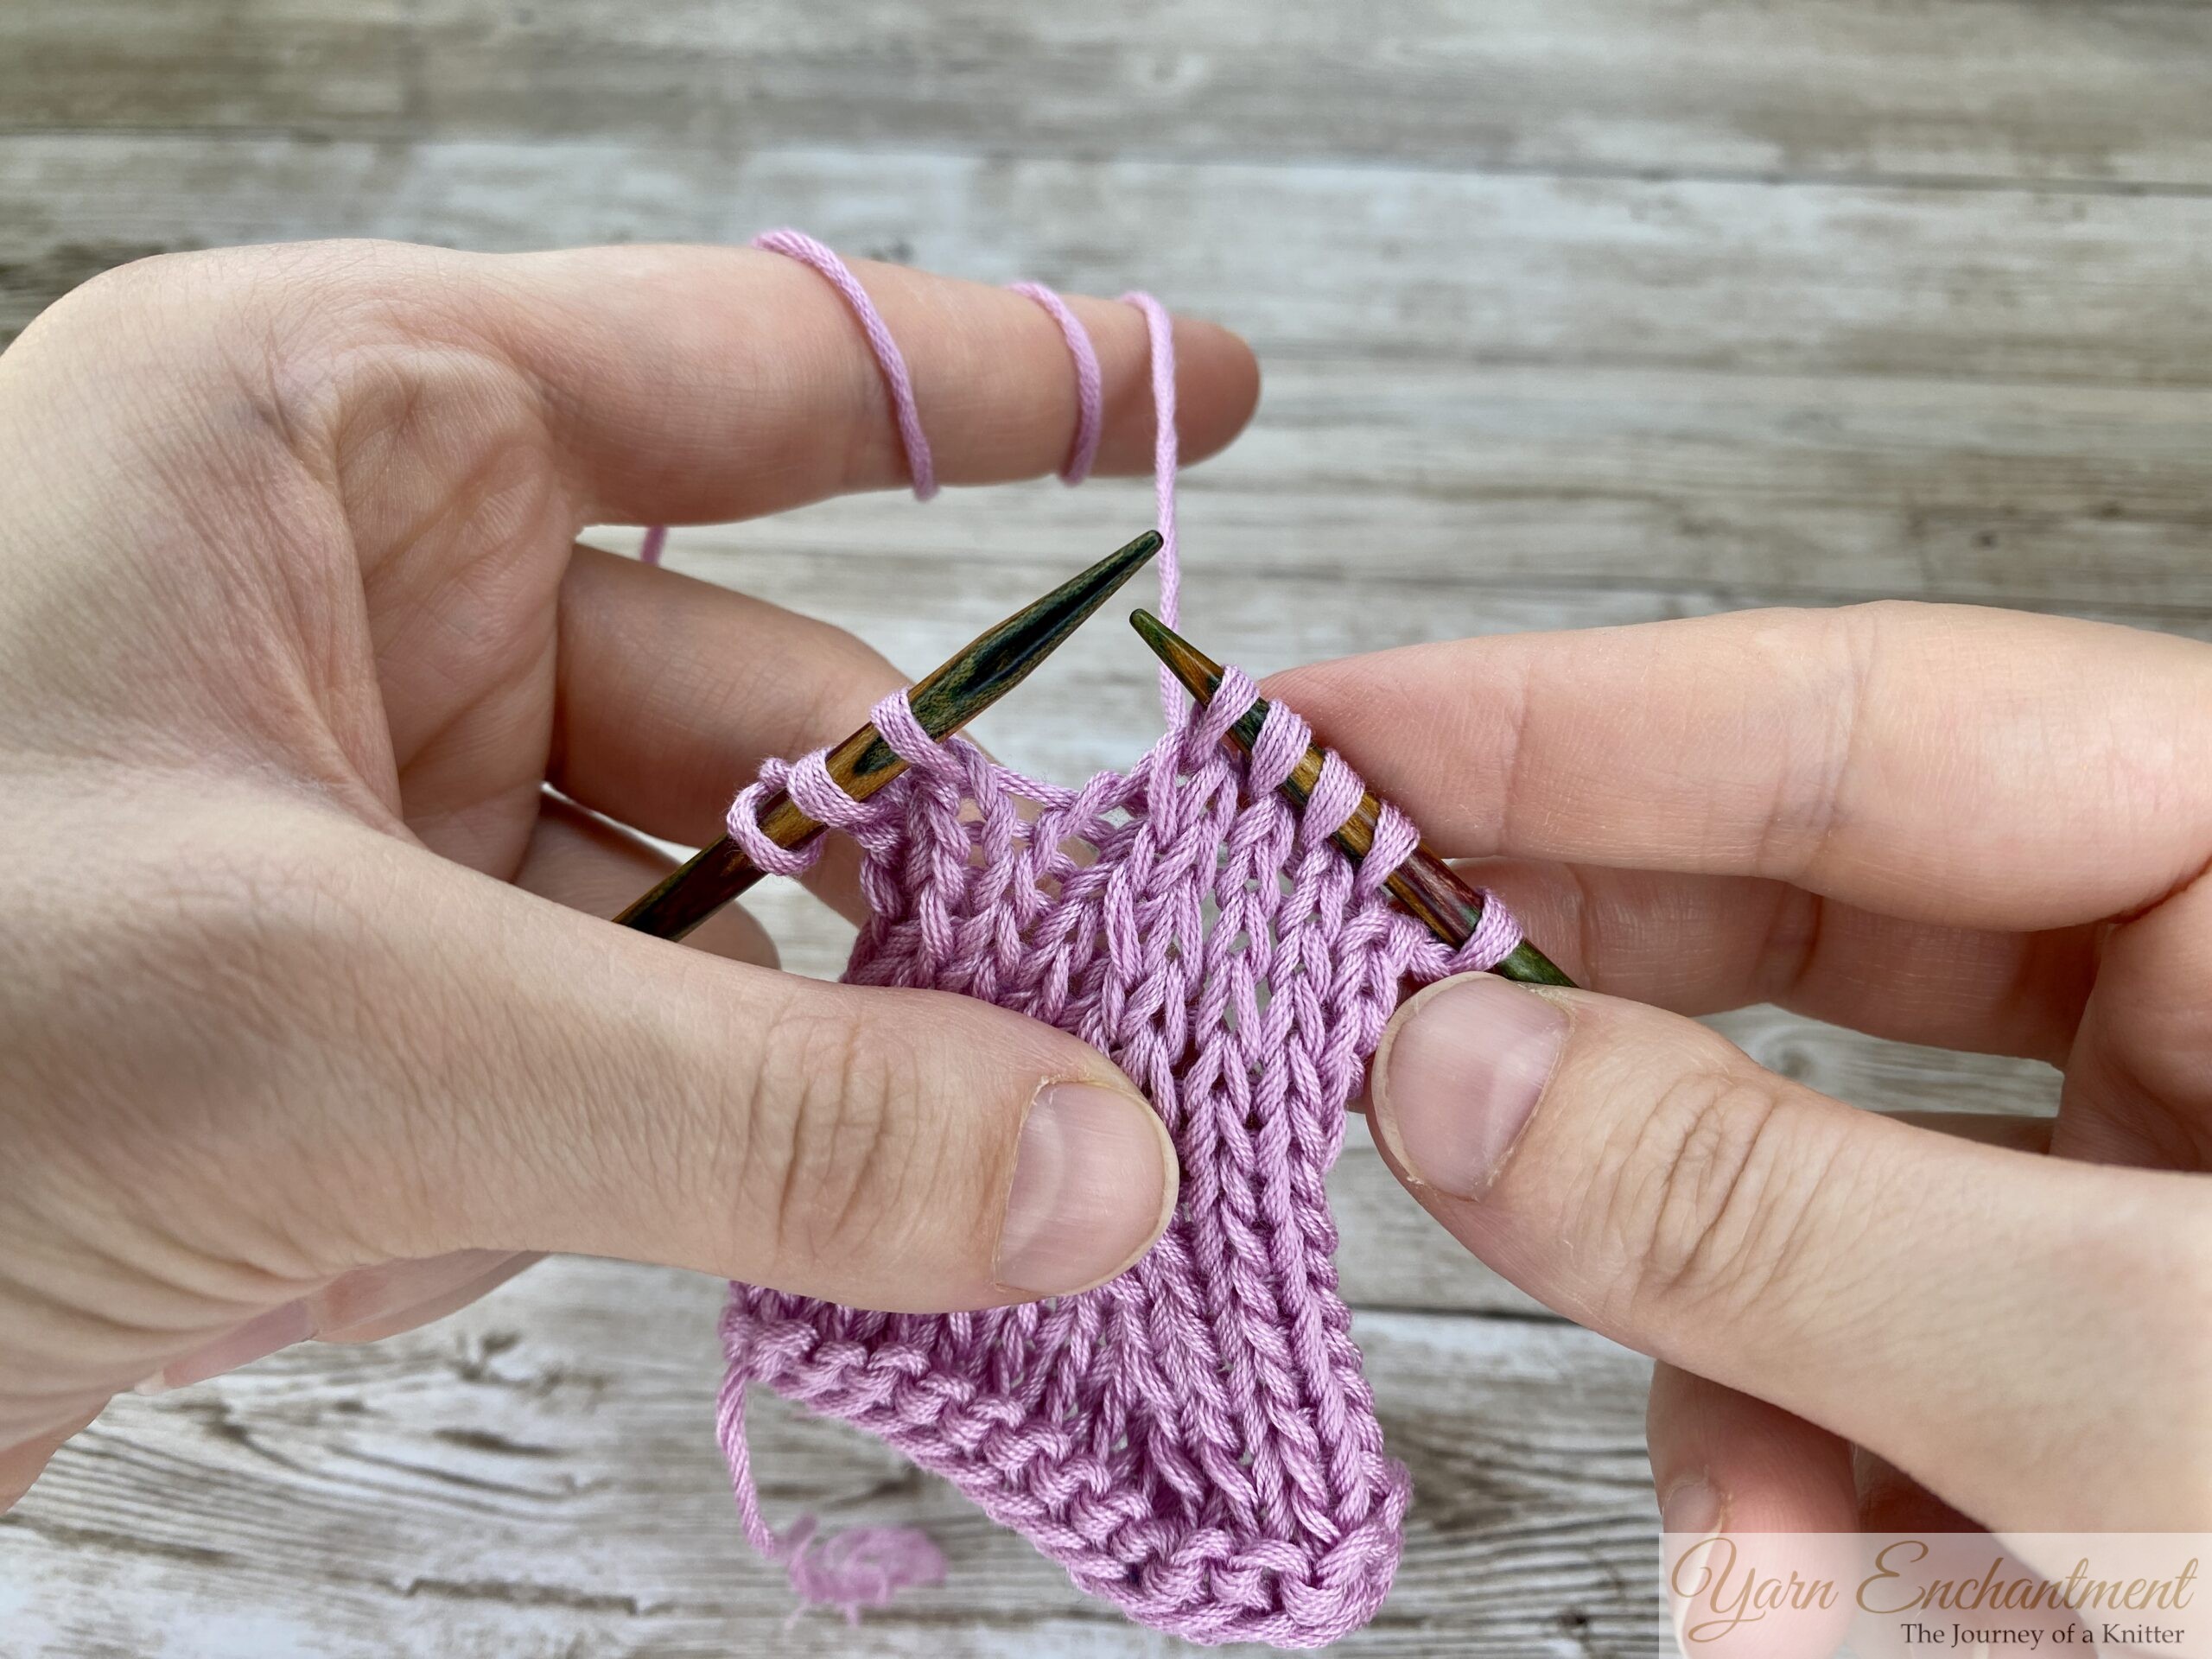
 |  |  | Knit the two stitches together through the back loop. | Slip it off the needles | Finished SSK decrease (worked in every other row). |


This method is simple and widely used, but many knitters find that their SSKs look looser and bulkier than their k2togs.
So, why does this happen?
Fixing Loose or Bulky SSKs (Expert Tips)
The good news is that you can make your SSKs look much neater with a few simple adjustments:
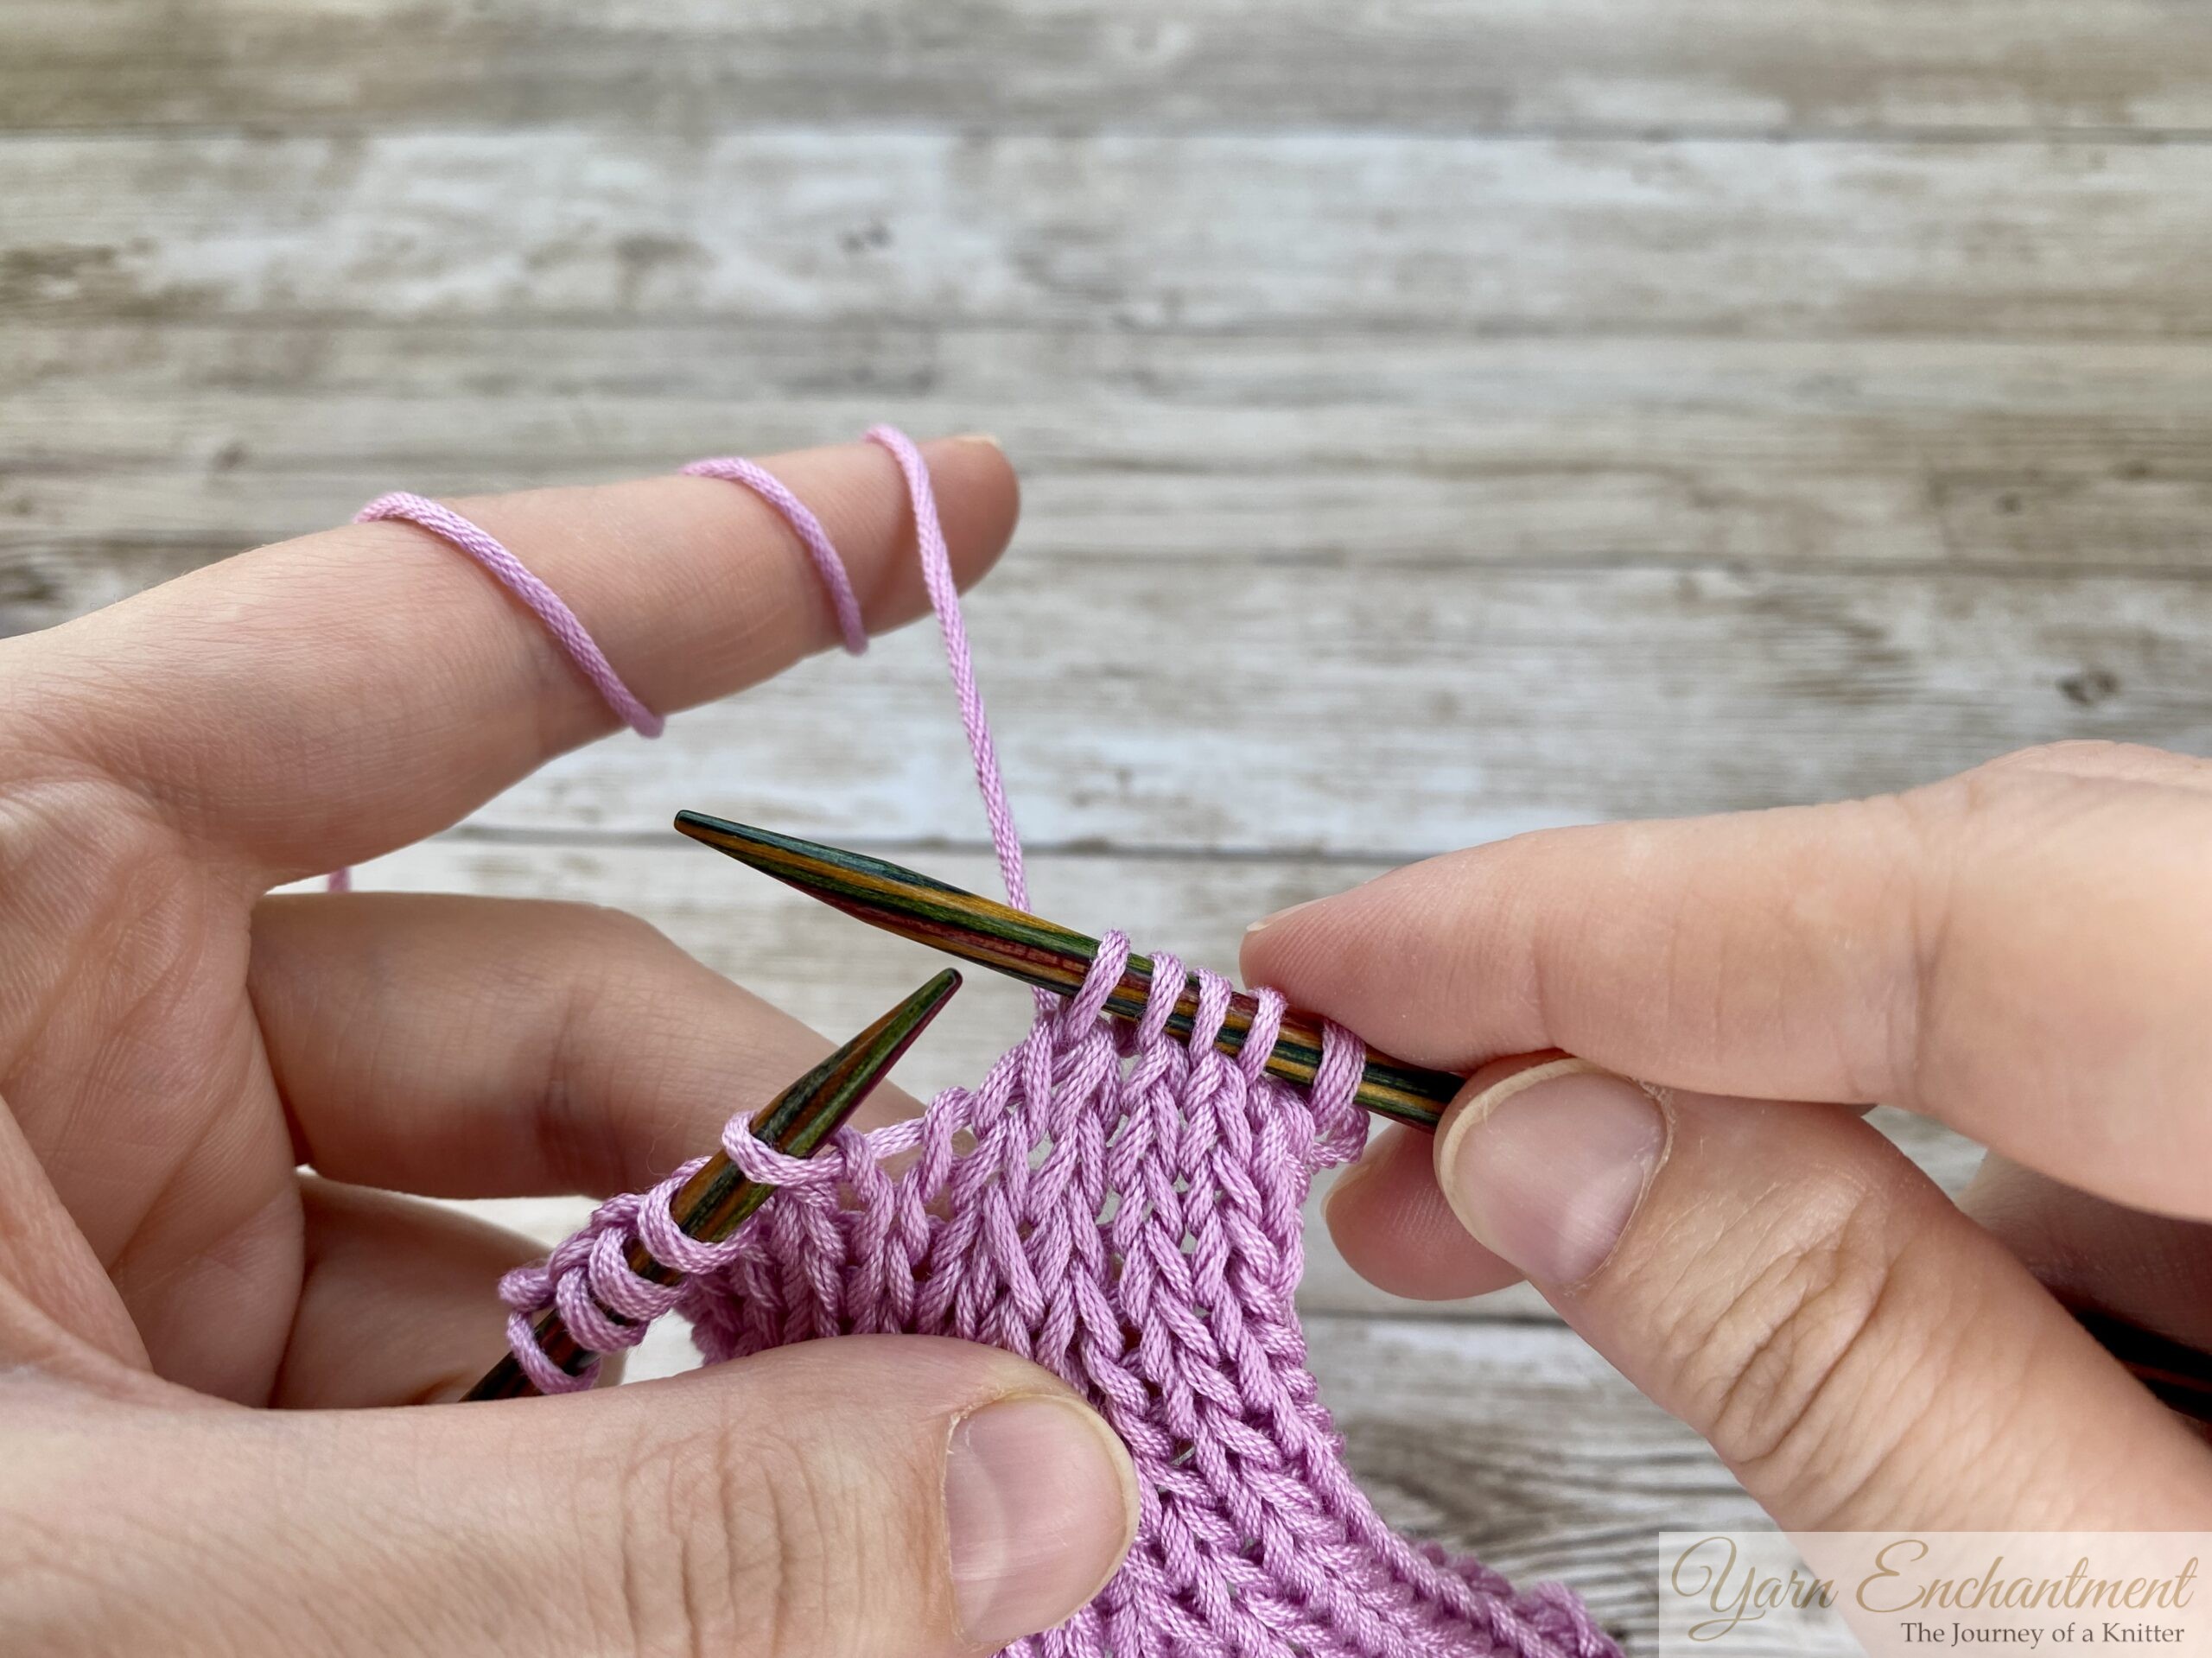
1. Work on the Tips of Your Needles
-
Keep the stitches on the tips of your needles while slipping and knitting them together. This minimizes stretching and helps maintain a tighter, neater decrease. (I really love doing it this way because my SSKs look really nice and create a clean decrease line.)
2. Be Mindful of your Tension
-
Avoid pulling the stitches. Instead, focus on keeping an even tension throughout.
3. Practice Makes Perfect
-
Like any knitting technique, SSKs improve with practice. Try working a few swatches to experiment with your tension and technique.
4. Minimize Slack
-
Be mindful of how you slip the stitches. Try to keep the yarn tension even and avoid pulling too much yarn into the slipped stitch. This can help reduce the slack caused by untwisting.
| You can see here the ridge of the left-leaning decreases formed by the SSK decreases. |
Best Alternatives to Standard SSK in Knitting
If the standard SSK still doesn’t give you the look you want, there are several alternative methods to achieve a left-leaning decrease. Here are some of the most popular options:
1. Slip One, Knit One, Pass Slipped Stitch Over (SKP or Sl1-K1-PSSO)
SKP is an older method of left-leaning decrease. It involves slipping one stitch as if to knit, knitting the next stitch, and then passing the slipped stitch over the knitted stitch.This method was commonly used before the SSK became popular. It produces the same left-leaning decrease.
How to Work SKP:
-
Knit the next stitch.
-
Slip the first stitch knitwise onto the right-hand needle.
-
Pass the slipped stitch over the knit stitch.
 |  |  | Slip the first stitch knitwise onto the right-hand needle. | Knit the next stitch. | Pass the slipped stitch over the knit stitch. |


 |  | The finished decrease. | Here’s how the decreases look when I work them in every other row. |


Result:
-
A left-leaning decrease that’s similar to SSK but may still appear slightly bulky.
2. Modified SSK (Slip Knitwise, Slip Purlwise, Knit Through Back Loop)
This variation changes how the stitches are slipped to reduce bulkiness.
How to Work the Modified SSK (Standard Method):
-
Slip the first stitch knitwise onto the right-hand needle.
-
Slip the second stitch purlwise onto the right-hand needle.
-
Insert the left-hand needle into the front of the two slipped stitches.
-
Knit them together through the back loop.
 |  | 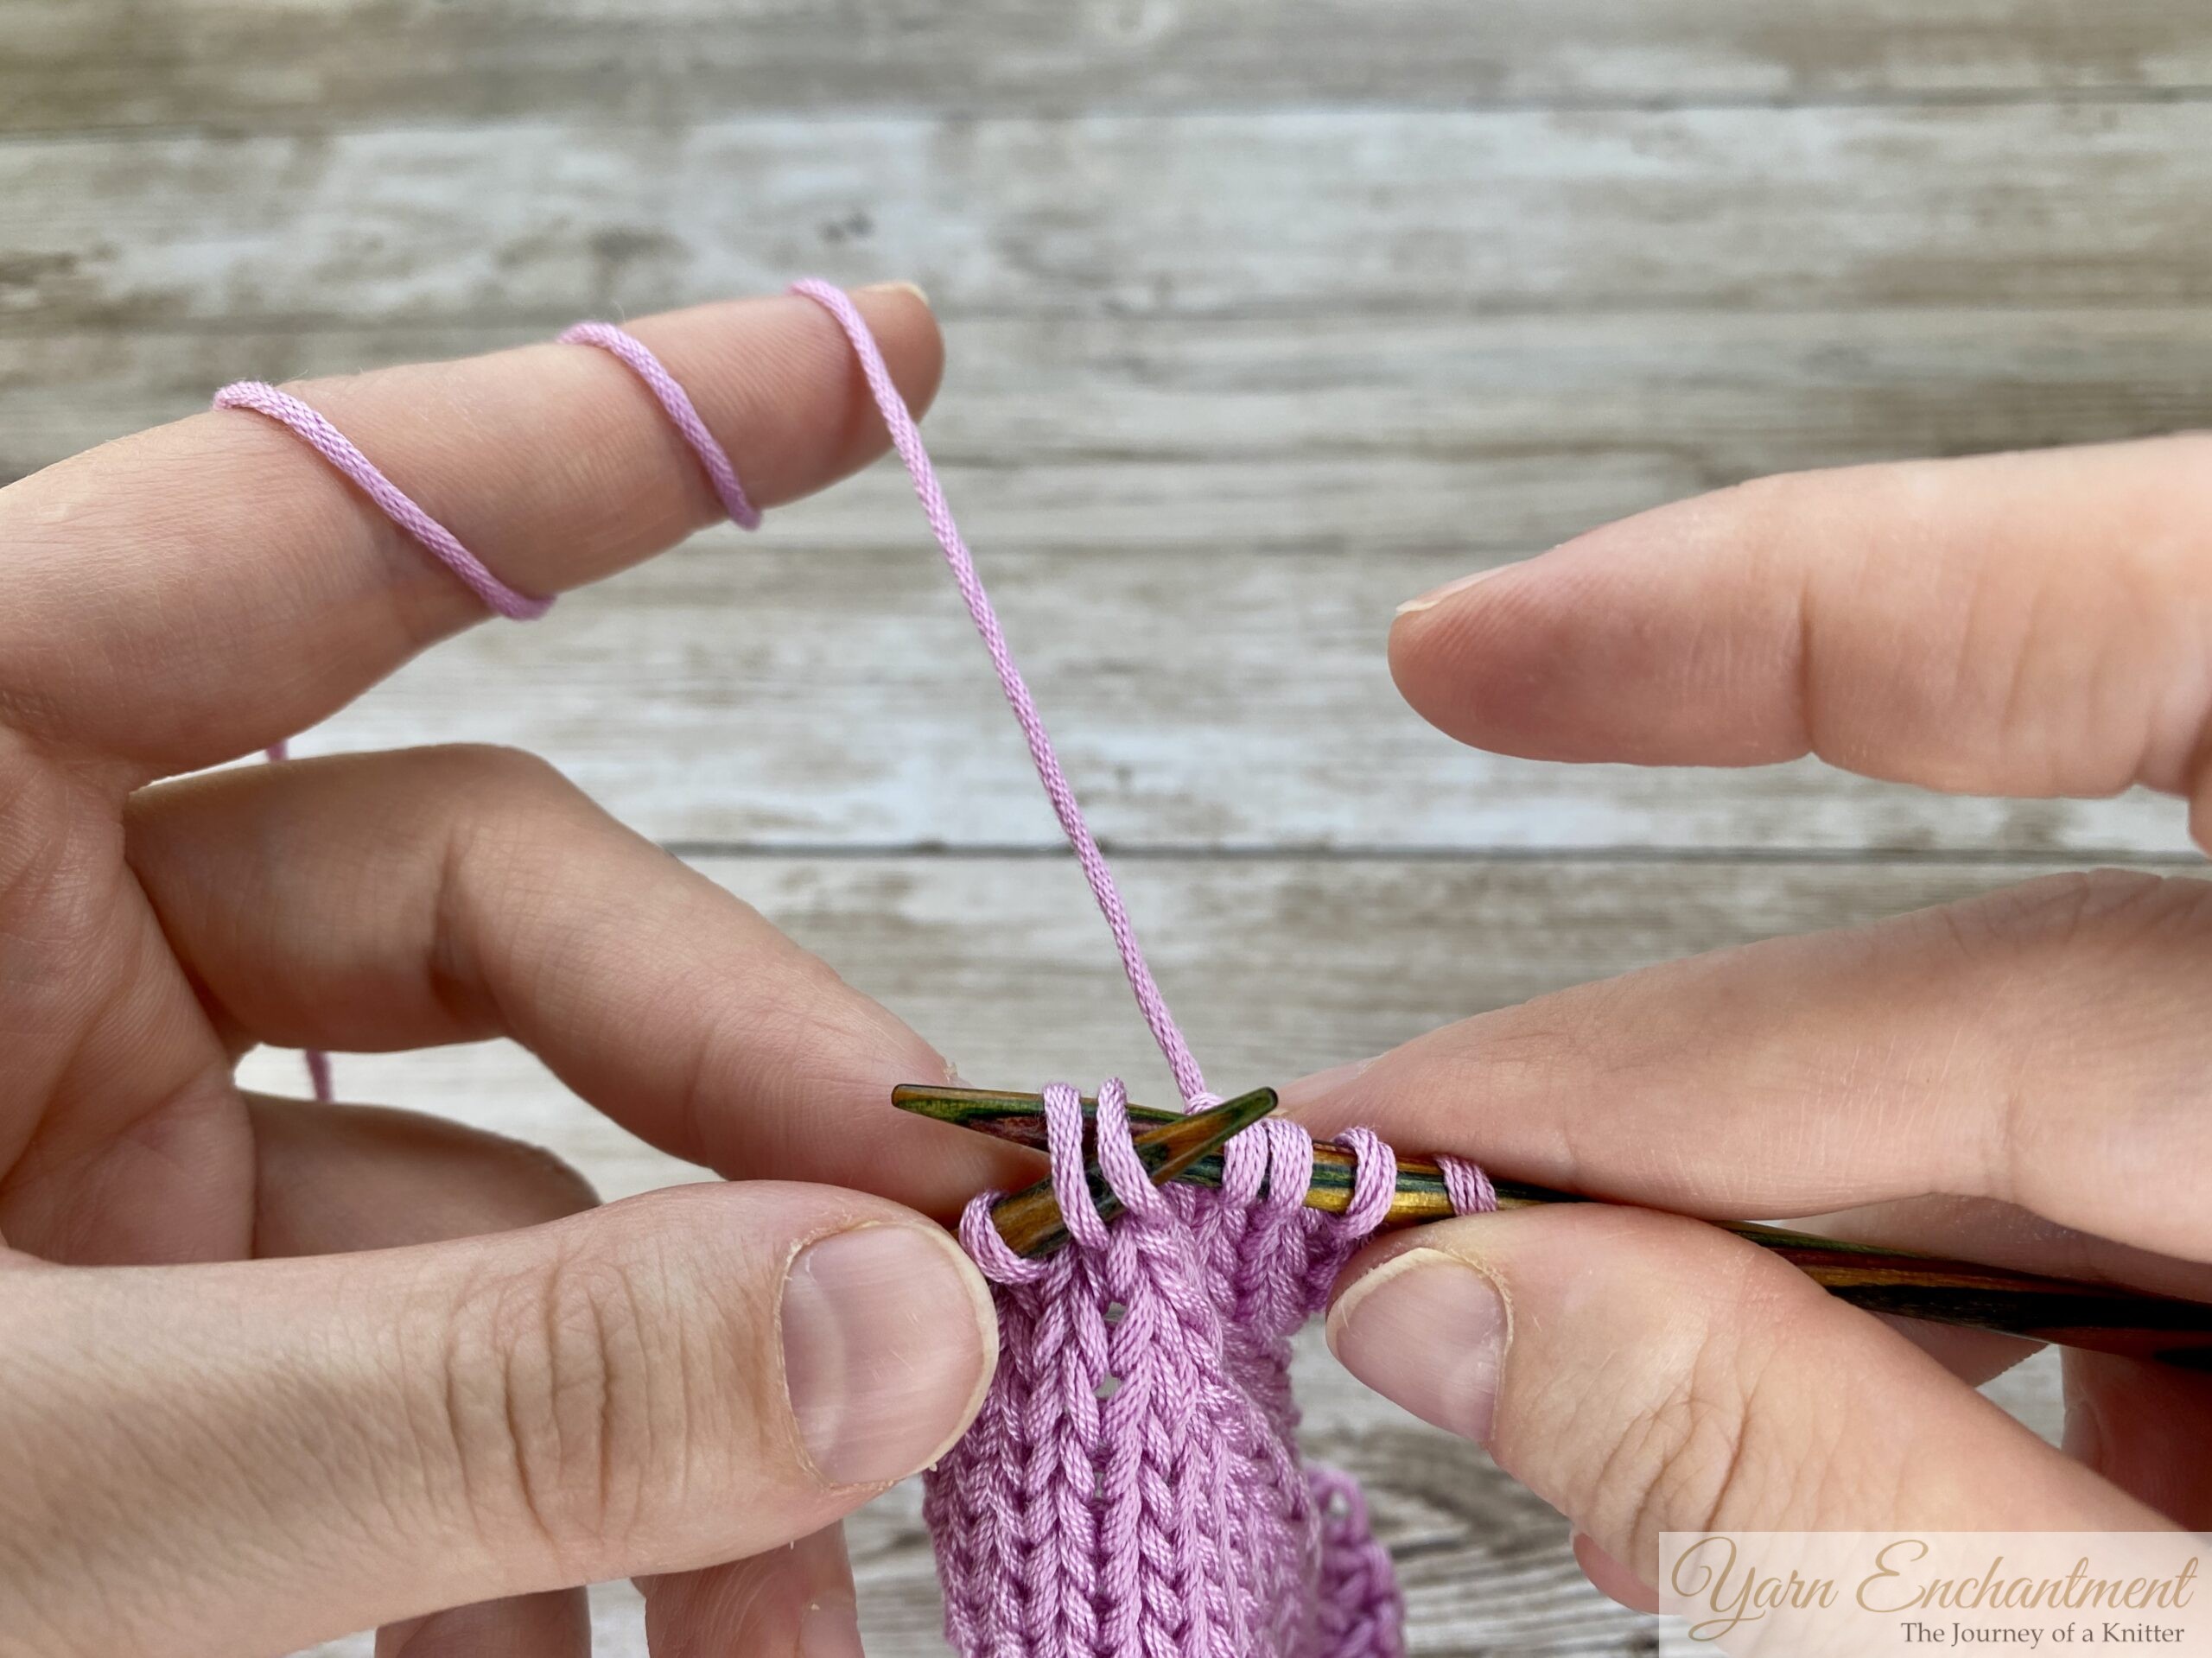 | Slip the first stitch knitwise onto the right-hand needle. | Slip the second stitch purlwise onto the right-hand needle. | Insert the left-hand needle into the front of the two slipped stitches. |


 |  | Knit them together through the back loop. | On the left, you can see the SSK decreases, and on the right, its modification: Slip Knitwise, Slip Purlwise, Knit Through Back Loop. |


How to Work Modified SSK (My Method):
-
Slip the first stitch knitwise onto the right-hand needle.
-
Return the stitch to the left-hand needle.
-
Knit the two stitches together through the back loop.
|  |  | Slip the first stitch knitwise onto the right-hand needle. | Return the stitch purlwise to the left-hand needle. | Knit the two stitches together through the back loop. |


| | Knit the two stitches together through the back loop. | In the video demonstration, you can see that when you don’t slip the second stitch purlwise, the decreases will look a little smaller. |
Why It Works:
-
Slipping or leaving the second stitch purlwise prevents it from untwisting as much, resulting in a tighter, neater decrease.
Why I am not using it
In my personal opinion, these decreases look a little sloppier than the standard SSK decreases, because as long as you are working the SSK decreases very carefully and only on the tips of your needles, they will look very neat and tidy. But perhaps this is the perfect method for you. Which decreases do you prefer? Let me know in the comments down below!
| For comparison, you can see the SSK decreases on the left and the Slip Knitwise, Slip Purlwise, Knit Through Back Loop on the right. The SSK looks much neater, but I worked both only on the tips of the needles. |
3. The One-Move SSK
If I’m not mistaken, it was Petty Lyons who first came up with this technique. I always try to find the original sources because I believe it’s only fair to credit the founder of an idea.
How to Work the One-Move SSK:
-
Insert your needle through the front loop of the first stitch.
-
Without slipping it off, bring your needle to the back and insert it through the back loop of the second stitch.
-
Petty would slip off both stitches at this point, but I prefer to first slip off the first stitch and then pull the second stitch a little tighter with the first stitch.
-
Finally, slip off the second stitch as well.
 |  |  | Insert your needle through the front loop of the first stitch. | Without slipping it off, bring your needle to the back and insert it through the back loop of the second stitch. | Bring your working yarn through both of the stitches and back to the front. |


 |  |  | I prefer to first slip off the first stitch and then pull the second stitch a little tighter with the first stitch. | Finally, slip off the second stitch as well. | I love using this method, especially for sleeves. |


Key Takeaways
Untwisting is Natural:
Yarn naturally untwists a bit during an SSK, but you can reduce its impact by working carefully and keeping your movements consistent.
Work on the Needle Tips:
Keep your stitches close to the needle tips while decreasing to avoid stretching them. This helps your SSKs stay neat and compact.
Experiment with Techniques:
Try different variations like the standard SSK, SKP, or modified SSK to see which method gives you the cleanest look and best matches your knitting tension.
Essential for Lace Patterns:
SSKs are key for creating symmetry and structure in lace knitting. When paired with right-leaning decreases like K2tog, they form elegant, directional lines that keep your lace balanced and visually cohesive.
SSK in Lace and Garment Shaping
If you’ve ever wanted your knits to look truly polished - especially those beautiful lace shawls, shaped sweaters, or neat cardigan edges - the SSK (Slip, Slip, Knit) decrease is a technique you’ll want in your toolkit. This simple move creates a nice, left-leaning lines that pair perfectly with right-leaning decreases like K2tog, giving your fabric that professional, balanced look. You’ll notice those tidy SSKs especially in places that matter most: running alongside cardigan fronts, shaping a delicate lace motif, or building a perfectly finished neckline. Because SSKs lie flatter and look less bulky than some alternatives, many knitters swear by them for any area meant to catch the eye. When you want your decrease lines to match up and your finished piece to look intentional and neat, the SSK is the way to go.
The Dahlia sweater by Le Knit is a perfect example of how different increases, like M1, and decreases, such as K2tog and SSK, can work beautifully together to create something truly outstanding.


SSK vs K2tog - Which Decrease is Best?
Ever wondered which decrease is better - SSK or K2tog? Both are must-haves for knitters, but they behave a little differently. K2tog (knit two together) leans right and usually looks neat and snug, blending right into your fabric. SSK (slip, slip, knit) leans left, which is perfect for mirrored shaping, but it sometimes ends up looking a bit looser. The good news? With a few little tricks - like working close to your needle tips or trying out modified SSK methods - you can make your SSKs just as tidy. When projects call for symmetry, use SSK on the left edge and K2tog on the right. That way, your decreases look polished and balanced, giving your handmade pieces that extra touch of intention and beauty.
Frequently Asked Questions (FAQs)
Q: Why do my SSKs look bigger than my K2togs?
SSKs can sometimes appear a little looser because slipping two stitches changes their twist, which can add extra slack. To fix this, try working on the very tips of your needles and pay close attention to tension - these small tweaks help tighten up your decrease and create a more even look.
Q: Is SKP the same as SSK in knitting?
They both create a left-leaning decrease, but SKP (slip one, knit one, pass slipped stitch over) is the older version. Most knitters now use SSK because it produces a smoother, flatter result that blends beautifully into modern fabric textures.
Q: Can I substitute SSK and K2tog in any pattern?
Not quite. Since SSK leans to the left and K2tog leans to the right, switching them will alter your shaping and symmetry. For example, in sweater necklines or lace edges, each type of decrease is placed intentionally to mirror the other. Always follow the pattern’s instructions for the cleanest, most balanced results.
Q: How can I make my SSKs look neater?
Try a modified version - slip the first stitch knitwise, the second purlwise, then knit them together through the back loop. Keeping your tension steady and working close to the needle tips helps too. With a little practice, your SSKs will look just as tidy as your K2togs.
Final Thoughts
SSKs are an essential part of knitting, but they don’t have to be frustrating. Once you understand why they sometimes look bulky and try out a few alternative methods, you’ll find they can be just as neat and dependable as any other decrease. Whether you prefer the classic SSK or enjoy experimenting with modified techniques, the key is to work carefully and keep your tension even. With a bit of practice, your left-leaning SSK decreases will look just as polished as their right-leaning counterparts, the smooth and reliable K2togs!
Next week, I want to talk about the Knit 2 Together Through the Back Loop (K2tog tbl) decreases, which are also left-leaning decreases! Don't forget to have fun and enjoy your knitting! If you have any questions or more tips regarding the SSK decreases, leave a comment down below!
Until then, happy knitting!
A Little Way to Say Thanks
You Might Also Like


 |
|
Join the Cozy Corner Newsletter!
Hey there, creative soul! Welcome to the Yarn Enchantment Newsletter, where we celebrate all things cozy, crafty, and full of heart. Think of this as your friendly crafting companion - a little dose of inspiration delivered straight to your inbox, just for you. Inside, you’ll find: ✨ Exclusive patterns & tutorials - ideas you won’t find anywhere else (just for us!) 📚 Bookish crafts that bring your favorite stories to life 🧶 Tips and tricks to make your crafting journey smoother (and more fun!) 💌 Heartfelt musings on life, creativity, and the magic of making something with your own two hands Whether you’re knitting by the fire, brainstorming your next DIY project, or just looking for a little creative pick-me-up, this newsletter is here to cheer you on. Because let’s be honest - crafting isn’t just about the finished project; it’s about the joy, peace, and stories we create along the way. So grab a cup of tea, cozy up, and join me. Together, we’ll weave a little magic into everyday life - one stitch, one story, and one email at a time. P.S. I’m so glad you’re here. Let’s make something beautiful together! (Note: If you're using an ad blocker, you may encounter issues subscribing to the newsletter. To subscribe, please consider disabling your ad blocker.)
|

2 Comments
What’s up, just wanted to say, I liked this blog post.
It was practical. Keep on posting!
Thank you so much for your kind words!