When Crafting Doesn’t Calm: Knitting, Anxiety & Healing
August 11, 2026
How to Care for Knitwear: Wash, Dry & Store Sweaters
August 30, 2026How to Read Lace Knitting Charts: A Beginner-Friendly Guide

Originally published on August 16, 2026
When I first started knitting lace, I fell completely in love with the airy eyelets and delicate fabric. The first project I picked came with both written instructions and a grid. At the time, that grid looked like a secret code. As a beginner, I had never worked with charted instructions before, so I decided to knit my first lace scarf using only the written row by row lines.
The written pattern was clear enough, but I kept losing my footing. There were so many abbreviations to track, and I had to stop constantly to look up what each one meant. Today, those symbols and abbreviations feel like second nature, but back then, I felt overwhelmed. Giving up, though, has never really been in my nature.
If you have ever felt that same hesitation, you are in good company. Learning how to read lace knitting charts is one of the best beginner knitting tips anyone can learn, because it opens up a whole world of gorgeous, cozy handmade gifts and intricate projects that only look impossible.
When I asked my newsletter readers what they struggled with most, lace charts symbols and how to read charts came up again and again. So grab your favorite mug, settle in with a warm cup of tea, and let us walk through this step by step.
In this beginner-friendly guide, we will explore:
- The difference between a lace chart vs written pattern
- Why charts are read from bottom to top and right to left
- What pattern repeat boxes and "no stitch" squares actually mean
- How to read common lace knitting chart symbols with confidence
- My favorite yarn tips for new crafters to help you keep your place
  |
How to read lace charts: A beginner-friendly guide |
Table Of Contents
Written vs. Charted Lace Patterns: What's the Difference?
When you open a lace knitting pattern, you will usually find one of two formats: written row by row instructions, or a visual grid made of symbols. Both tell you how to knit the same lace, but they do it in completely different ways. And depending on your personality, one will probably feel a lot more natural than the other.
What is a written lace pattern?
A written lace pattern uses words and standard knitting abbreviations to tell you what to do on each row. It looks something like this:
Row 1 (RS): k2, yo, ssk, k1, k2tog, yo, k3. Row 2 (WS): purl all stitches. Row 3: k3, yo, ssk, yo, k2tog, k2. Row 4: purl all stitches.
I remember starting with written patterns because they felt safer. You just follow the words, no symbol key required. If you already know your abbreviations, you are good to go. That is why written instructions are often easier for beginners. They tell you exactly what to do, step by step.
Pros of written lace patterns
- Easy to read if you know the abbreviations
- No need to memorize chart symbols
- Wonderful for simple stitch repeats
- Handy when you are knitting on the go, like waiting for an appointment or riding the train
Cons of written lace patterns
- Larger projects quickly turn into an intimidating wall of text
- Hard to see how decreases and yarn overs align visually
- Mistakes hide easily until you are many rows past them
- Repetitive lines make it easy for your eyes to wander to the wrong row
I once worked a written lace shawl where I missed a single yarn over. I did not realize my mistake until twelve rows later, which is the exact moment every knitter wants to sigh and put their work away for the night.
What is a charted lace pattern?
A charted lace pattern is a visual grid. Each square represents a single stitch, and the symbol inside tells you which technique to work:
- An empty square = knit on the right side, purl on the wrong side
- A circle = yarn over
- A left leaning slash = ssk
- A right leaning slash = k2tog
You read the grid from bottom to top, moving from right to left across right side rows, and left to right across wrong side rows.
The wonderful thing about learning how to read knitting charts is that the grid actually mirrors your physical fabric. The circles show where your eyelets will open up, and the slanted lines show where your decreases will lean.
Pros of charted lace patterns:
- You can see the entire motif at a single glance
- Makes tracking your pattern repeat section much simpler
- The visual map helps you spot mistakes immediately
- Perfect for intricate lace shawl knitting patterns and large projects
- Faster to follow once the symbols click in your mind
Cons of charted lace patterns:
- You need to check the key regularly until the symbols feel familiar
- Can feel intimidating on the first try
- Easy to lose your row without a bookmark or highlighter tape
- Remembering row direction takes a bit of practice
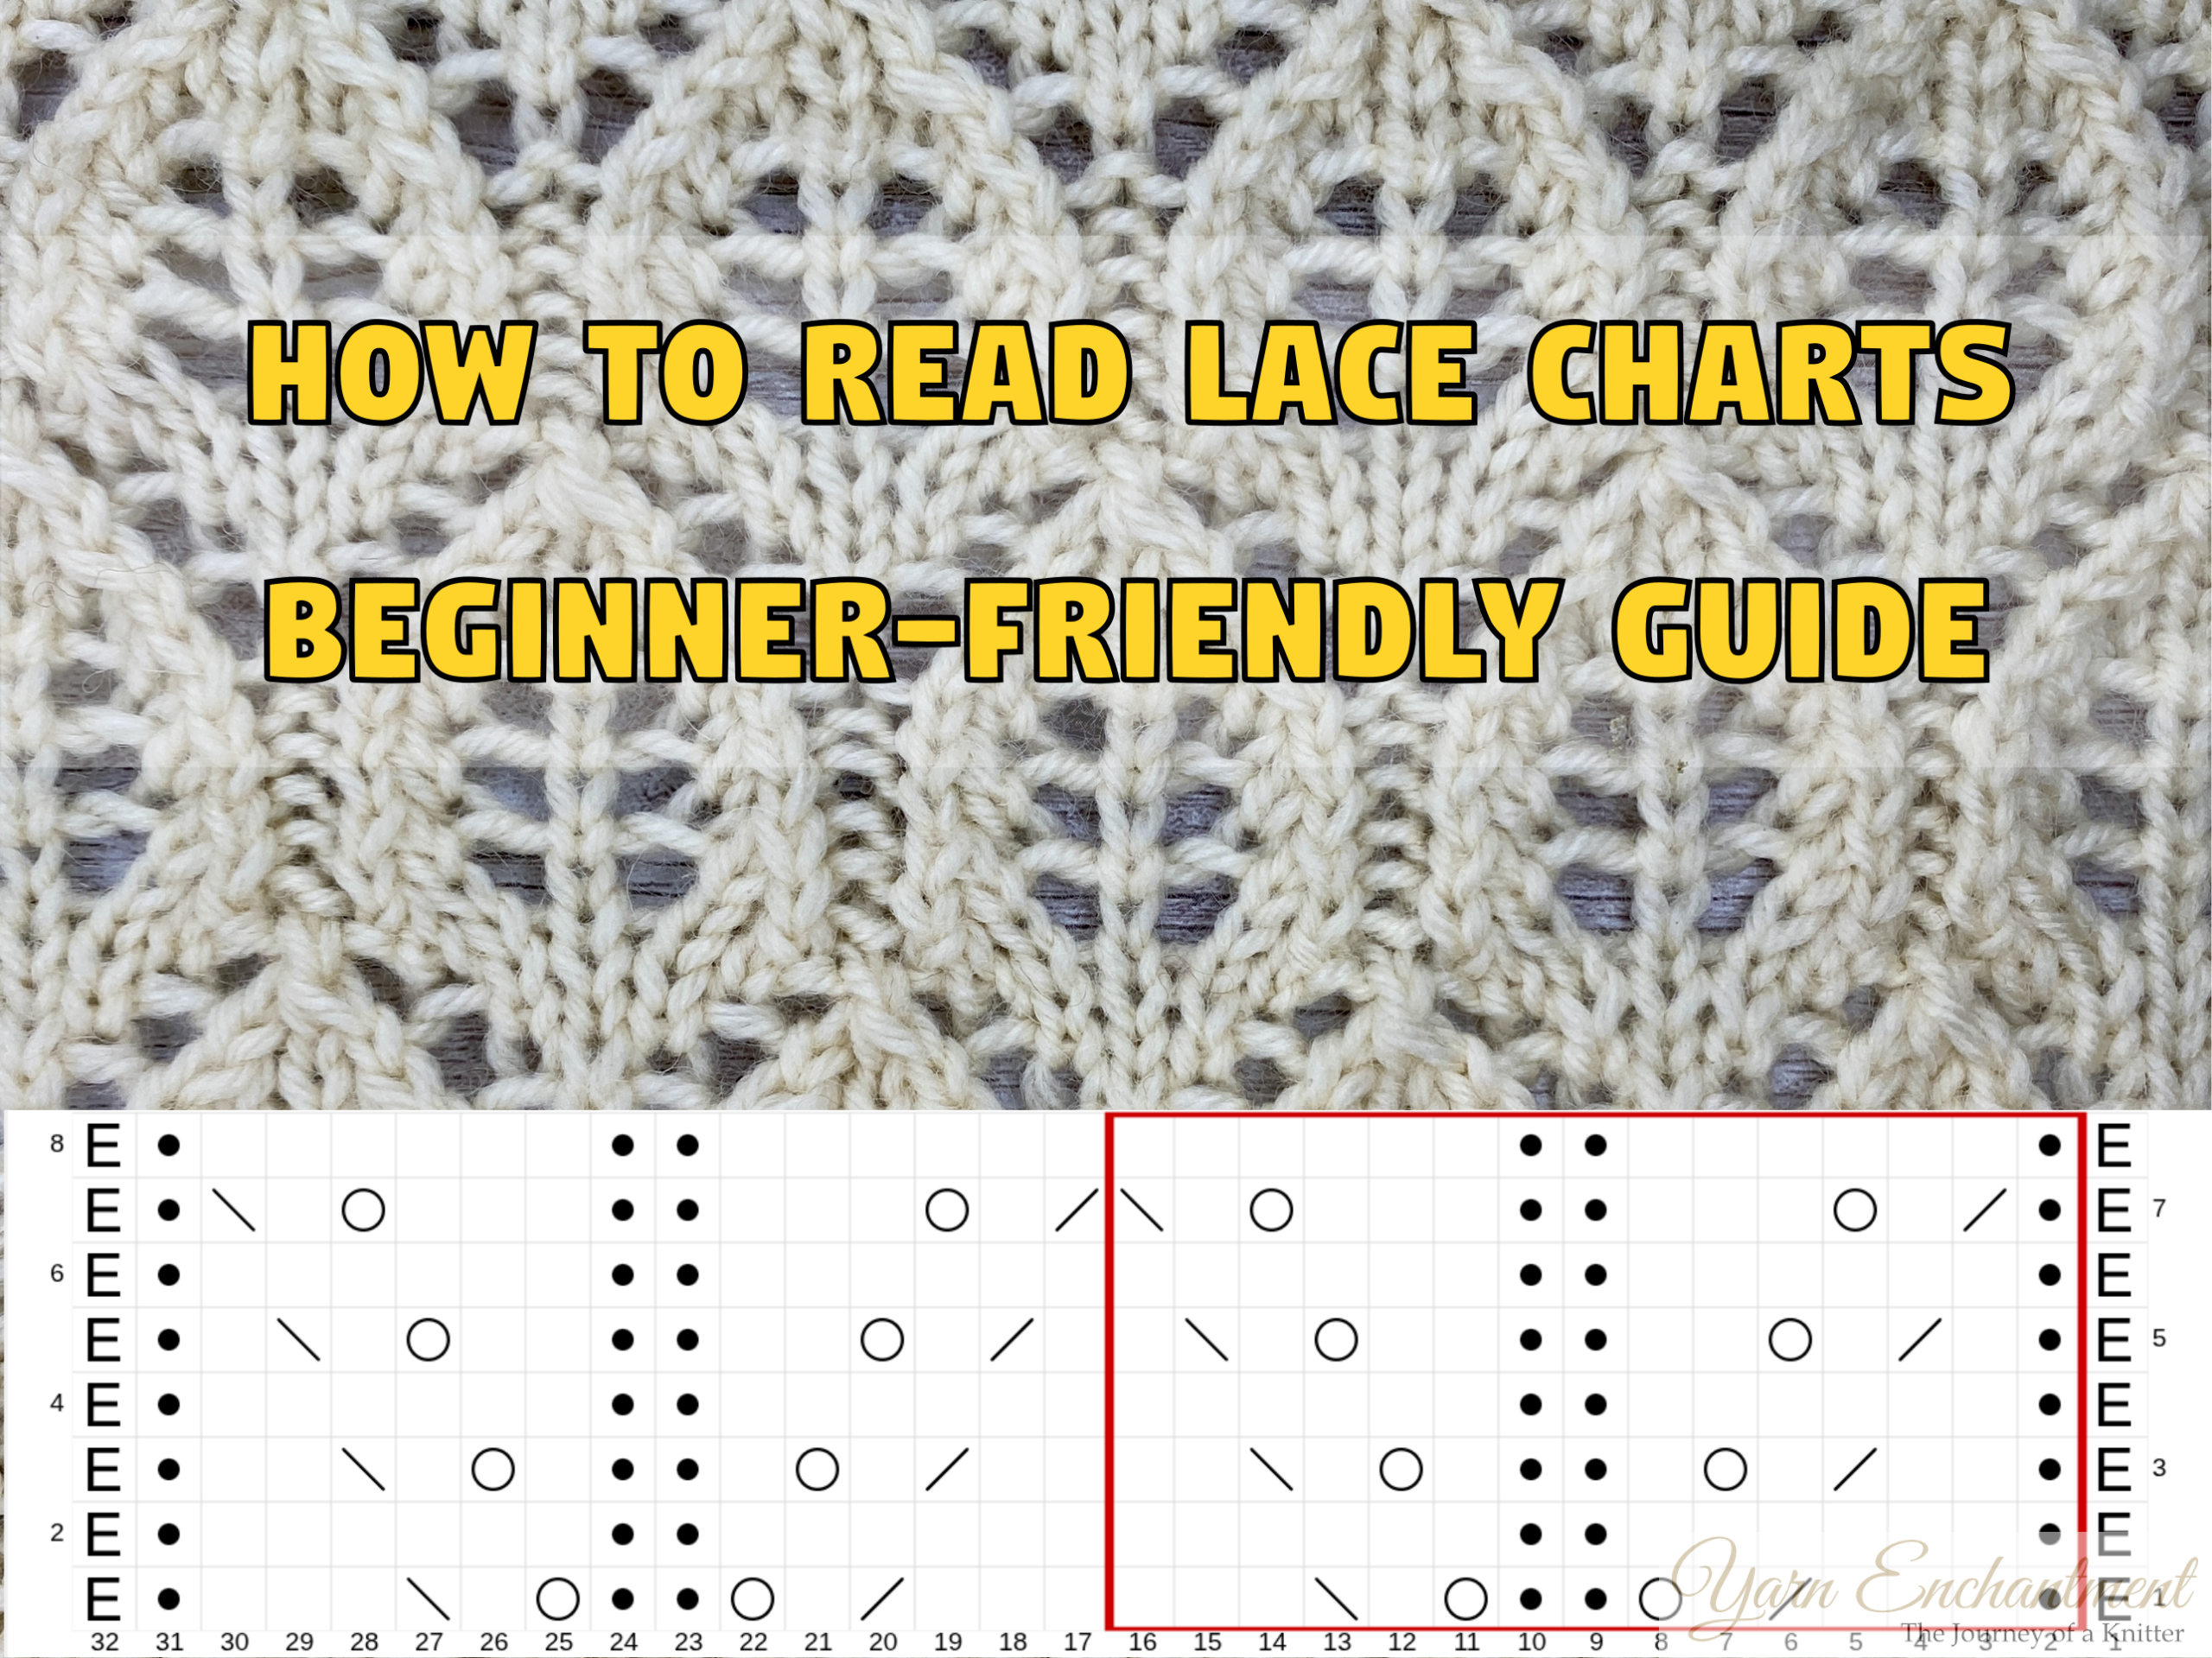
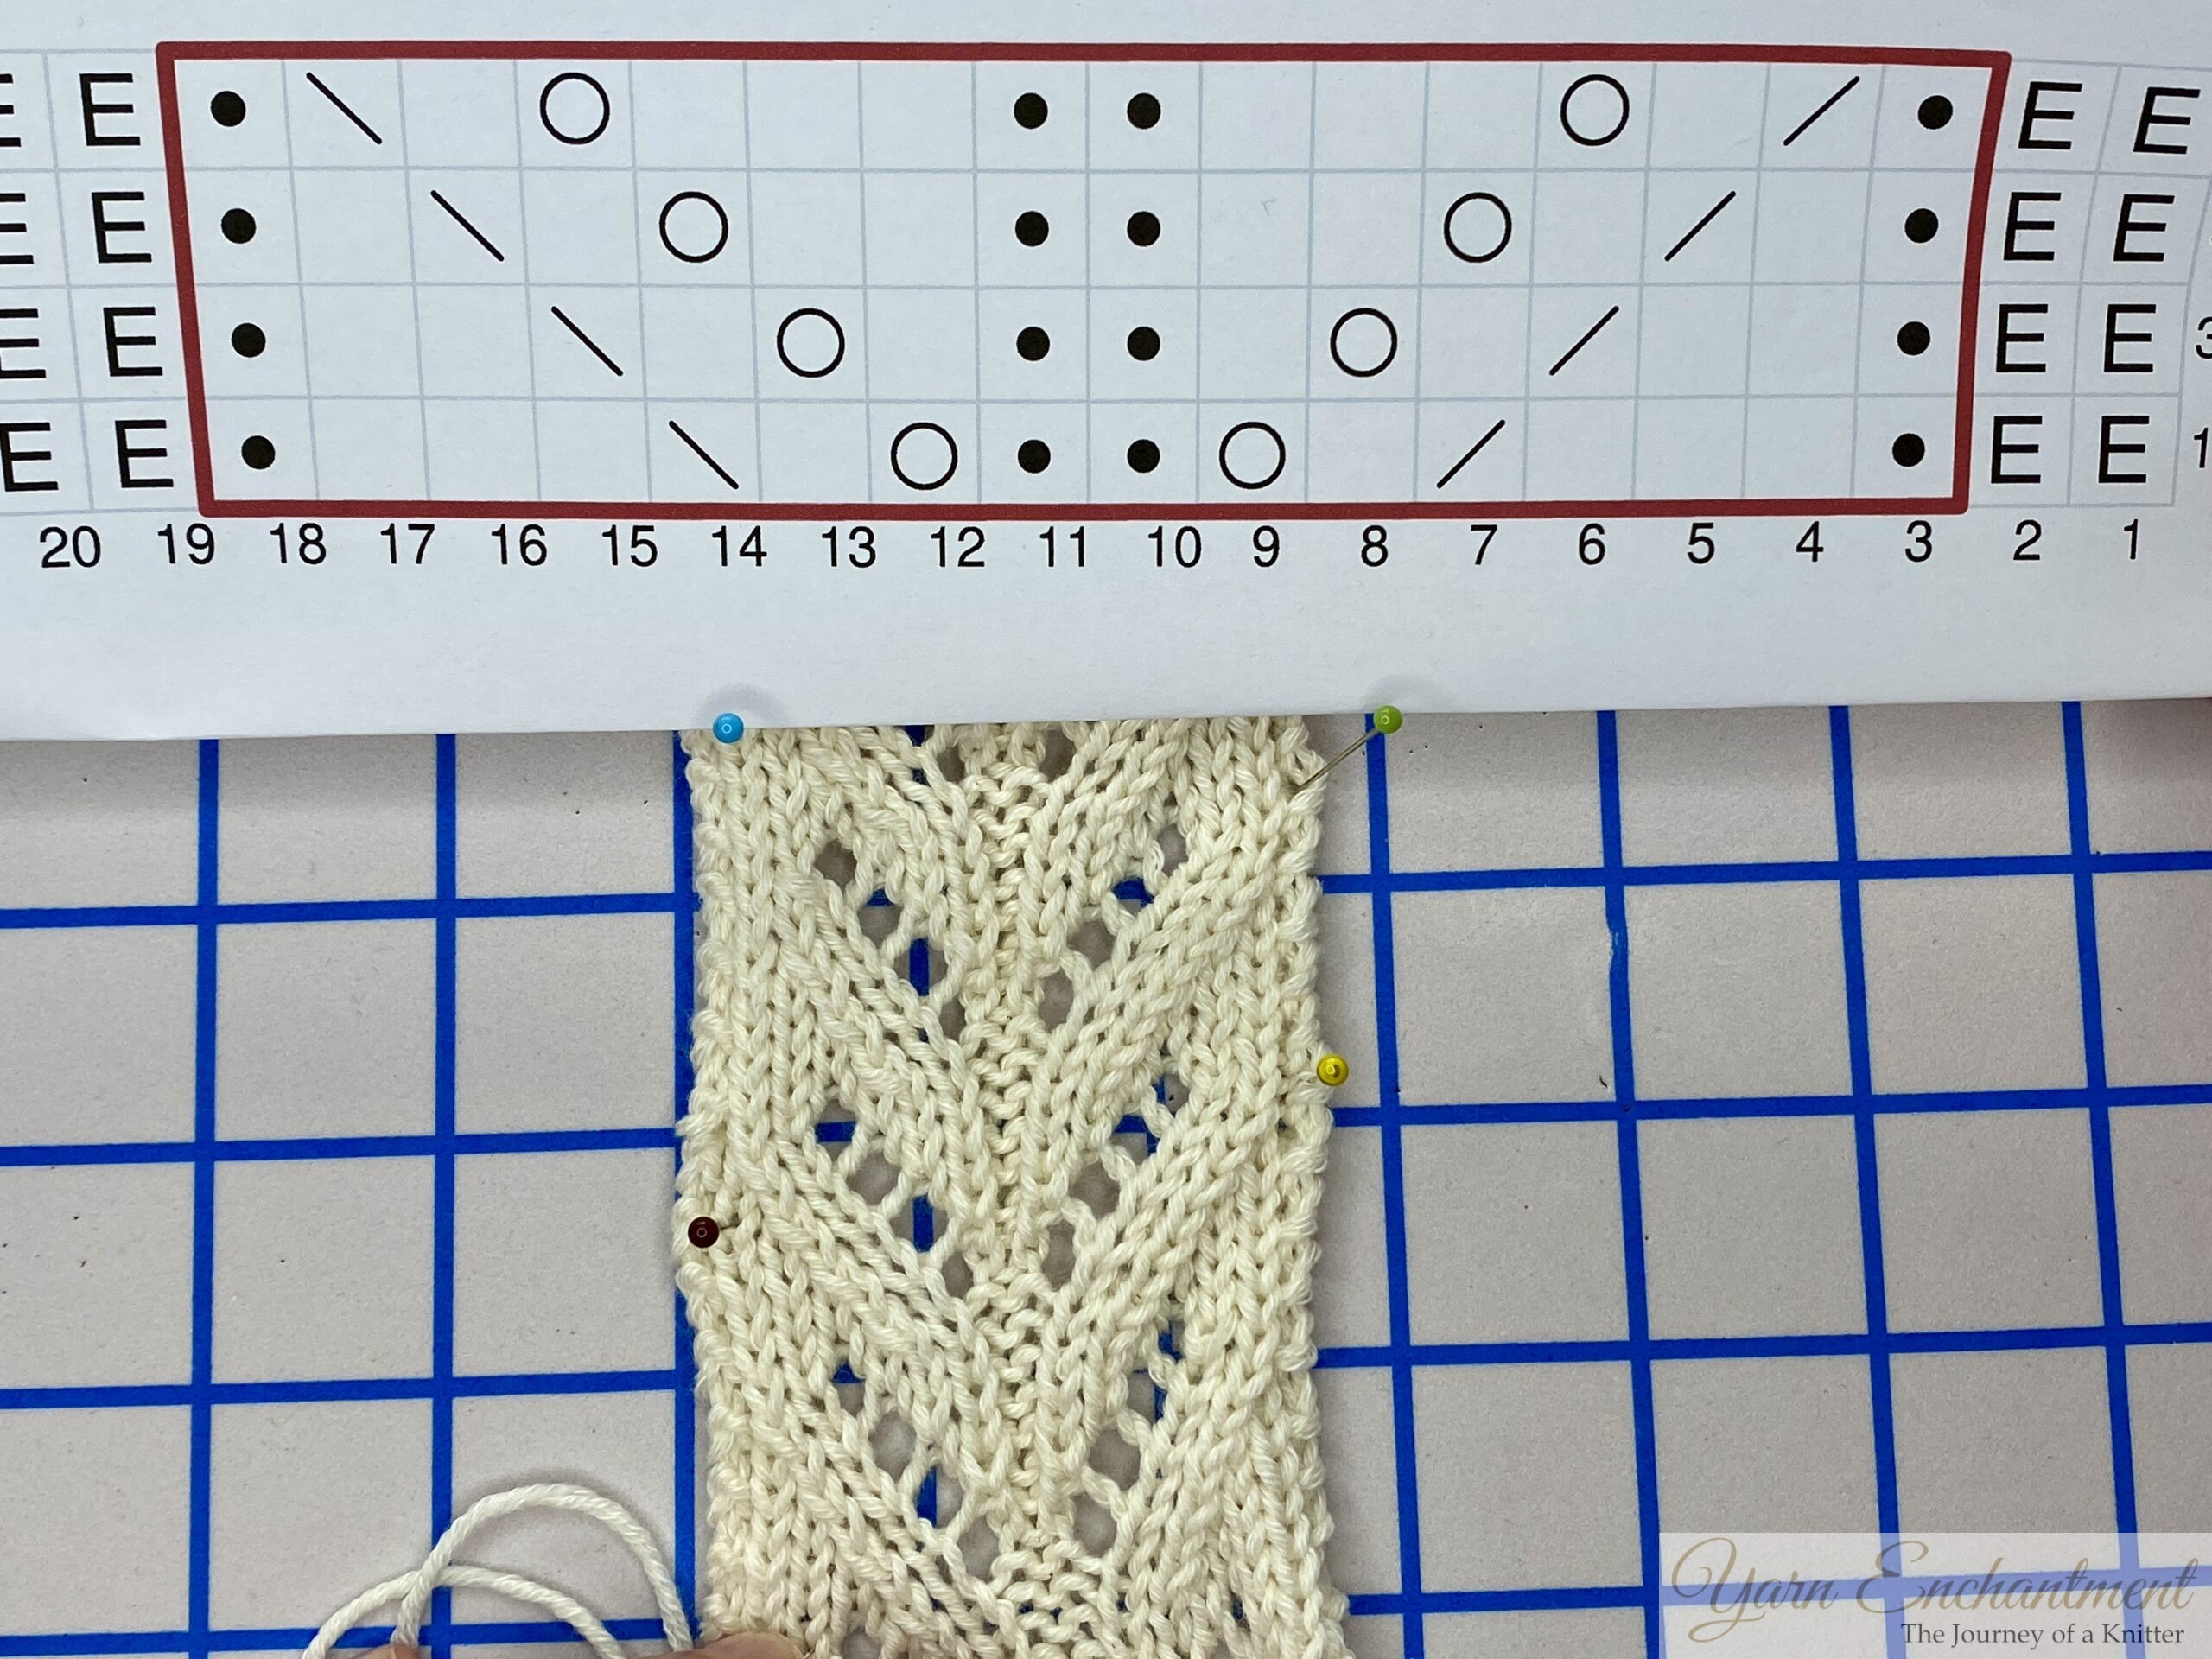
You can see here how the lace chart pattern fits perfectly with the knitted lace fabric. You can see the finished pattern taking shape before you even start knitting.

Which one should you use?
There is no right answer here. I know knitters who refuse to touch charts and knitters who refuse to touch written patterns. Both are valid. Many people start with written lace patterns and later switch to charts when they feel more comfortable. Some use both, like reading the written instructions to learn the repeat, then following the chart once they know what they are doing.
If you are brand new to lace, I would say do not pressure yourself to choose one. Try both. Keep a highlighter and a sticky note handy. And remember that every single person, including me, has gotten tangled up in the symbols and had to walk away for a cup of tea.
That's exactly what we'll do in this guide, we'll cover the symbols, the reading directions, and my favorite tricks for keeping your place. With those tips in your pocket, lace knitting becomes one of those cozy projects you actually enjoy making, not just for others, but for yourself.
What about you? Are you team written or team chart, or are you still on the fence? I would love to hear your experience in the comments. And if you have a specific lace chart question, ask away. I am planning my next post around exactly those questions.
Beginner Tip: If your pattern includes both written lines and a chart, read the written instructions first to get comfortable with the rhythm, then look at the chart to see what the fabric looks like.
Anatomy of a Lace Chart
Before we get into the symbols, let’s look at what a lace chart actually looks like. I like to think of a chart as a map. Once you understand the map, the knitting becomes much easier.
Every lace chart has a few basic parts: row numbers, stitch boxes, symbols, a key, and often a repeat outline. You don’t need to learn them all at once. We’ll go through each one slowly.
What a chart actually looks like
Let us start with the bones of any chart. A lace chart is a grid made of squares. Each square represents one stitch, and each horizontal line of squares is one row, or one round if you are knitting in the round.
- Odd-numbered rows are usually right side (RS) rows, with numbers placed on the right-hand edge.
- Even-numbered rows are usually wrong side (WS) rows, with numbers placed on the left-hand edge.
- Knitting in the round means every round is worked on the right side, so all numbers sit along the right side of the grid.
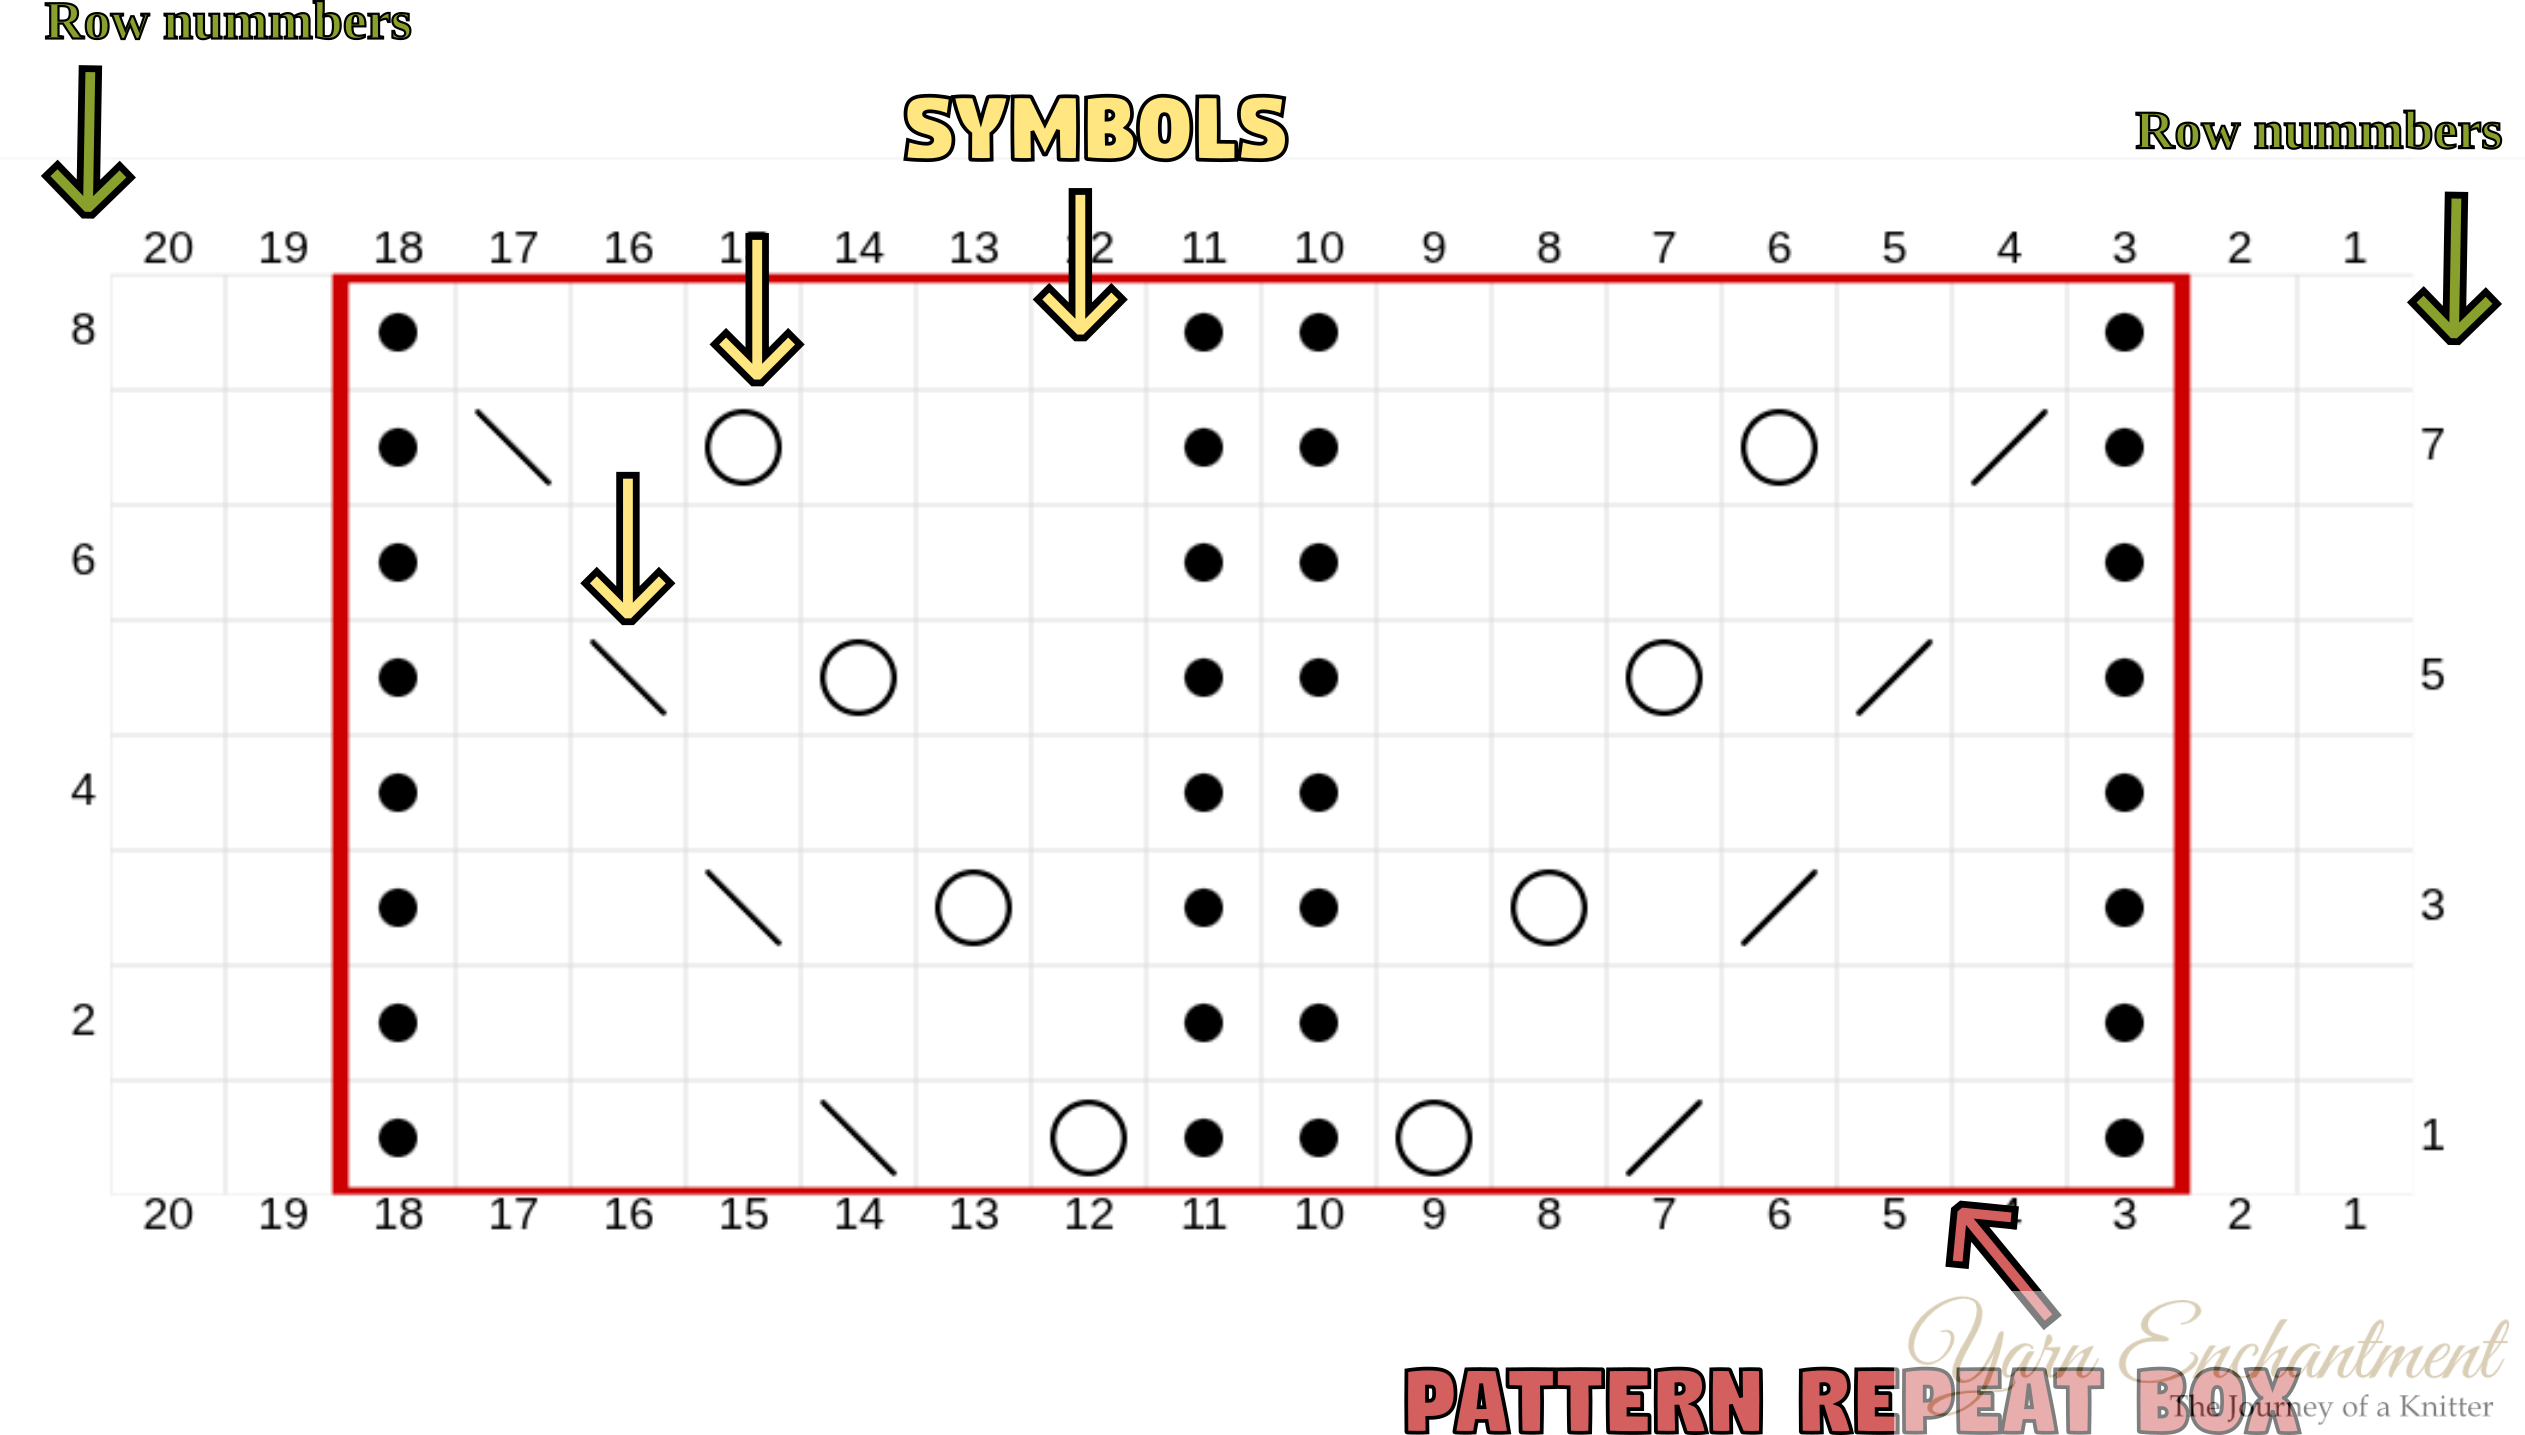  |
On the right side, rows 1, 3, 5, and 7 are the right side rows. On the left side, rows 2, 4, 6, and 8 are the wrong side rows. Around the chart you see a red line in a square shape, this is the repeat. This is the pattern you knit over and over again until the end of the row or round. The symbols are in the middle of the chart, and they tell you which stitch to knit. And they also show you how the finished piece will look once you have finished it. |
Row numbers on the sides
Most charts have numbers along the sides. These tell you which row you are on. In flat knitting, you will usually see odd numbers on the right side and even numbers on the left side. The side the number is on also tells you which direction to read that row. For example, if the number 1 is on the right side of the chart, row 1 is read from right to left.
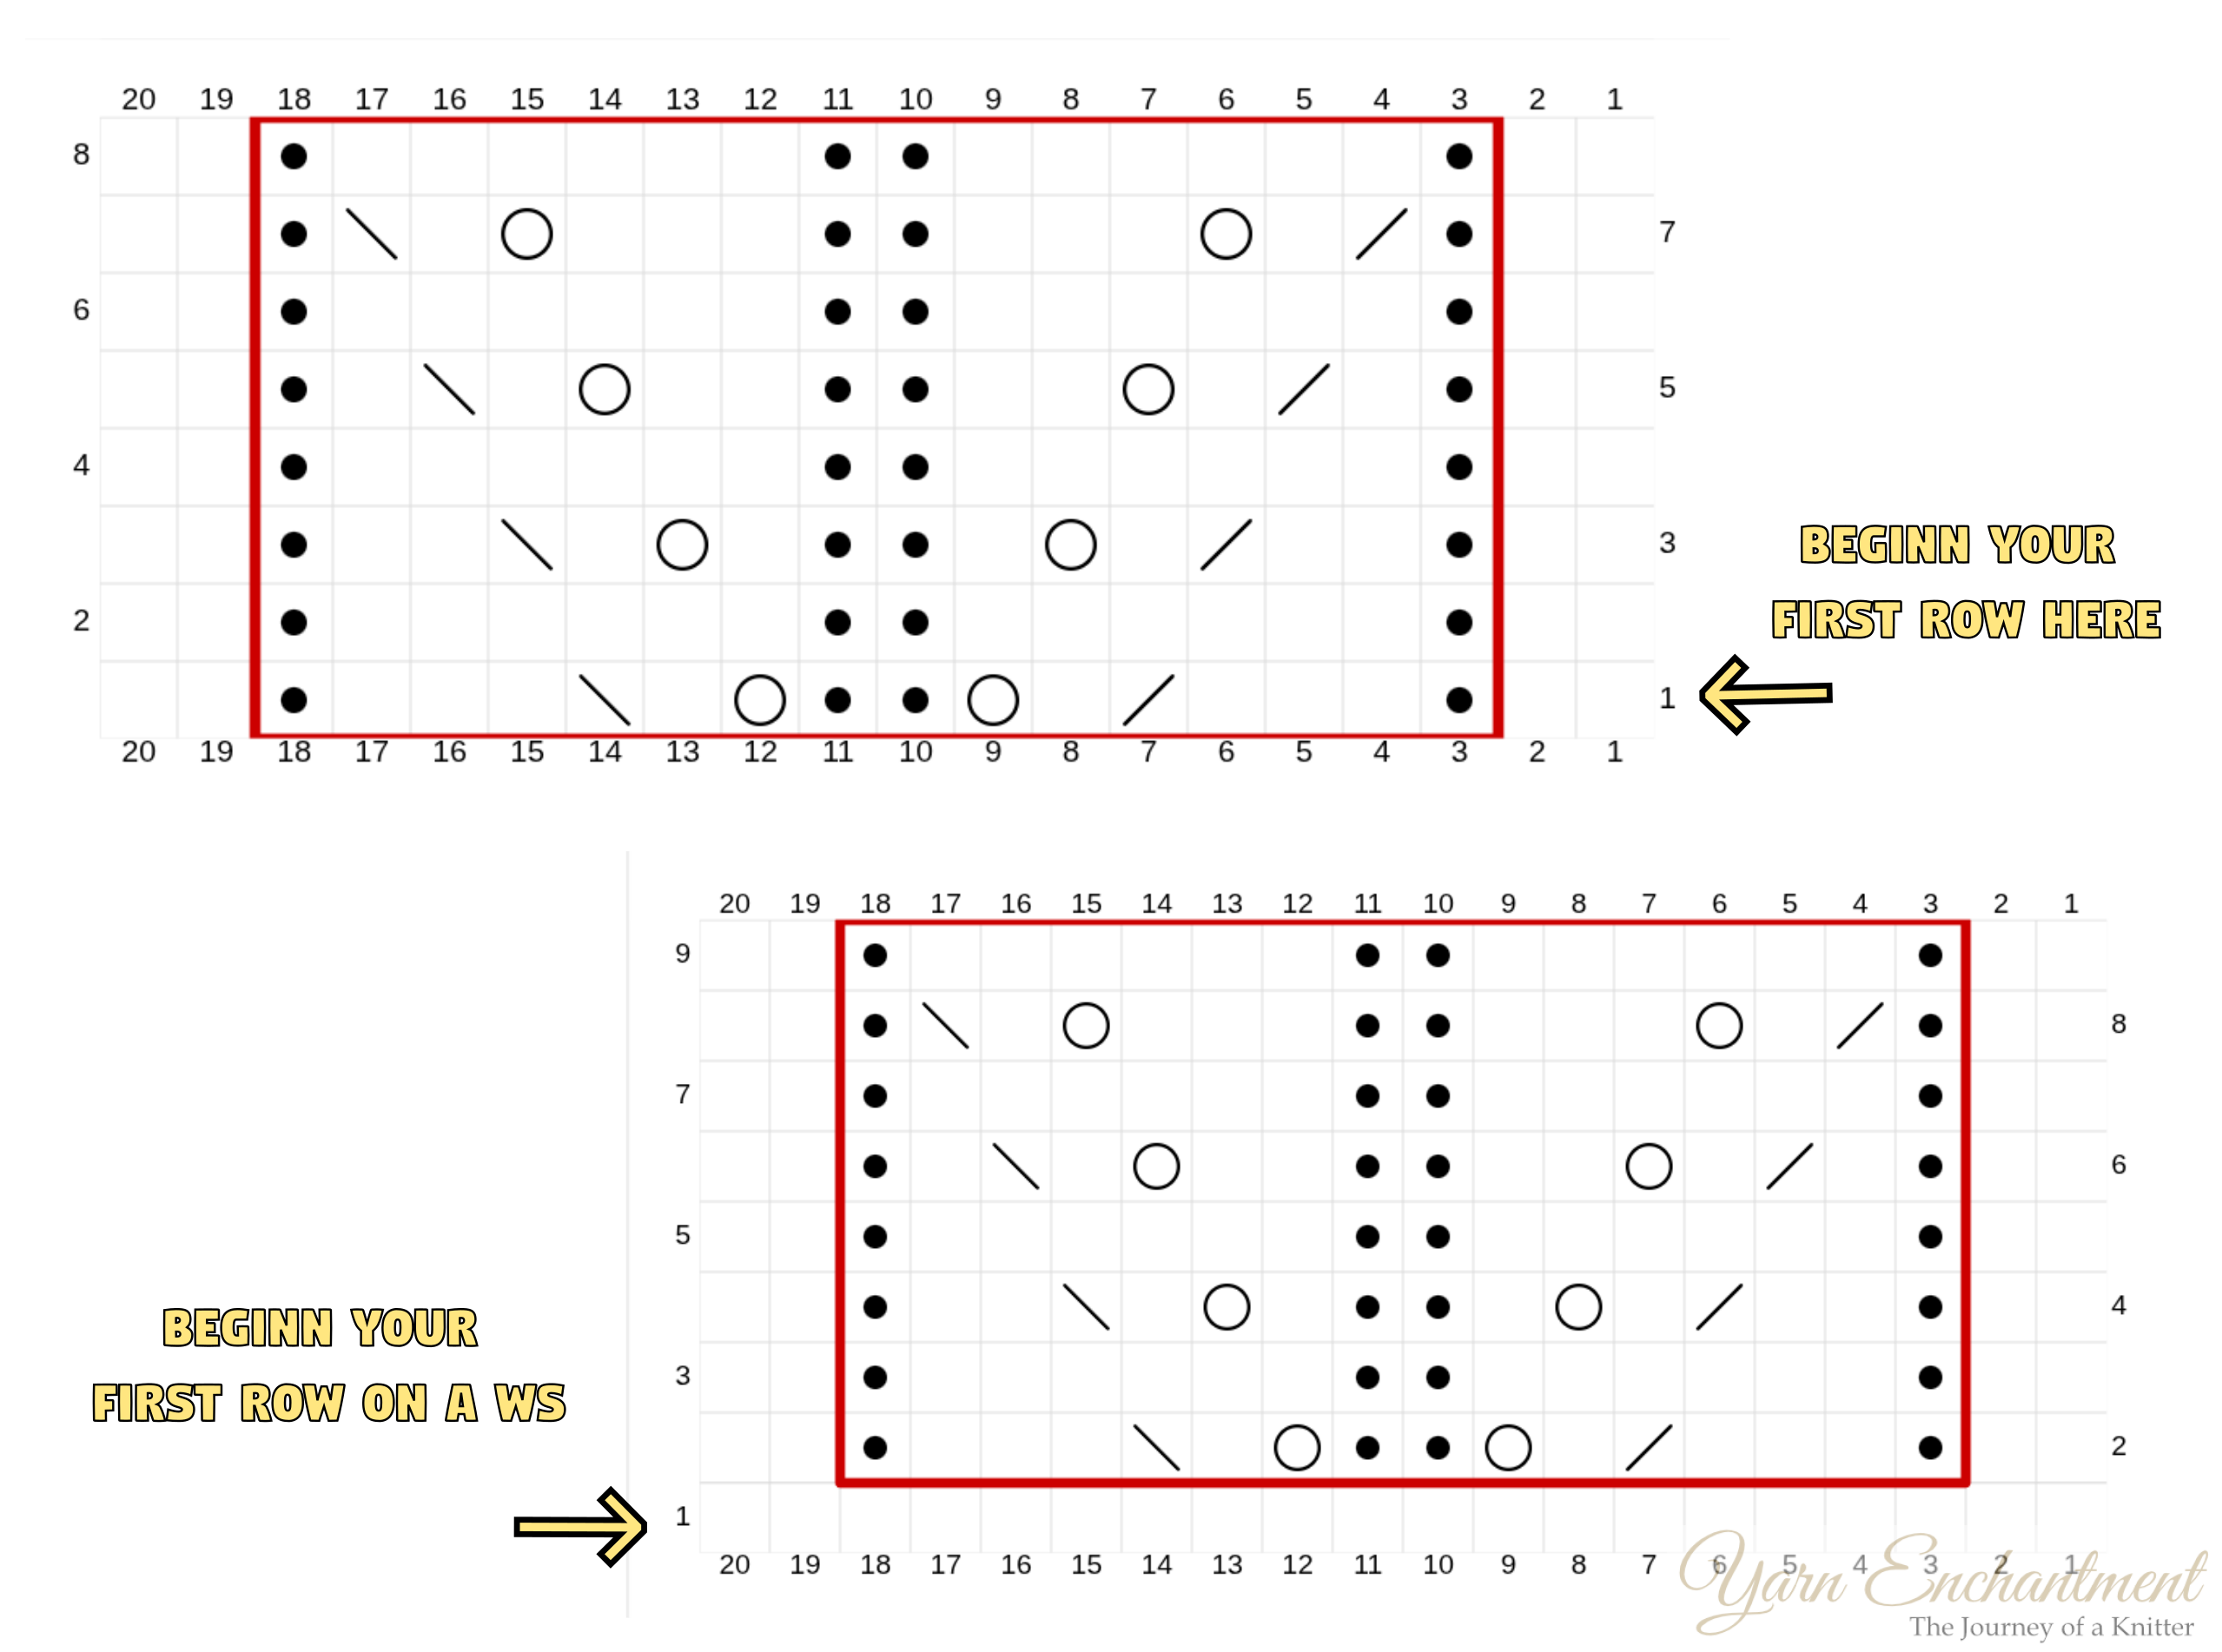  |
Usually you start at the right side of your chart, reading from right to left. But sometimes a chart pattern wants you to first knit or purl a row before starting your repeats. This could be a reason why your chart starts at the left instead of the right side. |
Why are knitting charts read bottom to top?
Charts are read from bottom to top because that is the direction your knitting grows. Row 1 is at the bottom, near the cast-on edge. Row 2 sits above it, then row 3, and so on. If you started at the top, you would be reading the pattern upside down. Reading from the bottom keeps the chart in the same order as your knitting.
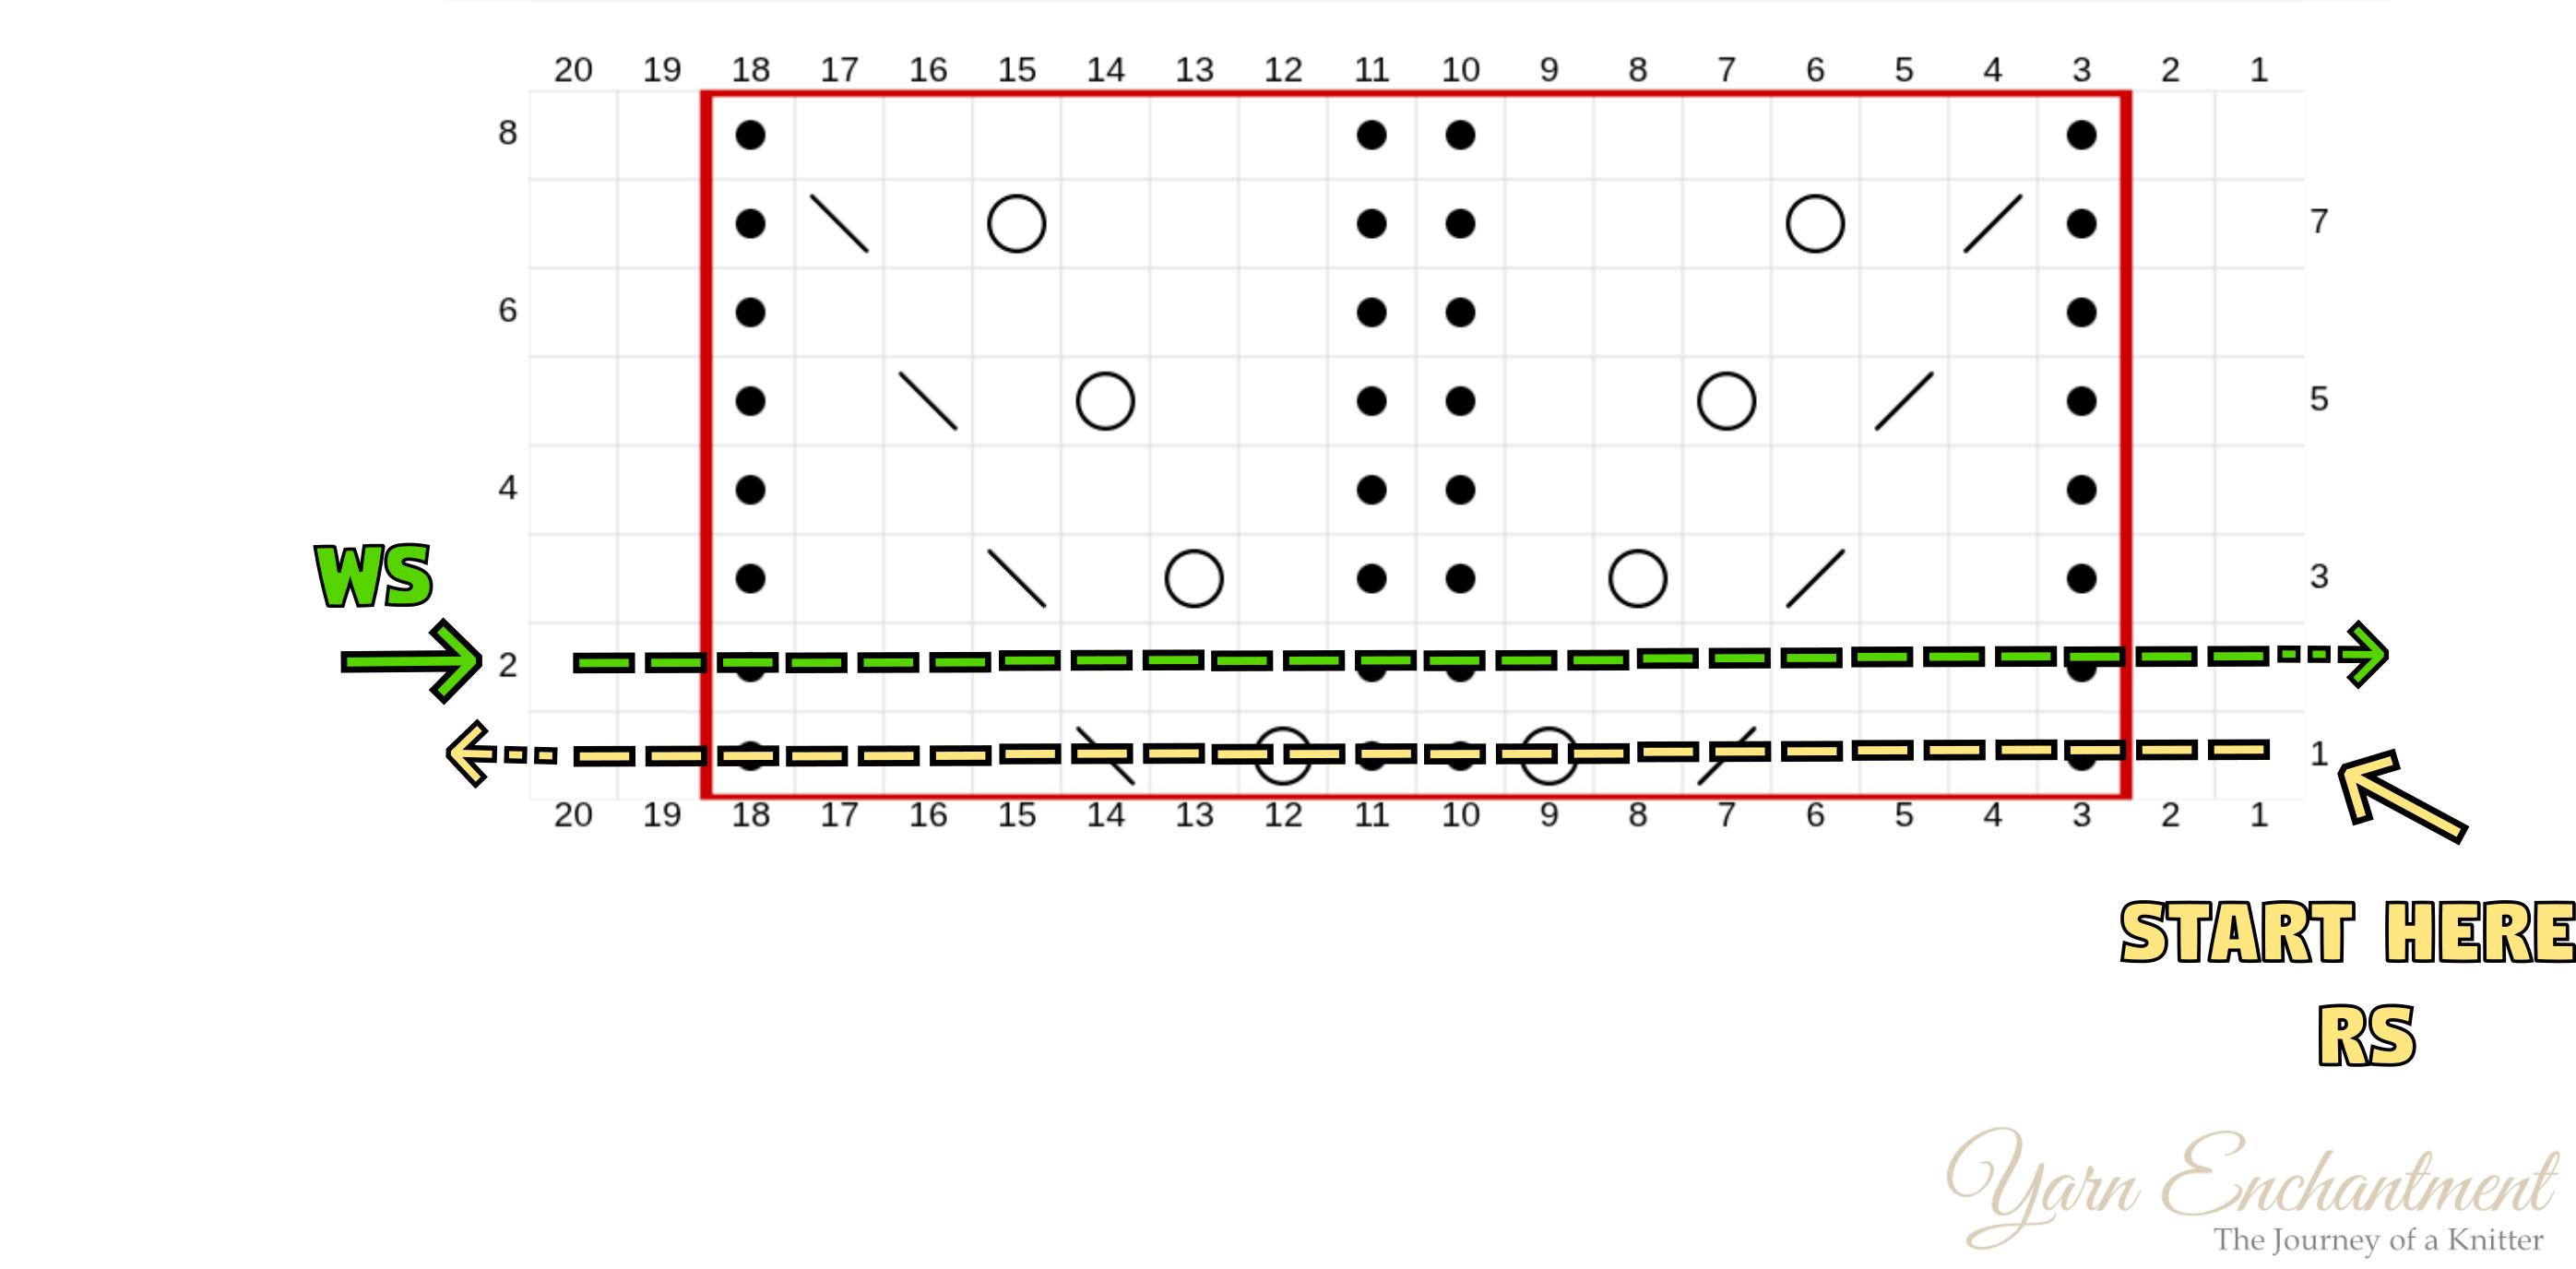  |
You start at the right edge and knit all the way to the left. Then you turn your work and work from left to right across the row. |
Right side vs. wrong side reading direction
In flat knitting, right-side rows are read from right to left. This matches the direction you knit across the row. Wrong-side rows are read from left to right, because you are working back across the fabric.
The row numbers on the chart help you see which is which. A number on the right side of the chart usually means a right-side row. A number on the left side usually means a wrong-side row.
If you are knitting in the round, every row is read from right to left, because you never turn the work.
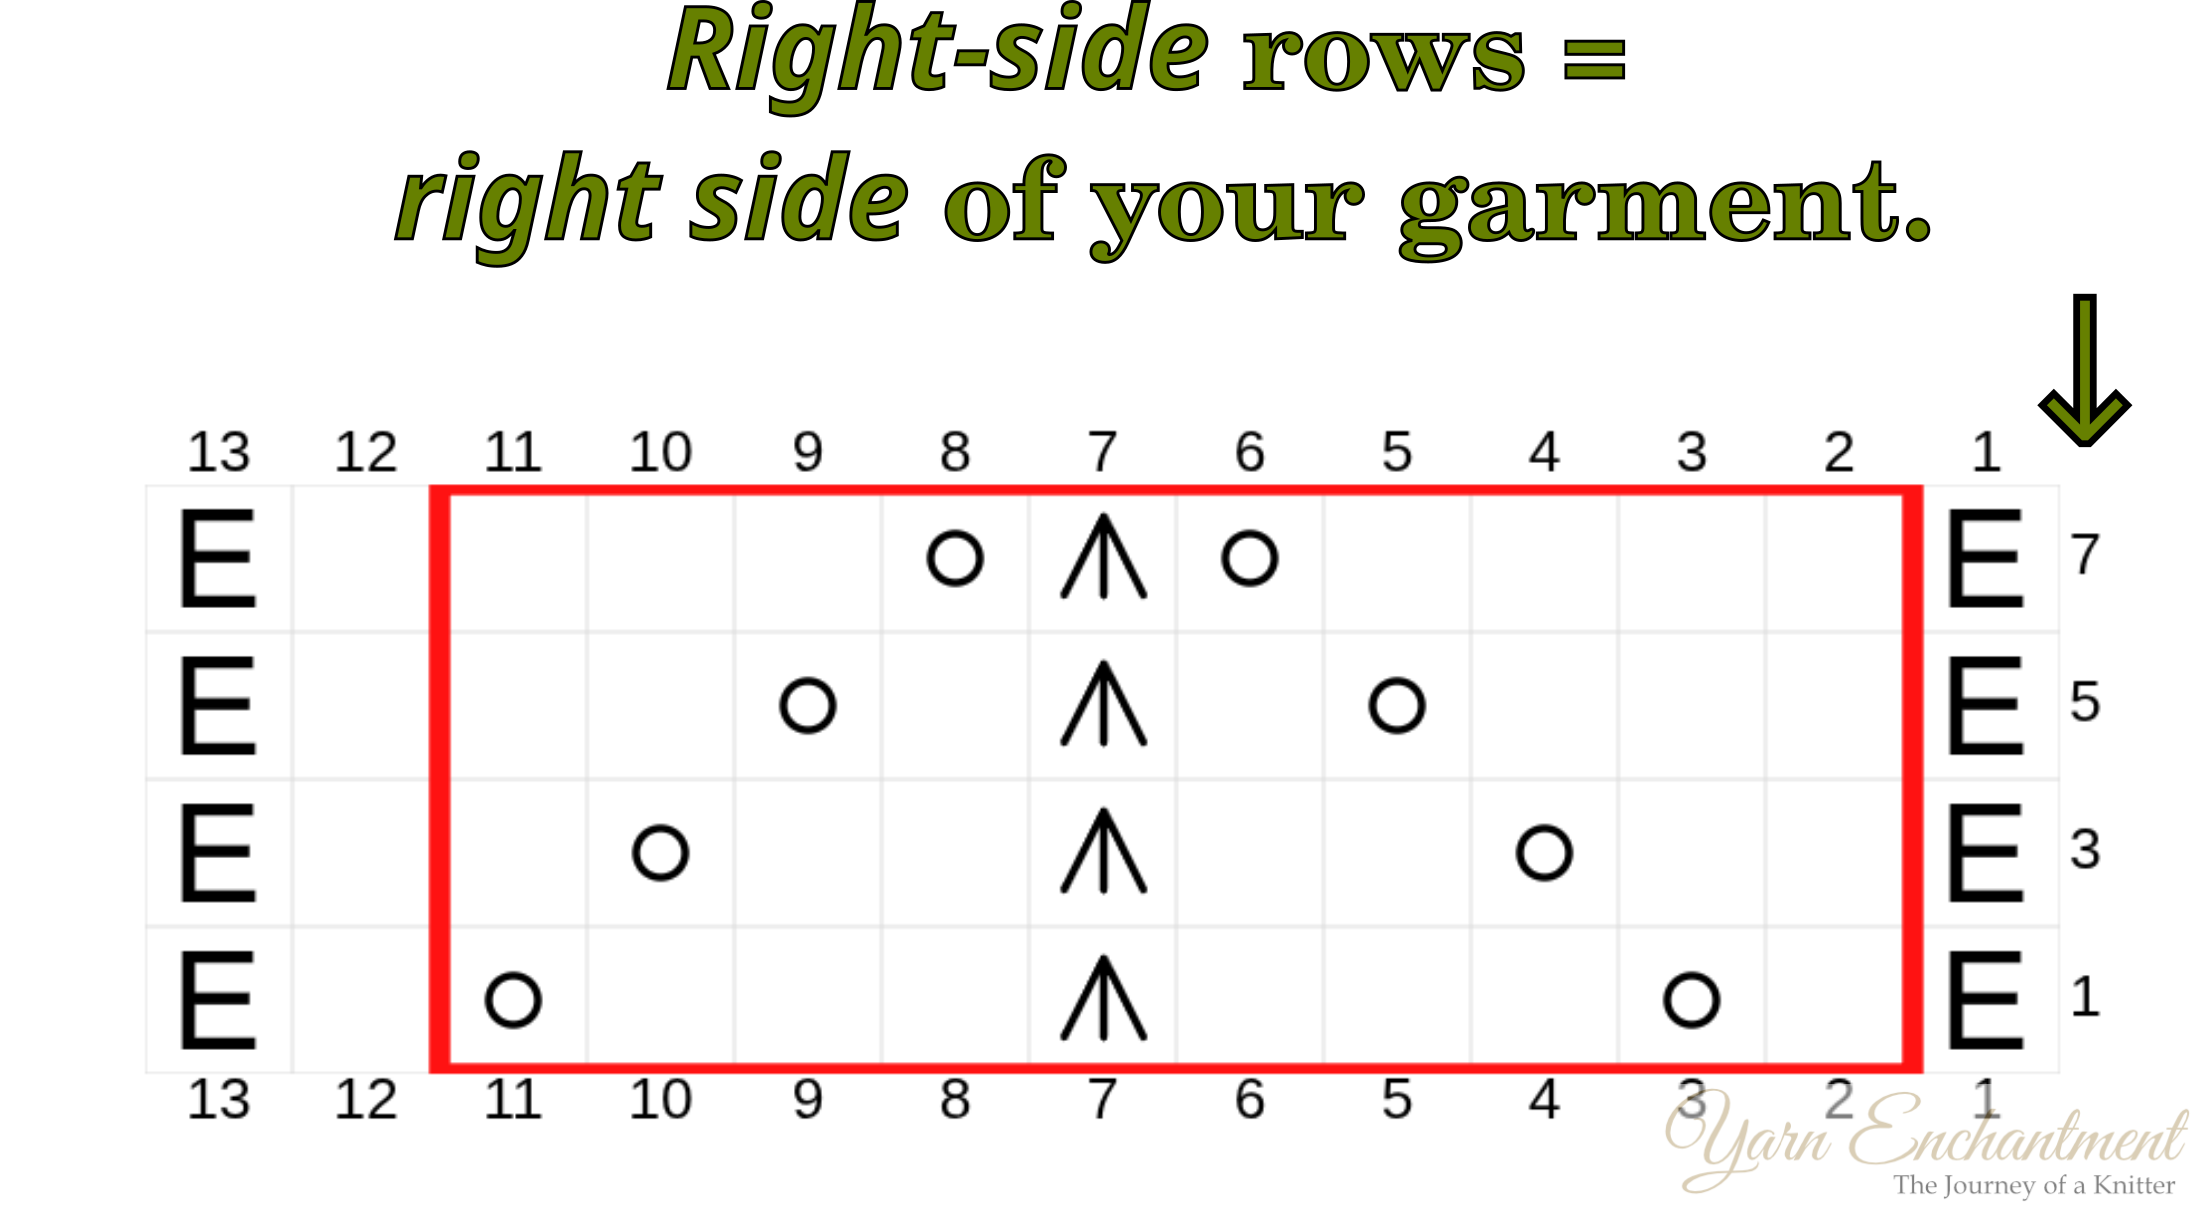  |
Right side rows always mean that you are working on the right side of your knit fabric. |
The chart key and legend
Every good chart includes a key or legend. This tells you what each symbol means. Always check the key before casting on, because symbols can vary between designers. One pattern might use a slash for a right-leaning decrease, while another uses it for something else. The key is your translation guide.
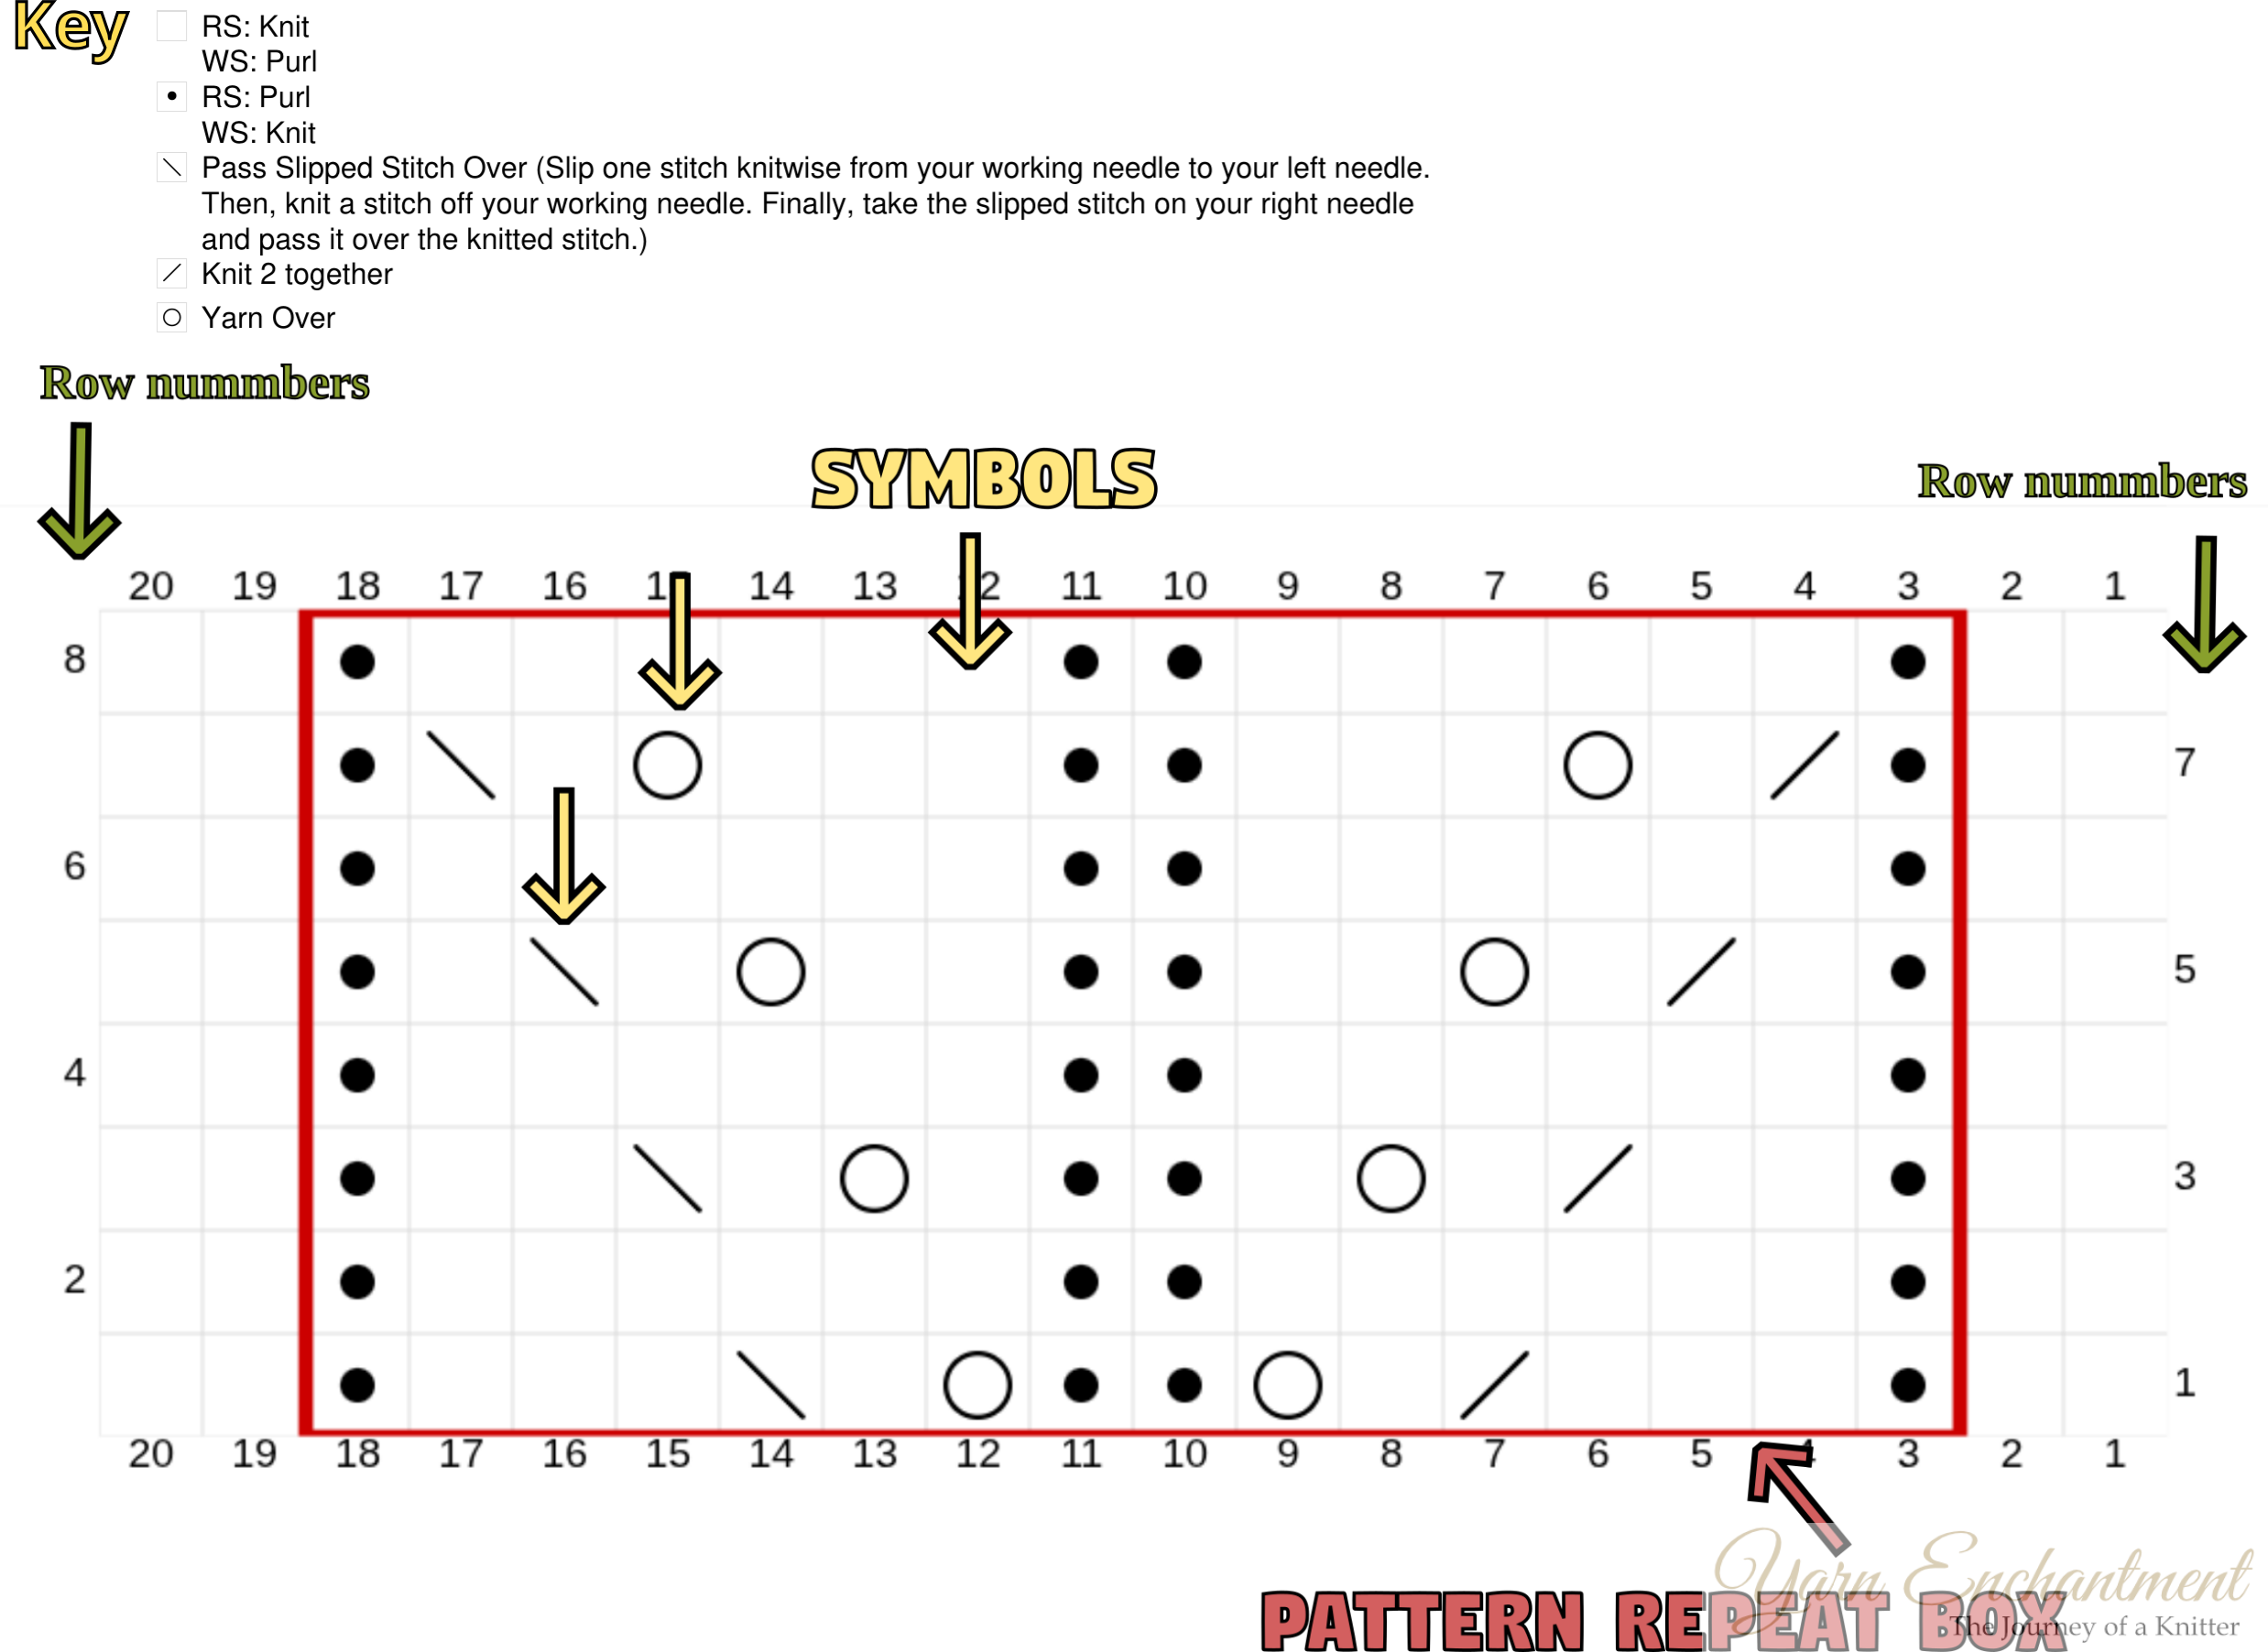  |
Each chart has a key. The key tells you the meaning of each symbol. |
Pattern repeat boxes and balancing stitches
Many lace charts have a section outlined in red or bold lines. This is the stitch repeat. You work those stitches over and over across the row until you have worked the number of repeats your pattern calls for.
Stitches outside the repeat are called balancing stitches. They are worked only once at the beginning and/or end of the row so the lace motif sits nicely on the fabric. For example, the chart might tell you to knit 1 stitch, repeat the boxed 10 stitches, then knit 2 stitches at the end.
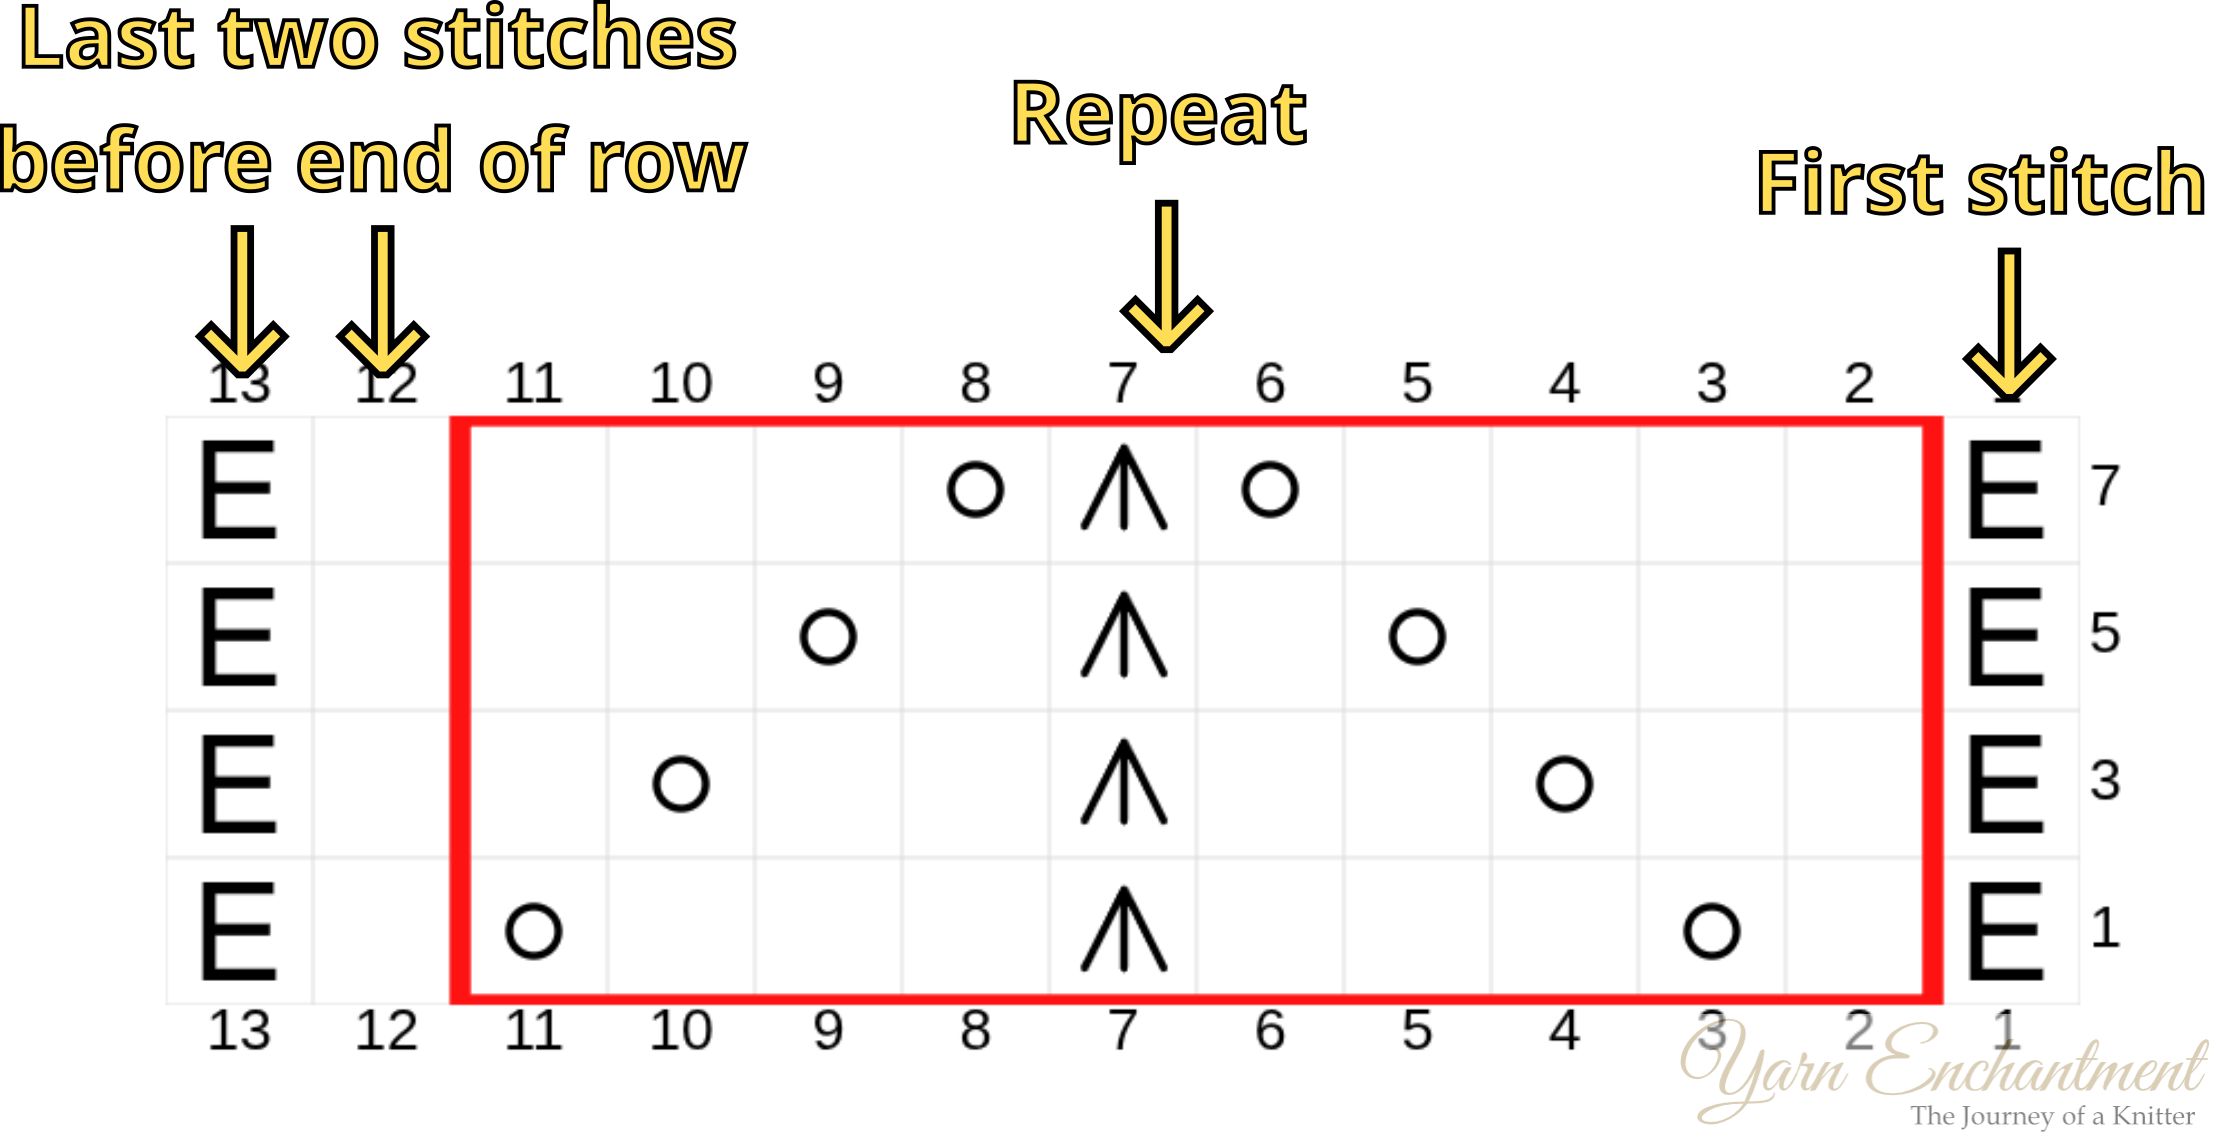  |
Here, you knit one edge stitch, work the pattern repeat box across your project, and finish with balancing stitches so the edges match neatly. |
What does no stitch mean in a knitting chart?
Sometimes you will see gray or dark boxes in a chart. These are called “no stitch” boxes. They do not represent a stitch on your needle. They are simply placeholders that keep the chart grid even.
When you come to a no-stitch box, skip it and move to the next symbol. They often appear when stitch counts change, such as at the edges of shaped lace or diagonal patterns. In my chart below, the no-stitch boxes are for the double yarn over. On the wrong side, the double yarn over is worked as a knit into one yarn over and a purl into the second yarn over.
Double yarn over: wrap the yarn twice around the needle.
What if the chart only shows right-side rows?
Some lace charts do not show wrong-side rows at all. You might see only odd row numbers, like 1, 3, 5, and 7, on the right side of the chart.
This usually happens when the wrong-side rows are plain, most often just purl across. The pattern will normally say something like:
All wrong side rows: purl.
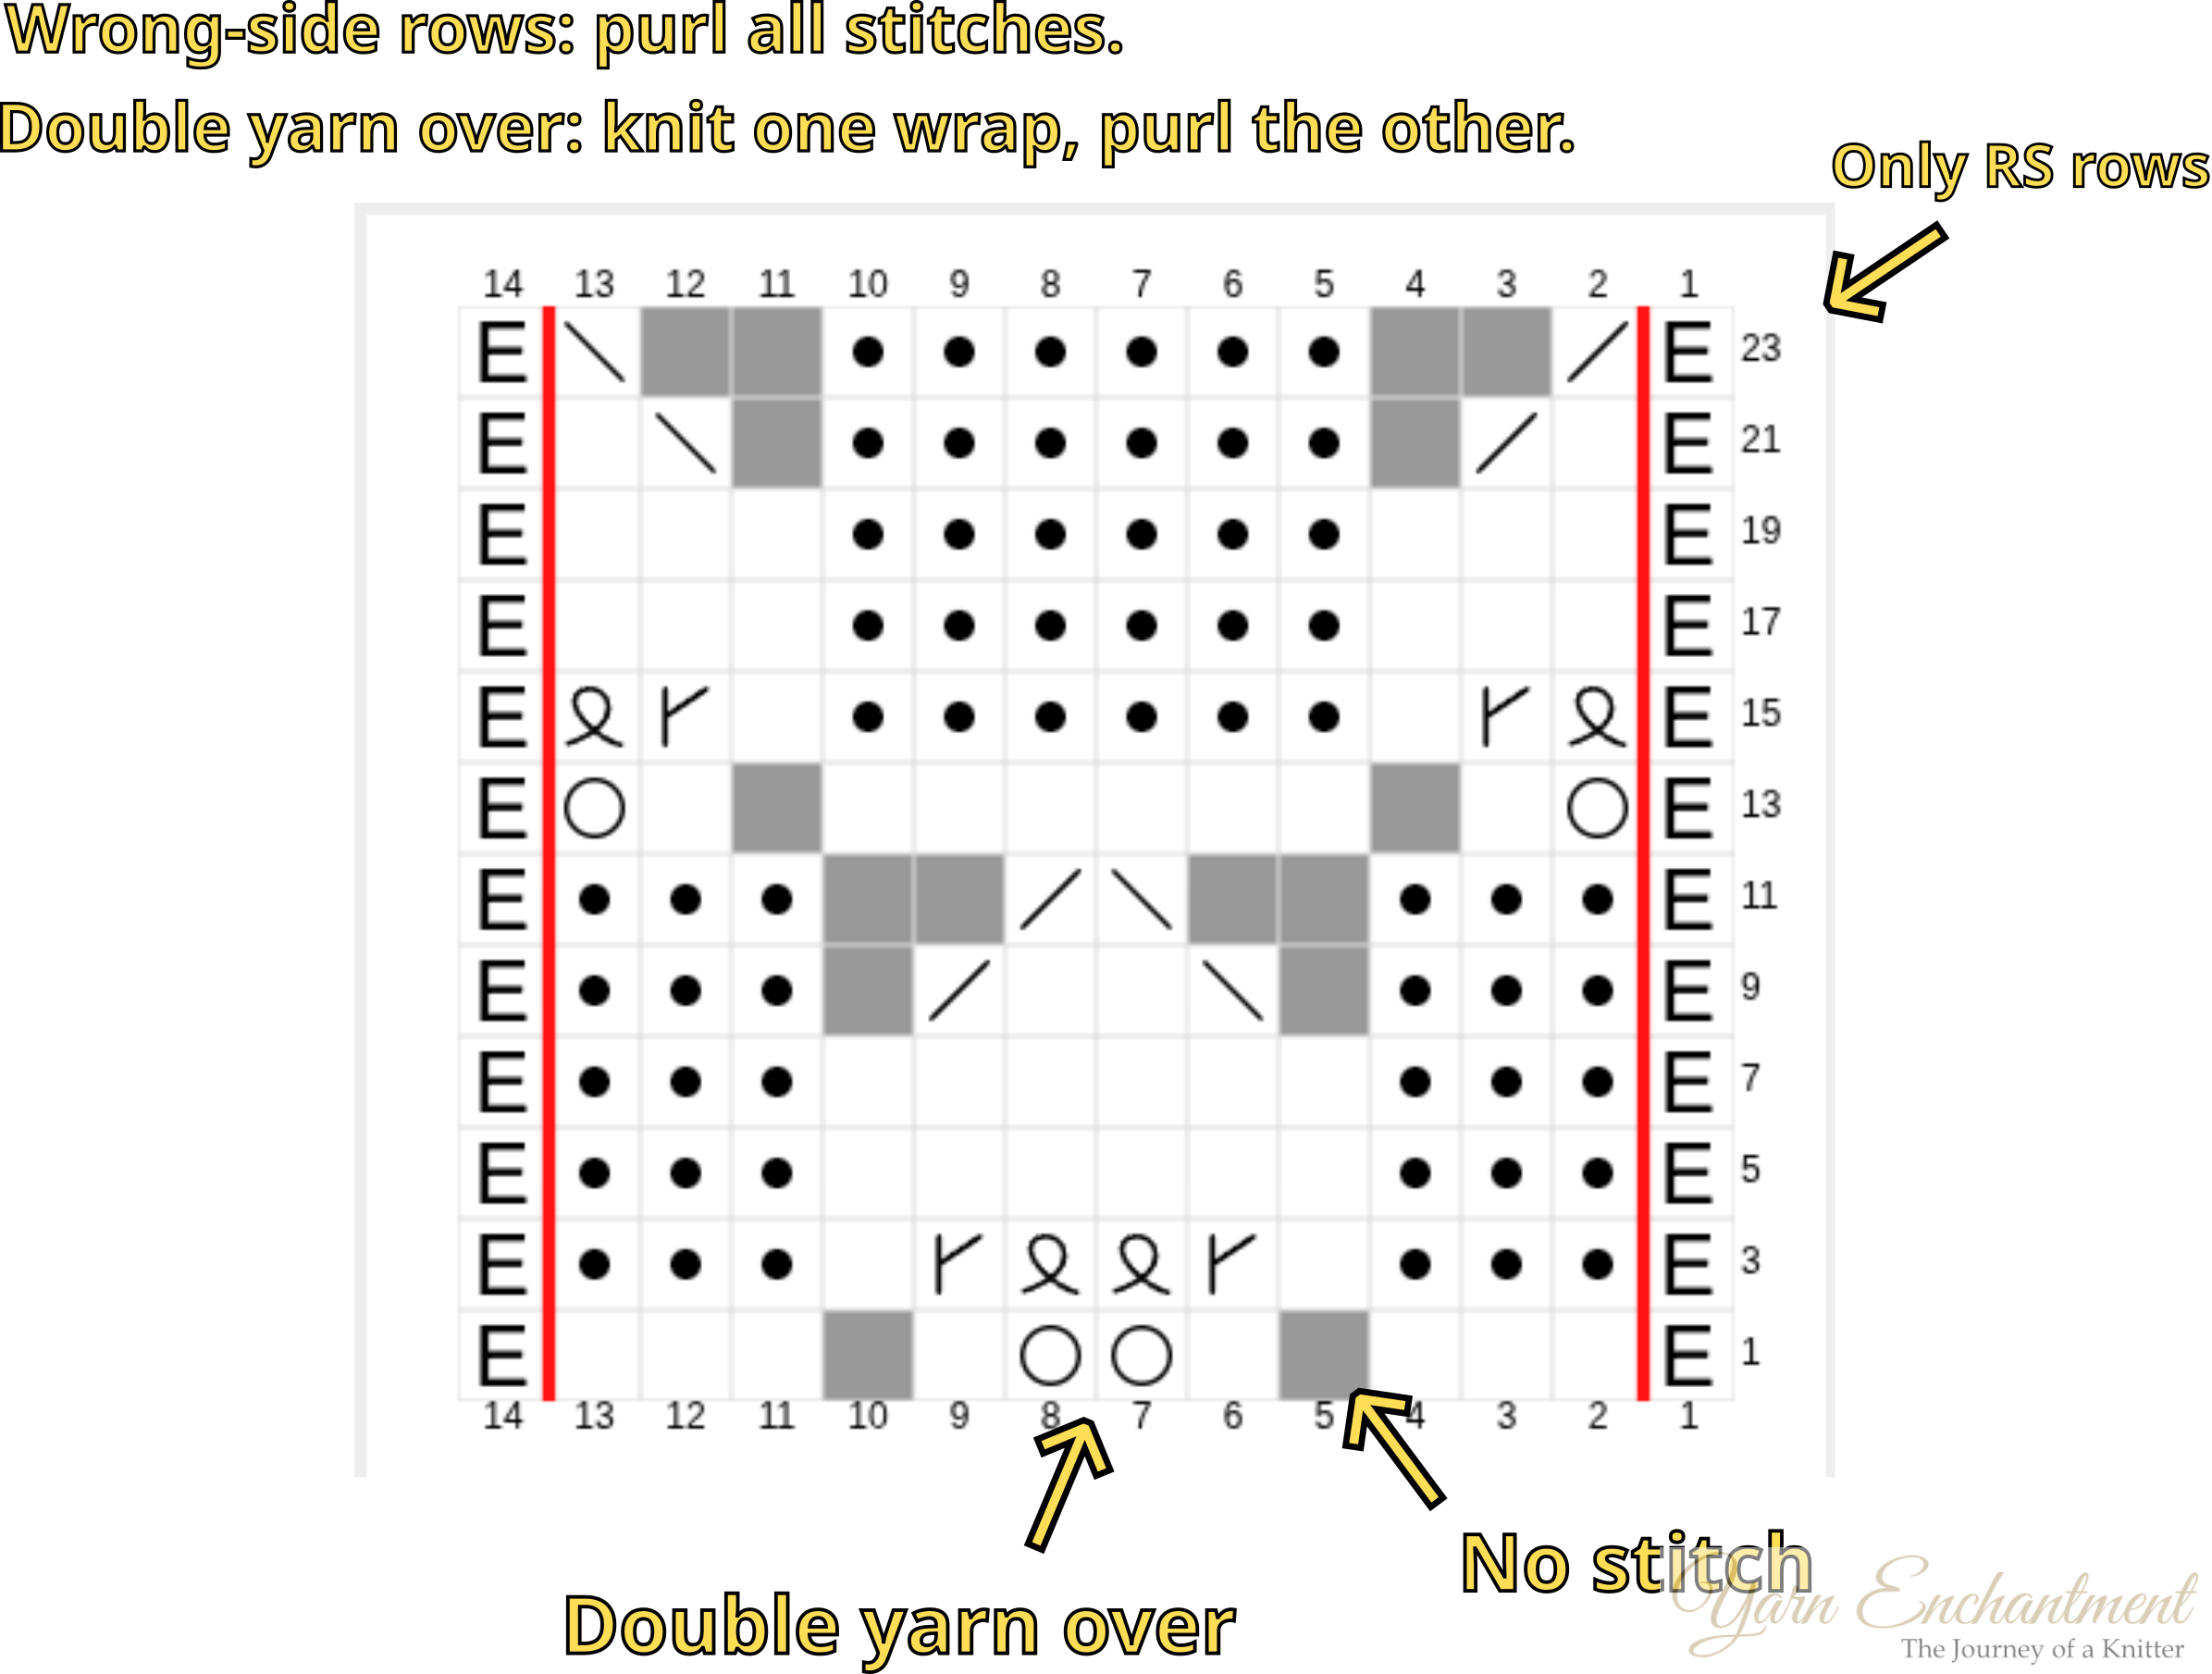  |
In this chart, I only show the right side rows. The wrong side rows are all purl stitches, so I left them out to keep things simple. The gray boxes are no-stitch boxes, which simply means you can skip them and pay them no attention. On row three, you will decrease those two extra stitches again to bring the stitch count back to 8 plus 2 edge stitches. |
How to read lace charts in the round
Circular lace patterns look slightly different because you never turn your needles to the wrong side.
- All round numbers sit on the right-hand edge
- You read every round from right to left
- A blank square usually means "knit every round" instead of alternating knit and purl
For example, if a chart for circular knitting says:
Sometimes a chart in the round also omits plain rounds. It may show only the lace rounds and include a note like:
“Knit all even rounds.”
This works the same way as flat charts that leave out plain wrong-side rows. The chart becomes shorter and easier to read.
One important thing to check is the key. Because you are always on the right side in circular knitting, a blank square often simply means “knit,” not “knit on RS, purl on WS.” The key will tell you exactly how to read each symbol for knitting in the round.
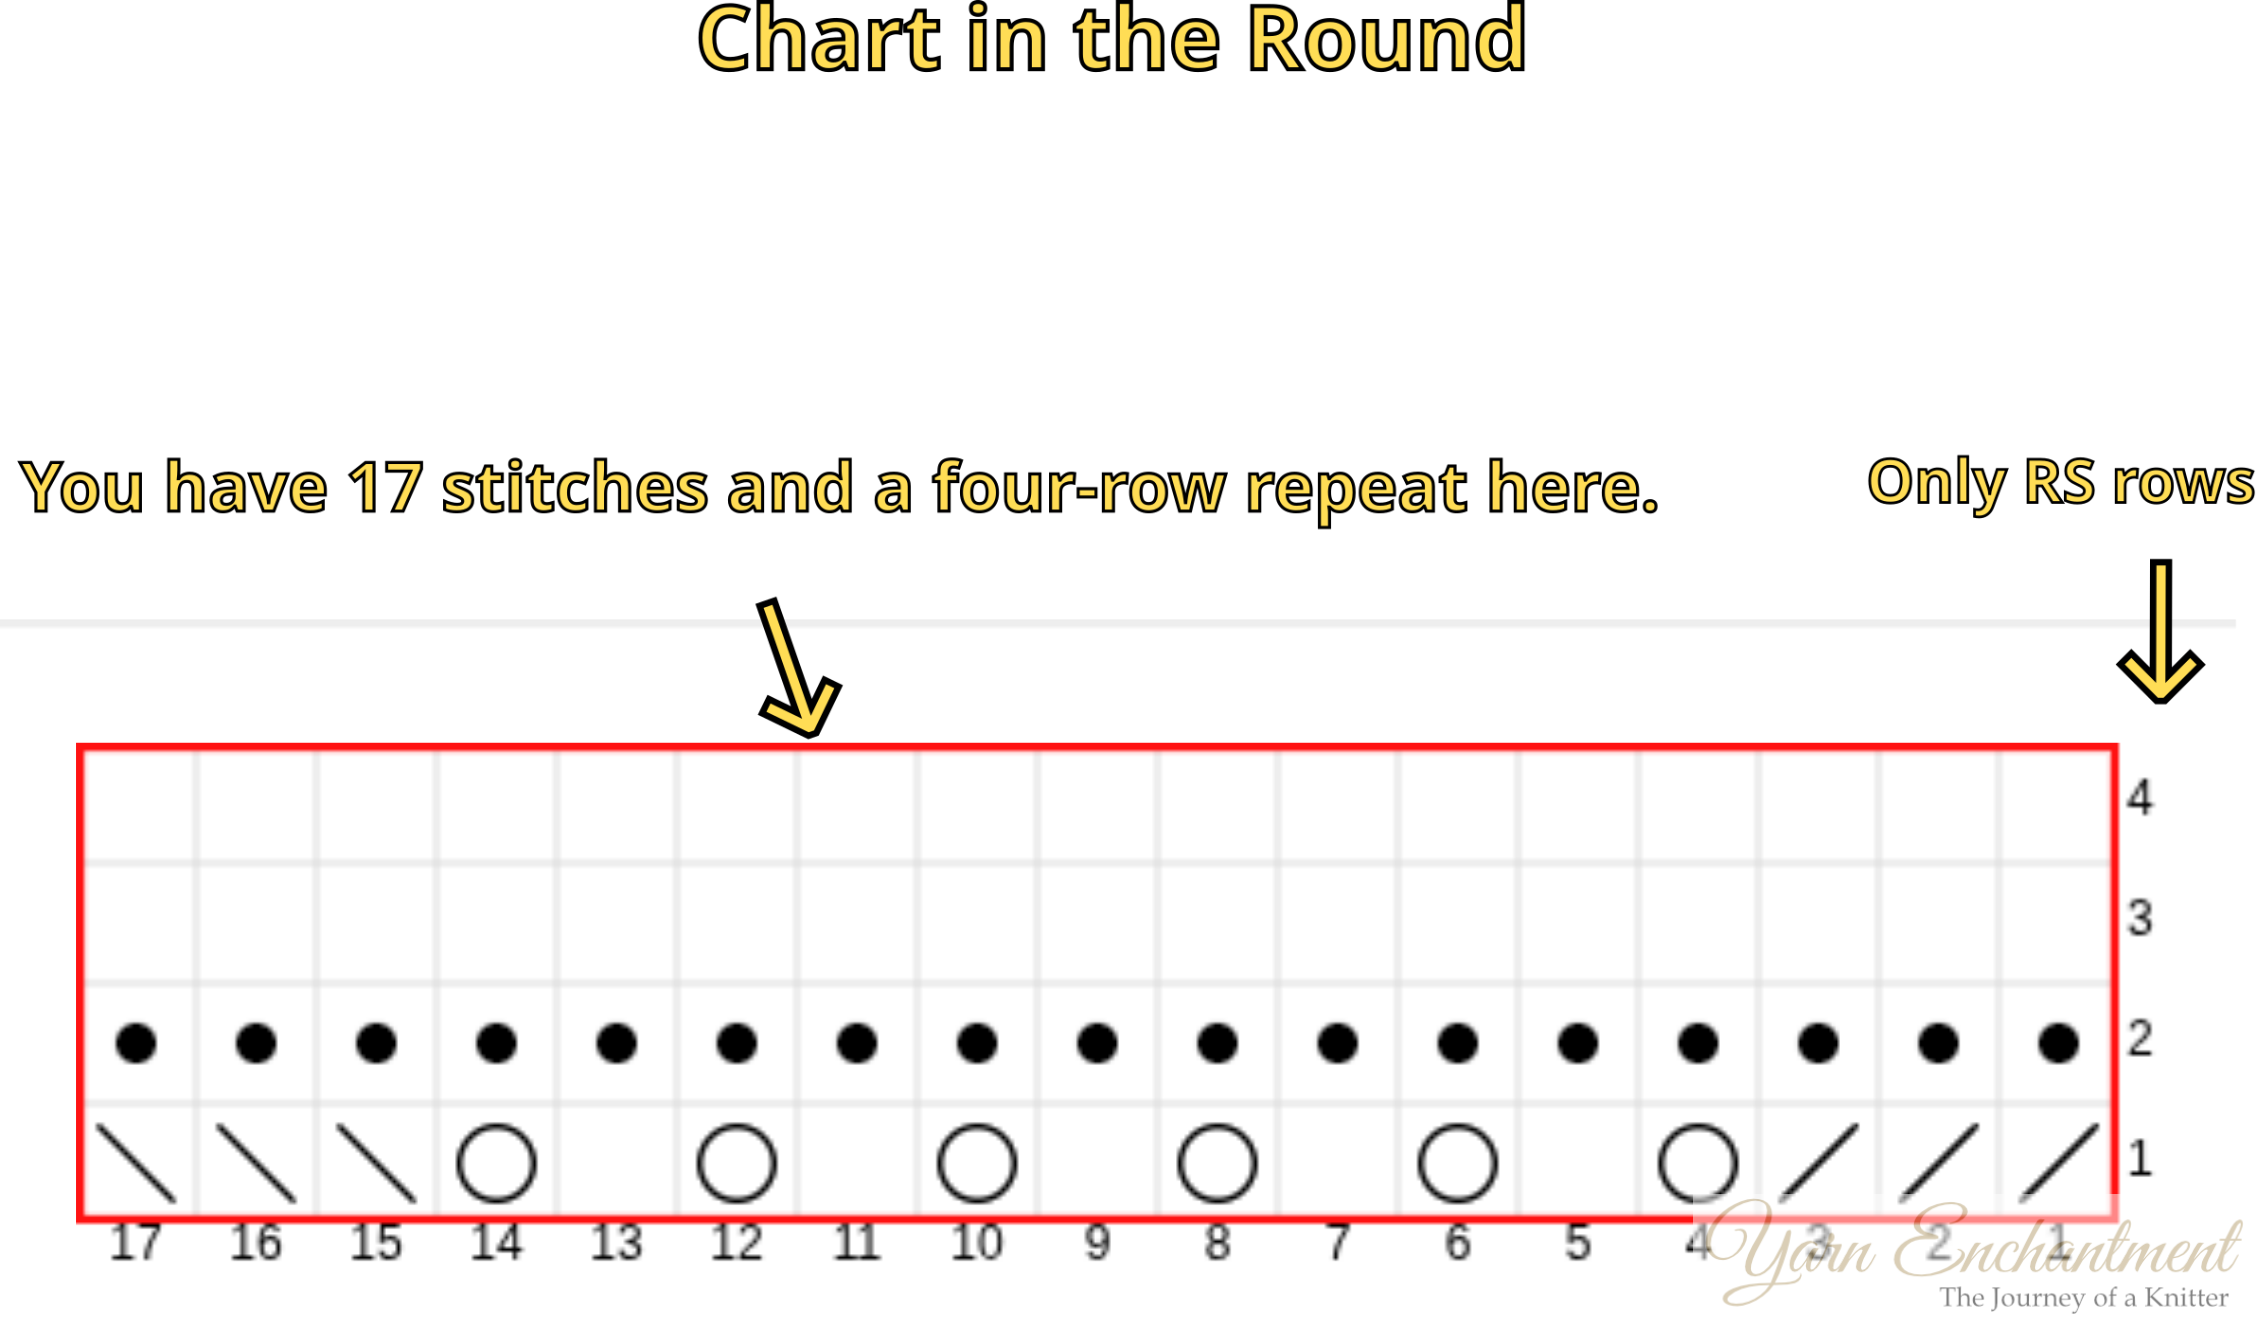  |
This is a chart worked in the round. |
How to Read Chart Symbols
Before we dive in, I want to tell you something. When I asked my newsletter readers what they struggled with the most, the most common answer was the symbols. They look like a secret code, right? Little circles and slashes and weird diagonal lines. I completely understand. I have been there too.
So I want to try my absolute best to explain them to you, clearly.
You already know how to find your way around a chart. You know how to read the row numbers, which direction to go, what the repeats mean, and what those mysterious no stitch boxes are all about. You have the map. Now we are going to learn the language.
Remember this: every symbol is just one tiny instruction. It is not a secret. It is not meant to confuse you. It is just a little picture that tells your hands what to do.
And once you learn a handful of them, the whole chart starts to open up like a flower. I promise.
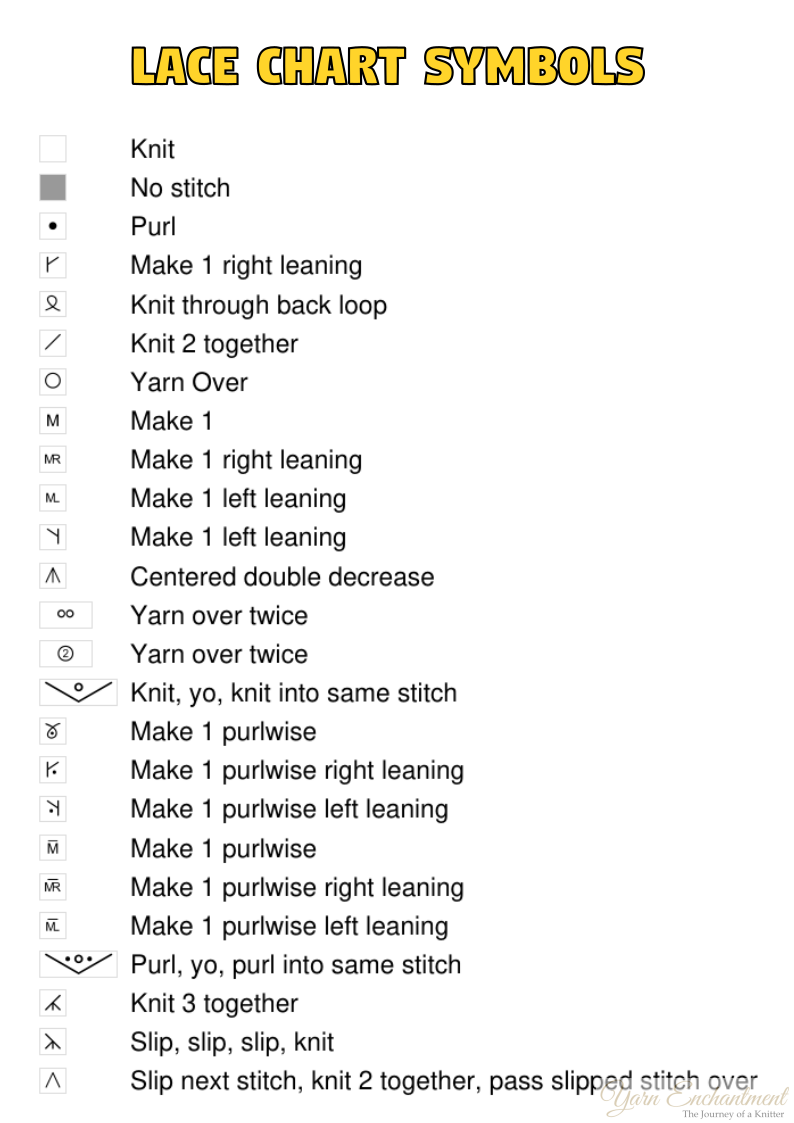
Common Lace Chart Symbols and How to Read Them
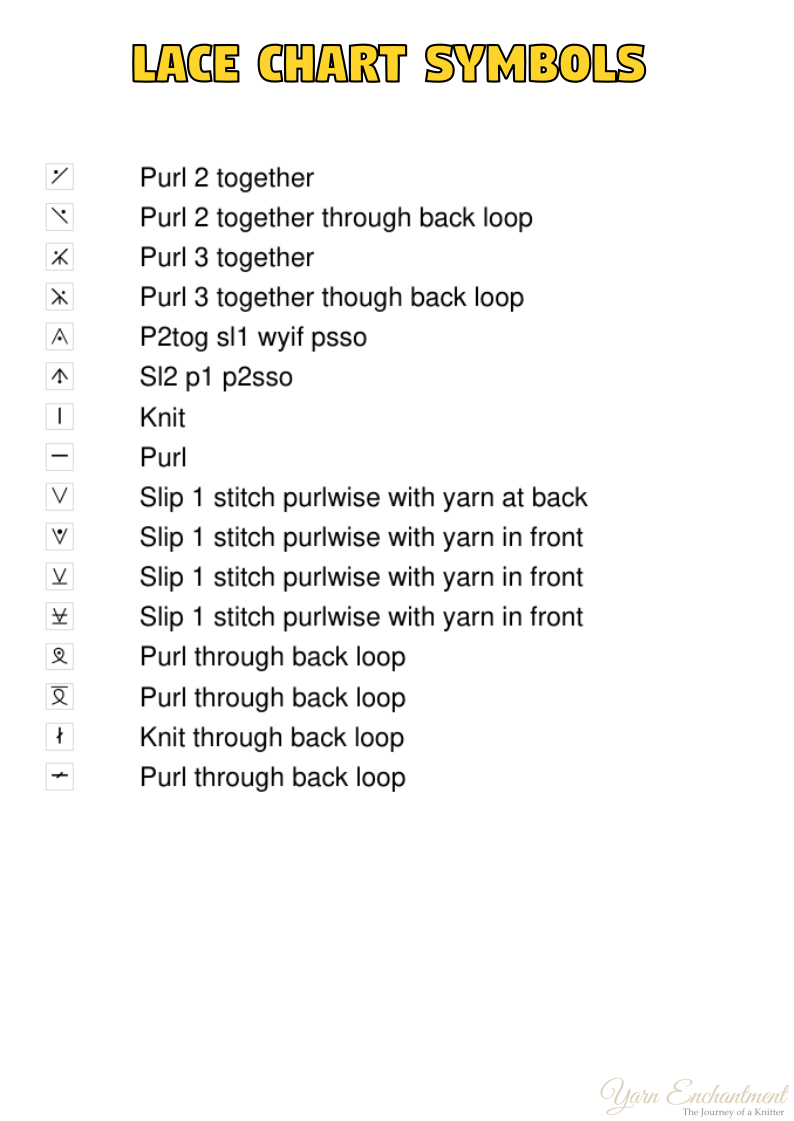
Lace knitting chart symbols vary from designer to designer, because each designer has their own preferences or uses a different tool to create lace charts. I use Stitch Fiddle for all of my charts, including the ones in this blog post. Stitch Fiddle has a lot of different options, for example the M1 symbols. There is also Stitchmastery. I have only looked at the free version, and I can already say that many of the symbols are very similar to Stitch Fiddle's. But make sure you always check the key before you start knitting. The key is your best friend. At the end of this post, I will include a table of the most commonly used lace chart symbols.
Here are the most common lace knitting chart symbols you will meet in modern patterns.
Knit Stitch
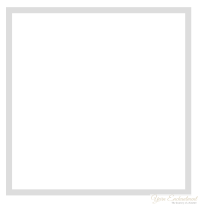
Symbol: Usually a blank or empty square.
What it means:
In most flat lace charts worked in stockinette, a blank square means knit on the right side and purl on the wrong side. If the chart is for garter stitch, the blank square may mean knit on every row. The chart key will tell you.
How to knit it:
Insert the right needle into the front of the stitch from left to right, wrap the yarn around, and pull the new loop through.
What it looks like:
A smooth V on the right side of the fabric.
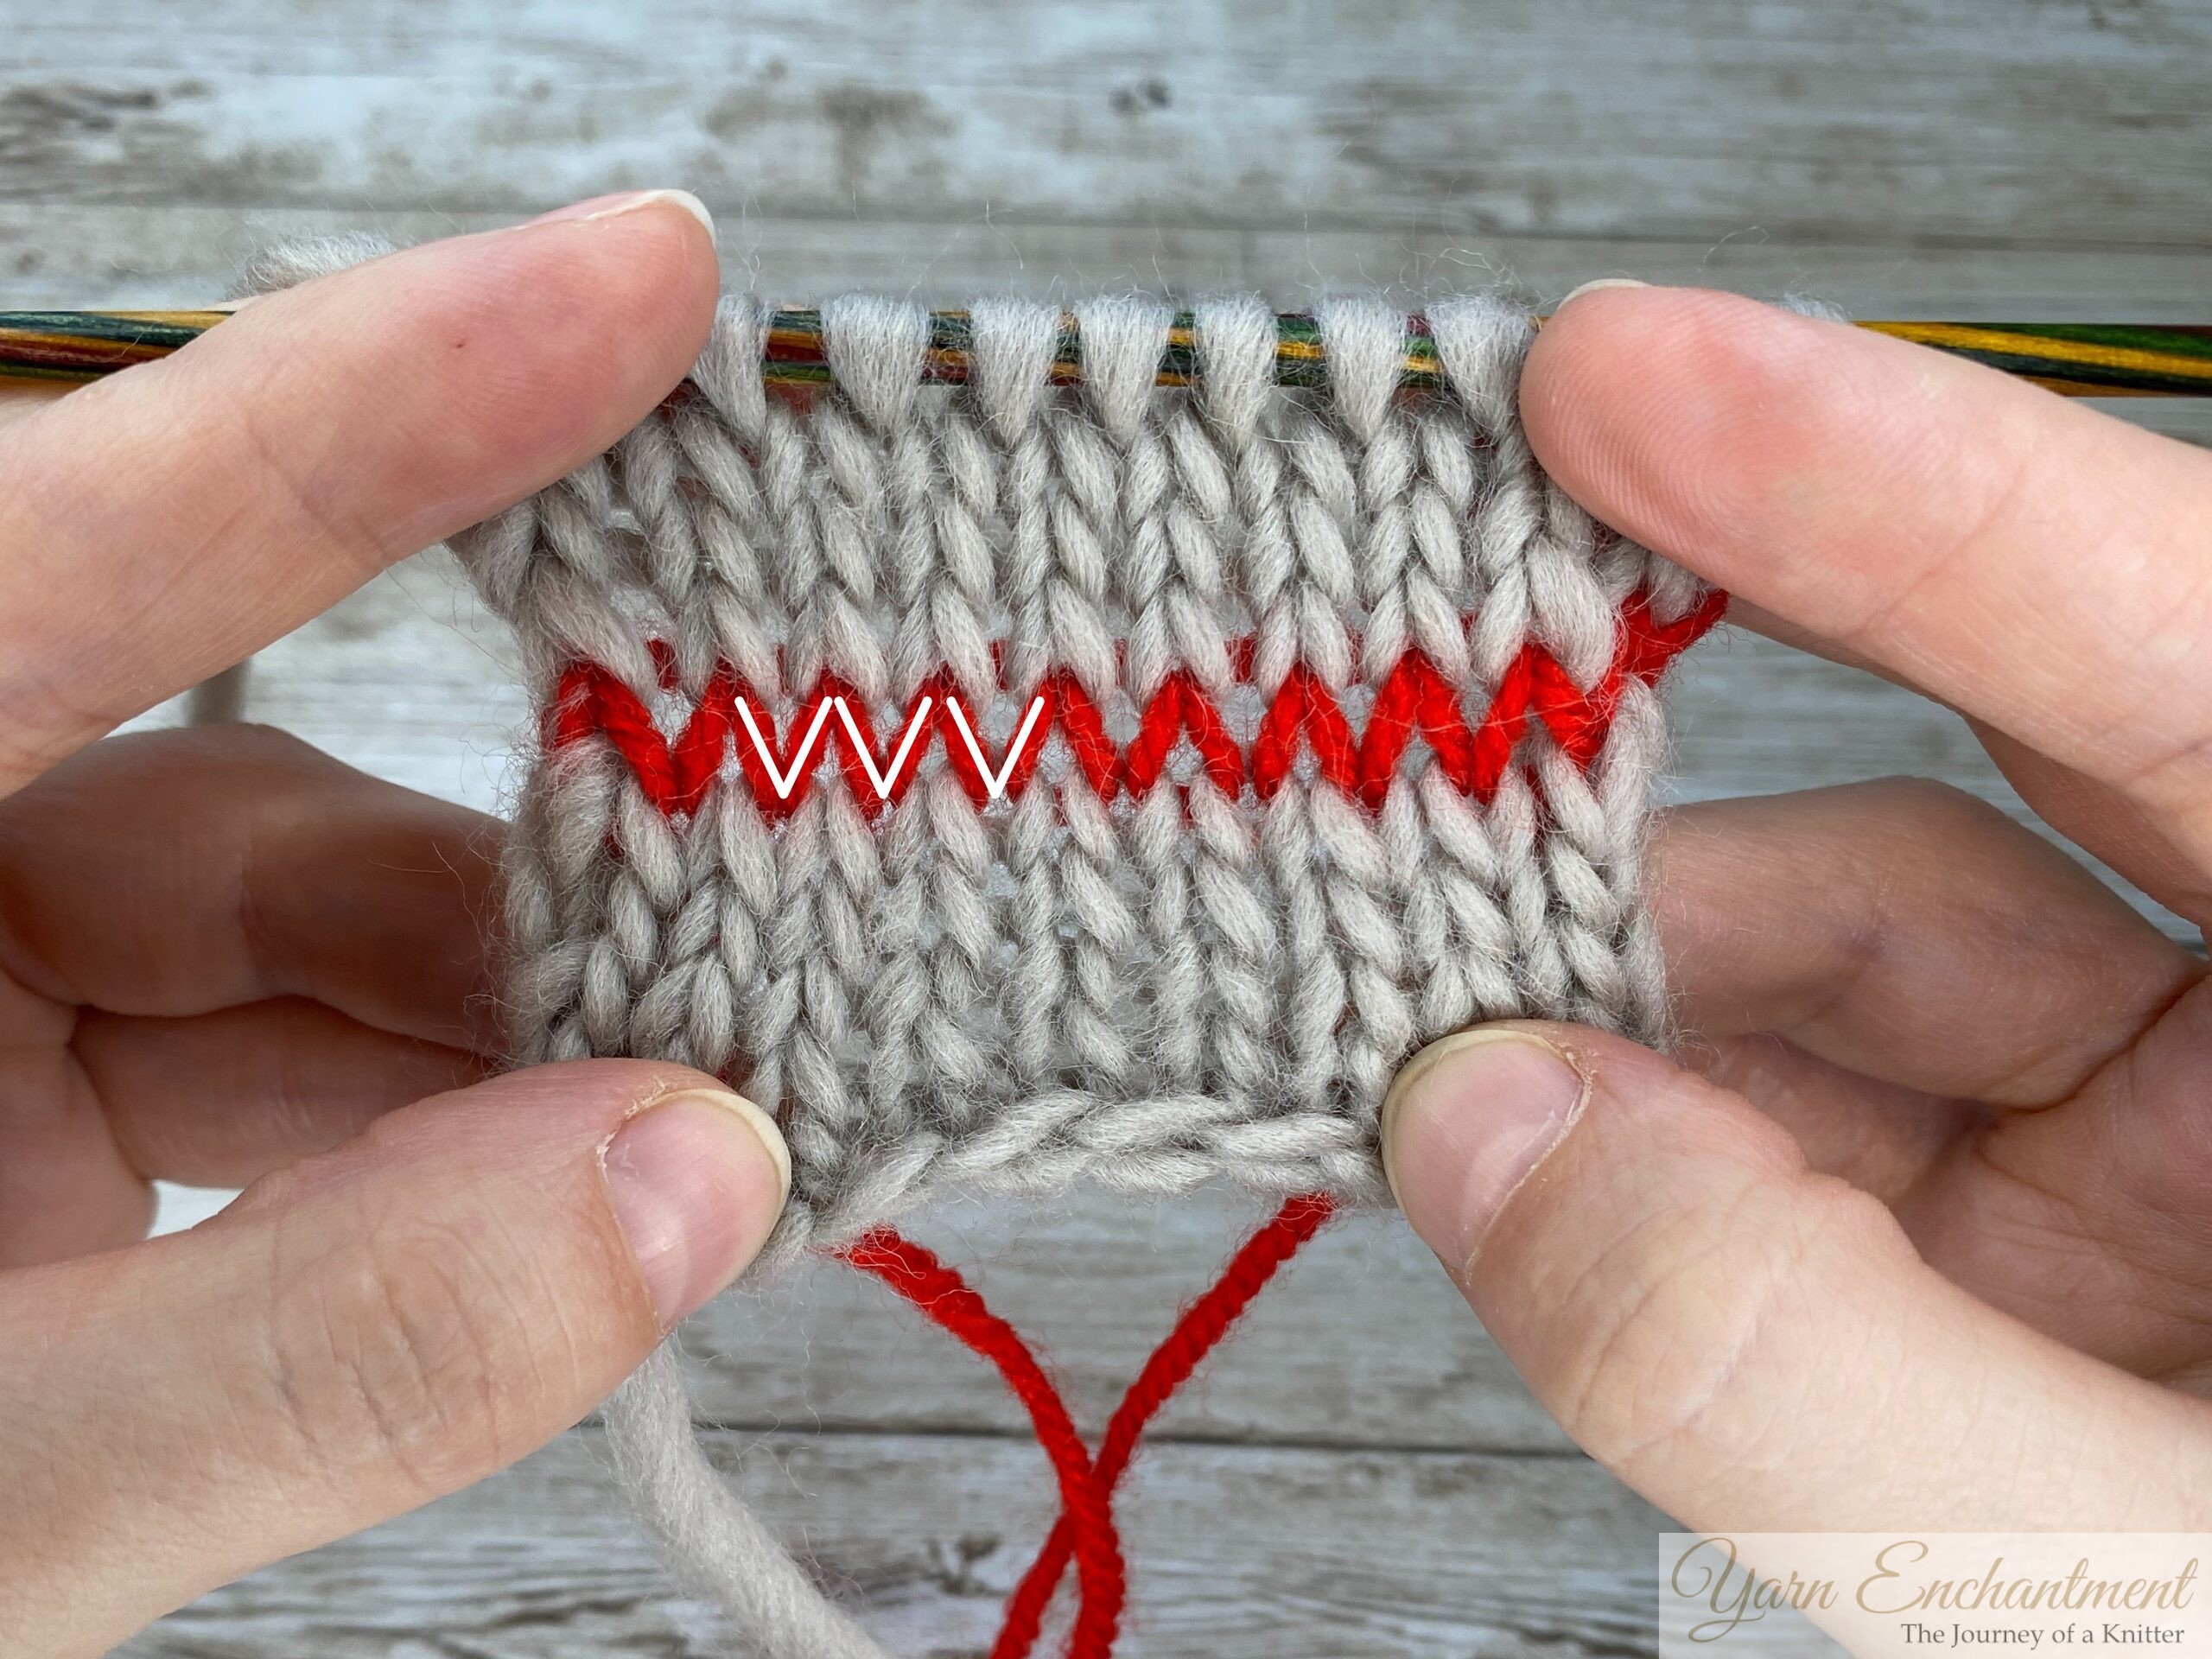  |
Knit stitches look like little V's. |
Purl Stitch
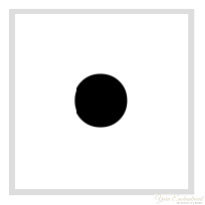
Symbol: Usually a dot (which I used), a small dash, or a filled square.
What it means:
In a flat stockinette chart, a purl symbol means purl on the right side and knit on the wrong side. In circular knitting, it usually means purl on every round.
How to purl it:
Bring the yarn to the front, insert the right needle from right to left into the front of the stitch, wrap the yarn around, and pull the new loop through.
If you need a little refresher, I have written a full tutorial on how to work the purl stitch. It walks you through every step with pictures.
What it looks like:
A little bump on the right side of the fabric.
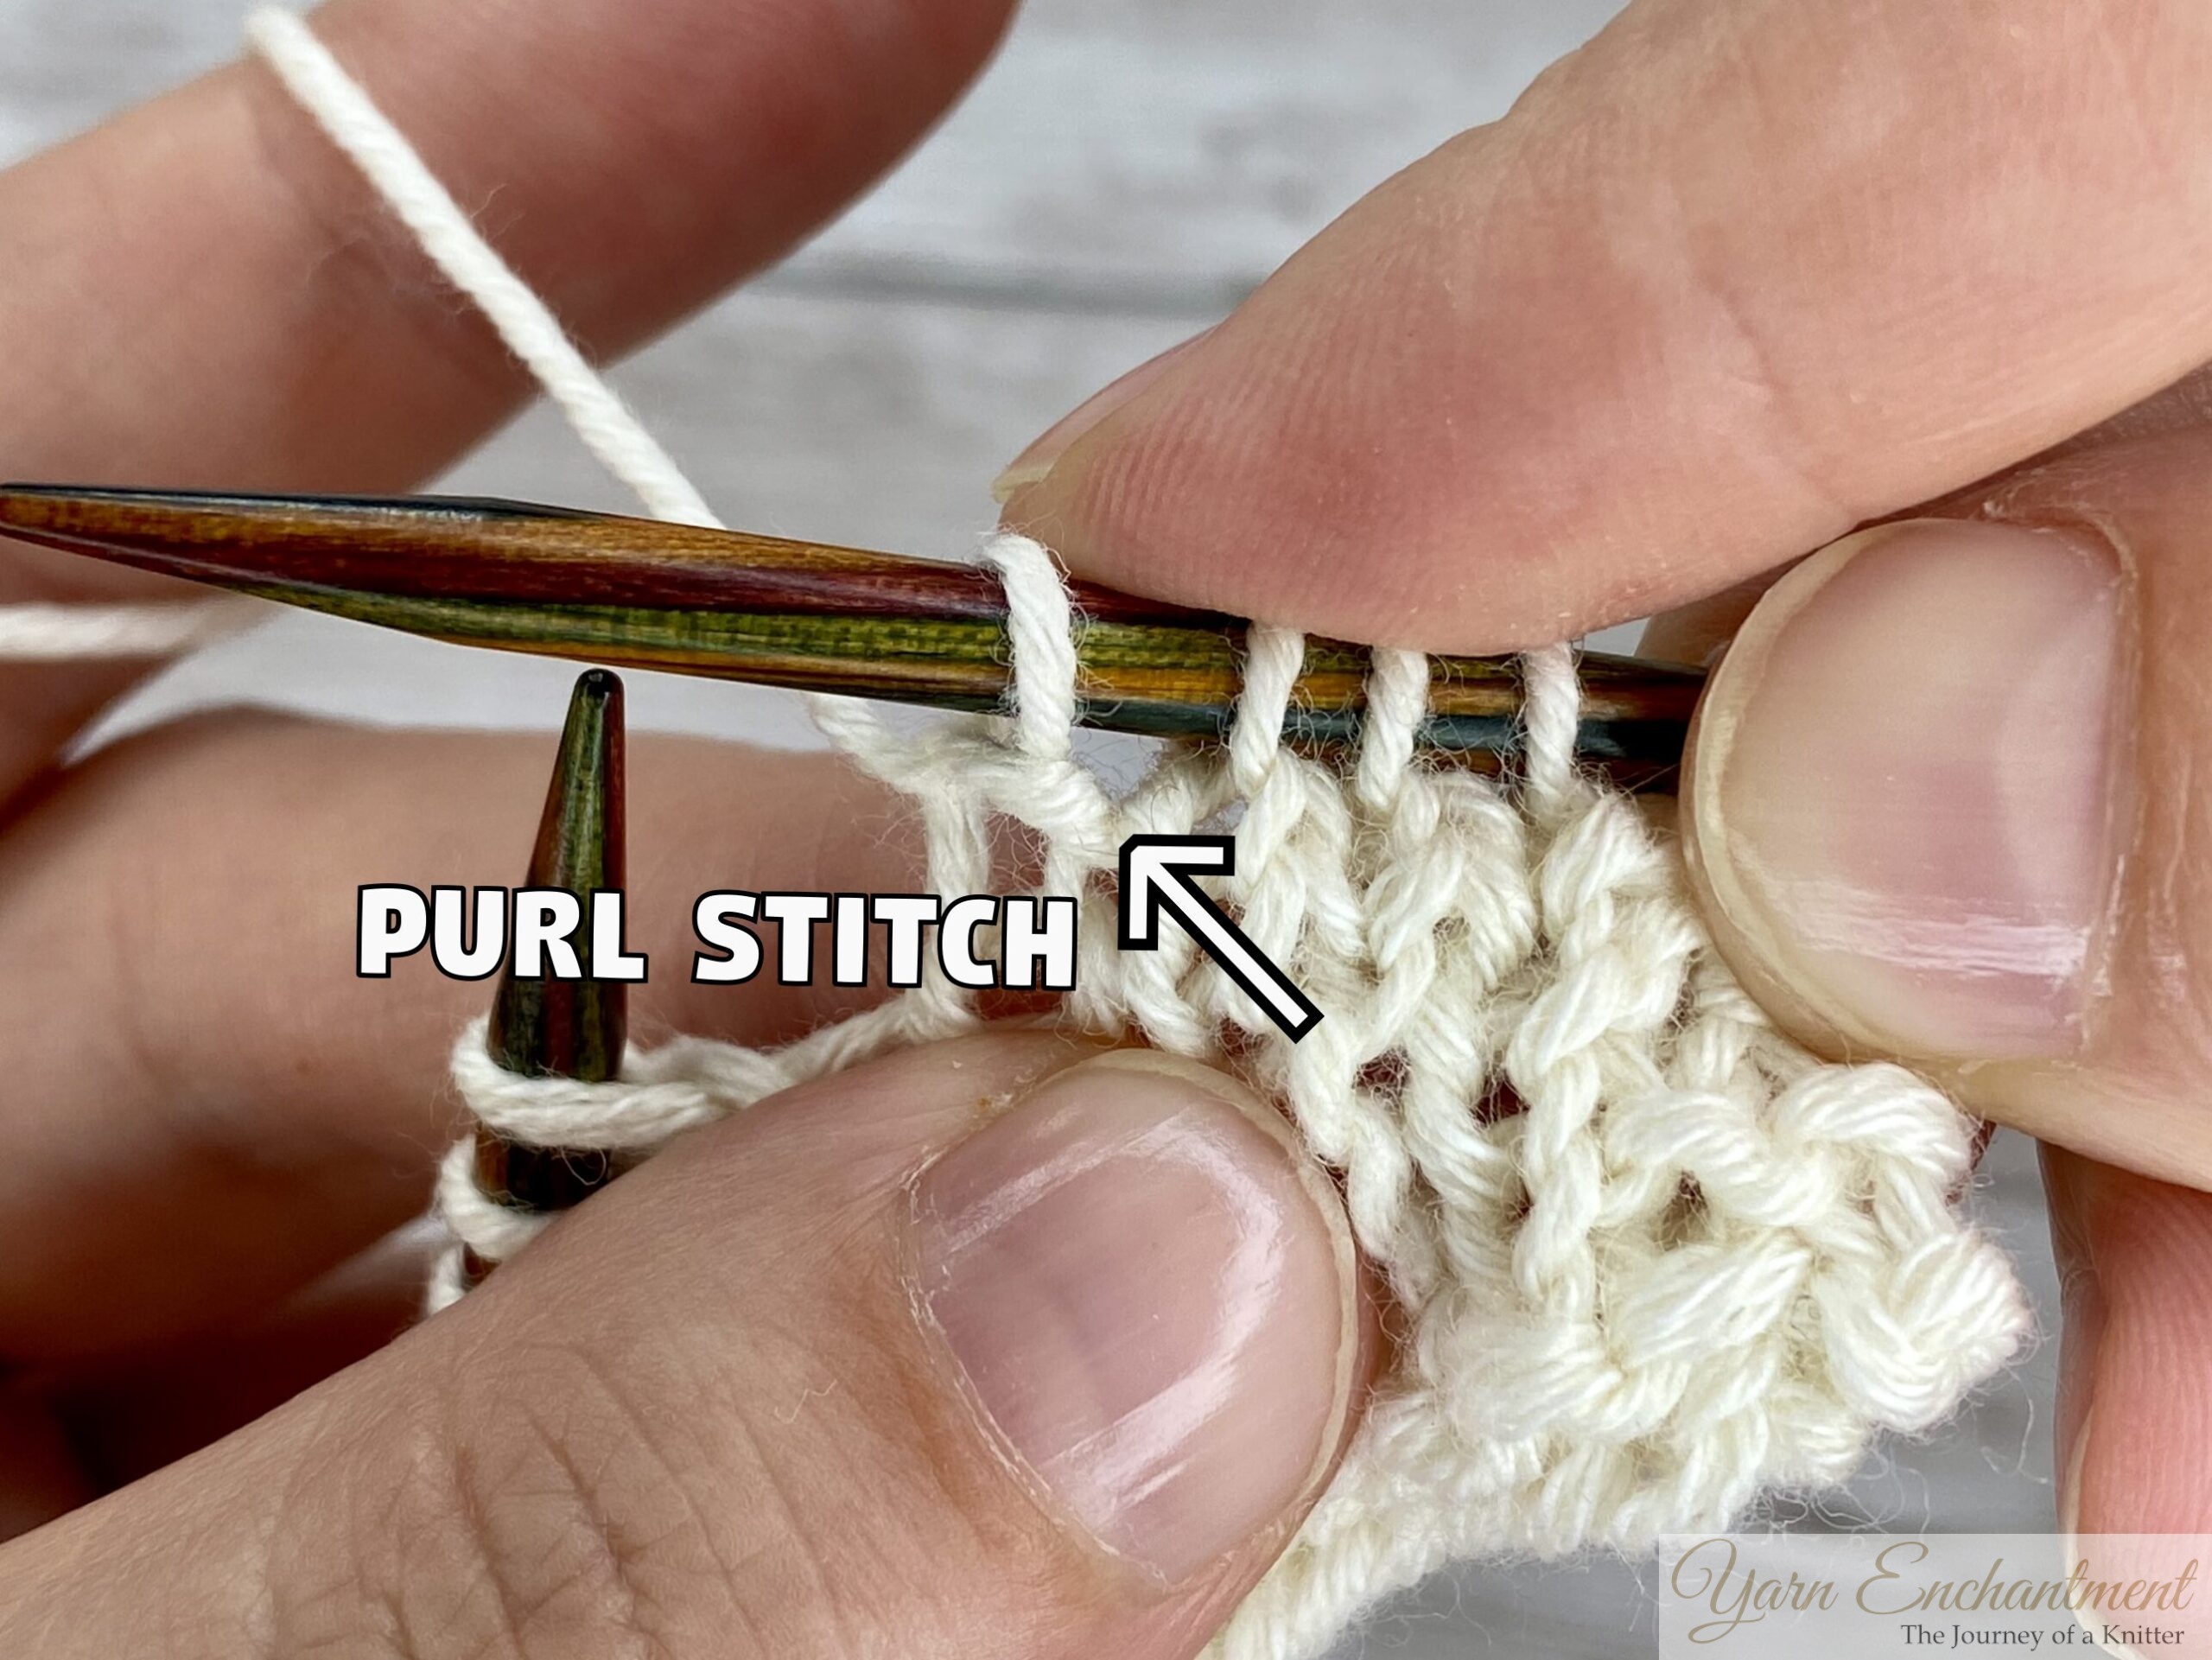  |
See that little dot? That is the purl stitch. It matches the symbol above perfectly, a tiny dot, so this chart symbol feels the most intuitive to me. |
Knit Through the Back Loop (ktbl)
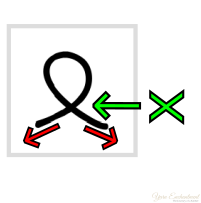
This symbol looks like a little loop crossing over itself. The legs marked with red arrows are twisted, and in the middle you can see an X. That is my trick for remembering a stitch worked through the back loop. Just be careful, the same symbol turned upside down can mean an M1 increase instead.
Symbol: A black loop crossing over itself, like crossed laces. Or it is often shown as a knit or purl symbol with a small extra line, or written as the abbreviation ktbl or ptbl.
What it means:
Instead of working into the front loop of the stitch, you work into the back loop. This twists the stitch at its base, creating a neat, tighter look.
How to work ktbl:
Insert the right needle into the back loop of the stitch and knit it normally.
How to work ptbl:
Insert the right needle into the back loop of the stitch and purl it.
Why it is used in lace:
Twisted stitches can tighten yarn overs, add lovely texture, or create a decorative line running through your lace. They are a small detail that makes a big difference..
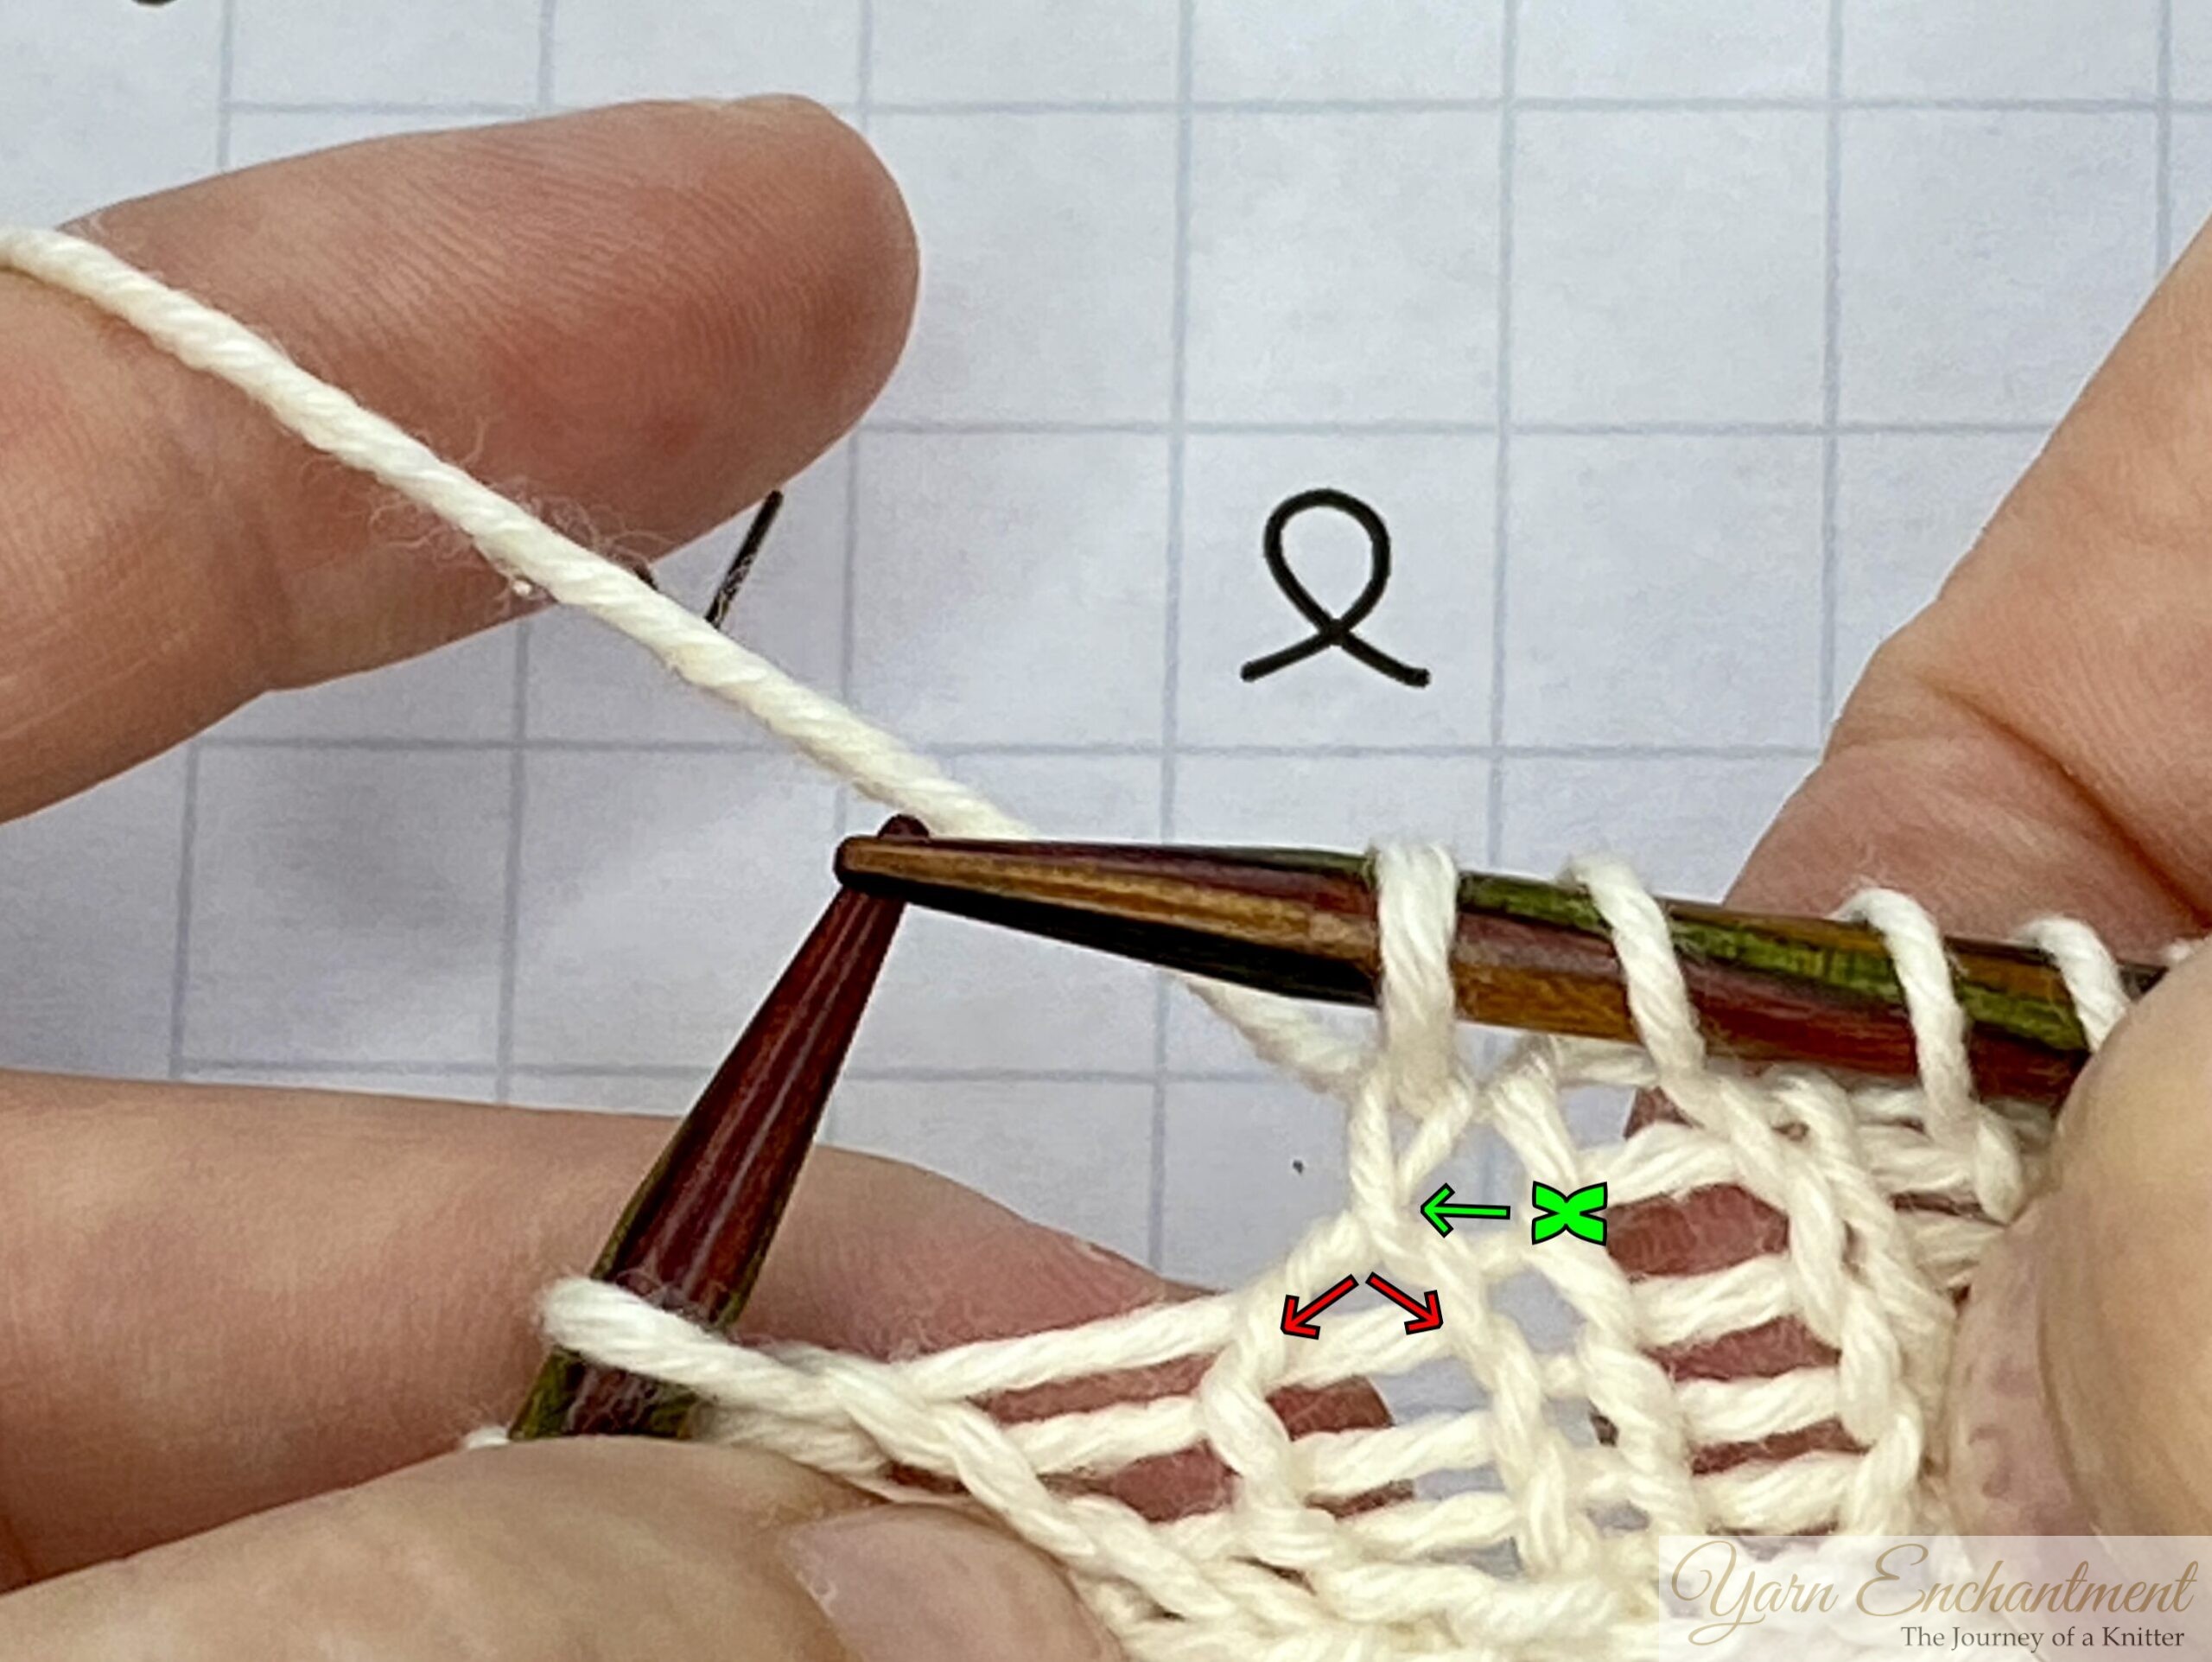  |
When the symbol for knit through the back loop was designed, it seems that people really put thought into it. When you look closely, you can see how the knitted stitch resembles the chart symbol. |
Yarn Over (yo)
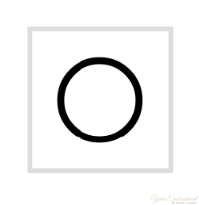
Symbol: Usually a circle or an O. In German pattern books they are marked as an U for Umschlag = Wrap
What it means:
A yarn over adds one stitch and creates an eyelet hole. This is the stitch that makes lace look like lace.
How to work it:
Bring the yarn to the front between the needles, then take it over the right needle to the back. On the next row, work the yarn over however the pattern tells you to.
What it looks like:
A small hole in the knitted fabric. That is why the chart symbol is often a circle.
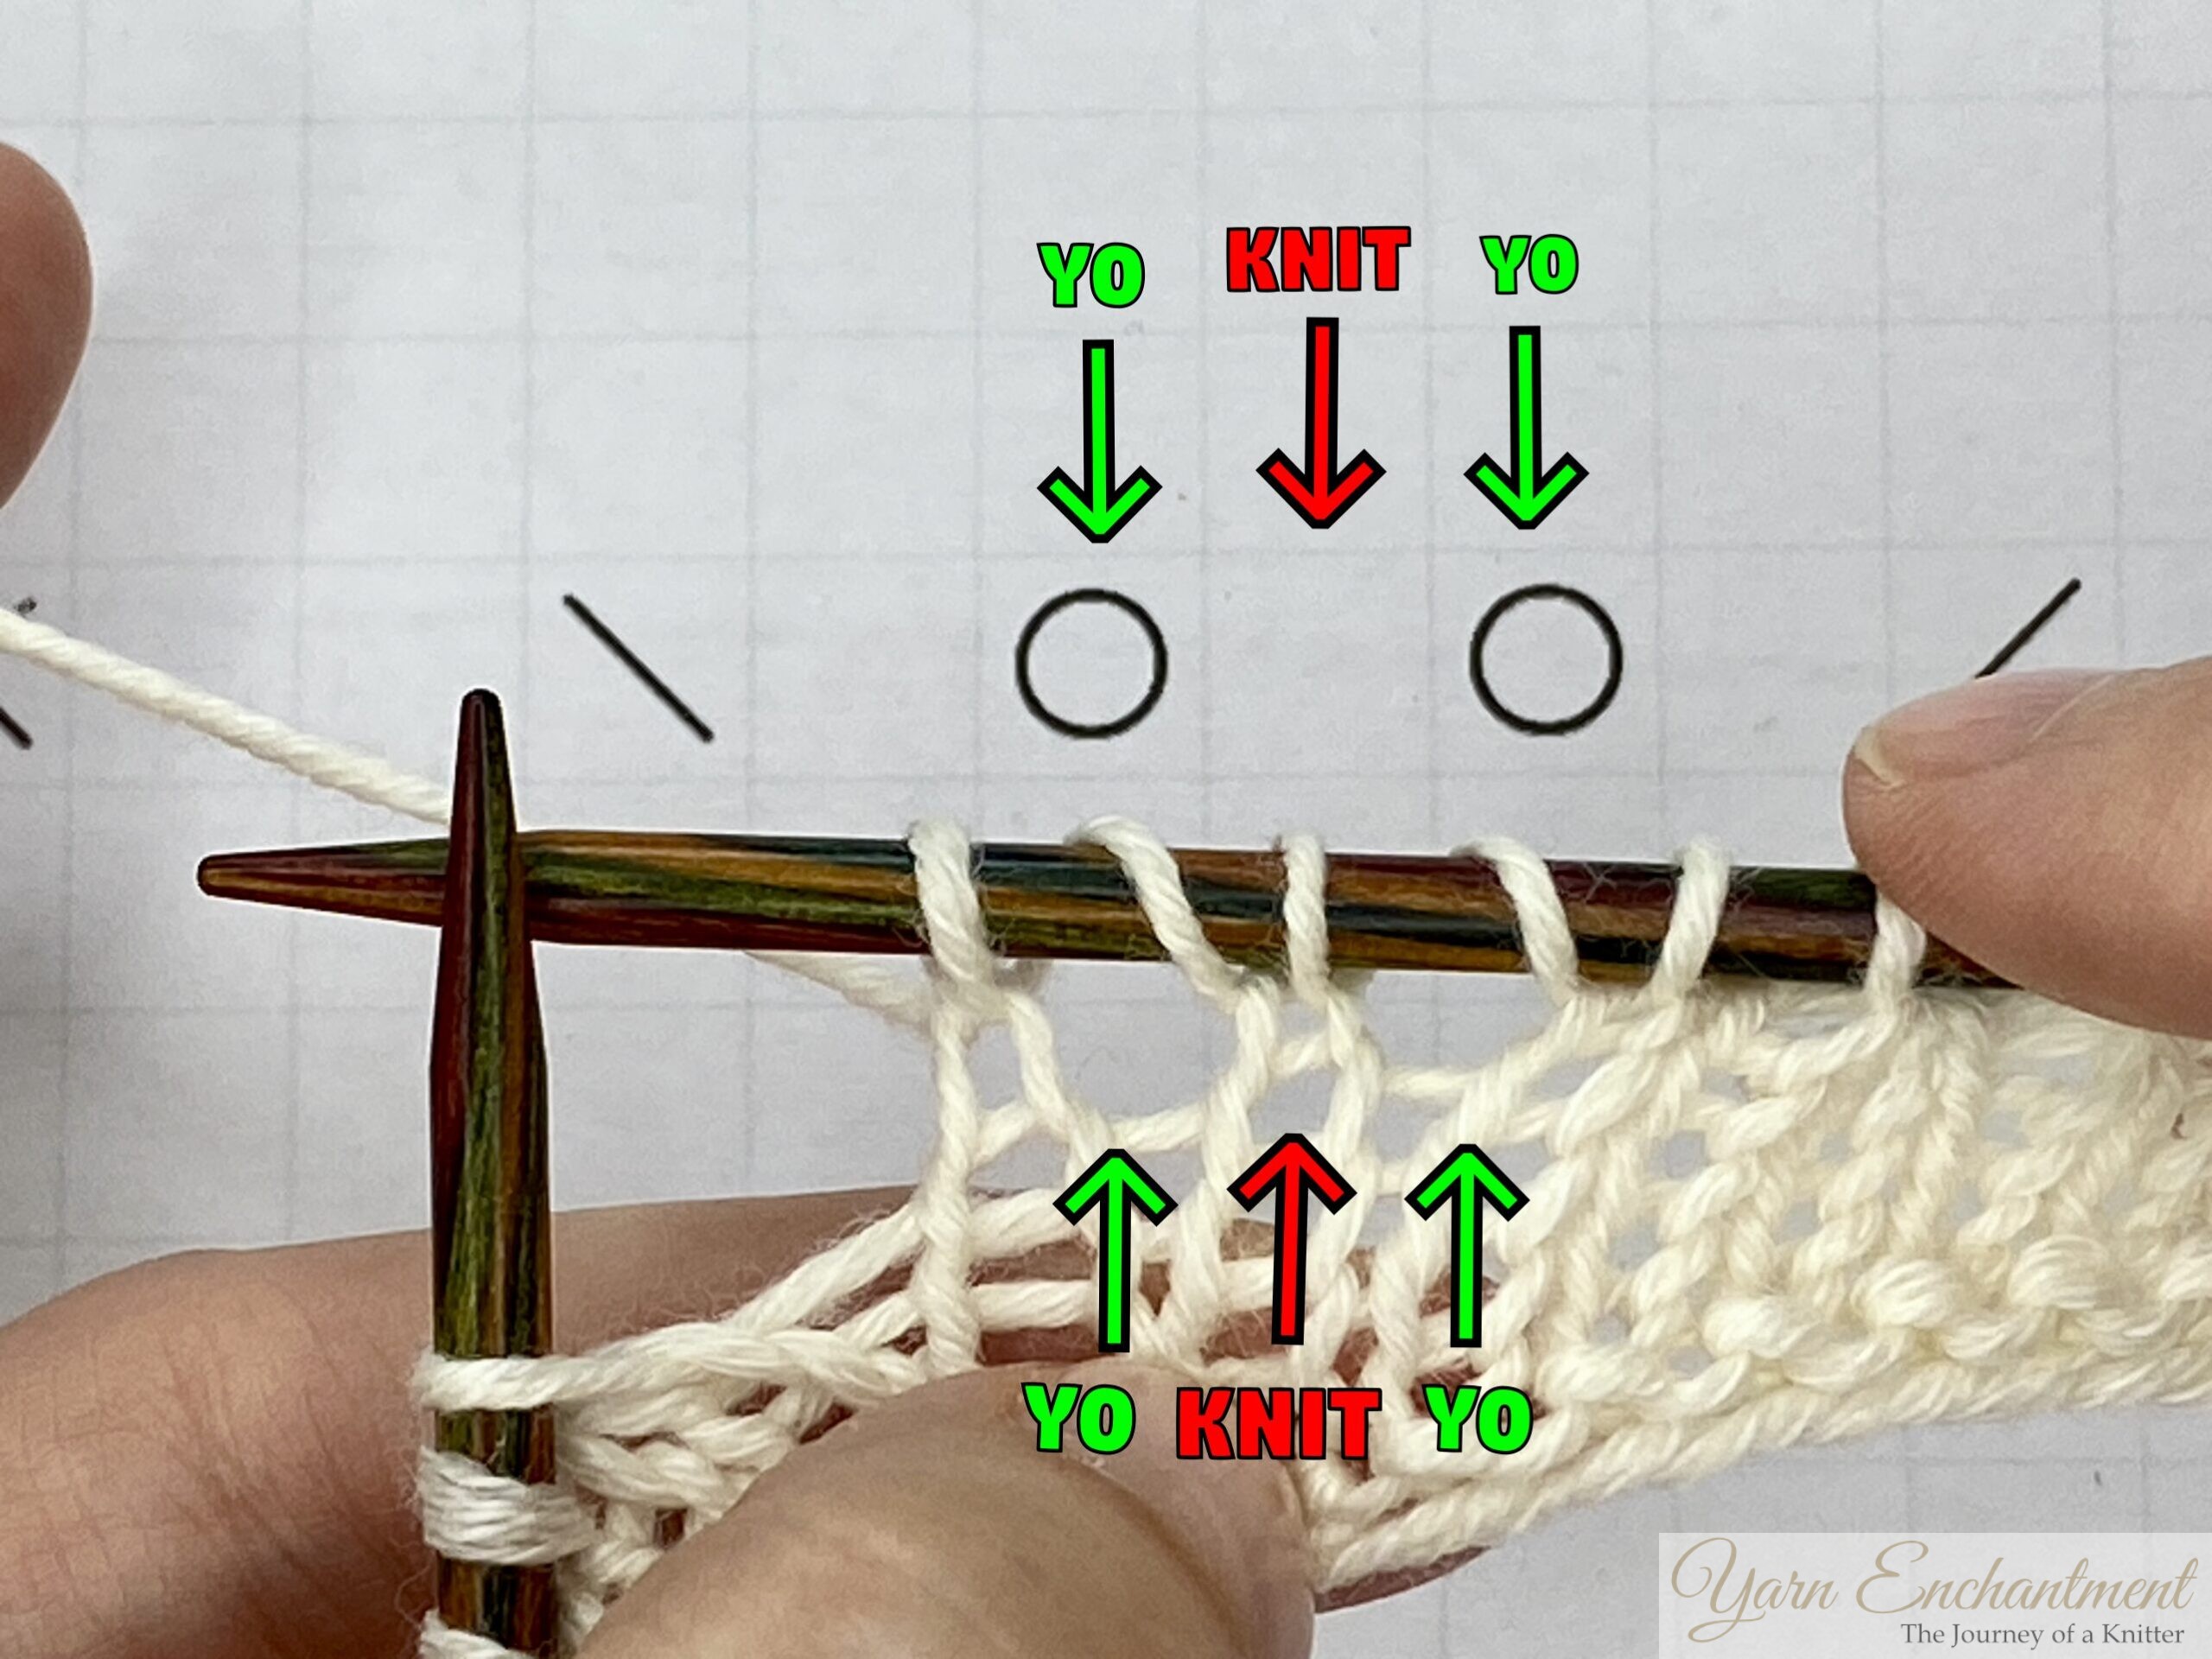  |
Here you can see how closely the lace chart symbols resemble the stitches on your needle. I have a yarn over (a little circle), followed by a knit stitch, and then another yarn over. |
Make 1 Left (M1L)
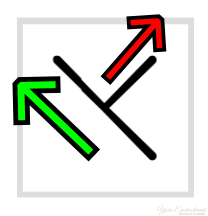 I use the arrows to help you see how I visualize and remember each symbol. The green arrow points to the left (The backslash is pointing to the left), so I know that increase leans left. The red arrow shows a line going out to the right, which reminds me that there is an extra stitch to work. That little visual trick is how I keep them straight.
Symbol: Usually shown as a lifted-increase symbol that leans to the left. I could also be a M1 or a ML symbol.
What it means:
This increase uses the strand between two stitches. It is twisted to avoid creating a hole.
How to work M1L:
Lift the strand between the stitches from front to back, then knit it through the back loop.
Why it is used in lace:
It adds a stitch without making an eyelet, so it is useful when you need shaping but do not want extra holes.
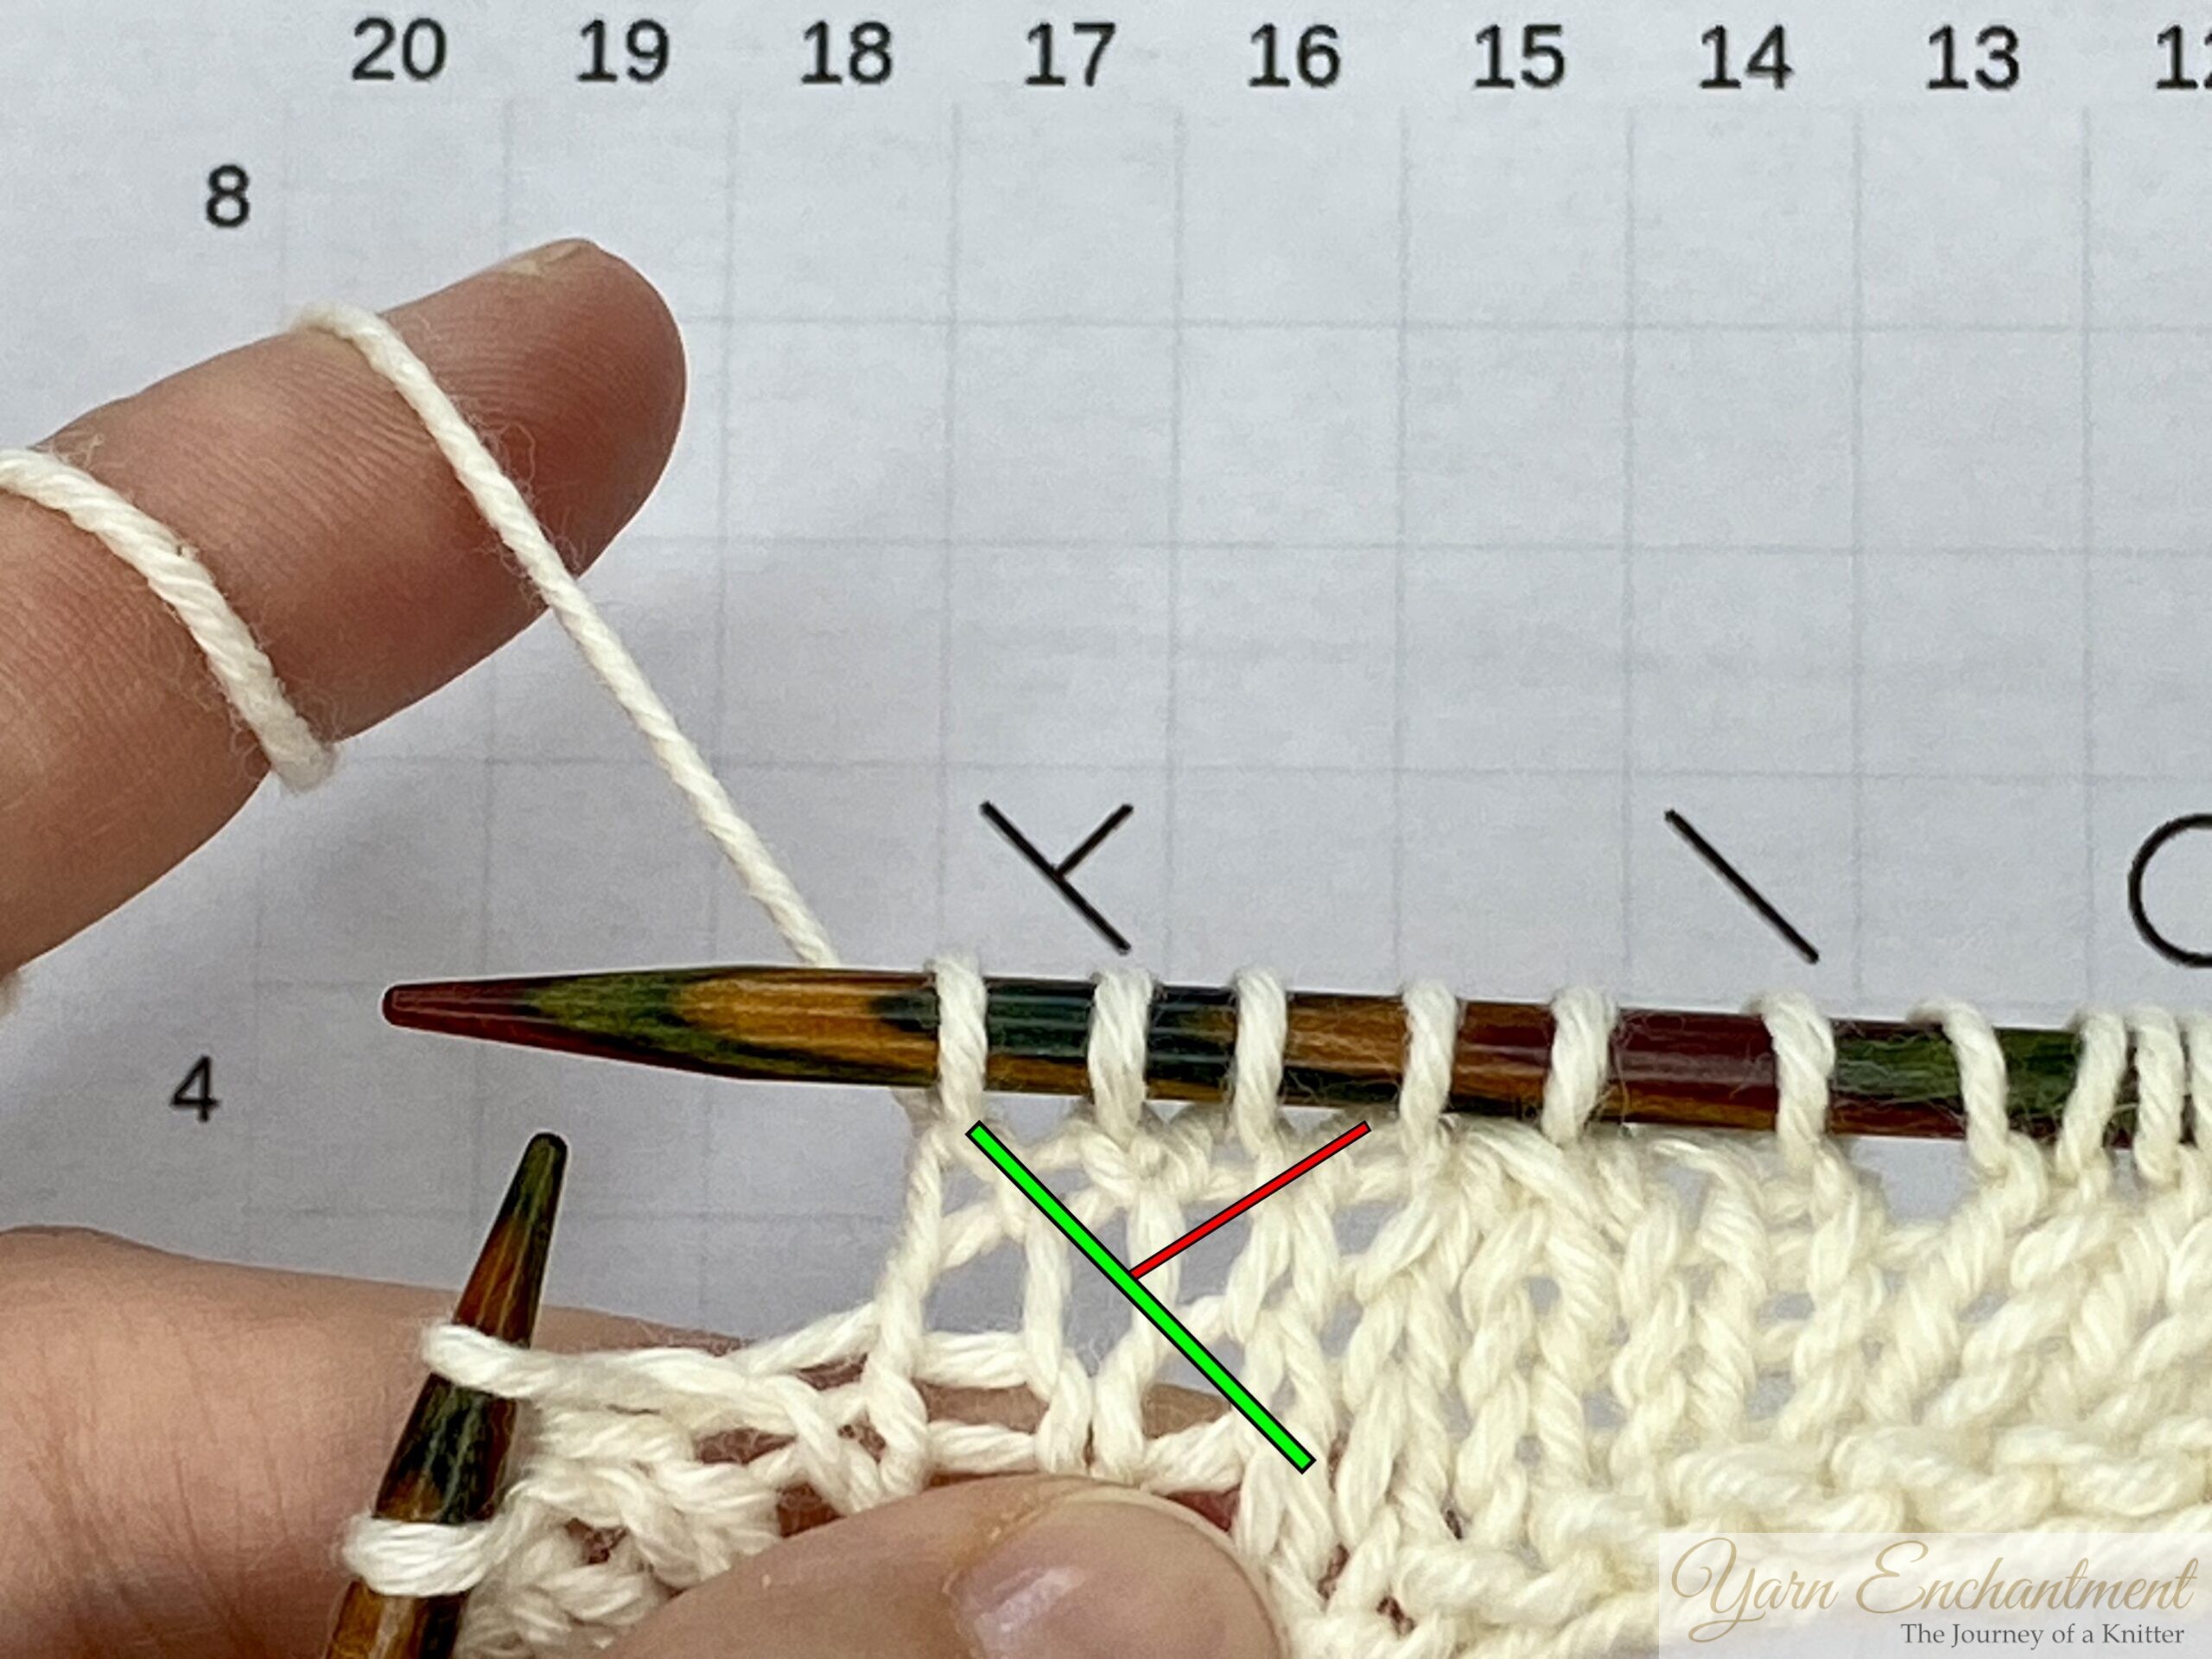  |
If I can be completely honest here, this symbol does not make any sense to me. I just remember which direction the slash is pointing, almost like with the SSK or K2tog, and I know which direction the increase needs to go. By the way, this is the most used symbol in the chart. |
There are two other symbols for the same increases, and I want to show you those too.
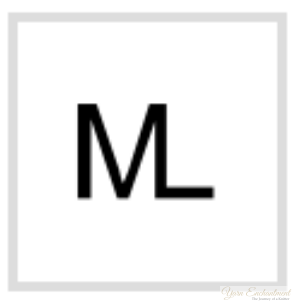
Make 1 Left can also appear as the ML in a chart, which is a really great symbol for this increase, if you ask me.
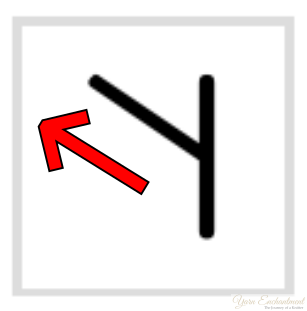
The other symbol you may come across is a straight line with a vertical line going to the left. This is also a very straightforward symbol for the make one left increase. But designers could use this for a left lifted increase.
Make 1 Right (M1R)
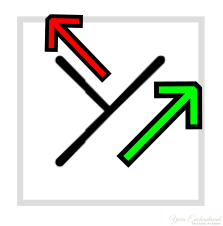
Again i used arrows to help you see how I visualize the symbol. The green arrow points to the right (The slash is pointing to the right), so I know that increase leans right. The red arrow shows a line going out to the left, which reminds me that there is an extra stitch to work. I could also be a M1 or a MR
Symbol: Usually shown as a lifted-increase symbol that leans to the right.
What it means:
This increase uses the strand between two stitches. It is twisted to avoid creating a hole.
How to work M1R:
Lift the strand between the stitches from back to front, then knit it through the front loop.
Why it is used in lace:
It adds a stitch without making an eyelet, so it is useful when you need shaping but do not want extra holes.
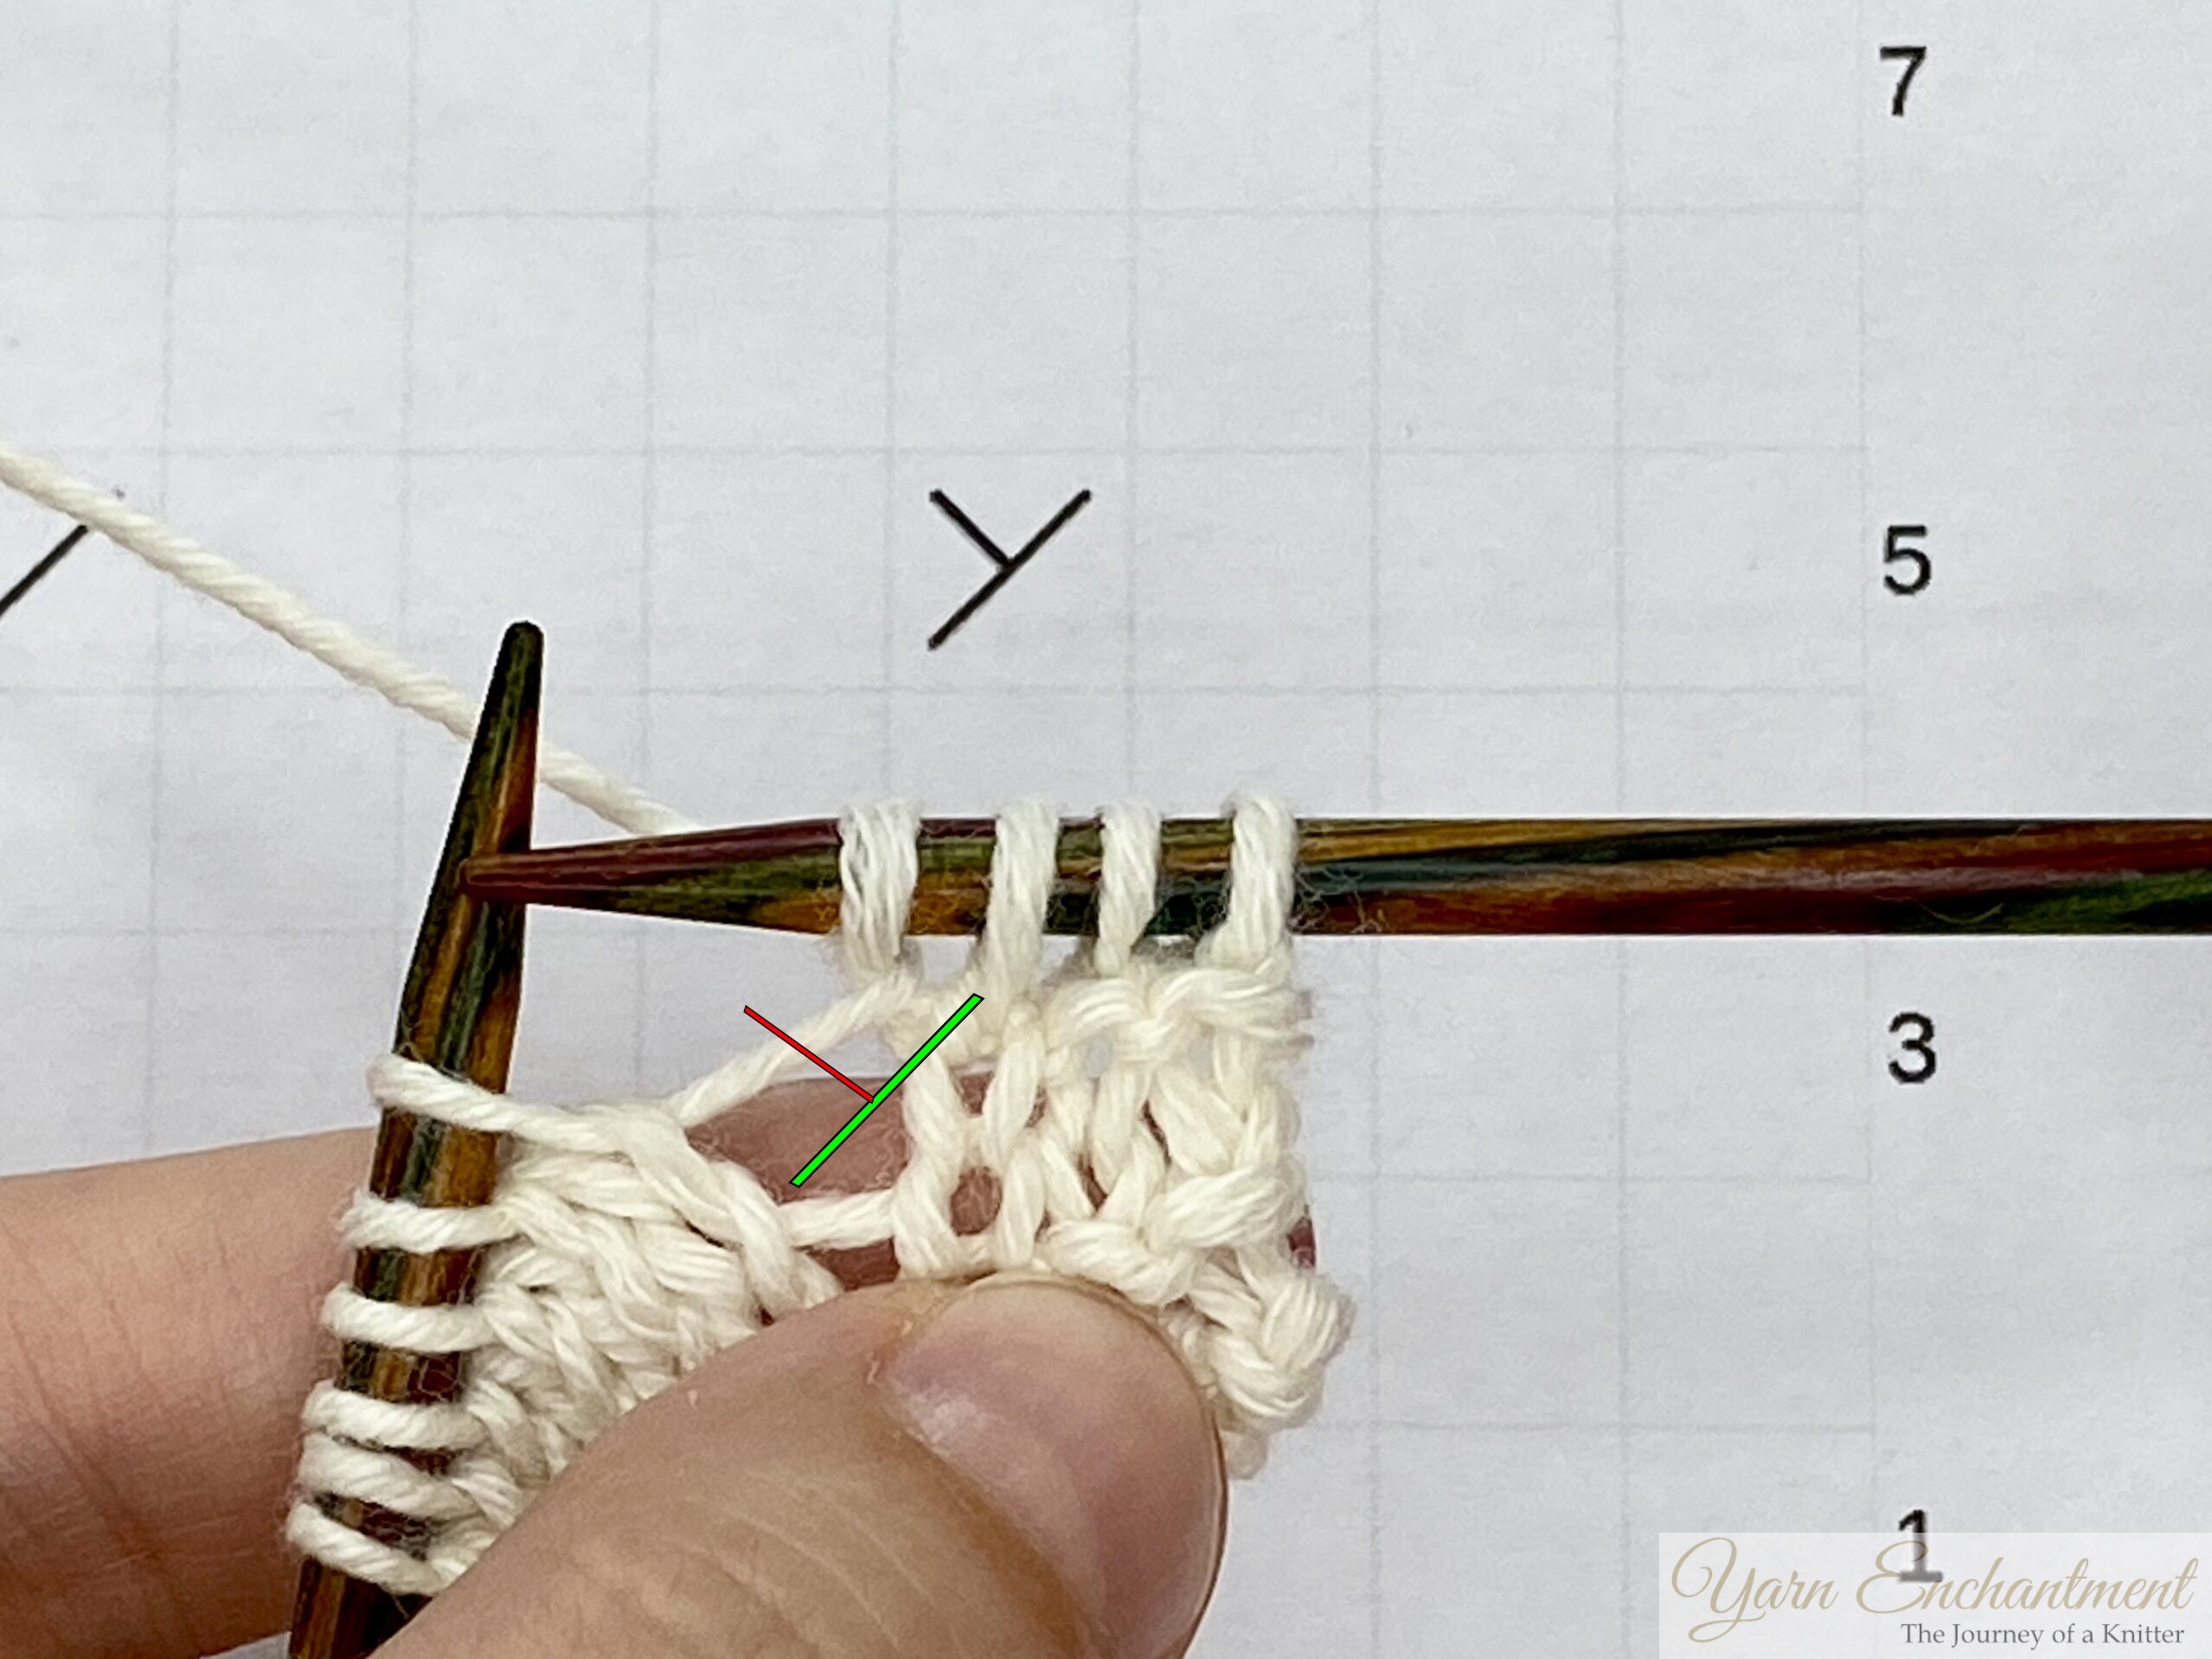  |
I tried to recreate the visual here for the Make One Right increase symbol chart. The green slash that points upward to the right shows me that there is a make one right increase to make. |
And just like the make one left increase has two other symbols, so does the make one right increase.

Make 1 Right can also appear as the MR in a chart, which again is a really great symbol for this increase.
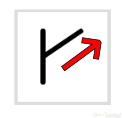
The other symbol you may come across is a straight line with a vertical line going to the right. This is also a very straightforward symbol for the make one right increase. But designers could use this for a right lifted increase.
Knit 2 Together (k2tog)
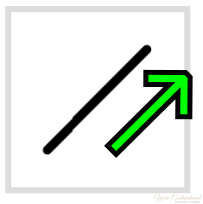
Symbol: Usually a right-leaning slash, like /.
What it means:
Knit two stitches together. This decreases one stitch and makes the new stitch lean to the right.
How to work it:
Insert the right needle into the next two stitches at the same time and knit them together.
What it looks like:
A decrease that tilts to the right. On a chart, the slash leans the same way the stitch will lean.
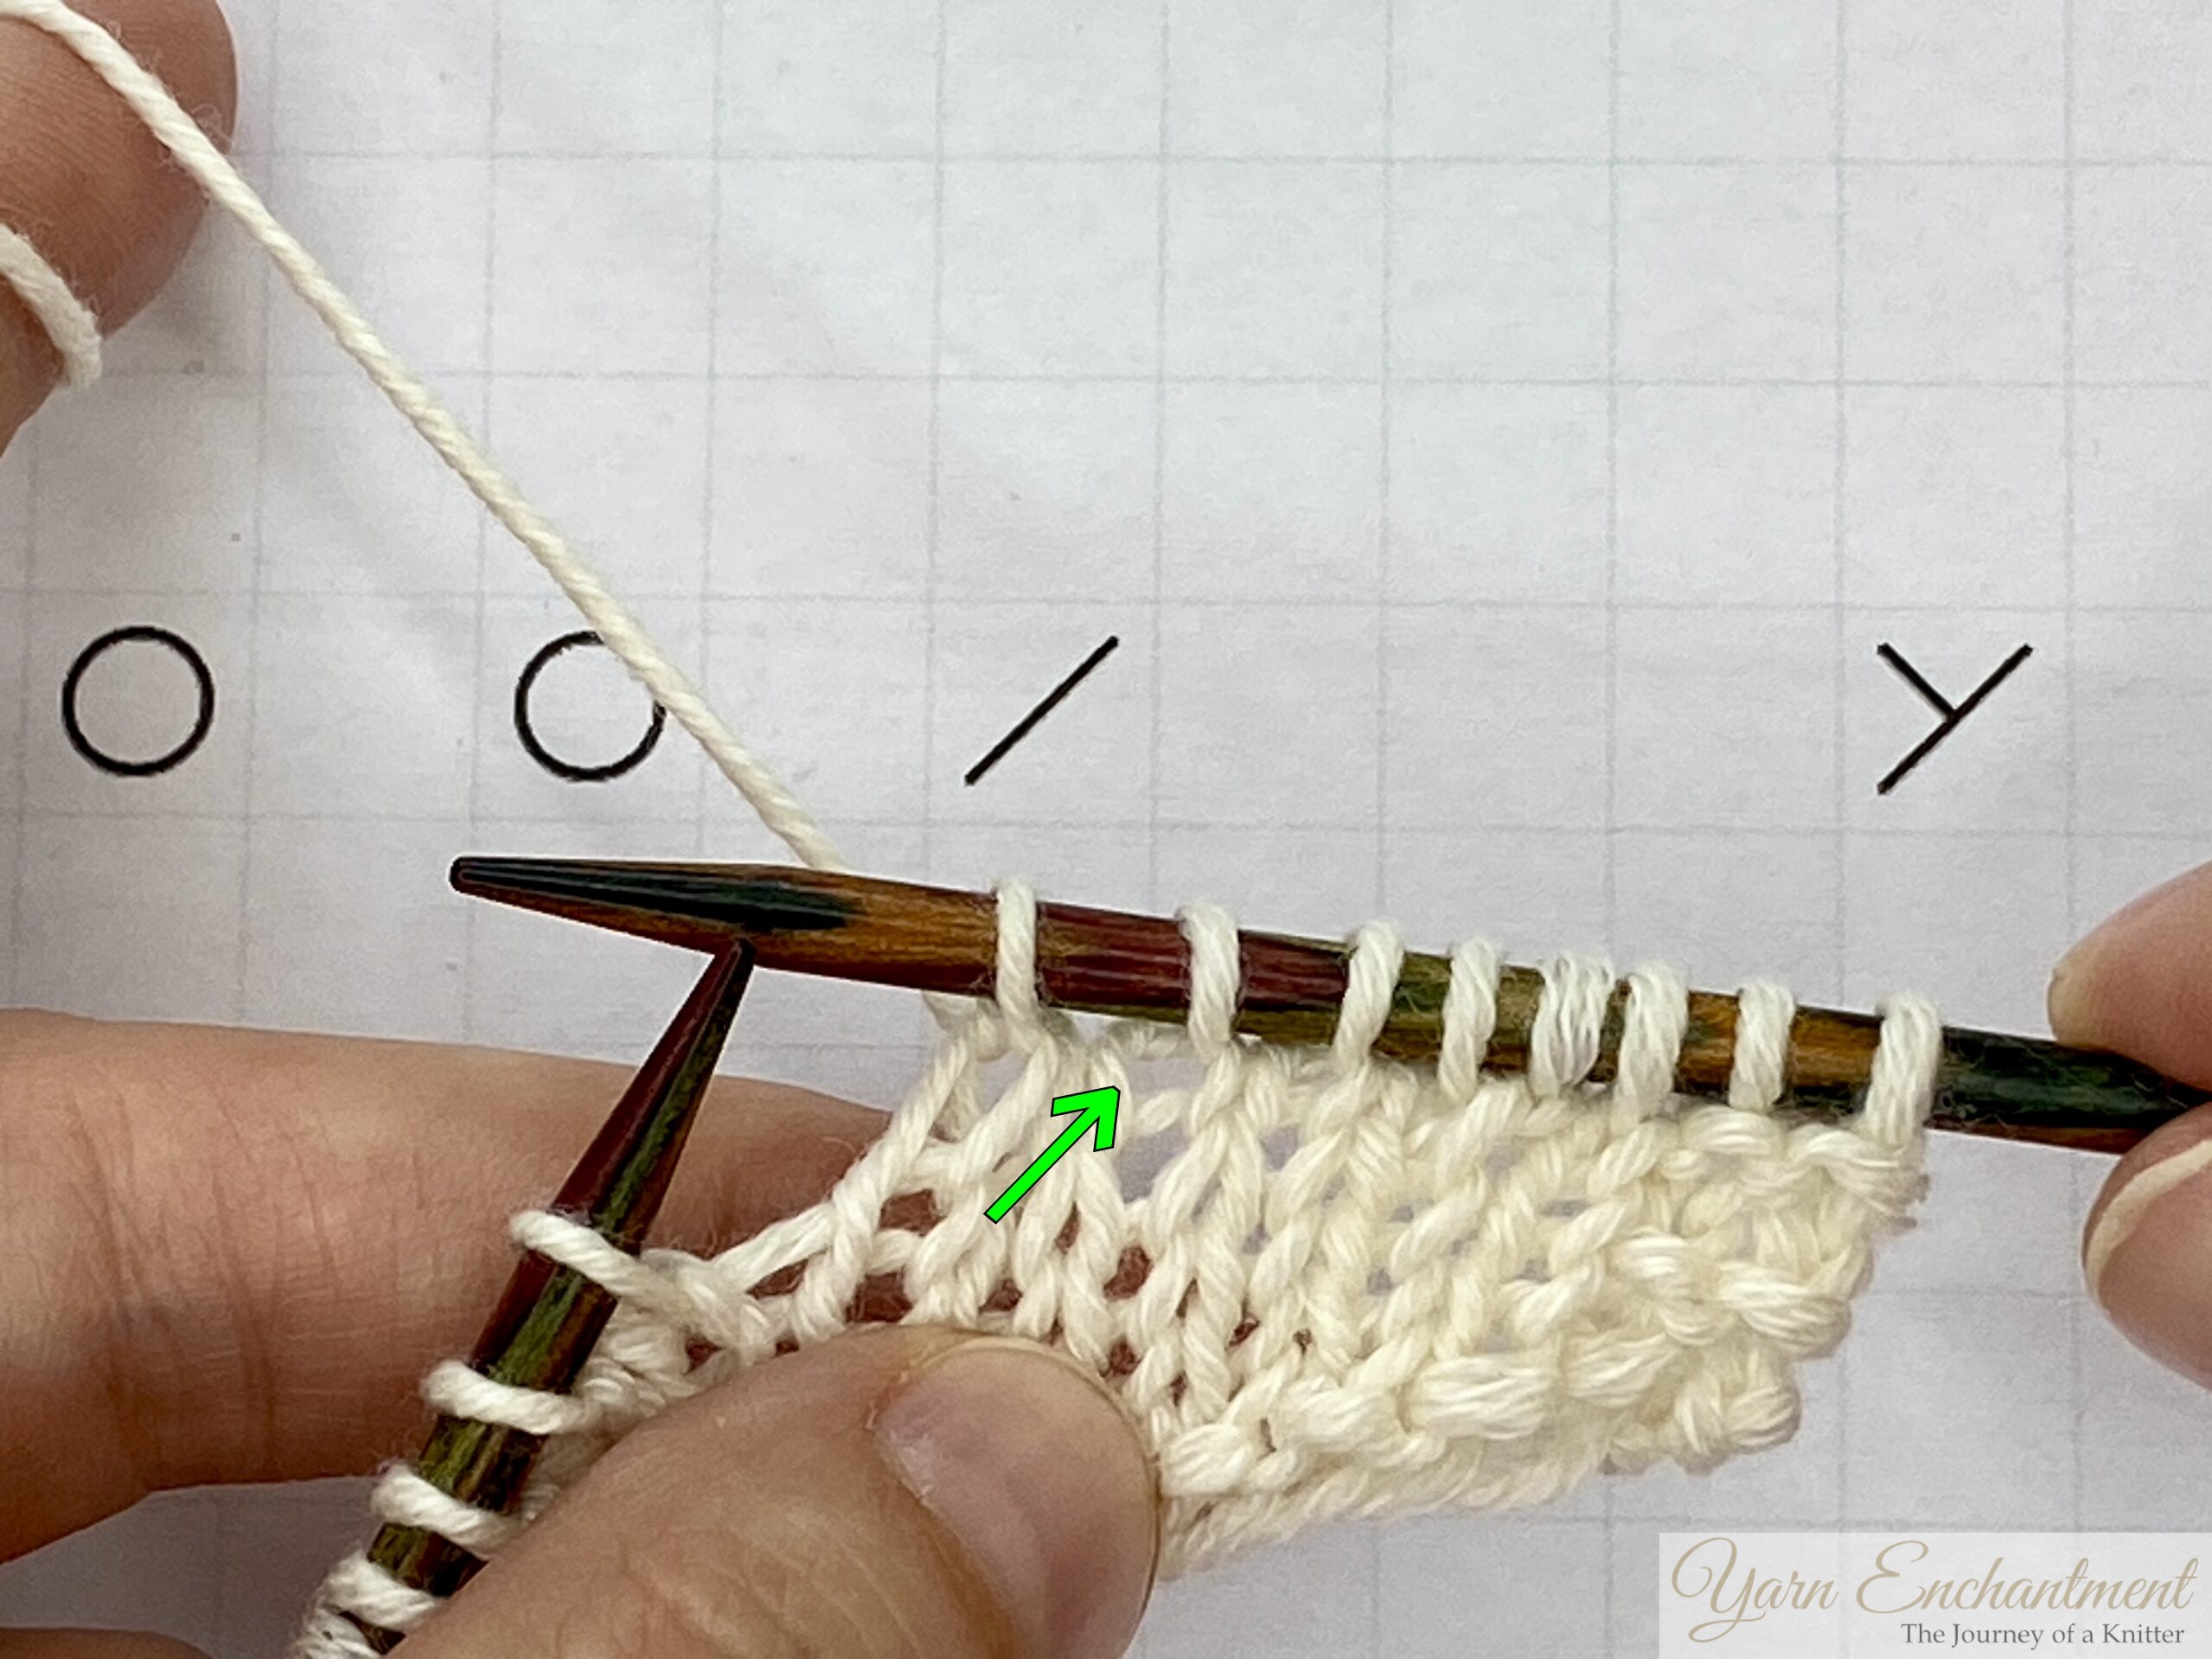  |
With a knit 2 together, you get a right-leaning decrease, which is exactly what the symbol is showing you. |
Slip, Slip, Knit (ssk)
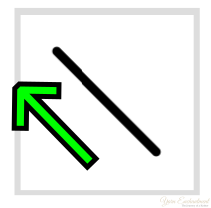
Symbol: Usually a left-leaning slash, like a backslash. \
What it means:
Slip, slip, knit. This decreases one stitch and makes the new stitch lean to the left.
How to work it:
Slip two stitches one at a time as if to knit. Then insert the left needle into the fronts of those two slipped stitches and knit them together through the back loop.
What it looks like:
A decrease that tilts to the left. The symbol leans left because the finished stitch leans left.
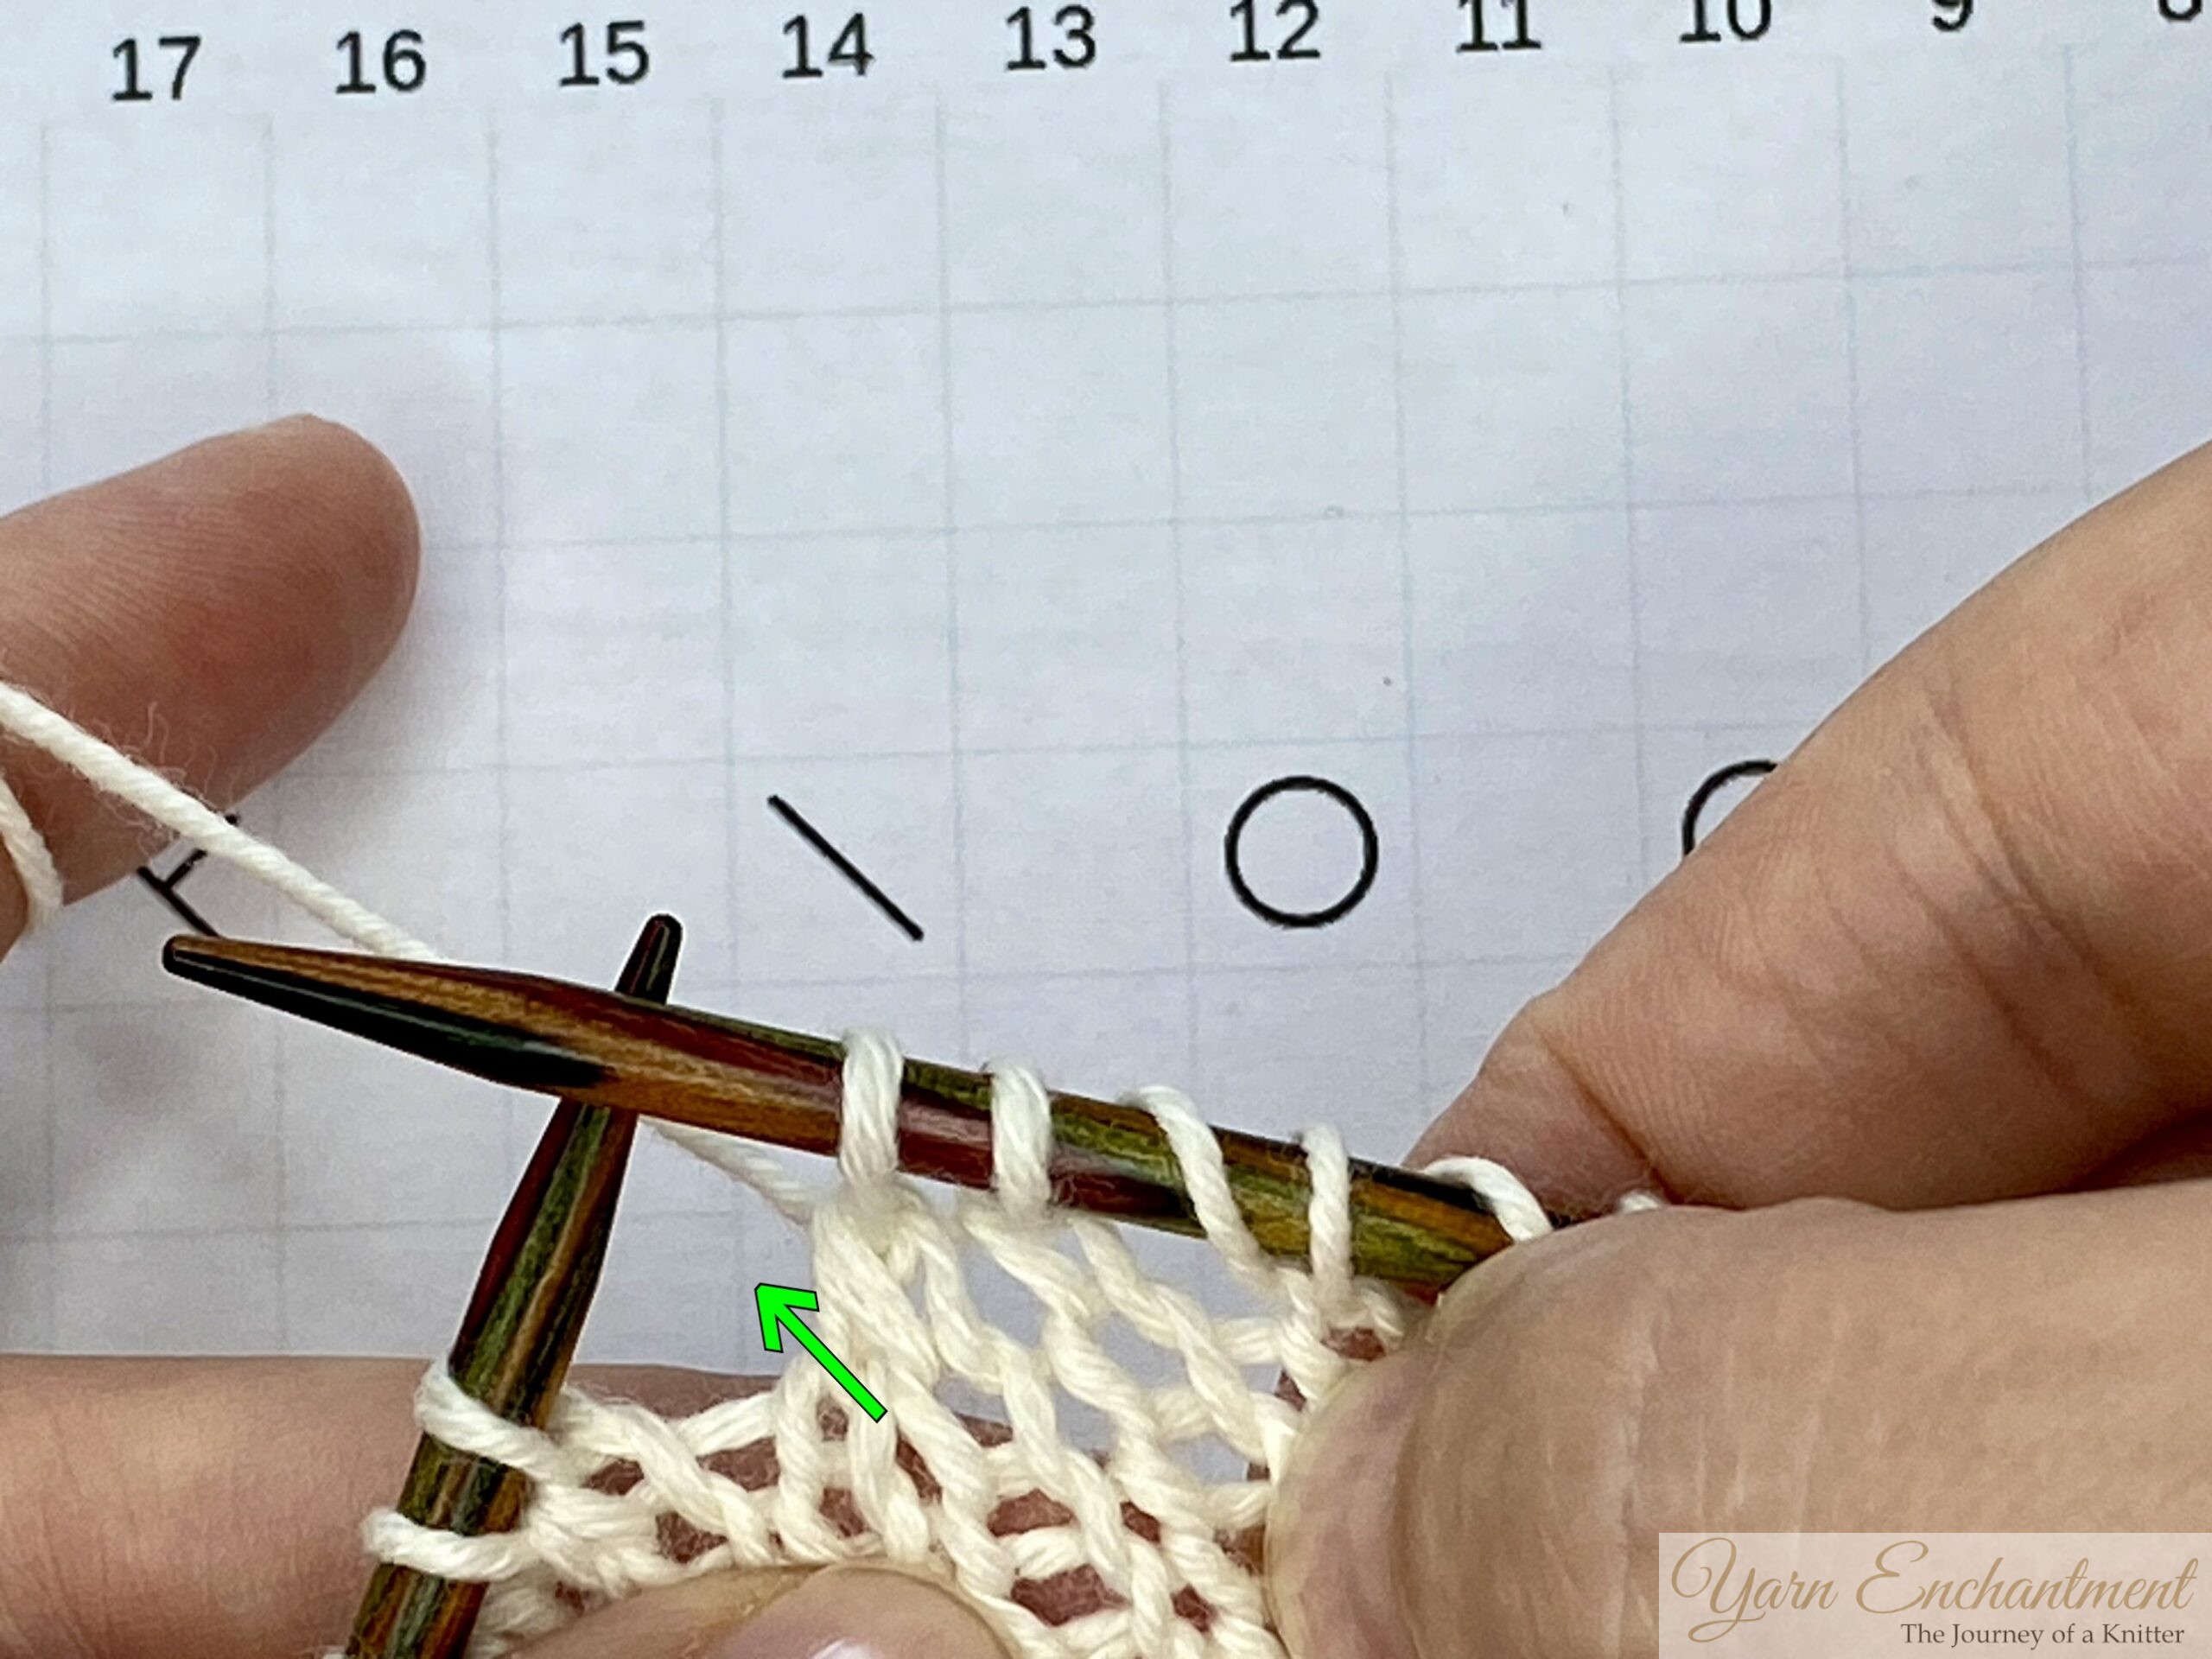  |
With a SSK or a PSSO, you get a left-leaning decrease, which is exactly what the symbol is showing you. |
Slip Stitch (sl)
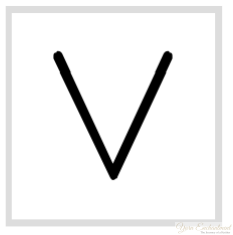
Symbol: Often shown as an elongated V.
What it means:
A slip stitch is passed from the left needle to the right needle without being worked.
How to work it:
Insert the right needle into the stitch as if to purl, and slide it over to the right needle. Some patterns will tell you to slip as if to knit instead, so check the instructions.
Why it is used in lace:
Slipped stitches can create edges, add structure, or form decorative lines within the lace pattern.
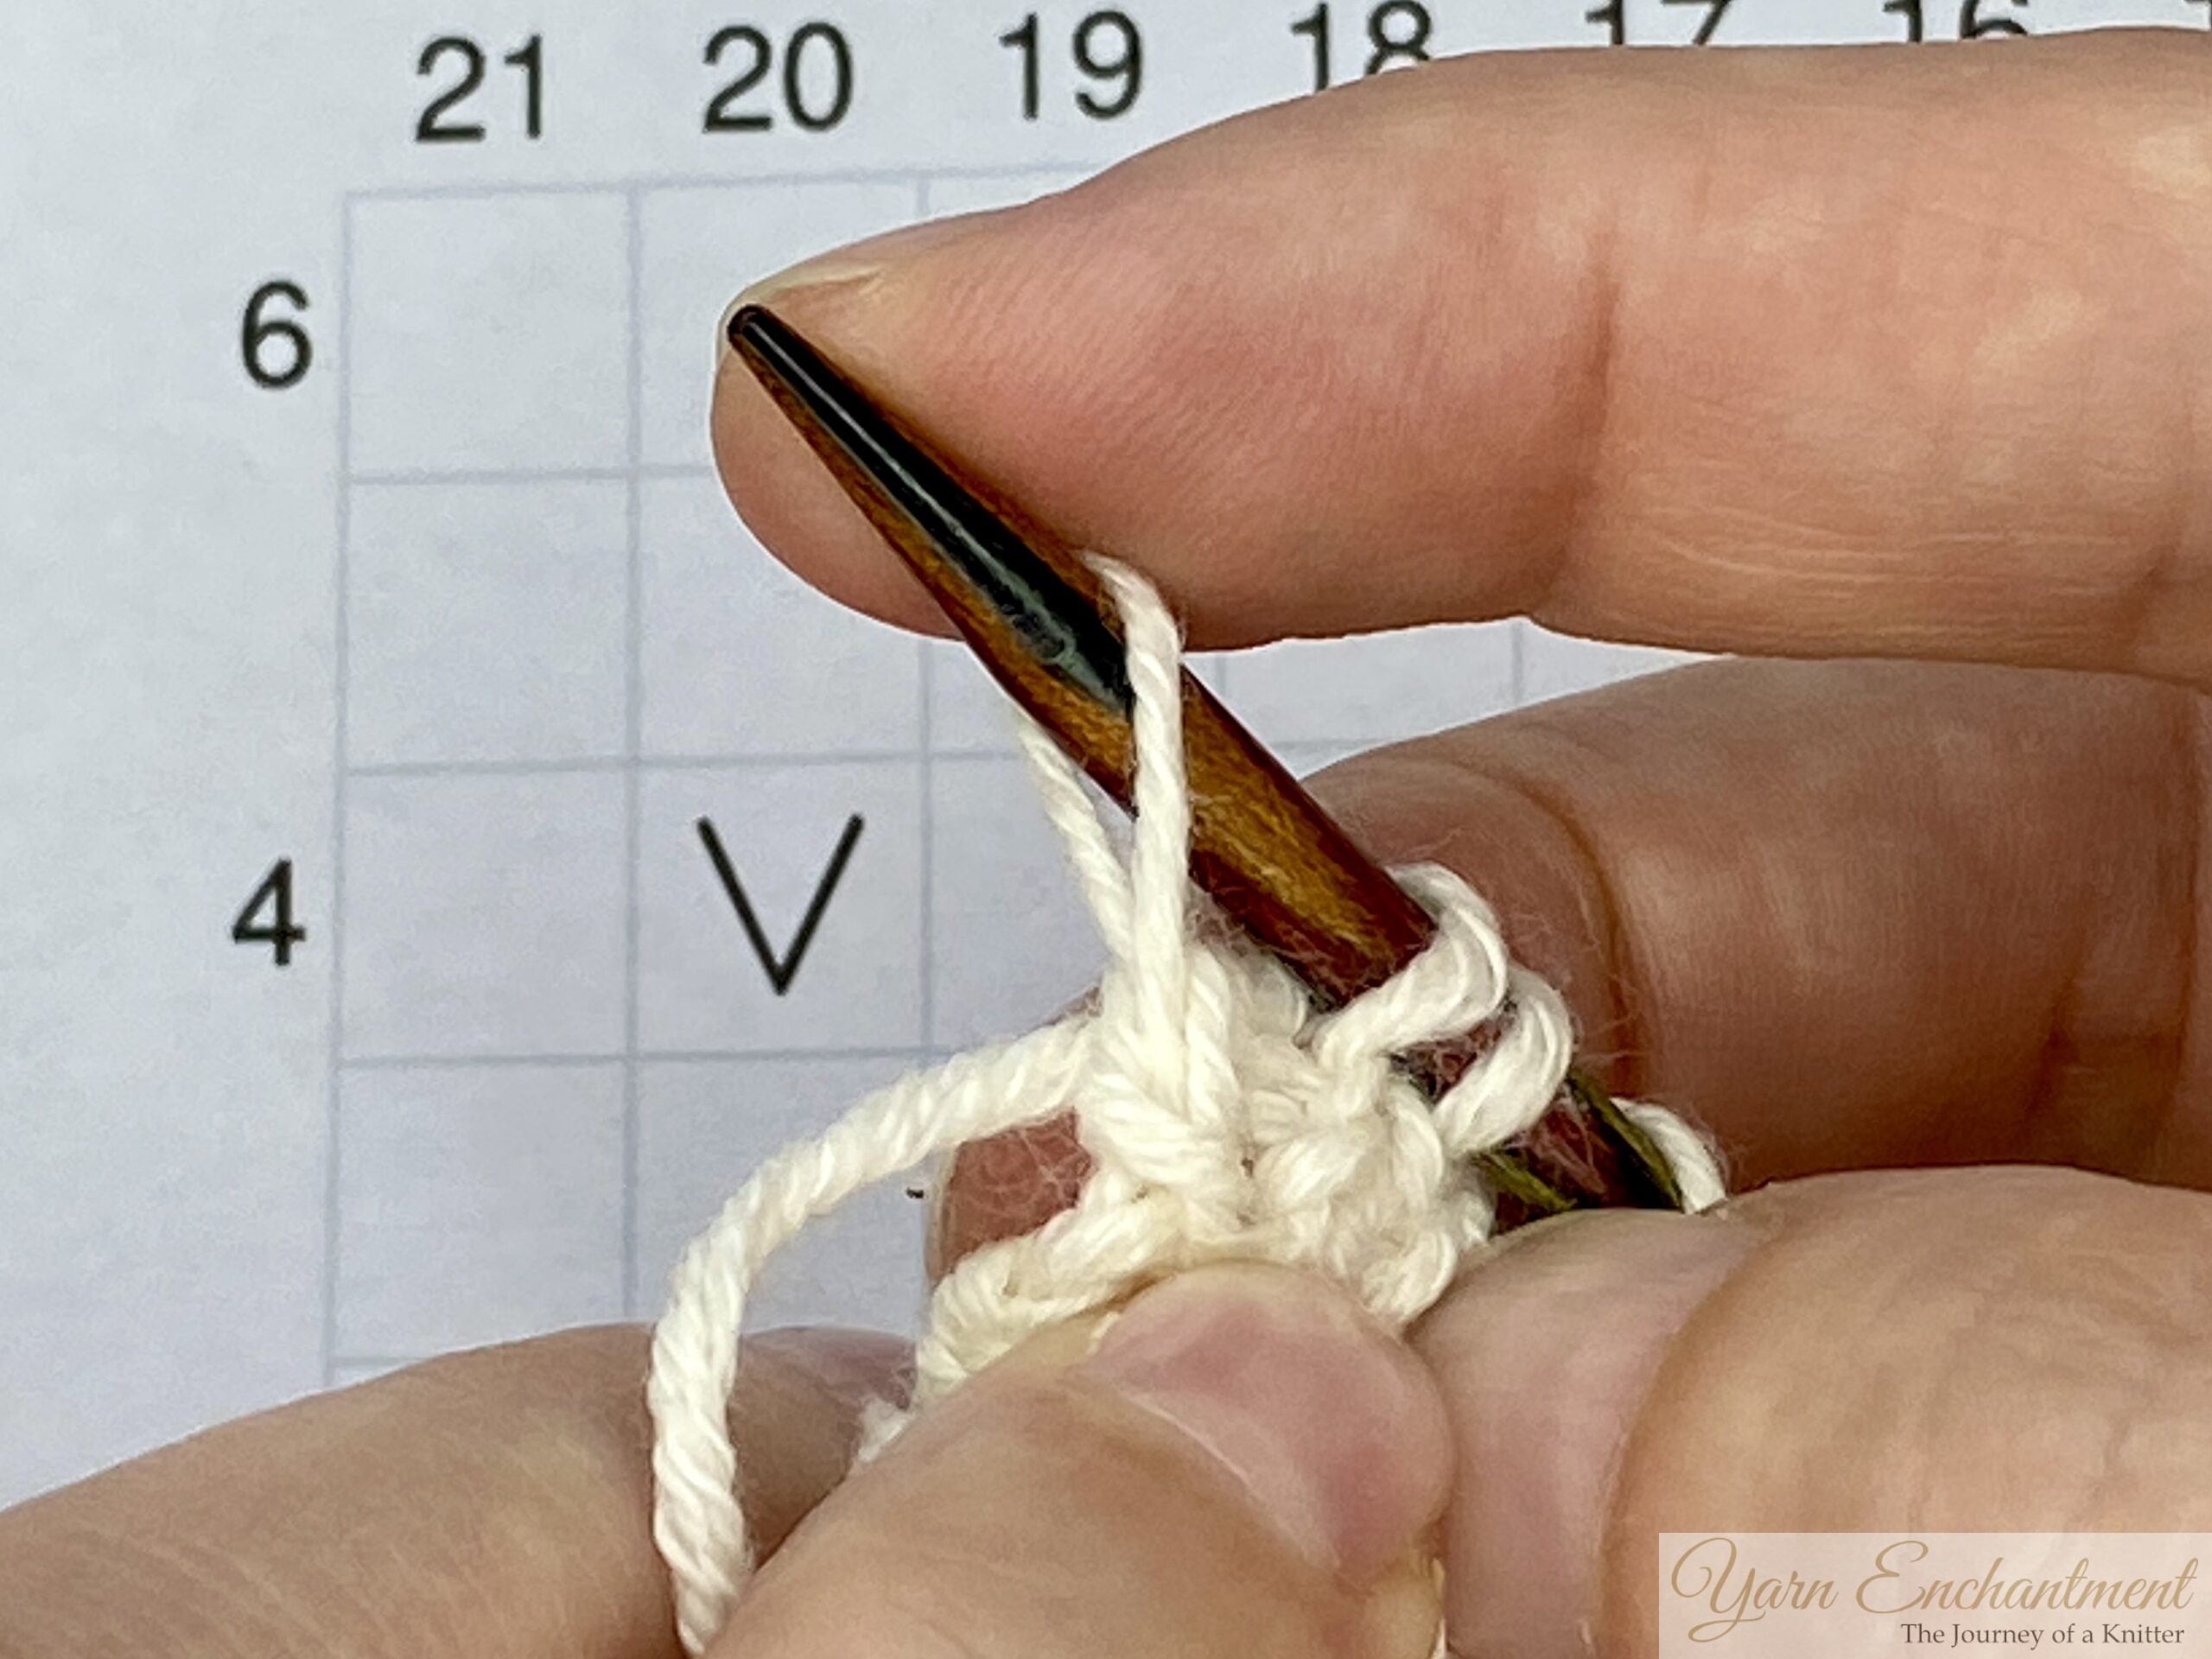  |
The slipped stitch looks like a really tall V. I believe this symbol fits perfectly for the slipped stitch. |
Centered Double Decrease (CDD / s2kp)
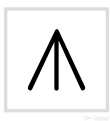
Symbol: Often shown as a vertical line with two stitches coming from the bottom, like an upward arrow or three lines joining into one.
What it means:
This decrease takes away two stitches at once and leaves the middle stitch sitting on top. It does not lean left or right. Instead, it stays centered.
How to work it:
A common way is to slip two stitches together as if to knit, knit the next stitch, then pass the two slipped stitches over the knitted stitch. This is often called sl2-k1-p2sso or s2kp.
What it looks like:
A neat, vertical decrease that is often used at the center of diamonds, leaves, or other symmetrical lace motifs.
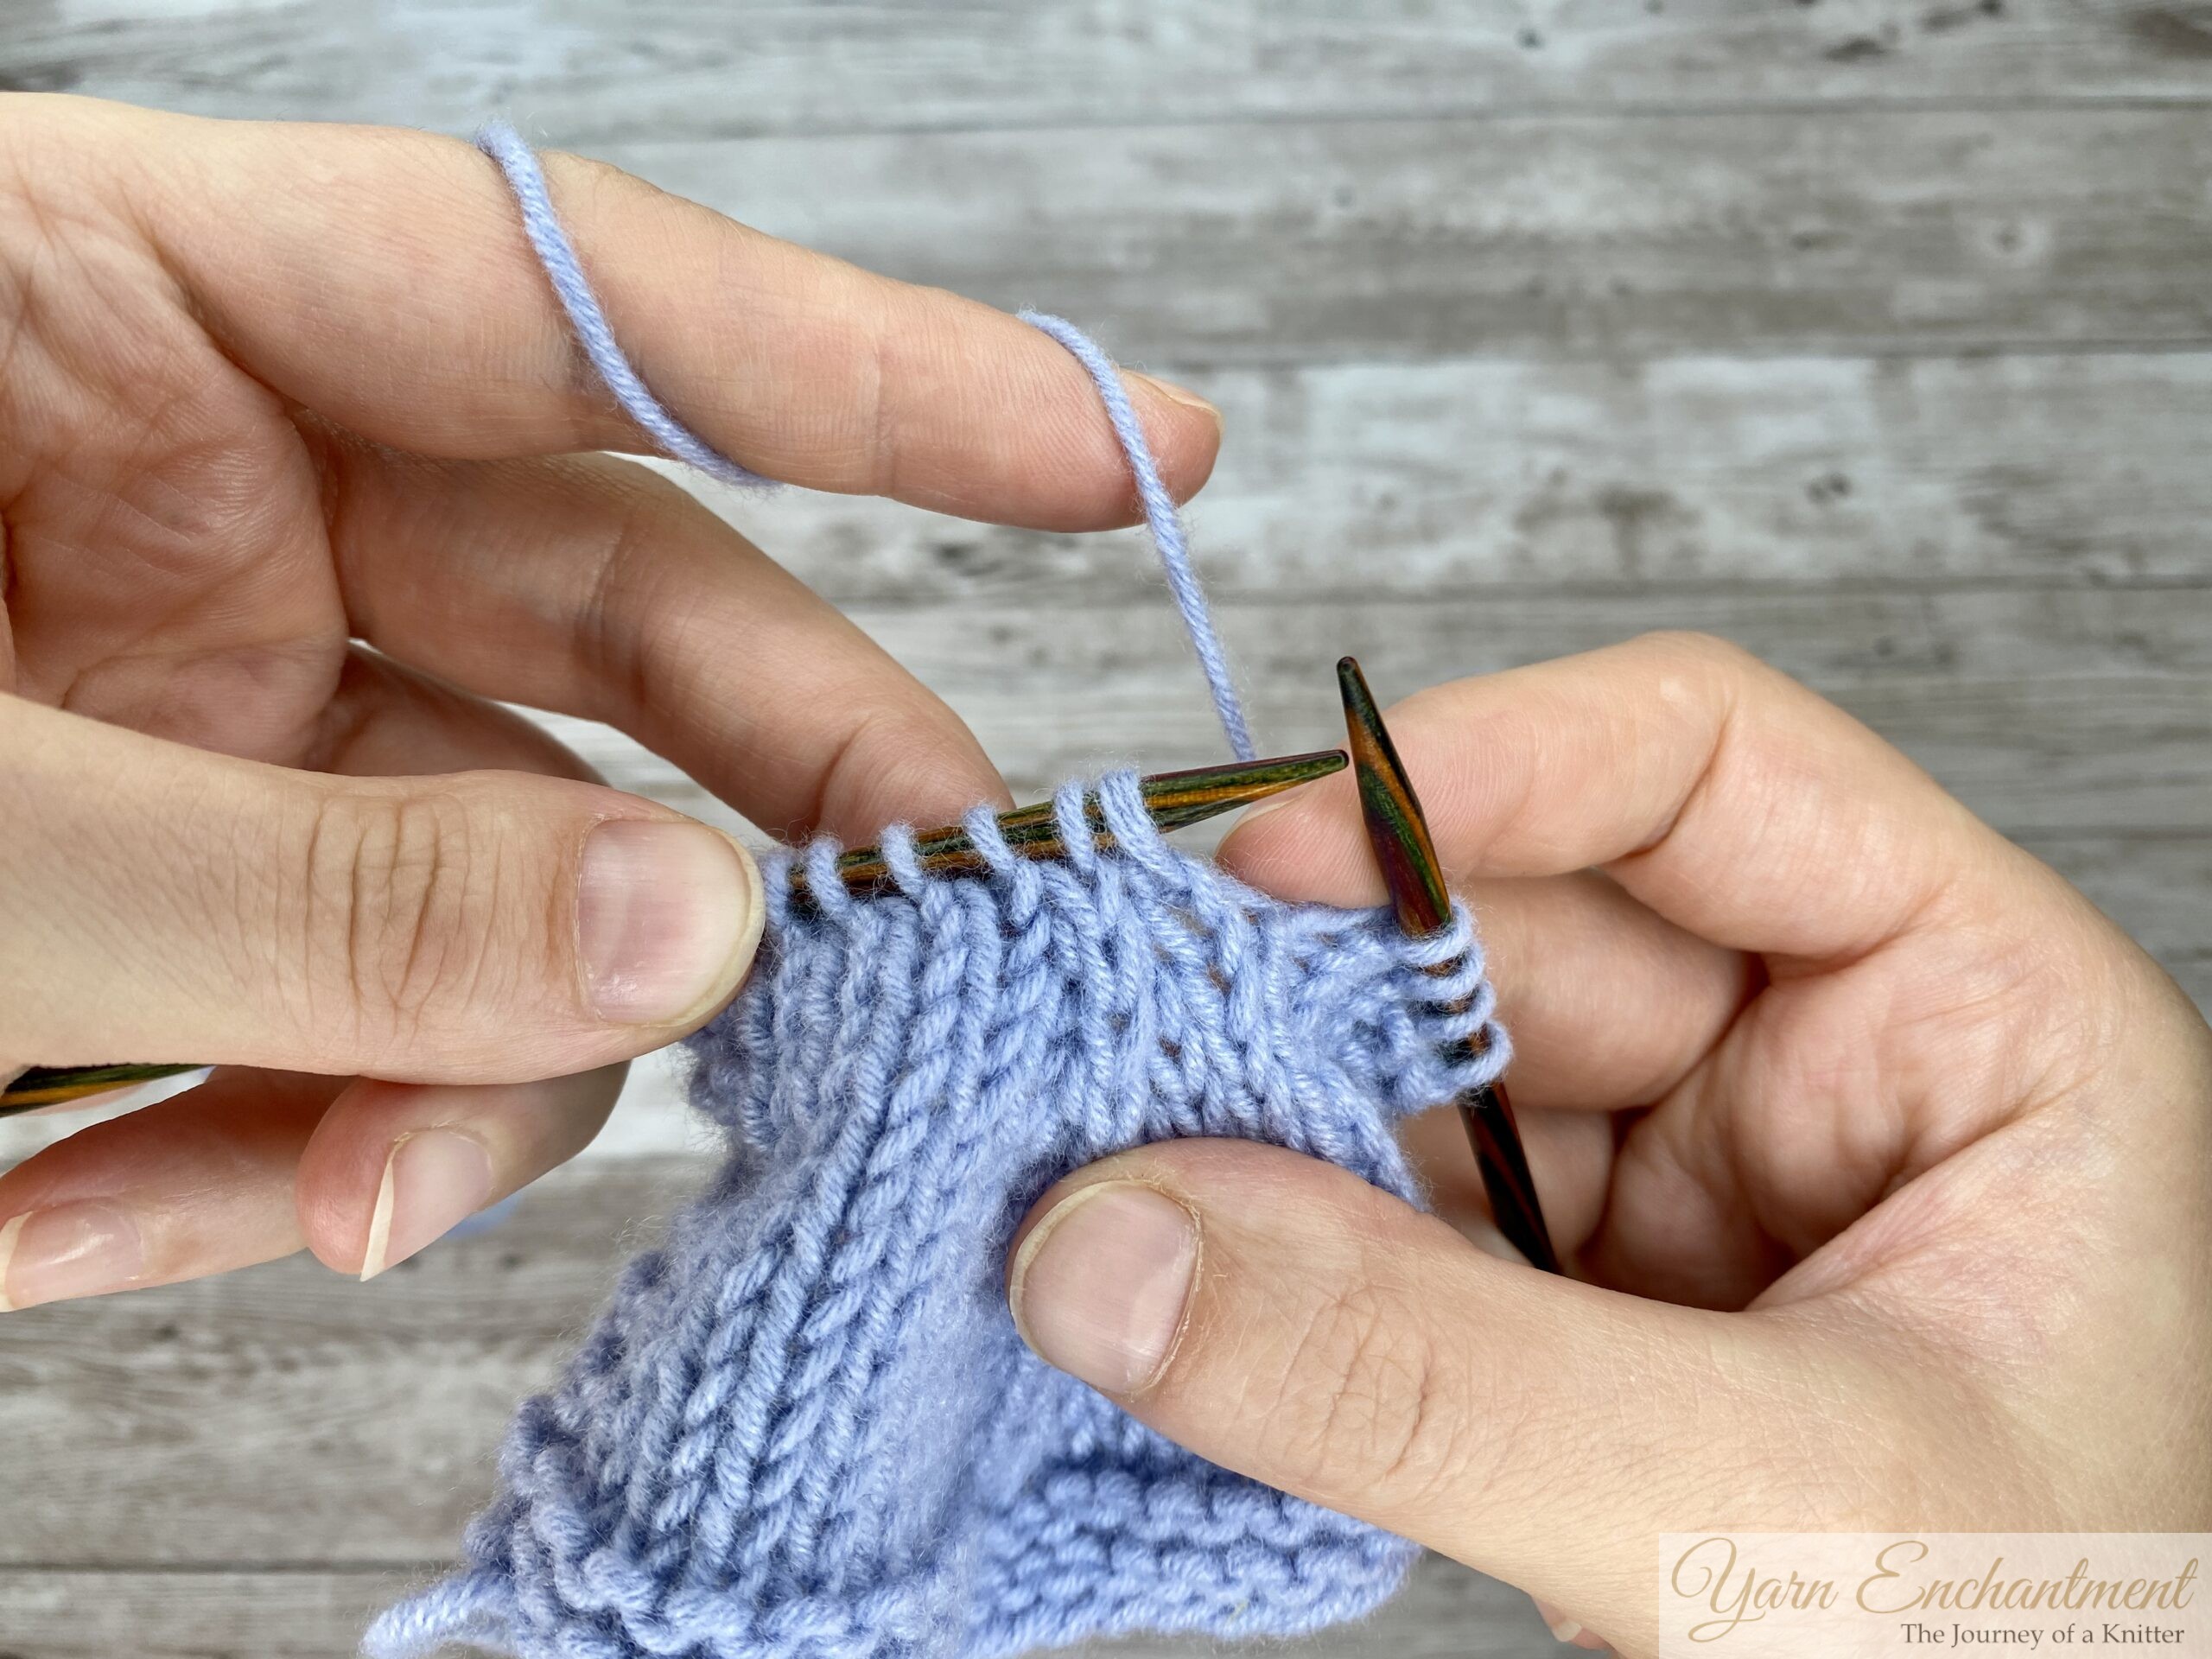  |
A centered double decrease is a decrease that takes away 2 stitches. It leans neither to the left nor to the right. |
No Stitch
Symbol: Usually a dark gray or shaded square. Some charts may use a black square or an X.
What it means:
A no-stitch box is not a stitch at all. It is simply a placeholder used to keep the chart grid even when the stitch count changes between rows.
What to do:
When you come to a no-stitch box, ignore it and move to the next symbol on the chart. You do not knit, purl, slip, or work anything in that square.
Why it appears:
No-stitch boxes often appear at the edges of diagonal or shaped lace patterns. They allow the chart to keep its rectangular shape even when some rows have fewer stitches than others.
Example:
If row 1 has 12 stitches and row 2 has 10 stitches, two boxes in row 2 may be shaded as "no stitch." That way, the remaining symbols still line up correctly under the stitches above them.
Quick tip:
When reading a row with no-stitch boxes, simply skip over them as if they are not there.


A (Very Brief) History of the Knitting Chart
I know it is a lot to take in, and I am so proud of you for making it this far. Learning to read lace chart symbols takes time, but you are doing amazing. I have decided to end this post here because it is very long. But before I let you go, I wanted to bring in a little history.
When you look at a lace chart today, it seems like such a logical way to show a pattern. But knitting charts as we know them are actually a relatively modern invention.
For most of knitting history, patterns were passed down by word of mouth or written out line by line. If you were lucky enough to be literate and wealthy enough to own a pattern book in the 1800s, you would likely find dense paragraphs of text or, at best, a list of abbreviations.
So where did our gridded lace maps come from?
Borrowing from Weavers
The idea of a grid representing fabric did not start with knitters. It started with weavers. For centuries, weavers have used drafting to map out which threads go up and down to create a pattern. If you look at an old weaving draft, it looks a lot like a modern knitting chart. Early knitters and publishers eventually realized that since knitted fabric is also made on a grid of interlocking loops, they could borrow this visual idea.
The Japanese Standardization
There is no single person we can credit with inventing the very first knitting chart, but we can credit a specific country for making them popular and incredibly precise: Japan.
In the mid-20th century, the Japanese publishing industry developed a standardized set of symbols to describe knitting. This system, often called the Japanese Industrial Standard for knitting notation, treated knitting symbols almost like a universal language.
Japanese knitters relied heavily on these grids, and their patterns became famous worldwide for being incredibly detailed, clear, and visual. Even if you did not speak a word of Japanese, you could theoretically knit an intricate lace shawl just by following the grid and the symbol key. This philosophy heavily influenced how modern charts are drawn today.
Modern Design Software
In the West, charts were slower to catch on. For a long time, American and European designers preferred written abbreviations.
That began to change in the 1970s and 1980s, largely thanks to influential knitting authors and magazines like Vogue Knitting, who began featuring charts for complex colorwork and lace. They realized that a lace pattern with 30 different actions could take a full page to write out, but drawing it out allowed the knitter to see the shape of the leaf or diamond forming.
Today, thanks to design software like Stitchmastery and EnvisioKnit, almost every modern designer can create clear, standardized charts right from their computers.
Why This Matters for Lace
Lace is where charts truly shine. Because lace relies on the relationship between holes, which are yarn overs, and decreases, a chart lets you see exactly how a decrease leans against a yarn over. It shows you the skeleton of the lace.
That chart you are looking at, with its little circles and slashes, is the result of hundreds of years of textile evolution. It combines the logic of the weaver's loom with the precision of modern graphic design.
FAQ: Reading Knitting Charts for Beginners
If you’re just getting into lace knitting, you probably have a few questions about charts. And if you’ve already tried a few easy knitting patterns, lace might be your next fun challenge. Let’s talk through the most common things I get asked.
Which is easier for a beginner, written patterns or charts?
Honestly, it depends on how your brain likes to work. I’ve seen knitters fall in love with charts right away, and others who prefer plain words. Written, row by row instructions feel safer at first because you’re just reading things like “yarn over, knit two together.” No symbols to decode. But charts are faster once you get used to them, because you can see the whole repeat at a glance and know exactly where you are.
Try the “read the written repeat first, then follow the chart” approach. It’s a lovely bridge between the two. Before you know it, you’ll be reading charts like a pro and wondering why you ever hesitated.
Can I convert a written pattern into a chart, or the other way around?
Absolutely. You can translate every written row into chart symbols, and every chart row into written words. Having both versions lets you double check your repeats and alignment.
Why are lace charts read from bottom to top and right to left?
Charts mimic the way your knitting grows. Row 1 sits at the bottom, right above the cast on edge. When you knit flat, the right side rows go from right to left because that’s the direction your stitches face. Wrong side rows go the opposite way, left to right, since you’ve turned your work. If you’re knitting in the round, every row goes right to left because you never turn.
What does a blank square mean on a chart?
Usually it means knit on the right side and purl on the wrong side, like in a stockinette chart. But and here’s the important part, always check the chart key. I’ve seen designers use blank squares for completely different stitches. Patterns can be quirky, and you don’t want to assume.
What is a “no stitch” box and how do I handle it?
That’s the shaded grey area that pops up when you’re increasing or decreasing. It’s not an actual stitch, just a placeholder to keep the grid tidy. When you see it, skip it and move to the next symbol. It won’t eat your yarn or mess up your count. Think of it like an empty seat on a bus, you just walk past it.
How do I keep my place when following a chart?
I have a whole toolbox for this. A magnetic board with a strip is my favorite for larger charts. A sticky note placed right above the row you’re working on works wonders. Highlighter tape is amazing because you can still see the stitches underneath. For long repeats, I like to highlight the columns I’ve already finished. And I always run a lifeline through my stitches every few rows. It’s just a scrap of yarn, and it saves the day if you need to rip back. Lifelines are one of the best yarn tips for new crafters. They make lace knitting feel much less scary, especially when you’re working on something you plan to give as a cozy handmade gift.
Do charts always show wrong side rows?
No, not always. Some charts only show right side rows and let you do plain purl or knit across the back. The pattern usually tells you, something like “all wrong side rows are purled.” So you follow the chart on the right side and simply knit the wrong side without looking. Easy peasy.
A Little Closing Thought
Learning how to read lace knitting charts is like learning to read sheet music. At first, every symbol feels strange, but with a little practice, the circles and slashes start to look like old friends. Before you know it, you will be reading charts with confidence and knitting lace that takes your breath away.
If you are feeling inspired, I am knitting a little lace headband right now, and I want to turn it into a pattern so you can practice your newfound skills. It will be a lovely, easy knitting pattern for beginners who want to try lace without feeling overwhelmed.
And remember, lace knitting does not have to be intimidating. With a little patience and a chart you understand, you can create cozy handmade gifts and garments that feel truly magical. Imagine wrapping a lacy shawl around someone you love, or keeping it for yourself on a crisp autumn evening. That is the joy of this craft.
So tell me, what will you knit first? Do you have a favorite yarn waiting in your stash? I would love to hear all about your lace adventures in the comments below. And if this guide helped you, please share it with a fellow knitter who is ready to fall in love with charts too. Thanks a bunch to all my lovely newsletter subscribers for your wonderful support.
Until next time, happy knitting!
Beginner-friendly guide on how to read lace knitting charts
Ready to keep practicing and build your confidence? This guide is part of a cozy lace series. If you would like to explore eyelets and shaping even further, take a peek at these companion guides:
[How to Knit Yarn Over Increases]: A step-by-step tutorial on creating clean, open eyelets with ease.
[Yarn Overs in Lace Knitting]: Discover how simple yarn overs work together to create airy, delicate textures in your favorite projects.
[How to Read Lace Charts]: Your beginner-friendly guide to learn and understand how to read lace carts.
A Little Way to Say Thanks
Yarn Enchantment is my cozy hobby corner on the internet. If something here made your knitting day easier or you simply enjoy reading my posts and would like to say thank you, you can leave a small Ko-fi tip - but only if you truly want to.
My patterns and tutorials stay free for everyone, always. Every little tip just goes toward new yarn and a cup of tea for my cozy knitting evenings.
☕ Support me on Ko-fi
You Might Also Like


 |
|
Join the Cozy Corner Newsletter
Hello, creative soul. Welcome to the Yarn Enchantment Newsletter, a little space where we celebrate all things cozy, crafty, and full of heart. Think of this as your friendly crafting companion, a soft dose of inspiration delivered straight to your inbox, just for you. Each newsletter brings you: ✨ Notifications about new patterns and tutorials – easy knitting patterns and beginner crochet projects you won’t find anywhere else 🧶 Practical yarn tips for new crafters, plus advice on the best yarn for fall, blankets, and handmade gifts 💌 Small stories and adventures from my own workbench, because crafting is as much about the journey as the finished piece Whether you’re knitting by the fire, looking for your next creative spark, or simply wanting a quiet moment with your hooks and needles, this newsletter is here to cheer you on. Crafting isn’t just about the final project. It’s about the joy, the peace, and the stories we weave along the way. So grab a cup of tea or coffee, settle in, and join me. Together we’ll make a little magic, one stitch and one story at a time. I’m so glad you’re here. Let’s create something beautiful together. Sign up below to receive your first email, and feel free to leave a comment on the blog if there’s a topic you’d love to see covered. Your ideas might just become our next newsletter feature. |