
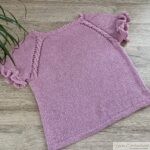
Rosy Ruffle Tee: Handmade Knitted Top to Match the Skeeter Skirt
July 19, 2025
What Do “Beginner,” “Intermediate,” and “Advanced” Mean for Knitters?
August 3, 2025The Complete Guide to the Knit Stitch: Start Your Knitting Journey Today

Originally published on July 22, 2025
Knitting is such a beautiful way to create something with your own two hands. Once you’ve got the hang of starting your project with a cast-on, the next thing to tackle is the knit stitch. Honestly, the knit stitch is where the magic begins, it’s the heart of every knitting project you’ll ever make.
Whether you’re imagining cozy scarves, warm blankets, or handmade sweaters, learning the knit stitch is the first step toward bringing those ideas to life. And guess what? It’s not as hard as it might seem! In this guide, I will walk you through everything you need to know to master the knit stitch, one simple step at a time.
 | Take a close-up look at this garment, which was knitted in the round using only knit stitches. You can clearly see the iconic "V" shapes that knit stitches create, a pattern that’s instantly recognizable. |

Table of Contents
- What is the Knit Stitch?
- What You Need to Start Knitting
- Anatomy of the Knit Stitch
- Yarn and Needle Holding Techniques
- How to Knit Stitch: A Step-by-Step Tutorial for Beginners
- What Happens at the End of a Row?
- Building Garter Stitch Fabric (Perfect for Practice)
- Troubleshooting Common Problems
- Pro Tips for Smoother Knitting
- Frequently Asked Questions
- Conclusion
What is the Knit Stitch?
The knit stitch forms the core of knitted fabrics. By pulling yarn through stitches in a specific way, you build soft, flexible fabric row by row. Understanding the knit stitch opens the door to a variety of patterns and projects. Once learned, the possibilities are limitless - from simple scarves to intricate sweaters.
Think of the knit stitch as the ABCs of knitting. Without it, you can’t form words, sentences, or stories. But once you’ve got it down, you’re ready to create something truly magical.
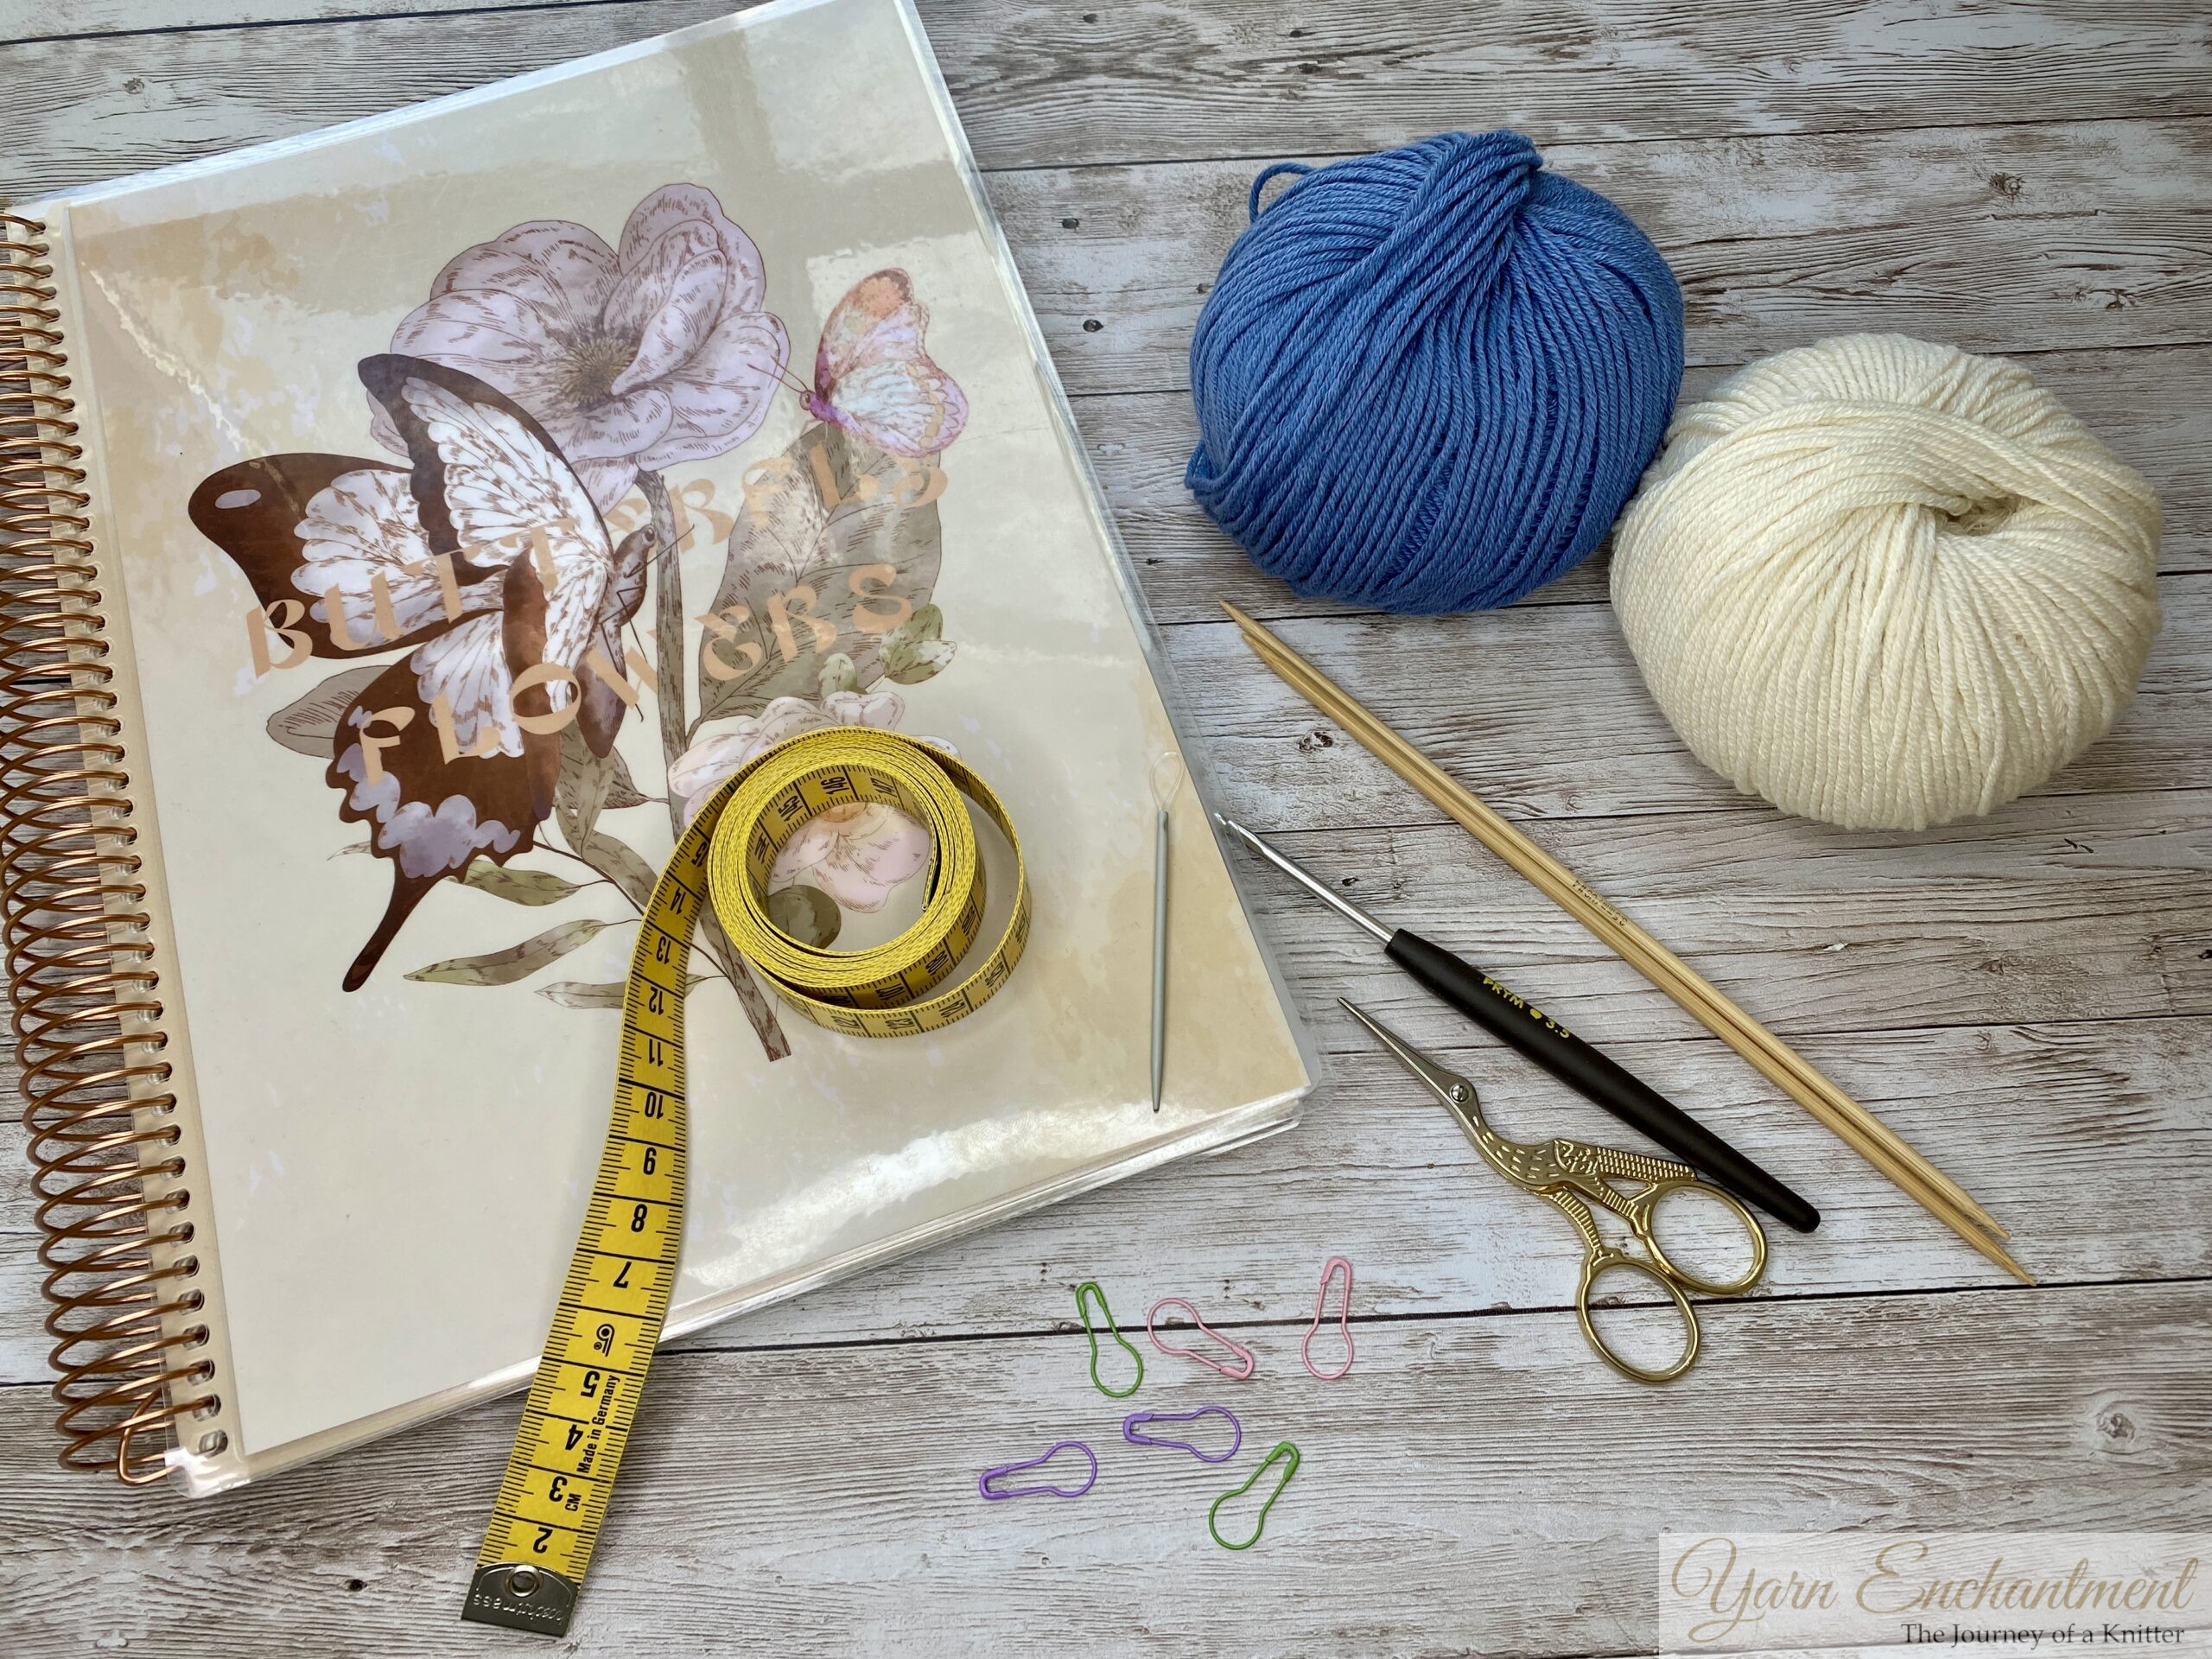
What You Need to Start Knitting
Before you dive into your first project, gather these essential materials.
Knitting Starter Checklist:
|
Supply |
Purpose/Notes |
|
|
Yarn |
Choose a medium-weight, light-colored yarn. Lighter shades make it easier to see your stitches as you work. | |
|
Needles |
Smooth, wooden or bamboo needles are ideal for beginners. Medium-sized needles (US 7/4.5mm) are commonly recommended. | |
|
Cast-On Row |
Before making knit stitches, you’ll need a cast-on foundation row on your needle. | |
|
Small scissors |
For cutting yarn |
|
| Yarn needle/tapestry needle |
Weaving in ends |
|
|
Stitch markers |
Helpful for tracking sections or repeats |
|
|
Measuring tape |
Great for checking length/width |
|
|
Crochet hook |
Useful for fixing dropped stitches |
|
| Notebook or printed notes | Tracking progress and keeping notes |
How to Use Your Knitting Starter Checklist
-
Print it out or bookmark this post, so your checklist is always easy to find.
-
Gather your supplies using the list—having everything ready helps you get started smoothly.
-
Check off each item as you collect it.
-
Download the printable version: Knitting Starter Checklist
Tip: Don’t overspend on supplies when you’re just starting out. Stick to affordable, beginner-friendly tools until you’re comfortable with the basics.
 |
|
The notebook is optional, you can also print out some notes to keep track of your progress. |
Anatomy of the Knit Stitch
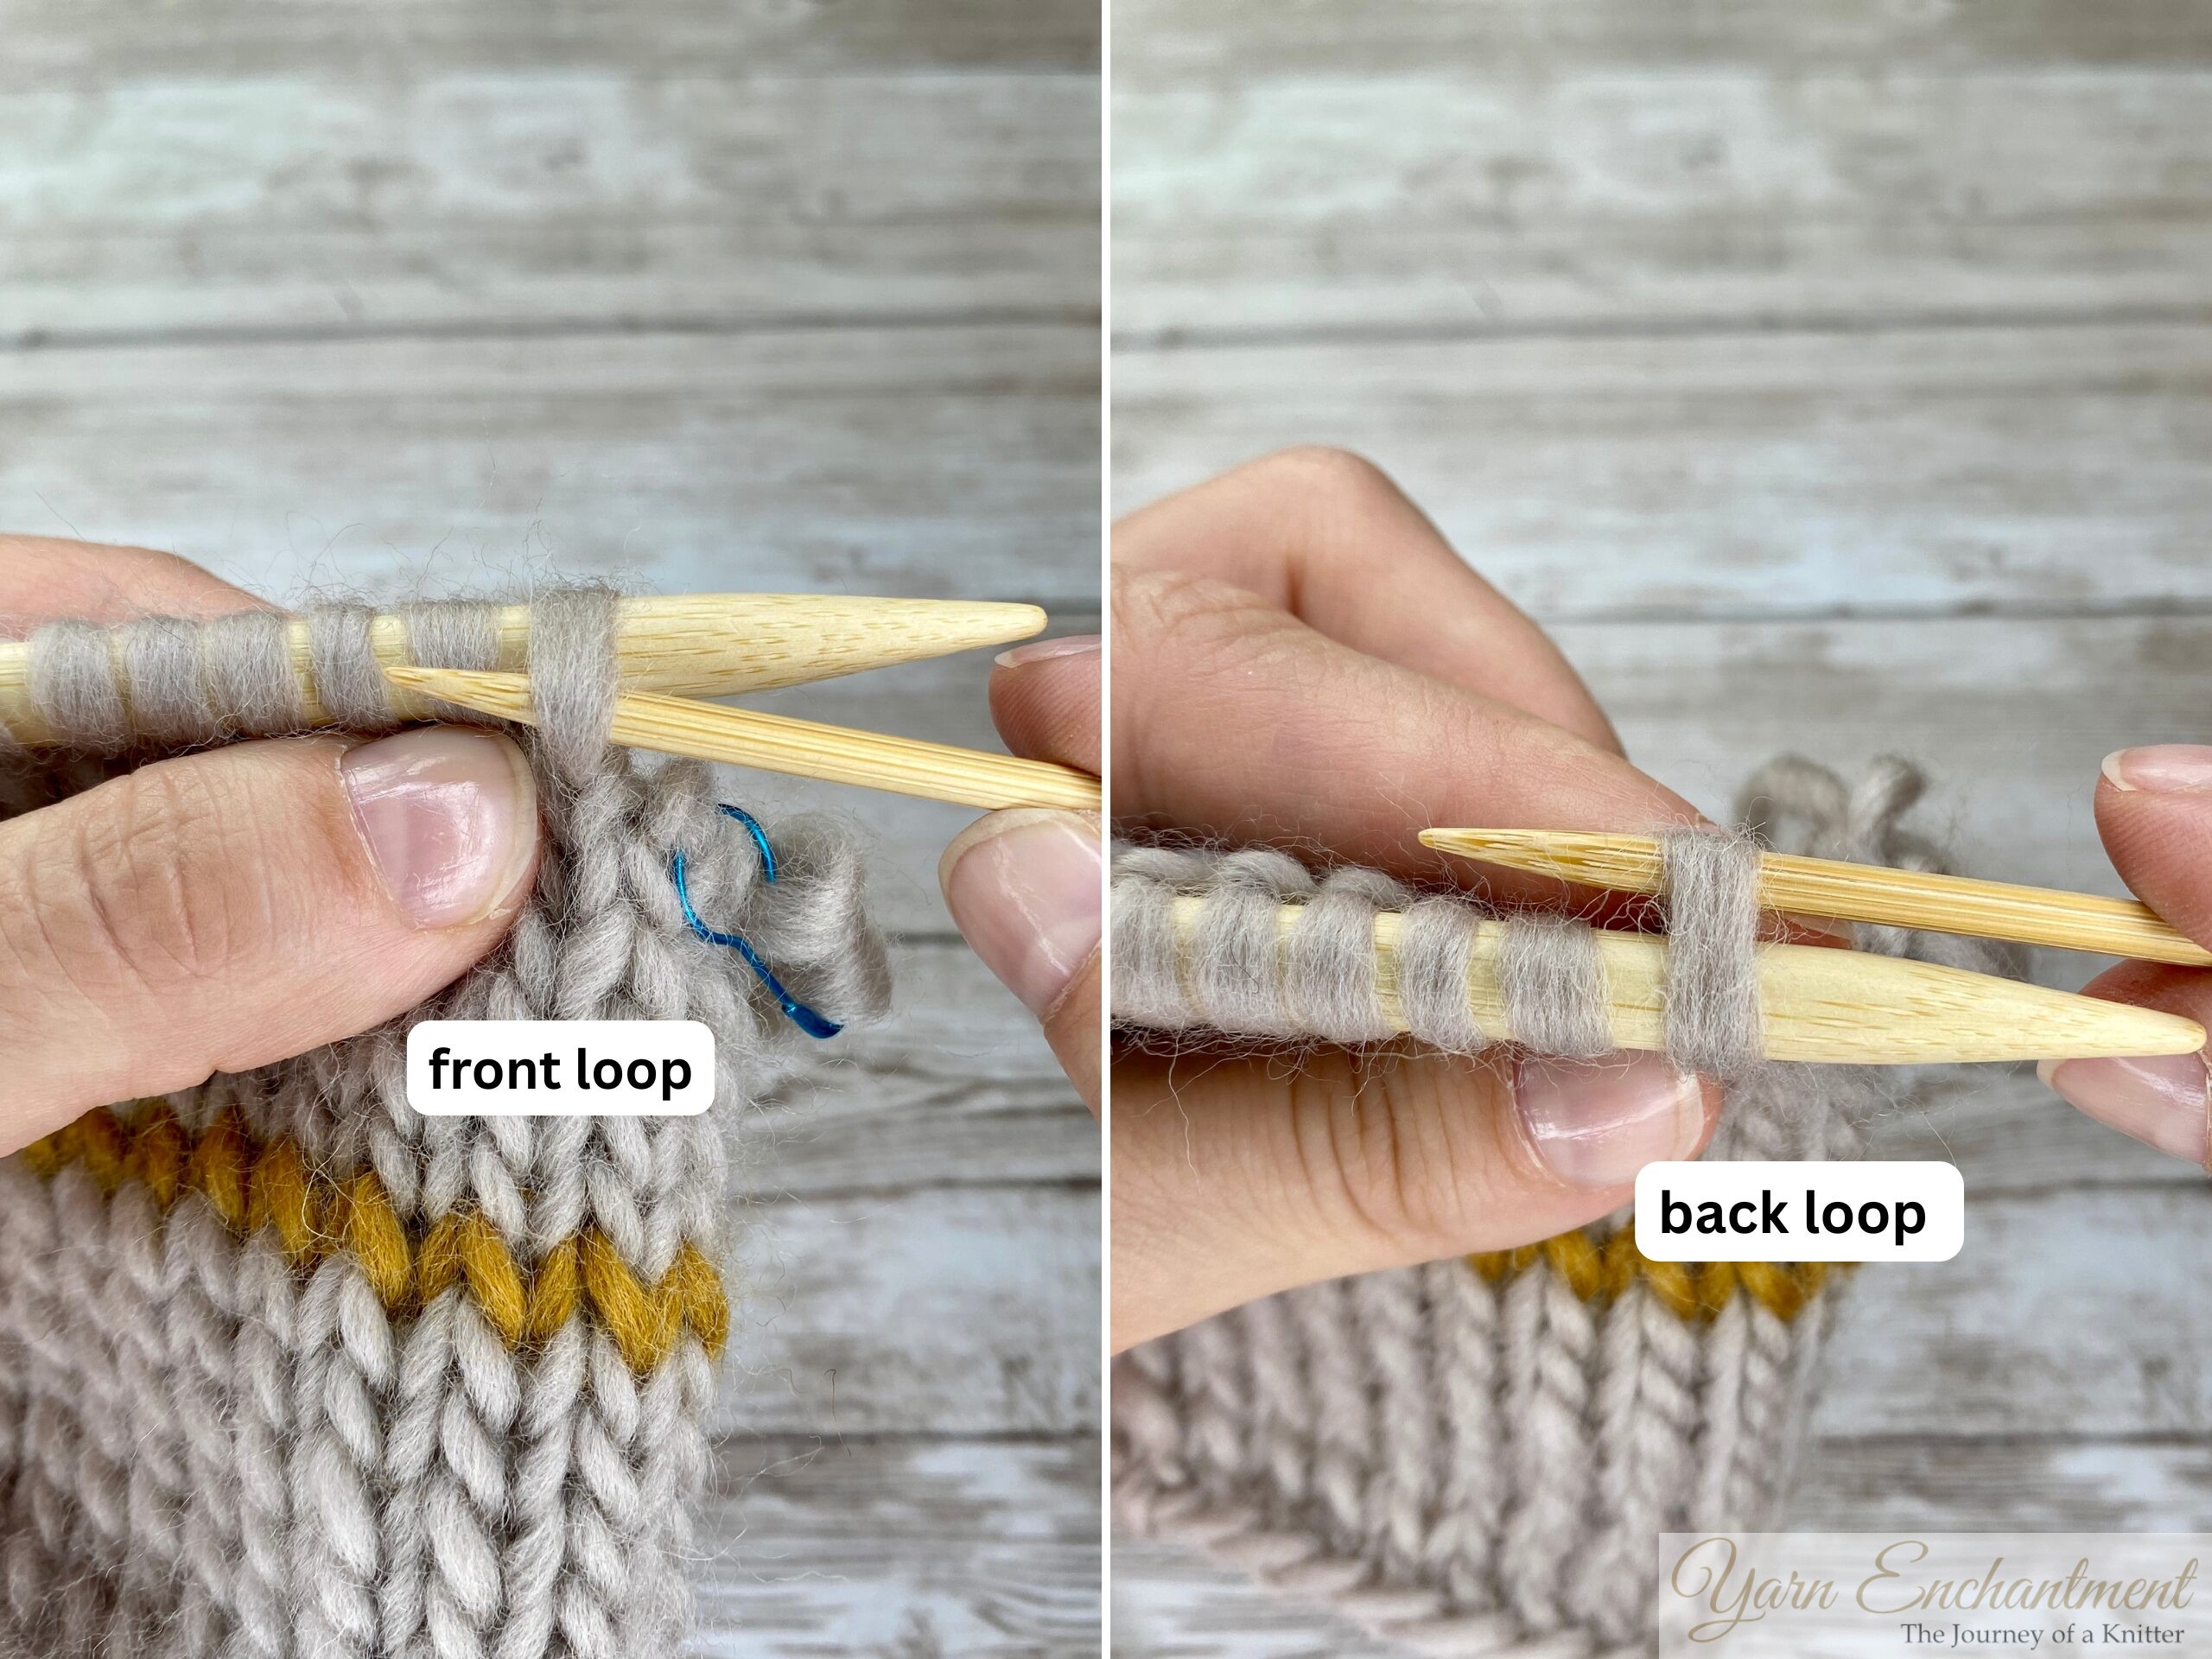
Each loop on your needle is called a stitch. When you make a knit stitch, it forms a neat “V” shape on the front (or right side) of the fabric. On the reverse side, you’ll see a “purl bump” - a little horizontal bar across the stitch.
Think of the “V” as the face of your knitting, this is the classic look most people associate with knitwear. The purl bump acts like a hidden backbone, supporting the structure from behind.
Each stitch on the needle has two sides, which I like to call the “legs.” When your stitches are still on the needle they are loops. There’s the front loop (closest to you) and the back loop (furthest away). When the loop is knitted and has become a "V" shaped knit stitch, you can see the right leg and left leg, because when you knit, the front loop becomes the right leg, and the back loop becomes the left leg.
When making a standard knit stitch, you’ll insert your needle through the front loop (or the right/leading leg). Understanding these parts is key to identifying stitches, fixing mistakes, and avoiding accidentally twisting your stitches. If you’ve ever noticed your stitches looking slanted or crossed, it often comes down to how you insert your needle, a topic I’ll dive into in an upcoming post about twisted stitches: why they happen, how to spot them, and how to fix them.
 |  | 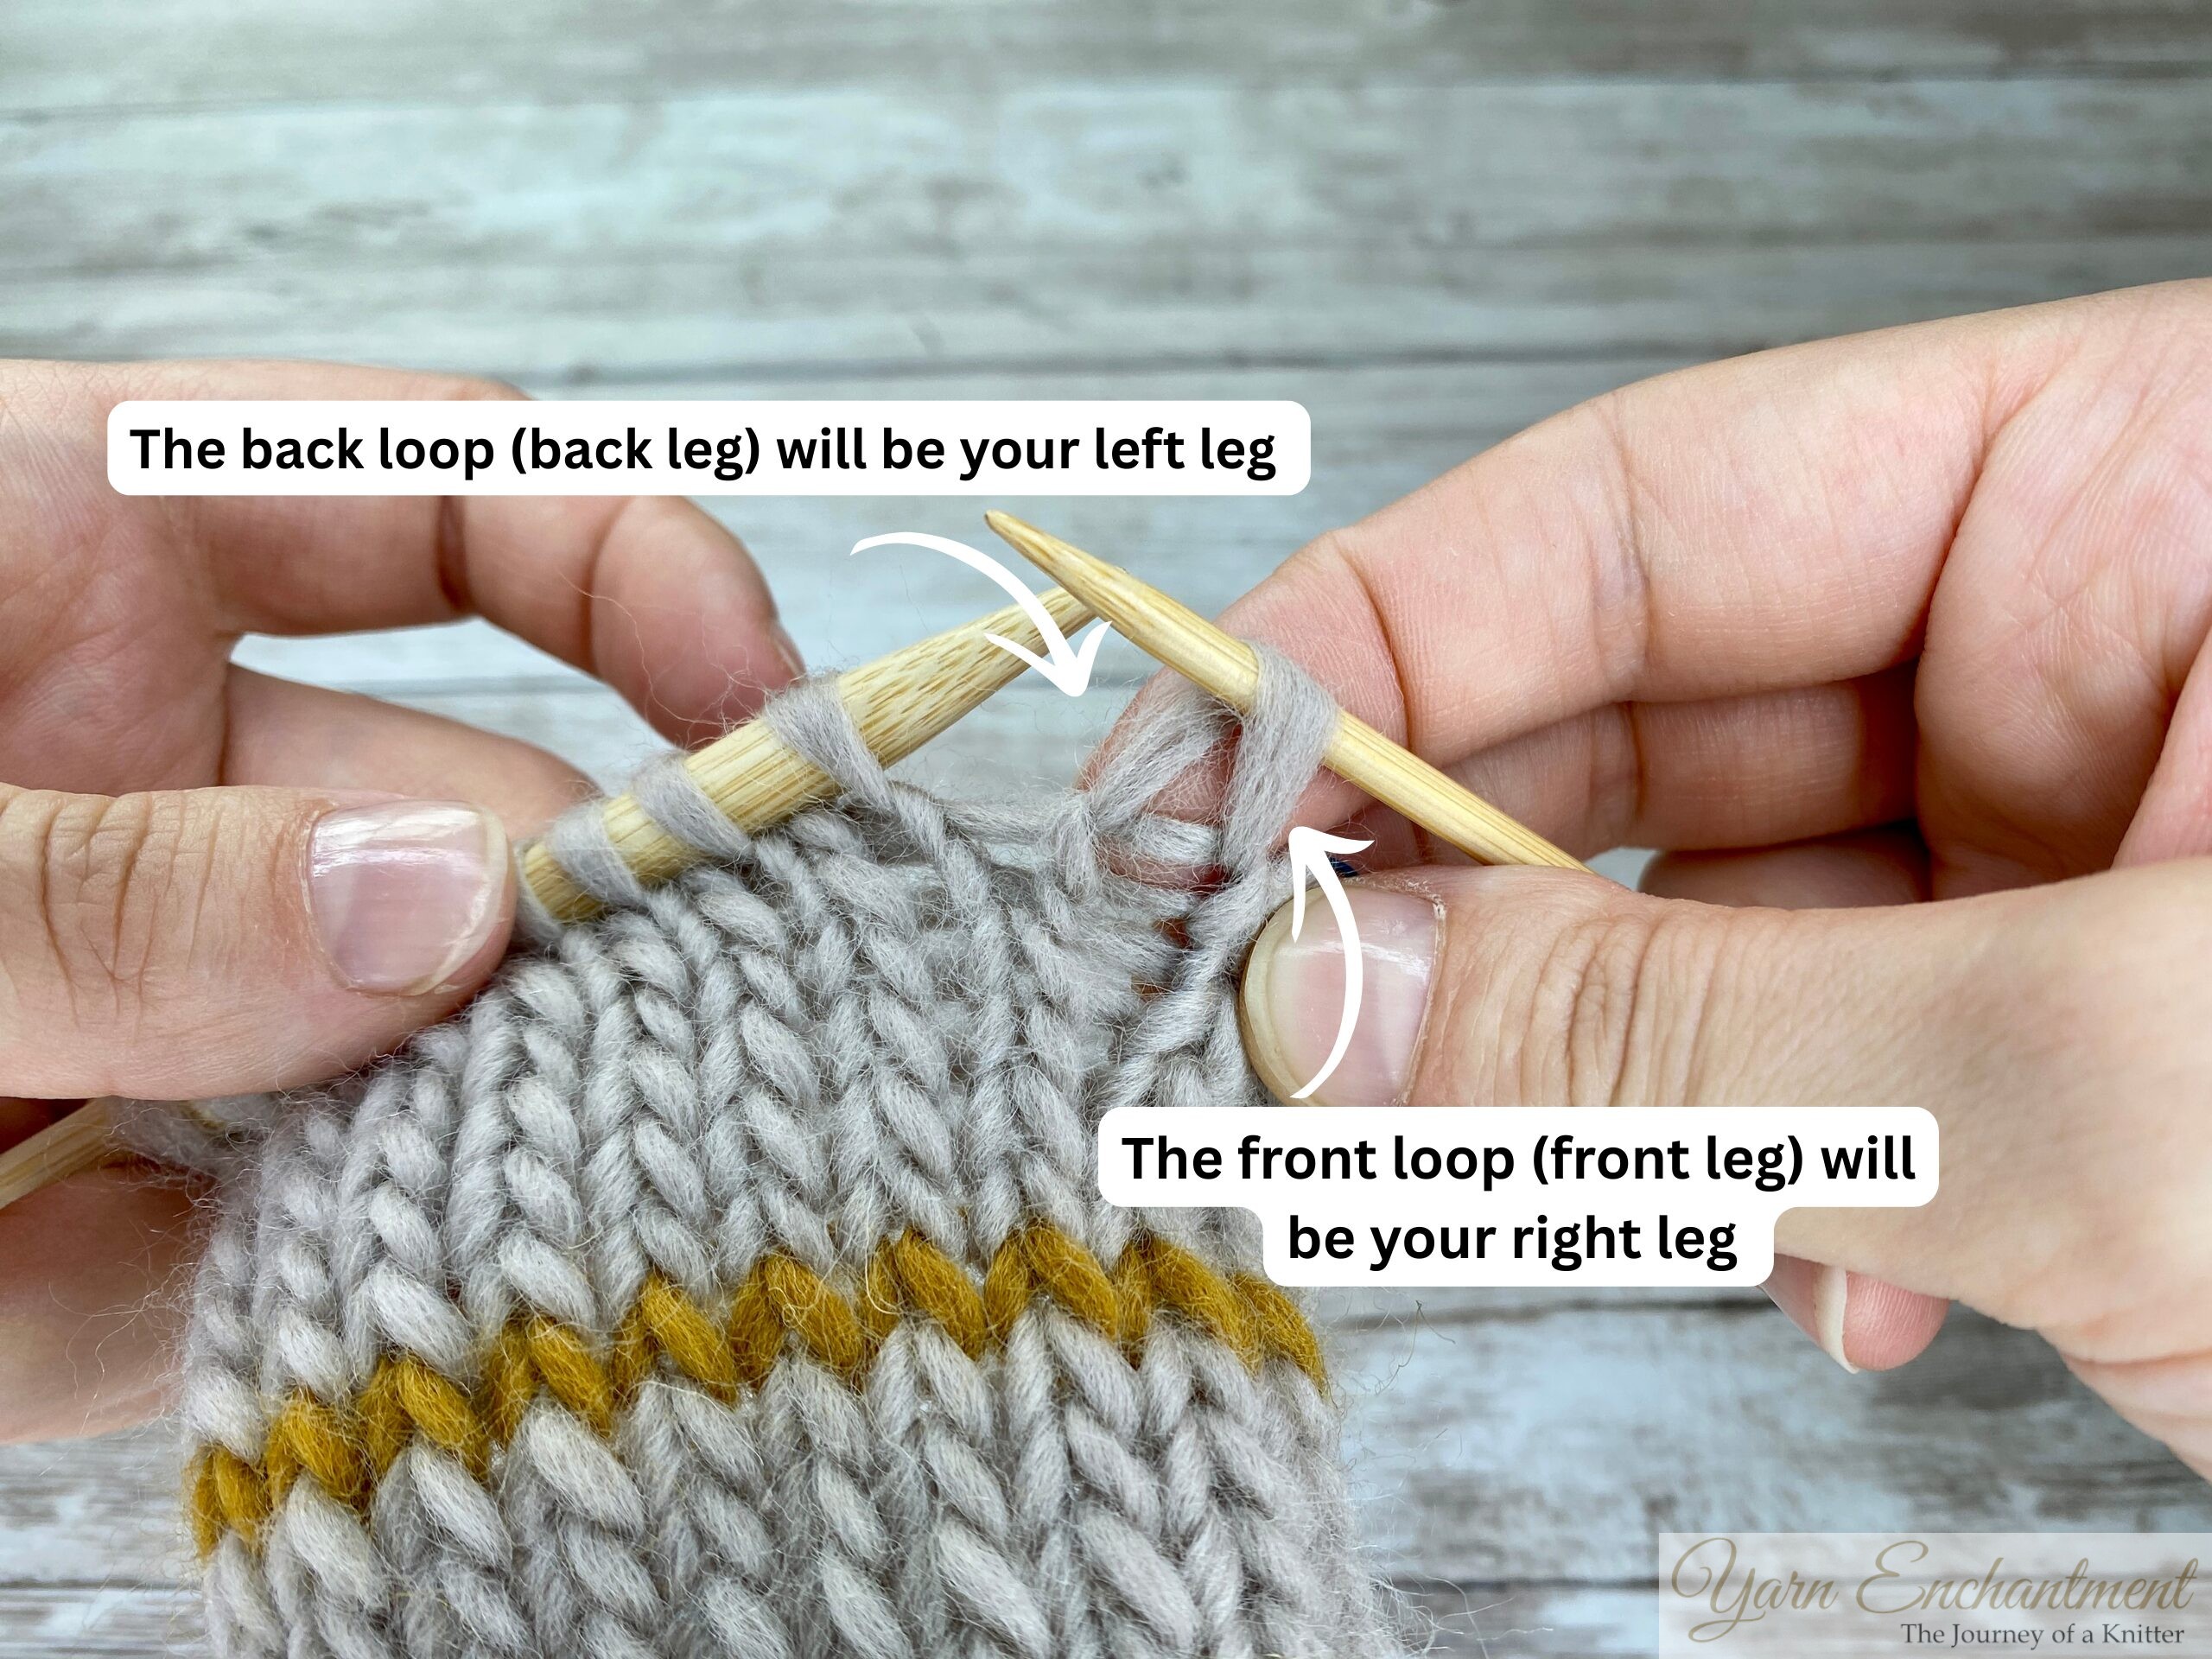 | You’ll notice that I’ve marked a little "V" where the stitch is - this is your knit stitch. I have also marked the right and the left lef of your knit stitch | The stitch on your needle has two parts: the front loop (closest to you) is the right leg , and the back loop (farther from you) is the left leg . Always insert your needle into the front loop (right leg) unless the pattern says otherwise. | When looking at a stitch on your needle, the front loop (the part of the stitch closest to you) will be referred to as the right leg , and the back loop (the part of the stitch farther from you) will be the left leg . This terminology helps you understand how to insert your needle correctly when making a knit stitch. |


Note About Twisted Stitches As you learn the knit stitch, it’s important to always insert your right needle into the front of each stitch (not the back). Accidentally knitting through the back loop can twist your stitches, which makes your fabric look and feel tighter and less even. Don’t worry if this happens, most beginners do it at first! If you start to notice your stitches looking a little slanted or "crossed", that’s a sign they may be twisted. I’ll be sharing a separate, detailed post soon that explains exactly what twisted stitches are, why they matter, and how to fix them step by step. For now, just keep an eye out as you knit, and remember that catching and correcting small mistakes is a natural part of learning. The legs of the stitch appear crossed, creating a slight twist. This is known as a twisted stitch. It typically happens when the needle is inserted into the back loop instead of the front loop.
Twisted stitches are not necessarily a mistake, they’re just a different variation of the knit stitch. However, if you’re aiming for smooth, consistent stitches, it’s helpful to catch twisted stitches early. If you spot one, don’t panic! You can easily fix it by carefully undoing that section and reworking the stitch correctly. On the left side, you can see the stitch that was knitted through the front loop, the two legs of the stitch are sitting neatly parallel. On the right side, you have the twisted stitch, where the legs cross over each other, giving it a slanted or twisted appearance. 


Yarn and Needle Holding Techniques
How you hold your yarn and needles can make a huge difference in how comfortable, fast, and enjoyable your knitting experience is. While there are many ways to hold your yarn, the two most popular techniques are the English (Throwing) Method and the Continental (Picking) Method . Give both a try, you might be surprised by which one feels more natural for you!
English (Throwing) Method
- Hold the yarn in your right hand .
- Use your right hand to wrap (or “throw”) the yarn around the right needle to create each stitch.
This method is rhythmic and intuitive for many beginners, especially if you’re used to controlling the yarn with your dominant hand.
Continental (Picking) Method
- Hold the yarn in your left hand .
- Use the right needle to “pick” the yarn as you form each stitch, creating a quick and fluid motion.
The Continental method is often favored for its efficiency, and some knitters find it faster once they get the hang of it.
Why It Matters
Both methods produce the same gorgeous knit stitches, so there’s no “right” or “wrong” way, just what feels best for you. Many knitters experiment with both styles before finding their favorite, and some even switch between the two depending on the project or stitch pattern!
Personally, I hold my yarn in my left hand (Continental style), but when it comes to colorwork knitting, I love holding one color in each hand. It’s all about finding what works for you and adapting as you grow in your knitting journey.
A Gentle Nudge:
The English method might appeal to you if you enjoy the soothing rhythm of wrapping the yarn, while the Continental method could feel more fluid once you get comfortable with it. The beauty of knitting lies in finding what brings you the most joy and relaxation. Don’t be afraid to try both, and remember, your knitting journey is uniquely yours. There’s no rush, just the pleasure of creating something beautiful with your own hands.
How to work the Knit Stitch: A Step-by-Step Tutorial for Beginners
Here’s how to make your first knit stitch (If you’re a visual learner, scroll down for my step-by-step video where I walk through each movement!)
Step 1: Hold Your Needles and Position Your Yarn Correctly
- Hold Your Needles:
Start by holding the needle with the cast-on stitches in your left hand, and the empty needle in your right. This is your starting position for knitting. - Position Your Yarn:
Make sure to bring your working yarn underneath the left needle to the back of your work. If the yarn goes over the top of the left needle instead of under it, you will accidentally create a double stitch, and we don’t want that!
 | 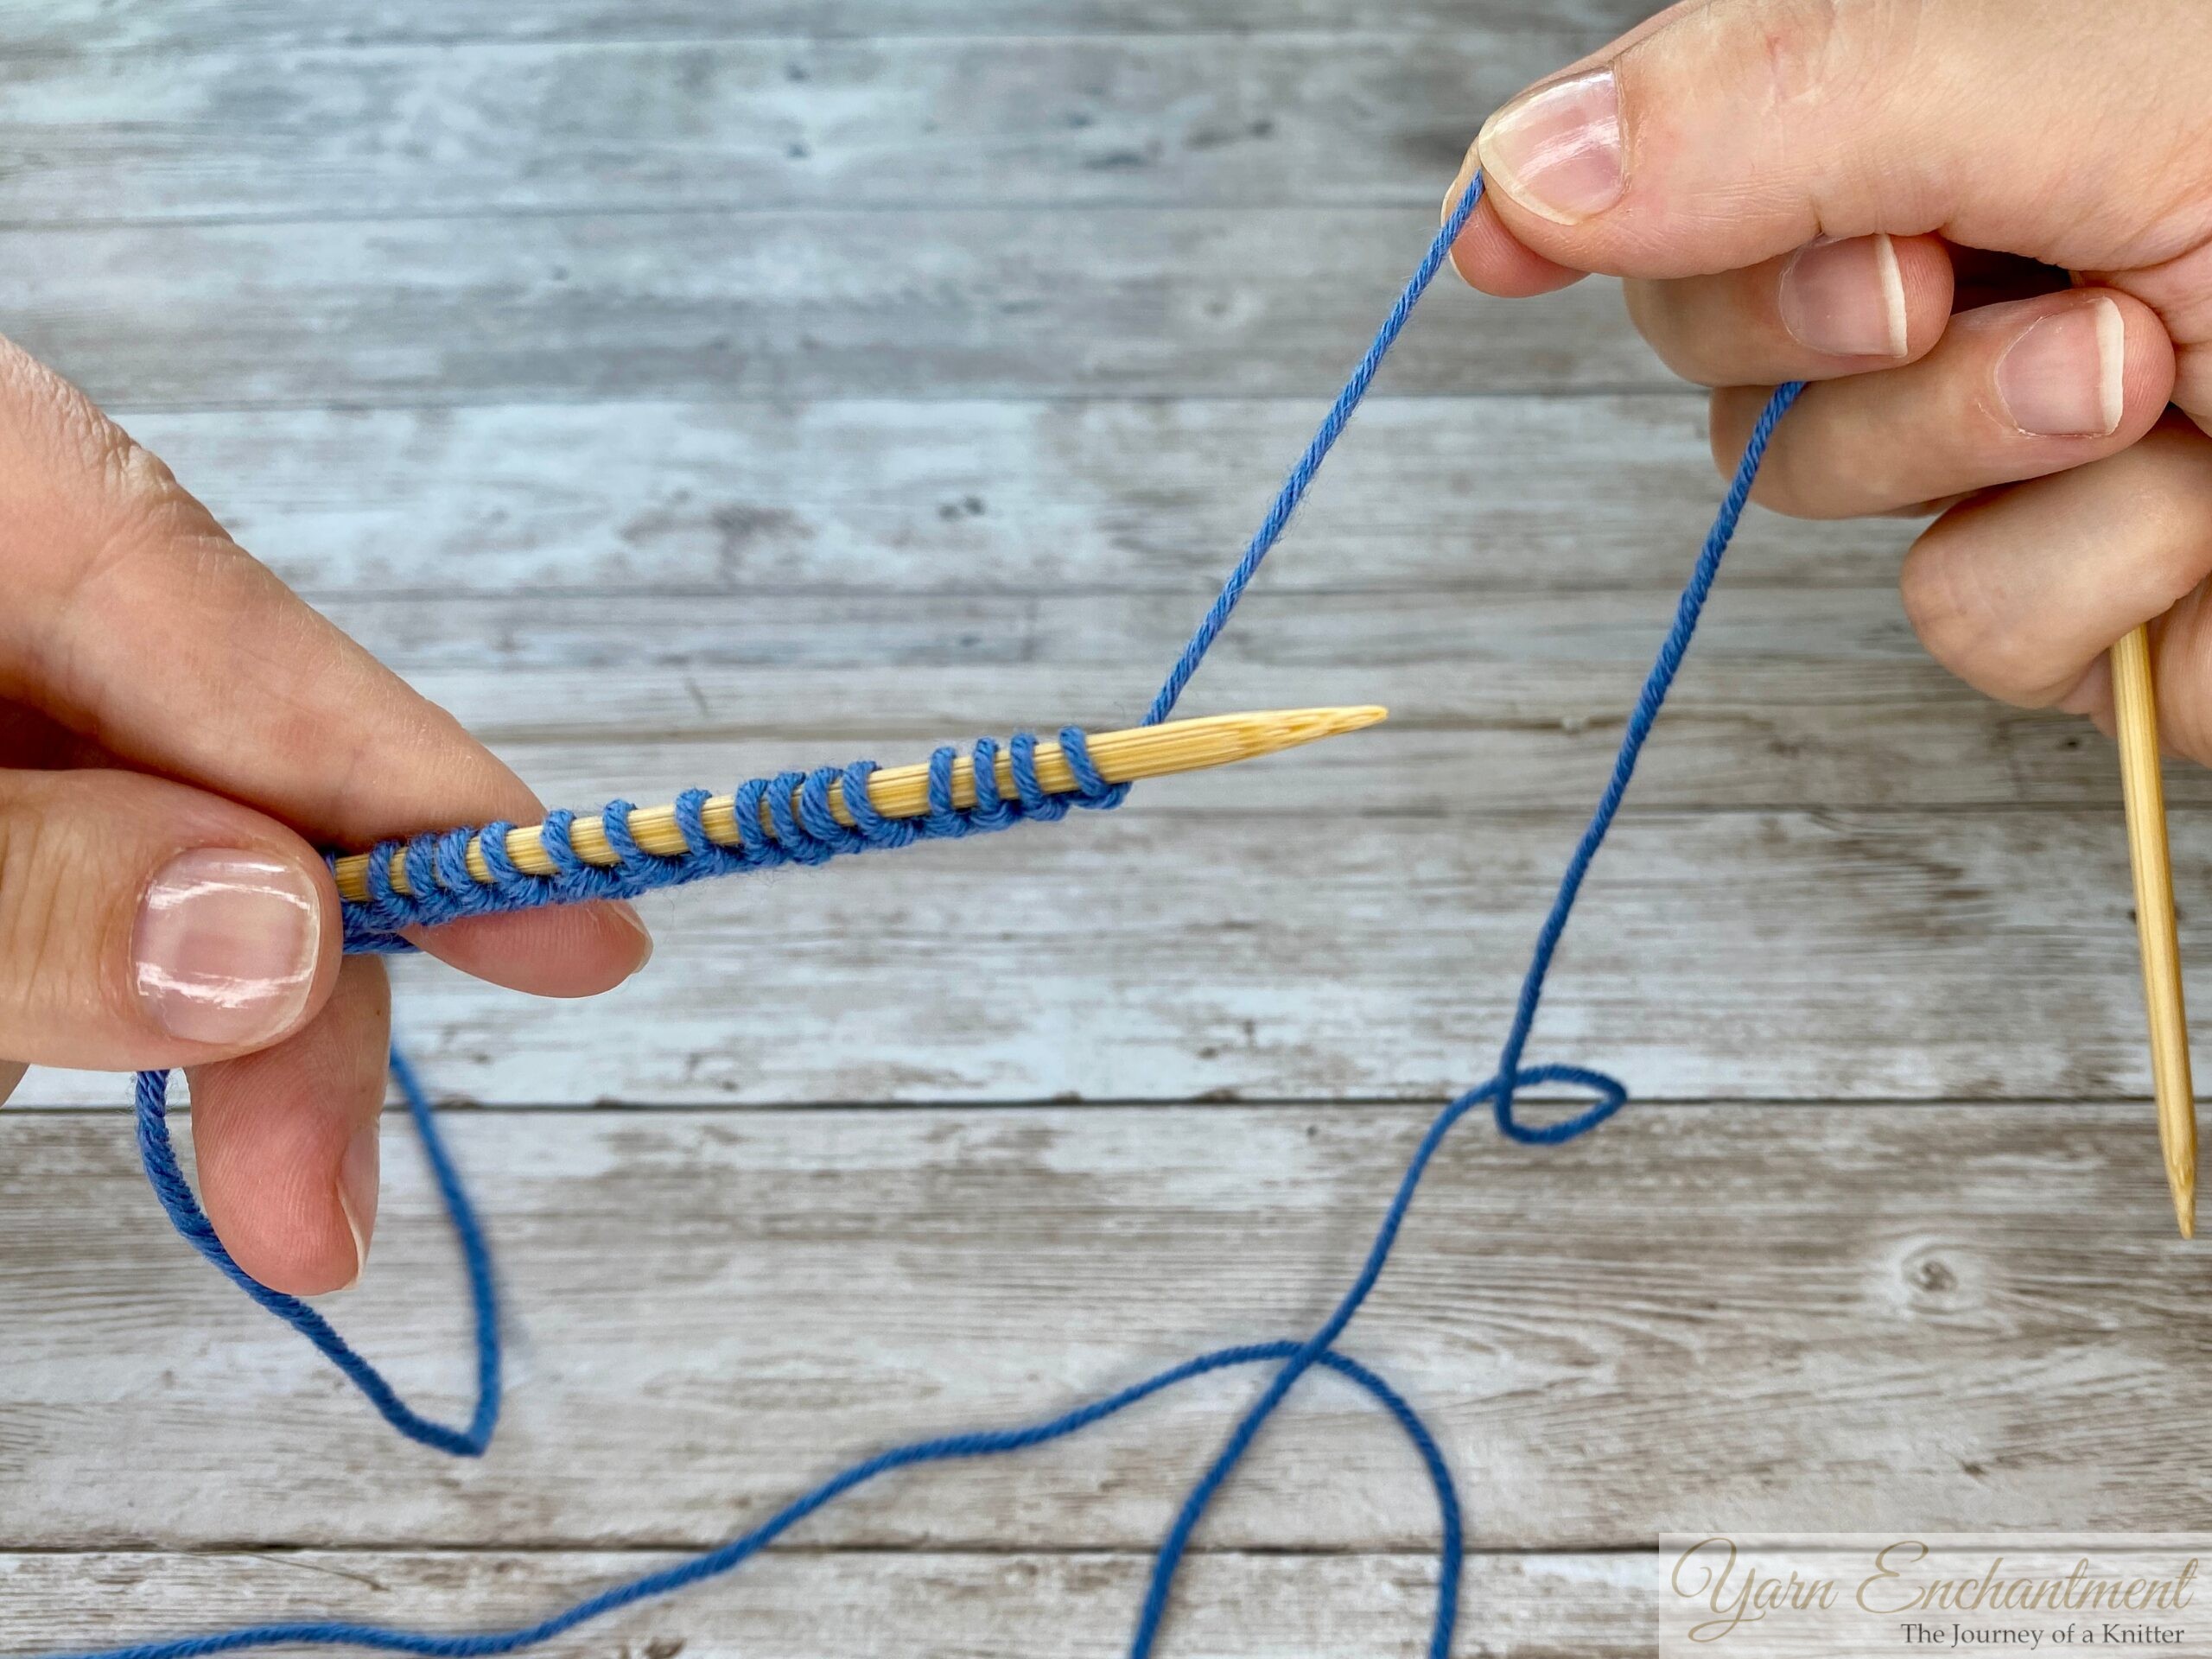 | 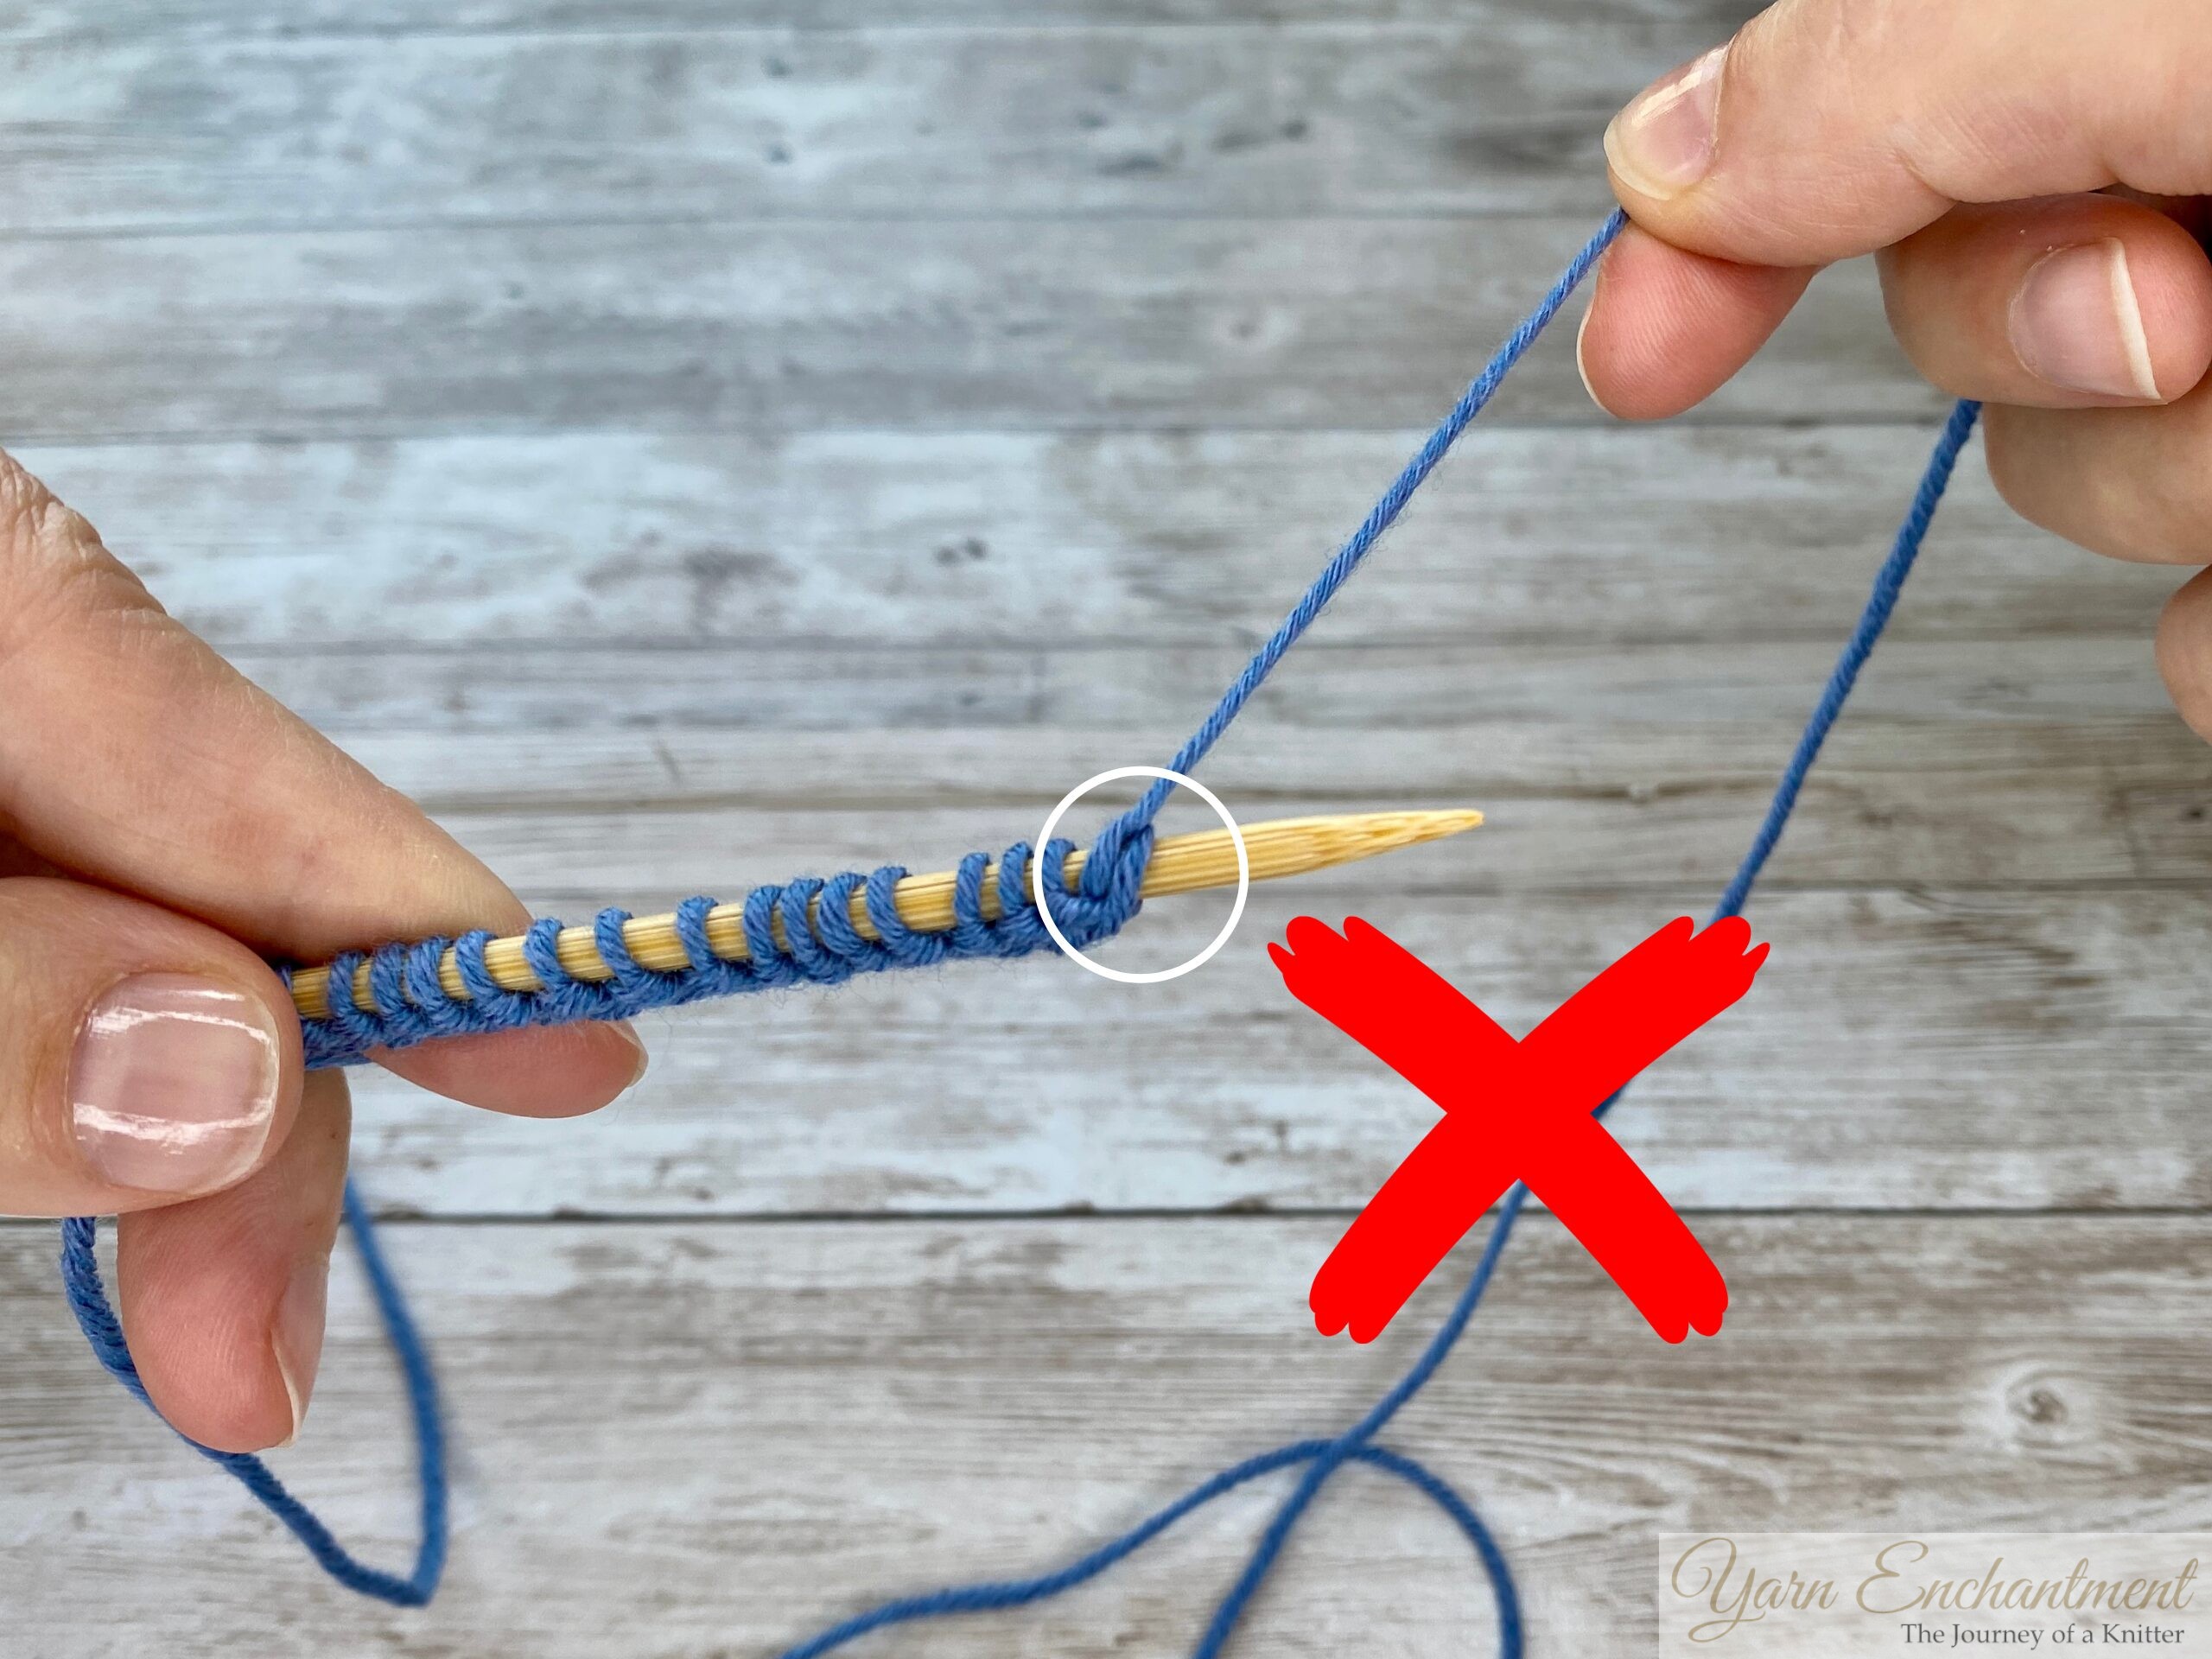 | Start by holding the needle with the cast-on stitches in your left hand, and the empty needle in your right. This is your starting position for knitting. | Make sure to bring your working yarn underneath the left needle to the back of your work, this will help you avoid accidentally creating a double stitch. | If the yarn goes over the top of the left needle instead of under it, you will accidentally create a double stitch, and we don’t want that! |


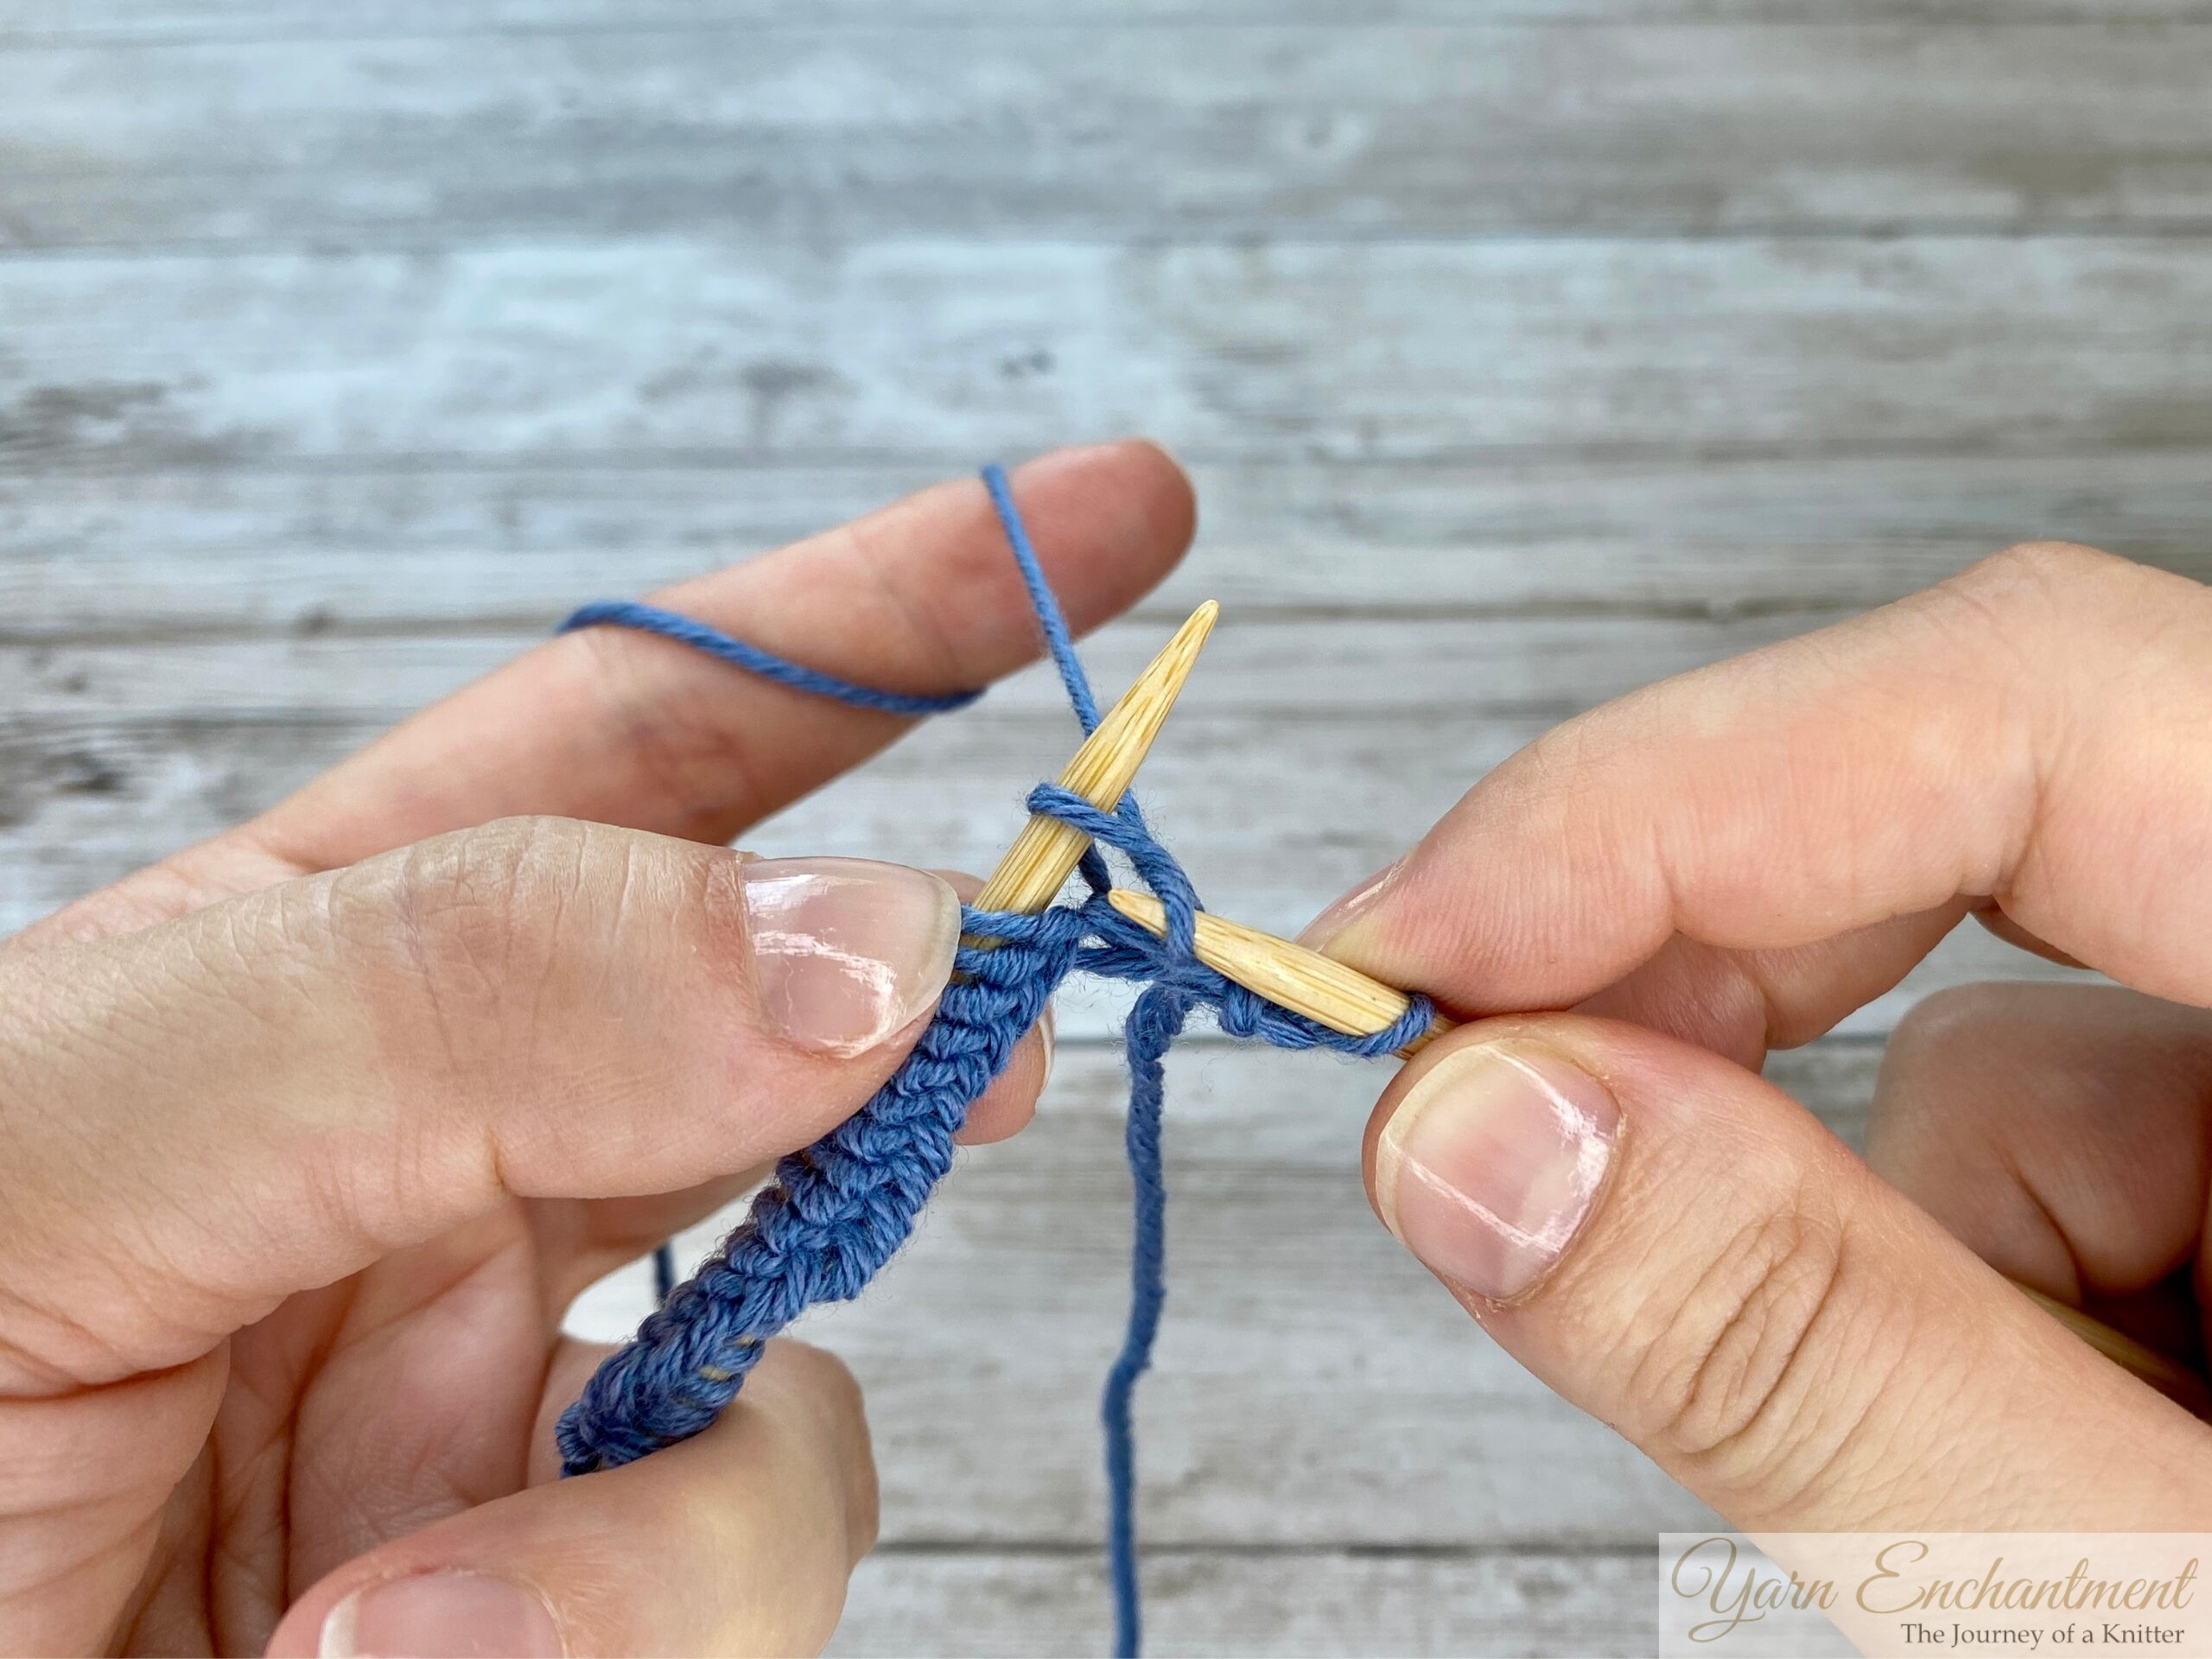
Step 2: Insert the Right Needle and Wrap the Yarn
- Insert the Right Needle:
Push the tip of the right needle into the front leg of the first stitch on the left needle. The needle should point away from you. - Wrap the Yarn:
With the working yarn behind your needles, wrap it counterclockwise around the right needle.- If you’re using the English style, use your right hand to "throw" the yarn around the needle (you’ll see this in action in the video tutorial).
- If you’re using the Continental style, simply guide the yarn with your left hand and let the right needle "pick" it up from behind.
 |  | Push the tip of the right needle into the front leg of the first stitch on the left needle. The needle should point away from you | With the working yarn behind your needles, wrap it counterclockwise around the right needle. |


Step 3: Draw Through and Slip Off
- Draw Through:
Gently pull the right needle back through the old stitch, bringing the new loop of yarn with it. You can also secure the wrapped yarn with your right index finger to keep it from slipping off the needle. While I don’t show this step in the photo here, I do demonstrate it clearly in the video tutorial, so be sure to check that out for extra guidance! - Slip Off:
Once the new stitch is safely on your right needle, slide the old stitch off the left needle. You’ve just made your first knit stitch!
 | 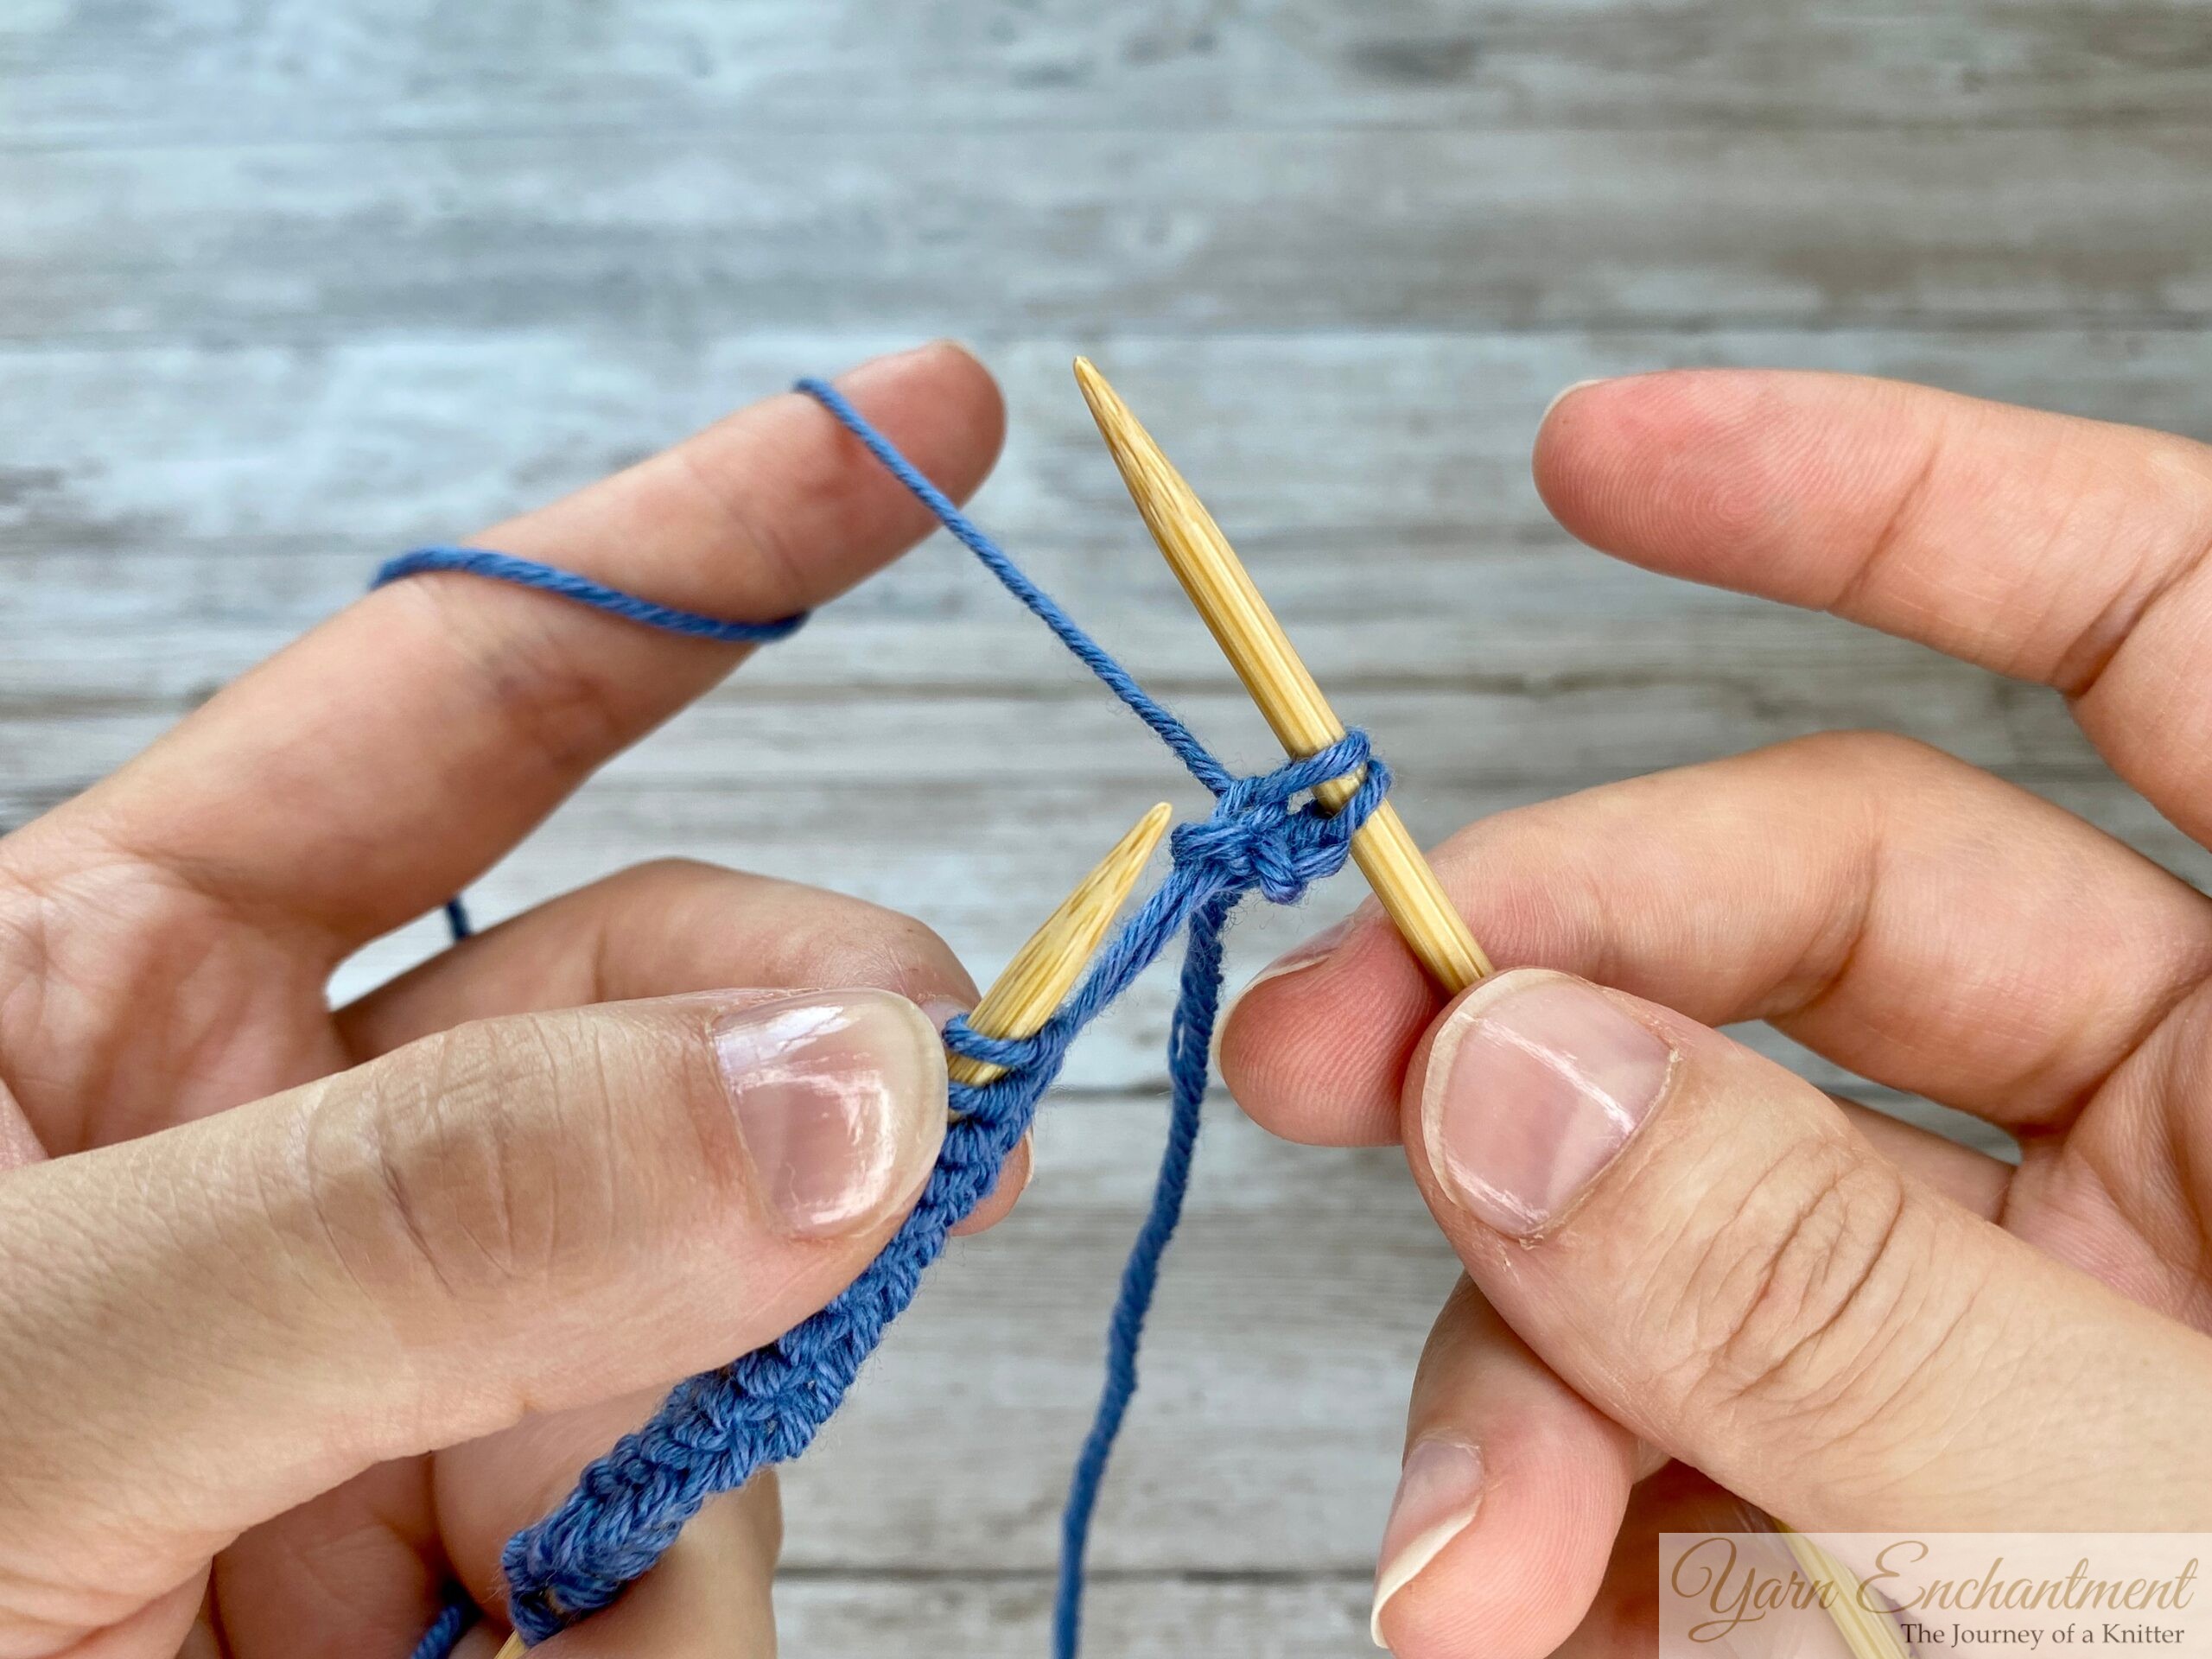 | Gently pull the right needle back through the old stitch, bringing the new loop of yarn with it. You can also secure the wrapped yarn with your right index finger to keep it from slipping off the needle. While I don’t show this step in the photo here, I do demonstrate it clearly in the video tutorial, so be sure to check that out for extra guidance! | Once the new stitch is safely on your right needle, slide the old stitch off the left needle. You’ve just made your first knit stitch! |


Repeat:
Keep going, work across the row, repeating these steps until all the stitches are transferred to the right needle.
Note:
Don’t worry if it feels awkward at first - knitting is like learning to ride a bike. With a bit of practice, your hands will start to remember the motions, and soon it’ll feel like second nature. Take your time and enjoy the process!
What Happens at the End of a Row?
Once you’ve finished knitting across the row, all your stitches will be on the right needle. Now it’s time to start the next row! Here’s how:
- Switch Hands
Take the full needle (the one with all your stitches) and move it to your left hand. Then, pick up the empty needle with your right hand. Think of this as "turning your work around"- you’re resetting for the next row - Position Your Yarn
Always make sure the working yarn is at the back of your work as you begin the new row. This keeps everything neat and avoids twisted stitches. Double-check that your hands, needles, and yarn are in the same position as they were in Step 1 before you start your first knit stitch. - Don’t Stress About Loose Stitches
If the first stitch of your row looks a little looser than the others, don’t worry, this is completely normal! As your project grows, those stitches will settle in and blend with the rest.
Building Garter Stitch Fabric (Perfect for Practice)
By knitting every row, you create what’s called garter stitch . This fabric is flat, reversible, squishy, and beautifully textured, making it an absolute favorite for beginners. It’s commonly used in projects like scarves, washcloths, and headbands, giving you plenty of opportunities to practice the knit stitch while creating something useful.
Think of garter stitch as your training wheels in knitting, it’s forgiving, easy to master, and perfect for building confidence. Plus, its cozy texture makes everything you create feel extra special.
 |
Supplies:
Use your preferred cast-on method. If you're unsure, the long-tail cast-on or knitted cast-on are great beginner-friendly options.
|

Troubleshooting Common Problems
Knitting is a learning journey, and even the most experienced knitters run into hiccups. Here’s how to tackle some common issues with ease:
-
Twisted Stitches:
I think this is one of the most common problems. So make sure you always insert your right needle through the front leg of the stitch. If it happens anyway and you notice it you can undo this section and fix it with a crochet hook. -
Dropped Stitches:
If a stitch slips off your needle, don’t panic! Catch it immediately with your knitting needle or a crochet hook. A small fix now can save you from bigger headaches later. -
Uneven Tension:
Practice makes it perfect, but keeping an eye on the slack in your yarn hand helps maintain consistent tension. Try to keep your movements smooth and relaxed for uniform stitches. -
Accidentally Adding or Losing Stitches:
It happens to everyone! Maybe you accidentally create a yarn over or knit two stitches together by mistake. To catch these errors early, make it a habit to count your stitches at the end of every row . This simple step will keep your project on track and help you avoid surprises later. -
First Stitch Looseness:
The first stitch of a row often turns out looser than the rest. To fix this, gently pull the second stitch a bit tighter as you work it. Over time, you’ll find your rhythm and this issue will naturally improve.
Tips for Smoother Knitting
Knitting is all about finding what works best for you. Here are some helpful tips to make your knitting experience smoother and more enjoyable:
- Keep Your Yarn in the Right Spot:
Always position your working yarn behind the needles when making knit stitches, never in front. This simple step keeps your stitches neat and consistent. - Slow and Steady Wins the Race:
Don’t rush! Smooth, steady movements help create even stitches and reduce frustration. Remember, knitting is meant to be relaxing. - Choose Beginner-Friendly Yarn:
Light-colored, medium-weight yarn is ideal for beginners because it’s easier to see your stitches and work with. - Experiment with Styles:
Try both the English (Throwing) and Continental (Picking) styles to discover which feels most natural for you. There’s no “right” way, just what works best for your hands. - Start Small:
Practice with small swatches before starting a full project. It’s a great way to build confidence and perfect your technique without feeling overwhelmed. - Take Care of Yourself:
Maintain good posture and stretch your hands during longer knitting sessions. Comfort is key to enjoying the process, and avoiding soreness later!
Frequently Asked Questions
Here are answers to some common knitting queries:
Q: Can I make a scarf using only the knit stitch?
A: Absolutely! A garter stitch scarf is beginner-friendly, cozy, and a beautiful way to showcase the simplicity of the knit stitch.
Q: What is the difference between knit and purl?
A: The knit and purl stitches are like two sides of the same coin. While the knit stitch creates a smooth "V," the purl stitch is its reverse. When combined, they create versatile fabrics like stockinette or ribbing.
Q: How do I fix a dropped stitch?
A: Use a knitting needle or crochet hook to carefully pick up the dropped loop and work it back up through the rows. It’s easier than it sounds! I’ve created a full tutorial along with a video, so make sure to check it out.
Q: Why are my edges loose?
A: Loose edges are common, especially for beginners. The first stitch of a row is often looser than the rest, but pulling the second stitch a bit tighter can help even things out.
Q: How long does it take to learn the knit stitch?
A: It depends on how much you practice, but most beginners get comfortable within a few hours of focused effort. Remember, knitting is a journey - enjoy the process!
Q: What’s the best project for practicing the knit stitch?
A: A garter stitch scarf is perfect for practice. It’s simple, repetitive, and forgiving, making it an ideal project to build confidence.
Conclusion
By mastering the knit stitch, you’ve taken the biggest step in your knitting journey. Consistent practice will help develop your muscle memory and open up a world of creative possibilities - from cozy scarves to intricate sweaters.
Once you’re comfortable with the knit stitch, it’s time to expand your skills:
- Learn the purl stitch, which pairs beautifully with the knit stitch to create more complex fabrics like stockinette and ribbing.
- Try simple projects like dishcloths, headbands, or the classic garter stitch scarf to build confidence.
- Experiment with different yarns, needle materials, and textures to discover what inspires you.
- Visit tutorials, patterns, and community forums for tips, inspiration, and support along the way.
Ready to dive deeper into the world of knitting? If you have a question or need help with a tricky step, leave a comment below or send me an e-mail - I'm here to help!
Share your progress in the comments, ask anything that’s holding you back, or let me know which projects you’re working on. And if you want to keep learning, be sure to explore my other tutorials to keep growing your skills.
Until then, happy knitting!
A Little Way to Say Thanks
You Might Also Like


 |
|
Join the Cozy Corner Newsletter!
Hey there, creative soul! Welcome to the Yarn Enchantment Newsletter, where we celebrate all things cozy, crafty, and full of heart. Think of this as your friendly crafting companion - a little dose of inspiration delivered straight to your inbox, just for you. Inside, you’ll find: ✨ Exclusive patterns & tutorials - ideas you won’t find anywhere else (just for us!) 📚 Bookish crafts that bring your favorite stories to life 🧶 Tips and tricks to make your crafting journey smoother (and more fun!) 💌 Heartfelt musings on life, creativity, and the magic of making something with your own two hands Whether you’re knitting by the fire, brainstorming your next DIY project, or just looking for a little creative pick-me-up, this newsletter is here to cheer you on. Because let’s be honest - crafting isn’t just about the finished project; it’s about the joy, peace, and stories we create along the way. So grab a cup of tea, cozy up, and join me. Together, we’ll weave a little magic into everyday life - one stitch, one story, and one email at a time. P.S. I’m so glad you’re here. Let’s make something beautiful together! (Note: If you're using an ad blocker, you may encounter issues subscribing to the newsletter. To subscribe, please consider disabling your ad blocker.)
|
