

What Do “Beginner,” “Intermediate,” and “Advanced” Mean for Knitters?
August 3, 2025
How to Knit Garter Stitch – Easy Step-by-Step Knitting Guide
August 14, 2025The Complete Guide to the Purl Stitch: Take Your Knitting to the Next Level

Originally published on August 6, 2025
Are you looking for a truly complete, beginner-friendly guide to the purl stitch - all in one place? You’ve found it! This isn’t just a quick overview: I spent over two weeks creating this extra-detailed resource so you’ll never be left searching for missing steps or troubleshooting tips. Whether you’re brand new to knitting or just want a thorough reference, this guide is packed with everything you need:
-
- Clear step-by-step instructions
- Troubleshooting for common issues
- Tips
- Helpful photos, video tutorials, printable checklists, and more
I know it’s a bit longer than most blog posts, but that’s on purpose - my goal is for you to have every answer and technique right here, whenever you need it. Use the Table of Contents to quickly jump to any section, watch the video if you’re a visual learner, or take your time and read it all. Go ahead and bookmark this post, you can always come back whenever you're feeling stuck or need a little help. I’m here to make sure you feel confident, supported, and ready to take on whatever comes your way.
I poured my passion, patience, and plenty of test-knitting into these pages, so take a deep breath and let’s master the purl stitch together!
If you’re new to knitting, start with the basics in my (Complete Guide to the Knit Stitch). Once you’ve got that down, come back here to learn the purl stitch!
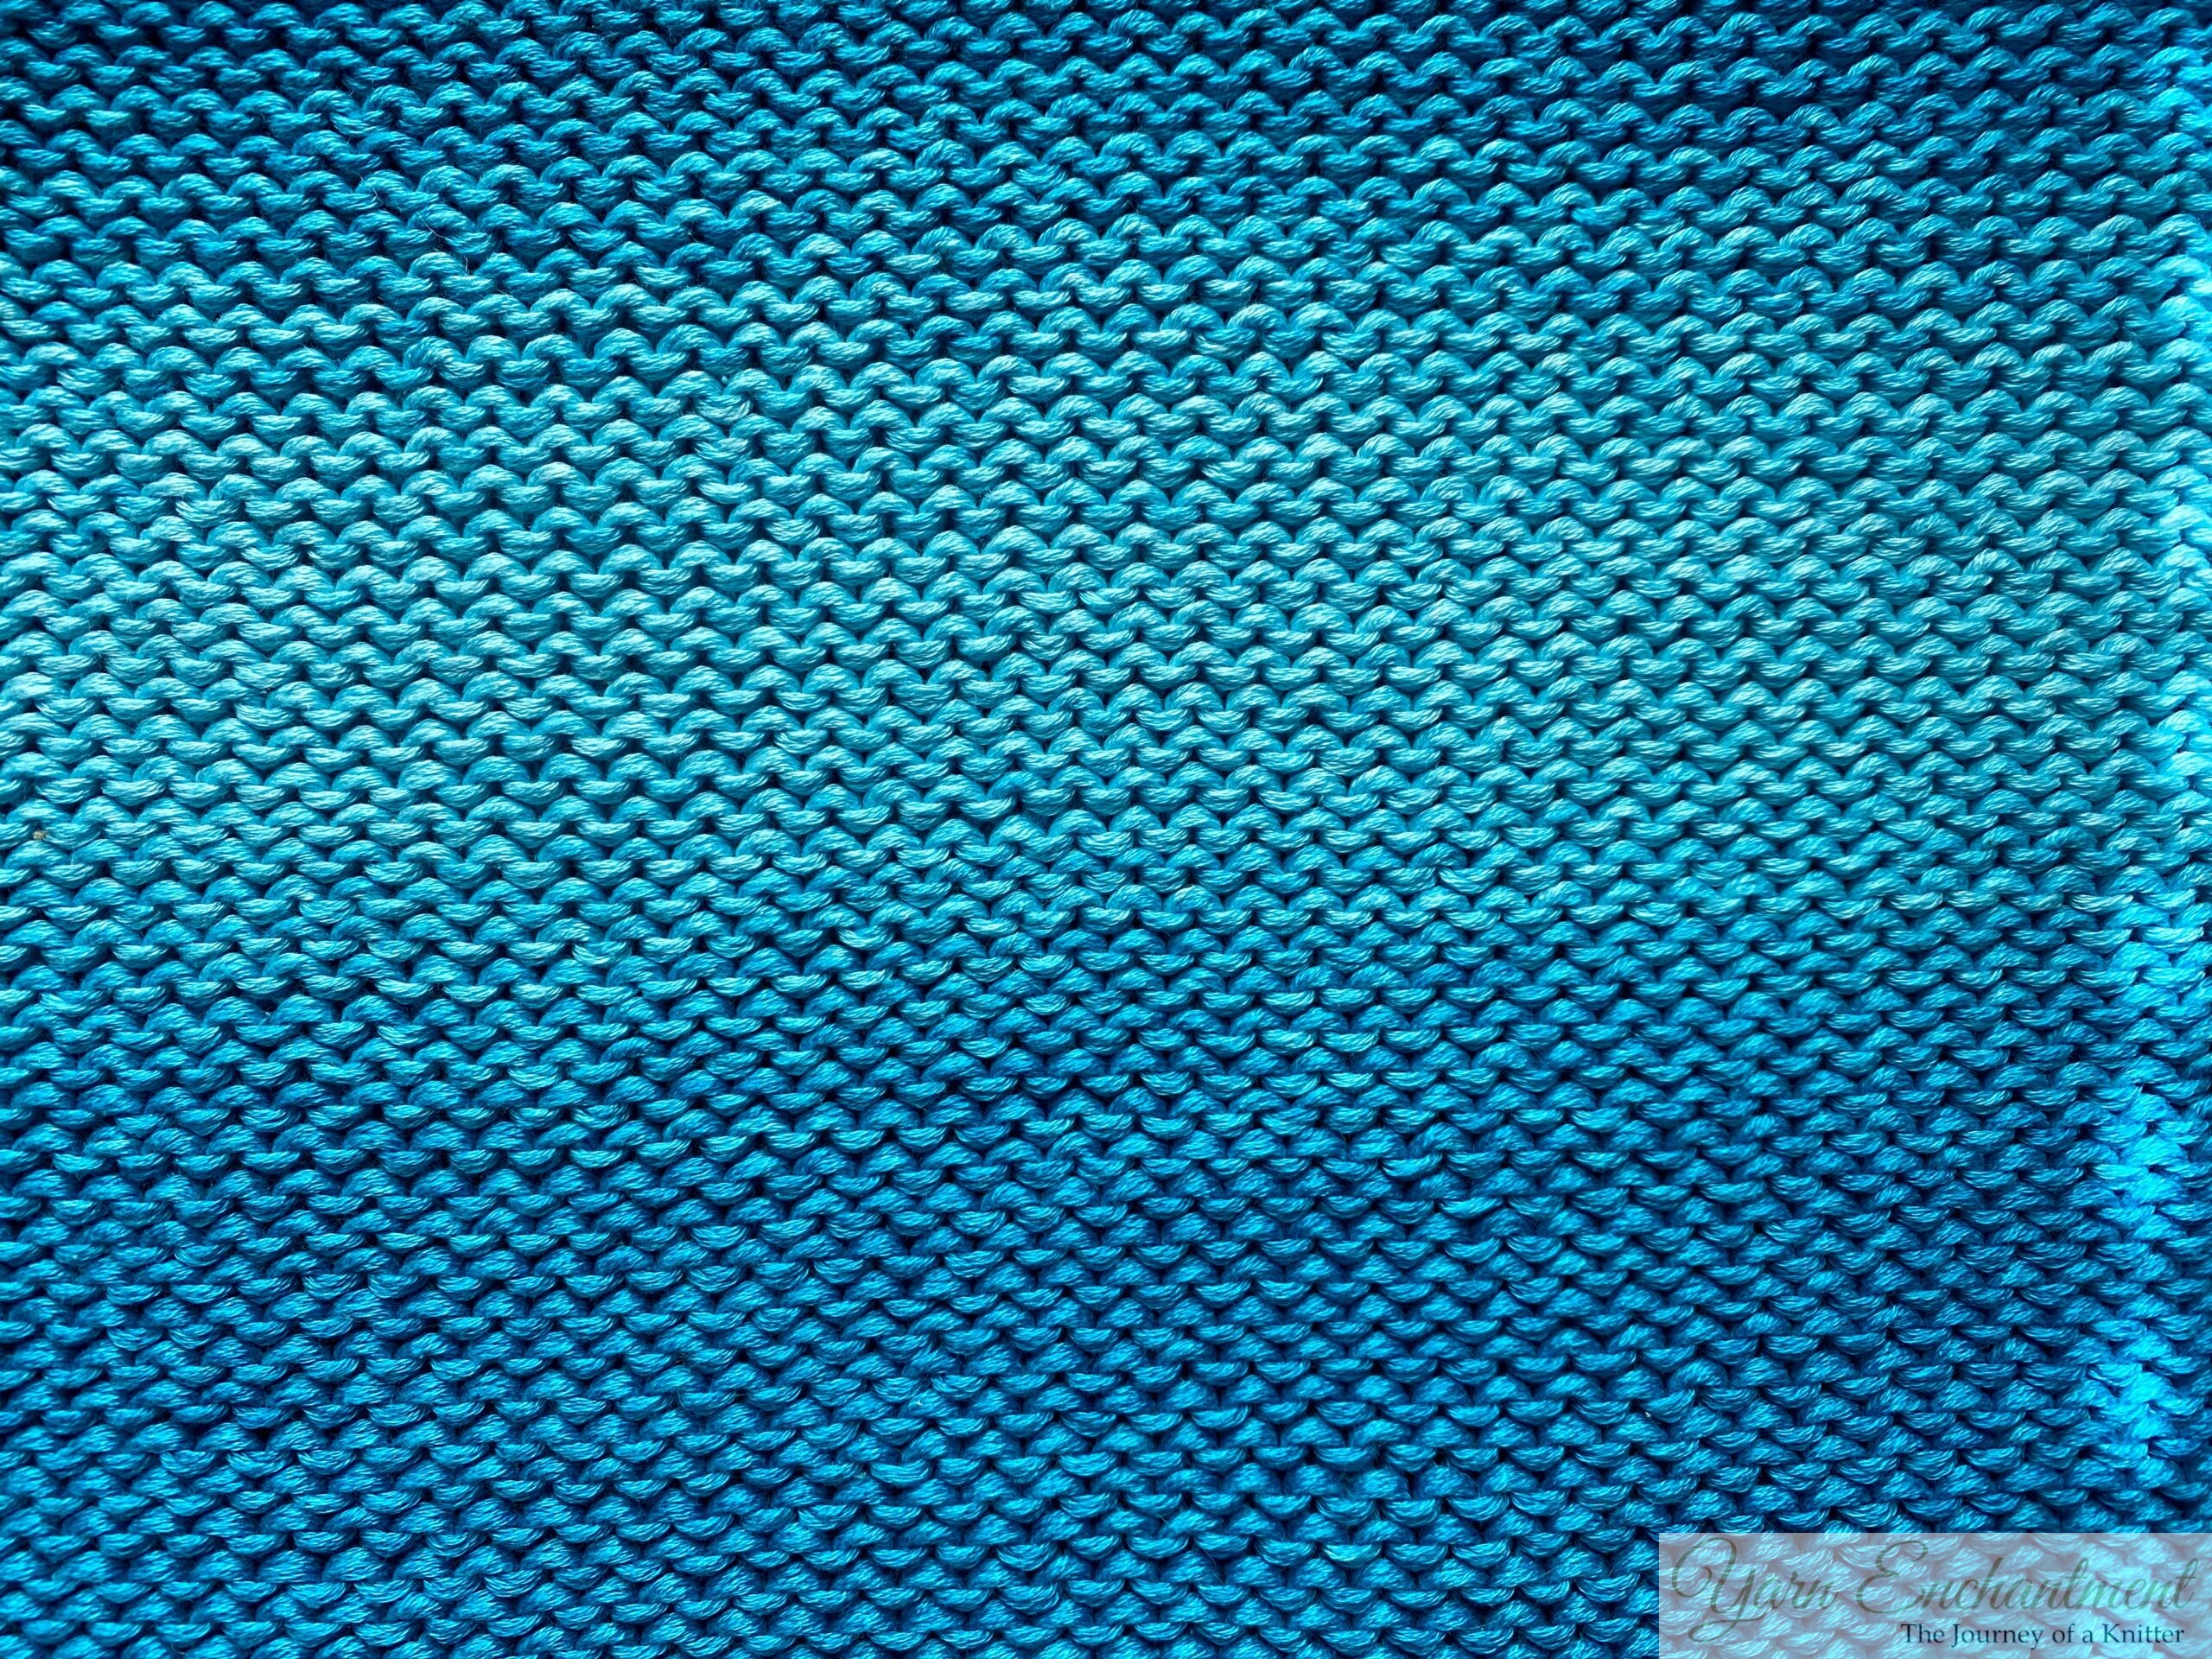 | The purl side reveals a textured surface covered in tiny, raised bumps. These "purl bumps" |

Table of Contents
What is the Purl Stitch?
If you’re just starting out with knitting, you’ve probably heard about the purl stitch. Maybe you’ve even seen it in action - those little bumpy rows that give knitting its texture and personality. But what exactly is a purl stitch, and why does it matter so much?
Let me break it down for you.
The purl stitch is one of the two most basic stitches in knitting (the other being the knit stitch). Together, these two stitches are like the peanut butter and jelly of knitting - they work beautifully together and form the foundation of almost every pattern you’ll ever make.
When you purl, you’re basically flipping the knit stitch inside out. Instead of creating a smooth, flat side like the knit stitch does, the purl stitch creates a bumpy, textured surface. Think of it as the yin to the knit stitch’s yang. They balance each other out, and when you combine them, magic happens.
What You Need to Start Purling
Purling Starter Checklist:
|
Supply |
Purpose/Notes |
|
|
Yarn |
Choose a medium-weight, light-colored yarn. Lighter shades make it easier to see your stitches as you work. | |
|
Needles |
Smooth, wooden or bamboo needles are ideal for beginners. Medium-sized needles (US 7/4.5mm) are commonly recommended. | |
|
Cast-On Row |
Before making knit stitches, you’ll need a cast-on foundation row on your needle. | |
|
Small scissors |
For cutting yarn |
|
| Yarn needle/tapestry needle |
Weaving in ends |
|
|
Stitch markers |
Helpful for tracking sections or repeats |
|
|
Measuring tape |
Great for checking length/width |
|
|
Crochet hook |
Useful for fixing dropped stitches |
|
| Notebook or printed notes | Tracking progress and keeping notes |
How to Use Your Starter Checklist
-
-
Print it out or bookmark this post, so your checklist is always easy to find.
-
Gather your supplies using the list - having everything ready helps you get started smoothly.
-
Check off each item as you collect it.
-
Download the printable version: Starter Checklist
-
Tip: Don’t overspend on supplies when you’re just starting out. Stick to affordable, beginner-friendly tools until you’re comfortable with the basics.
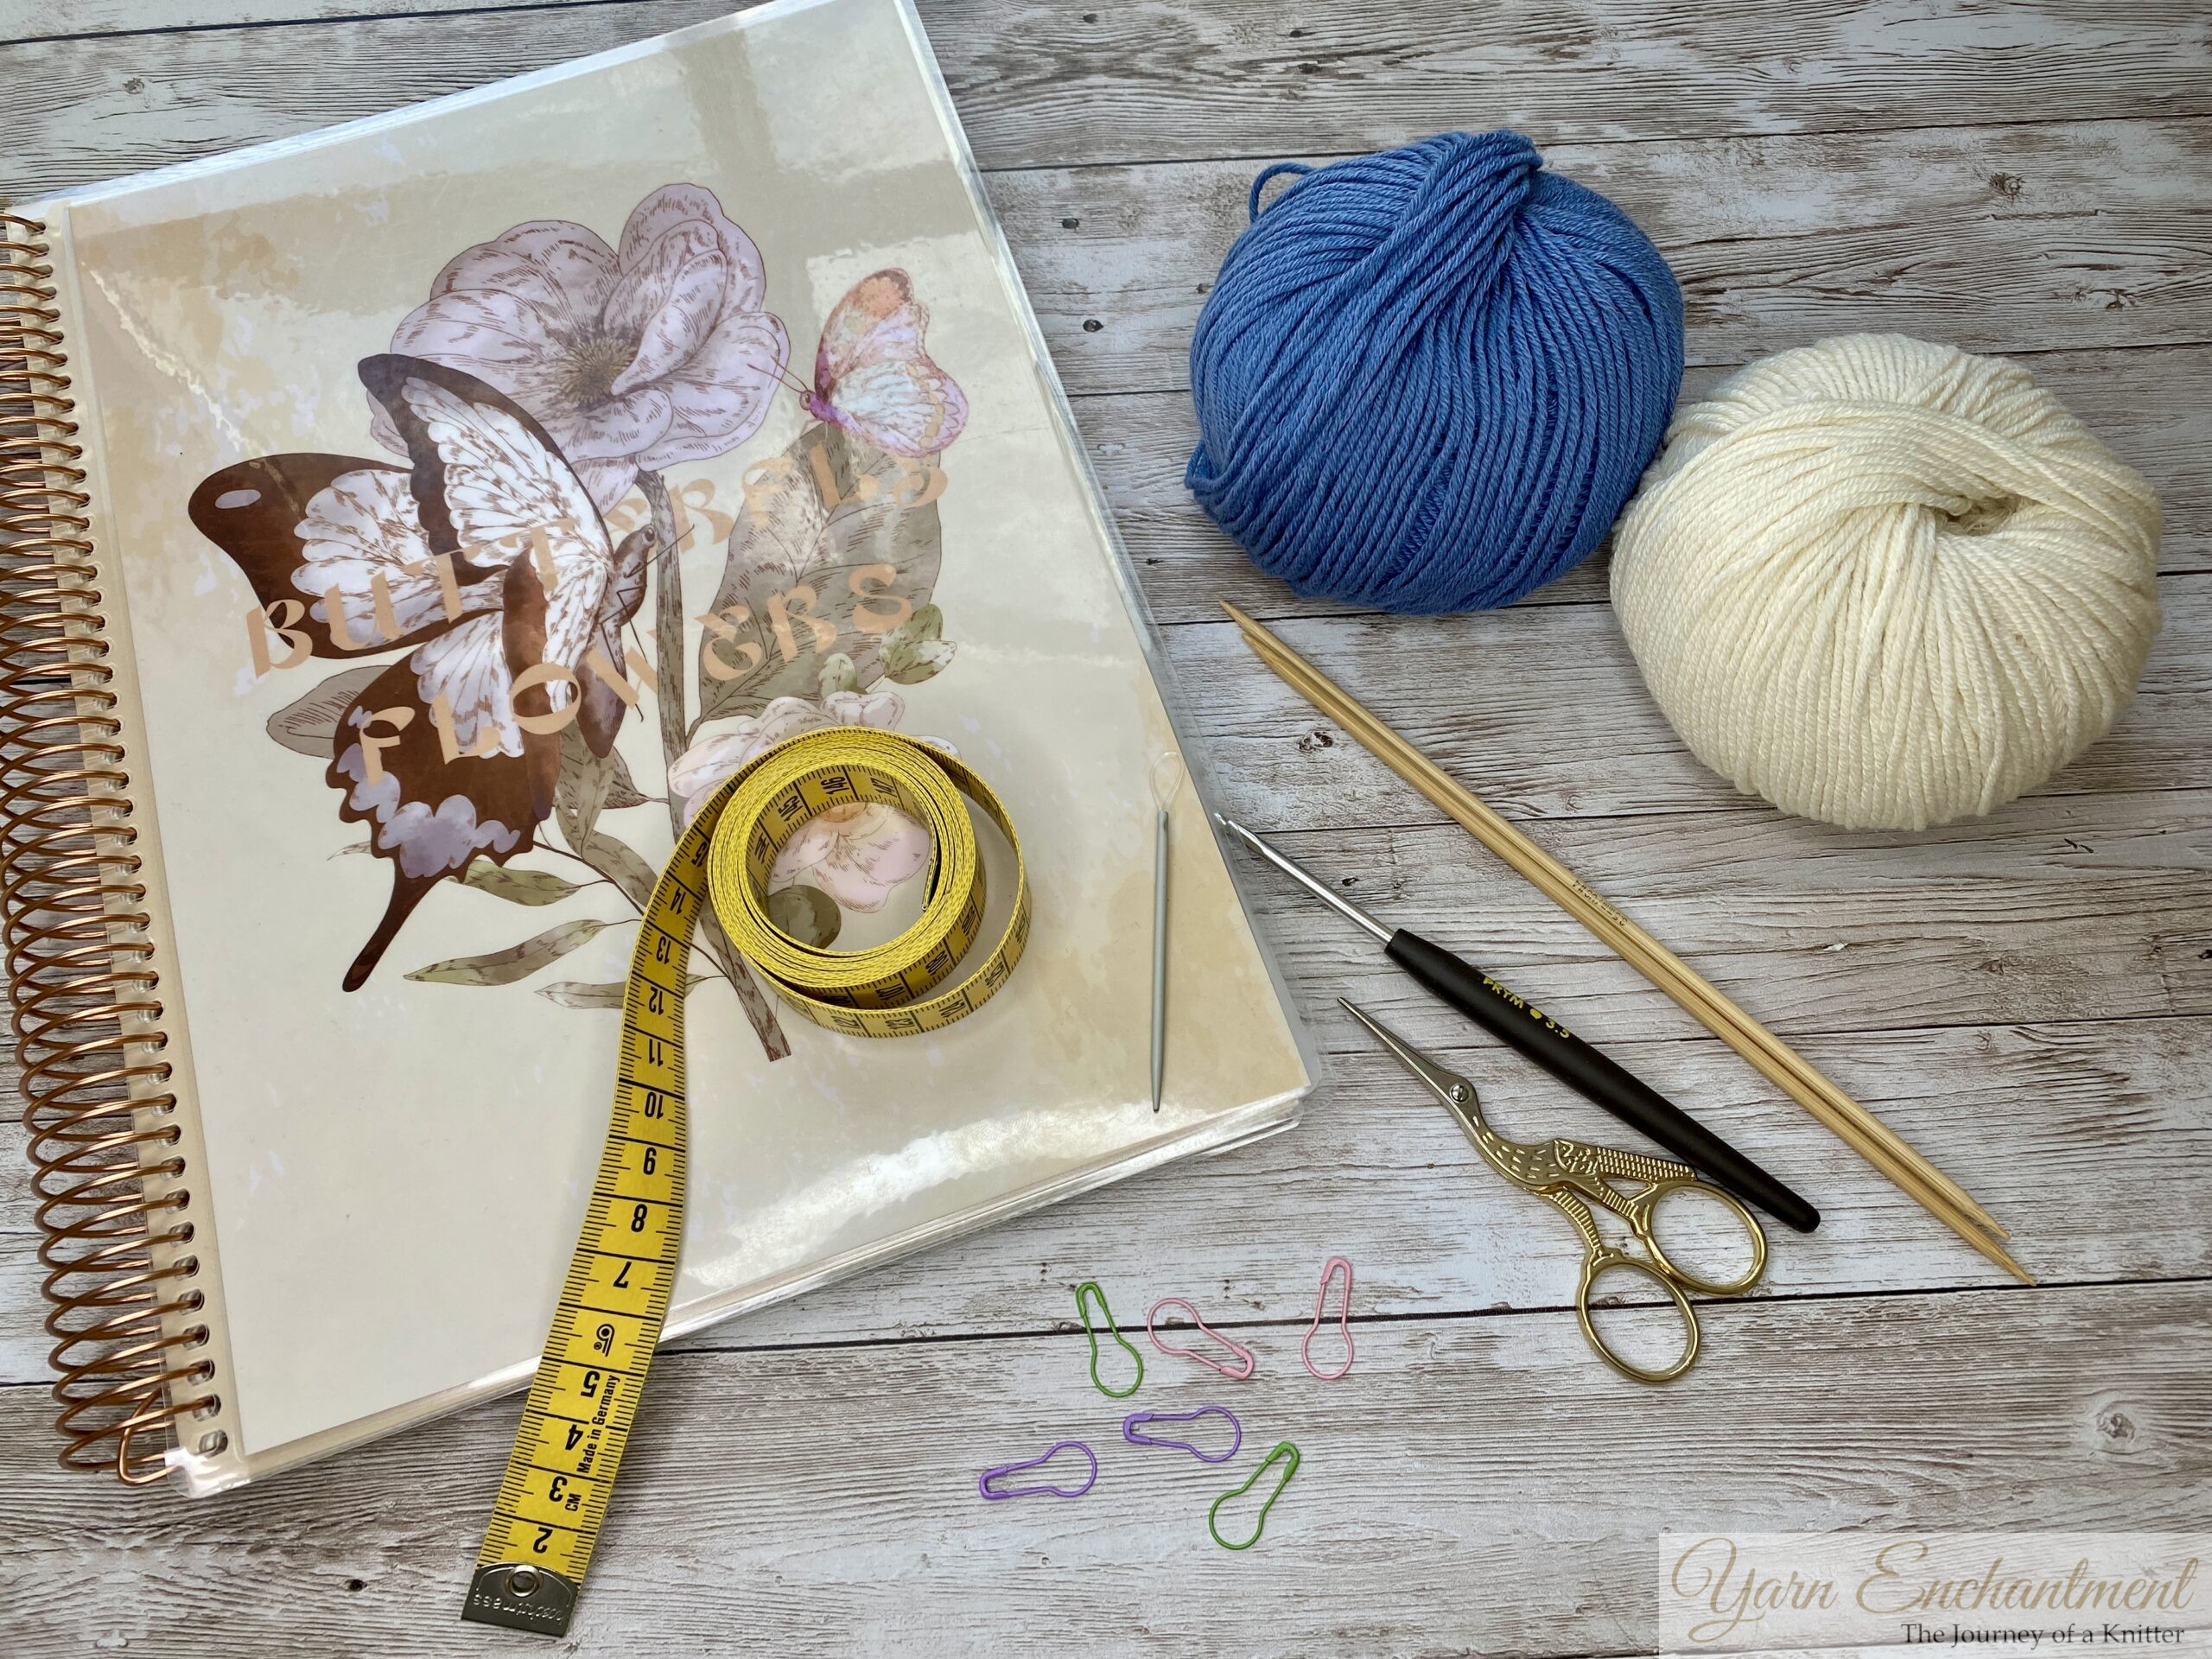 | The notebook is optional, you can also print out some notes to keep track of your progress. |

Purling vs. Knitting: What’s the Difference?
At first glance, knitting and purling might seem like two completely different skills, but they’re actually just two sides of the same coin. Once you understand the differences between them, you’ll be able to switch between the two like a pro, and trust me, it’s easier than it sounds. Let’s break it down:
1. Where’s the Yarn?
- Knit Stitch: When you’re knitting, the yarn stays behind your work. Think of it as chilling in the back while you focus on making those smooth, V-shaped stitches.
- Purl Stitch: For purling, the yarn hangs out in front of your work. Bringing it forward is one of the first signs you’re about to purl instead of knit.
 |  | When you’re knitting, the yarn stays behind your work. | For purling, the yarn should be in front of your work. |


2. How Do You Insert the Needle?
- Knit Stitch: To knit, you insert the needle from front to back into the stitch.
- Purl Stitch: Purling flips that around - you insert the needle from back to front. It’s the opposite motion, which creates that bumpy texture.
 |  | To knit, you insert the needle from front to back into the stitch | For a purl stitch you insert the needle from back to front |


3. What Does It Look Like?
- Knit Stitch: When you look at the front side of a knit stitch, you’ll see those classic “V” shapes. They give your knitting a smooth, clean look.
- Purl Stitch: On the other hand, purl stitches create what knitters affectionately call “purl bumps.” These little horizontal bars give your fabric a textured, bumpy appearance.
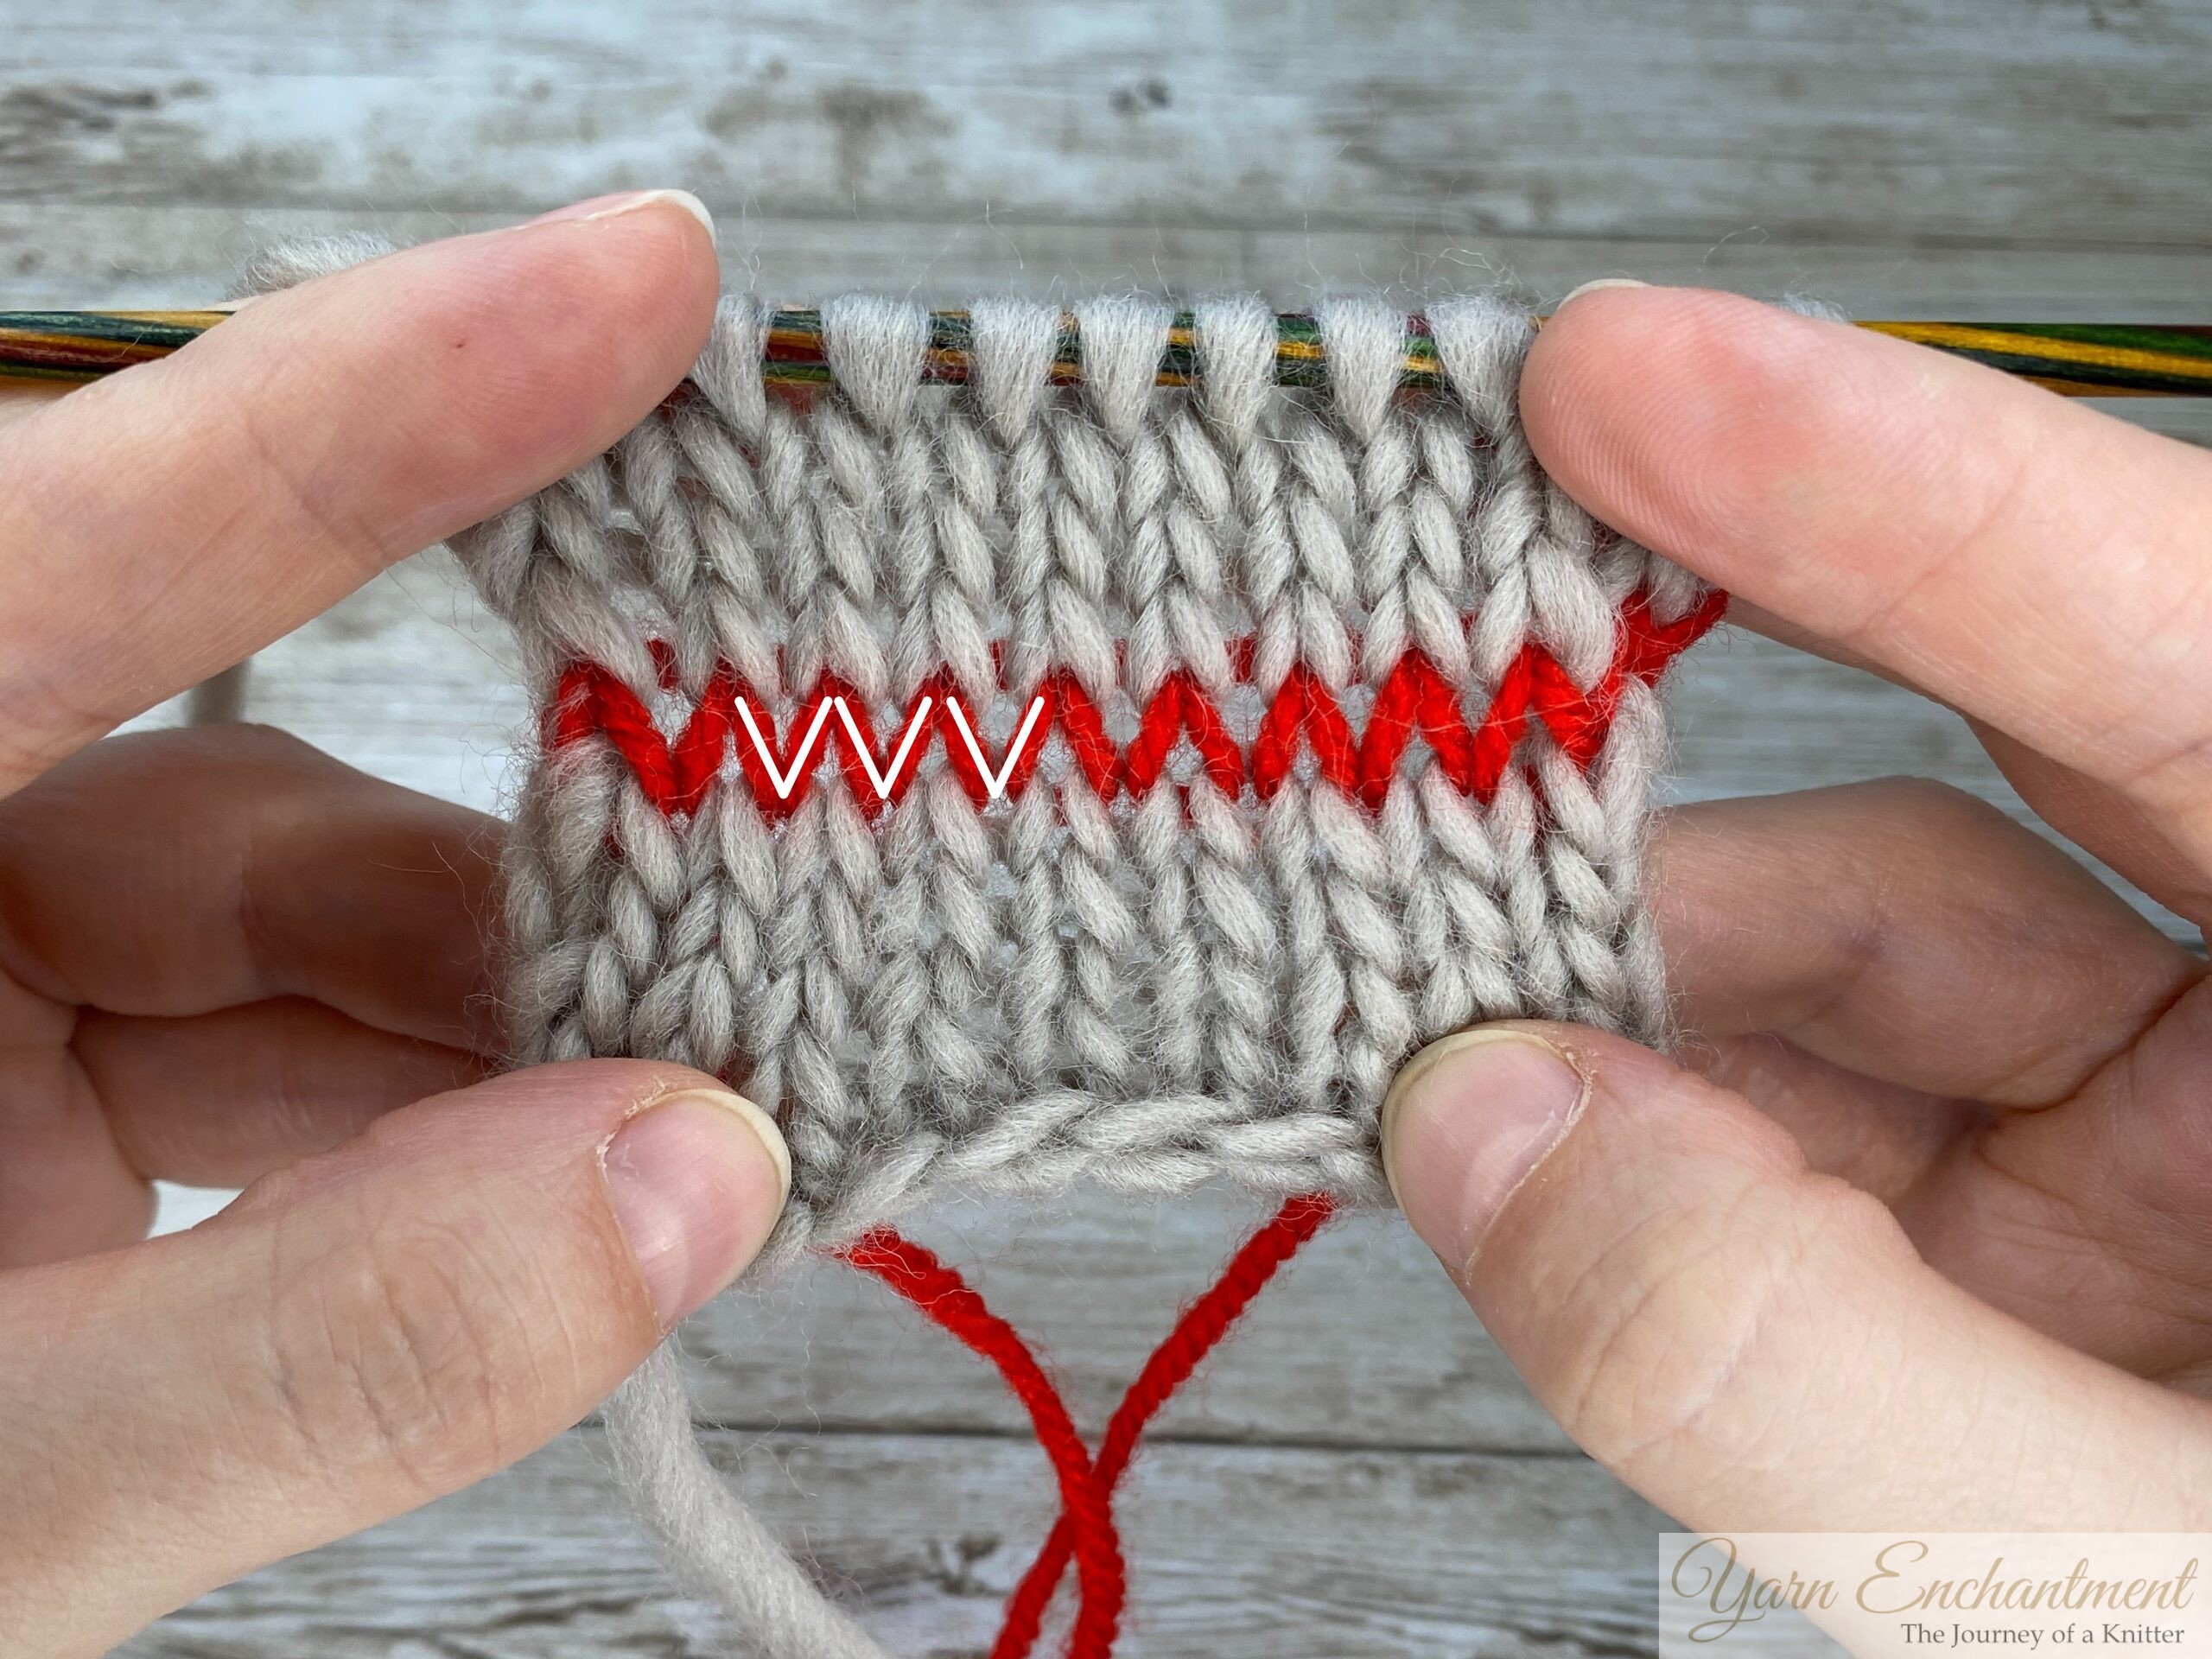 |  | When you look at the front side of a knit stitch, you’ll see those classic “V” shapes. | Purl stitches create what knitters call “purl bumps.” These little horizontal bars give your fabric a textured, bumpy appearance. |


4. How Are They Abbreviated?
- Knit Stitch: In patterns, you’ll see the knit stitch shortened to just “k” (e.g., “k5” means knit 5 stitches).
- Purl Stitch: The purl stitch gets the abbreviation “p” (so “p3” means purl 3 stitches).
Why Does This Matter?
When I first started knitting, I didn’t pay much attention to all the little details. I had some basic experience from school and picked up a few tips by watching my granny work her magic. But looking back, I realize that if you’re new to knitting - or even if you’ve never held needles before - understanding these small but important differences is key to becoming a confident knitter.
Getting comfortable with the basics - like how stitches form, how tension works, what twisted stitches are, and how knit and purl stitches behave - makes a world of difference. It’ll help you read patterns more easily, fix mistakes when they happen (and trust me, they will happen!), and even start experimenting with combining knit and purl stitches to create cool textures.
So next time you sit down to knit, take a moment to notice where the yarn is, how the needle moves, and what your stitches look like. These small observations are all part of the knitting journey - and honestly, it’s pretty satisfying once everything starts to click!
Yarn and Needle Holding Techniques for Purling
When it comes to purling, there are two main ways to handle your yarn and needles. Both work perfectly fine - it just depends on what feels most comfortable for you. Let’s break them down:
-
English Style (aka "Throwing")
If you’re an English-style knitter, you’ll hold the yarn in your right hand. As you purl, you’ll kind of “throw” the yarn around the needle to create each stitch. It’s called “throwing” because you’re literally looping the yarn over the needle with your right hand. This method might feel natural if you’re used to holding the yarn this way when knitting. -
Continental Style (aka "Picking")
On the other hand (literally), Continental-style knitters hold the yarn in their left hand. Instead of throwing the yarn, you’ll use the needle to “pick up” the yarn as you work each stitch. This style can feel quicker once you get the hang of it because the yarn stays mostly stationary in your left hand.
So, which one should you choose? Honestly, there’s no right or wrong answer here. Some people prefer English because it feels familiar, while others love the efficiency of Continental. My advice? Try both and see which one clicks for you. Knitting is all about finding what feels good in your hands - so go with whatever makes purling feel easier and more enjoyable.
How to Purl Stitch: Step-by-Step Tutorial for Beginners
Step 1: Start Position
- Hold the needle with your stitches in your left hand (You’re holding your needles the same way as when working the knit stitch: the full needle is in your left hand, and the empty needle is in your right hand.).
-
Make sure the working yarn (the yarn attached to the ball) is hanging in front of your work. This is key because it sets you up for the purl stitch. (In the picture, I worked up to the middle of my swatch because it was easier to see. However, you’ll do the same thing at the beginning of your row).
 |  | Hold the needle with your stitches in your left hand | Make sure the working yarn (the yarn attached to the ball) is hanging in front of your work. |


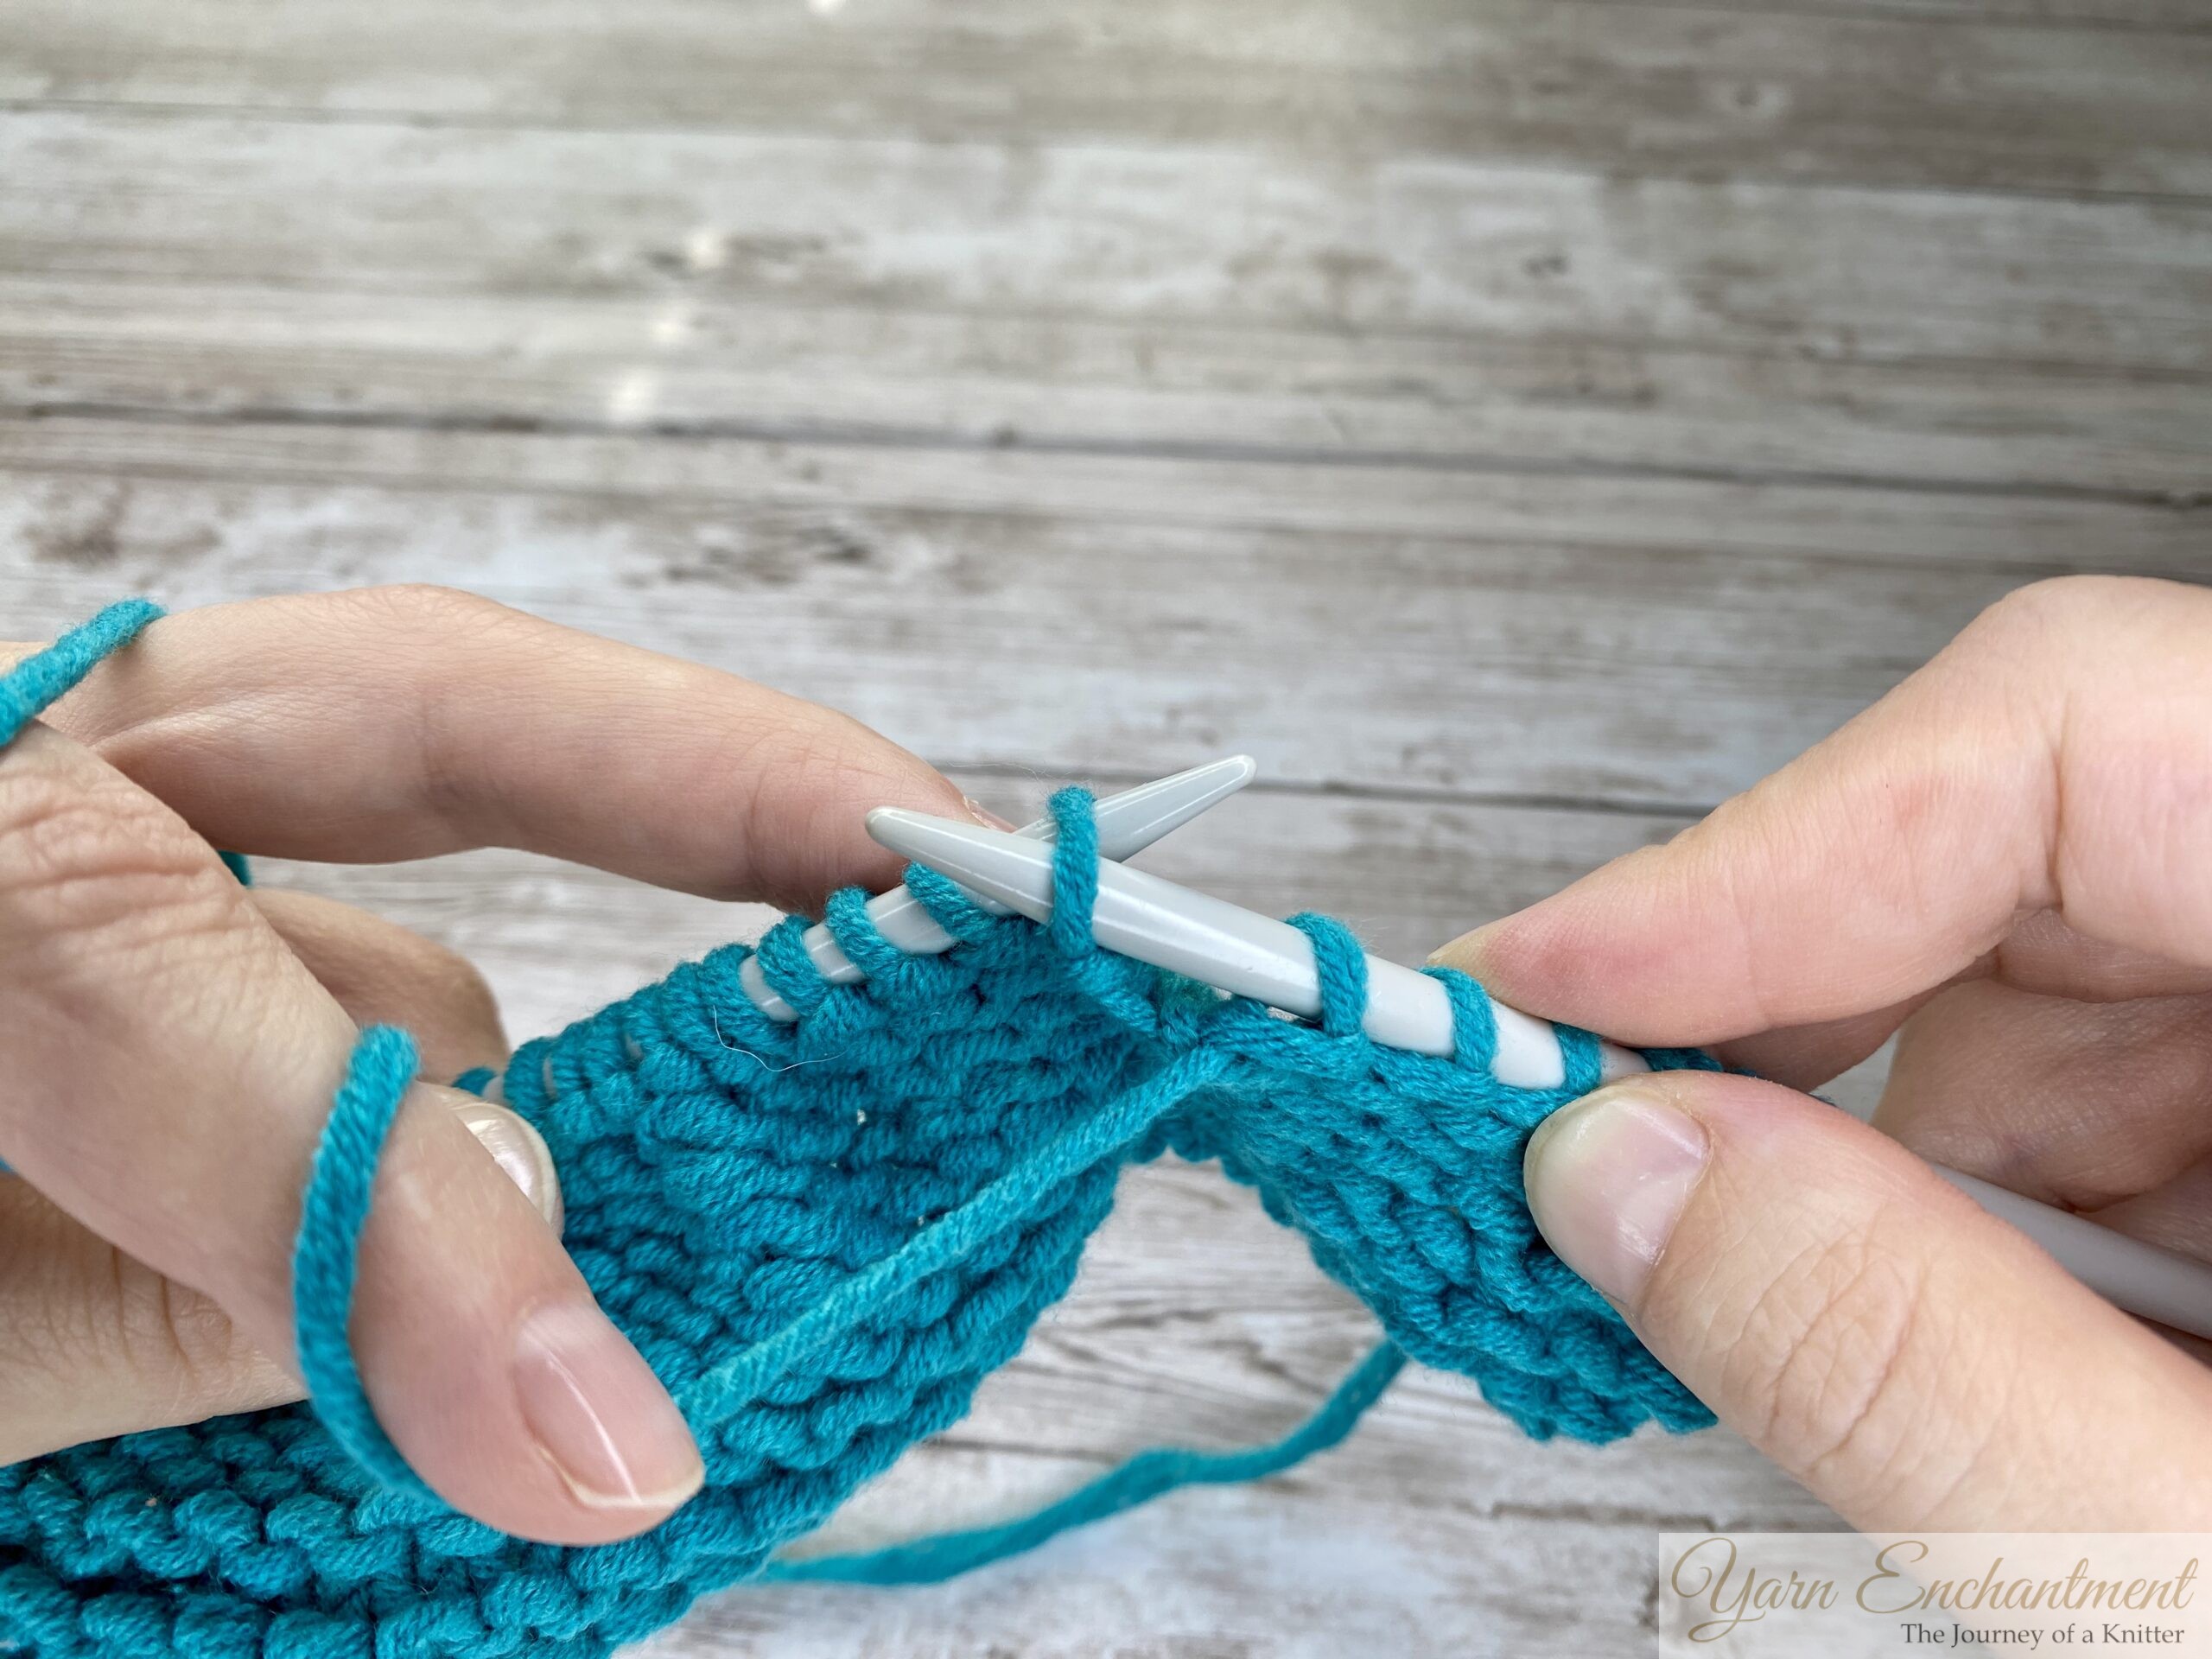
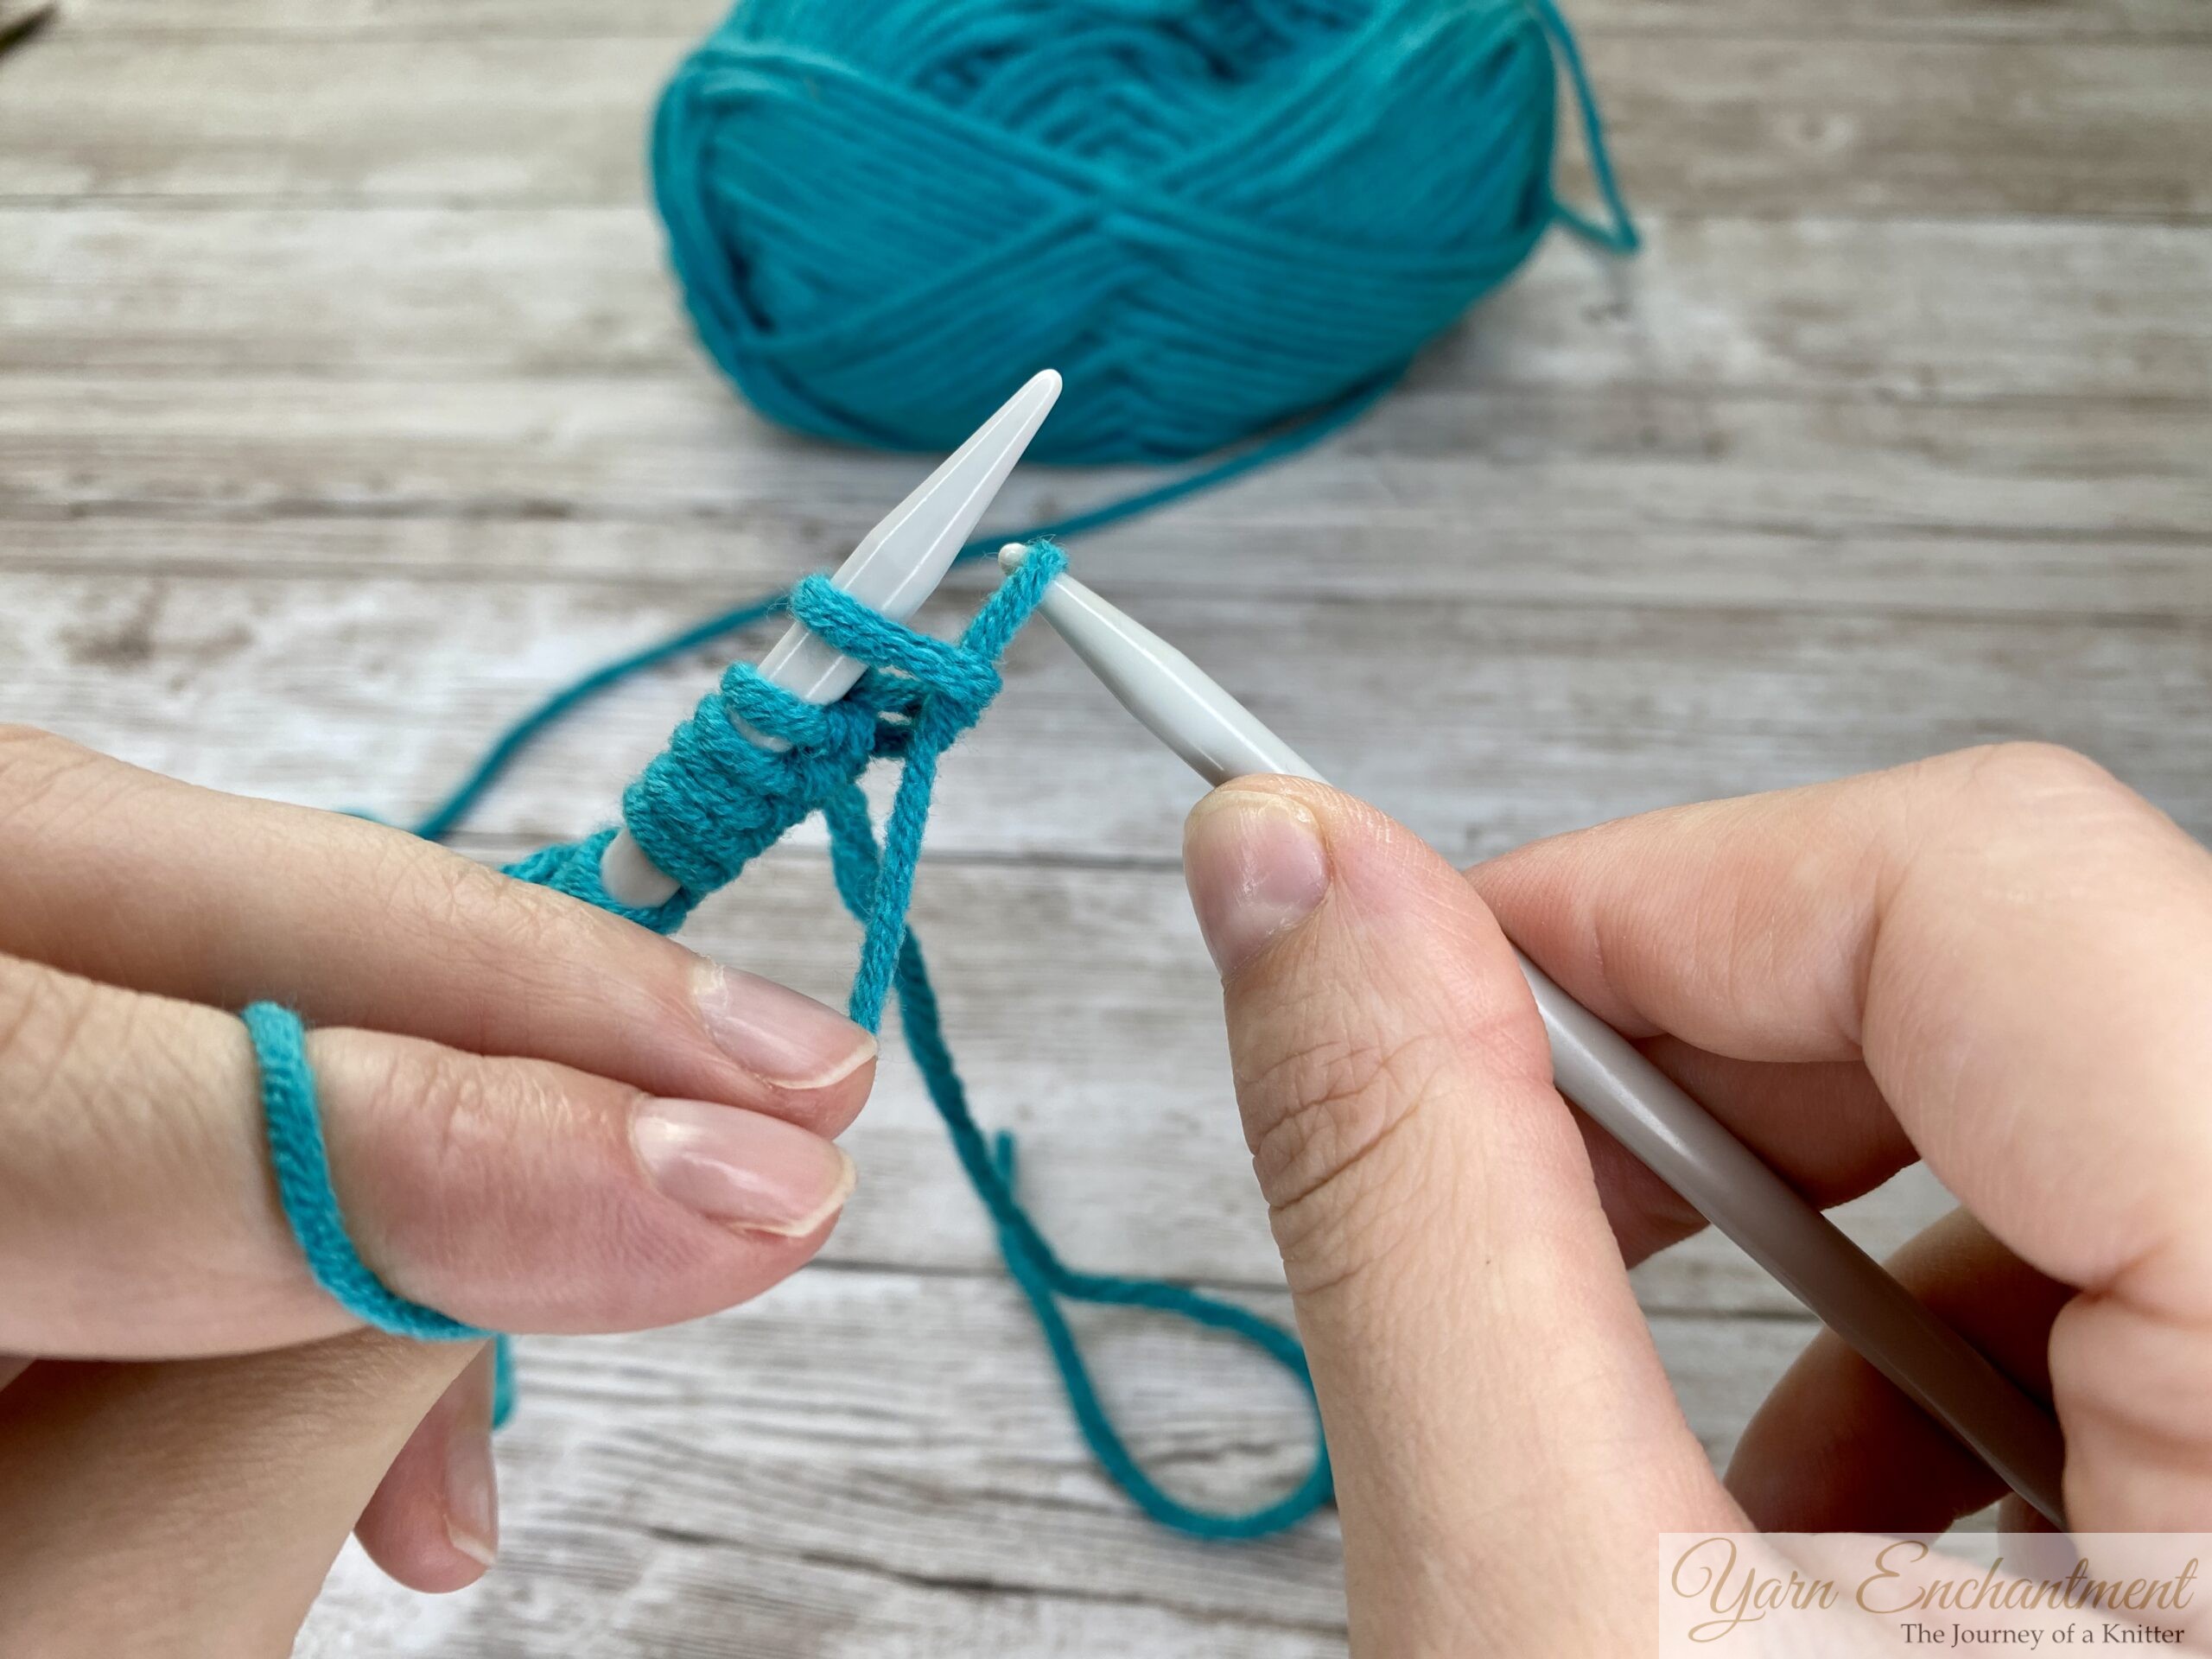
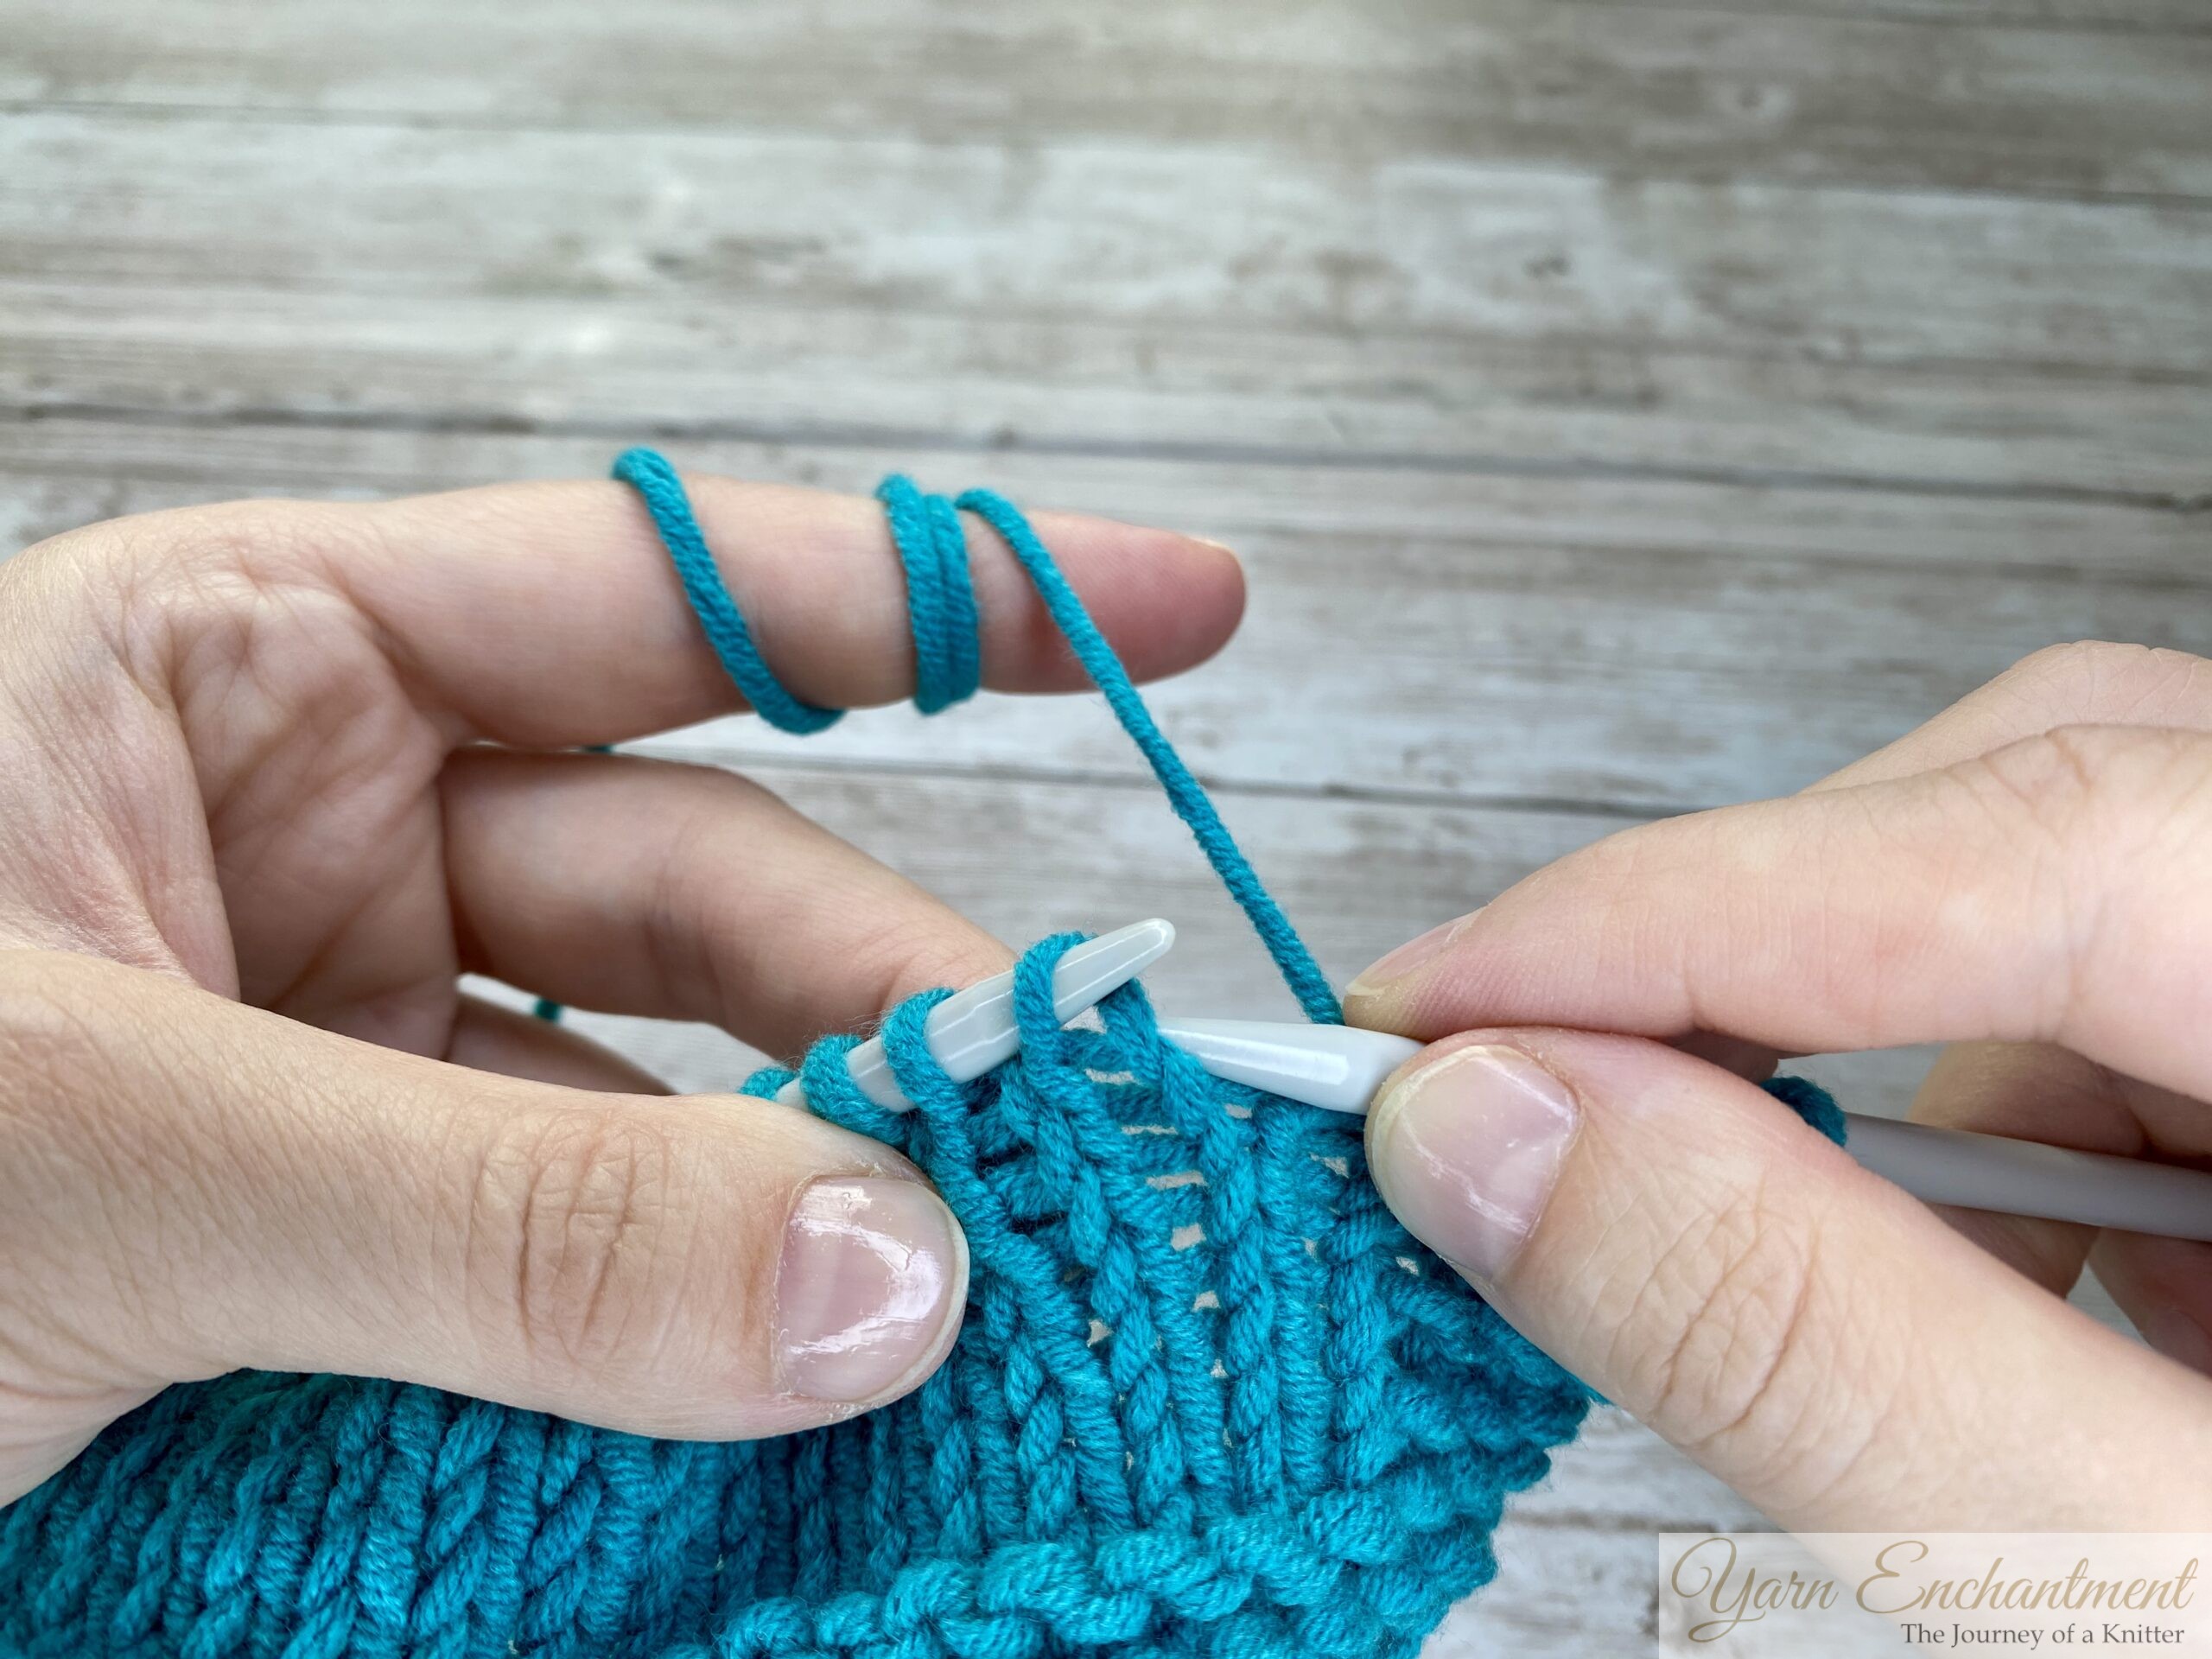
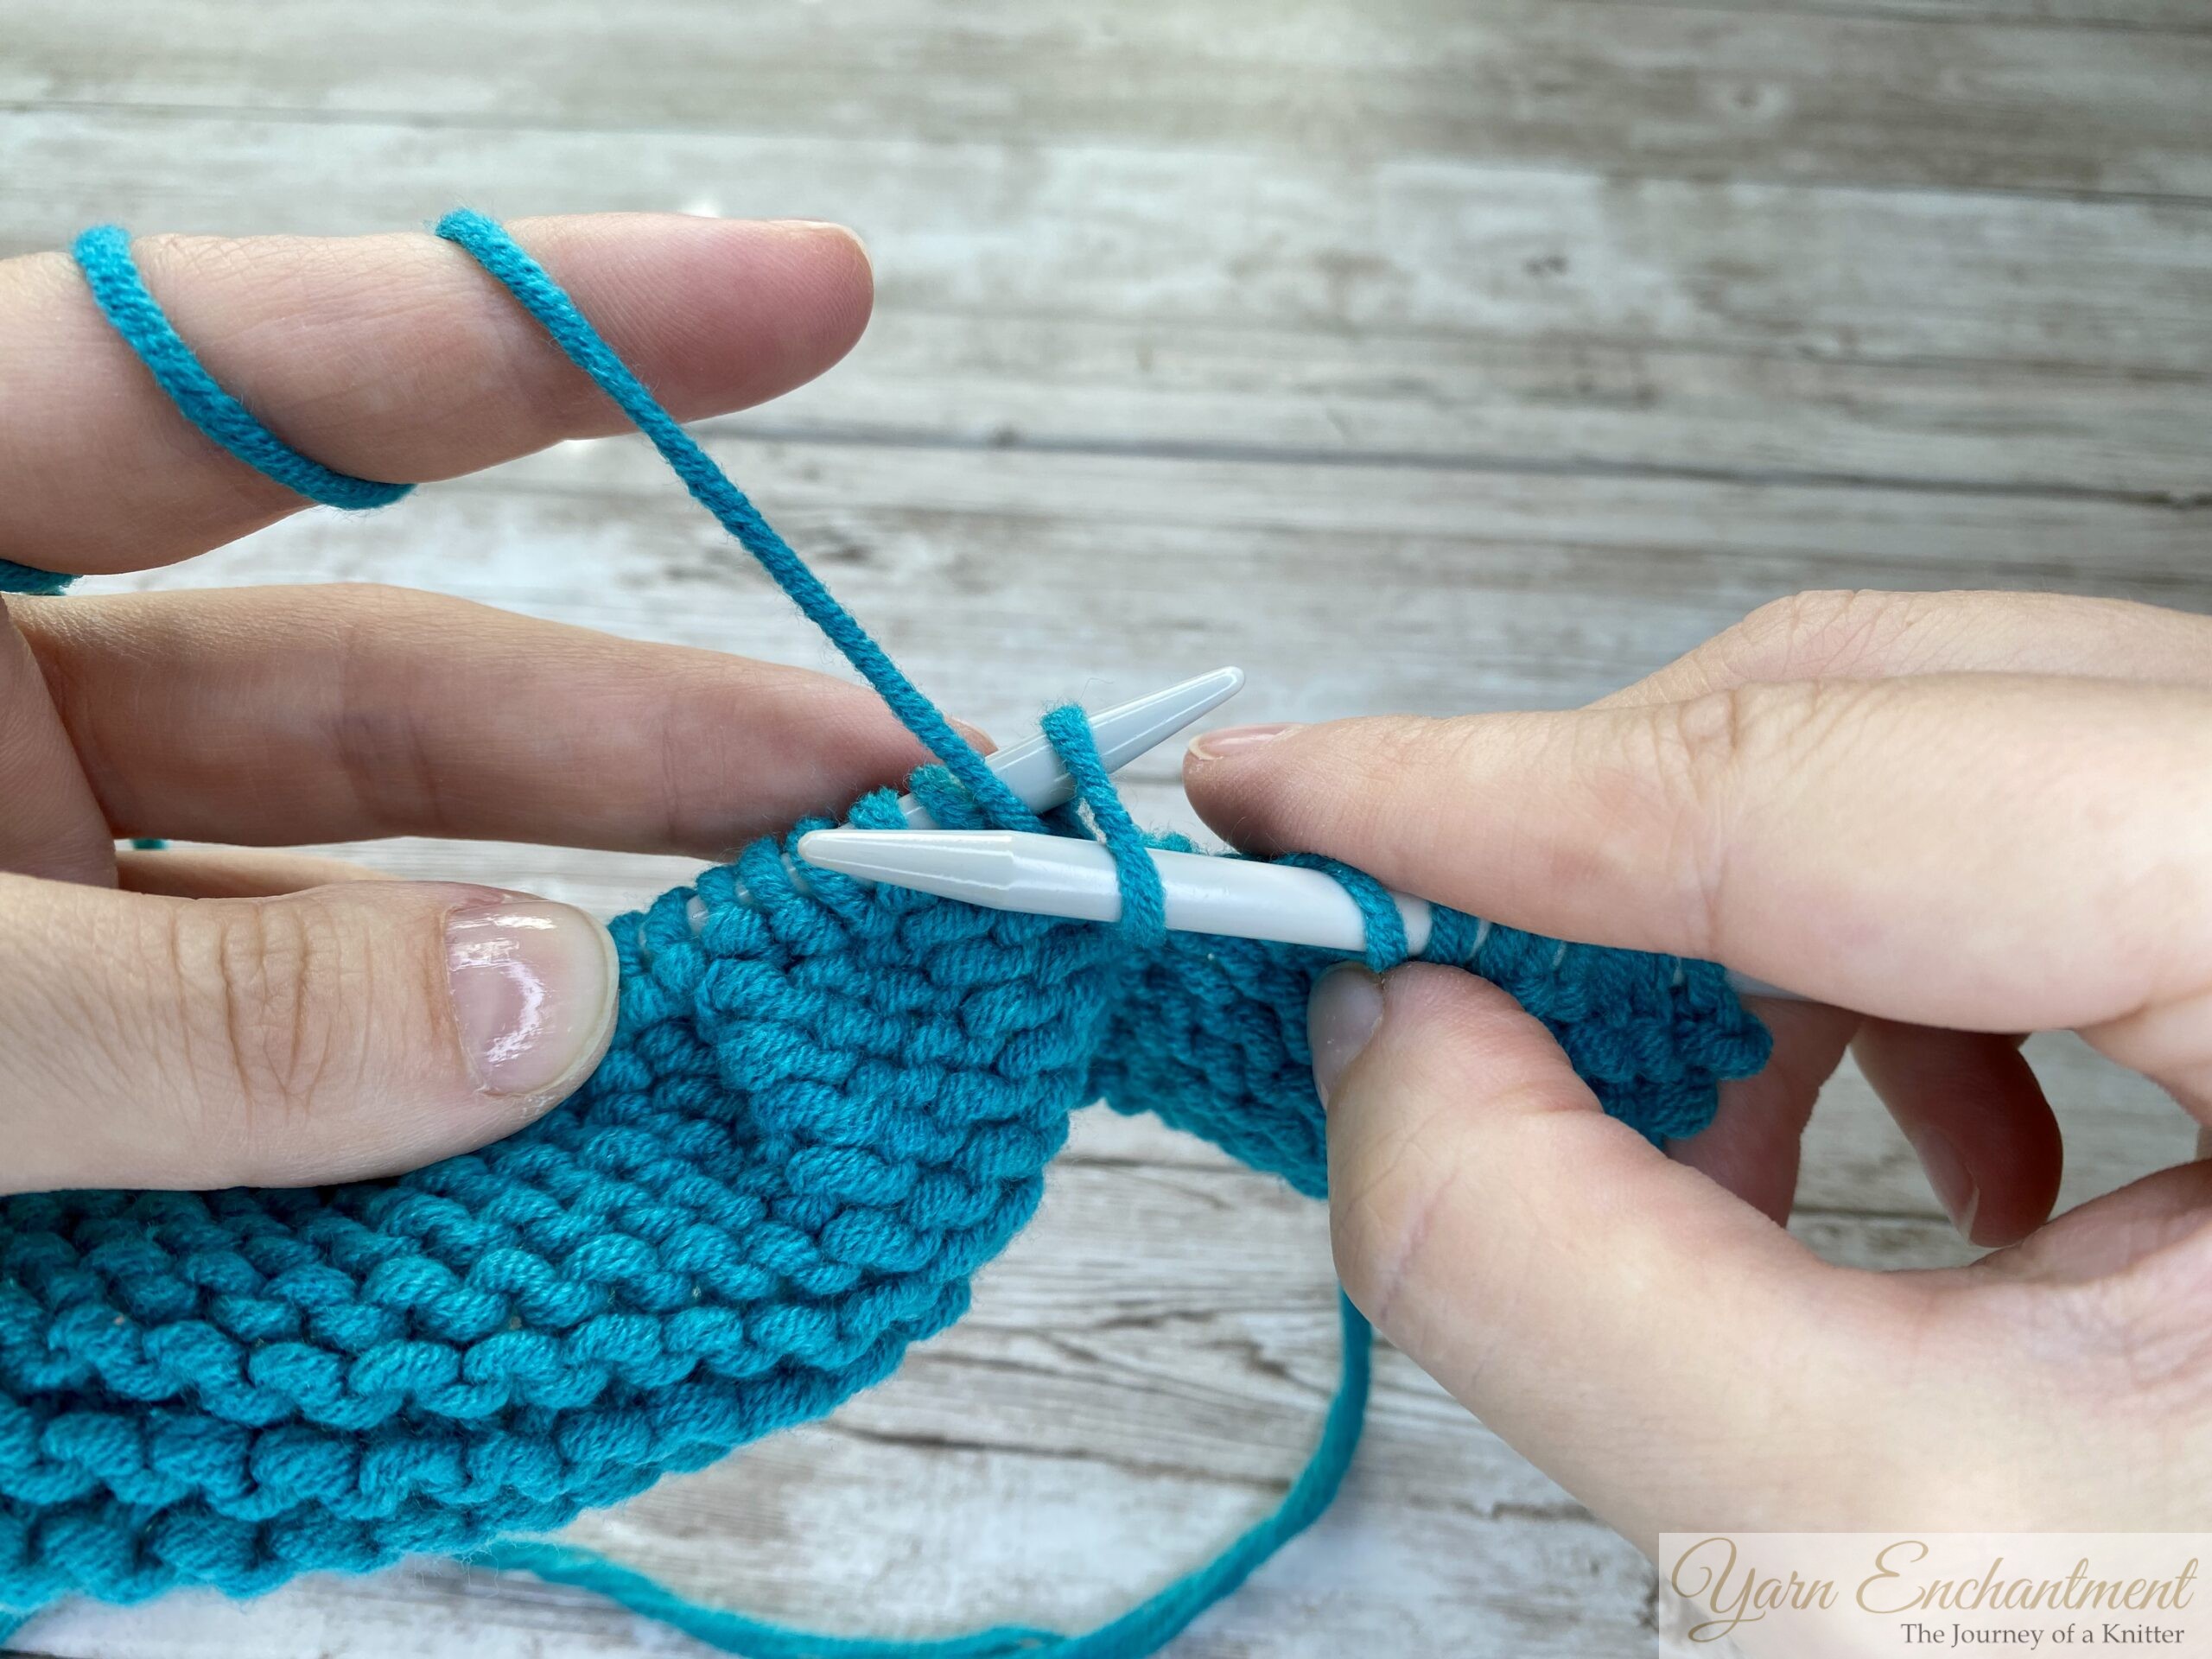
Step 2: Insert Needle and Wrapping the Yarn Arround
- With your yarn in front of your work, take the right-hand needle and slide it into the first stitch on the left-hand needle, from back to front.
- Now, grab the working yarn and wrap it counterclockwise around the tip of the right-hand needle. The yarn should move from the front of the needle to the back, creating a yarn over.
|  | With your yarn in front of your work, take the right-hand needle and slide it into the first stitch on the left-hand needle, from back to front | Grab the working yarn and wrap it counterclockwise around the tip of the right-hand needle. The yarn should move from the front of the needle to the back, creating a yarn over. |

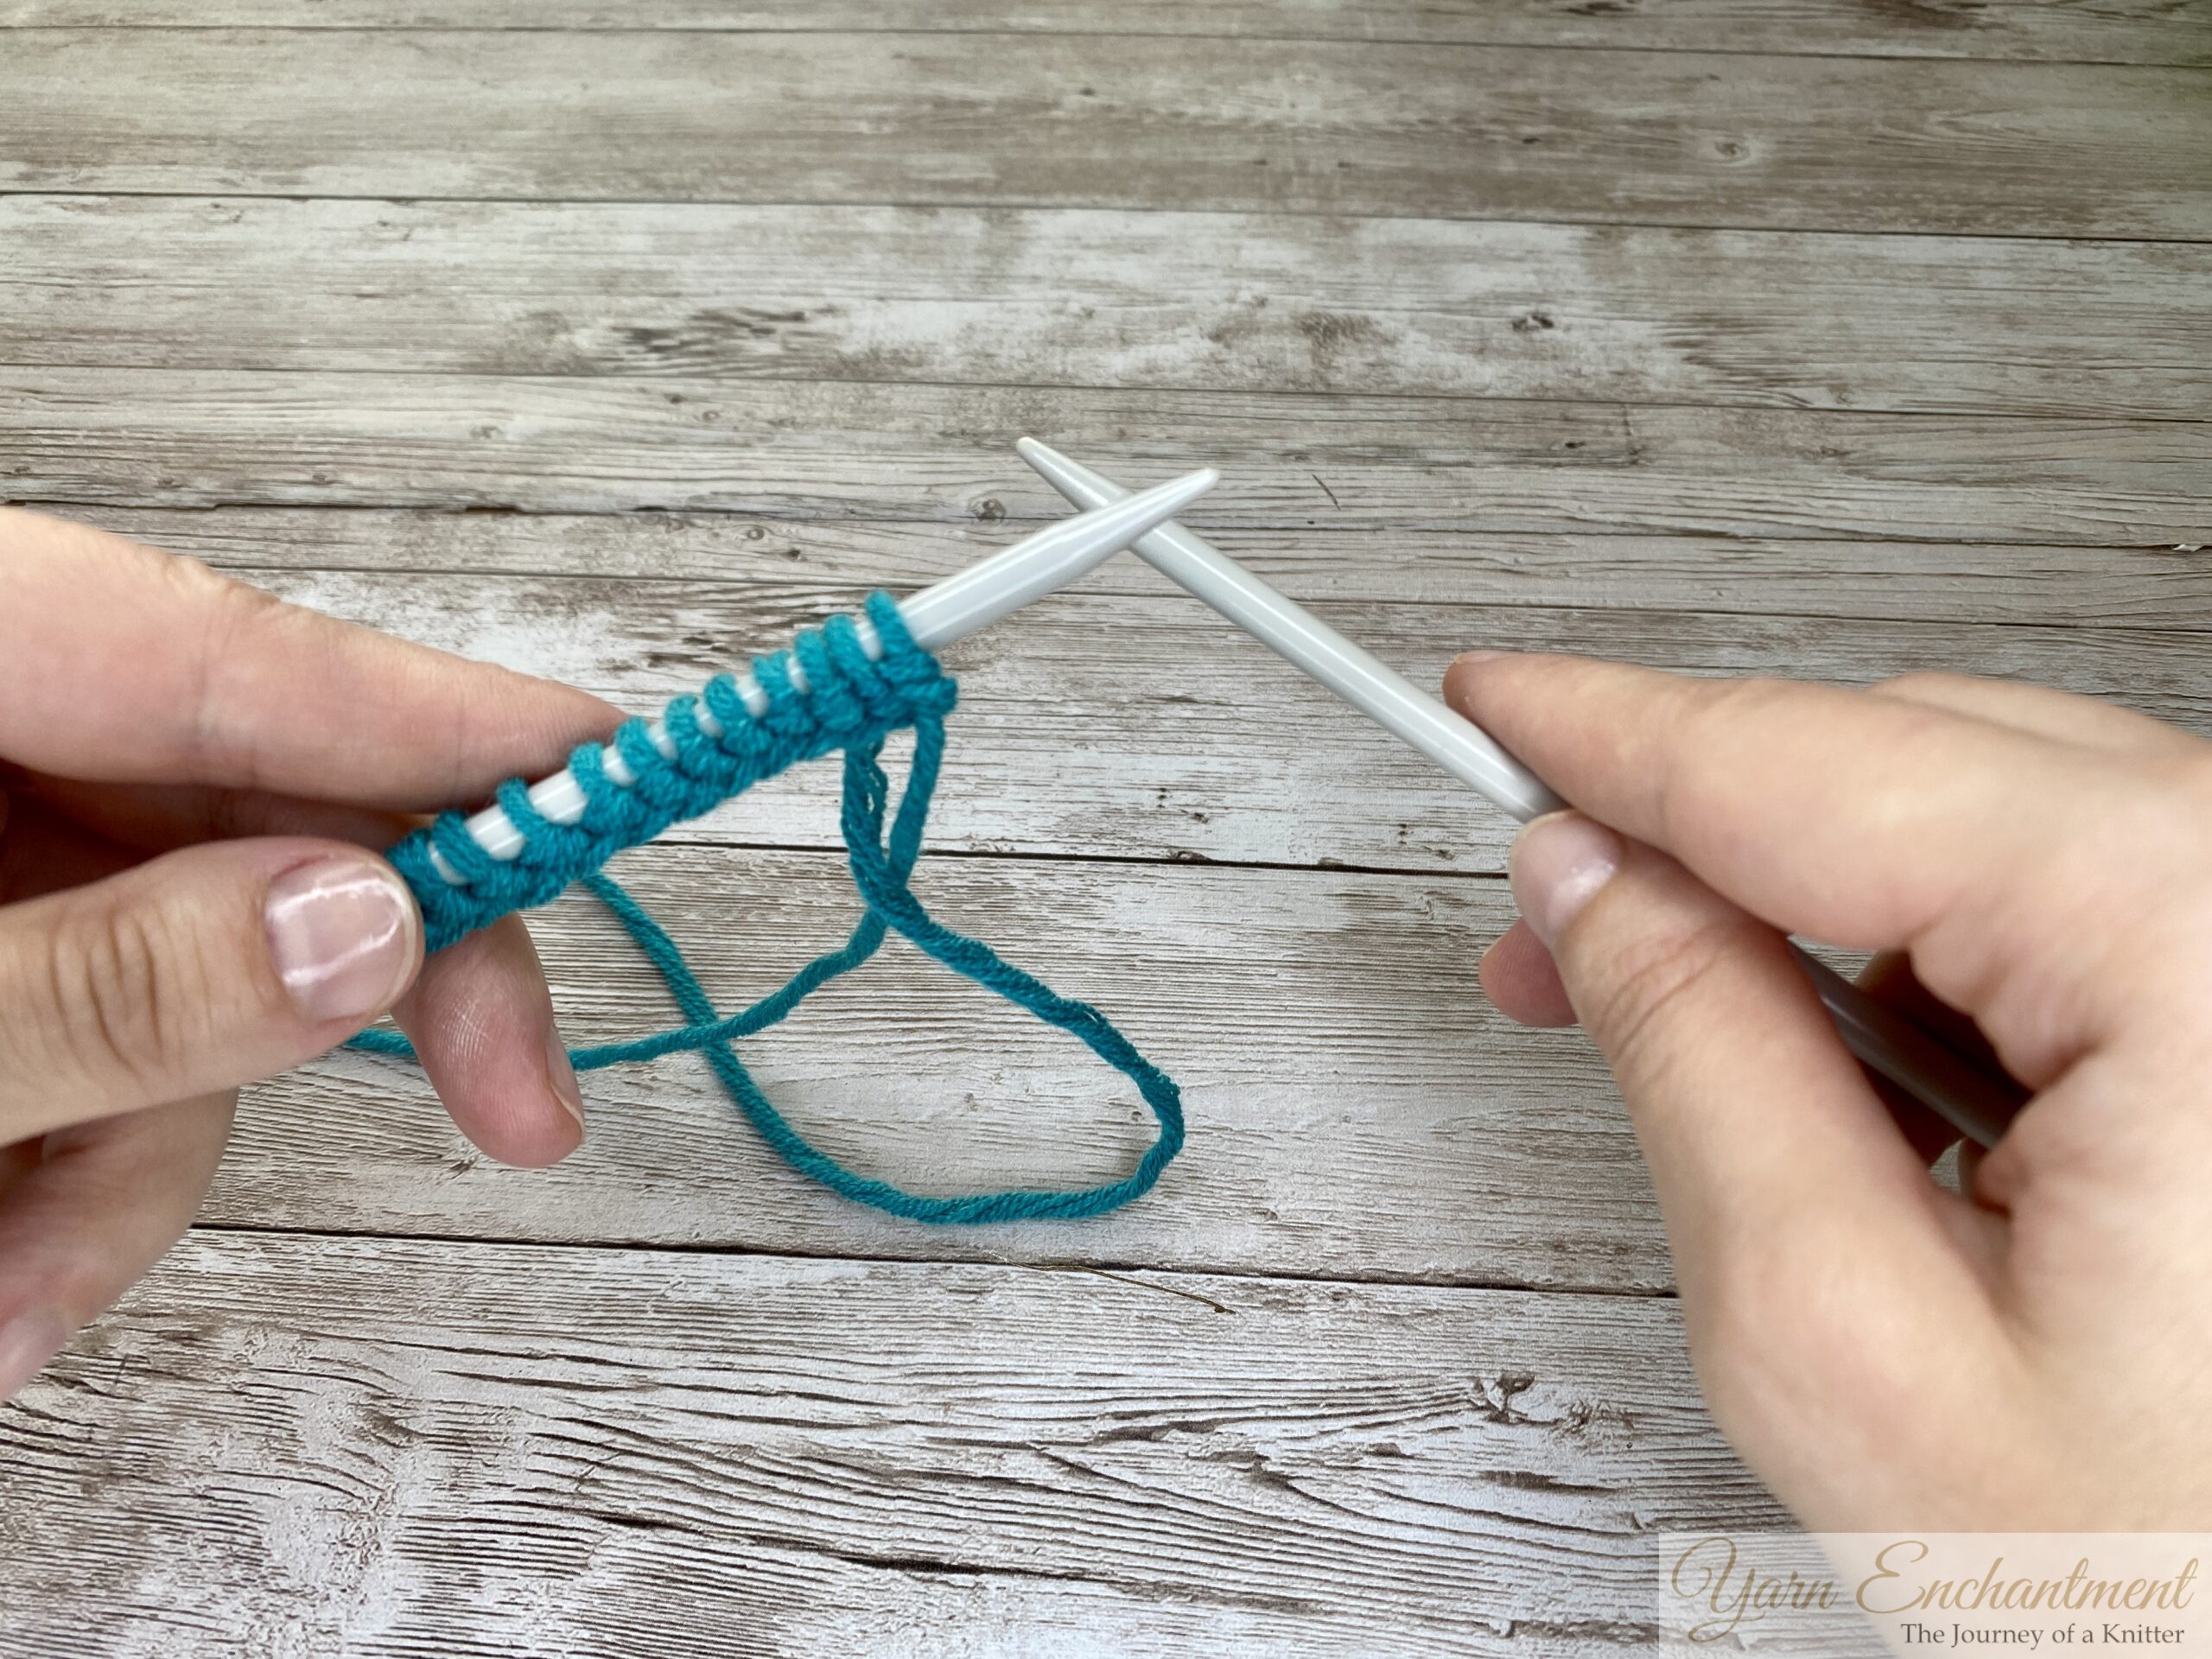
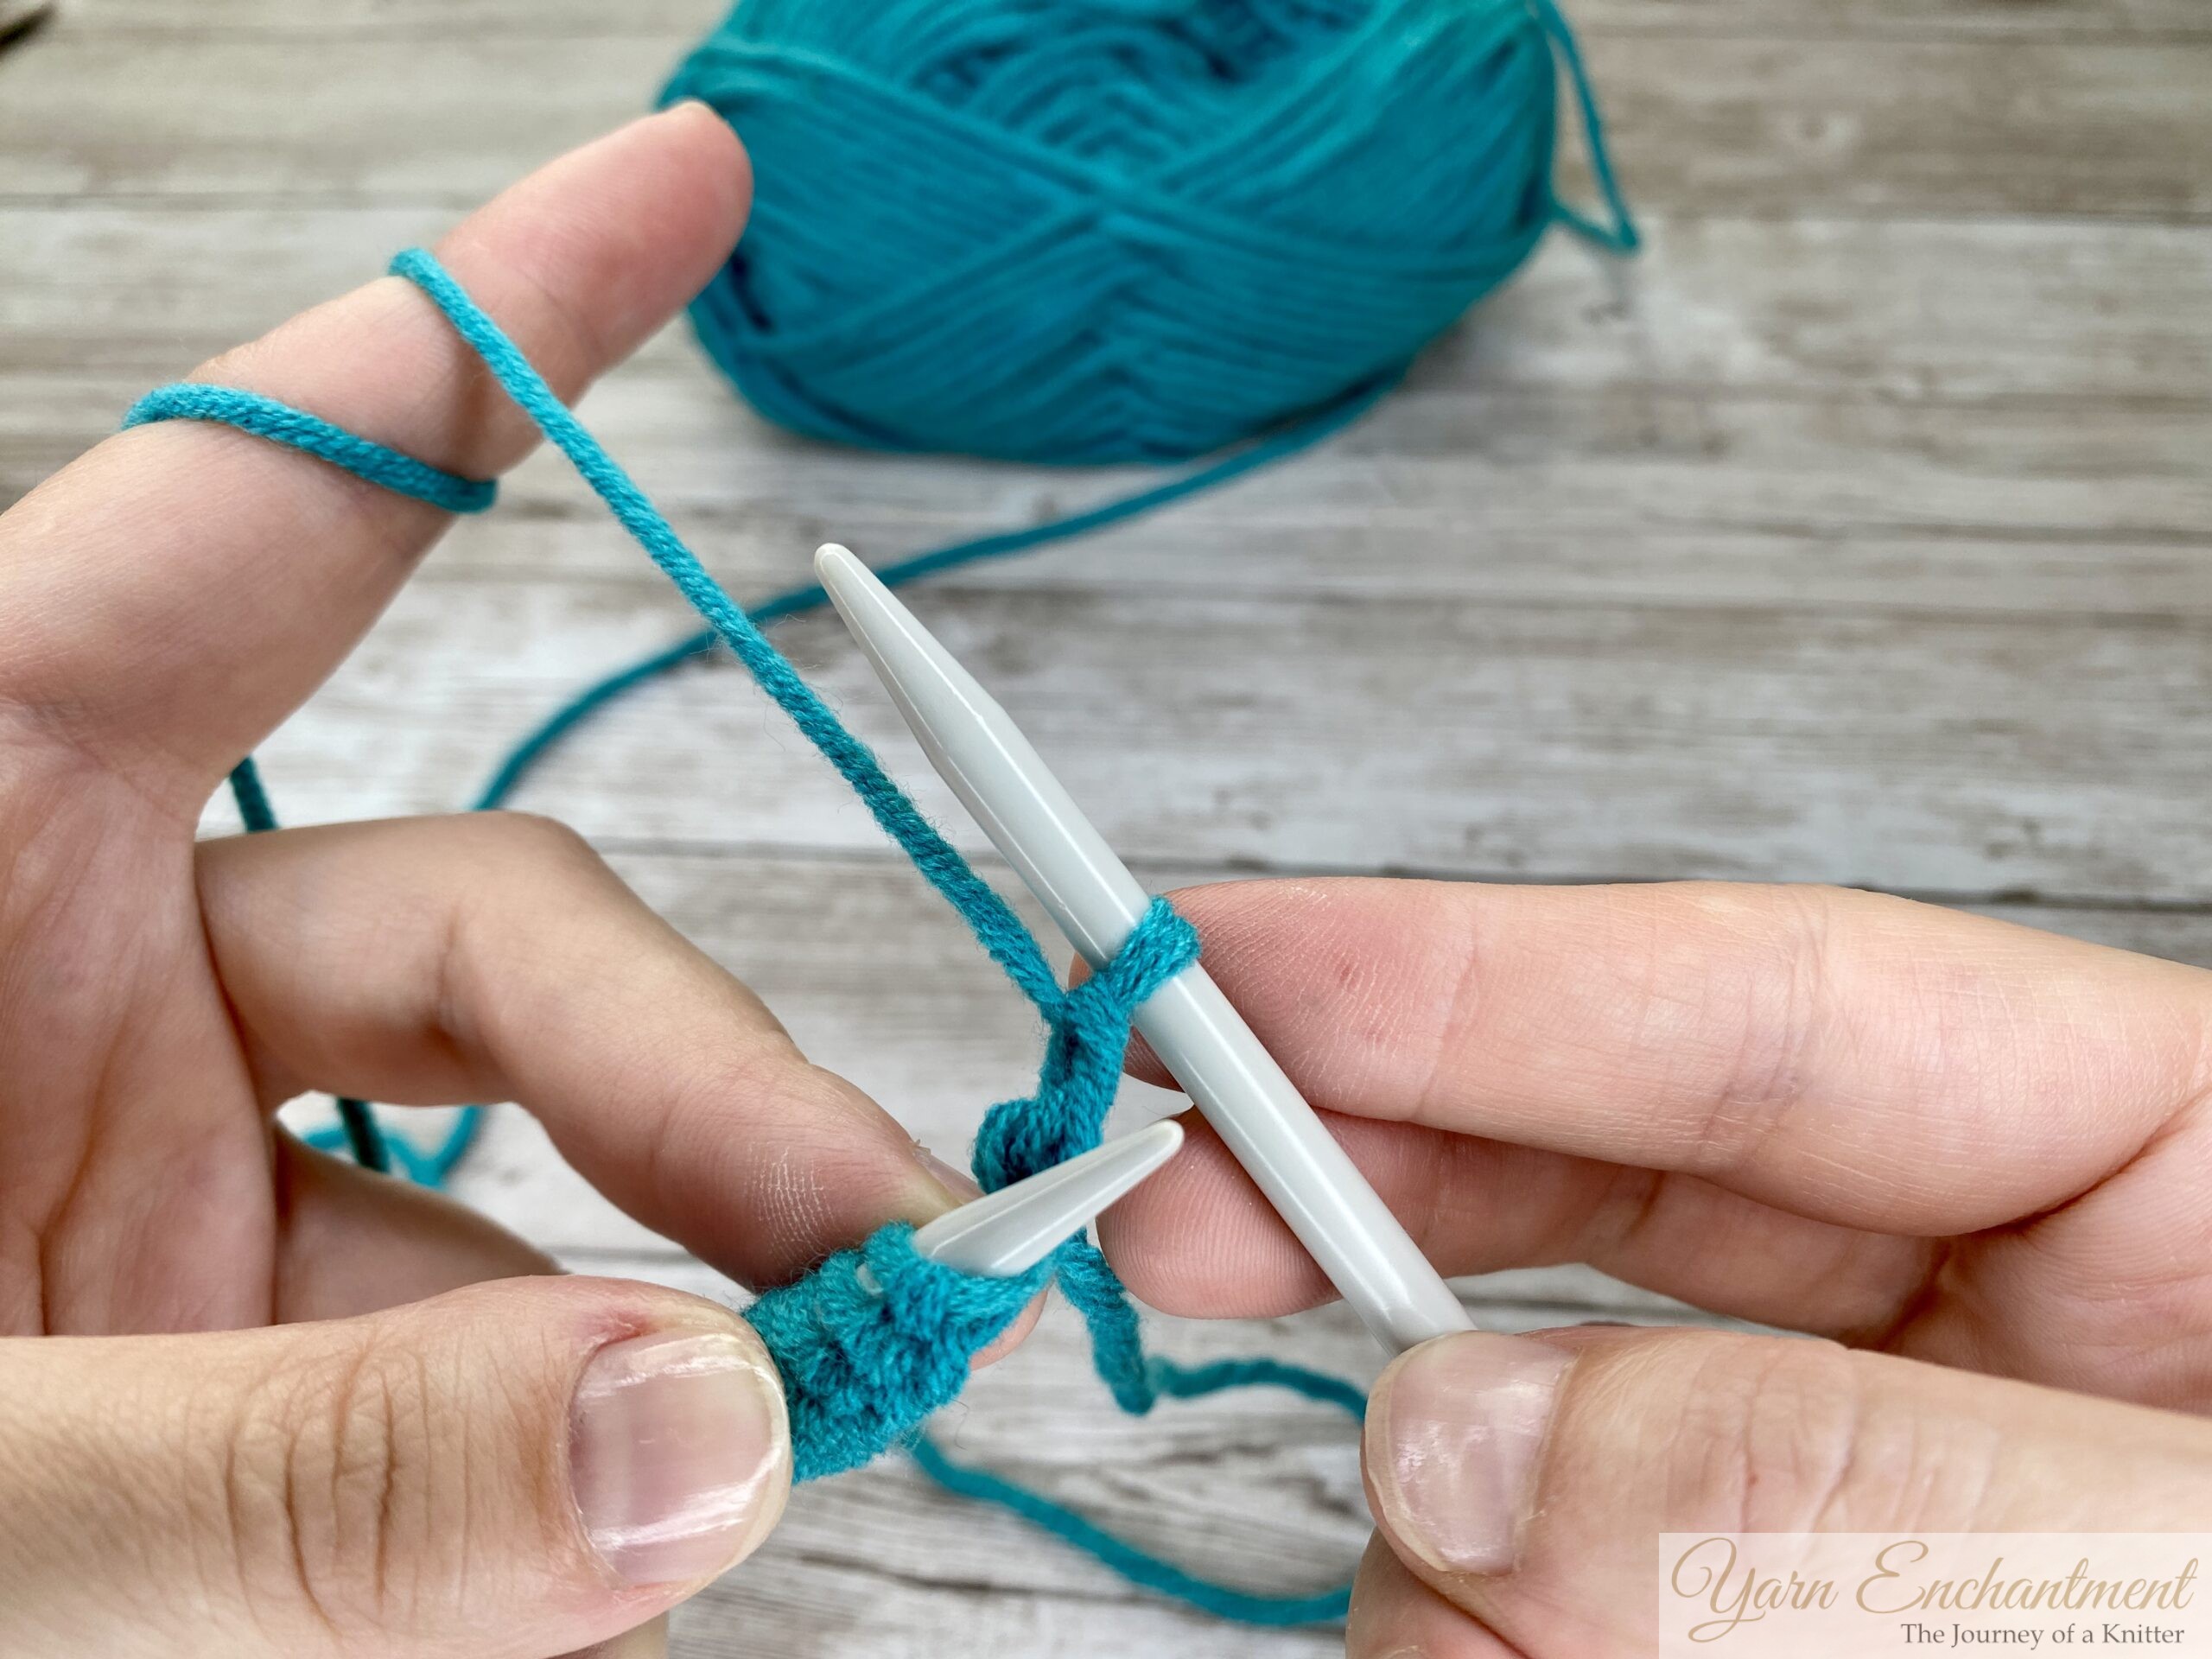
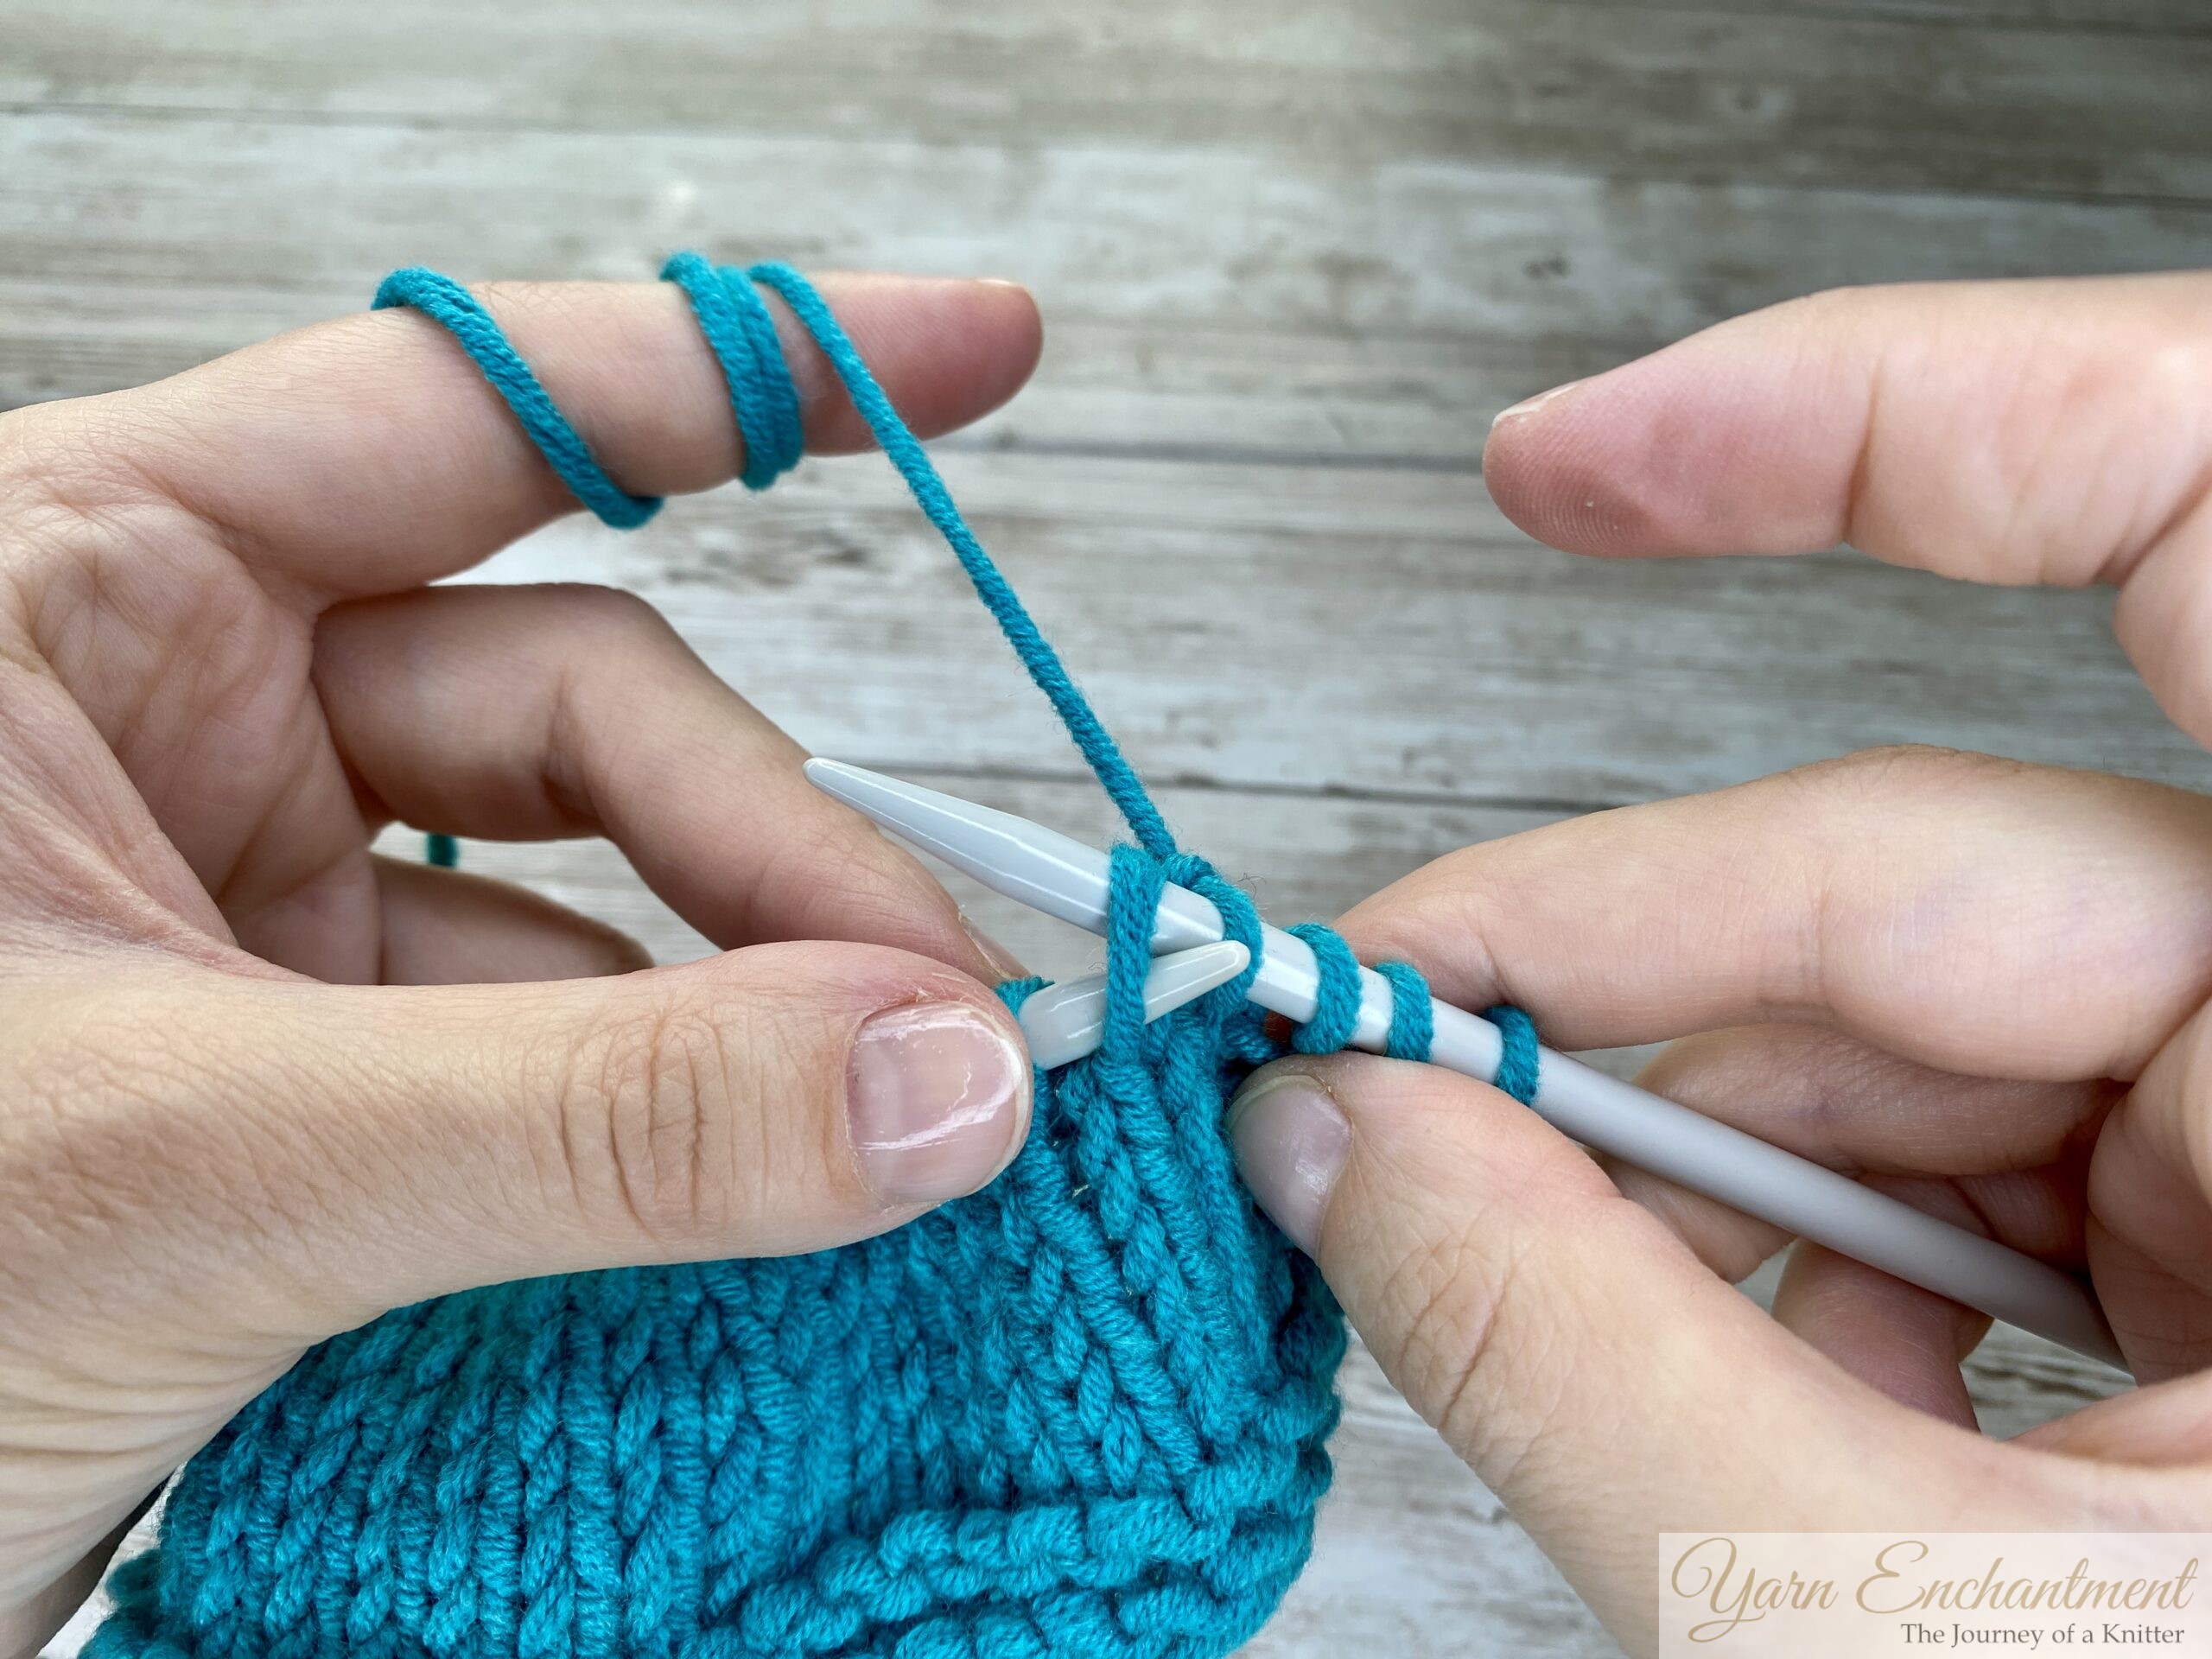
Step 3: Draw Loop Through and Slip Off
- With the yarn wrapped around the right-hand needle, pull it back through the stitch on the left-hand needle. This creates a new loop on your right-hand needle. You’re basically pulling the yarn through to form your purl stitch!
- Once you’ve pulled the new loop through, carefully slide the old stitch off the left-hand needle. Voilà, you’ve just made your first purl stitch!
 |  |  | With the yarn wrapped around the right-hand needle, | pull it back through the stitch on the left-hand needle, and carefully slide the old stitch off the left-hand needle | You’ve just made your first purl stitch |


Step 4: Repeat
Now, keep going! Repeat these steps for each stitch across the row until you reach the end. Remember, practice makes perfect, so don’t worry if it feels a little awkward at first.
💡 To help you remember, here’s the purl stitch sequence in a nutshell:
Tip: Memorize the Sequence
Yarn in front → Insert needle → Wrap yarn → Pull through → Slip off.
Extra Tip: Mastering the First Purl Stitch
When I first started knitting, I personally found the first purl stitch of a row a bit tricky, it was something I had to work through. Over time, I picked up a tricks to make it easier, and I’d be happy to share it with you if you ever face a similar challenge!
Here’s how to approach the first stitch step-by-step:
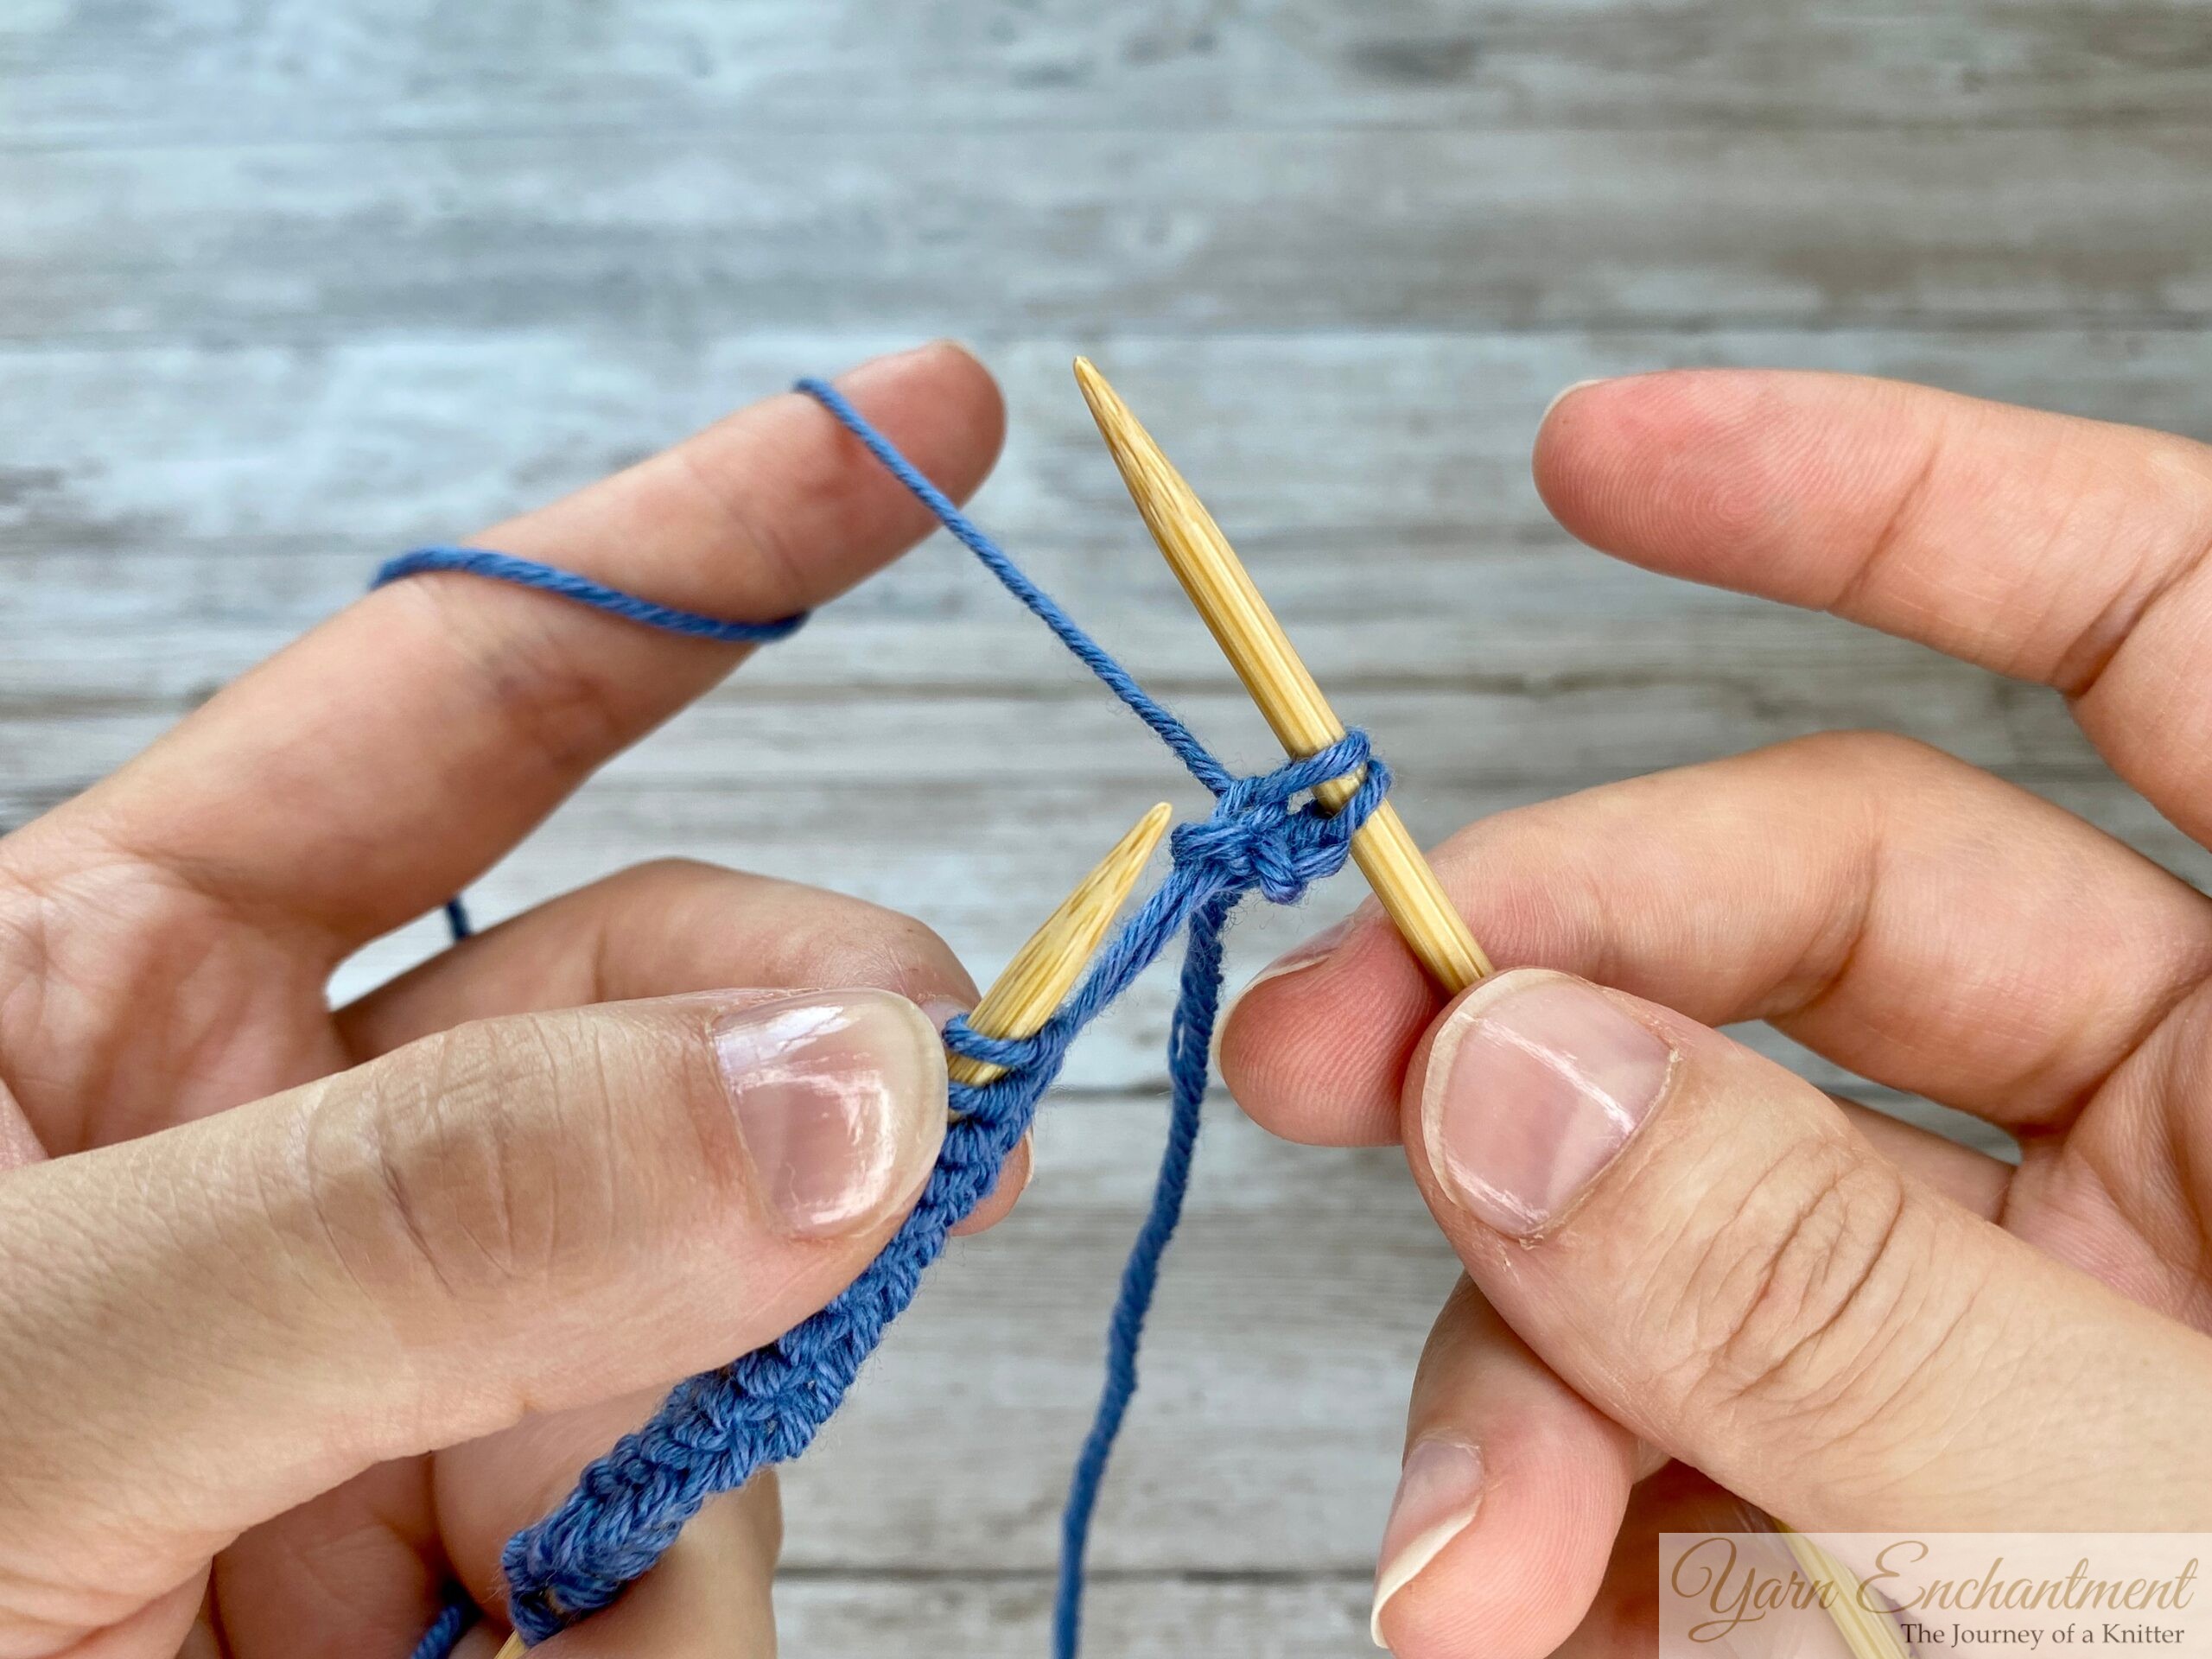
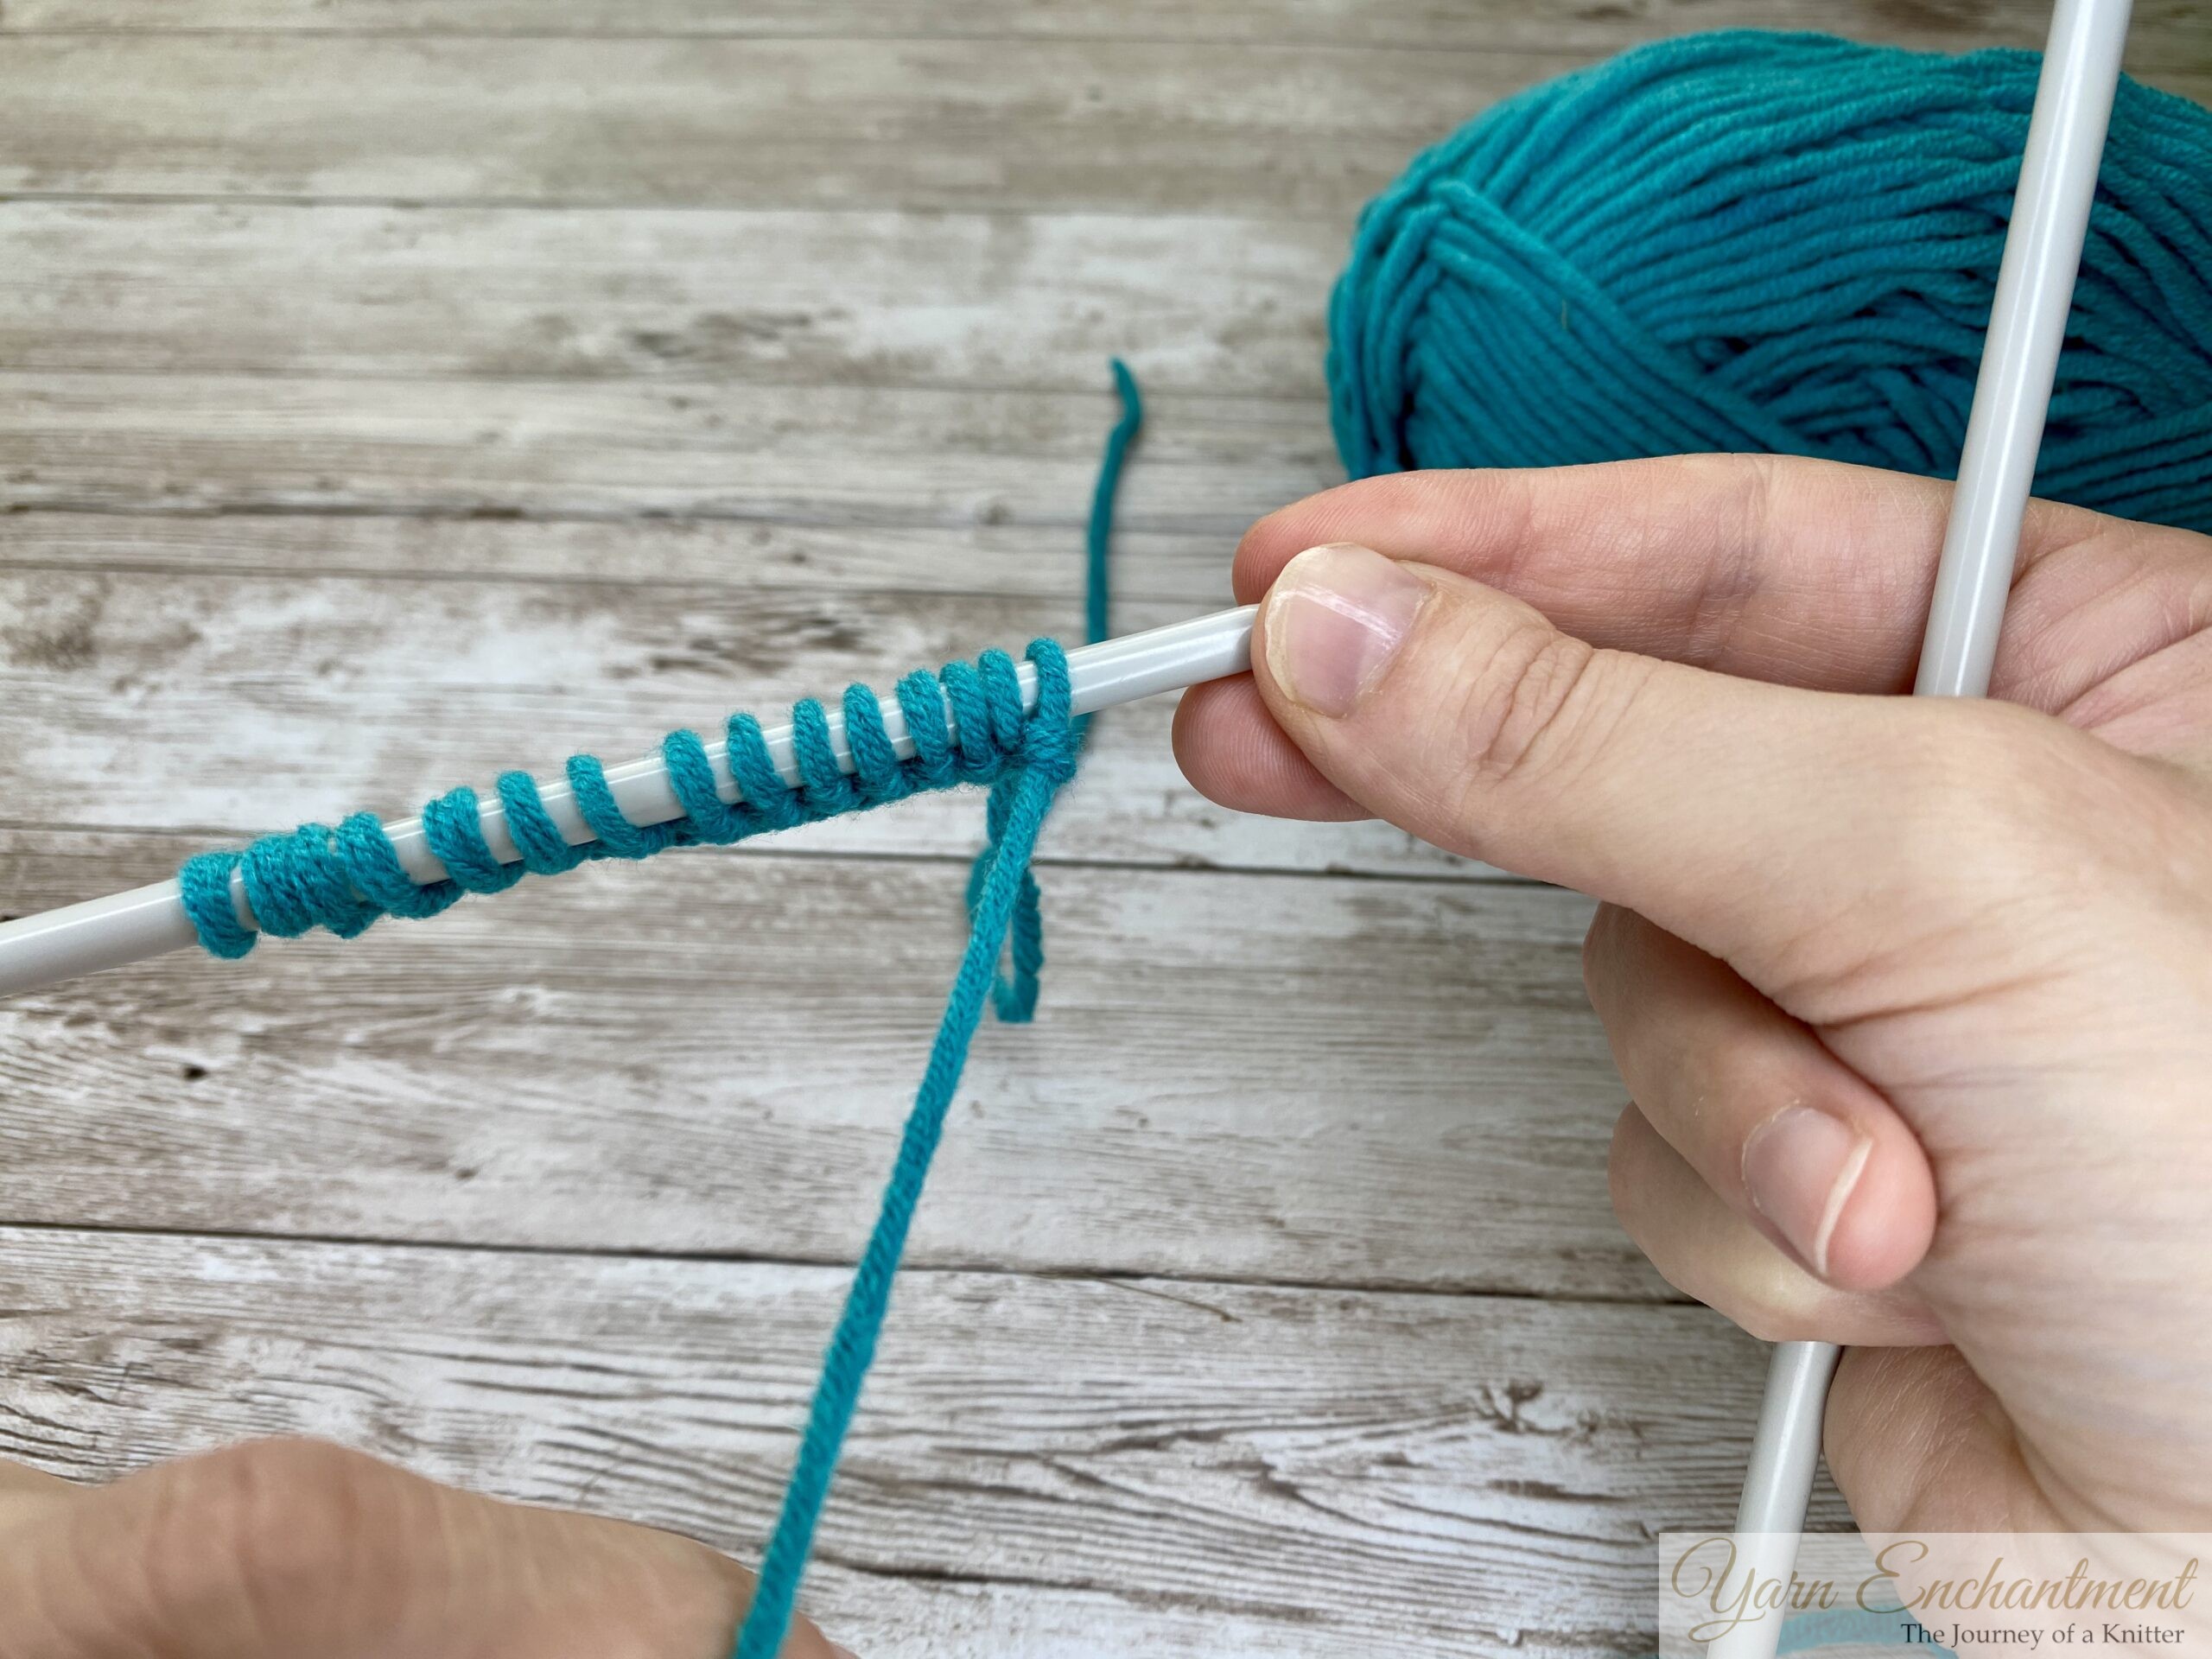
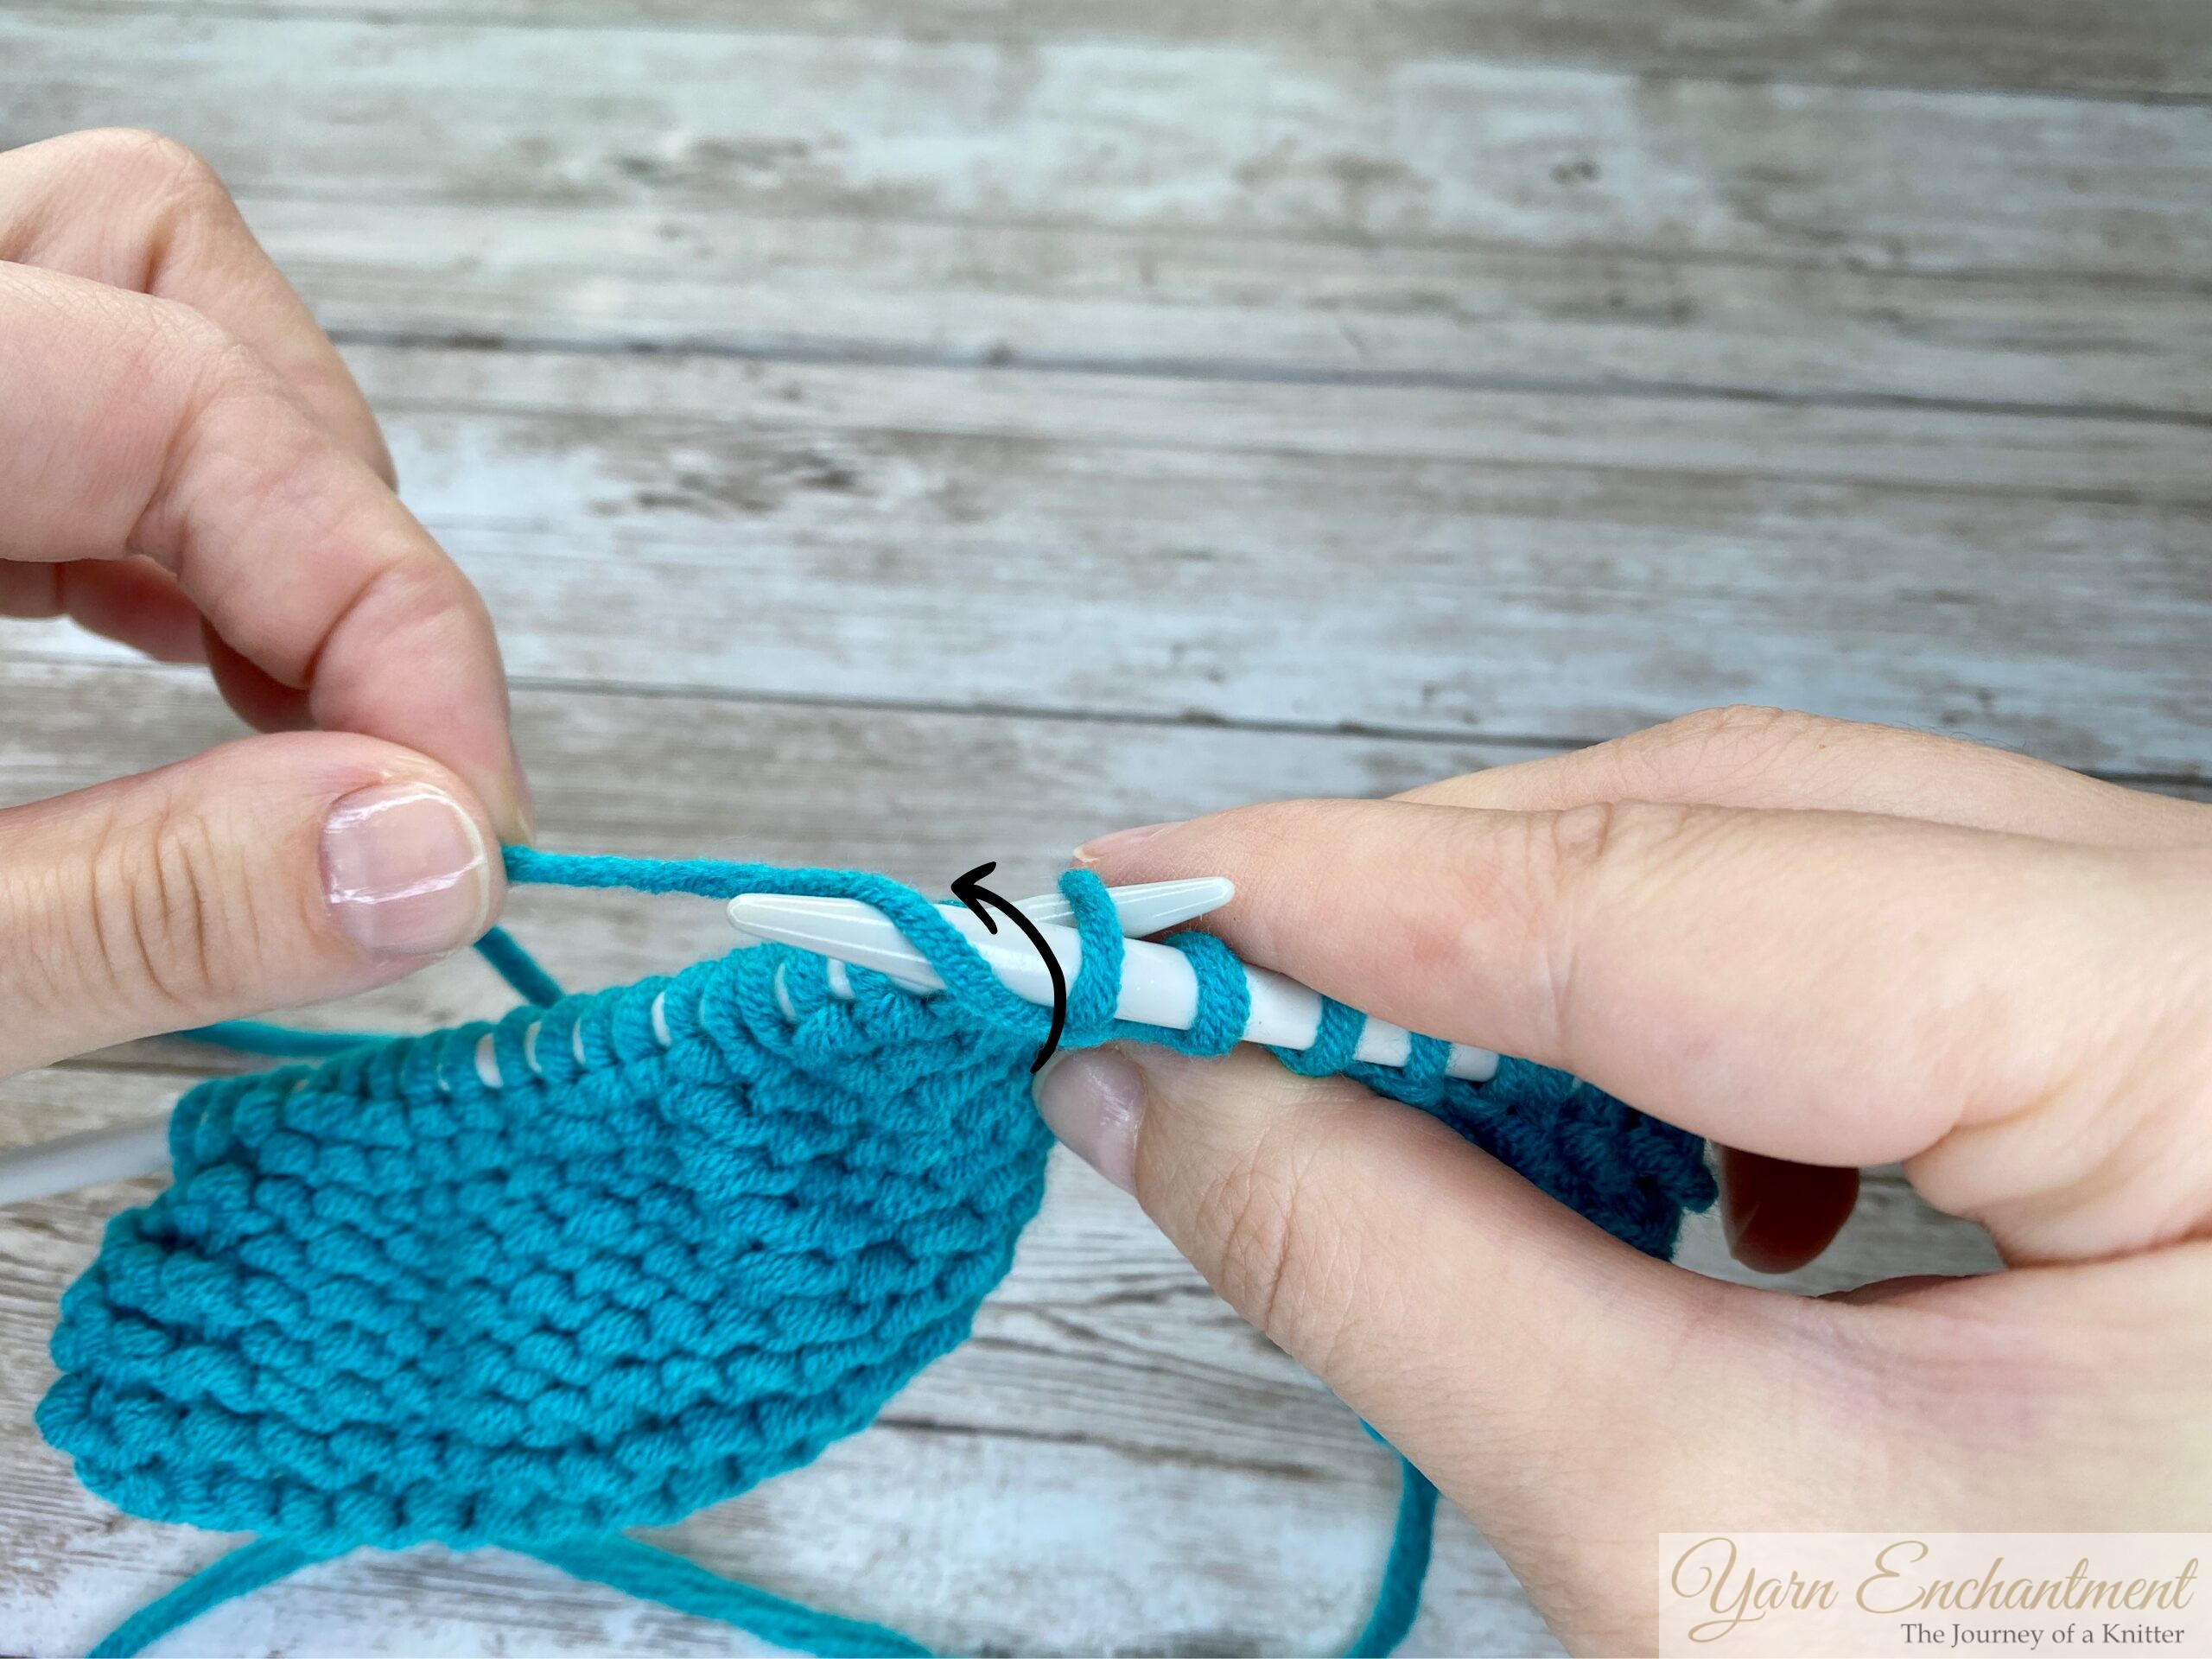
Step 1: Position Your Yarn and Needle:
- Bring your working yarn with your right needle to the front of your work. Secure the working yarn on your needle with your thumb for stability.
 | 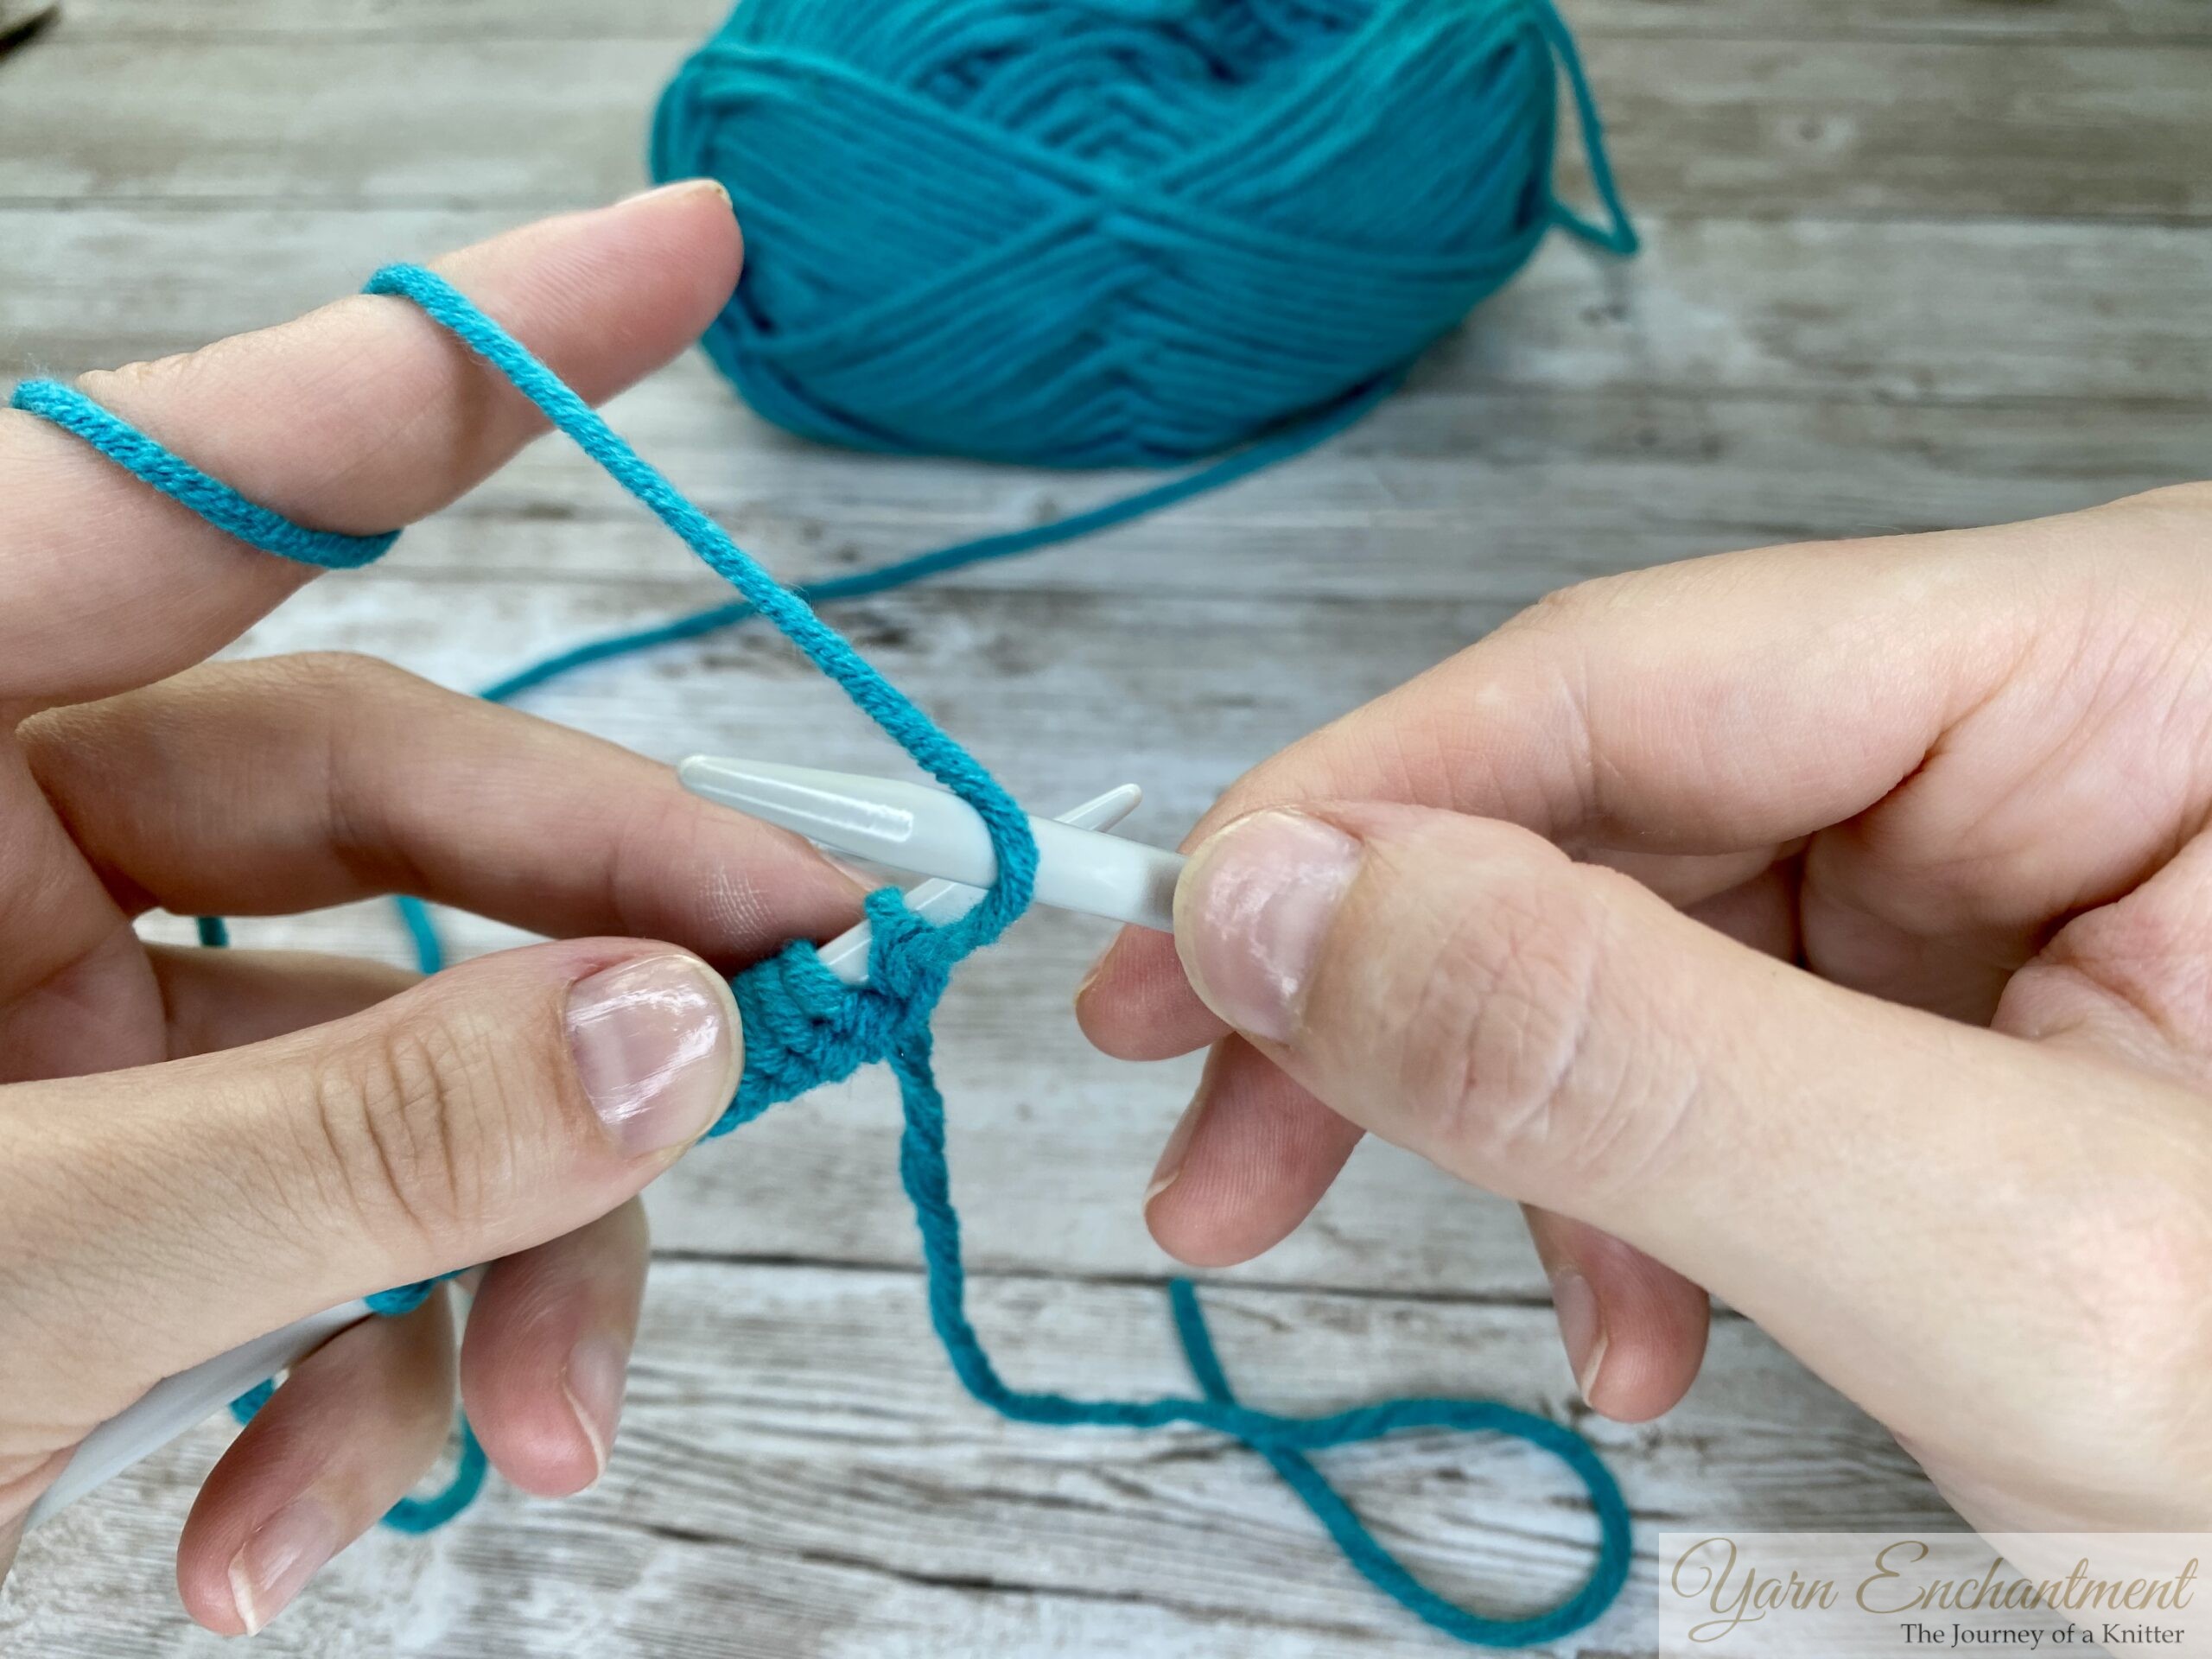 |  | Position your right needle behind your working yarn. | and bring your working yarn with your right needle to the front of your work | Secure the working yarn on your needle with your thumb for stability. |


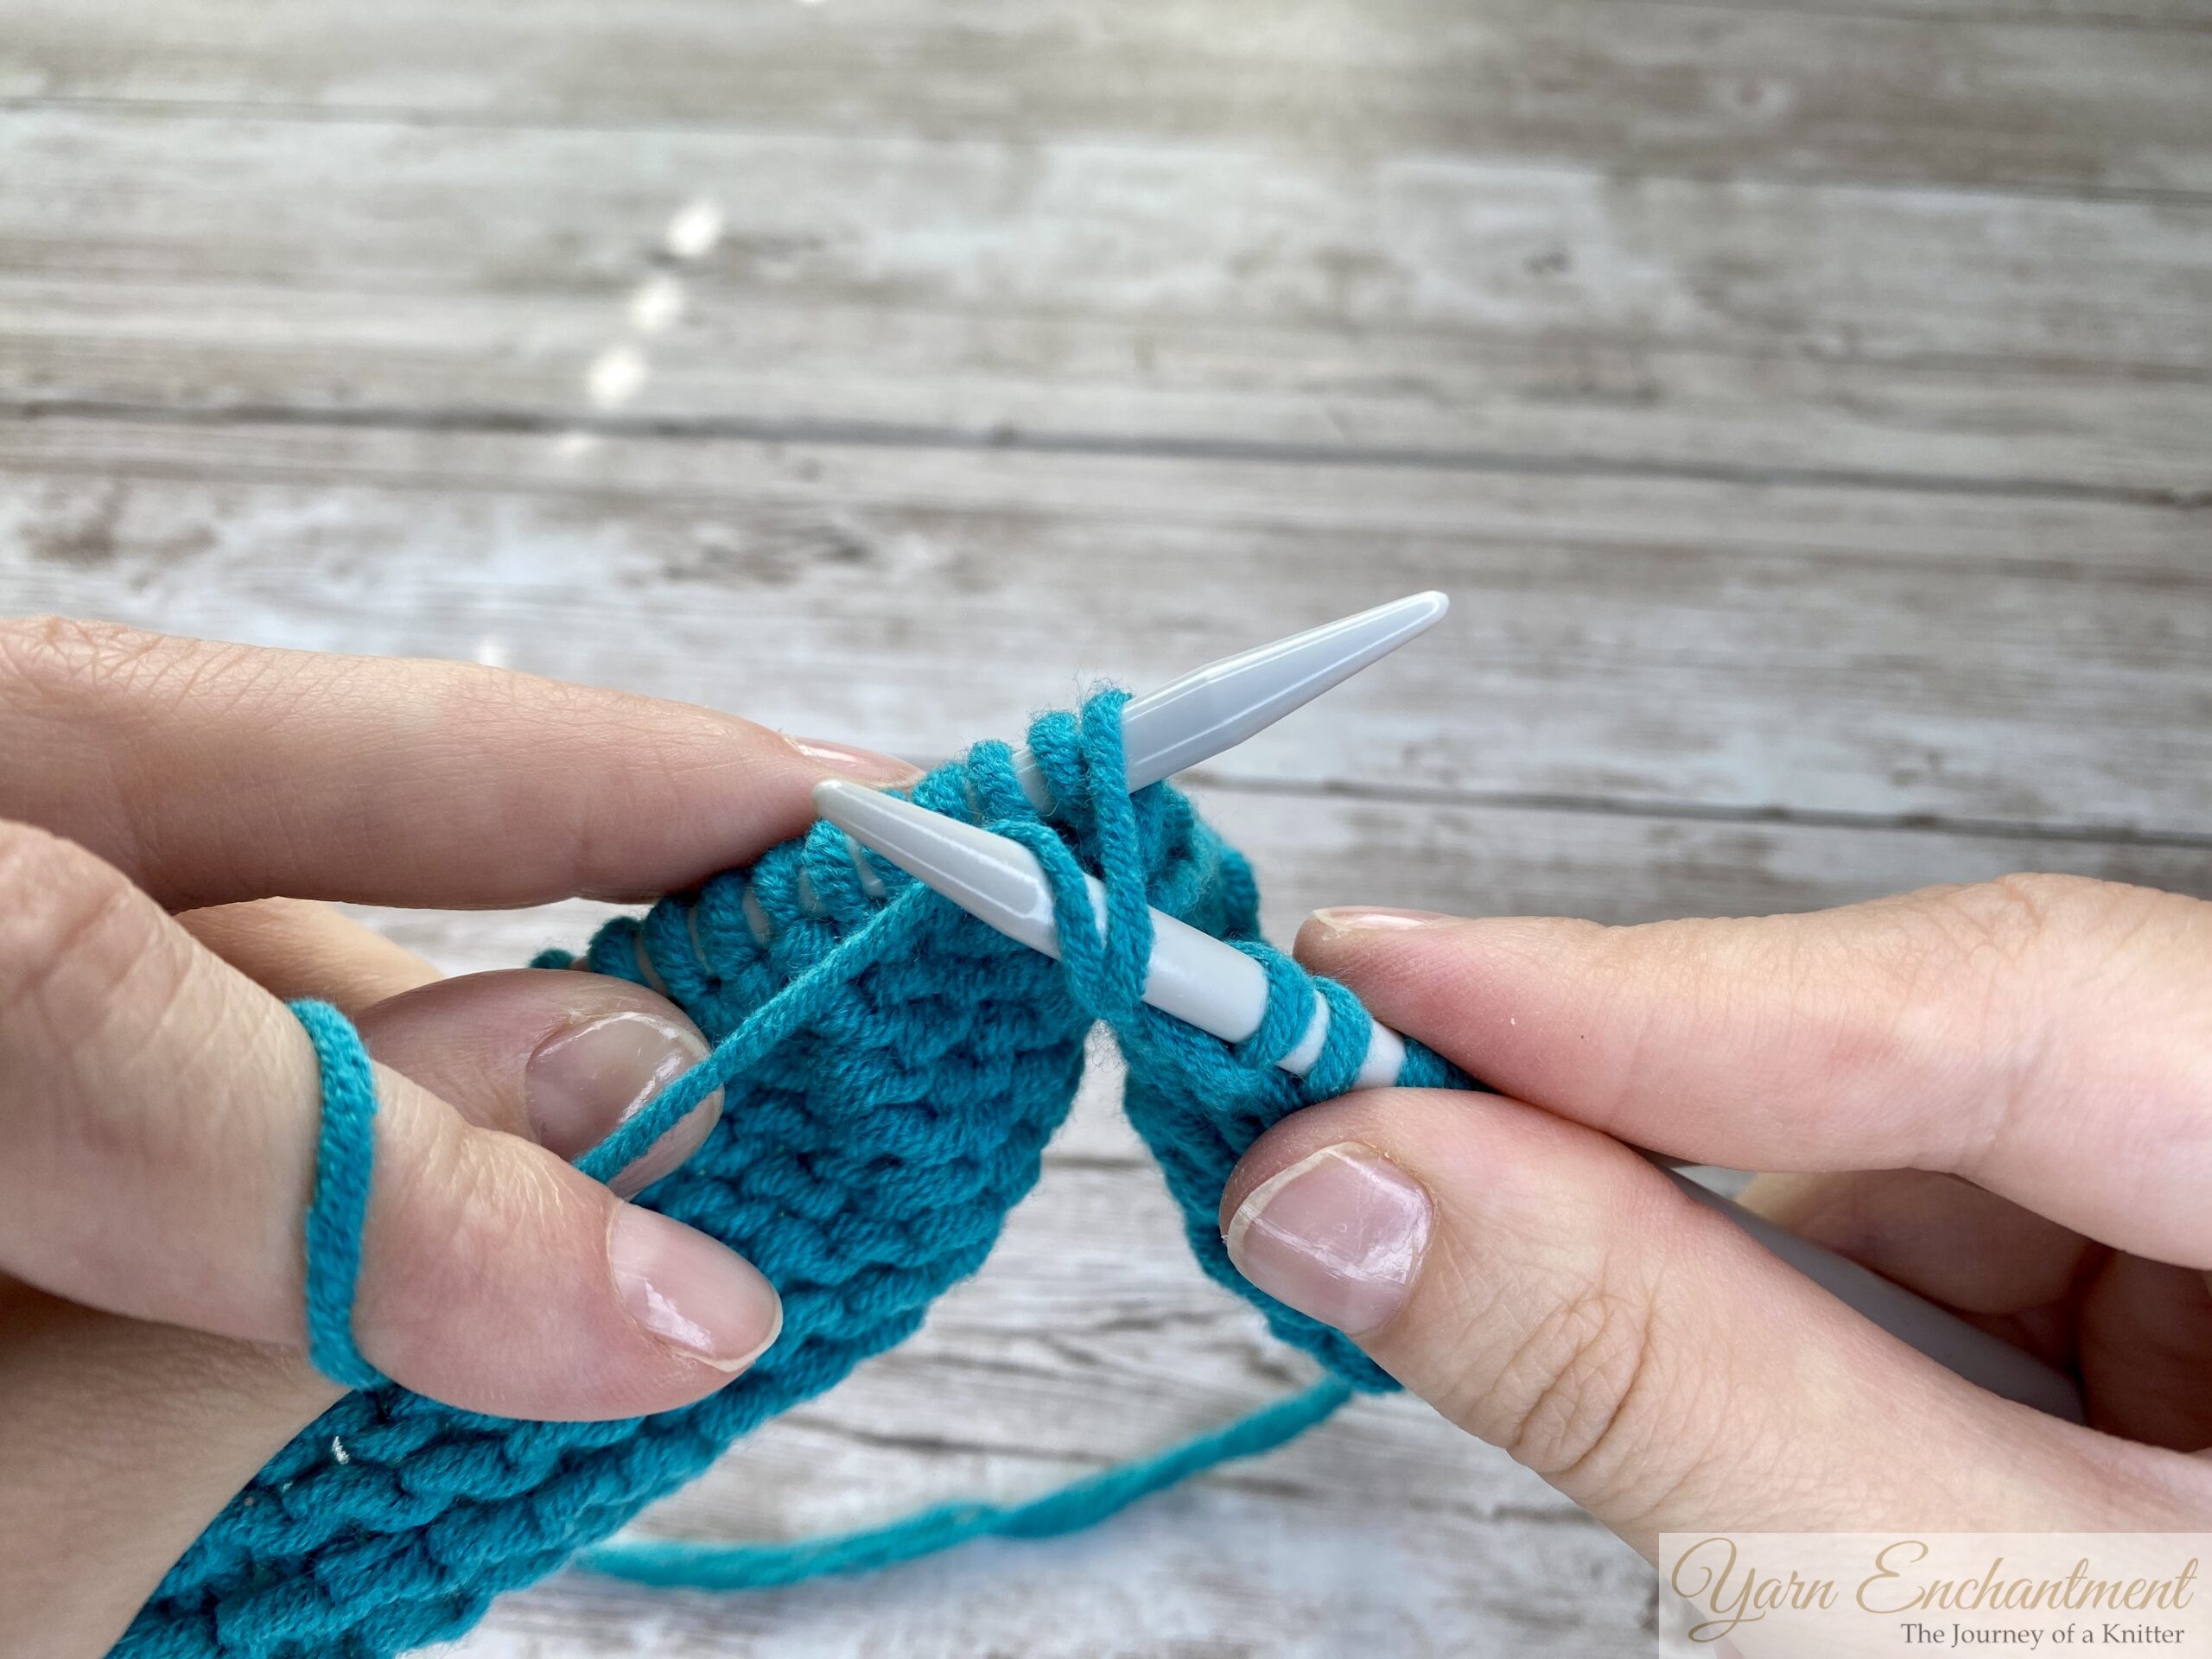
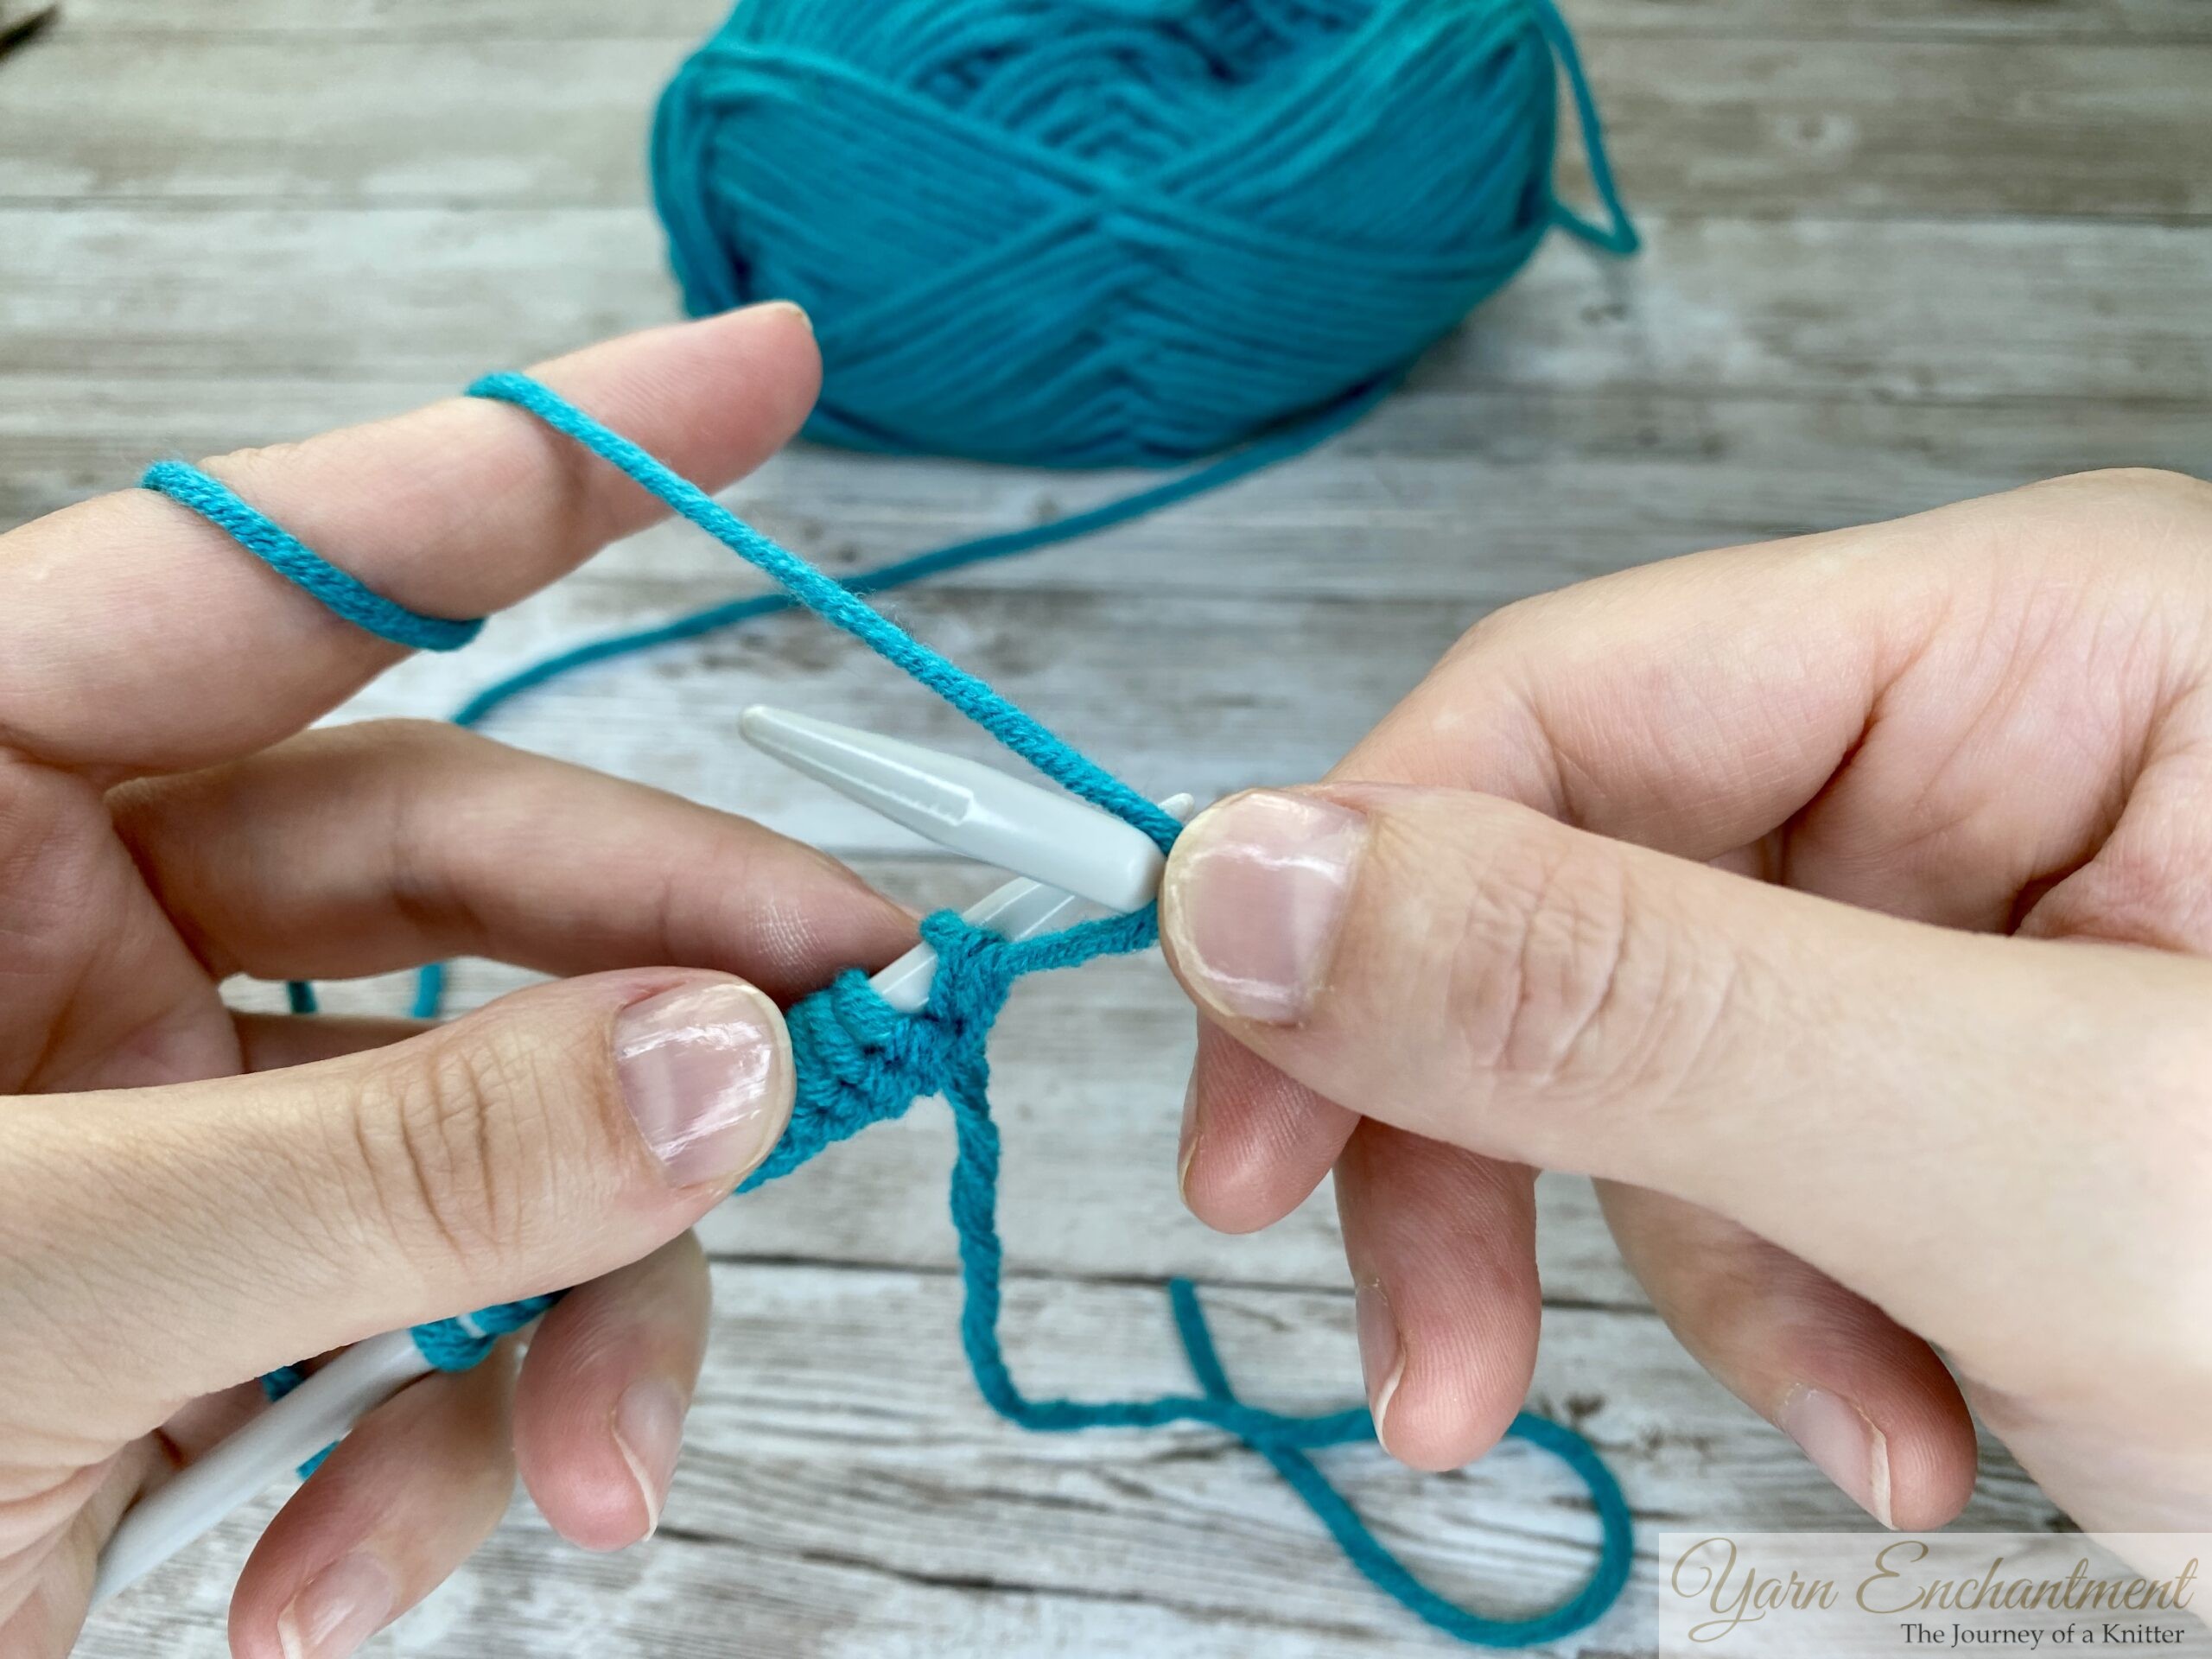
Step 2 Insert the Needle and Wrap the Yarn
- Insert the right needle from back to front (purlwise) into the first stitch.
- Wrap the yarn counterclockwise around the needle.
 |  | Insert the right needle from back to front (purlwise) into the first stitch. | Wrap the yarn counterclockwise around the needle. |


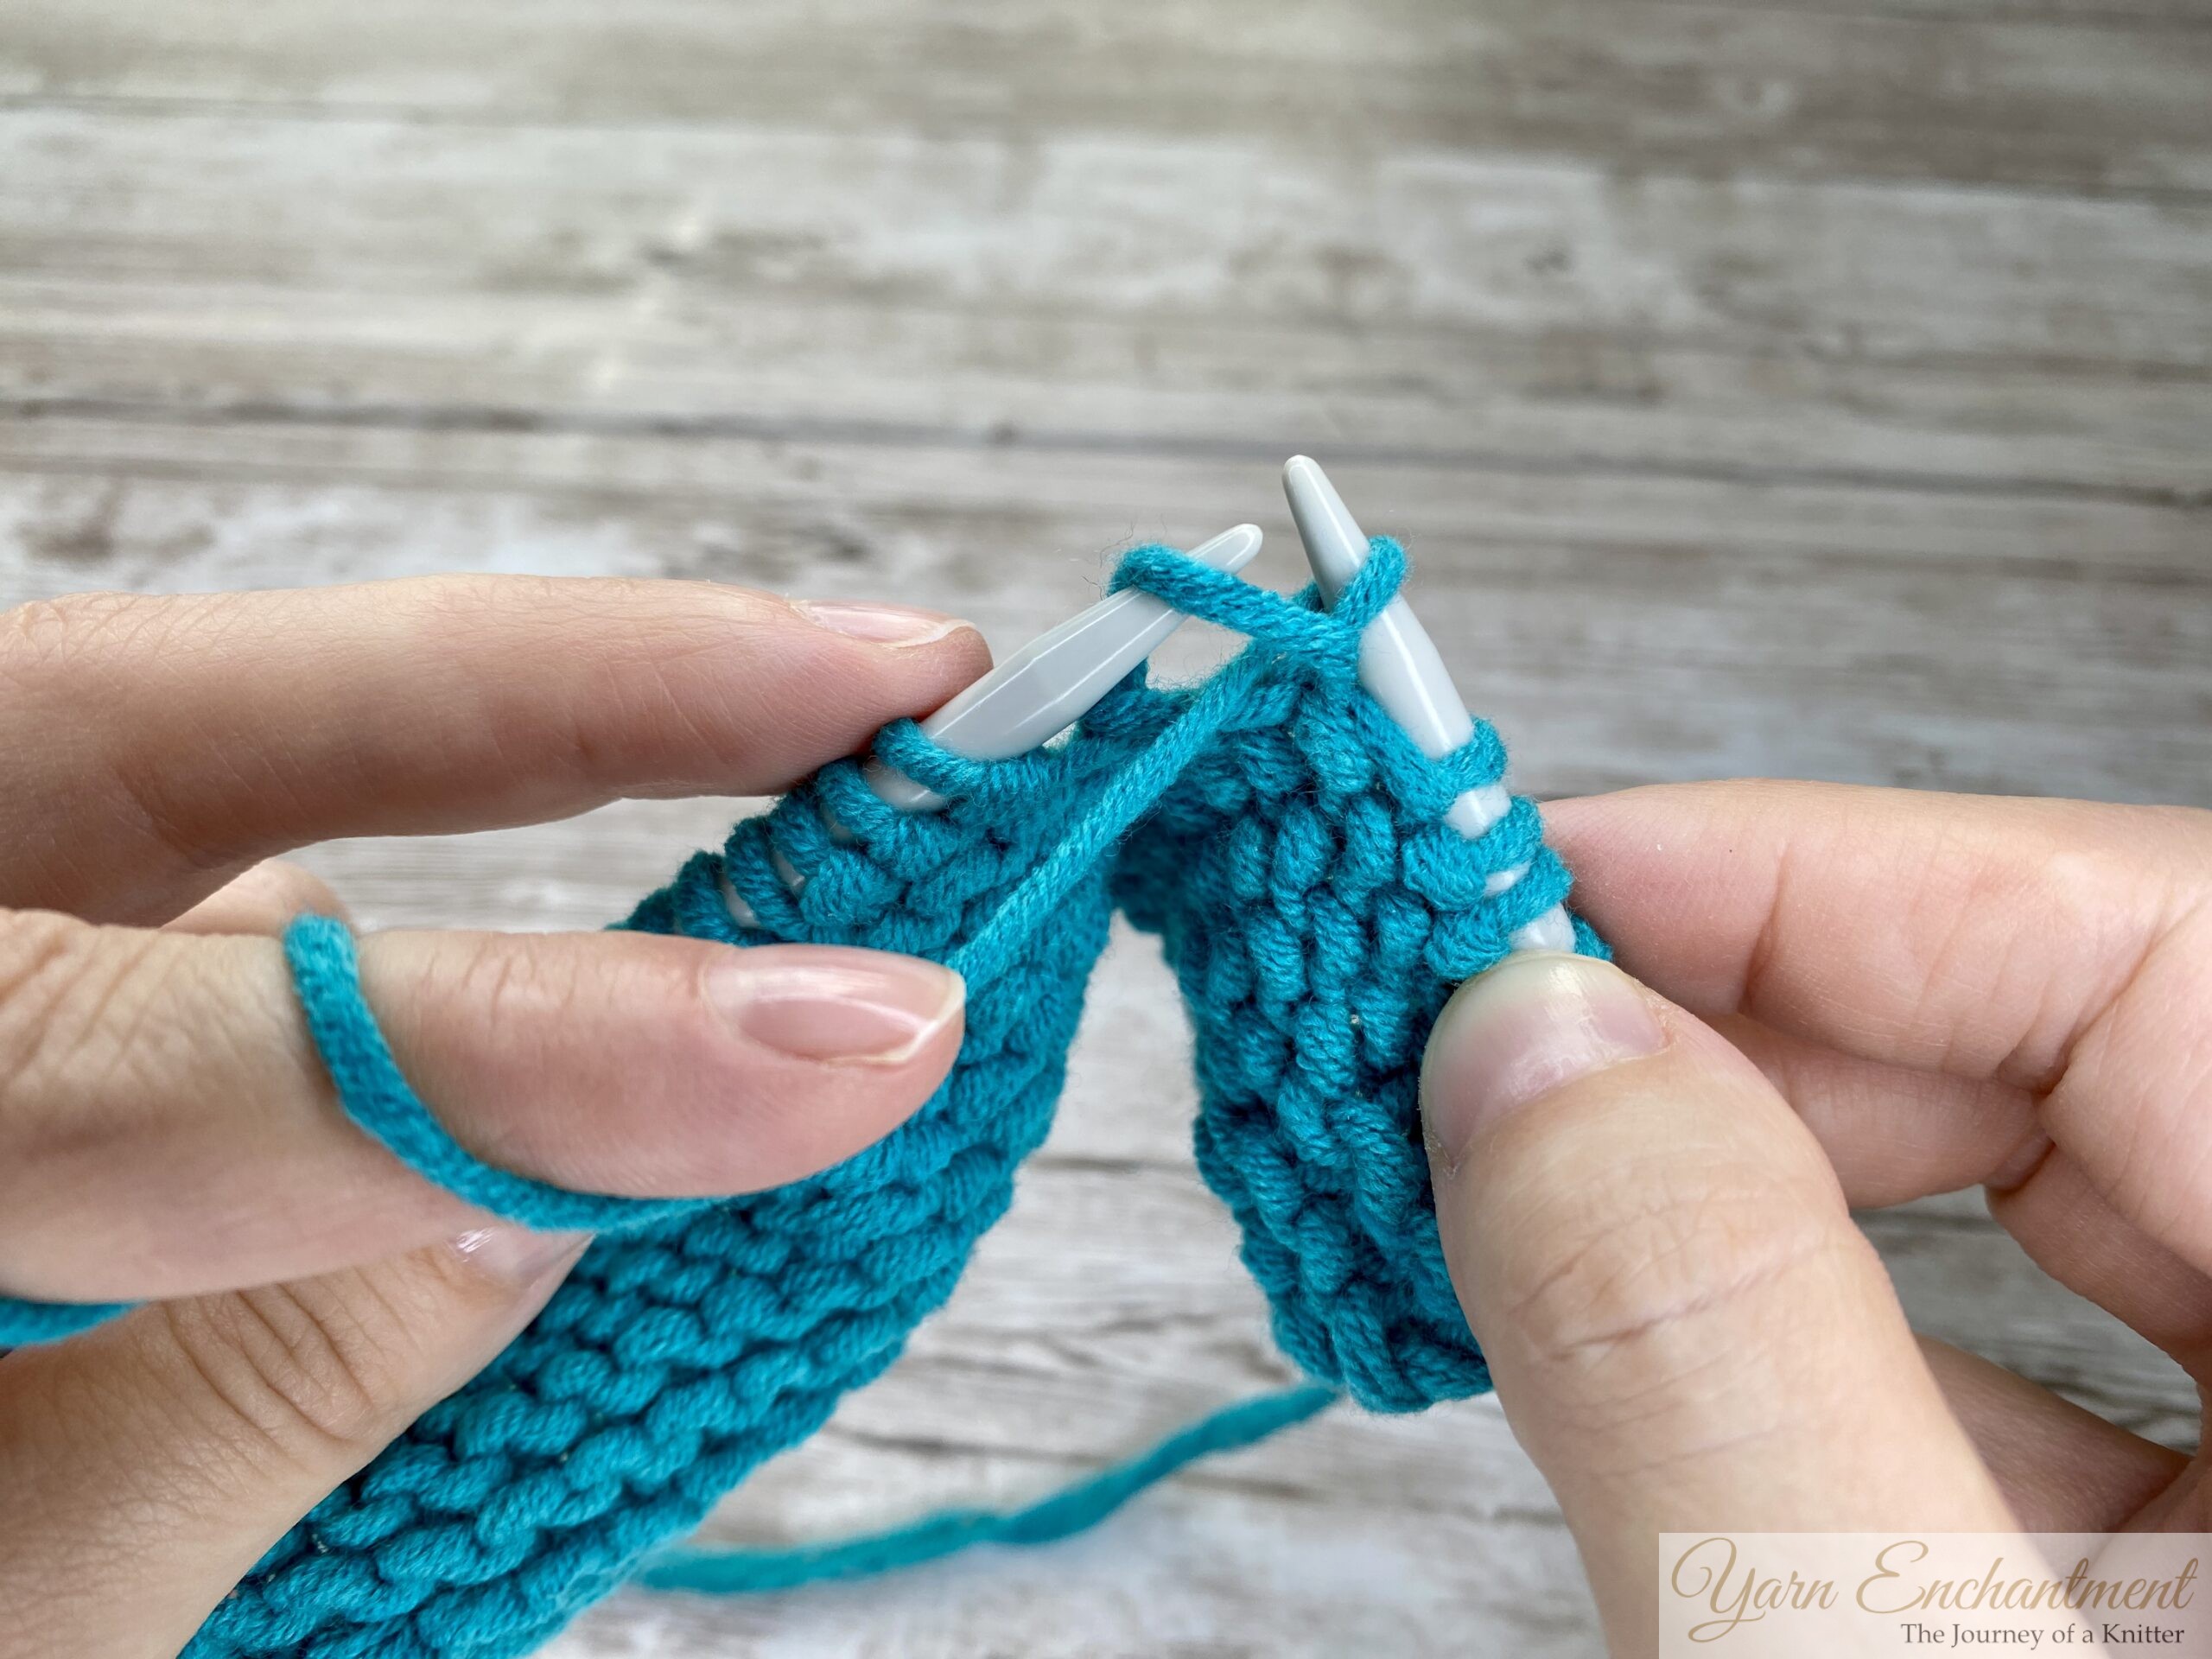
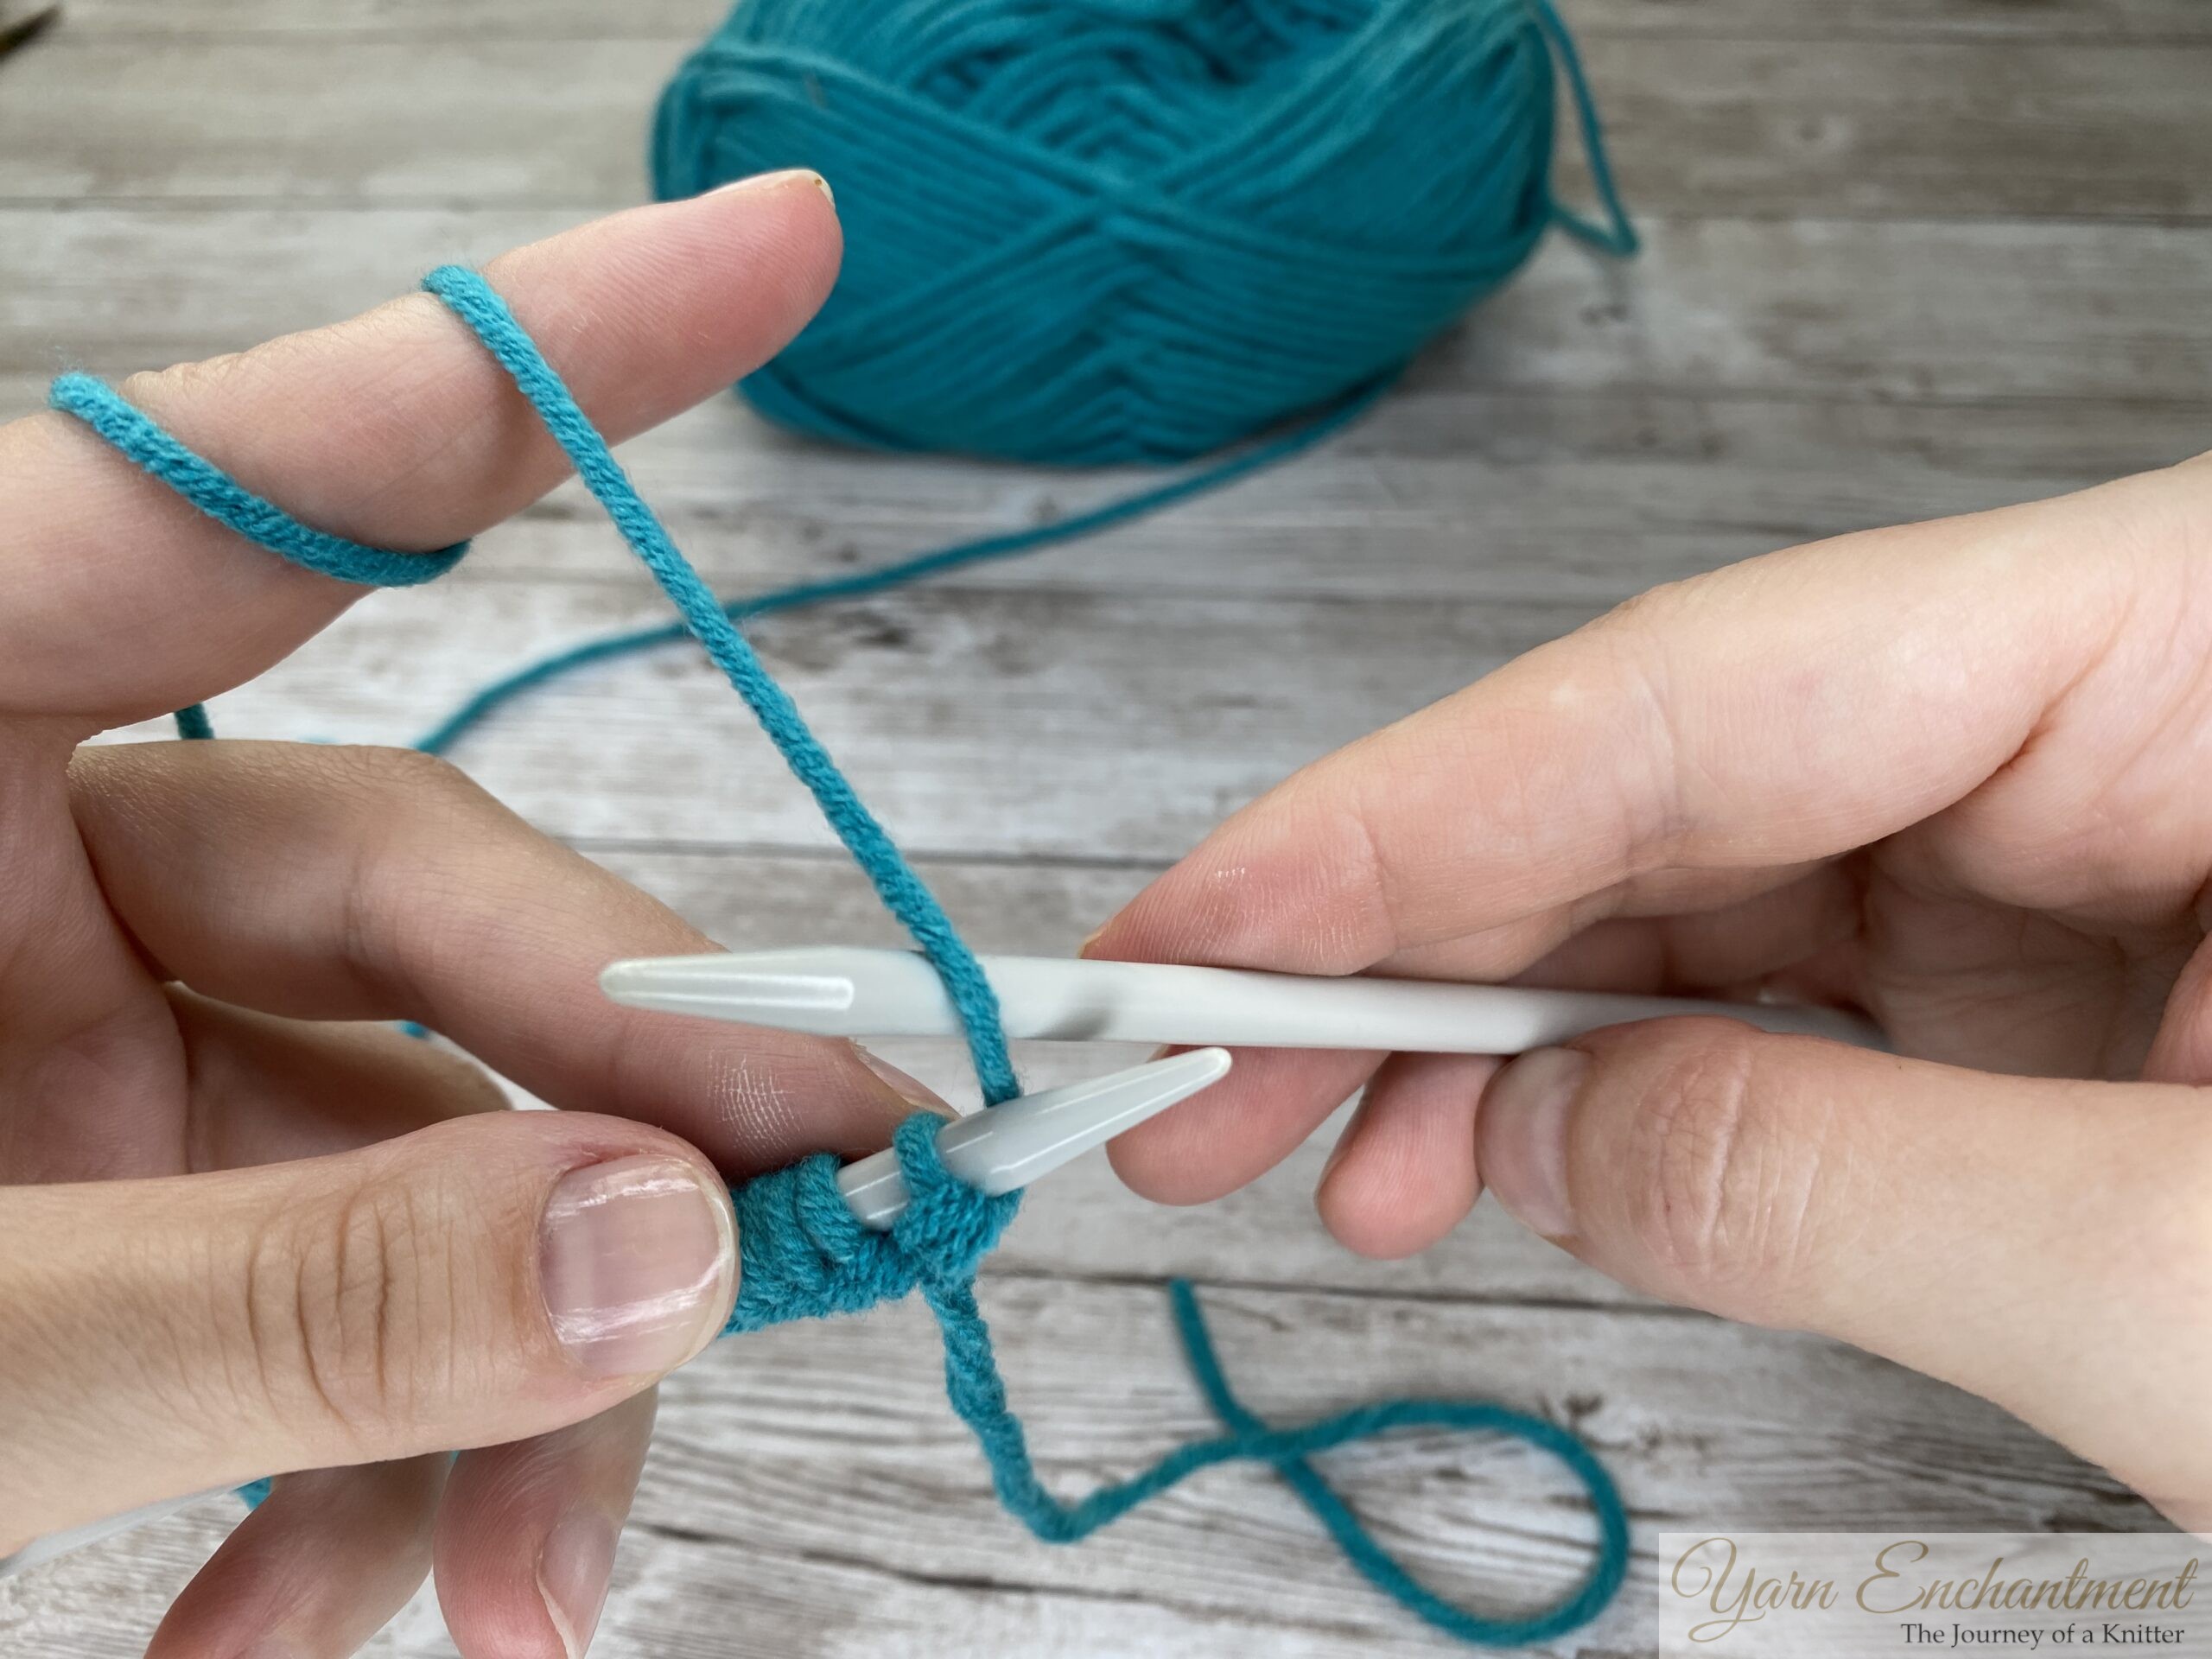
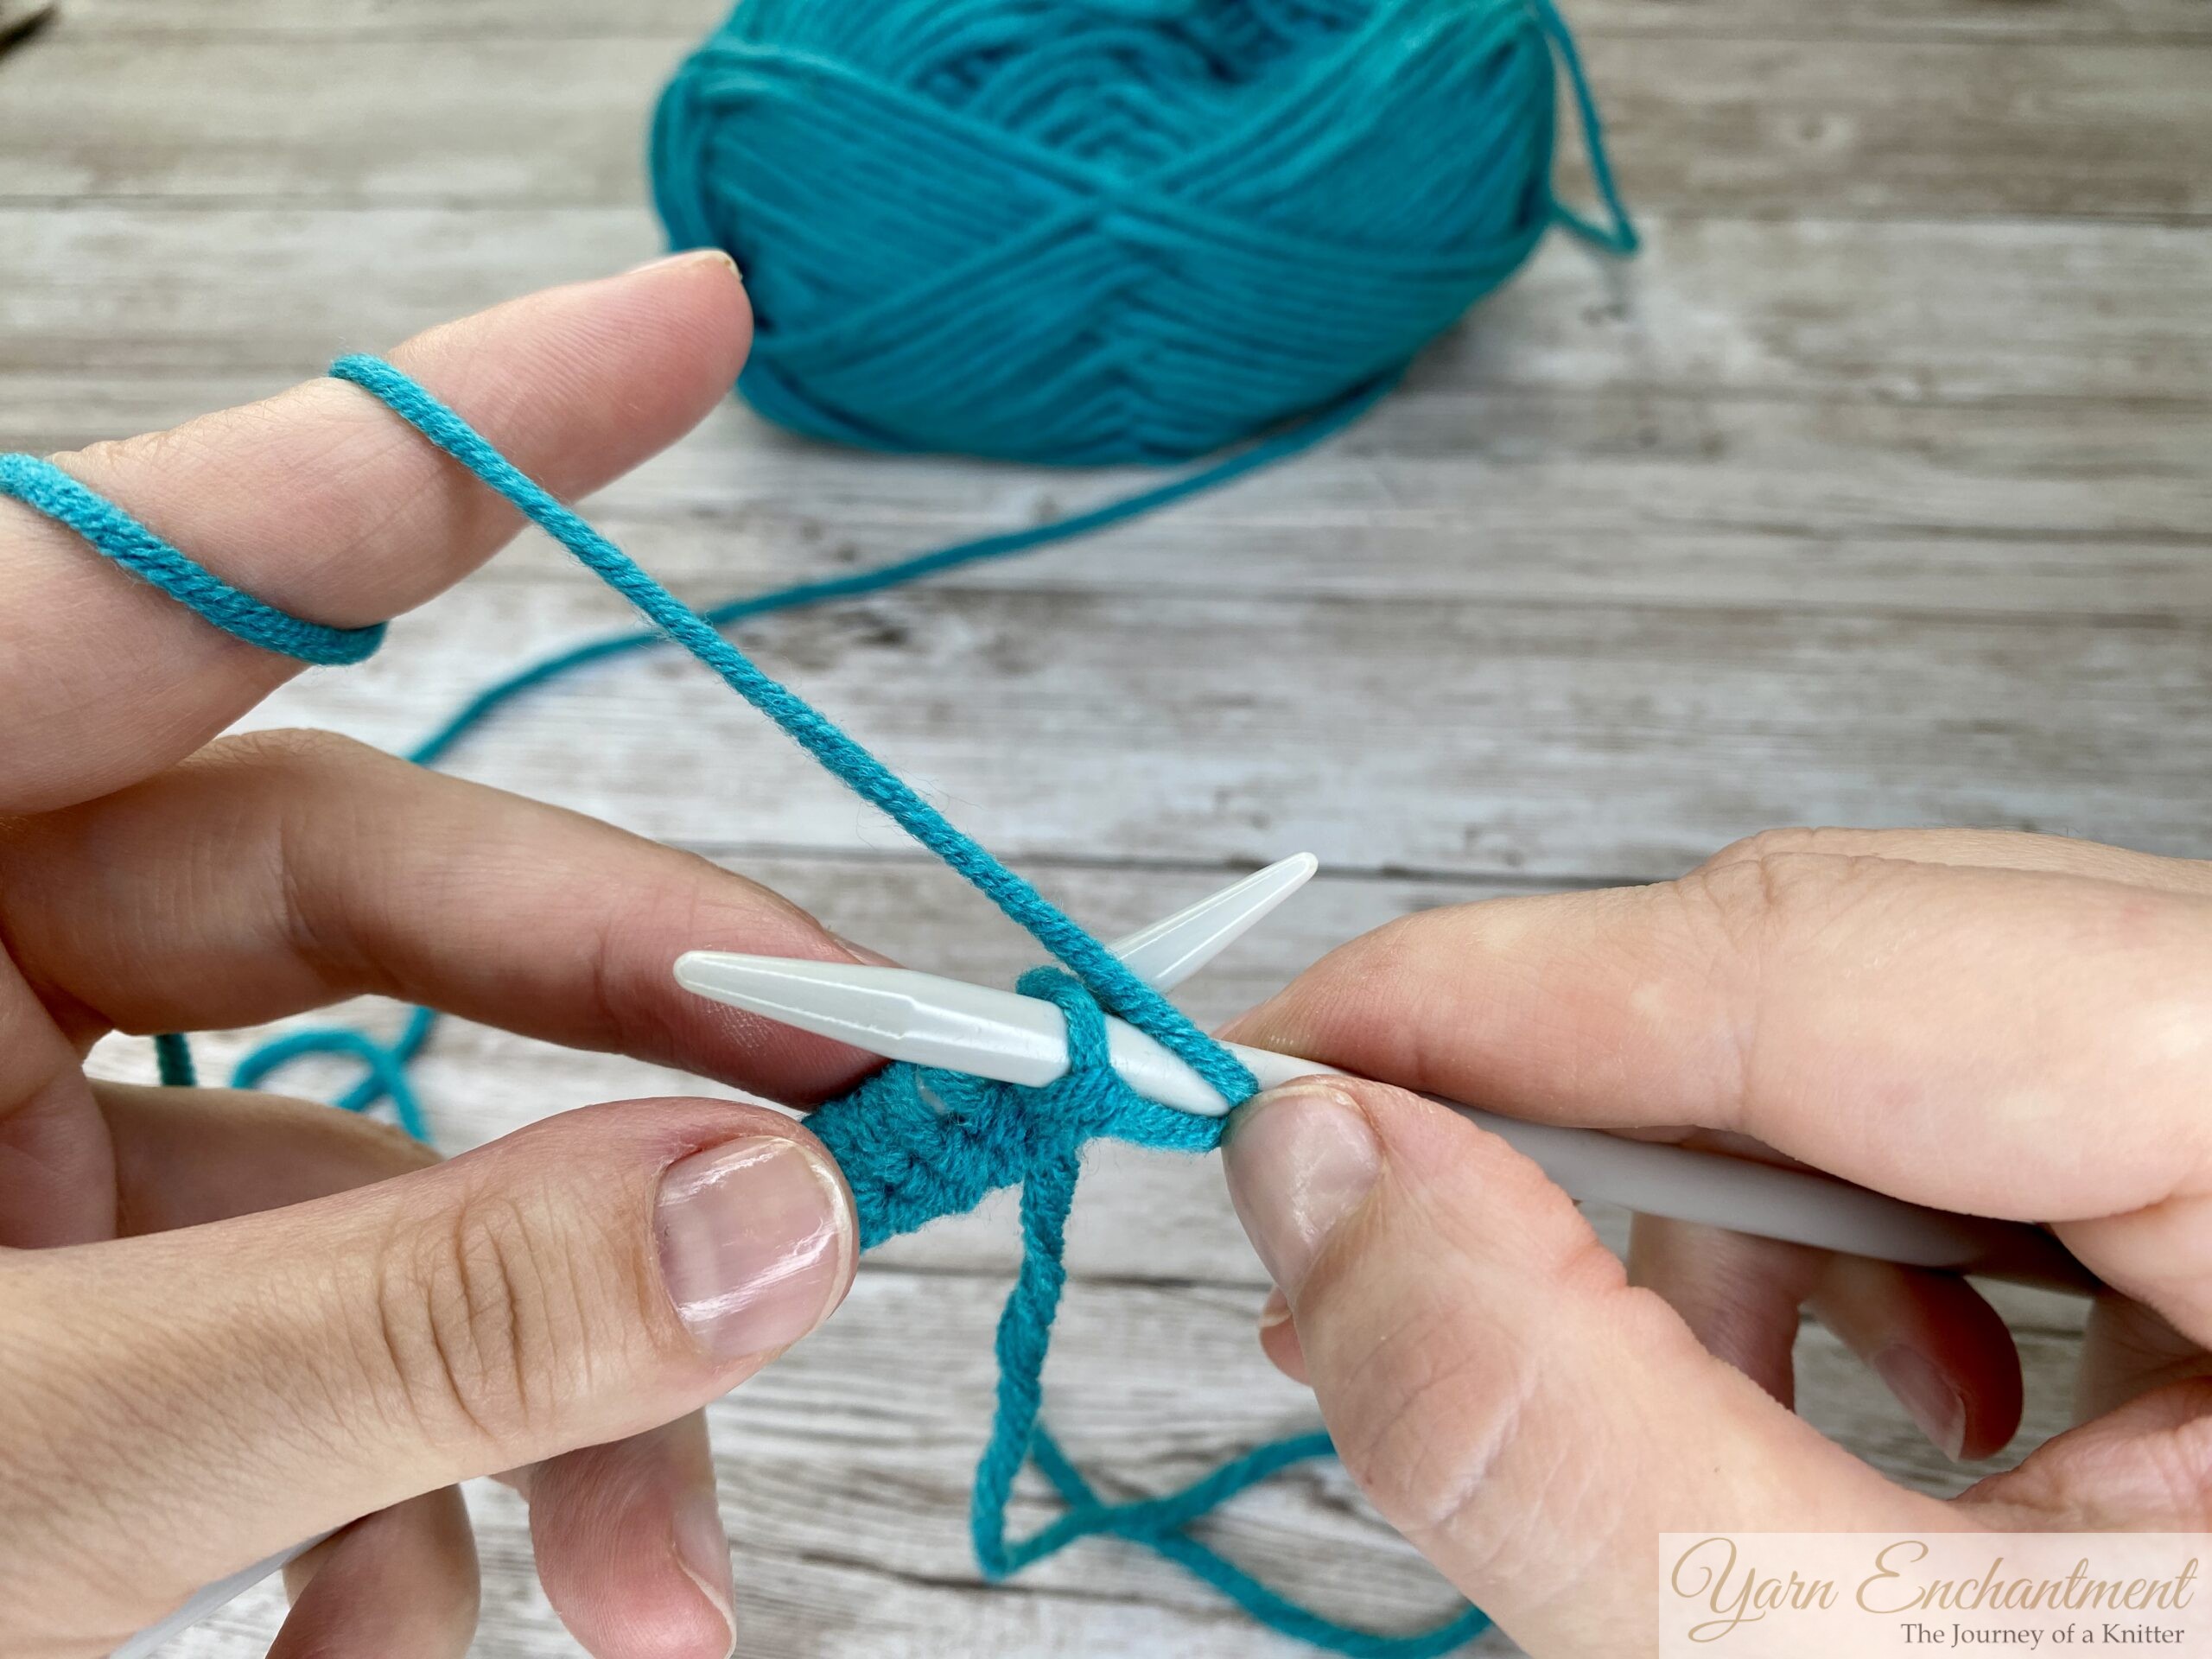
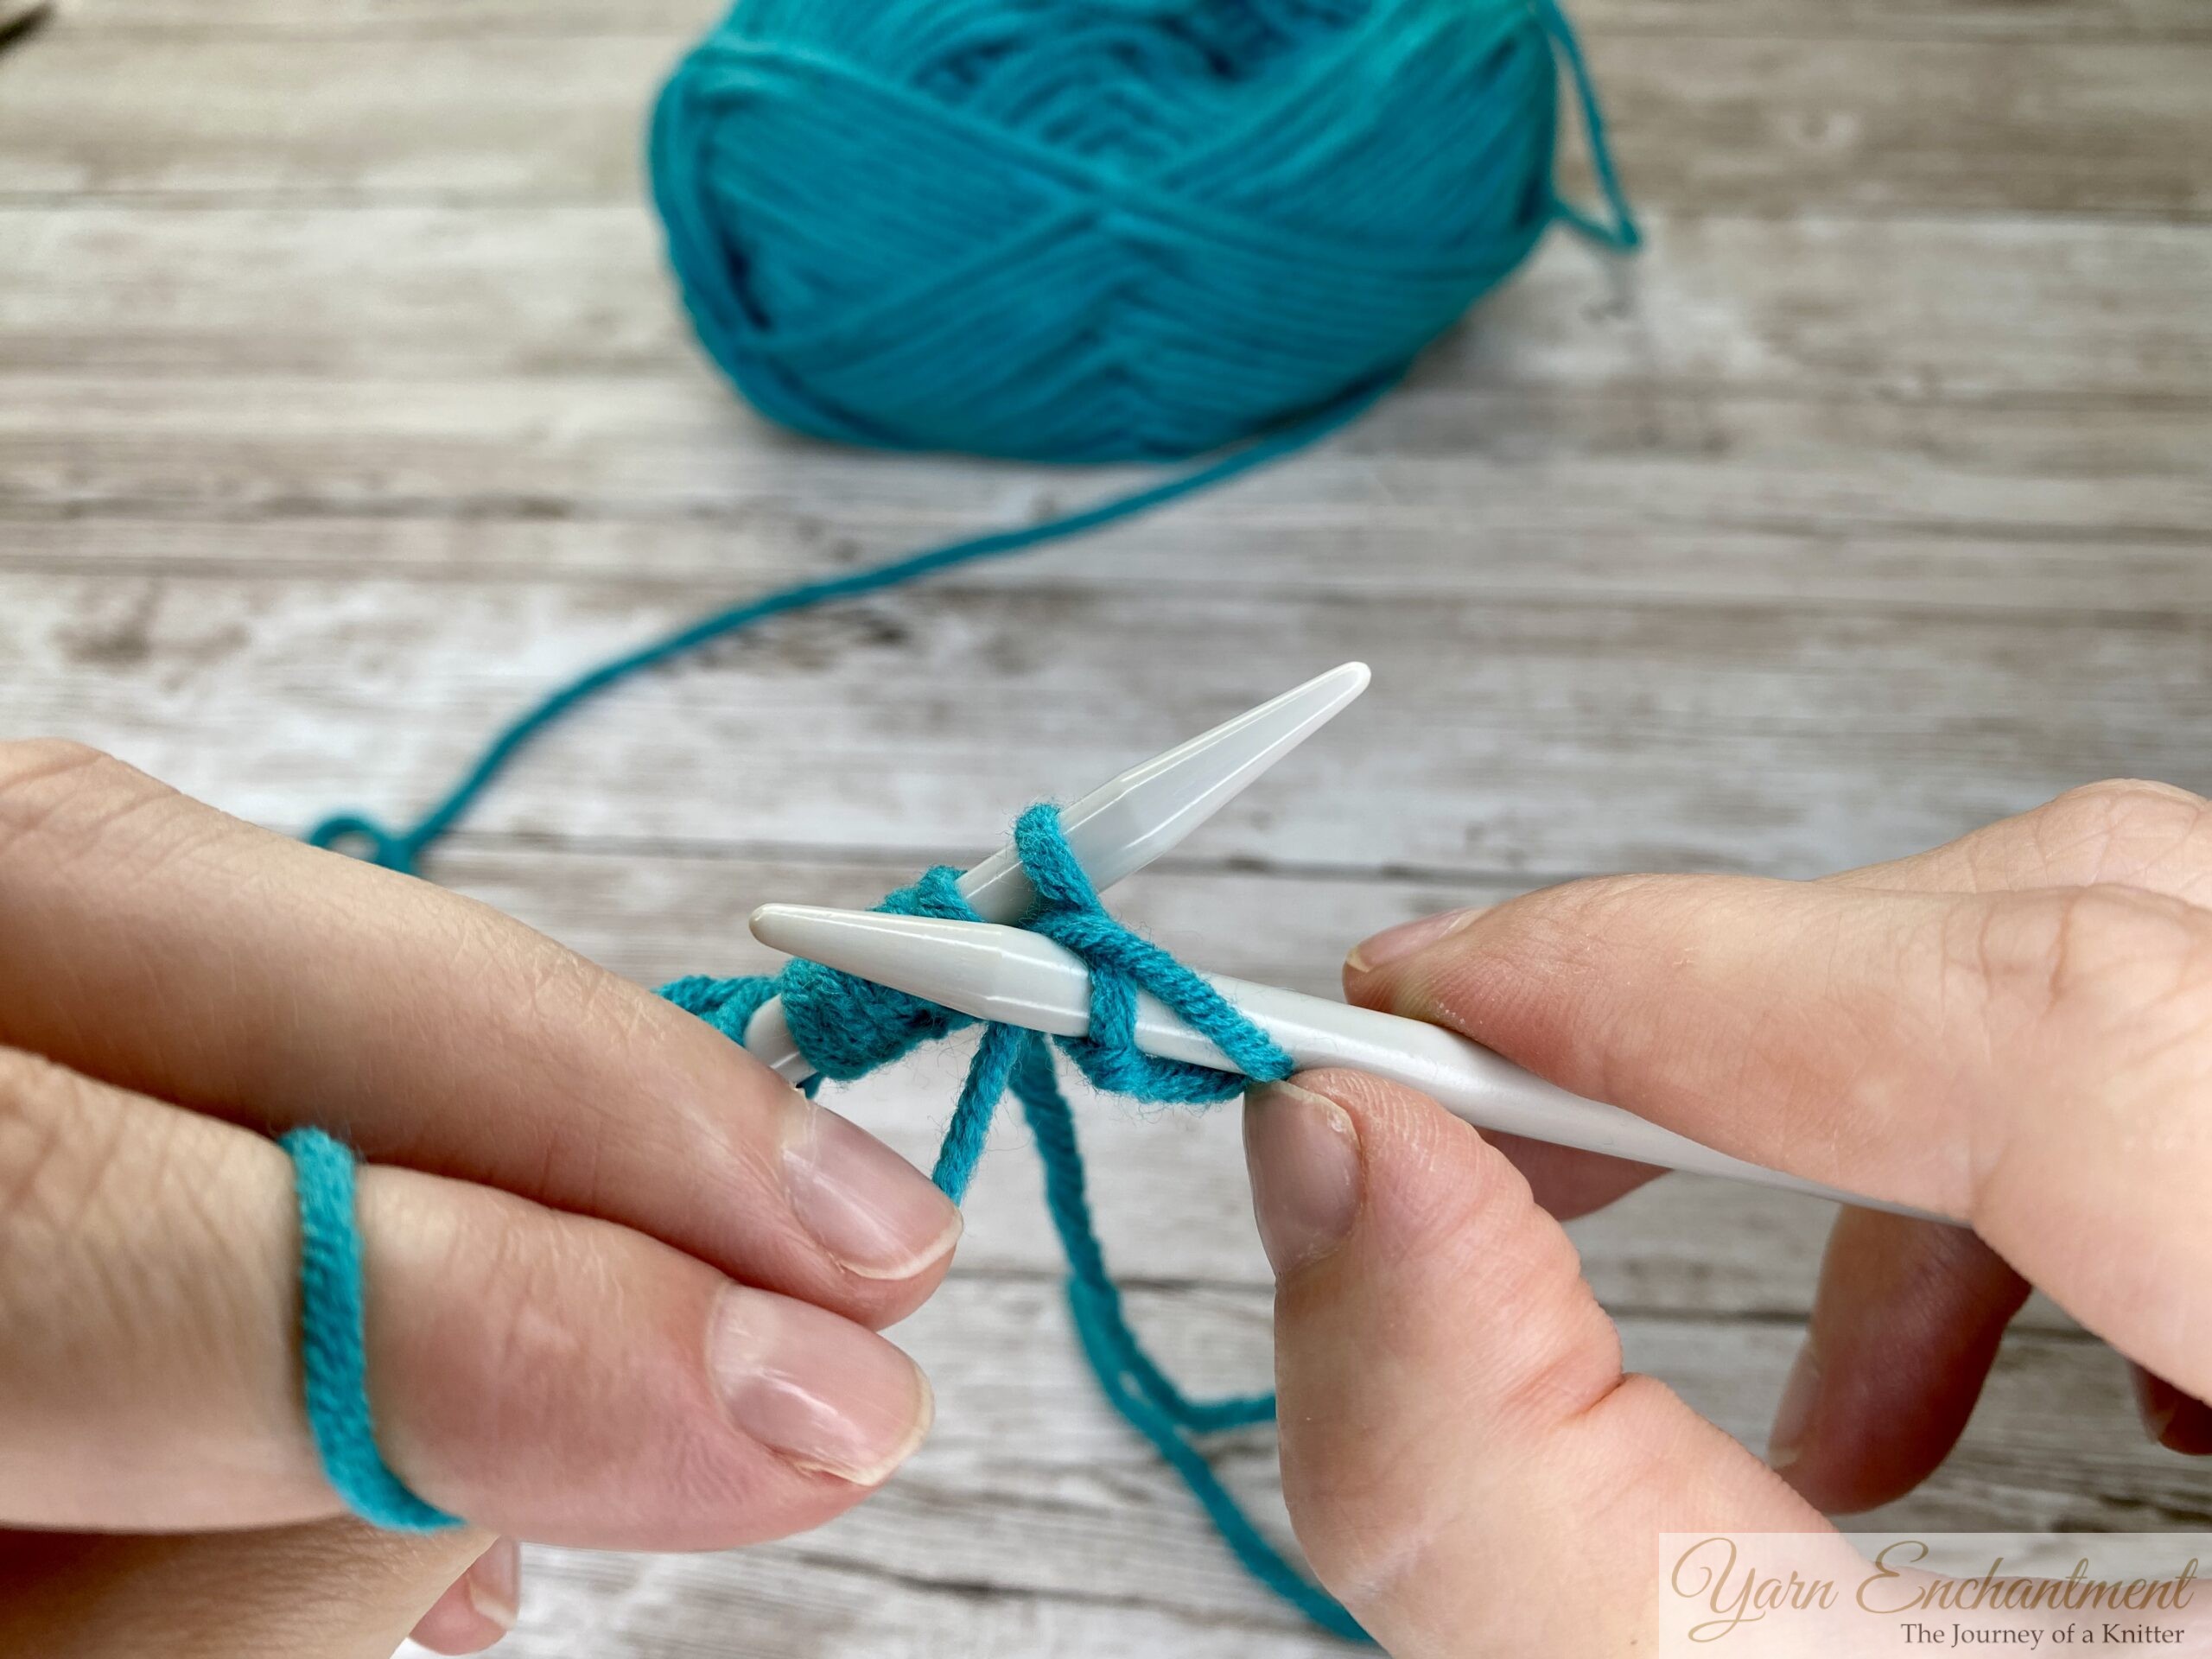
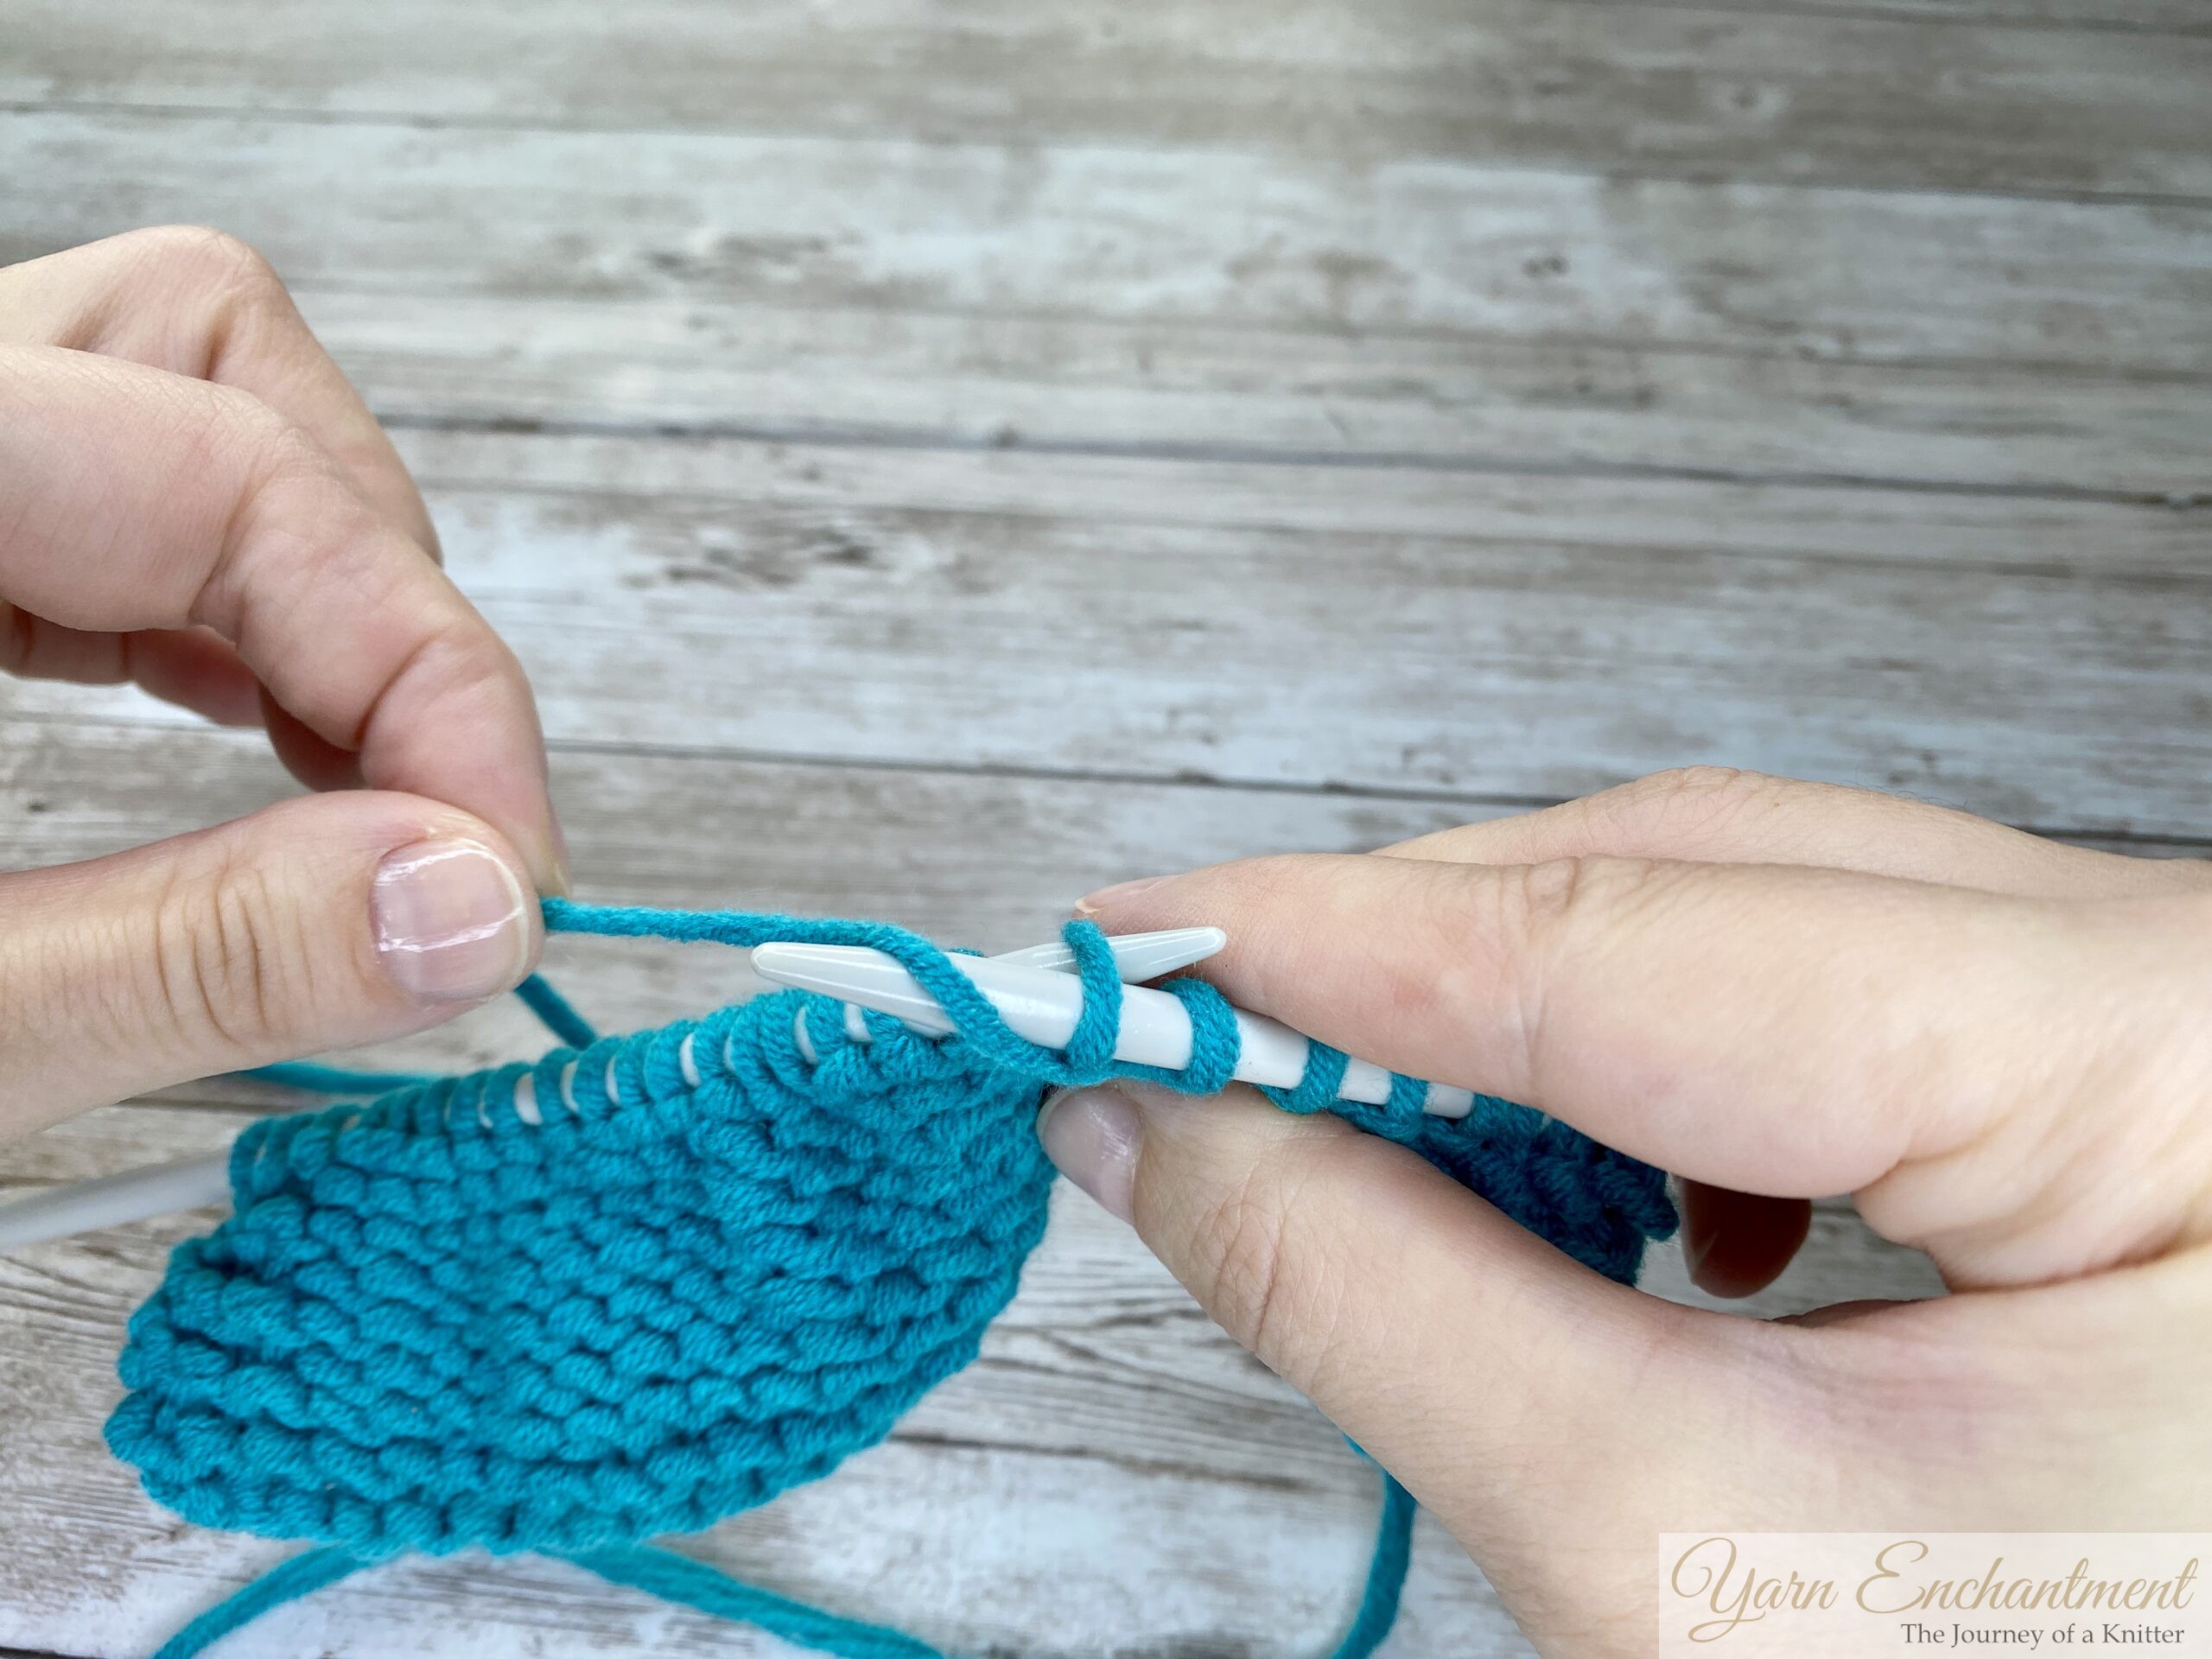
Step 3: Complete the Stitch
- Pull the yarn through the stitch to create a new one, then slip the old stitch off the left needle.
 |  | Pull the yarn through the stitch to create a new one... | ...then slip the old stitch off the left needle. you can pull a little on your working yarn to tighten your first stitch. |


After the first stitch is knitted, it becomes a little easier. Bring your working yarn to the front of your work and keep repeating what you learned in Step 1.
 | Bring your working yarn to the front of your work and purl your next stitch. |

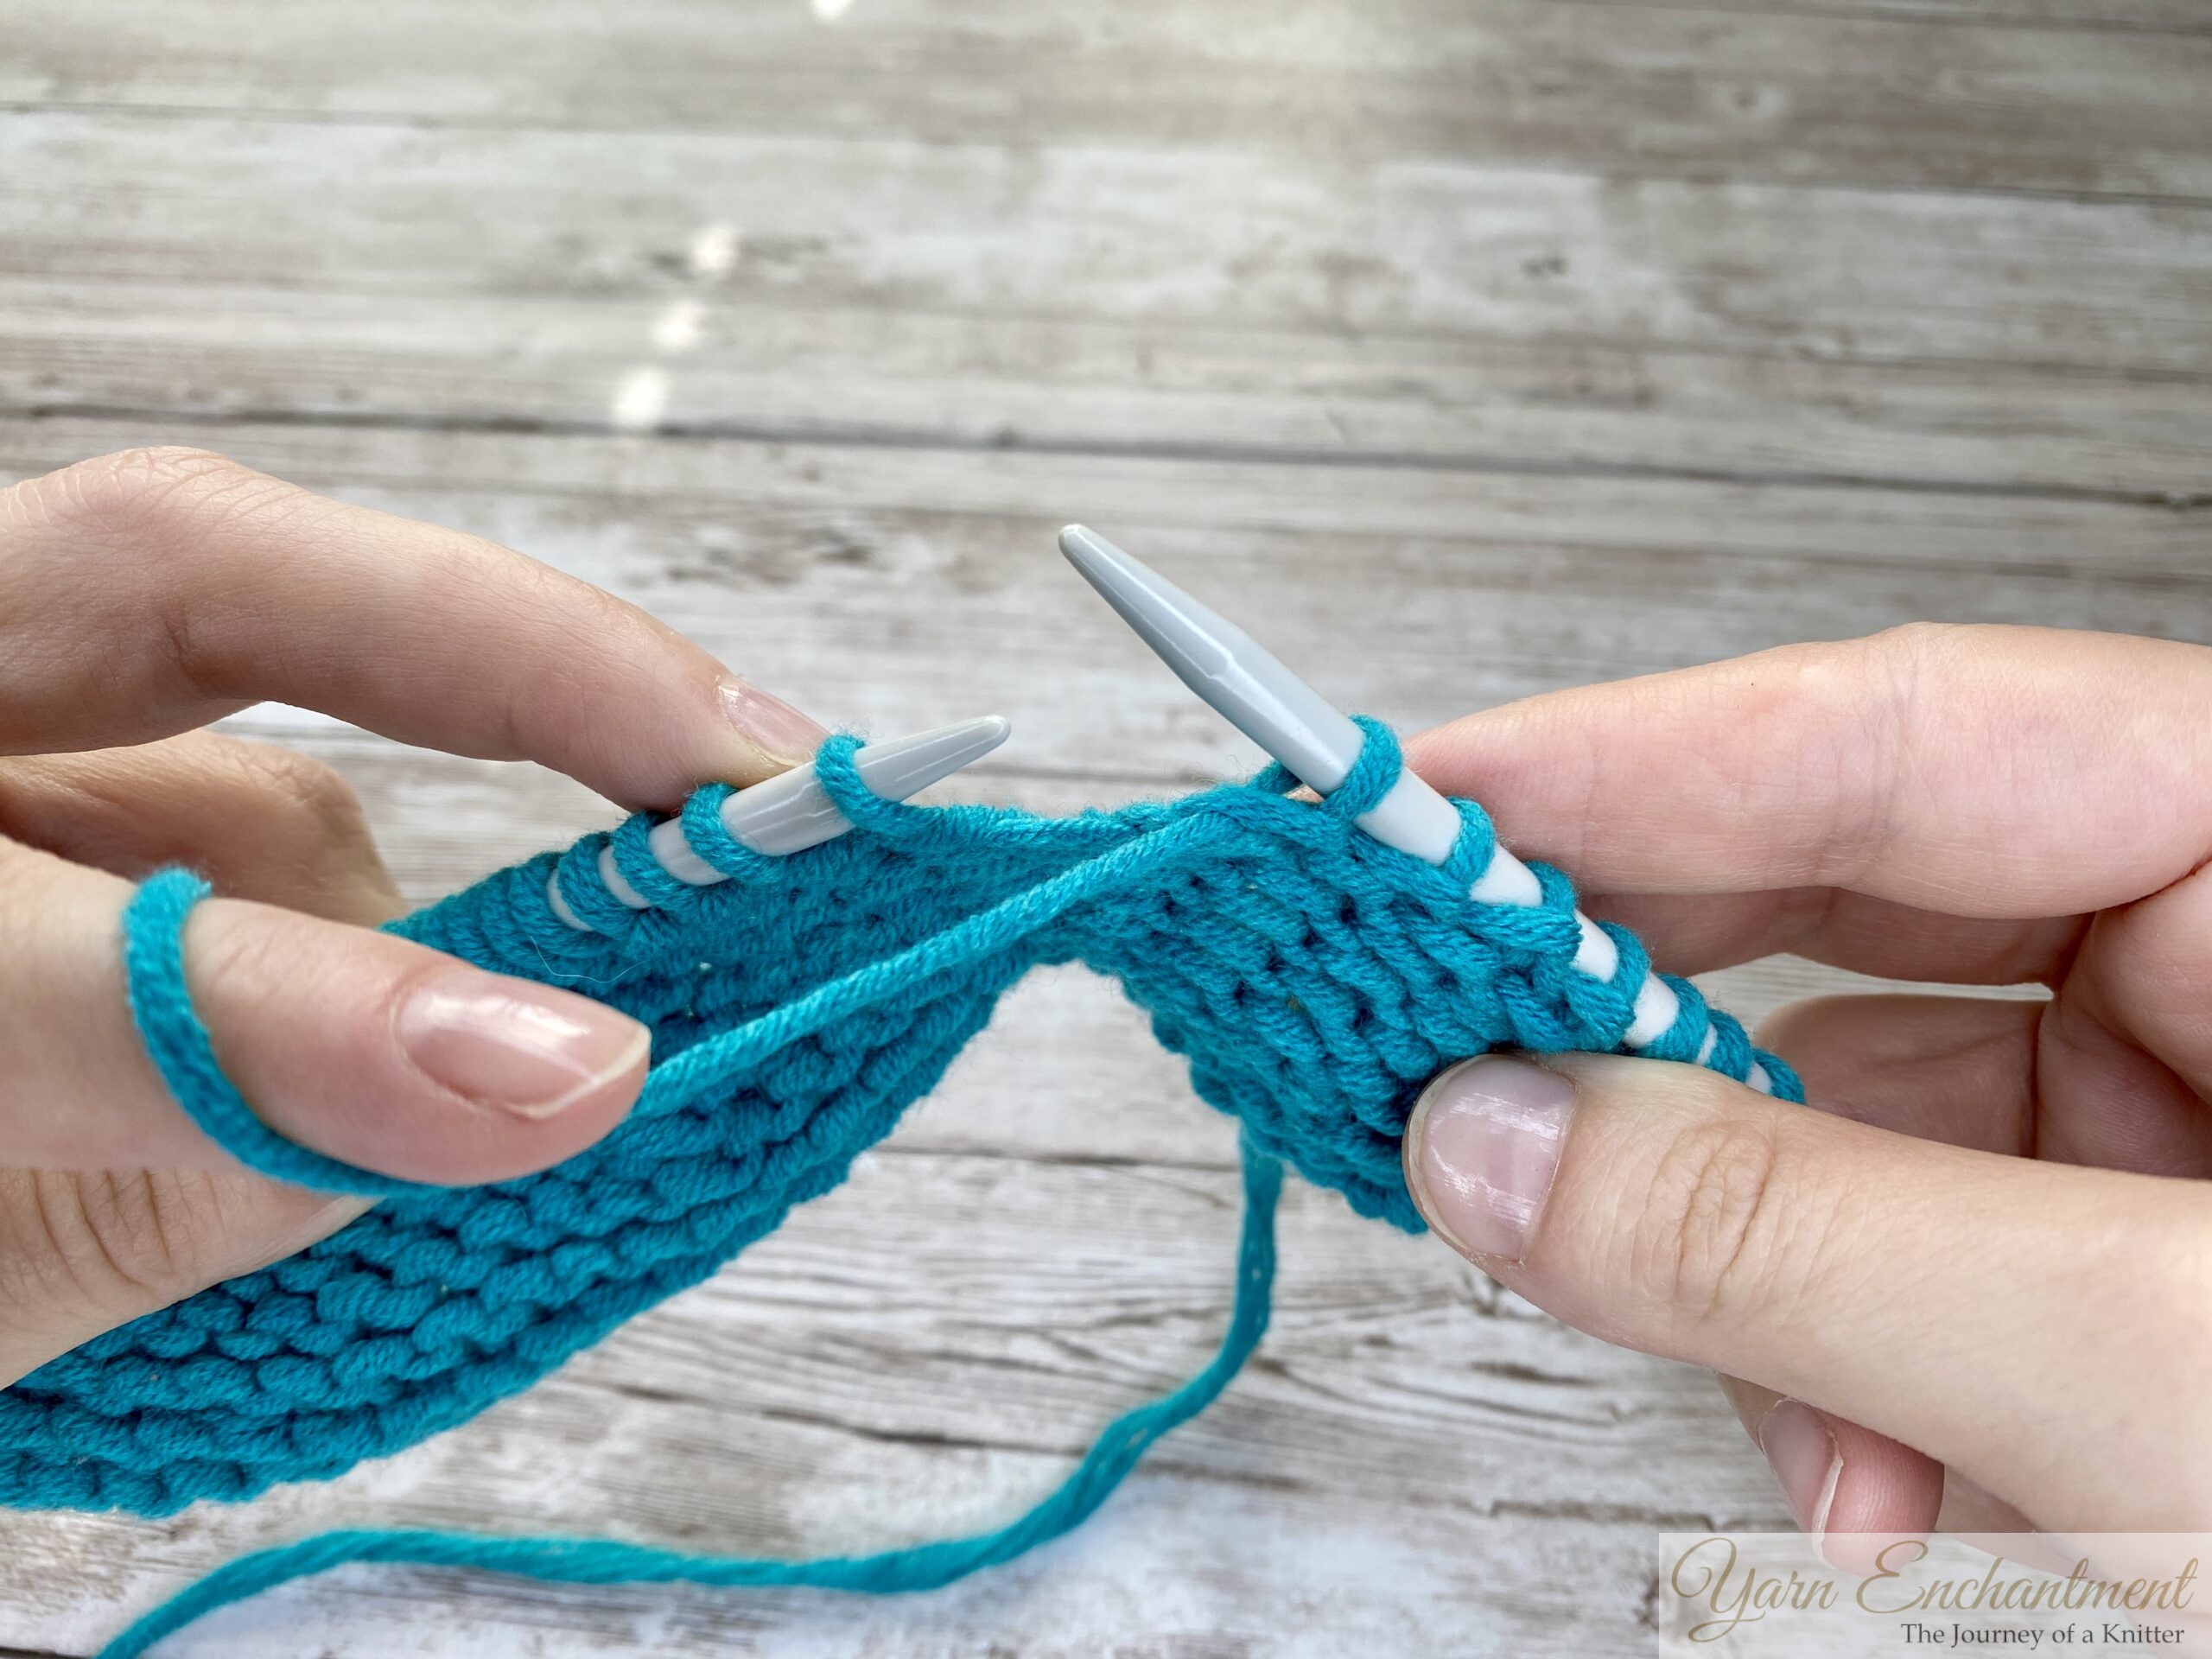
What Happens at the End of a Row?
Once you’ve finished purling across the row, all your stitches will now be on the right-hand needle. Great job, you’re ready to start the next row! Here’s how to get set up:
Switch Hands
Take the full needle (the one with all your stitches) and move it to your left hand. Then, pick up the empty needle with your right hand. Think of this as “turning your work around” - you’re just resetting everything to start the next row.
Position Your Yarn
Since you’re about to purl again, make sure the working yarn is hanging in front of your work. This is super important because it sets you up for those nice, even purl stitches. Double-check that your hands, needles, and yarn are in the same position as they were when you started your first purl stitch.
If you want to knit the next row to create a knit stitch, remember that your working yarn should be at the back of your work.
Stockinette, Garter, and Purl-Based Fabrics
Once you’ve got the hang of the purl stitch, you can start using it to create some of the most popular knitting fabrics. These patterns are simple but versatile, and they’re the foundation for so many knitting projects. Here’s a quick rundown of what you can make by combining knit and purl stitches:
Stockinette Stitch
The stockinette stitch is one of the most classic knitting fabrics, and for good reason! It’s smooth, sleek, and perfect for everything from scarves to sweaters.
-
- How to Make It: Alternate rows of knit and purl. For flat knitting, you’ll knit one row, then purl the next, and repeat. In circular knitting, you’ll just knit every round (because the back side of the work isn’t visible).
- What It Looks Like: The “right” side (the side you’ll show off) has that clean, smooth V-shape we all love. The “wrong” side has the bumpy texture of purl stitches.
- Best For: Any project you think off - hats, sweaters, and dishcloths.
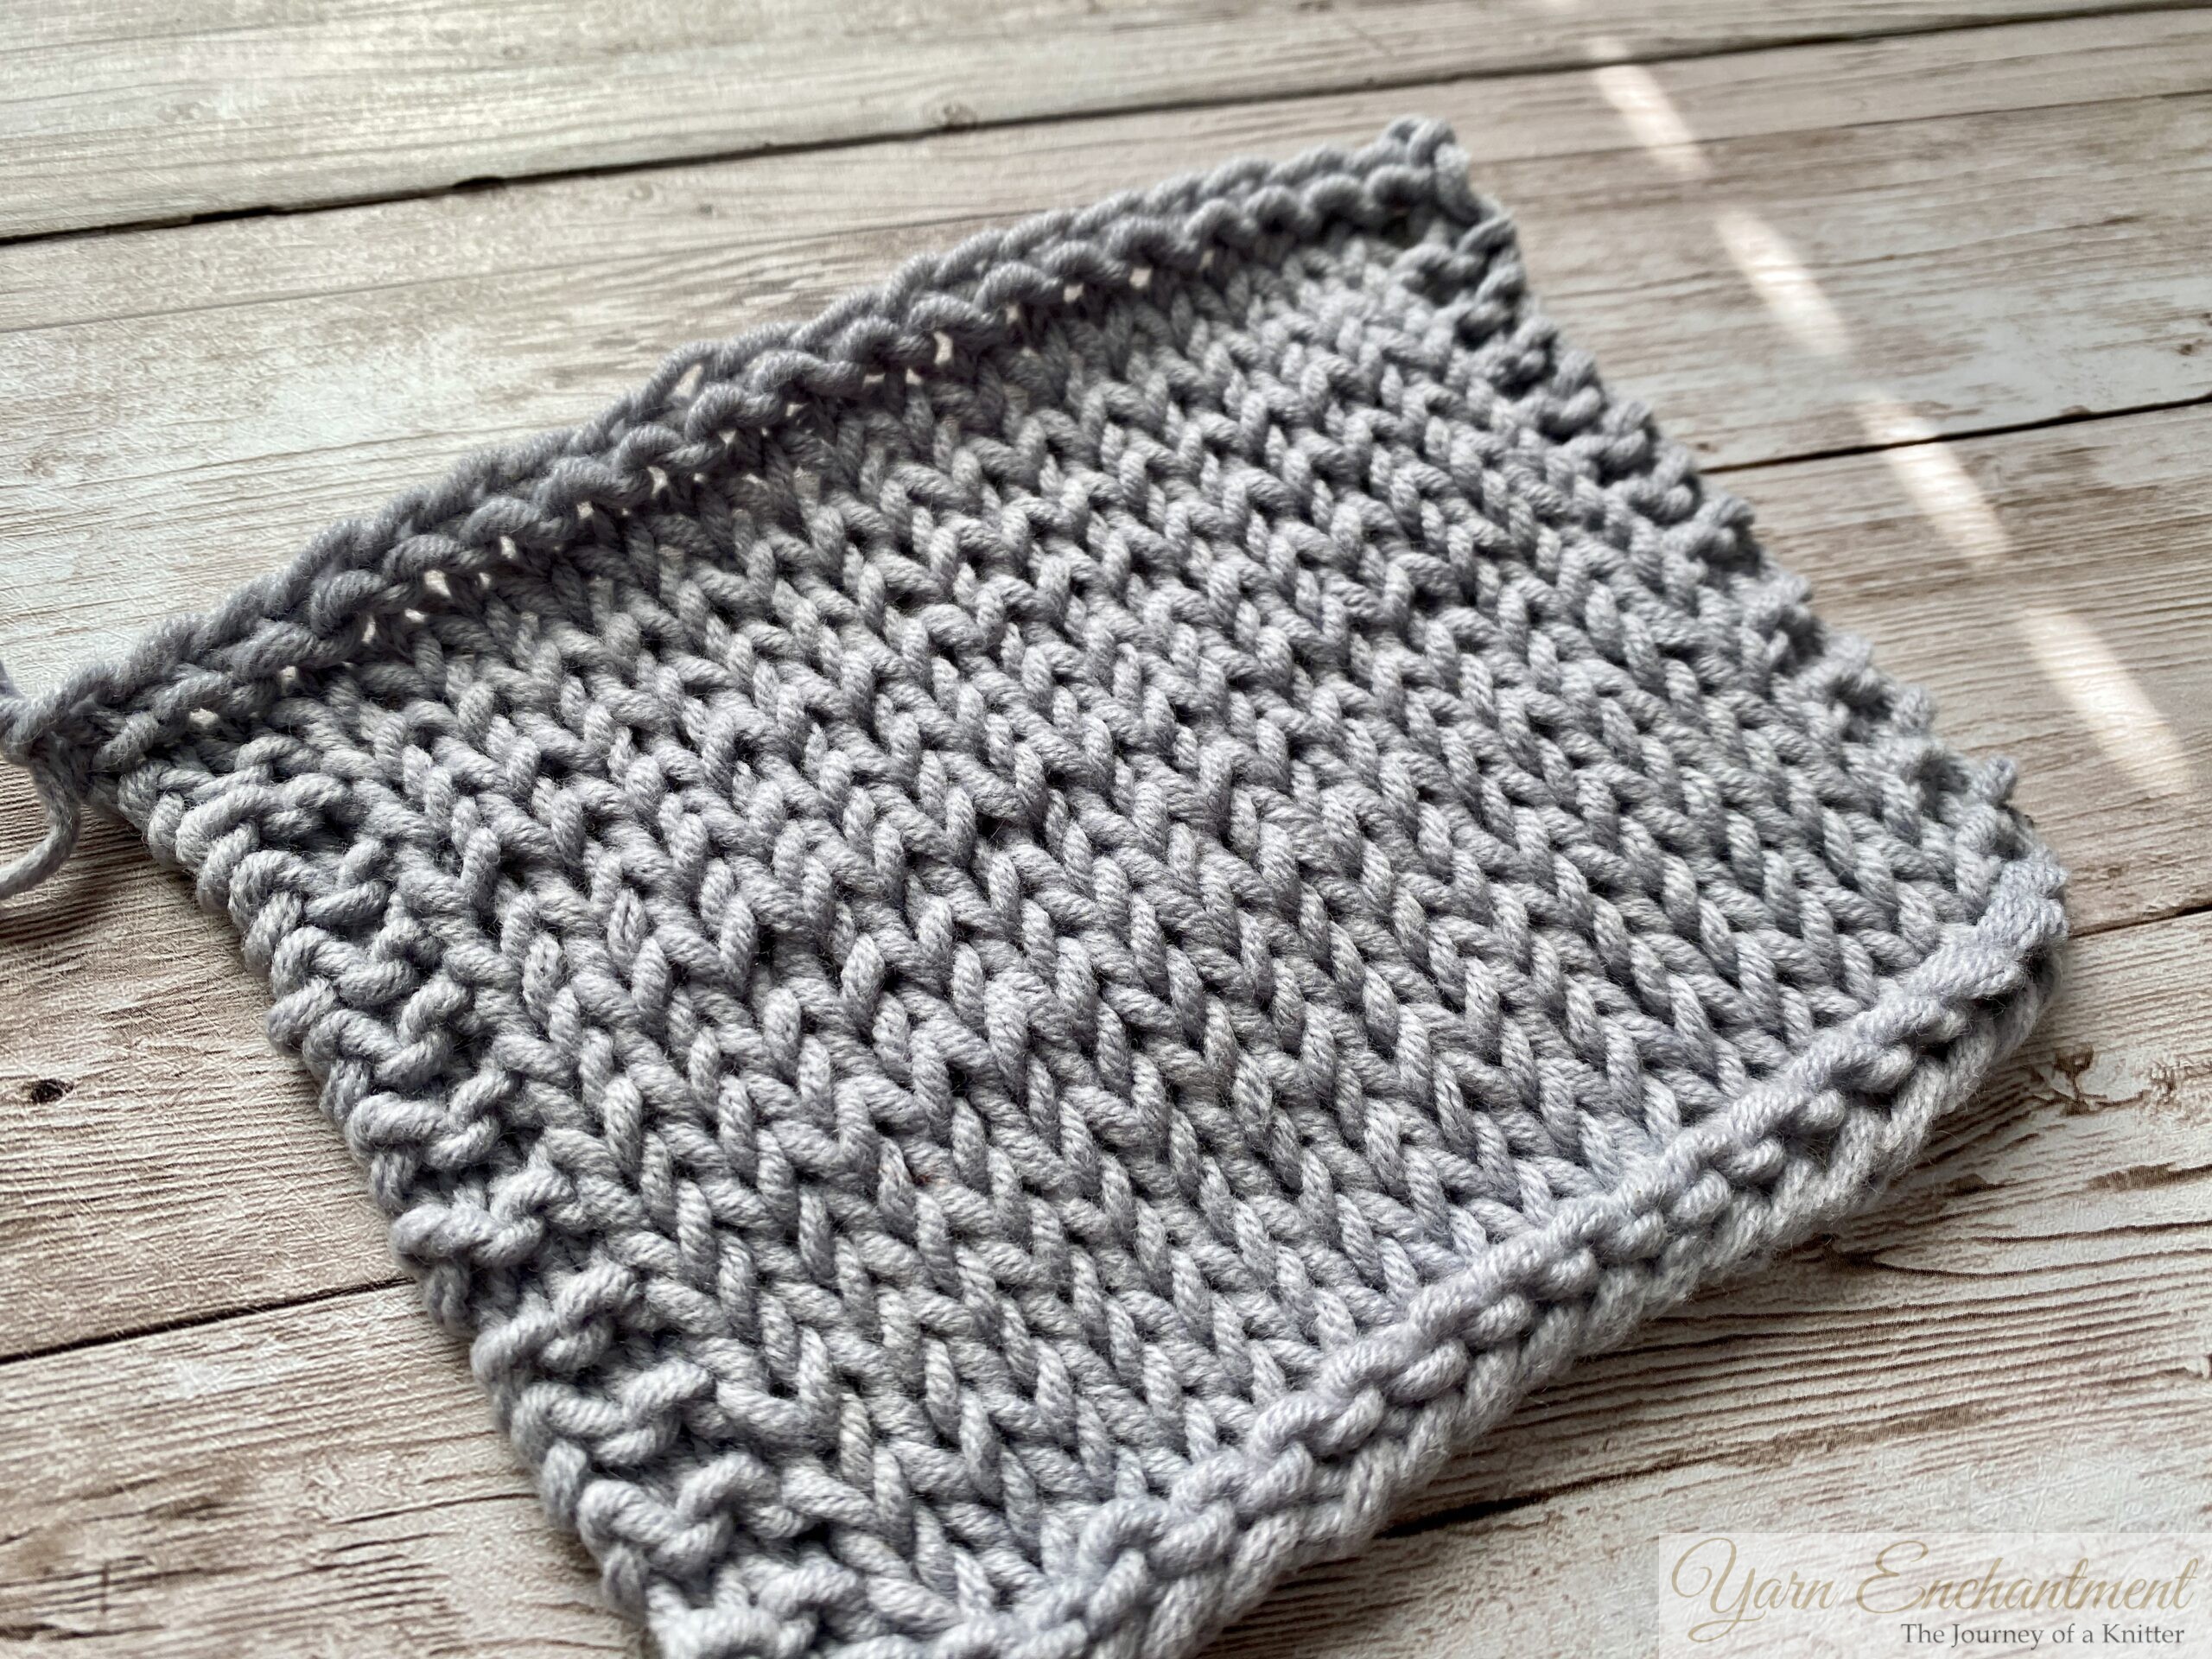
Garter Stitch (Purled)
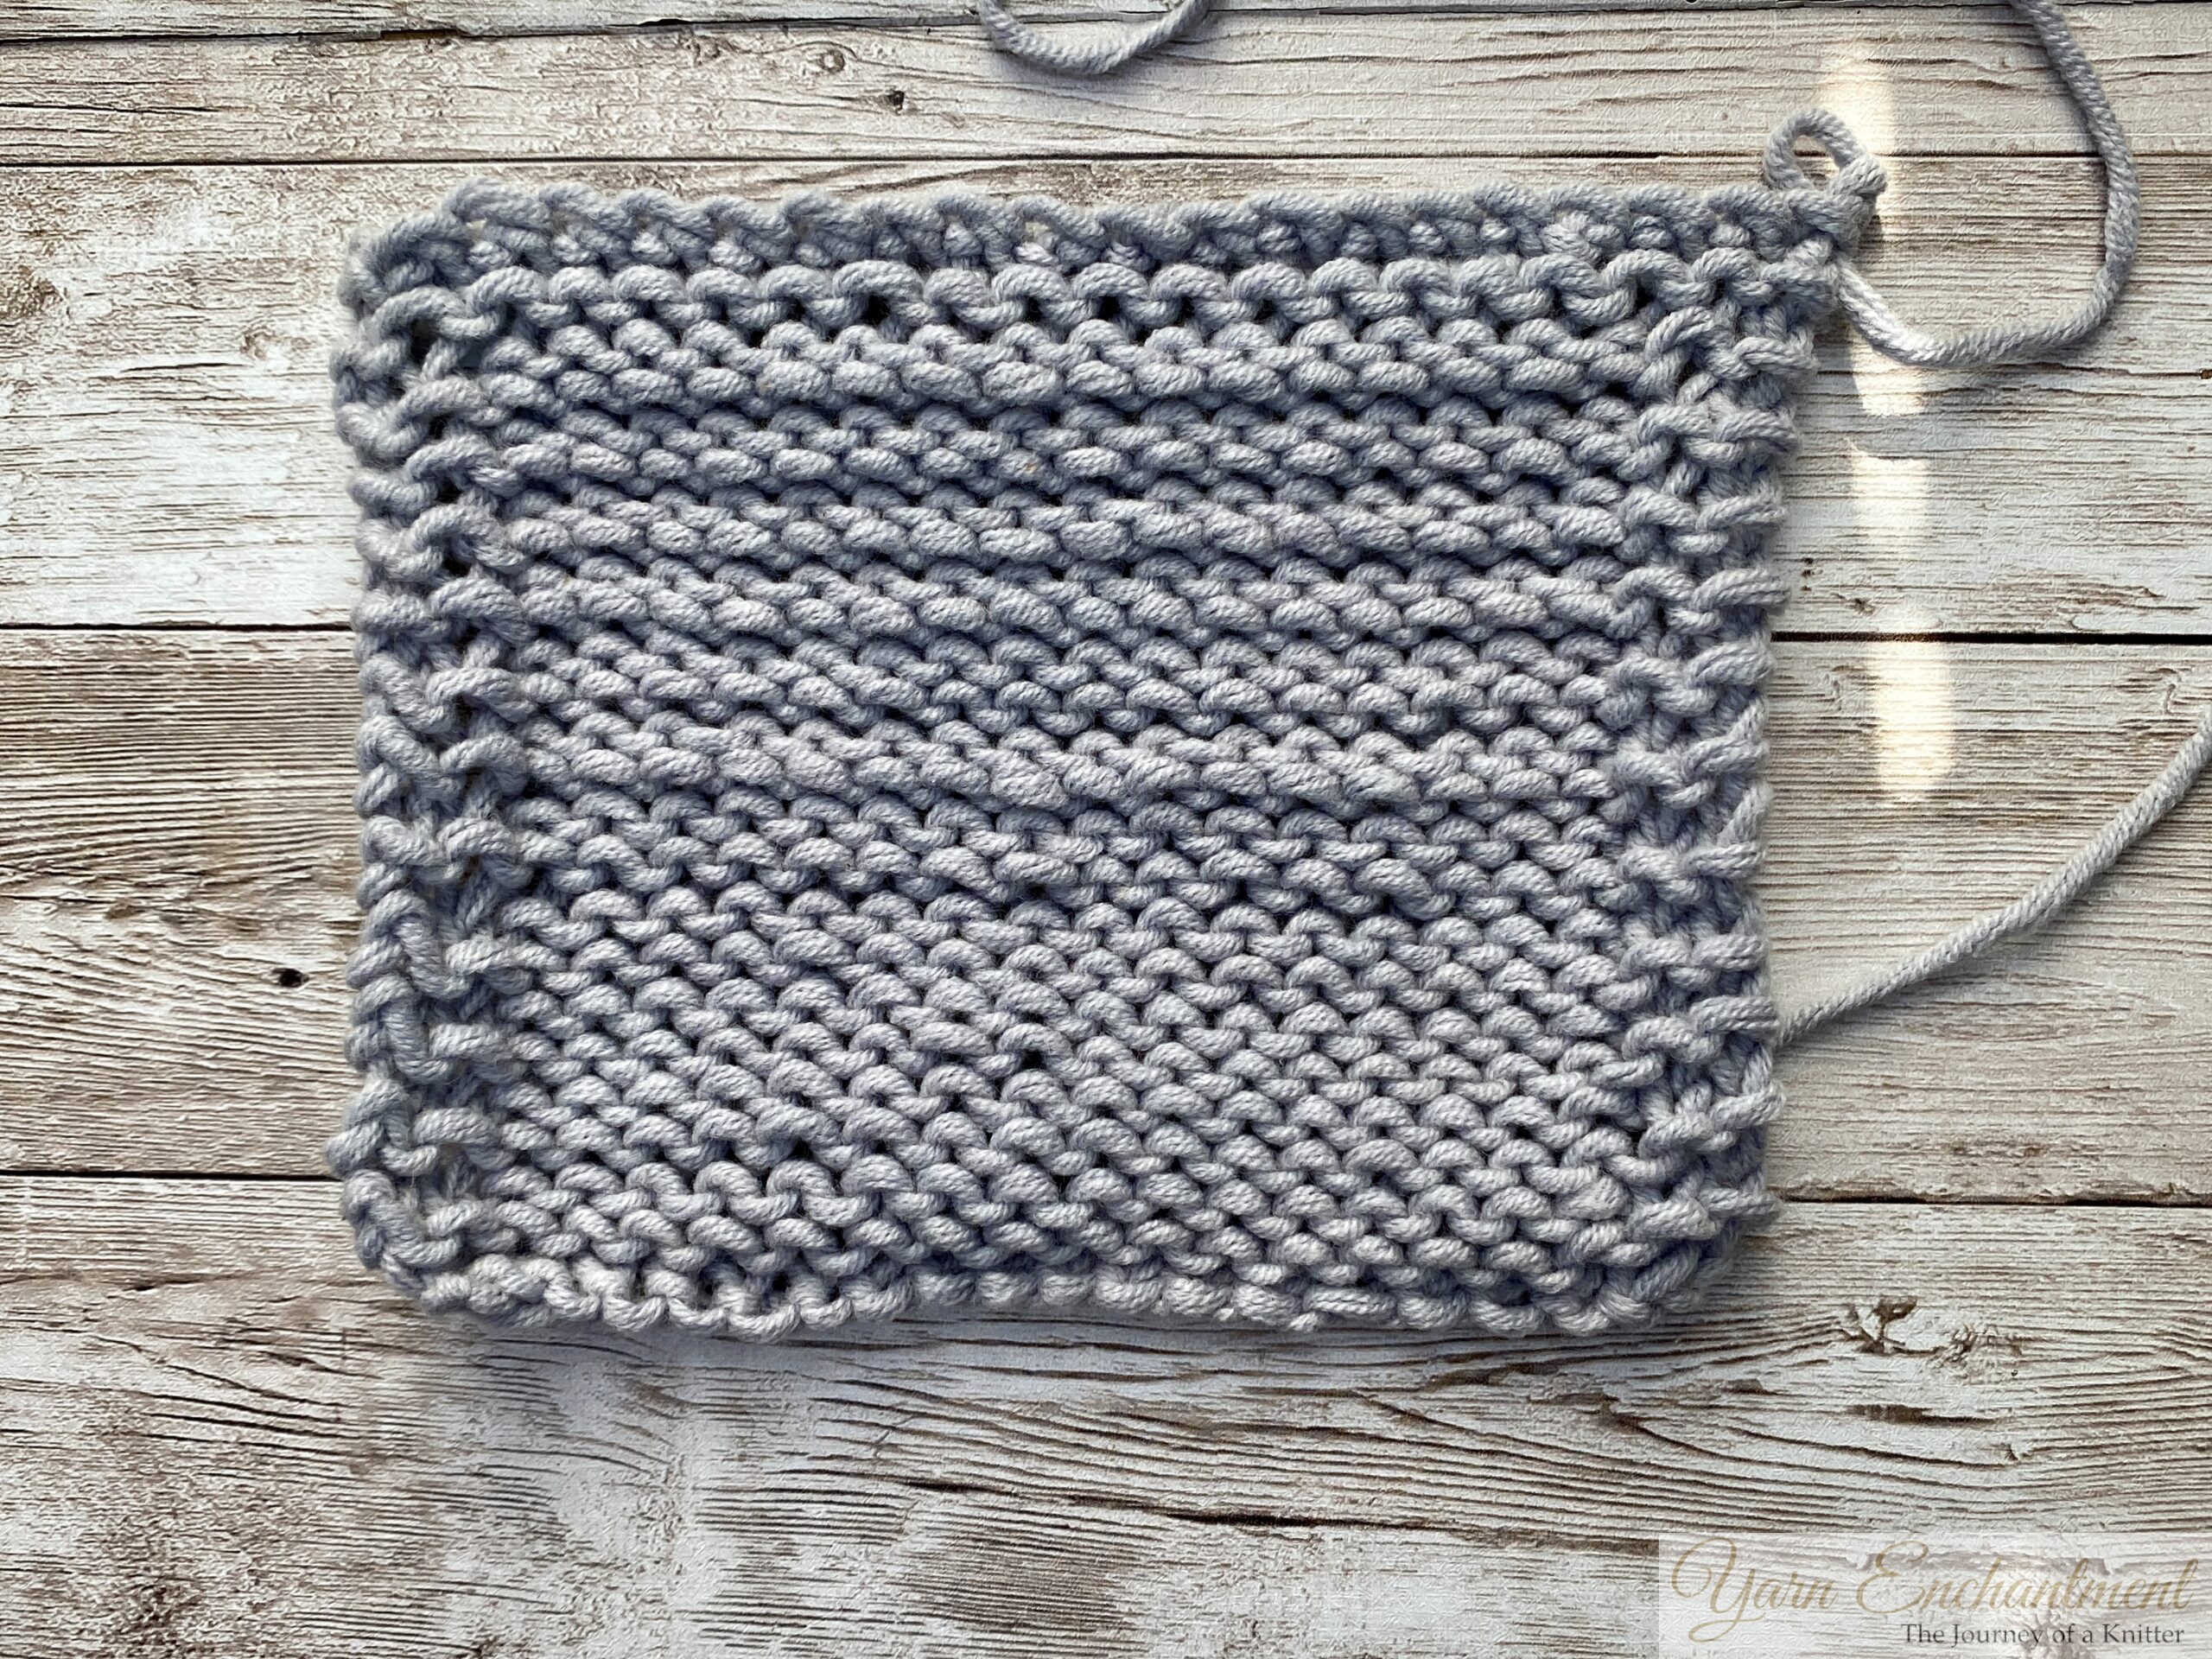
You might already know that garter stitch is made by knitting every row, but did you know you can create the exact same fabric by purling every row?
-
- How to Make It: Instead of knitting every row, try purling every single row. It’s a great way to practice your purling rhythm and build confidence with the stitch.
- What It Looks Like: Both sides of the fabric will have the same bumpy, textured ridges. This makes garter stitch reversible.
- Why Try It?: If you’re working on improving your purling skills, this is an excellent exercise. Plus, it’s a good reminder that knitting and purling are two sides of the same coin!
 | The purled Gater stitch looks the same as the knitted garer stitch |

Ribbing
Ribbing is the secret behind stretchy, snug-fitting edges like cuffs, collars, and hems. It’s also super easy to make once you know how to knit and purl.
-
- How to Make It: Alternate knit and purl stitches in the same row. A common ribbing pattern is k1, p1 (knit one, purl one), but you can also try k2, p2 for a slightly different look.
- What It Looks Like: The fabric has vertical columns of knit and purl stitches, which create a stretchy, elastic texture.
- Best For: Socks, hats, sleeves, and anything that needs to hug your body just right.
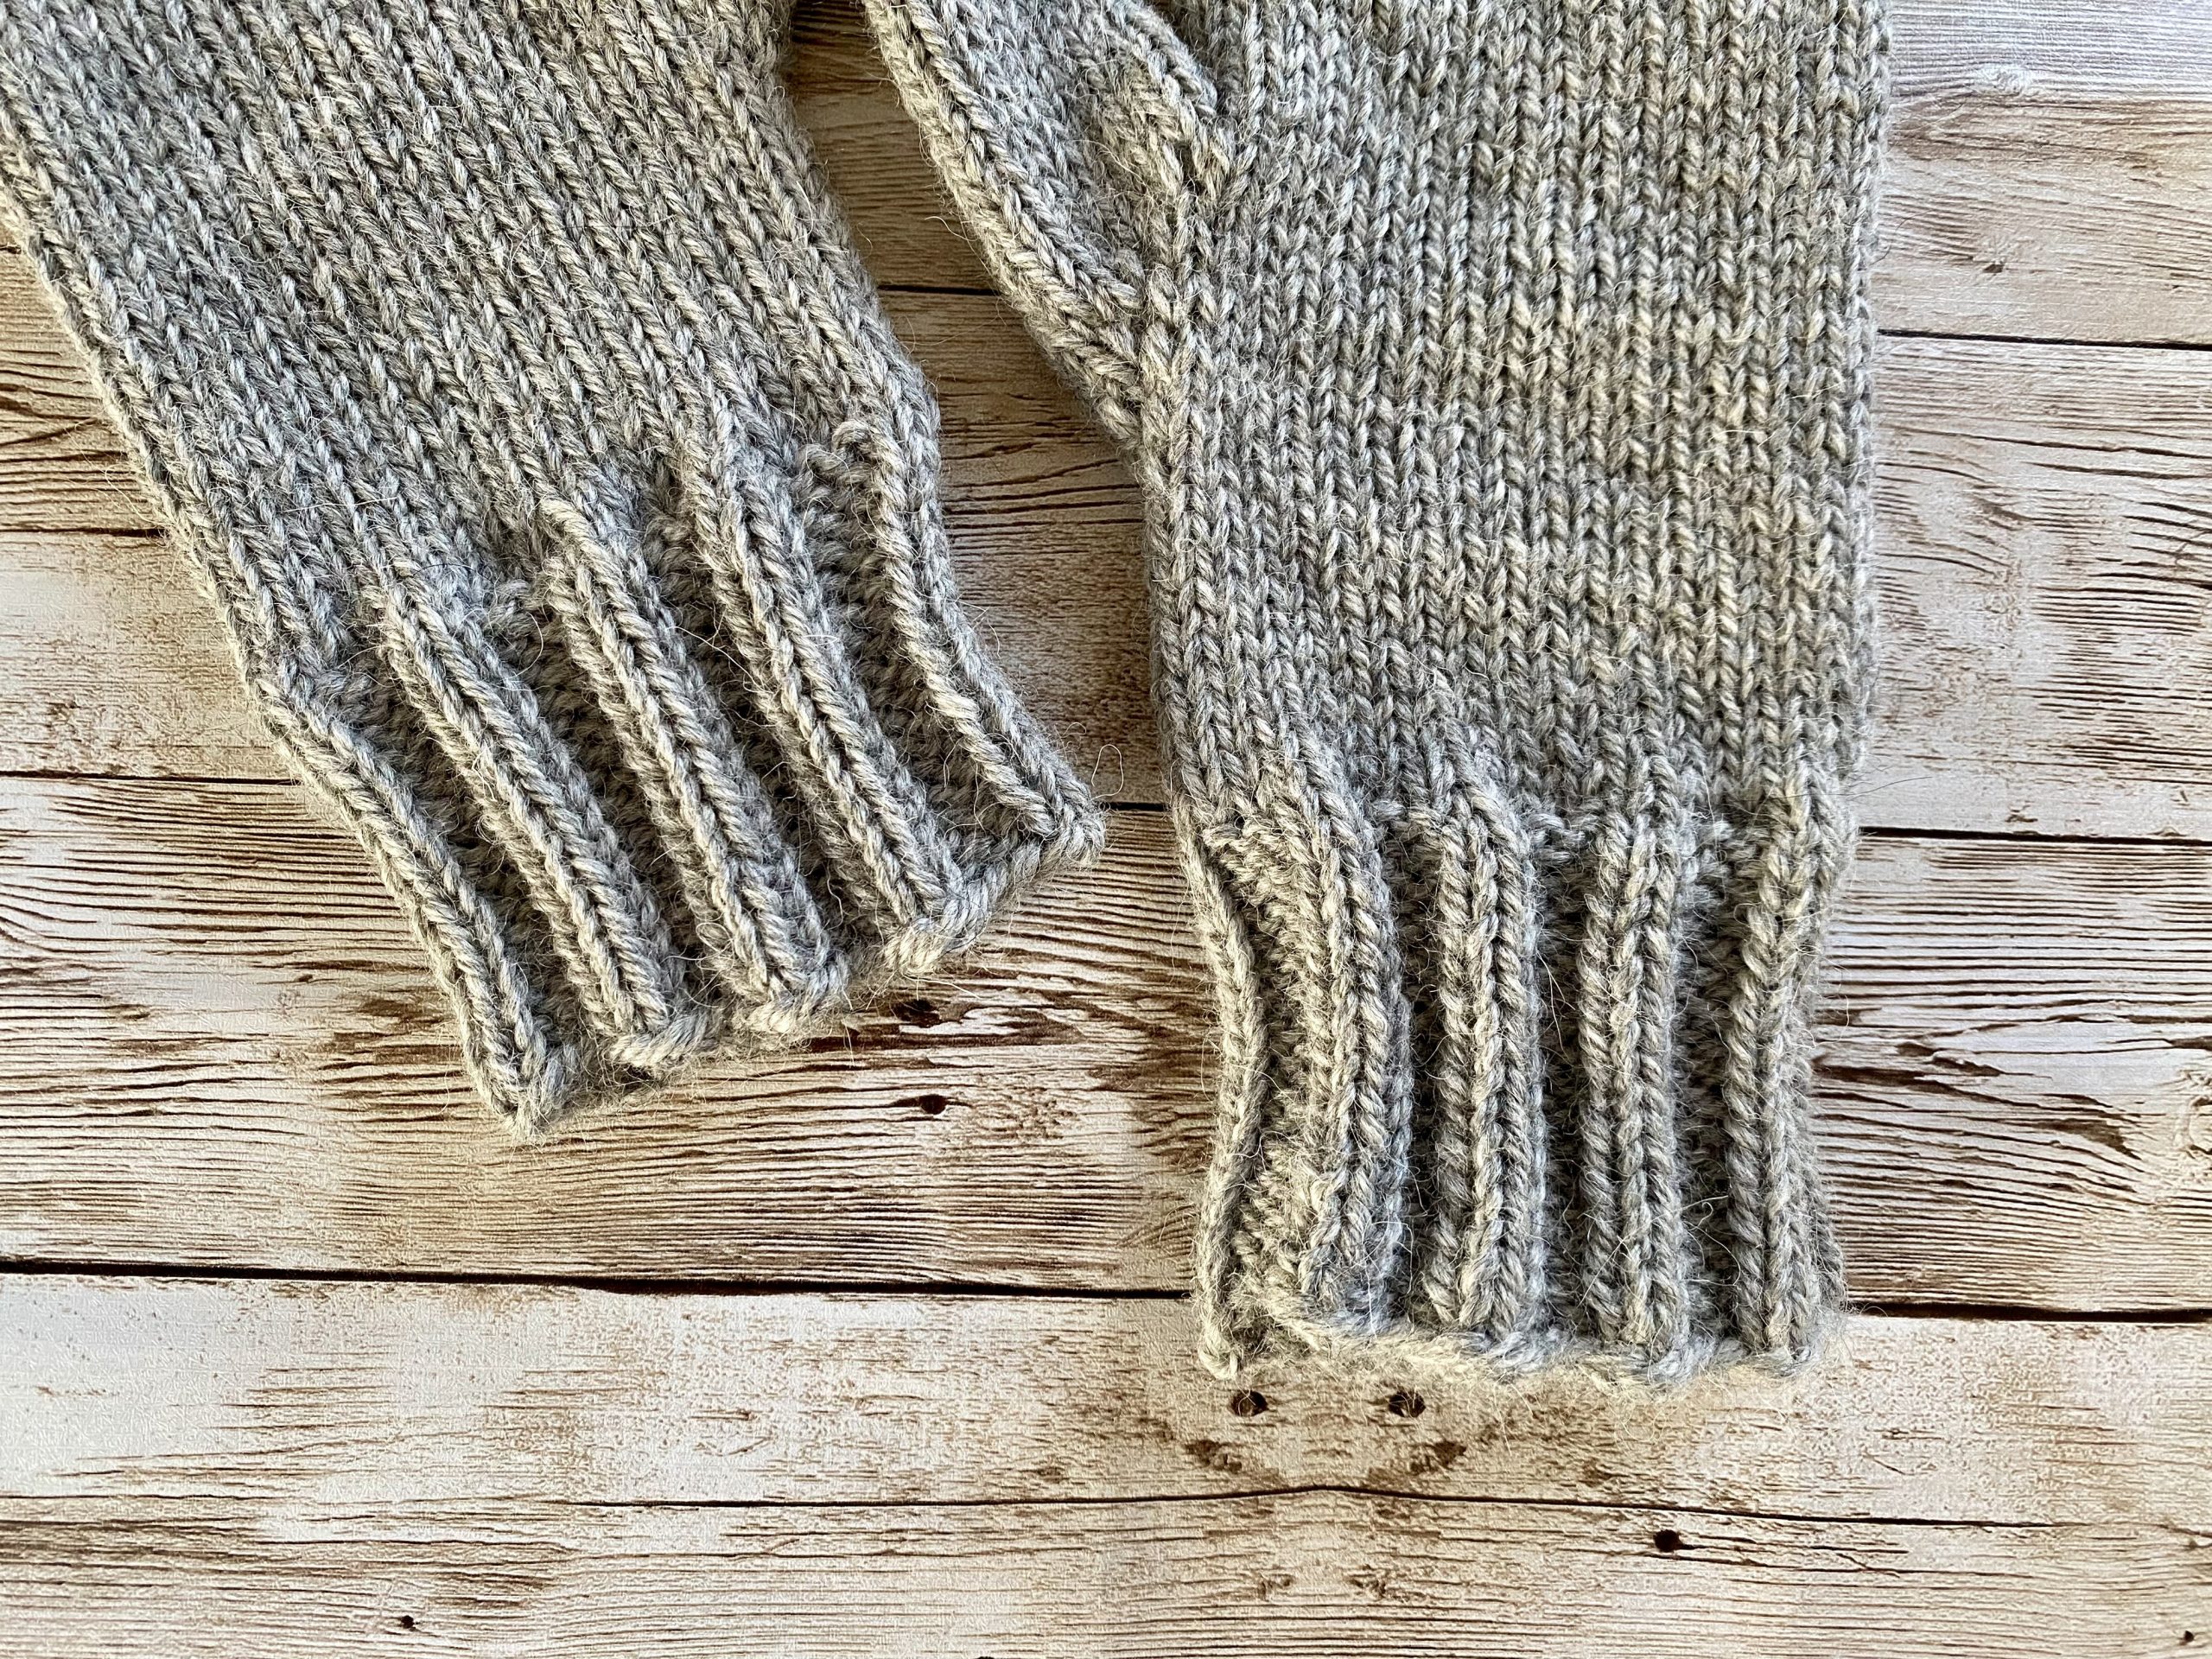 | I worked a 2x2 ribbing on the cuffs for a snug, comfortable fit. |

Moss Stitch 1 (Seed Stitch)
Moss stitch is a fun, textured pattern that looks a bit like scattered seeds. It’s super easy but adds a lot of visual interest to your projects.
-
-
How to Make It:
Alternate knit and purl stitches across the row. For example:- Cast on an odd number of stitches.
- Start with k1, p1 and end the row with a k1.
- On the next row, repeat the same pattern: k1, p1, ending with a k1.
- What It Looks Like: The fabric has a bumpy, speckled texture that’s the same on both sides. It’s almost like a denser version of garter stitch.
- Best For: Coasters, dishcloths, scarves, or anything where you want a cozy, textured feel.
-
 | Moss Stitch |

Troubleshooting Common Purl Stitch Problems
Knitting isn’t always smooth sailing, especially when you’re new to it. But don’t worry! Most issues are easy to fix once you know what to look for. Here’s how to troubleshoot some of the most common purling problems:
Why Are Purl Stitches Looser Than Knit Stitches?
Another common problem is that the purl stitches are looser than the knit stitches. If you’ve ever knit a flat piece with alternating knit and purl rows (like stockinette stitch), you might have noticed something a little odd: the knit fabric appears stripy, your purl stitches often look looser, or even bigger, than your knit stitches. This can create a fabric with slightly uneven tension, a phenomenon knitters call “rowing out.” Don’t worry, it’s super common, and there’s a reason it happens. Let’s break it down:
 |  | The knit stitches appears to be looser and it locks a little stripy | On the wrong side you can clearly see the loose purls stitches |


1. Different Yarn Path, Hand Motion and Yarn Take-Up
The uneven tension between knit and purl stitches often comes down to how the yarn travels and the way we move our hands for each technique:
-
- Knit Stitch: The yarn stays at the back, and the natural motion of pulling it snugly creates tighter, consistent stitches.
- Purl Stitch: The yarn travels around the front of the needle, which can leave more slack, especially if you don’t give the working yarn a gentle tug after each stitch.
Over the course of a row, these small differences in yarn path and hand motion add up, causing purl stitches (and rows) to appear looser than their knit counterparts.
2.Finger Tension Changes
Your hand position changes when purling, making it harder to maintain consistent tension:
-
- Knitting feels natural, but purling can feel awkward, causing you to loosen your grip unintentionally.
- In continental knitting, the yarn wraps around the needle differently during purling, creating longer loops.
4.Needle Size and Material
Believe it or not, your needles can play a role here too! Knitters often find this tension issue more noticeable when using slick needles (like metal) or working with softer, looser yarns. Slick needles let the yarn slide more easily, which can make it harder to control your tension. Similarly, looser yarns are more prone to stretching, which can exaggerate inconsistencies between your knit and purl rows.
How to Fix Loose Purl Stitches
The good news? You can fix this! Here are a few tips to help you tighten up those purl stitches and achieve more even tension:
-
-
Consciously Tighten the Yarn
After completing each purl stitch, give the working yarn a gentle tug to snug it up. This simple habit can make a big difference in evening out your stitches. - Experiment with Needle Size or Technique
Some knitters use a smaller needle for their purl rows to compensate for the looser tension. Others explore “combination knitting,” where you wrap the yarn in the opposite direction for purls to naturally tighten them. - Block Your Finished Piece
If you’ve already finished your project and notice some unevenness, don’t panic! Blocking (wetting or steaming your knitted fabric to even it out) can smooth out minor inconsistencies and make your stitches look more uniform.
-
Twisted Stitches
-
What’s happening?
Your stitches look a little off, like they’re twisted or sitting funny on the needle. Instead of lying flat and even, they might appear crossed. -
Why it happens:
When purling, twisting a stitch can happen in a couple of ways, but one common culprit is how you wrap the yarn around the needle. If you accidentally wrap the yarn clockwise instead of counterclockwise while making a purl stitch, you create what’s called a “reverse-mounted” stitch. This means the leading leg of the stitch ends up at the back of the needle instead of the front.
In the next row, if you insert your needle into the front loop as usual, you’ll twist the stitch.
(Don’t worry too much about accidentally purling into the back loop and twisting the stitch, it’s pretty unlikely because it feels awkward and uncomfortable to do. The more common cause is a clockwise wrap, which creates that reverse mount).
How to fix it:
1.Prevent it from happening:
-
- Always wrap the yarn counterclockwise when purling. This ensures the stitch sits correctly on the needle with the leading leg in the front.
- Double-check your stitches every few rows to make sure they’re not twisted.
2. Fix it if it happens:
If you notice twisted stitches, you have two options:
-
- Let them be: Twisted stitches won’t unravel, and in some cases, they might even add texture if that’s what you’re going for.
- Tink back: Undo your work back to the row where the twist occurred, and rework the stitches correctly.
3. Recognize reverse mounts:
If you spot a reverse-mounted stitch (leading leg at the back), you can either:
-
- Work into the back loop on the next row to untwist it, or
- Slip the stitch off the needle, untwist it with your fingers, and place it back on the needle correctly before working it.
 |  | Here, you can see that the leading leg (the right leg) is positioned at the back of your work. | Knit this stitch through the back loop to untwist it. If you want to twist the stitch on purpose, knit it through the front loop instead. |


The key is learning to recognize the leading leg of your stitch. The “leading leg” is the part of the stitch that sits closest to the tip of the needle, and it tells you whether the stitch is mounted correctly or reversed.
It’s All About Recognizing the Leading Leg
There are two main methods of knitting - Eastern and Western - but the only difference lies in how you wrap your yarn around the needle. Here’s the truth: when it comes to how you purl or knit your stitch, there’s no one “right” way. If wrapping the yarn clockwise feels more natural or comfortable for your hands, then go for it! What really matters is understanding how your stitches are sitting on the needle and ensuring you work them correctly to avoid unwanted twists or intentionally twist them if that’s what the pattern calls for.
A Closer Look at Western and Eastern Knitting
Western Knitting
-
-
- Stitch Mount: The right leg of the stitch is in front of the needle.
- Yarn Wrap: The yarn is wrapped counterclockwise around the needle when creating a new stitch.
- Commonly Used In: Western Europe, English-speaking countries, and regions influenced by Western European traditions.
- Popular Styles: Throwing (English or American style), Flicking, and Picking (Continental style).
-
Eastern Knitting
-
-
- Stitch Mount: The left leg of the stitch is in front of the needle.
- Yarn Wrap: The yarn is wrapped clockwise around the needle when creating a new stitch.
- Commonly Used In: Eastern Europe, Arab countries, and areas with Arab influence, including some parts of South America.
- Also Known As: Russian knitting or Combination knitting.
-
 |  | In Western Kniting the yarn is wrapped counterclockwise around the needle when creating a new stitch. | In easter knitting the the yarn is wrapped clockwise around the needle when creating a new stitch. |


Tips for Smoother Purling
-
-
Posture and Comfort:
Many Knitters experience hand pain from too much purling so try to Sit comfortably, keep wrists relaxed, and stretch if knitting for long periods. -
Yarn Choice:
Beginners benefit from smooth, light-colored yarns and grippy needles. -
Practice Swatches:
Practice purling on small swatches before tackling full projects.
-
Frequently Asked Questions
Q: What’s the main difference between knit and purl?
A: Knits make V’s and are worked with yarn behind. Purls make bumps and require yarn in front.
Q: Can I purl a whole project?
A: Yes, but purled garter fabric is typically looser than knit-based garter.
Q: My purl stitch looks uneven - why?
A: Focus on consistent yarn tension and adjust finger positions as you gain experience.
Q: I keep twisting my purl stitches. What am I doing wrong?
A: Always check your stitch mount before you work your next stitch.
Conclusion
If you’ve made it this far, give yourself a pat on the back - you’re well on your way to mastering the purl stitch. I know this guide is packed with details, but that’s because I wanted to give you everything you need to feel confident, whether you’re just starting out or troubleshooting common frustrations like loose stitches or twisted rows.
Let’s be real: the purl stitch doesn’t always get love. Some knitters outright hate it, finding it awkward or frustrating, especially when their rows end up looking “stripey” from uneven tension. Others dread the first few tries, convinced they’ll never master it. But here’s the thing - the purl stitch isn’t your enemy. It’s just a skill that takes practice to perfect. And once you get the hang of it, you’ll discover how versatile and rewarding it truly is. From cozy ribbing to smooth stockinette, the combination of knit and purl stitches lets you create textures and patterns that make knitting so magical.
Remember, every knitter - yes, even the pros - has struggled with tension issues, dropped stitches, or figuring out which way the yarn should wrap. These challenges are part of the journey. The key is to keep going, stay patient, and trust the process. Over time, those little frustrations will turn into triumphs.
So grab your needles, take a deep breath, and keep practicing. Whether you’re working on a simple scarf or dreaming up something more complex, every stitch you make is progress. Knitting is about more than just the finished project - it’s about the joy of creating something with your own hands. And honestly? There’s nothing quite like the satisfaction of seeing it all come together.
Until then, happy knitting, and don’t forget to share how your very first purl stitch turned out - I’d love to hear all about it!
A Little Way to Say Thanks
You Might Also Like


 |
|
Join the Cozy Corner Newsletter!
Hey there, creative soul! Welcome to the Yarn Enchantment Newsletter, where we celebrate all things cozy, crafty, and full of heart. Think of this as your friendly crafting companion - a little dose of inspiration delivered straight to your inbox, just for you. Inside, you’ll find: ✨ Exclusive patterns & tutorials - ideas you won’t find anywhere else (just for us!) 📚 Bookish crafts that bring your favorite stories to life 🧶 Tips and tricks to make your crafting journey smoother (and more fun!) 💌 Heartfelt musings on life, creativity, and the magic of making something with your own two hands Whether you’re knitting by the fire, brainstorming your next DIY project, or just looking for a little creative pick-me-up, this newsletter is here to cheer you on. Because let’s be honest - crafting isn’t just about the finished project; it’s about the joy, peace, and stories we create along the way. So grab a cup of tea, cozy up, and join me. Together, we’ll weave a little magic into everyday life - one stitch, one story, and one email at a time. P.S. I’m so glad you’re here. Let’s make something beautiful together! (Note: If you're using an ad blocker, you may encounter issues subscribing to the newsletter. To subscribe, please consider disabling your ad blocker.)
|
