

Knitting & Crochet Tips: Stay Cool While Crafting in Hot Weather
July 10, 2026
How to Spot AI-Generated Crochet & Knitting in 2026
July 21, 2026Yarn Over Increase: Invisible vs. Eyelet (Directional M1L/M1R)
)
Originally published on July 17, 2026
This week I want to dive a little deeper into yarn overs. A few days ago, I was scanning through my blog and noticed that I didn't have a yarn over increase in my tutorials. So we definitely need to catch up on this topic, because it's not only about wrapping the yarn around the needle and knitting through the back loop to have no hole, or through the front loop to create a decorative hole. No, yarn overs can be incorporated into increases, bind-offs, and they are essential in lace work. You can also adjust how big the hole should be.
But I want to write two blog posts about yarn overs. First, the increases, which will cover the easy yarn overs and the directional yarn overs. Then, in the next one, I want to talk about yarn overs in lace.
If you've been looking for an easy knitting increase that feels professional and polished, this technique is for you. It's also perfect for cozy handmade gifts where you want clean shaping without that lacy look. And yes, I'll even share how it can be used for beginner knitting tips you can apply right away.
  |
Yarn Over Increase: Invisible vs. Eyelet (Directional M1L/M1R) |
Table of Contents
What Exactly Is a Yarn Over Increase?
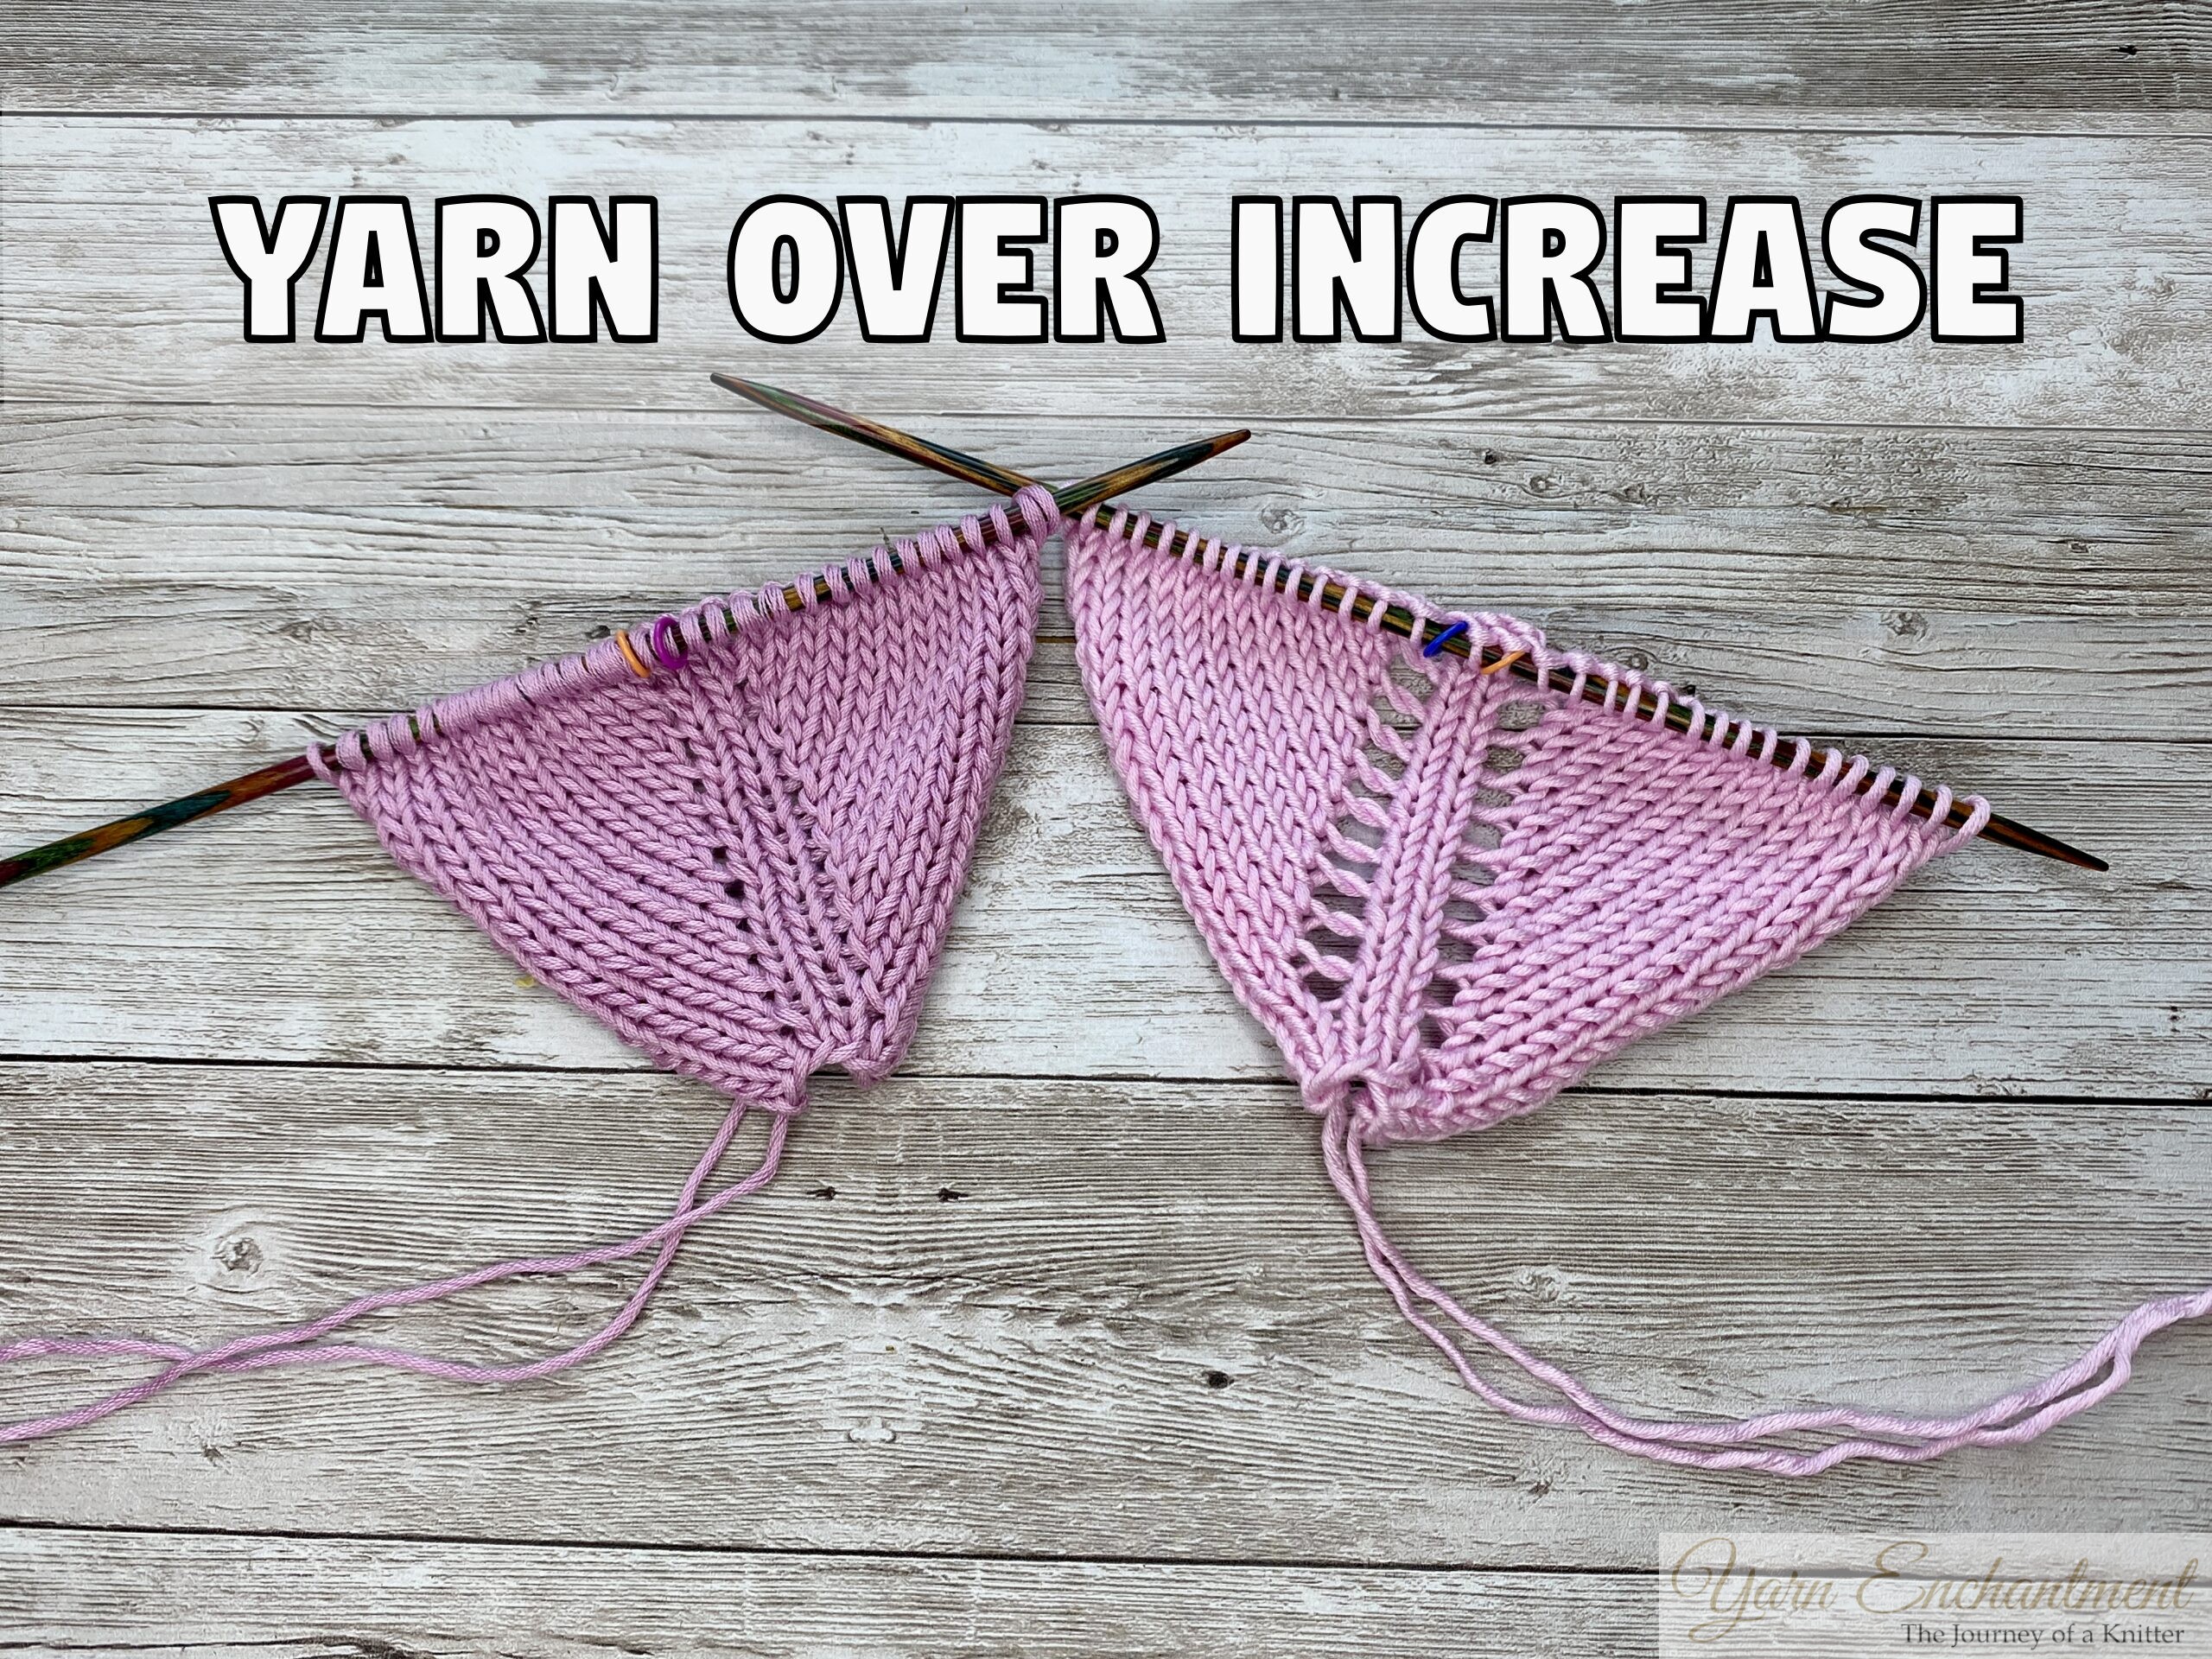
A yarn over increase is just what it sounds like. You wrap the yarn around your right needle between two stitches. That creates an extra loop. On the next row, you have to work that loop as a stitch. And here's where the magic happens.
Now, here's the thing about a yarn over: it always leaves a little hole or eyelet in your finished fabric. That's its nature. And honestly, that's what makes it so lovely for lace patterns, where you want that open, airy feel. But here's a little secret, you can also use it as a shaping increase and decide whether that hole stays open or closes up tight. What's more, you can choose which direction that closed increase leans. Pretty clever, right?
Before we go any further, I want to mention something that happens to all of us. Sometimes a yarn over happens completely by accident! You're knitting along, and suddenly the yarn loops over your needle without you meaning to. Surprise! You end up with an unexpected hole and an extra stitch you didn't plan for. Don't worry, we've all been there. I'll show you how to spot these little surprises and fix them when they pop up.
So why would you want to use a yarn over on purpose? Well, it does two wonderful things at once. It increases the number of stitches on your needles, and it leaves a decorative open space in your fabric. Knitters love using them in lace patterns, mesh stitch patterns, and even as subtle design details in otherwise solid fabrics. They're such a versatile little move, and once you learn them, you'll spot them everywhere.
The loop sits there all alone with no stitch below it. That means it naturally wants to leave a little hole. But you can decide whether that hole stays open or closes up tight. And with a simple twist of your needle, you can even control which way your increase leans.
For the best results, I recommend using a smooth, plied yarn when you first practice. That makes it easier to see which leg is the back loop. If you want to read more about choosing the right fiber, check out my guide on yarn tips for new crafters.
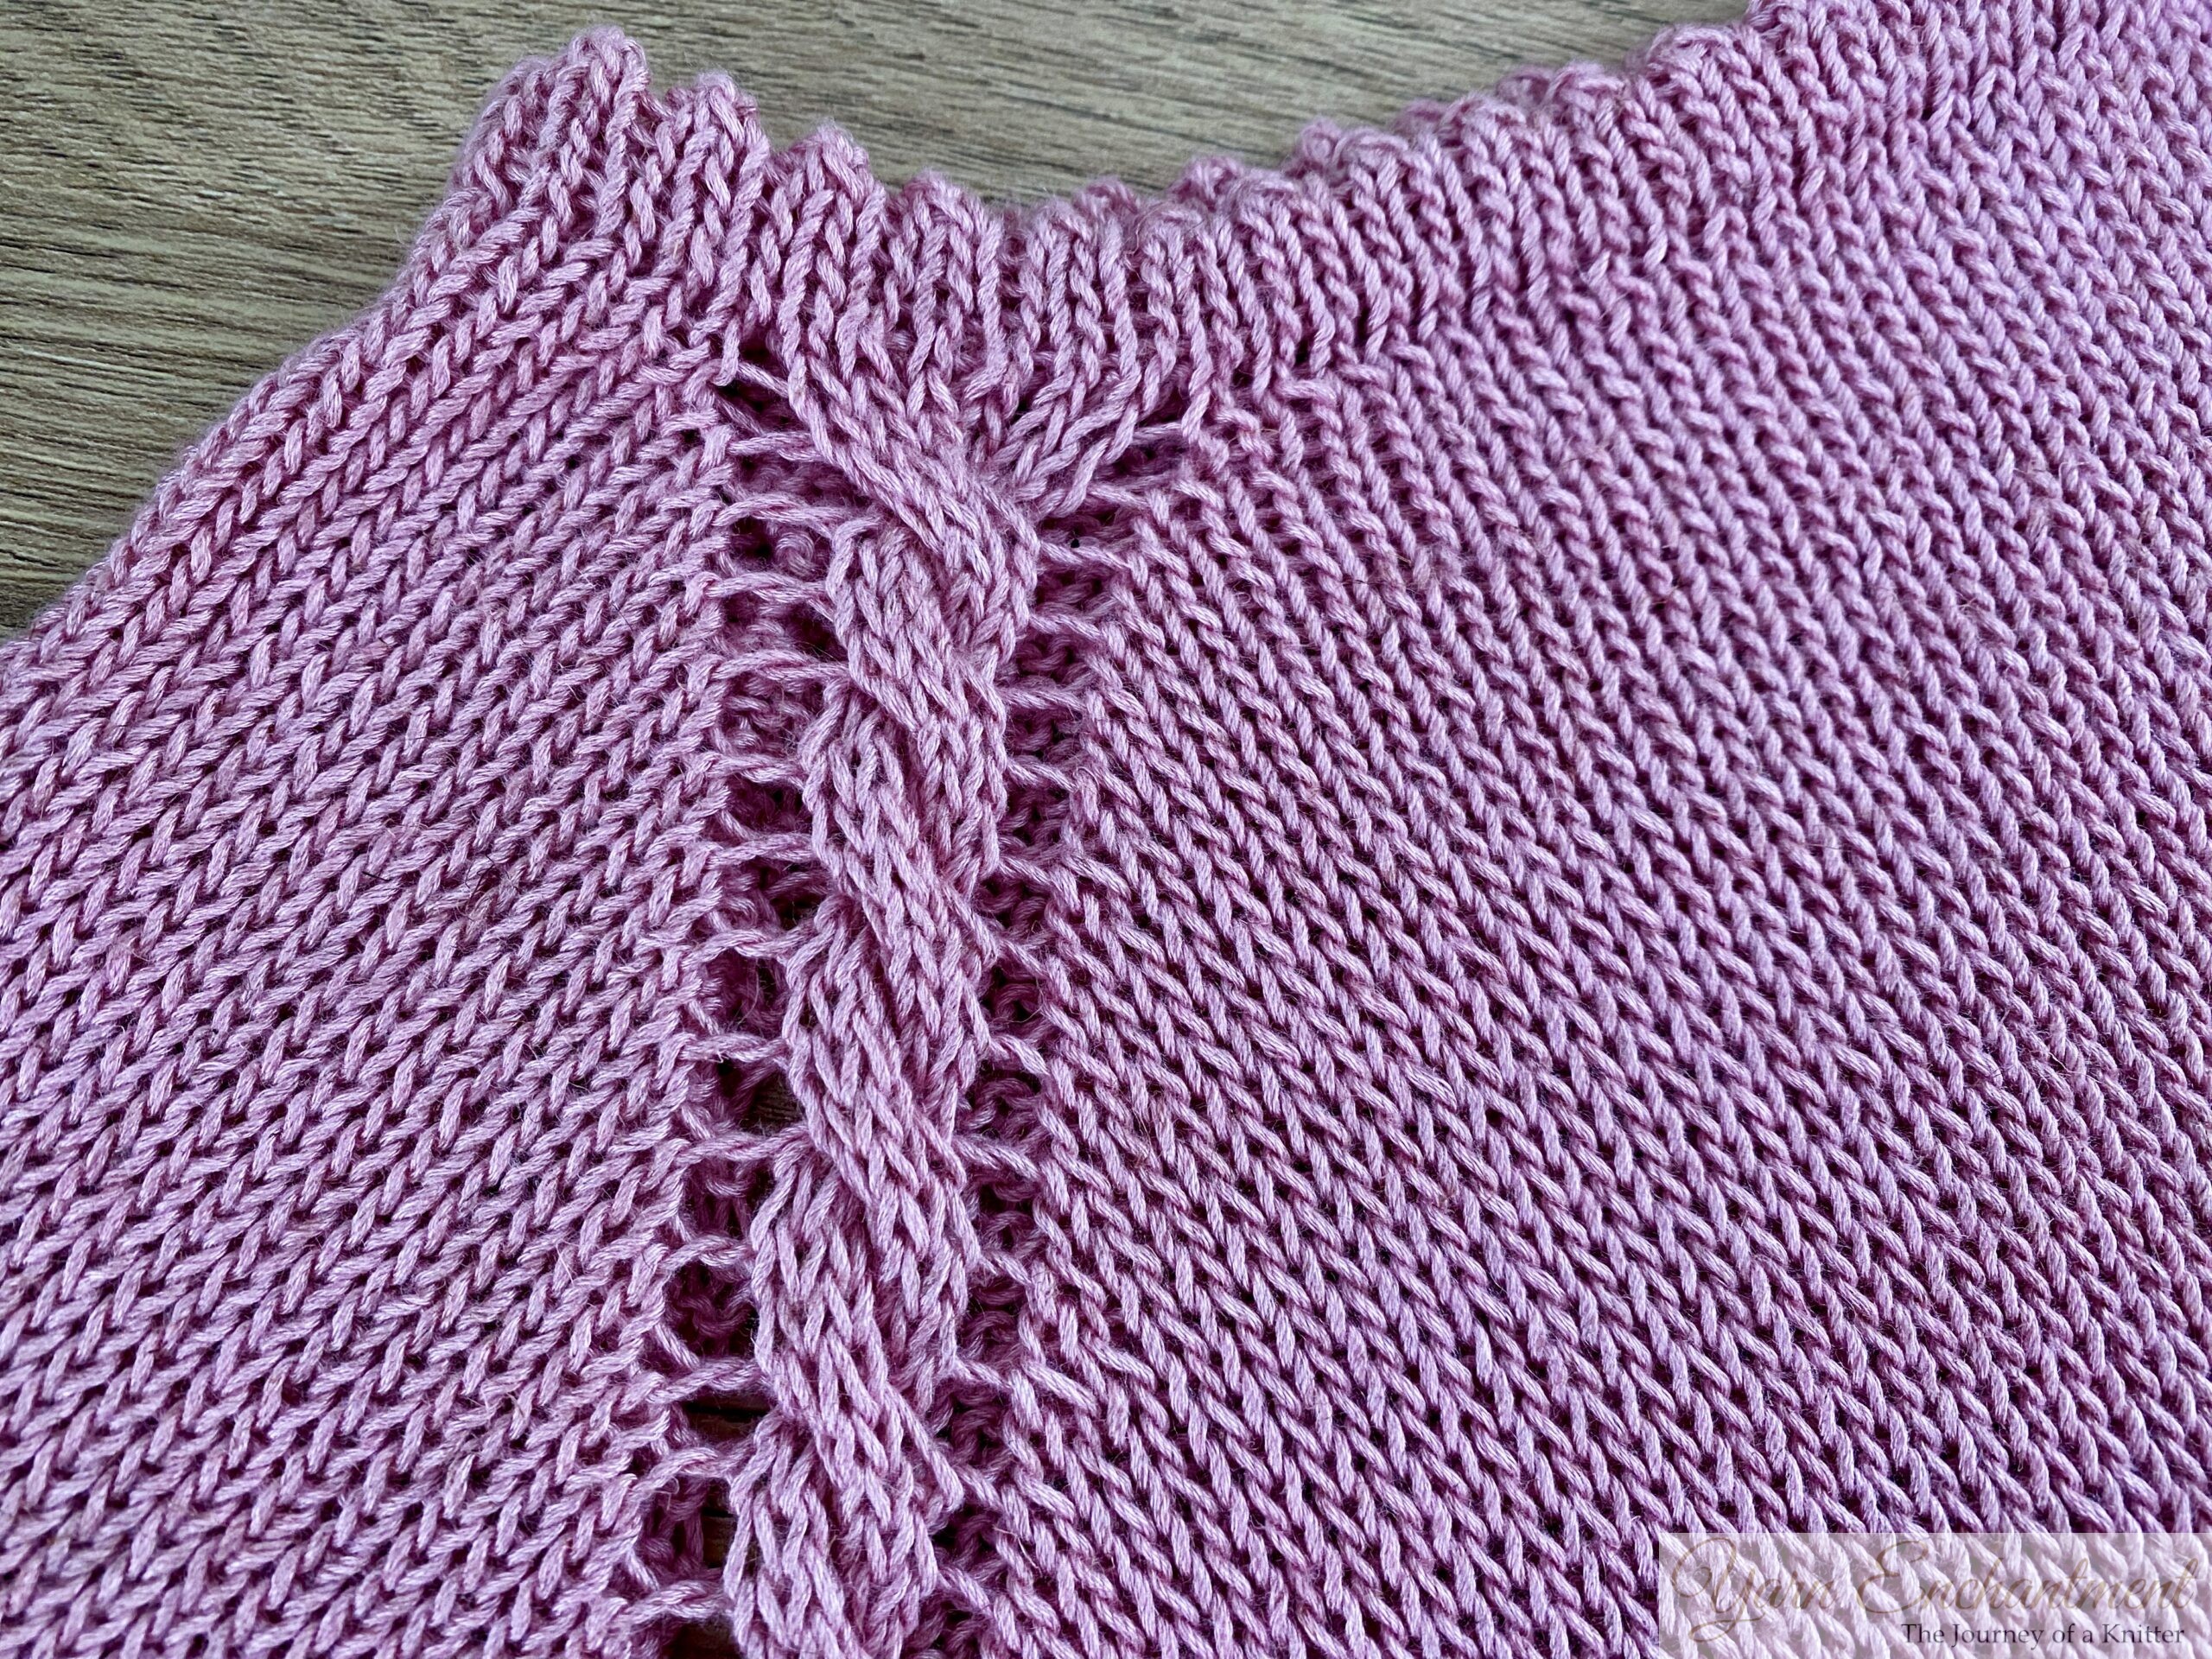  |
I worked yarn over increases on both sides of a cable stitch pattern for the Rosy Ruffle Tee. It's a beautiful way to add shaping while keeping the cable as the focal point of the design! |
Step‑by‑Step: How to Work a Yarn Over Increase
Method One: Yarn Over Increase - Flat Knitting (No Holes)
When you want to increase with yarn overs but you don't want the holes, on the wrong side you have to purl through the back loop (often written as ptbl in patterns). This simple twist transforms your yarn over into a nearly invisible increase.
Here's what happens: when you purl through the back loop, you twist the yarn over. That twist pulls the yarn tight and draws the surrounding stitches closer together. The hole nearly disappears. It's like magic, but better - it's knitting!
How to Work Yarn Over Increases Flat (No Holes):
When you're working flat, that is, knitting back and forth on straight needles, you have both right-side (RS) and wrong-side (WS) rows to consider. This is where the magic of closing that yarn over hole really happens. Let me walk you through it step by step.
On the Right Side (RS) – Creating the Yarn Over
On the right side of your work, you'll create your yarn over increase. Here's exactly how to do it:
-
Work your way across the row until you reach the spot where you want your increase.
-
Bring the yarn to the front of your needle, just as if you were going to purl.
-
Now, take the yarn over the top of the right needle to the back. This wraps the yarn around the needle and creates your new loop.
-
Continue knitting the rest of your row as usual.
On the Wrong Side (WS) – Closing the Hole
When you turn your work to the wrong side, you'll eventually reach that yarn over loop you created on the previous row. If you want to close the hole (and create an invisible increase), you need to purl it through the back loop.
Here's how to purl through the back loop (ptbl):
-
Hold your working yarn in front of your work, just as you would for a regular purl stitch.
-
Insert your right needle into the back leg of the yarn over loop. The back leg is the one farthest from the tip of your left needle.
-
Wrap the yarn around the right needle counterclockwise (just like a normal purl).
-
Pull the loop through to complete the stitch.
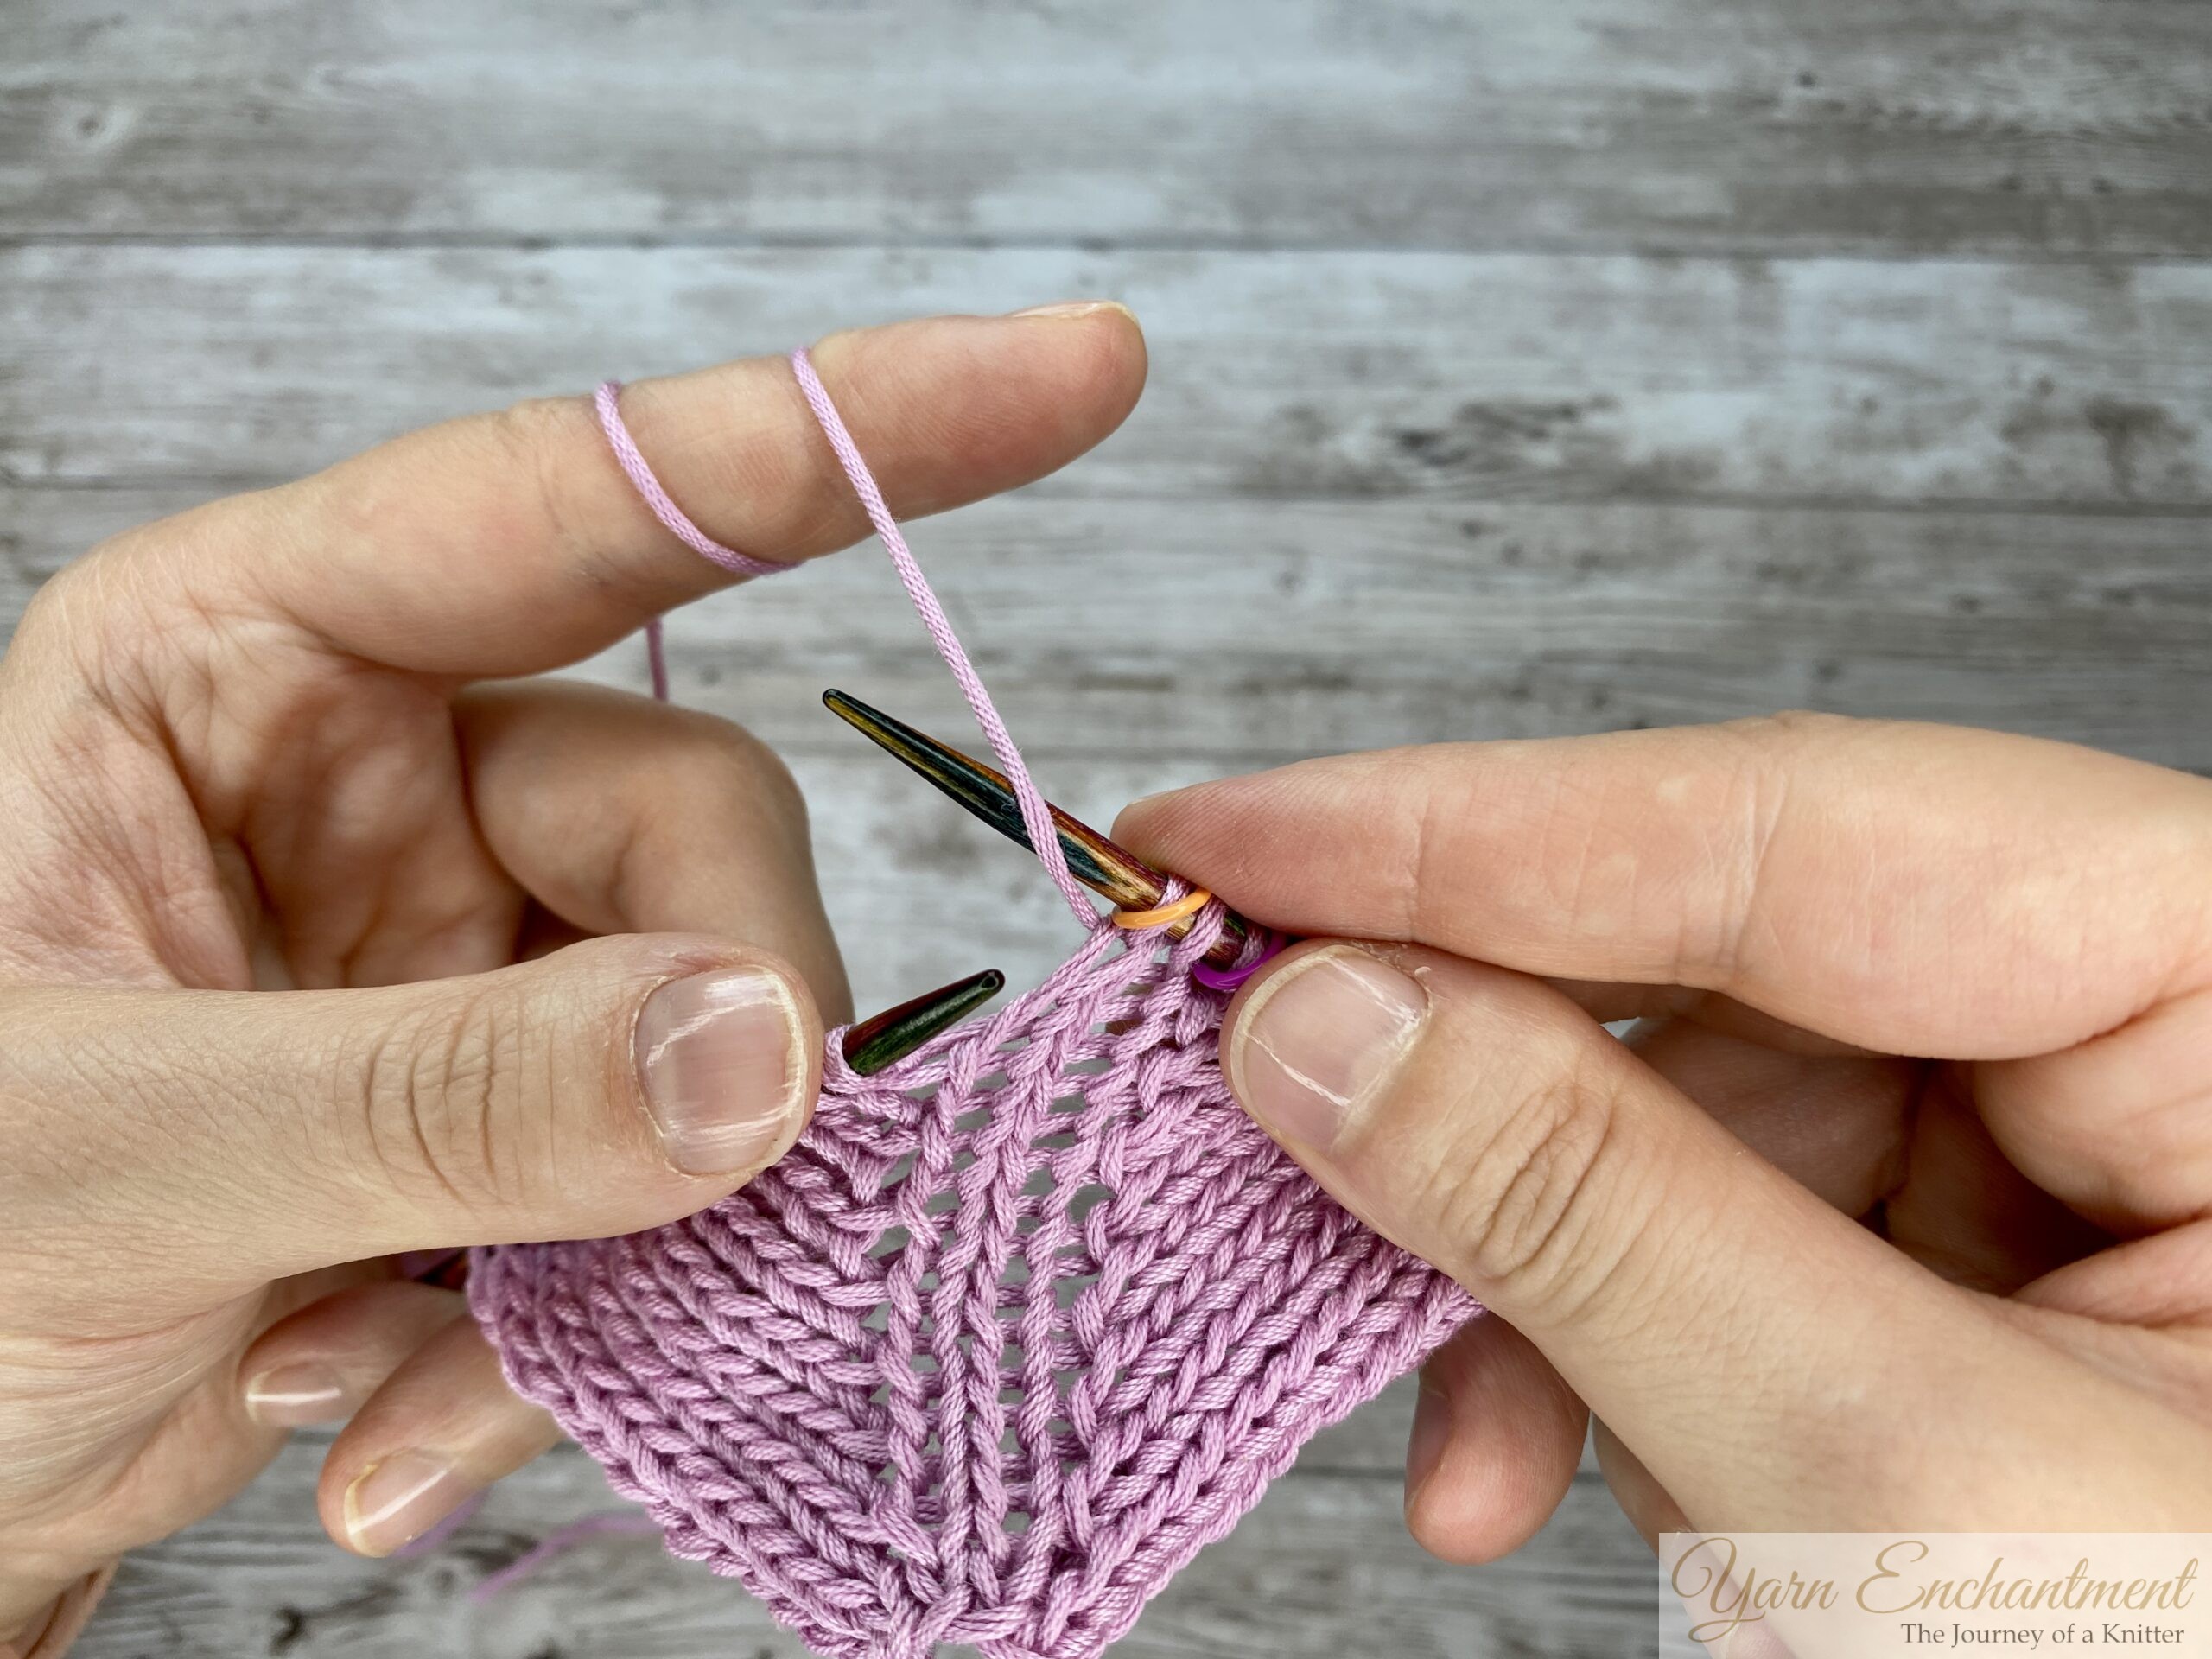  | 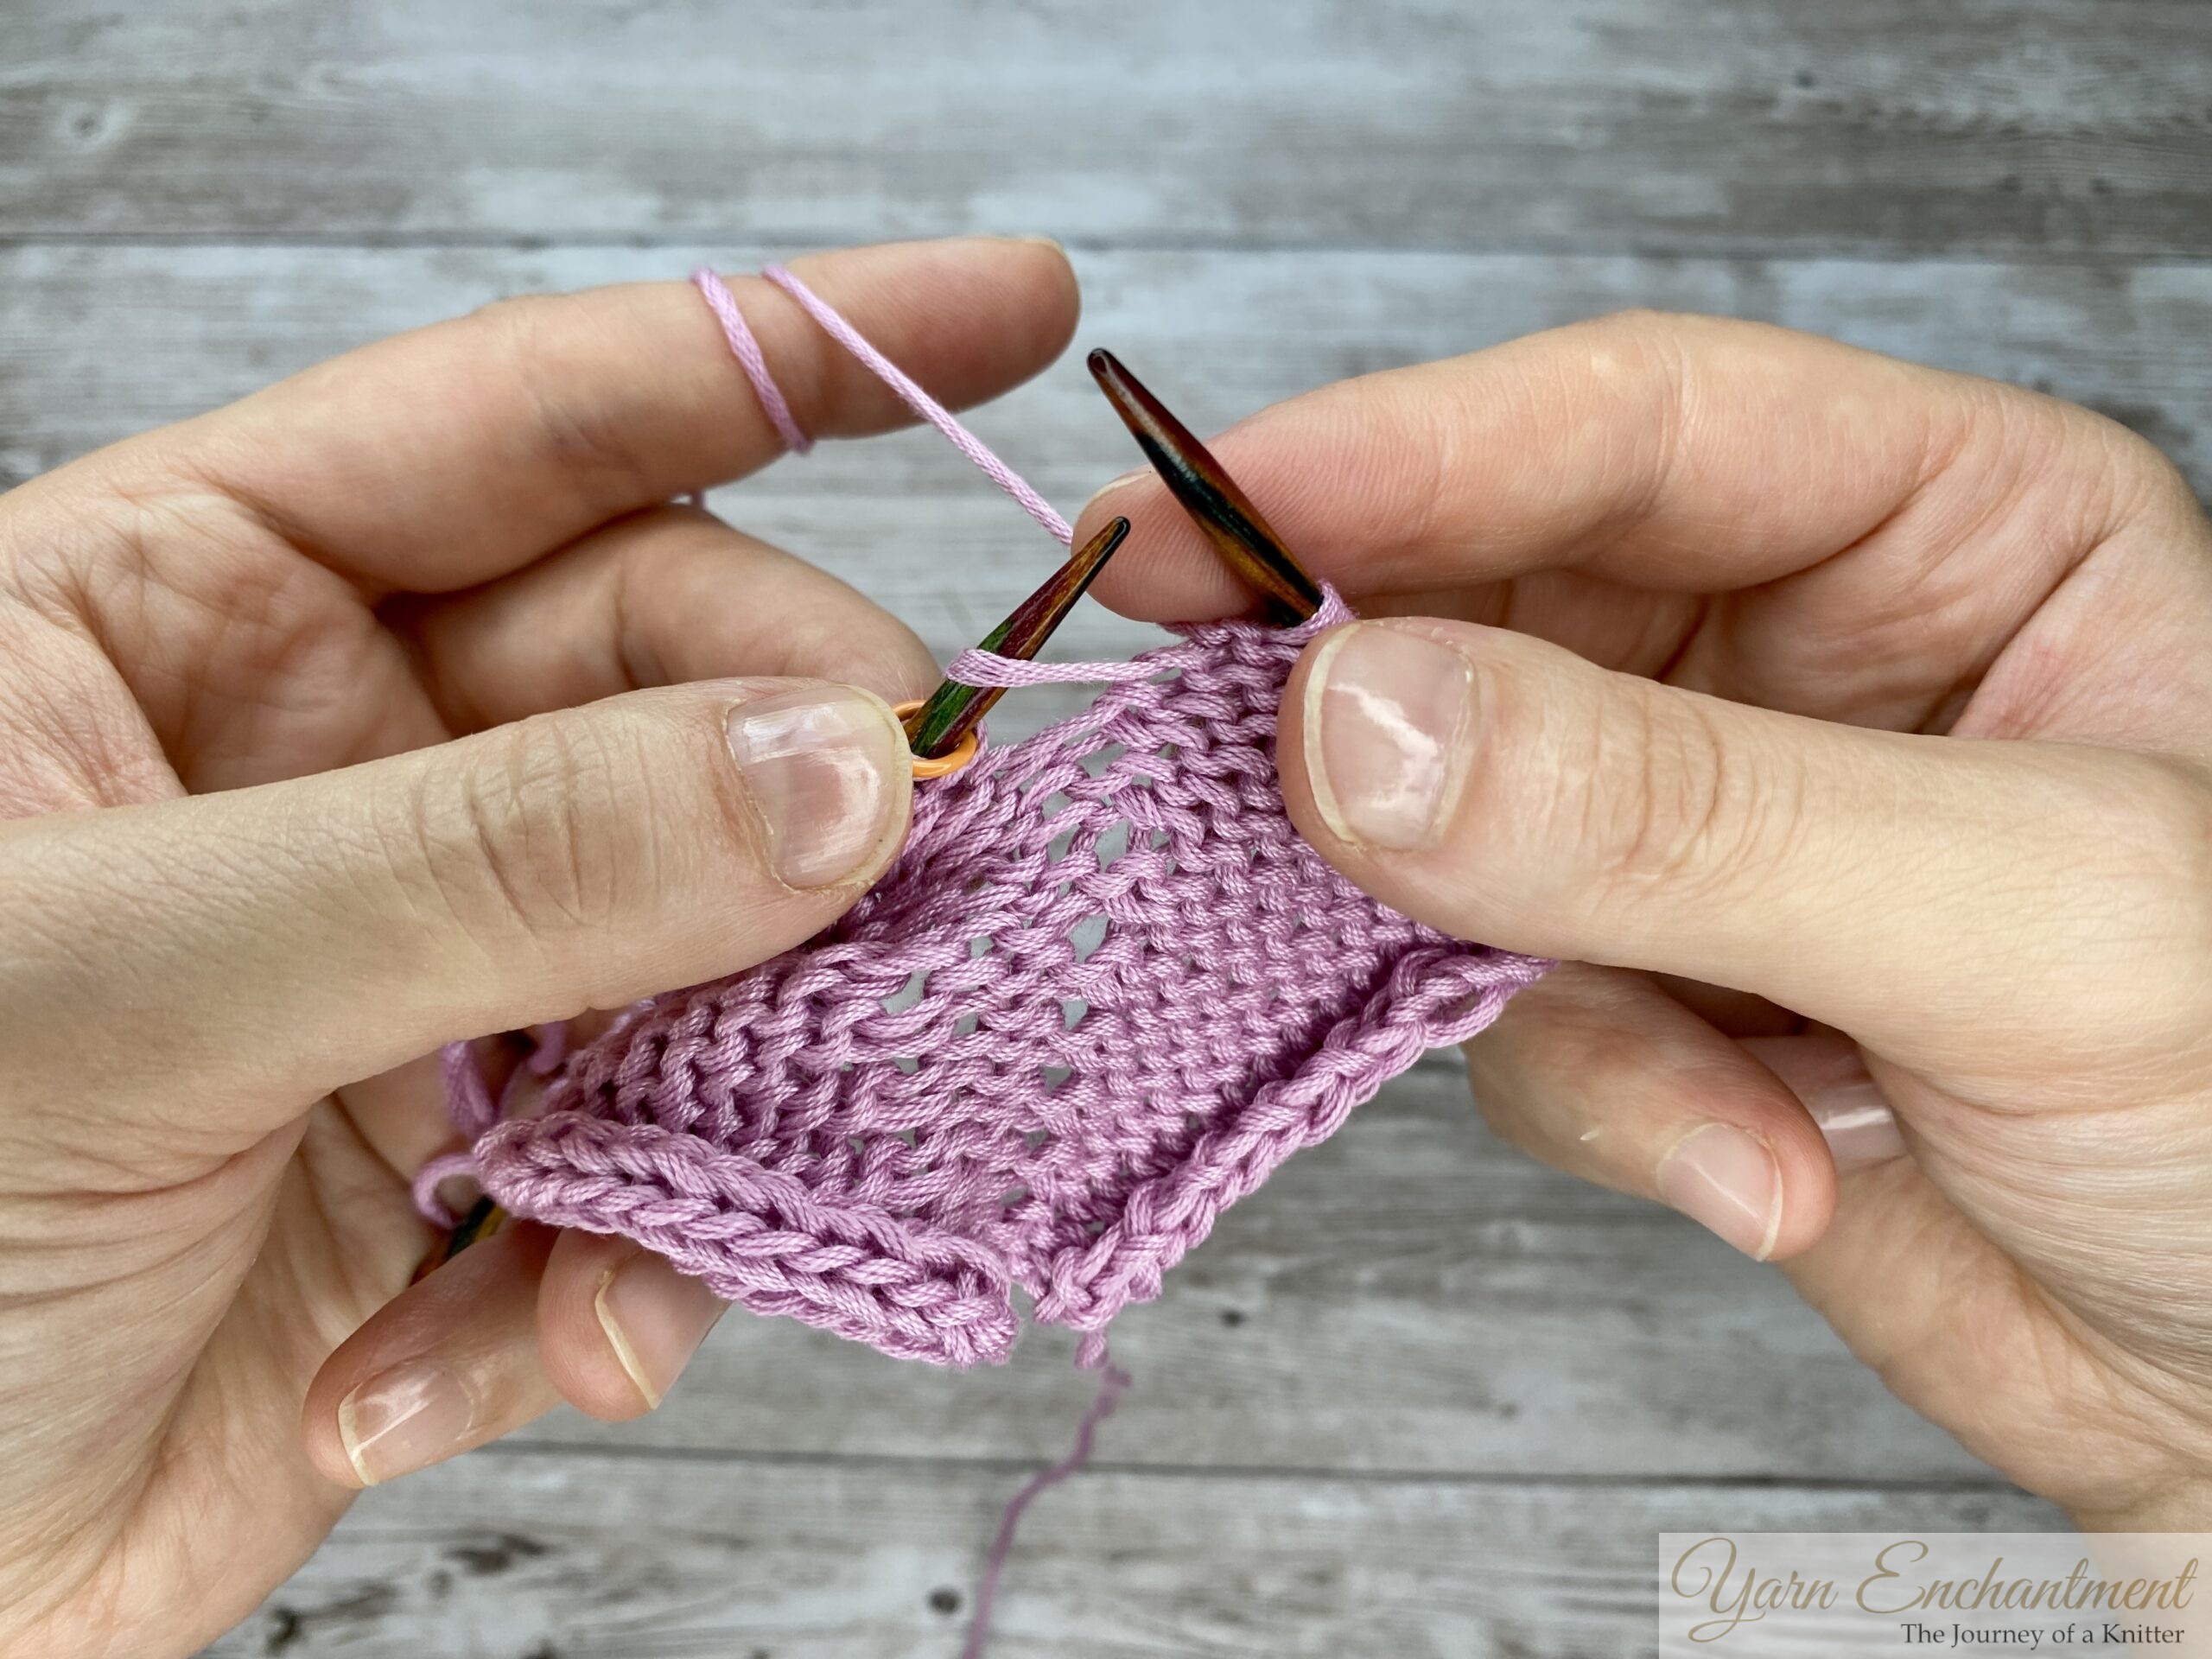  | 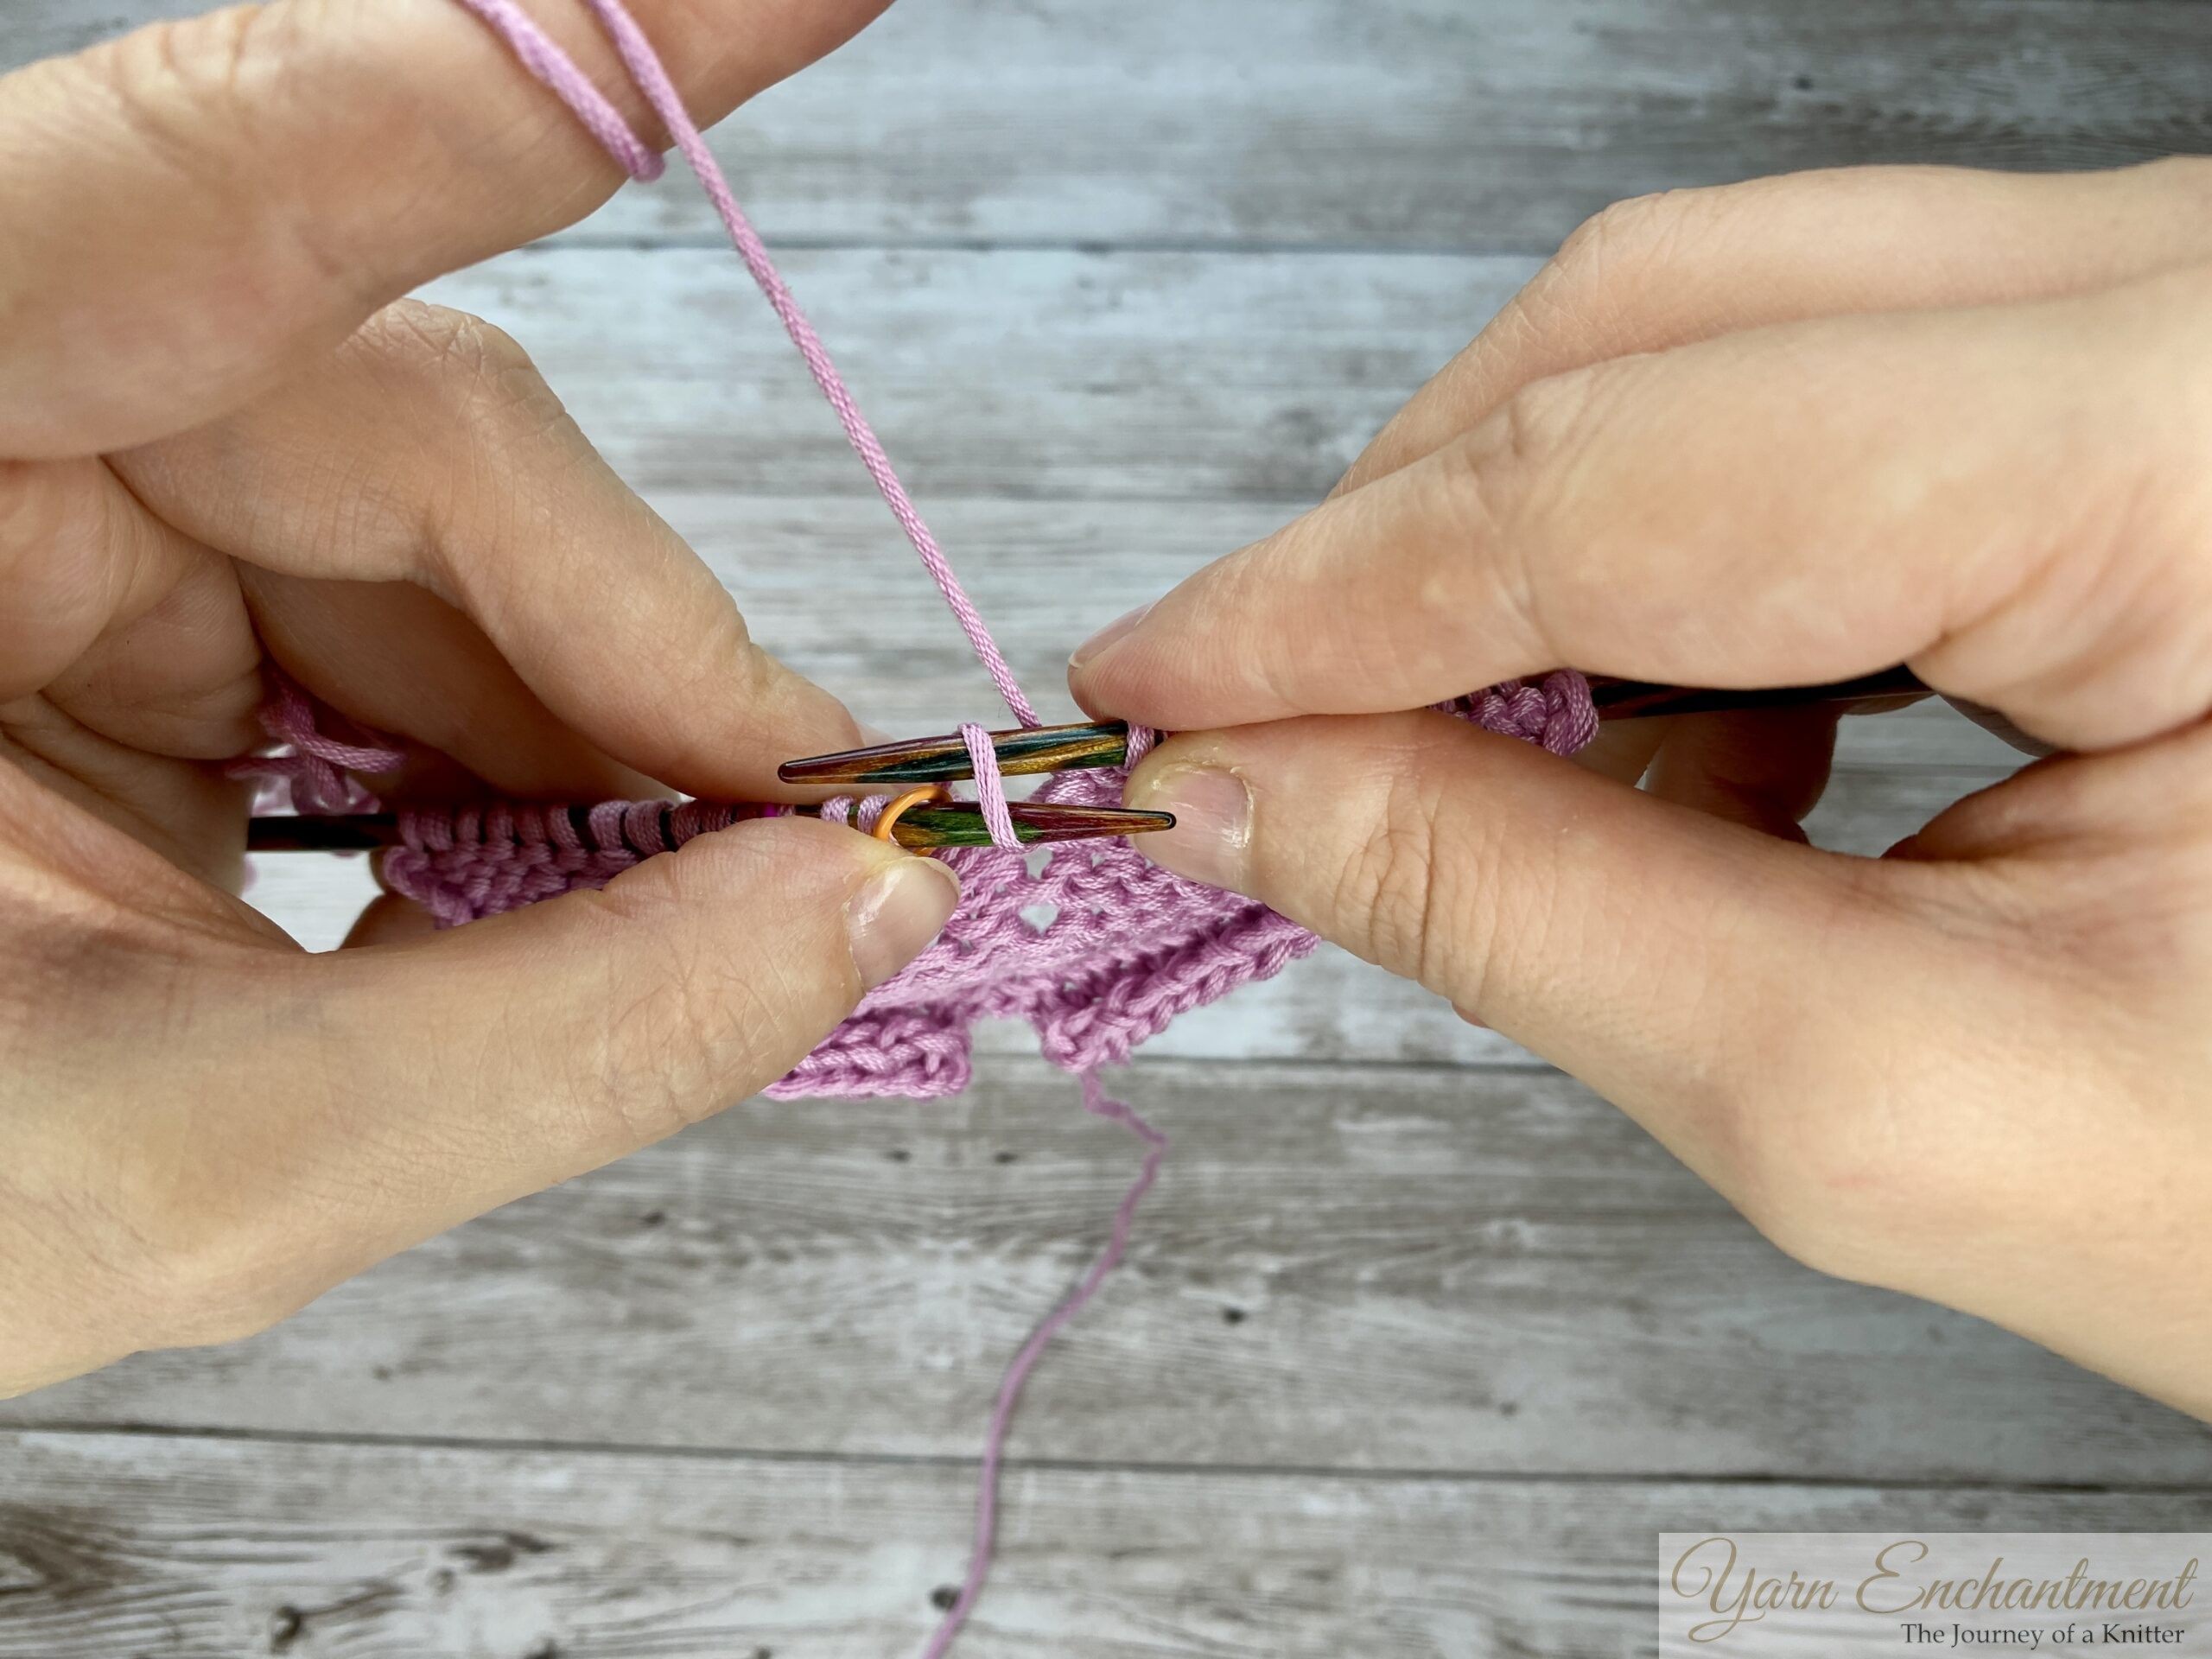  |
Bring the yarn to the front of your needle, just as if you were going to purl. Now, take the yarn over the top of the right needle to the back. This wraps the yarn around the needle and creates your new loop. | Work your way to to the yarn over | Look at the stitch on your left needle. See how it has two "legs" - one in front and one in back? The back leg is the one that sits farthest away from you, behind the needle. |
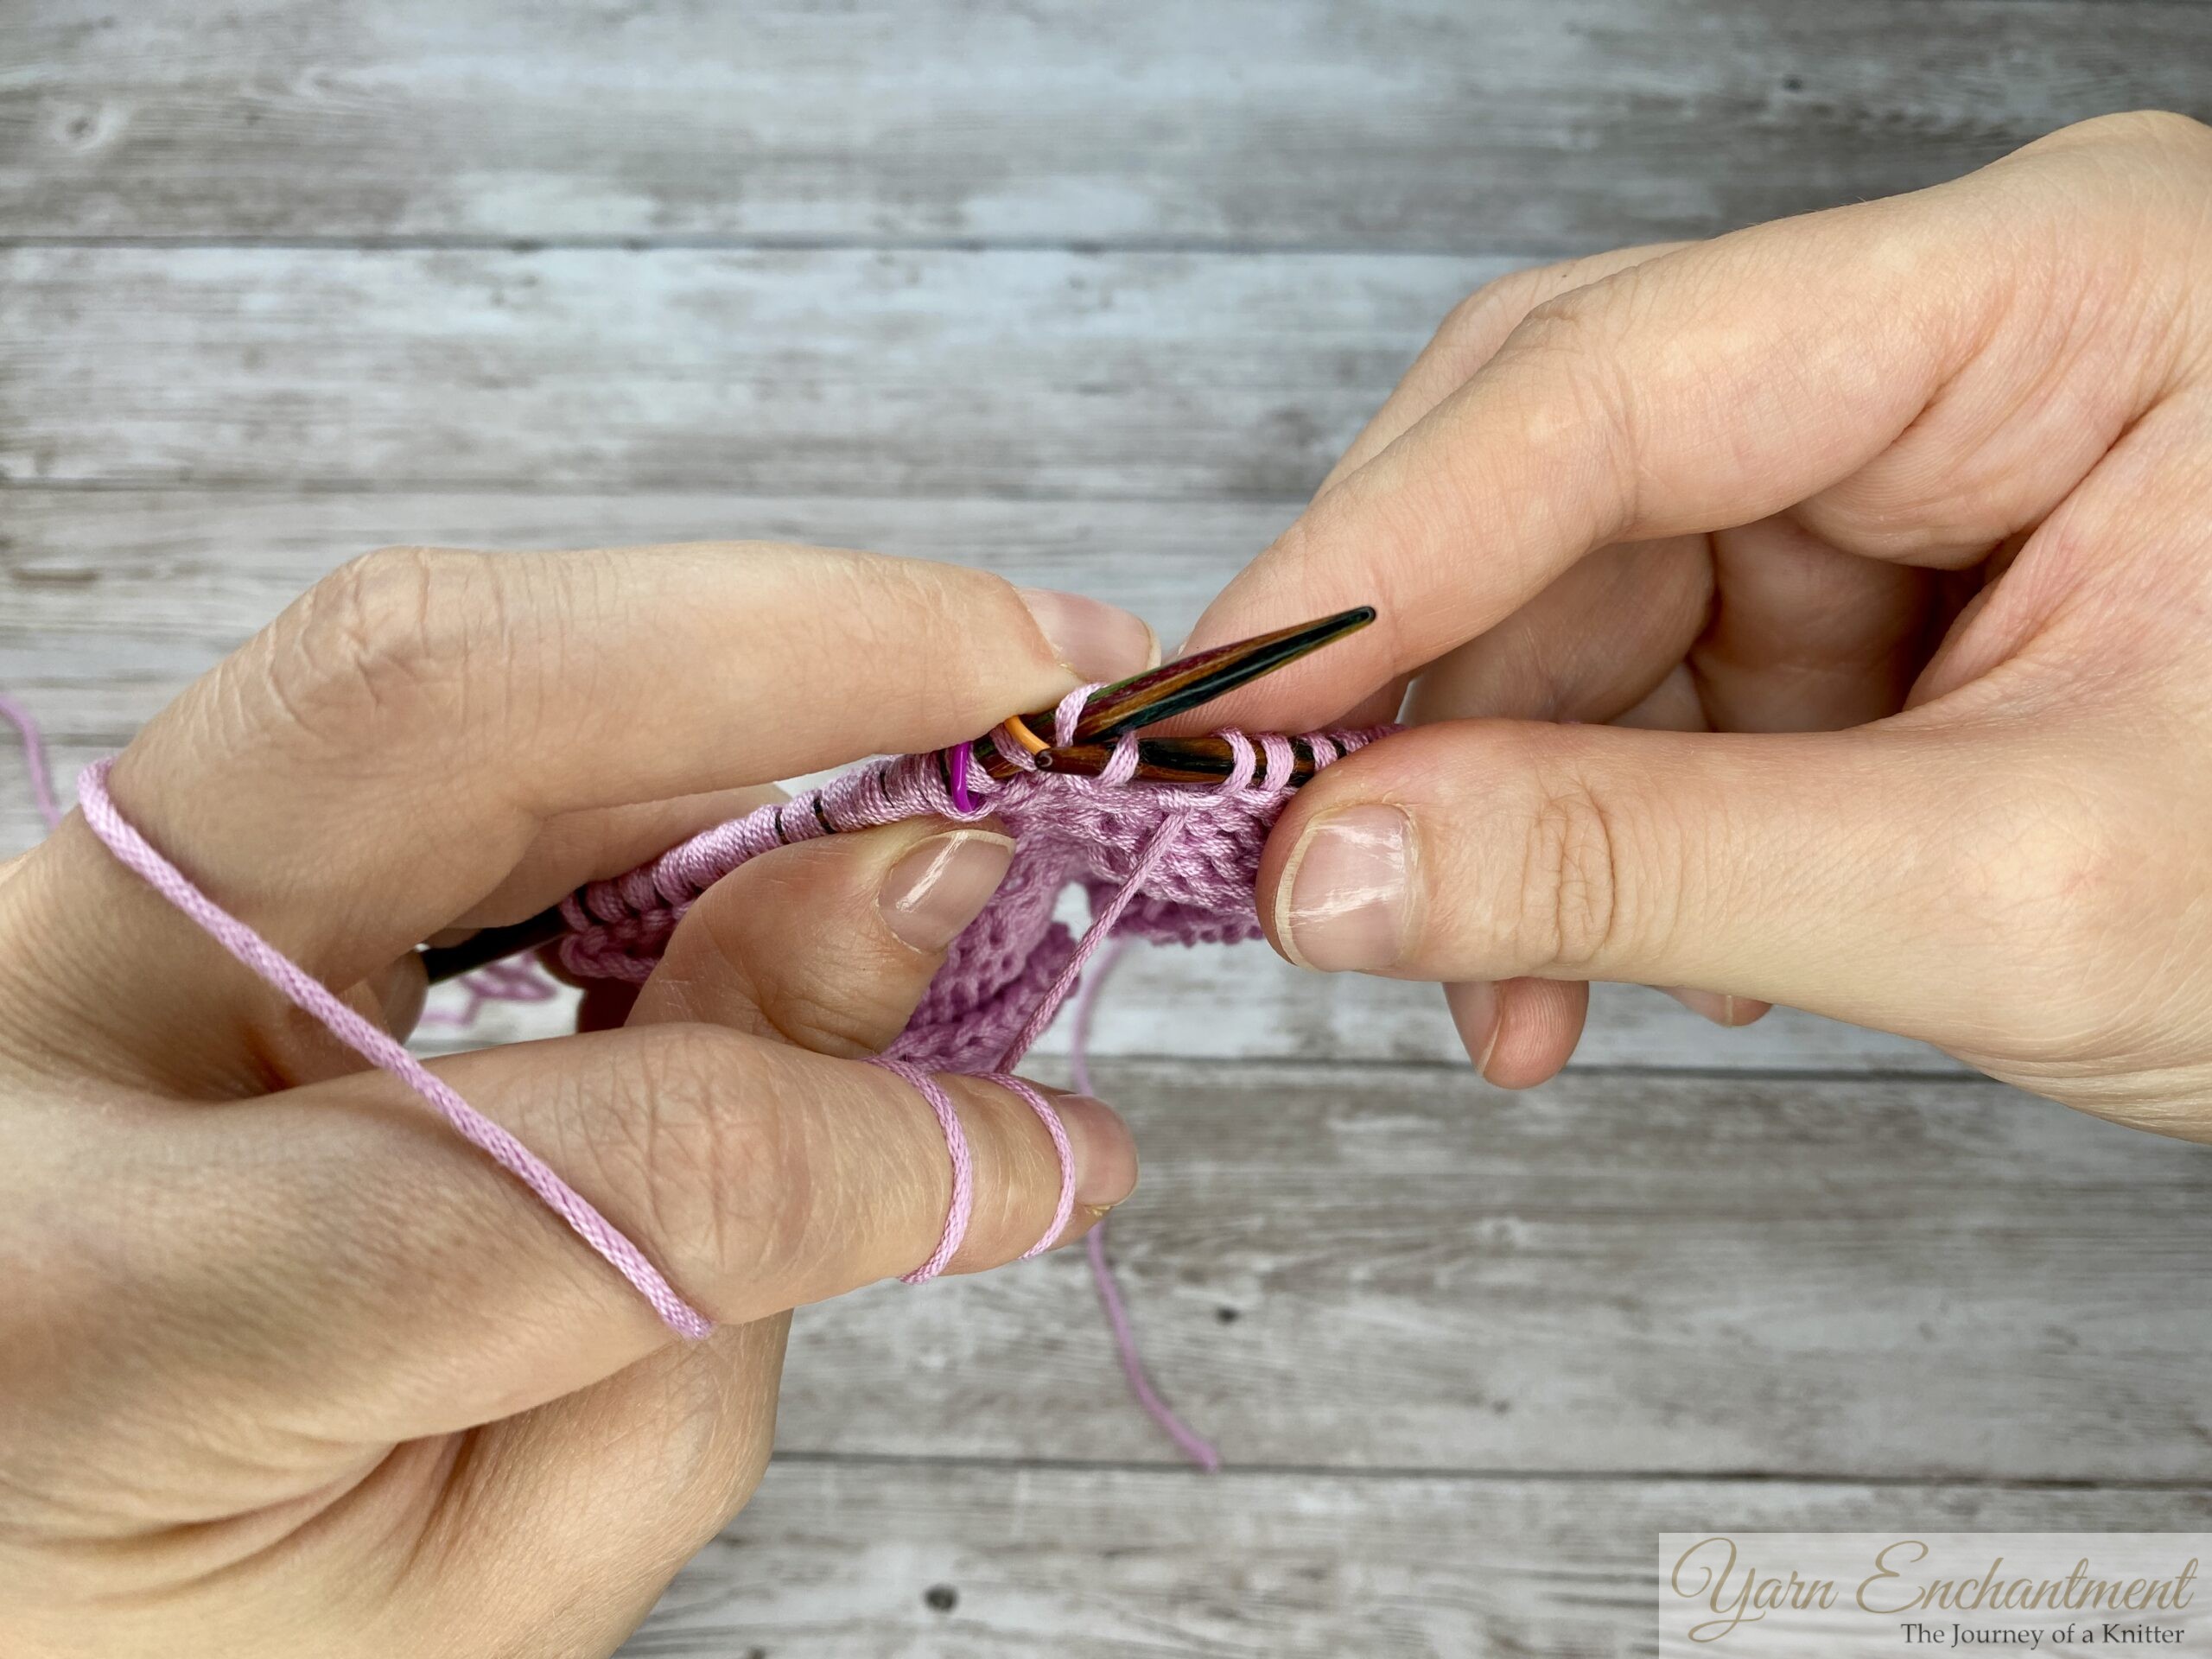  | 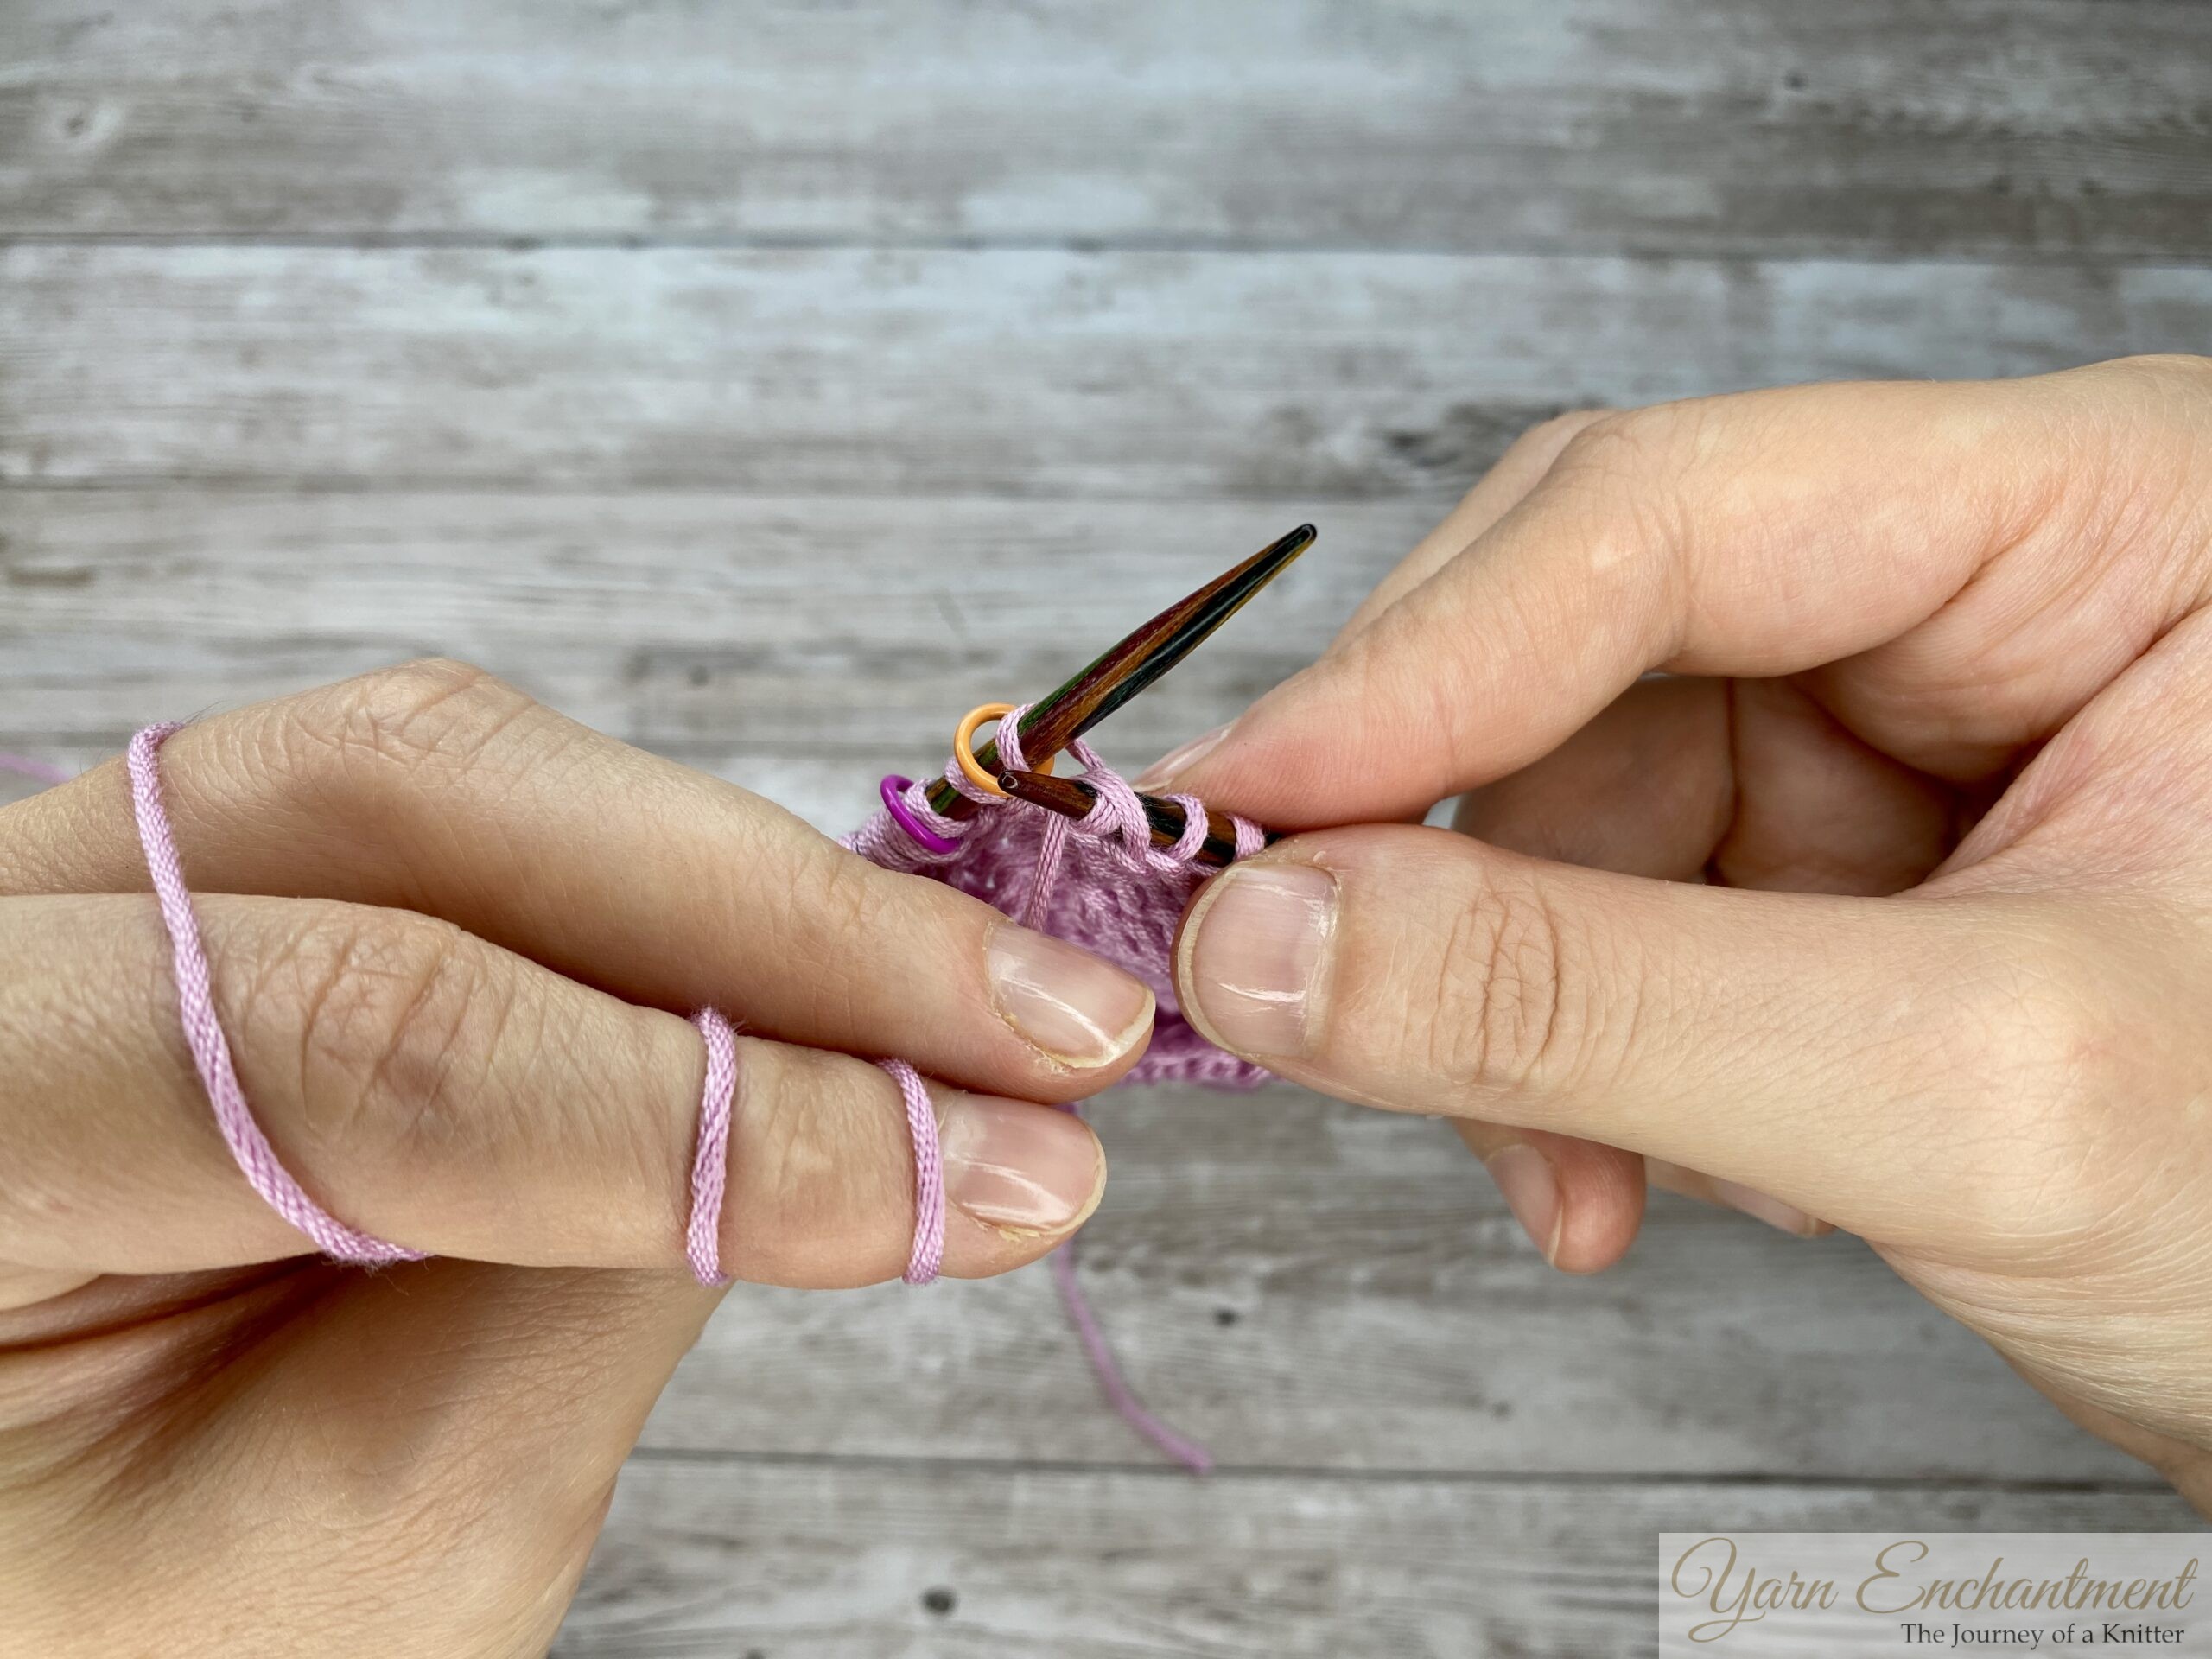  | 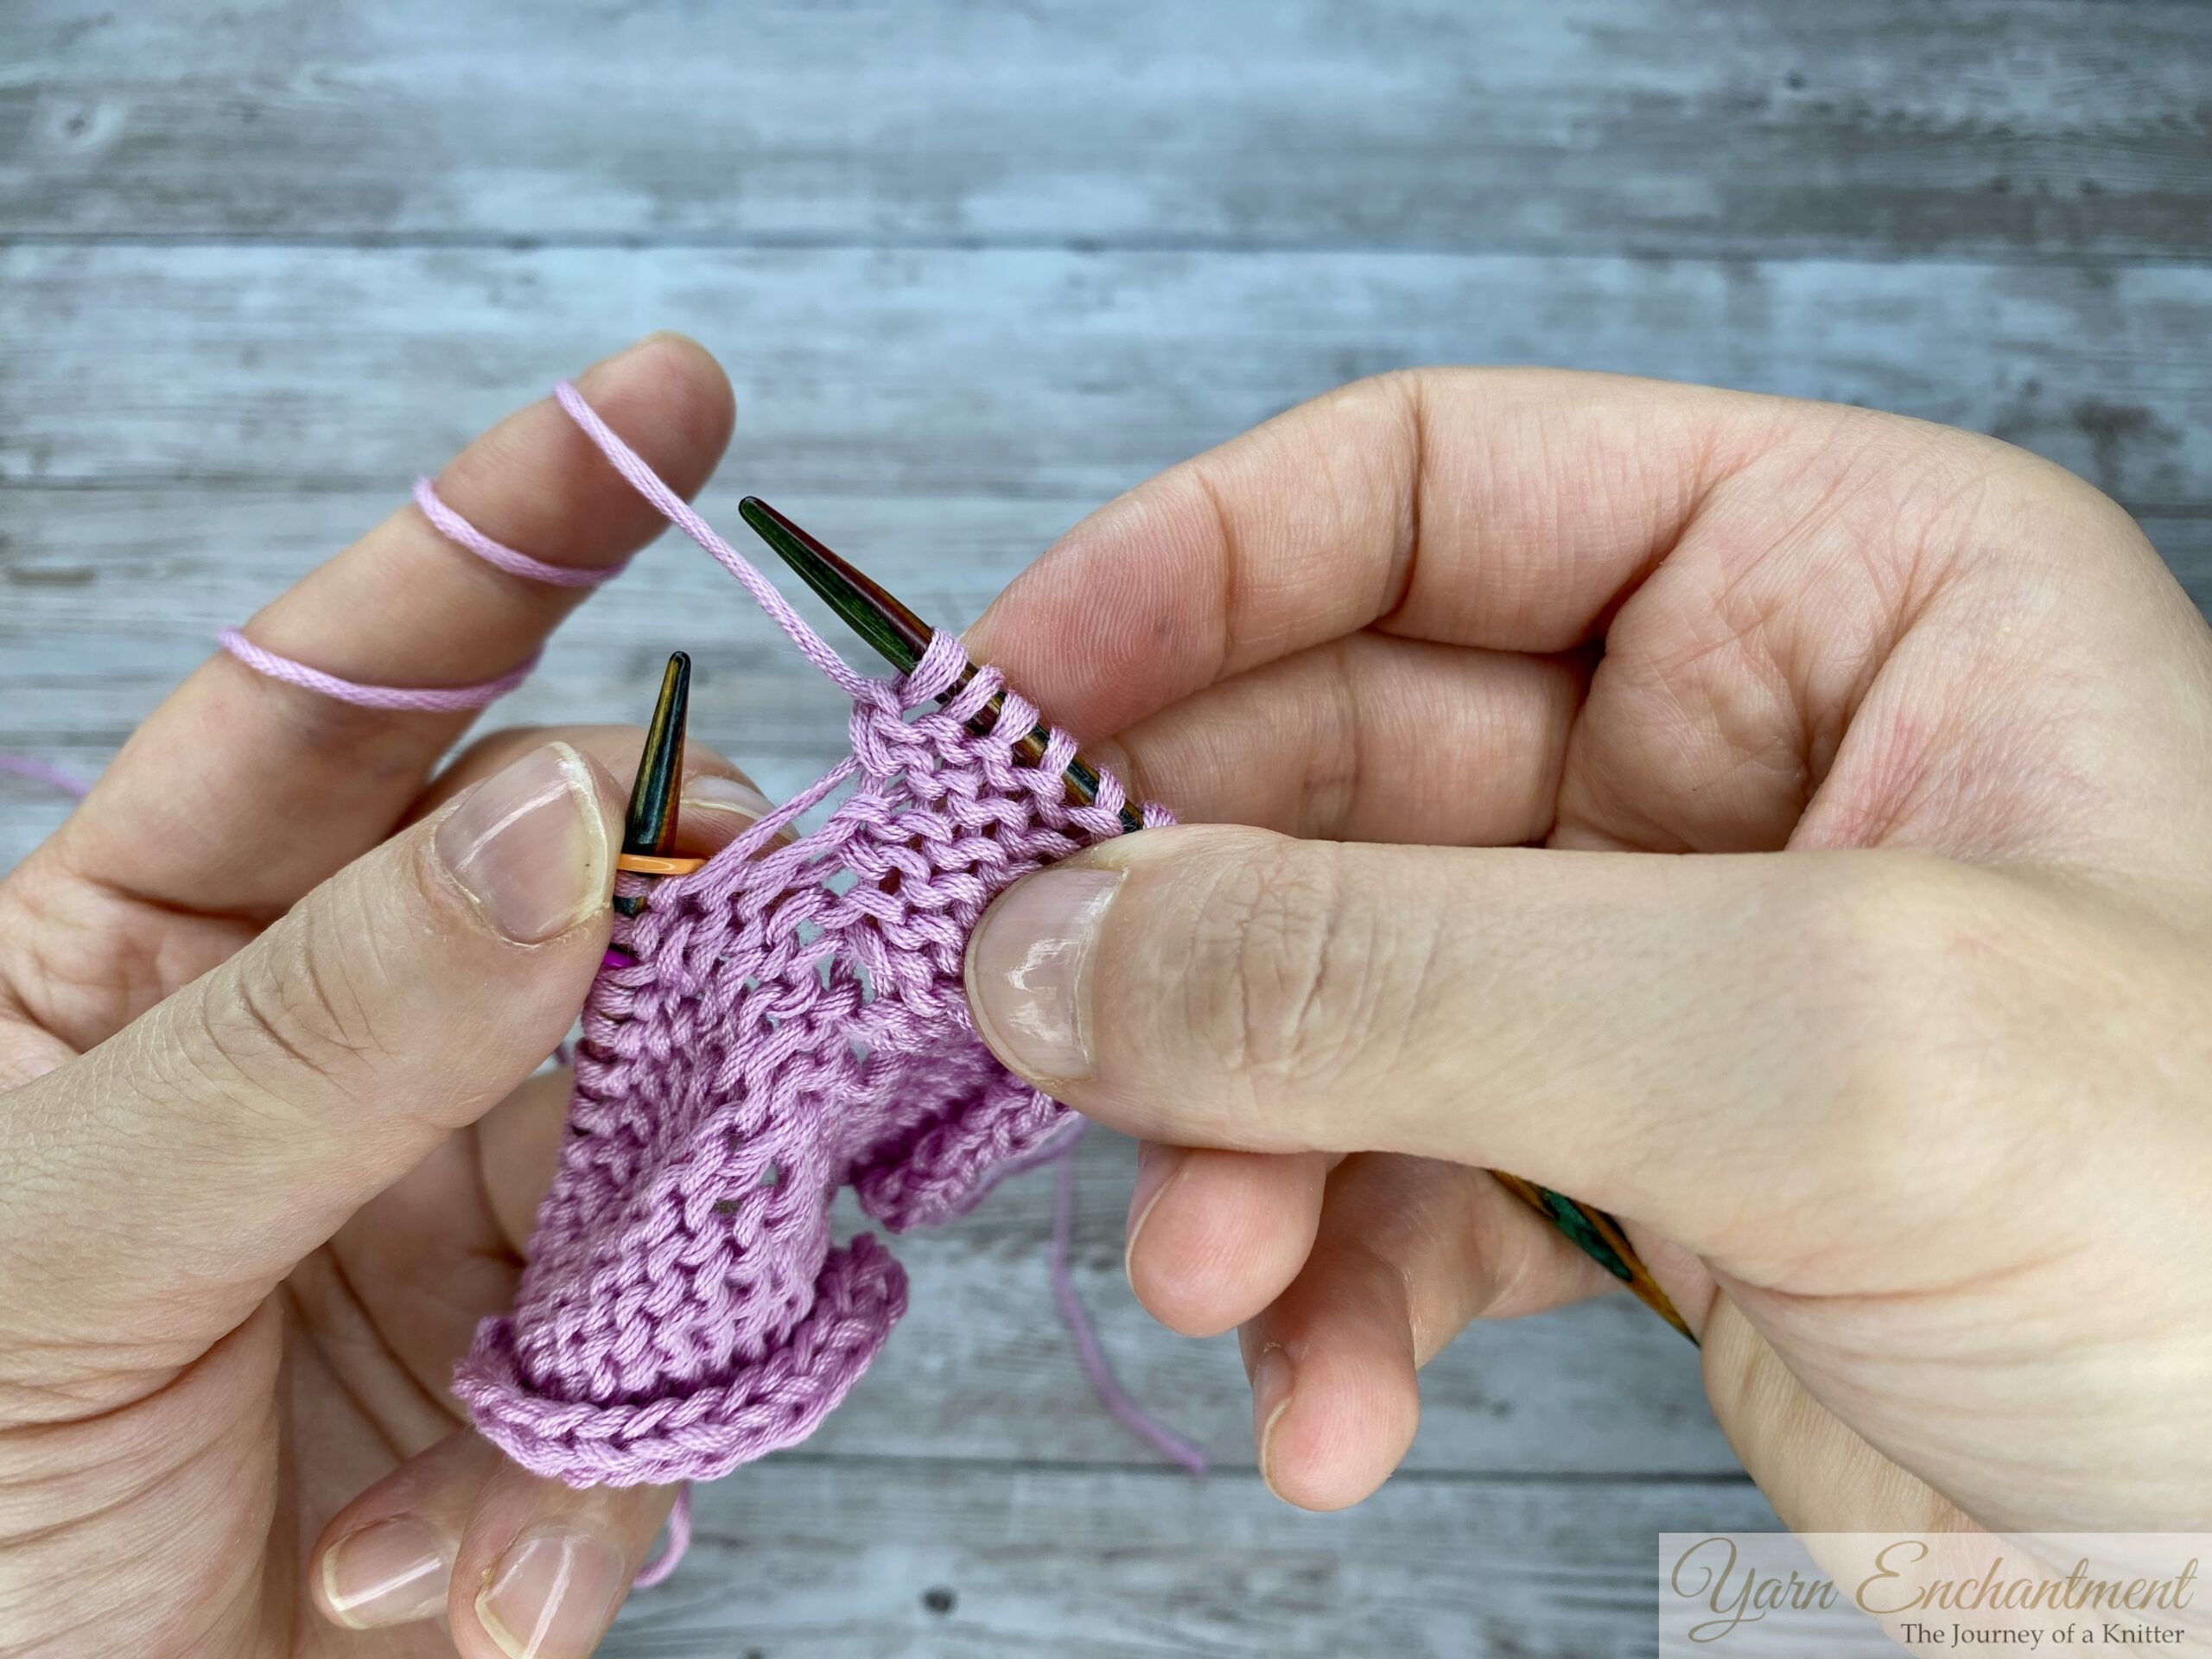  |
Bring your working yarn to the front. Instead of inserting your right needle into the front leg (like you would for a regular purl), insert it from right to left into the back leg. Think of it as going in through the "back door." | Wrap the yarn around your right needle, just as you would for a normal purl. | Pull the loop through to complete the stitch. |
A quick tip: If you're finding that your yarn over keeps slipping off the needle before you can work it, simply place your finger gently on top of the loop to hold it in place while you knit the next stitch. This keeps it secure until you're ready to work it. It becomes second nature after a few rounds, I promise! I am placing my finger gently on top of the yarn over to prevent it from slipping off the needle before I knit the next stitch. This little trick keeps everything secure and gives me peace of mind!
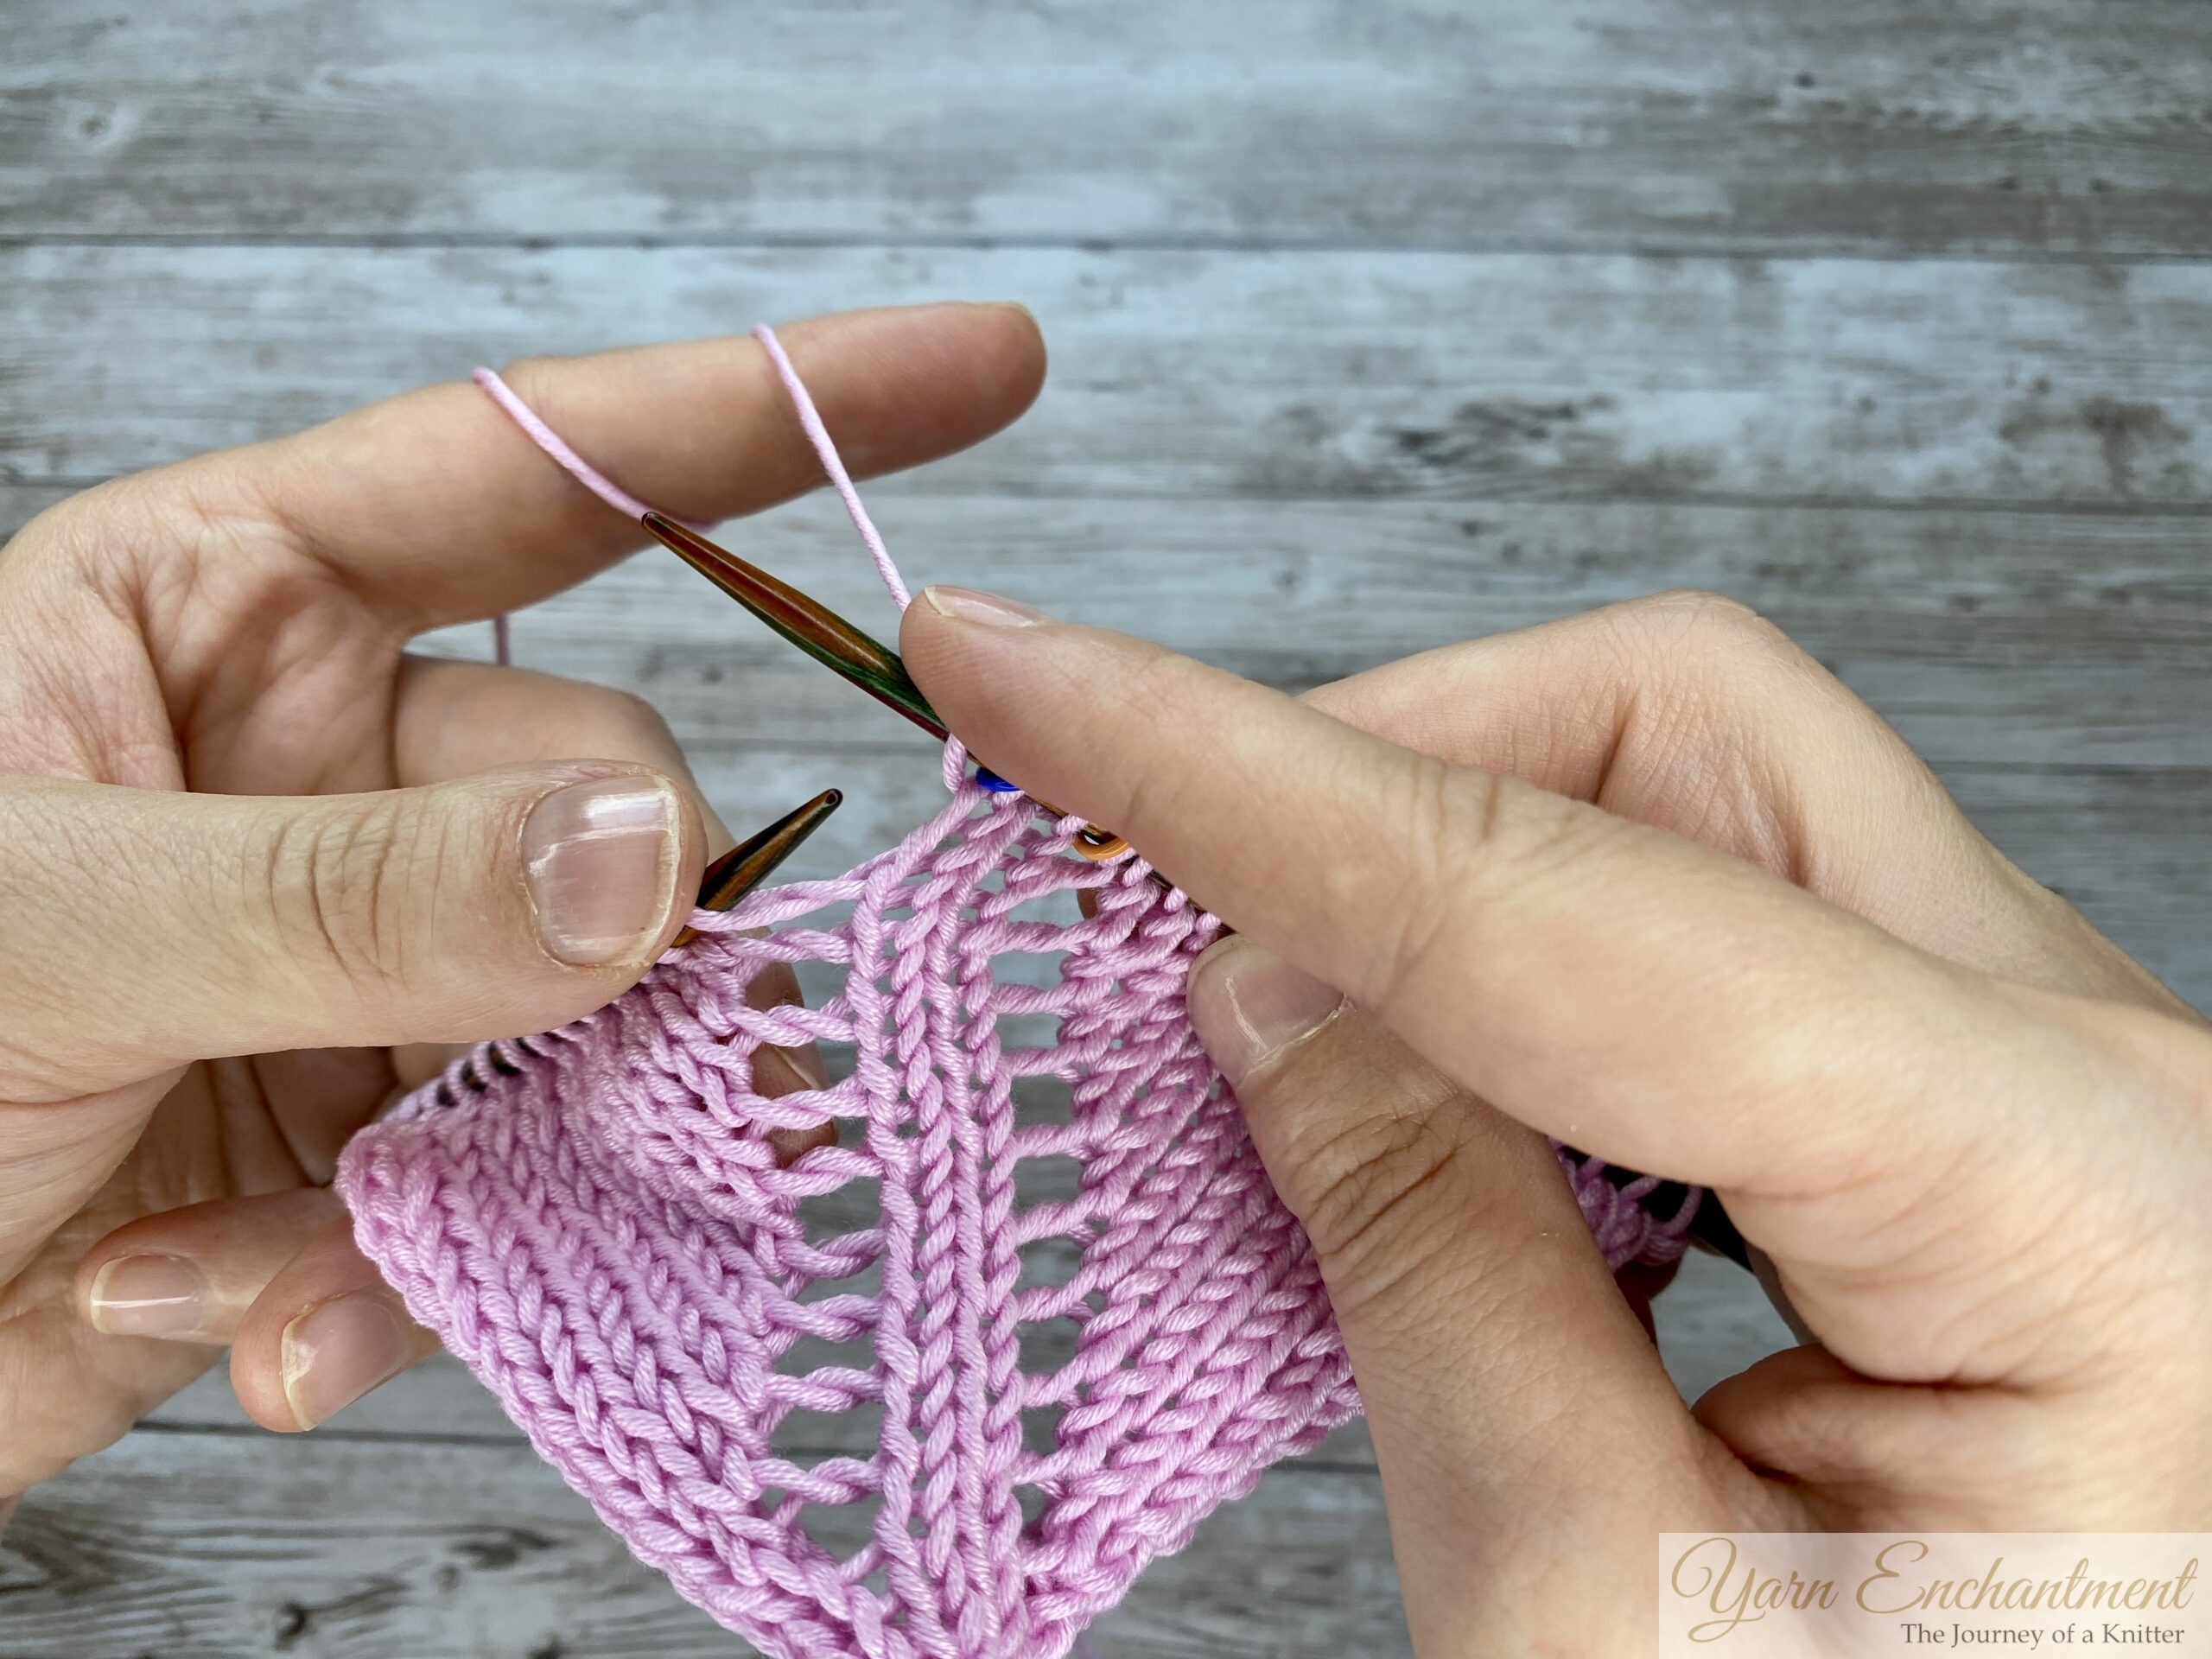

Method Two: Yarn Over Increase - Flat Knitting (Open Eyelet)
Now for the other method. This one is for when you want that beautiful little hole to show.
When you're working flat (back and forth on straight needles), you create your yarn over on the right side of your work. Then, when you turn to the wrong side, you simply knit or purl that yarn over through the front loop as normal. This creates this lovely, open eyelet.
How to Work Yarn Over Increases Flat (Open Eyelet)
On the right side (RS): Make your yarn over as usual. Bring the yarn from back to front, then over the needle to the back. This creates your extra loop.
On the wrong side (WS): When you reach that yarn over loop, work it through the front loop just like any other stitch. If you're knitting the wrong side rows, knit it through the front loop. If you're purling the wrong side rows, purl it through the front loop.
  | 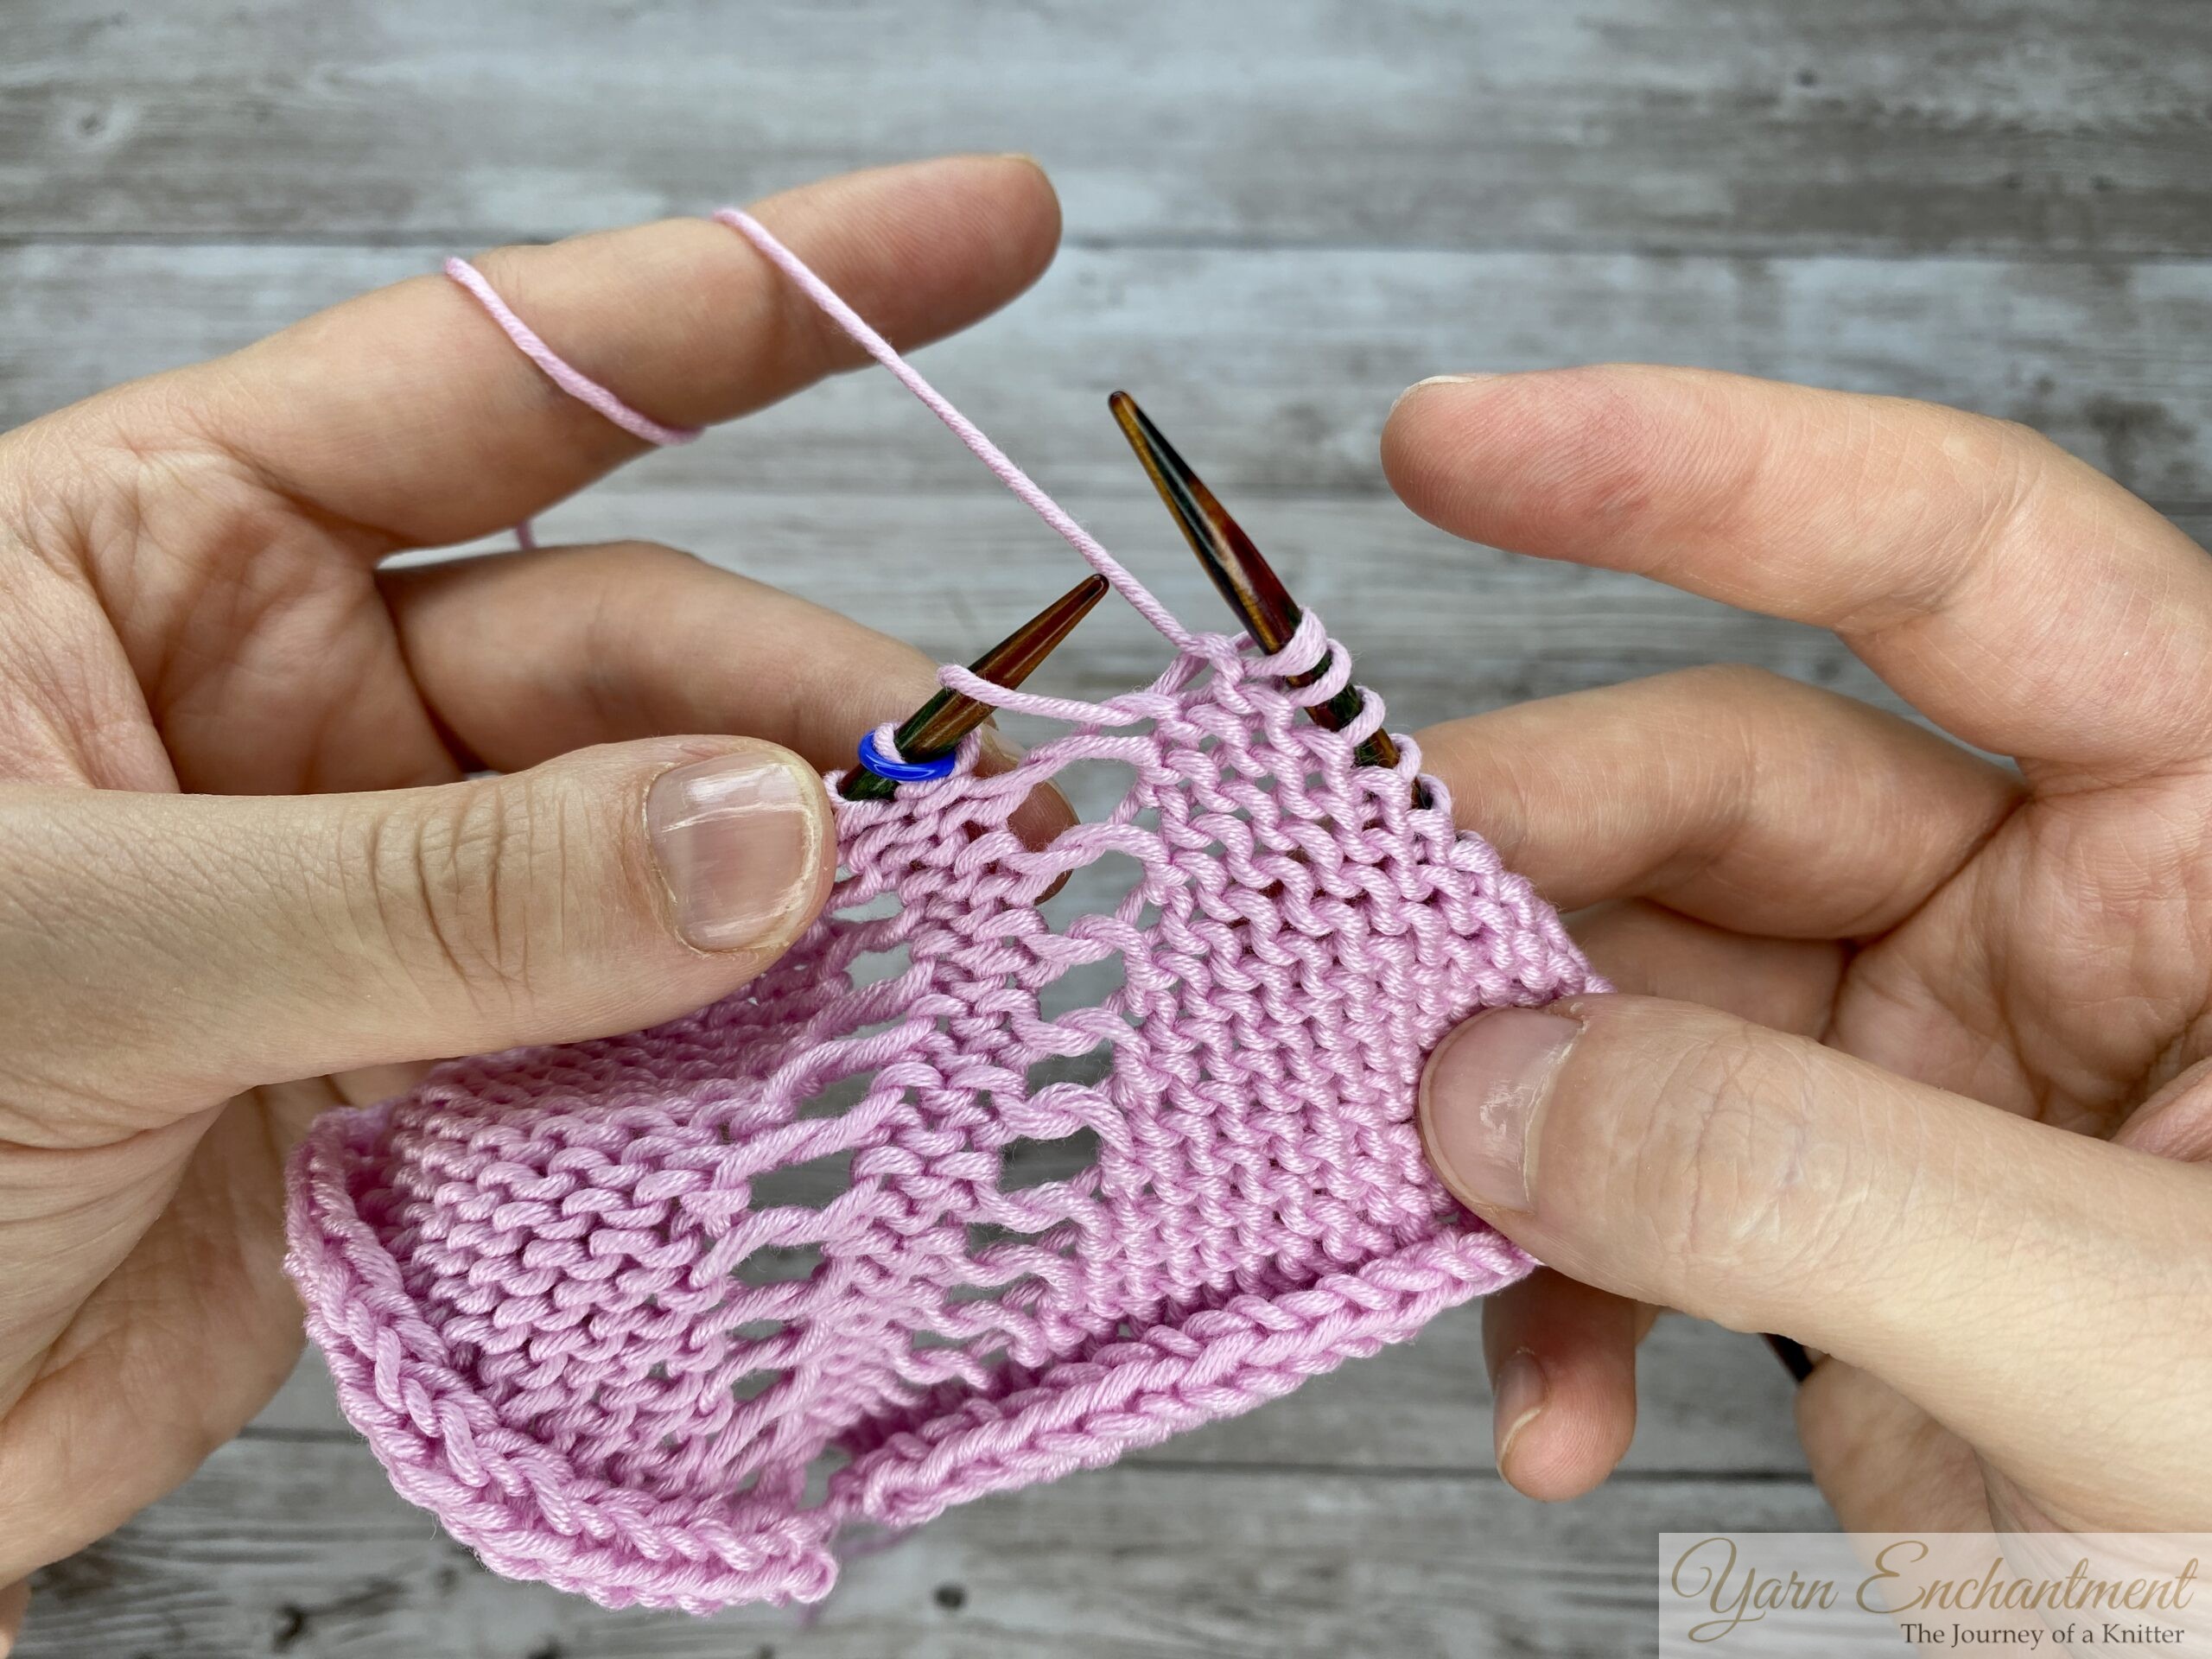  | 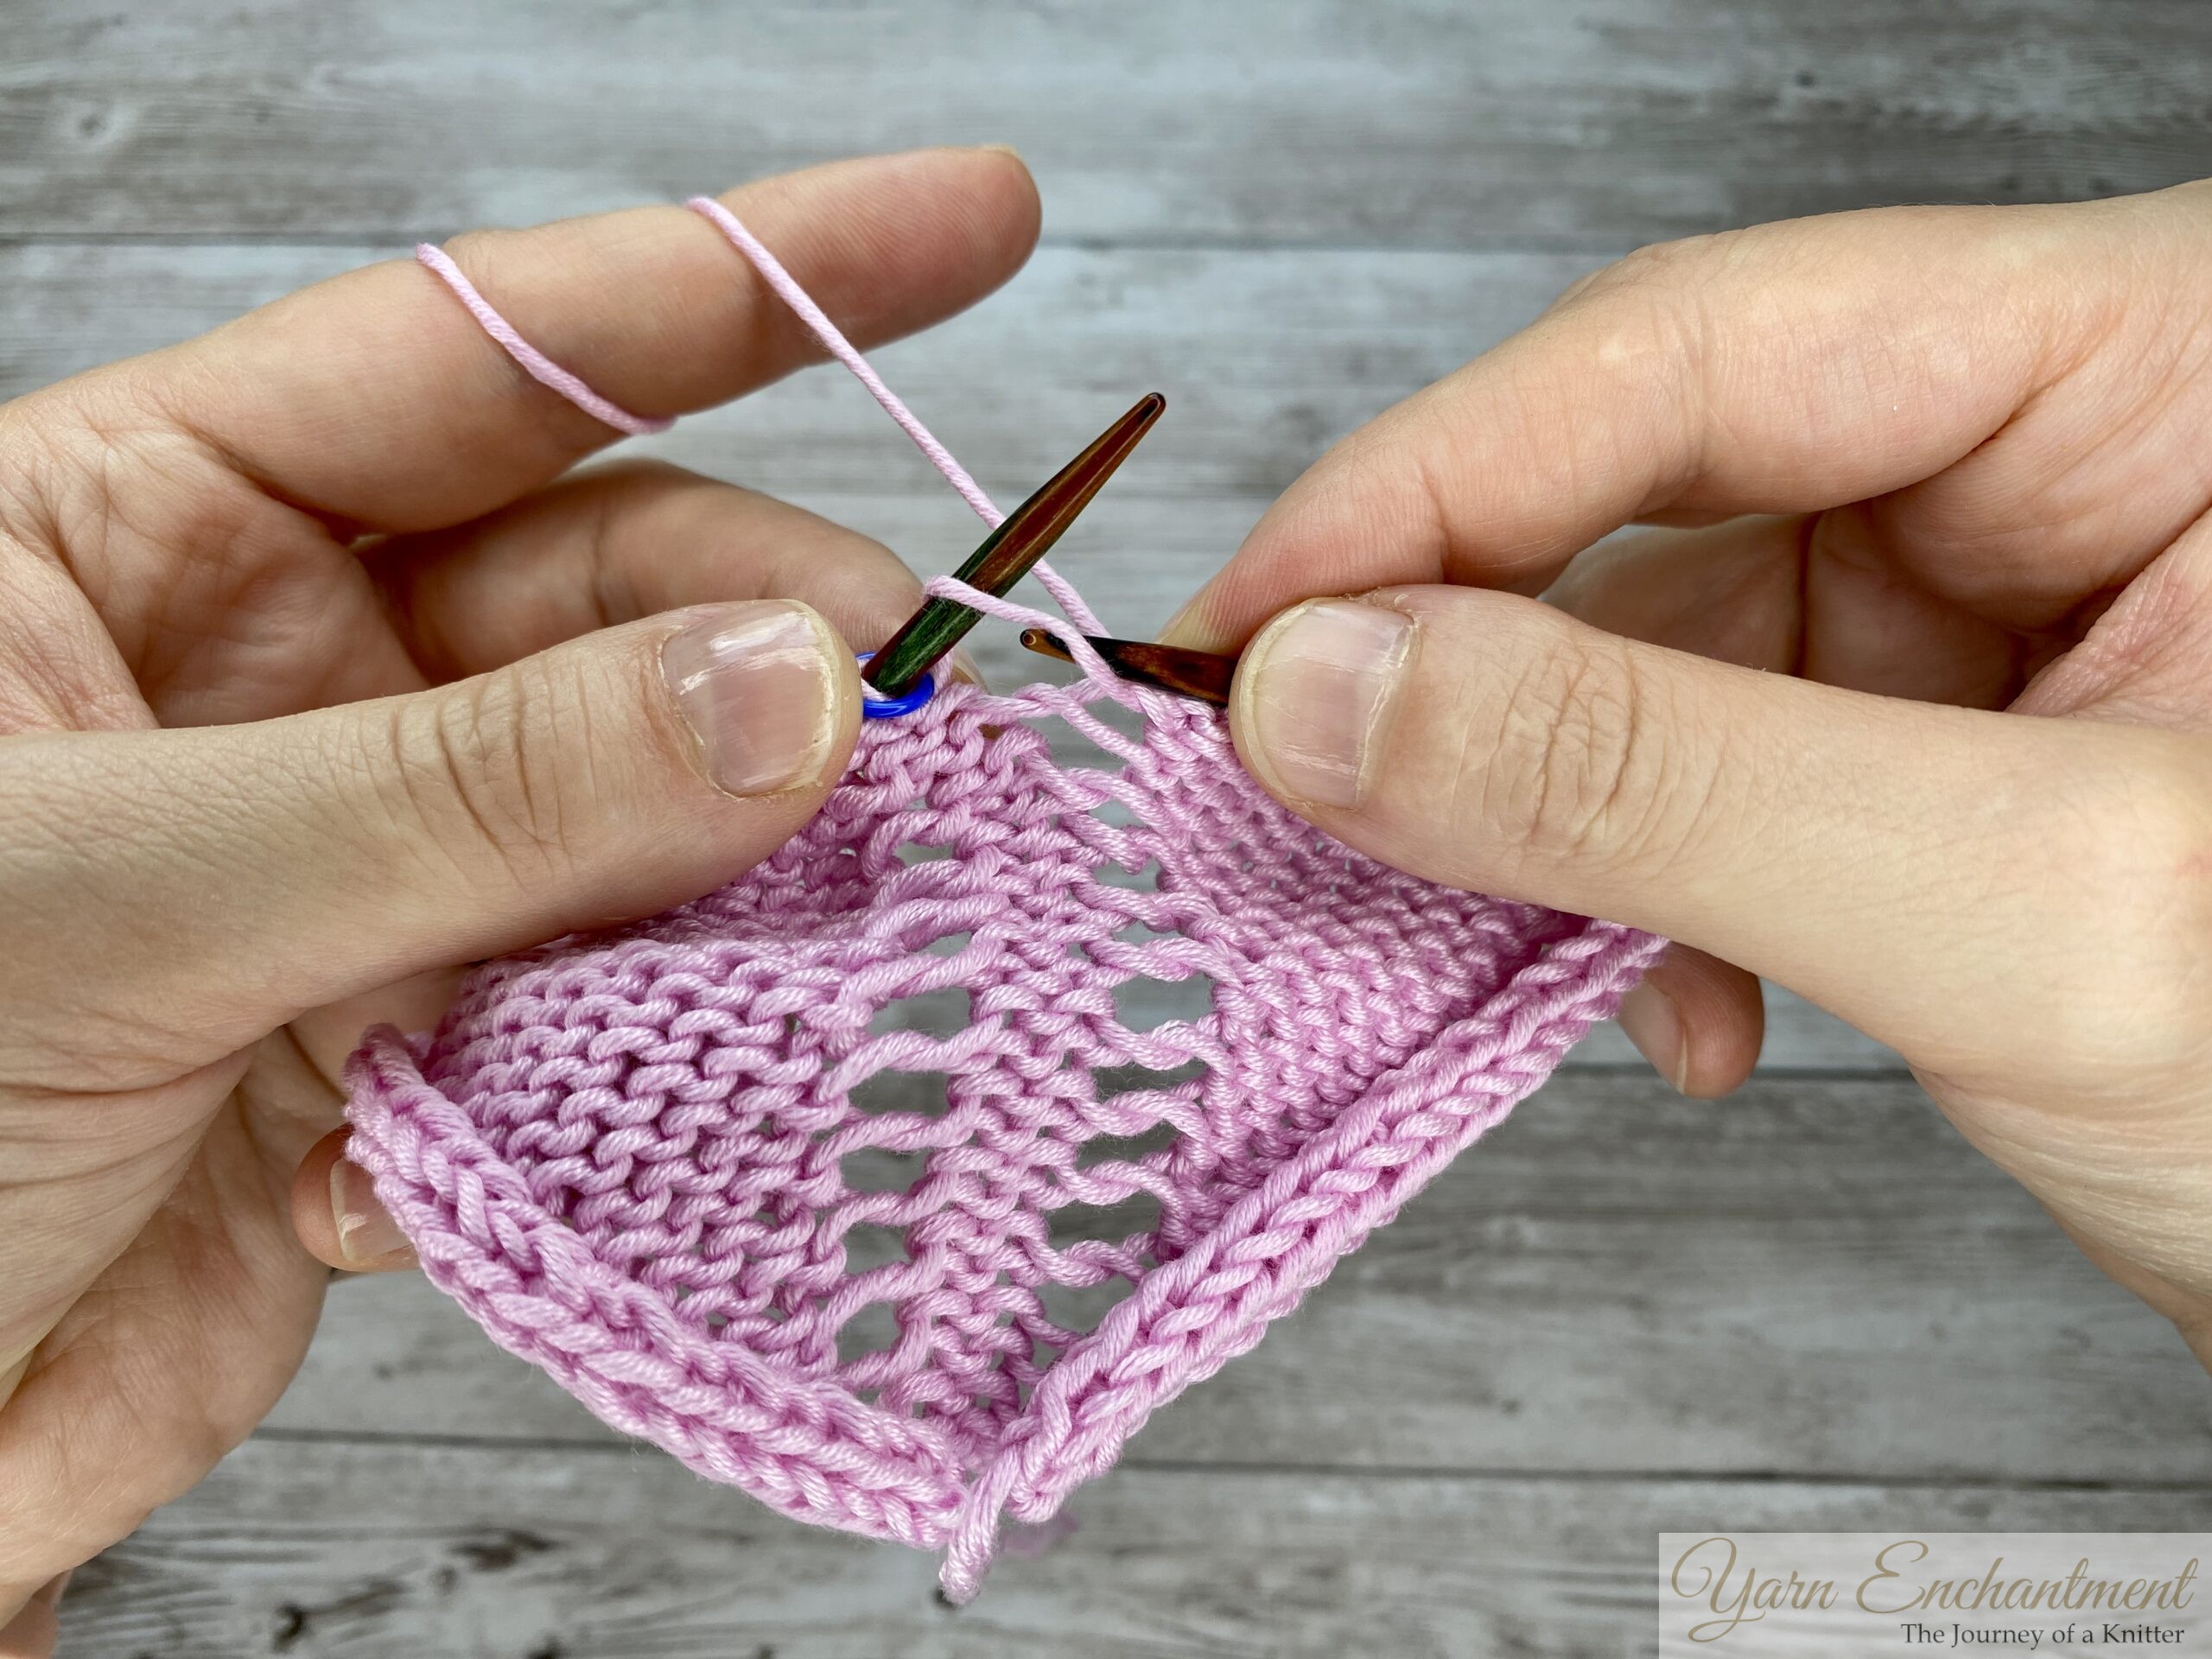  |
Bring the yarn to the front of your needle, now take the yarn over the top of the right needle to the back. This creates a yarn over | On the wrong side, knit or purl until you reach the yarn over loop. | Since I'm working purl stitches on this wrong-side row, I want to purl through the front loop to create an open eyelet stitch. |
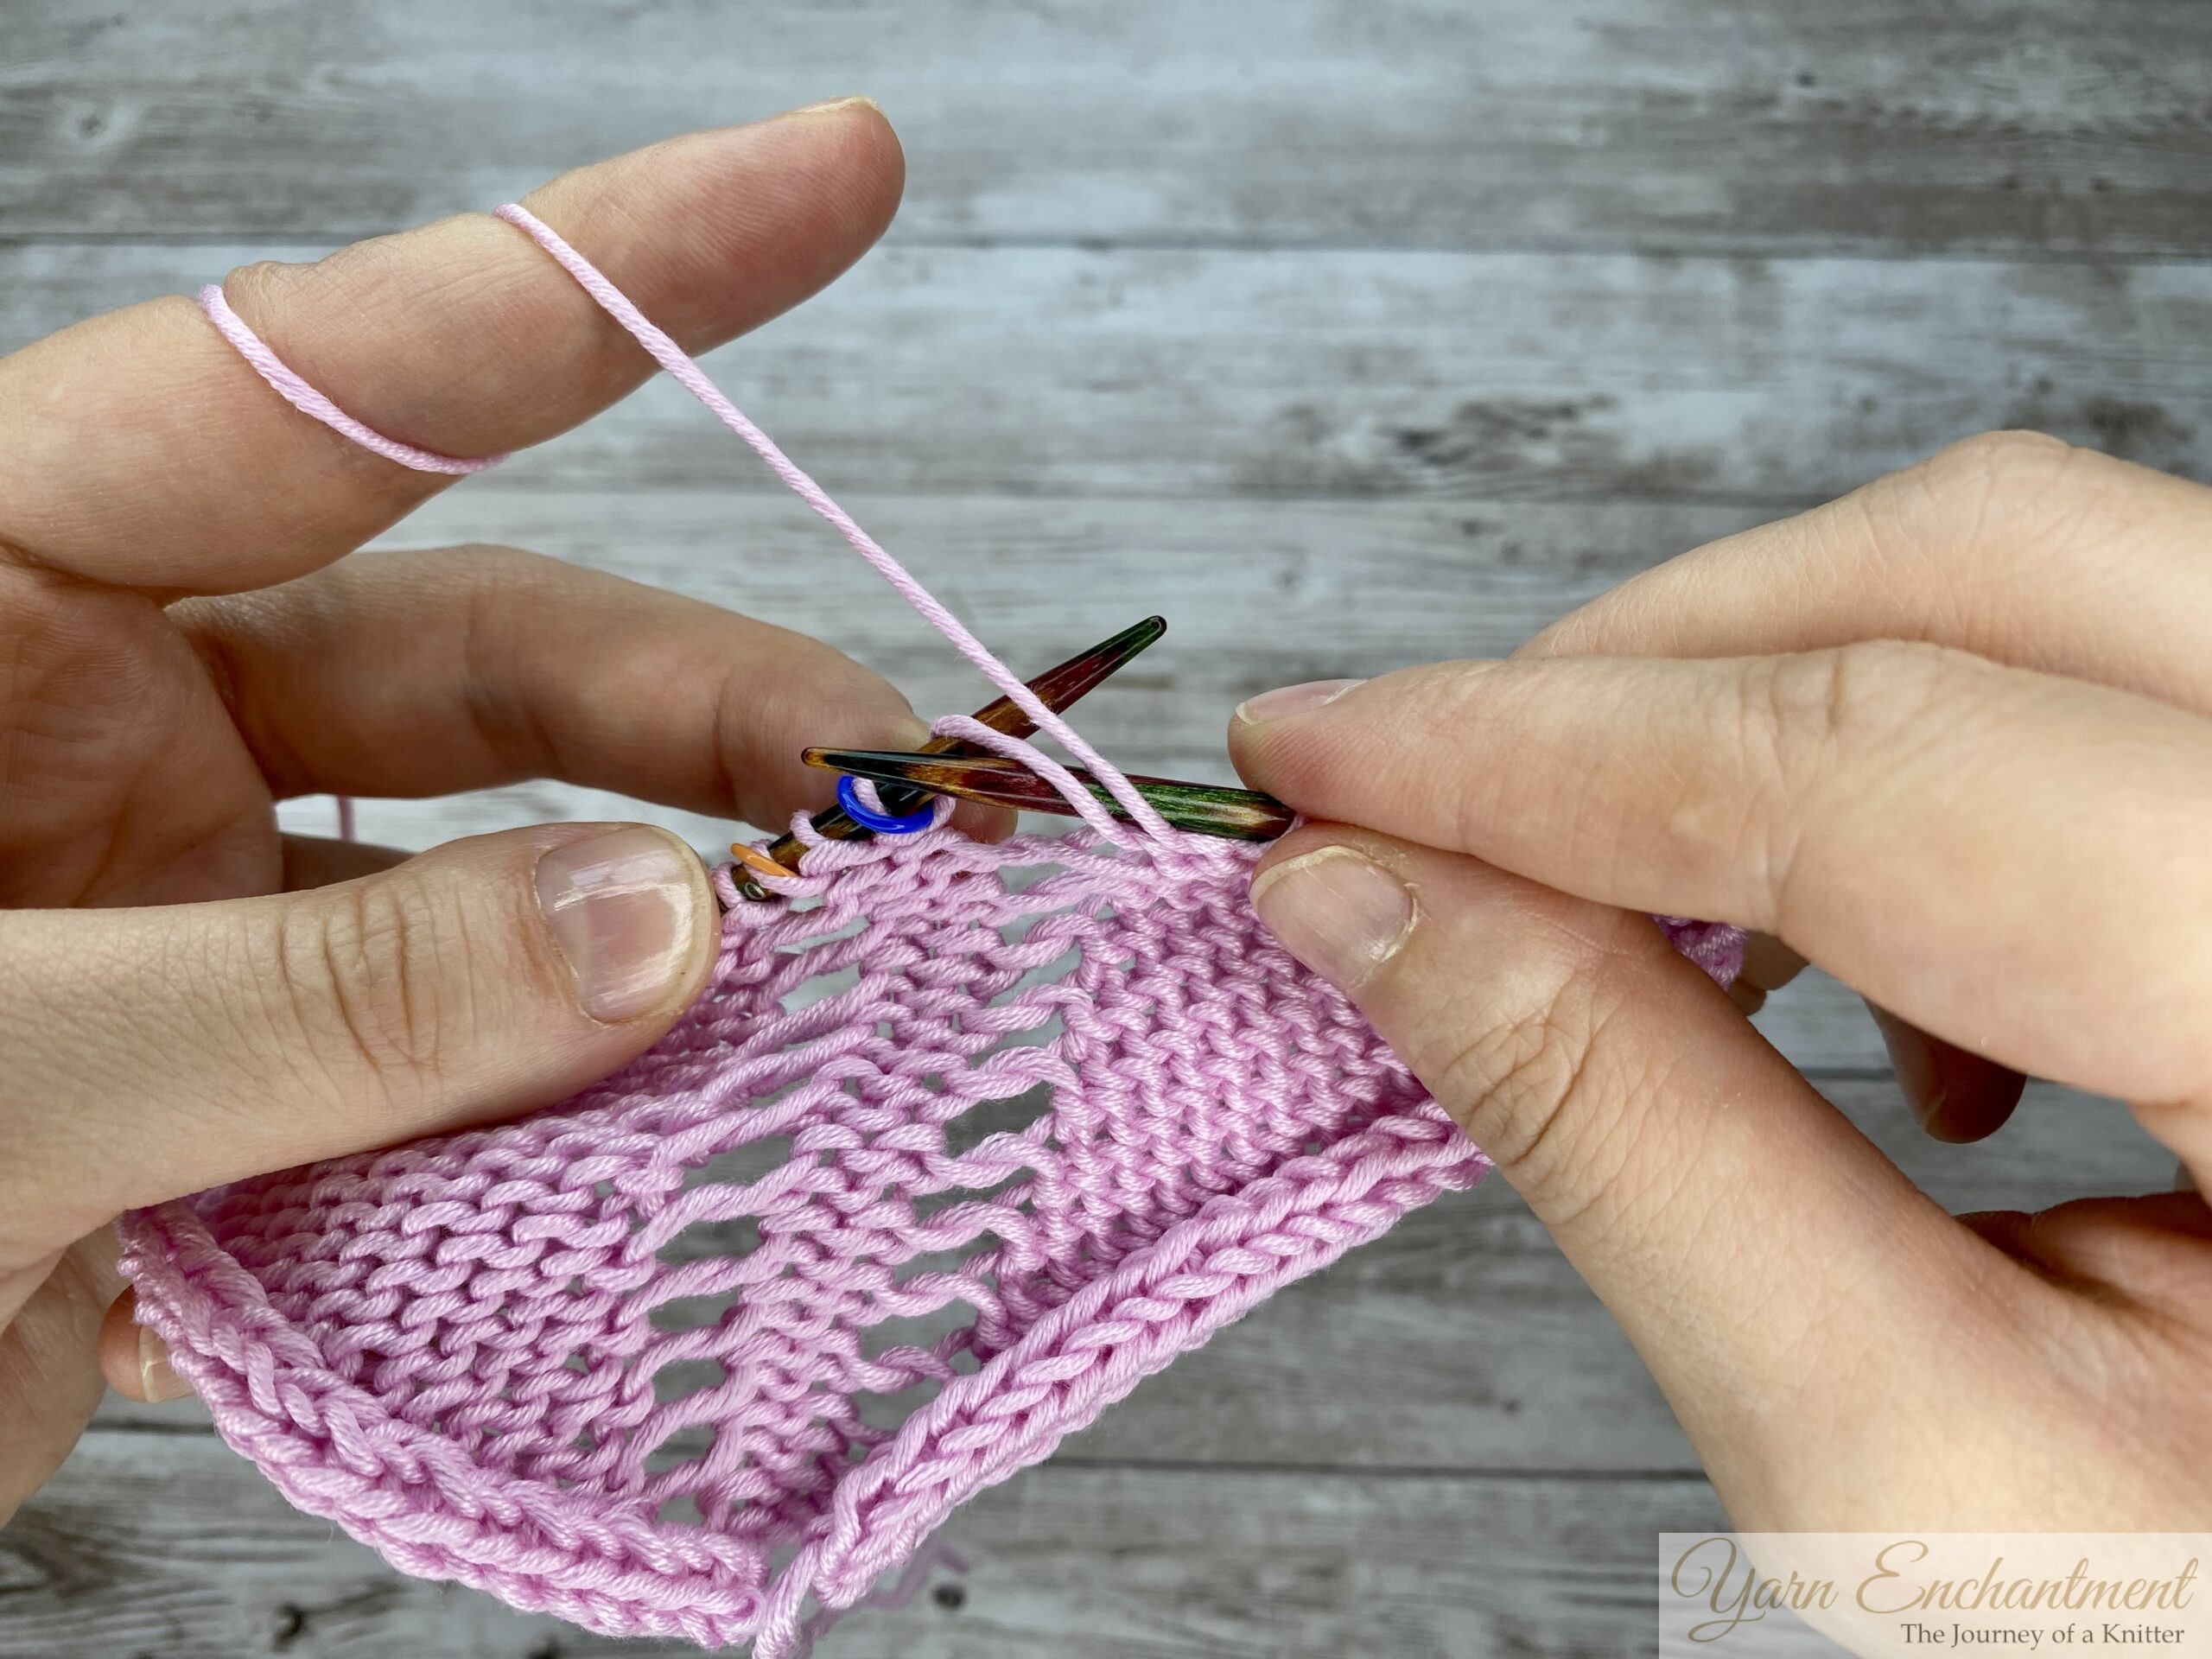  | 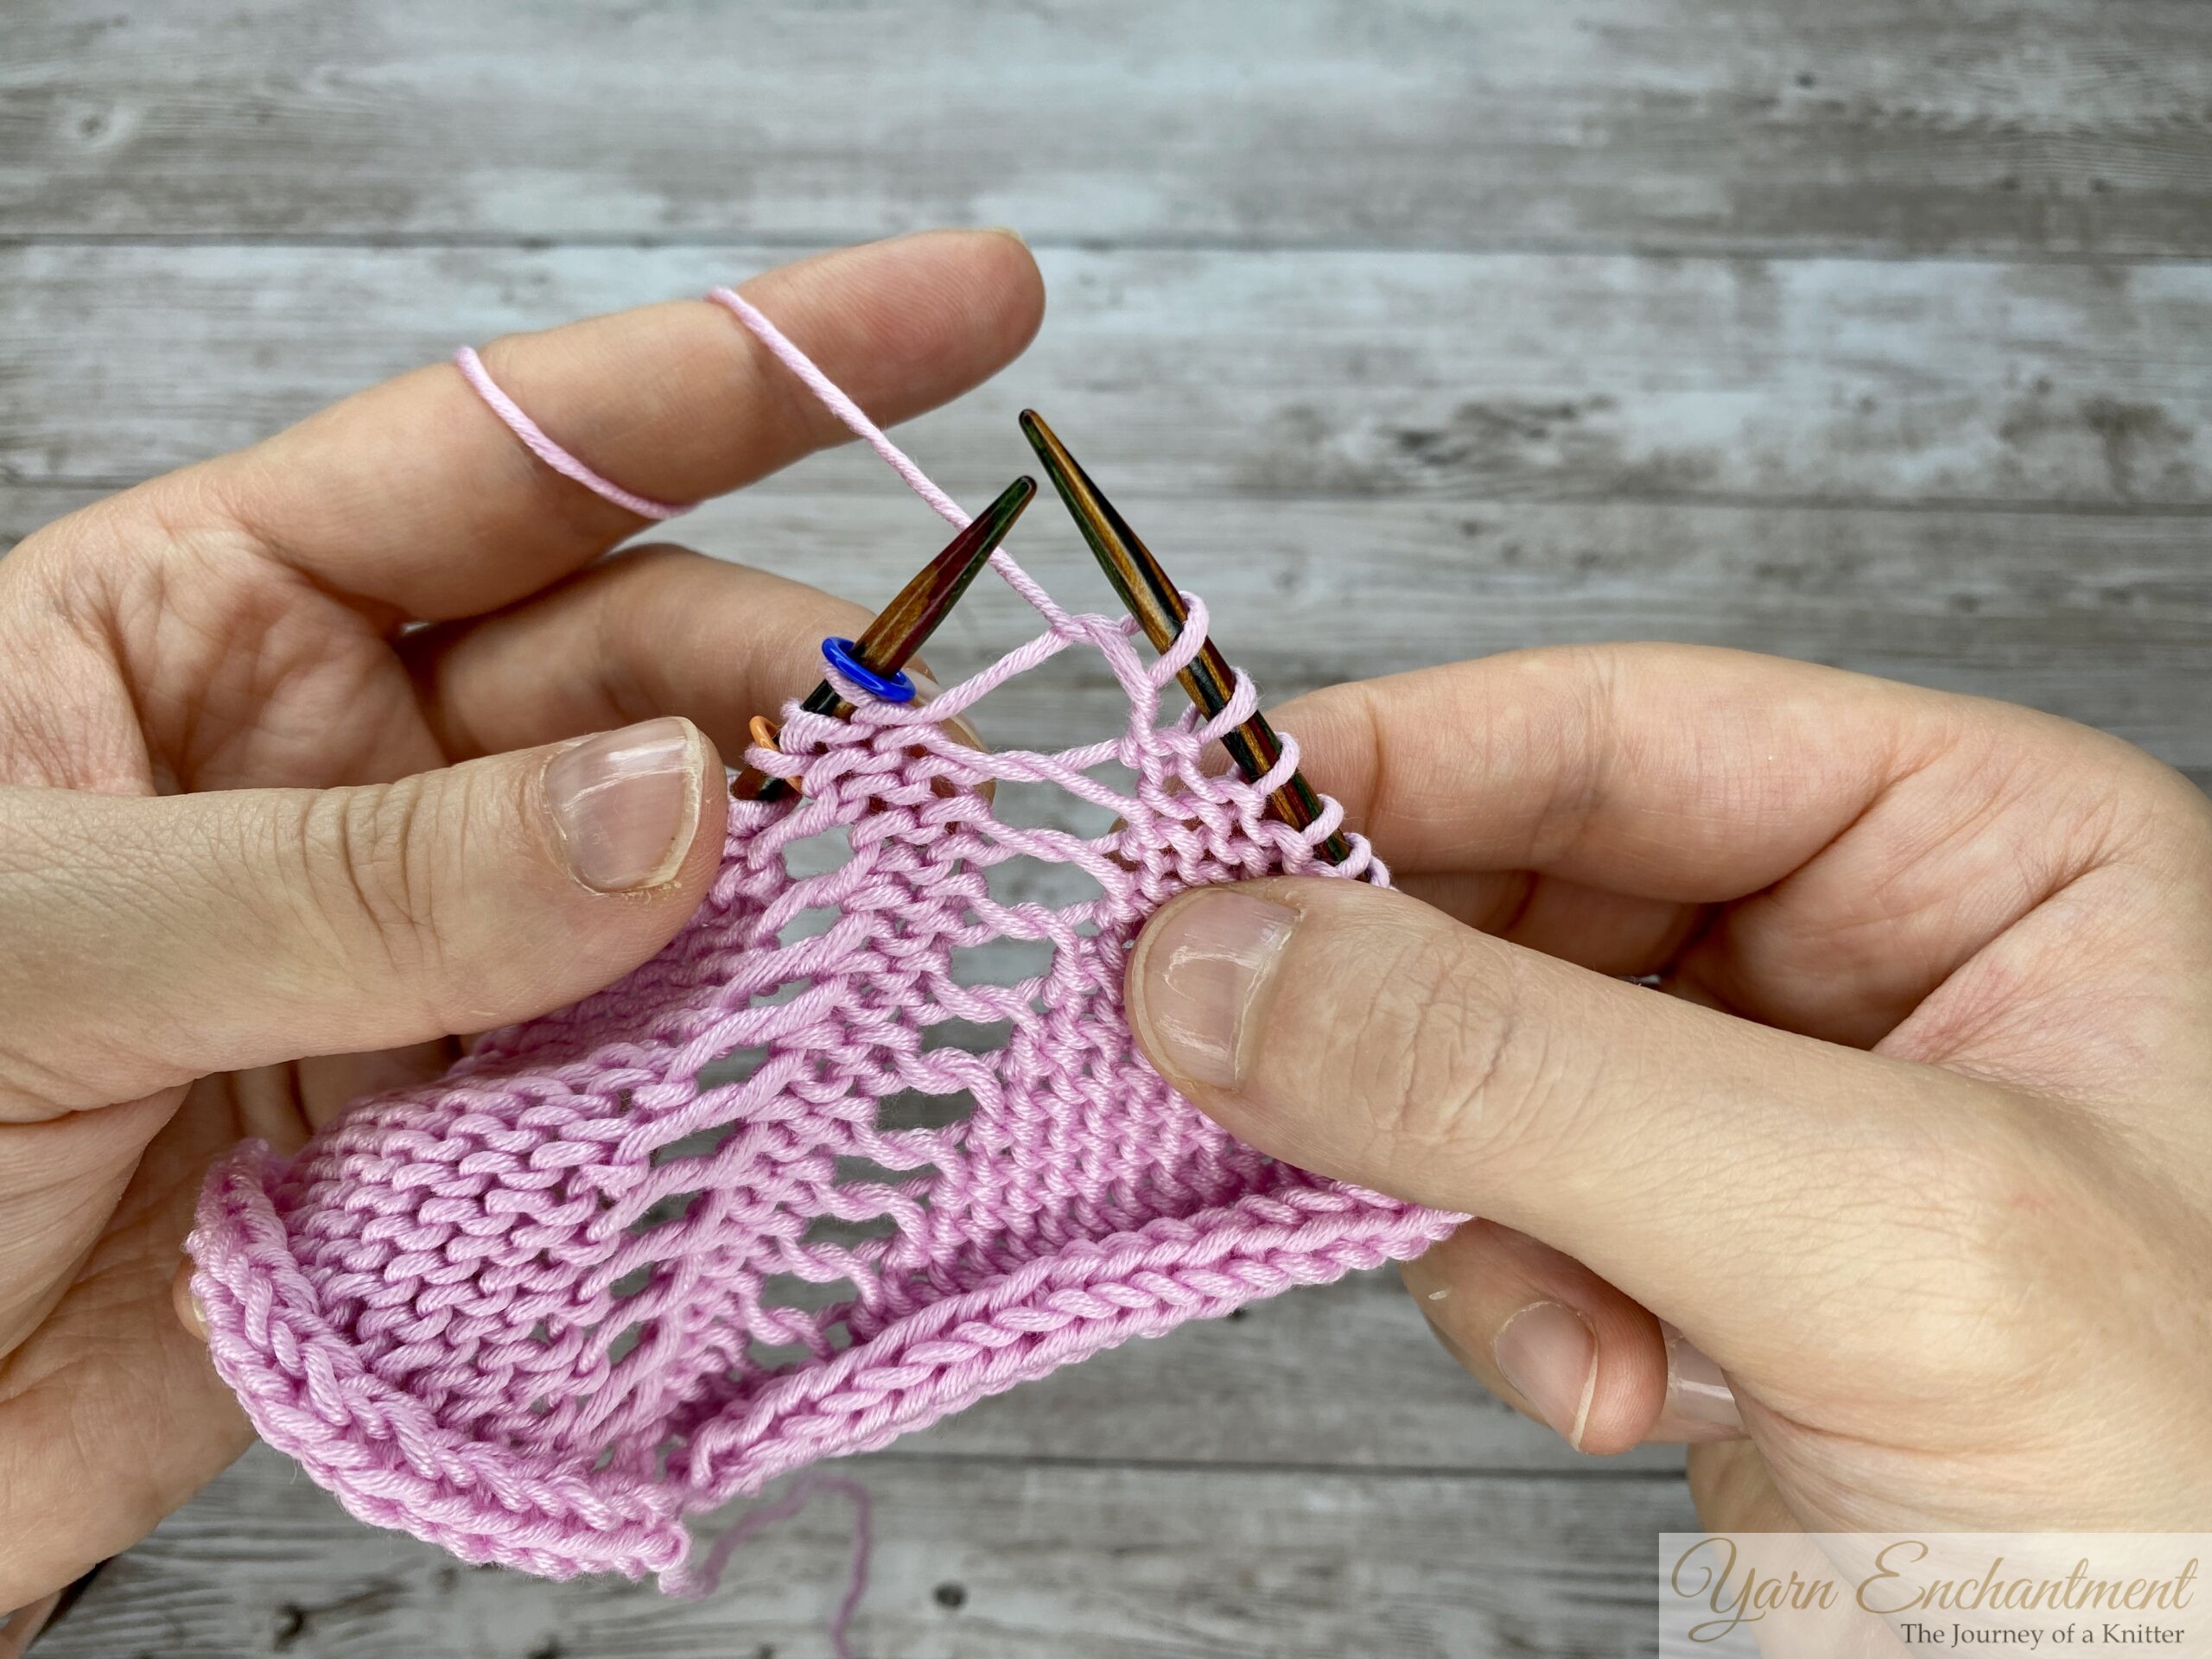  | 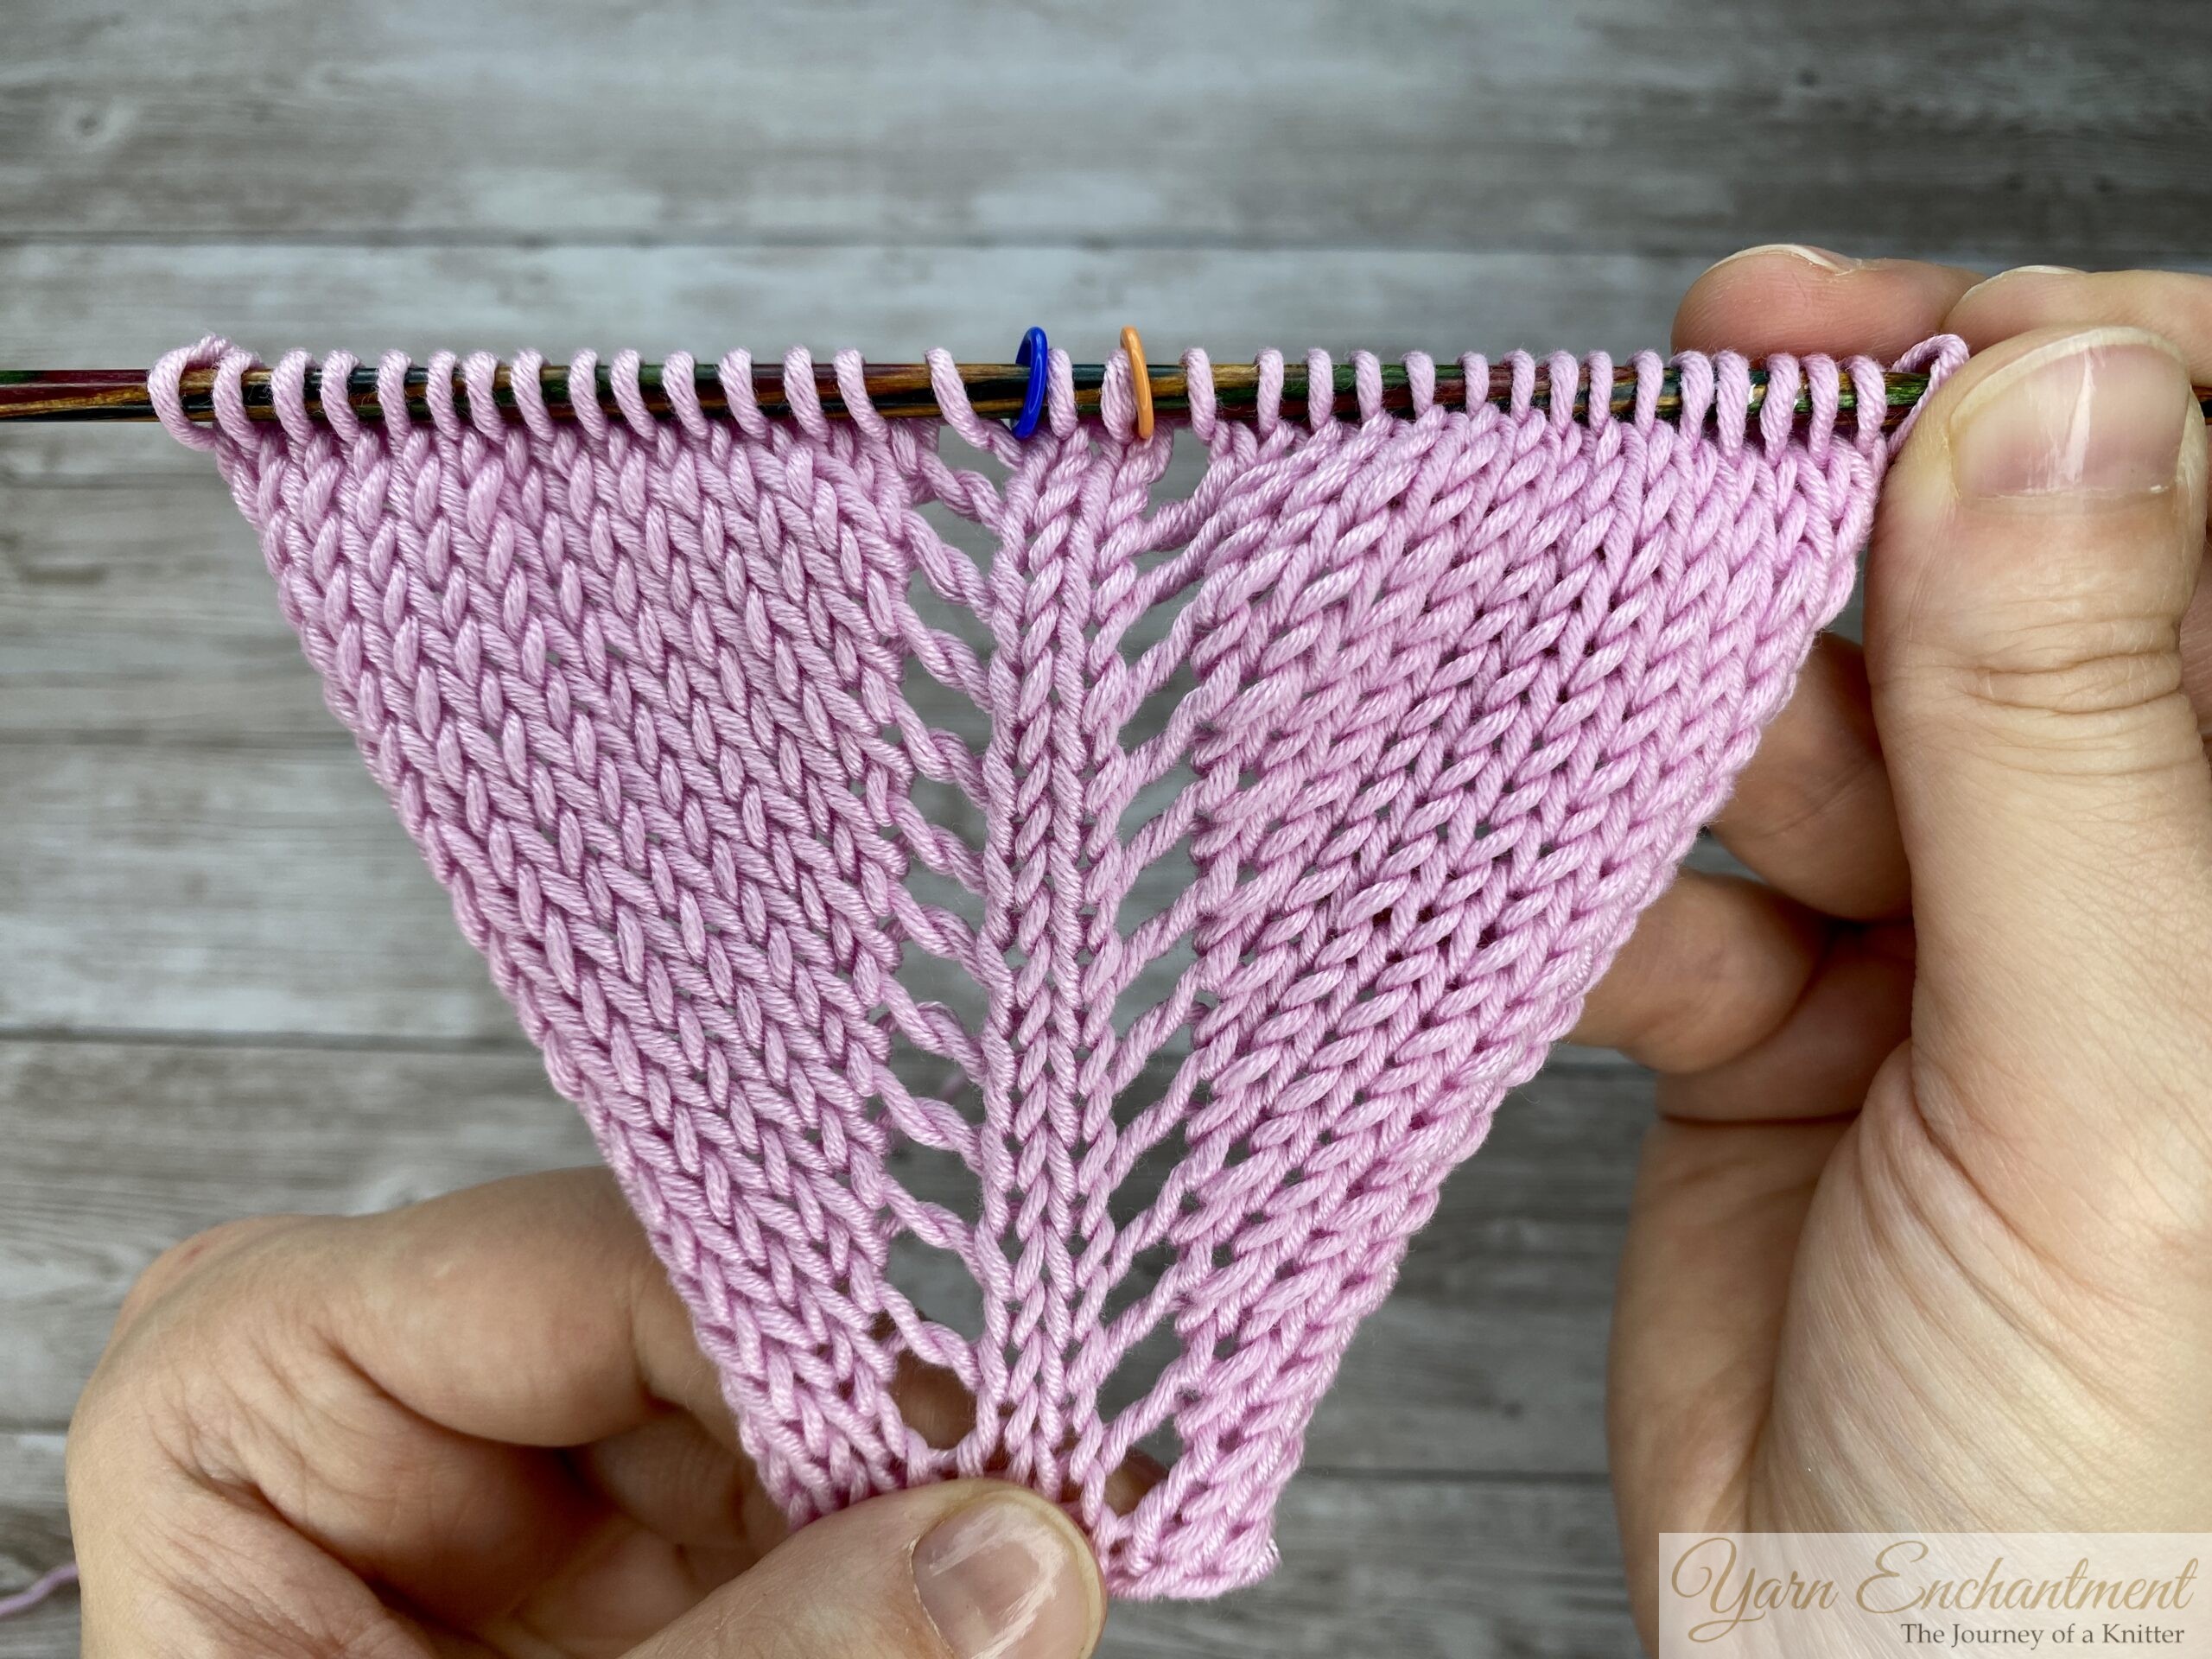  |
Bring your yarn to the front of your work, just as you normally would for a purl stitch. Insert your right needle into the front leg of the yarn over loop. Wrap the yarn around your needle counterclockwise and pull it through to complete the purl stitch. | You'll immediately see the hole you just created, so you know you worked it the right way! That open eyelet is exactly what we're after with this method. | For this swatch, I worked a yarn over (YO), then two raglan stitches, and then another yarn over right after. |
Working Yarn Over Increases In the Round
Now that you know the basics of working yarn over increases flat, let's talk about what changes when you're knitting in the round. The principles are exactly the same! The only difference is that you're always working on the right side of your fabric, there's no wrong-side row anymore.
Working in the Round: Closed Method (No Hole)
When you're knitting in the round and you want a closed increase, you need to work that yarn over on the very next round. Since there's no wrong side to purl through the back loop, you'll knit through the back loop (ktbl) instead.
Here's how to do it:
-
On Round 1 (RS): Make your yarn over as usual. Bring the yarn from back to front, then over the needle to the back. This creates your extra loop.
-
On Round 2: When you reach that yarn over loop, knit it through the back loop (ktbl). Insert your right needle into the back leg of the loop, the leg that sits behind the needle, and knit it normally.
That twist is what closes the hole and creates your invisible increase.
| 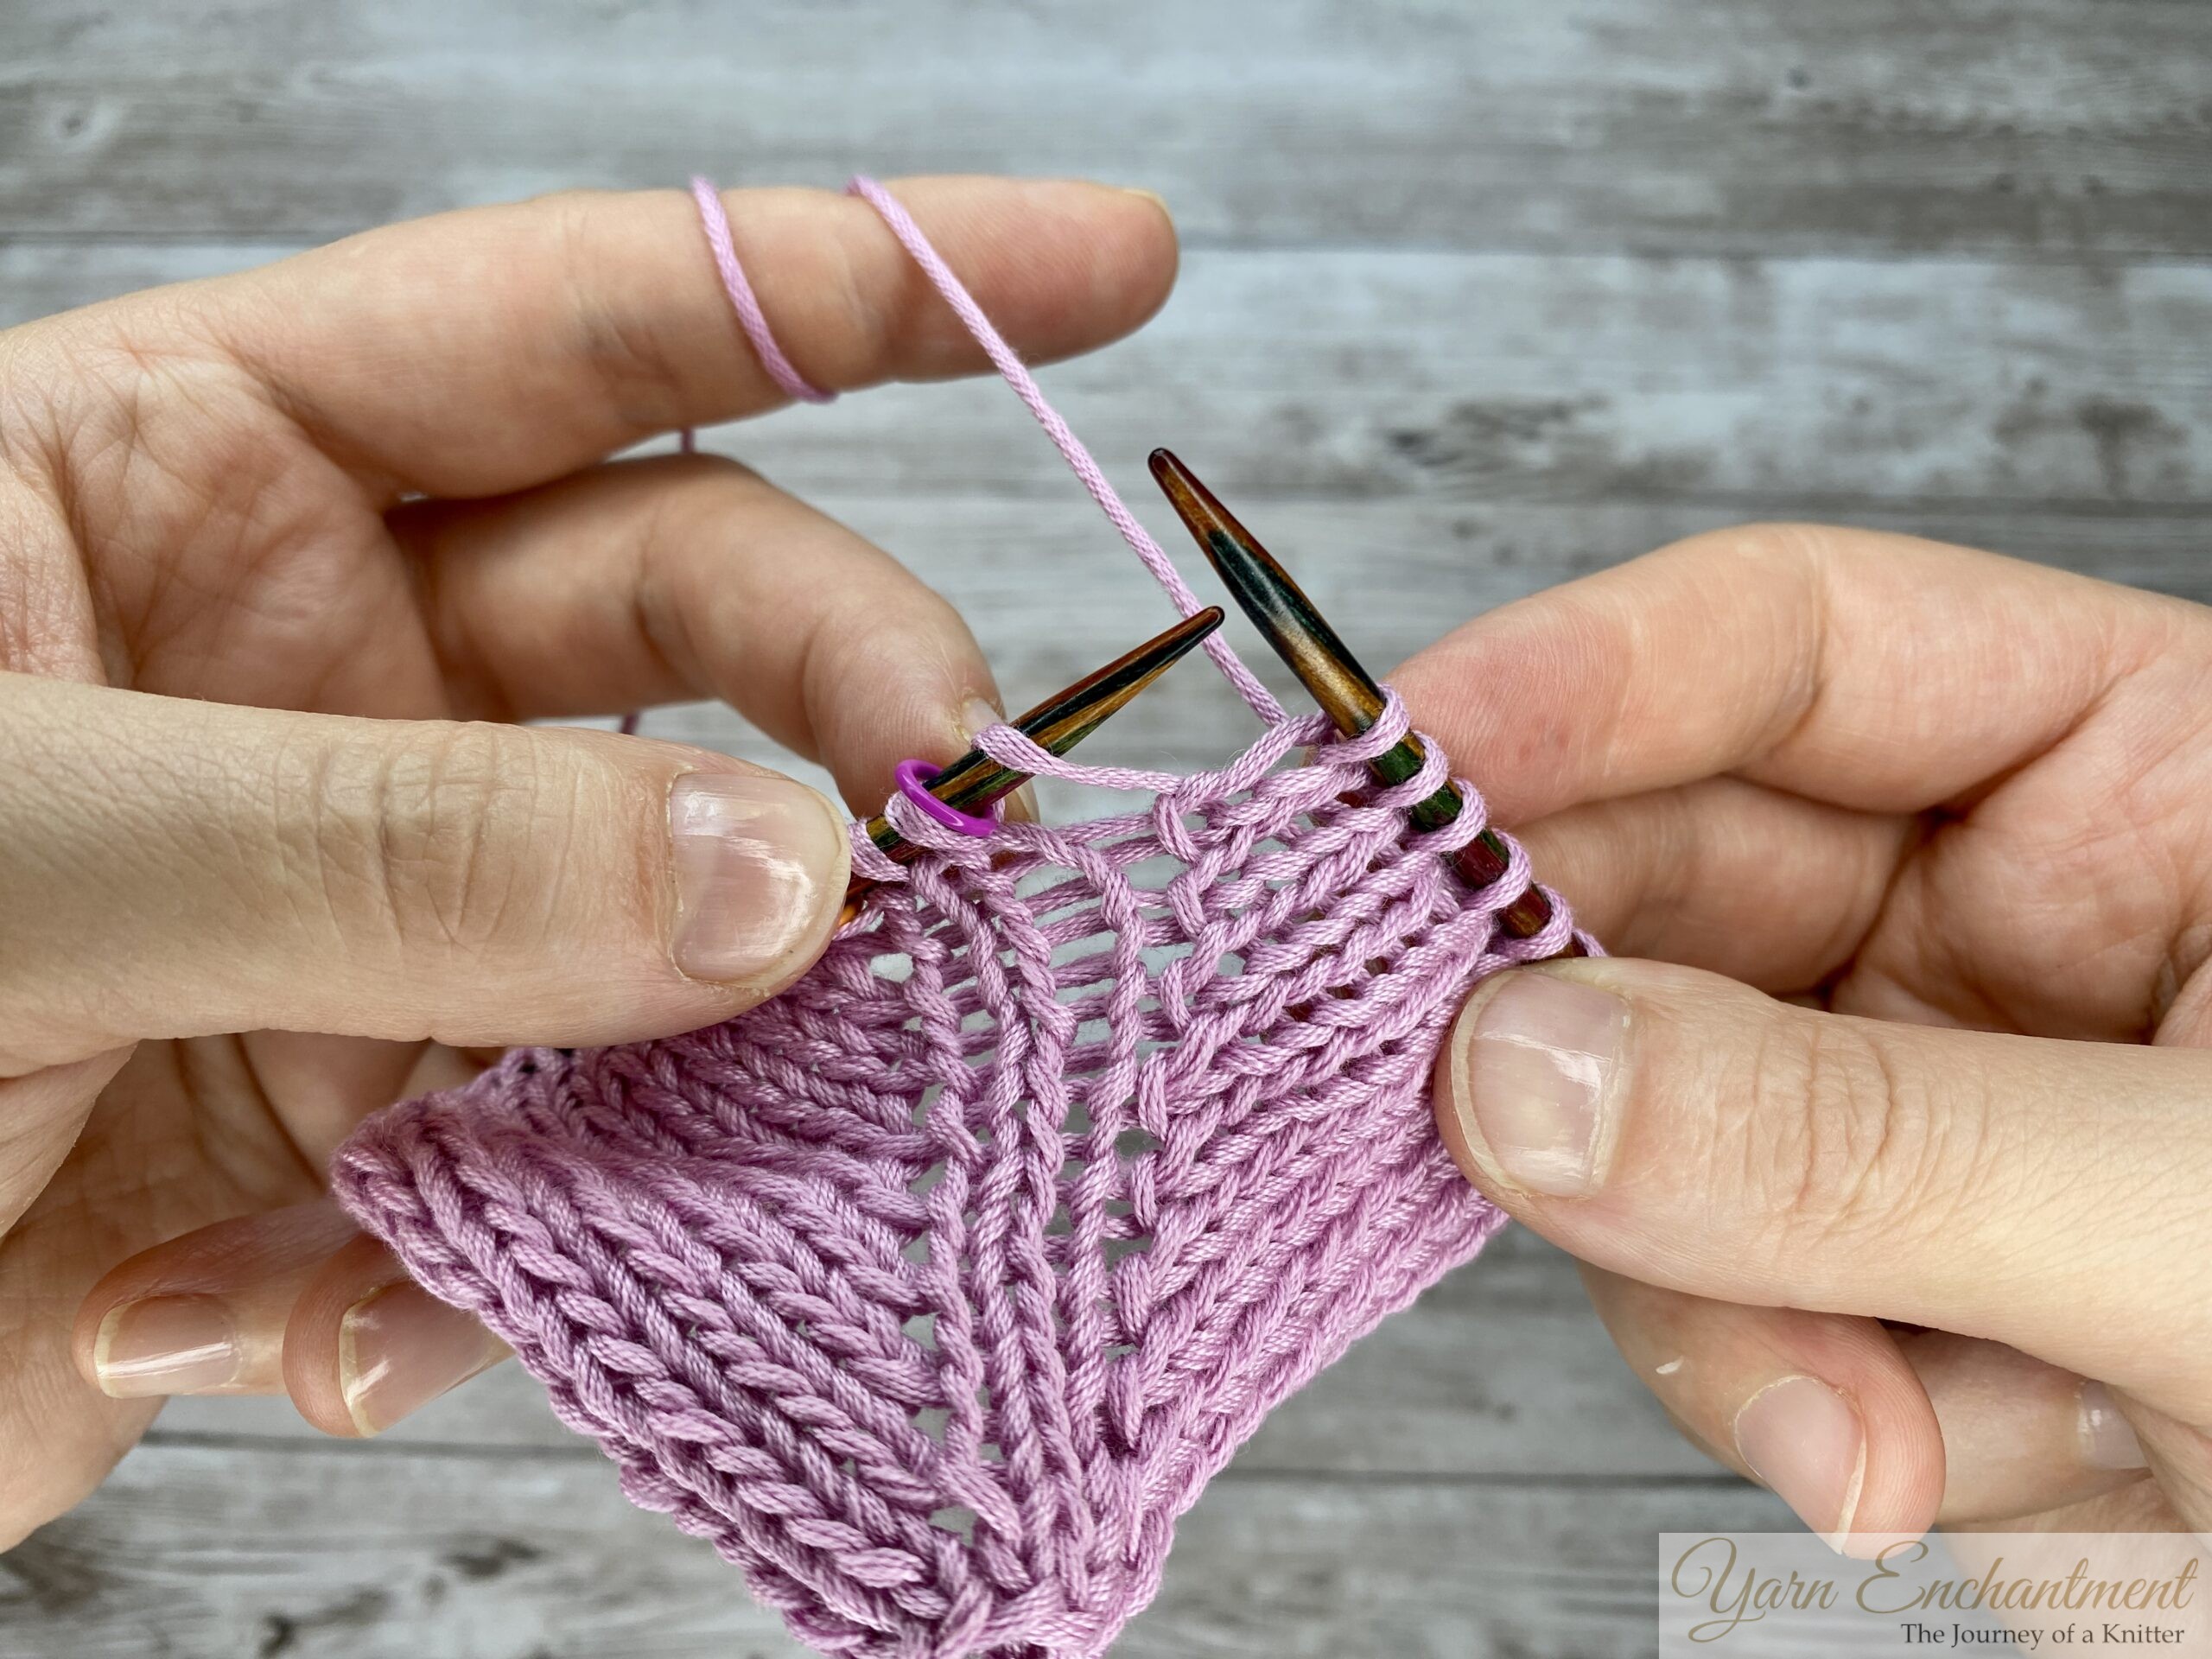  |
On Round 1: Work all your increases by yarning over from front to back. Bring the yarn to the front of your needle, then over the top to the back, just like you would for any standard yarn over. | On Round 2: When you reach the yarn over loop, ... |
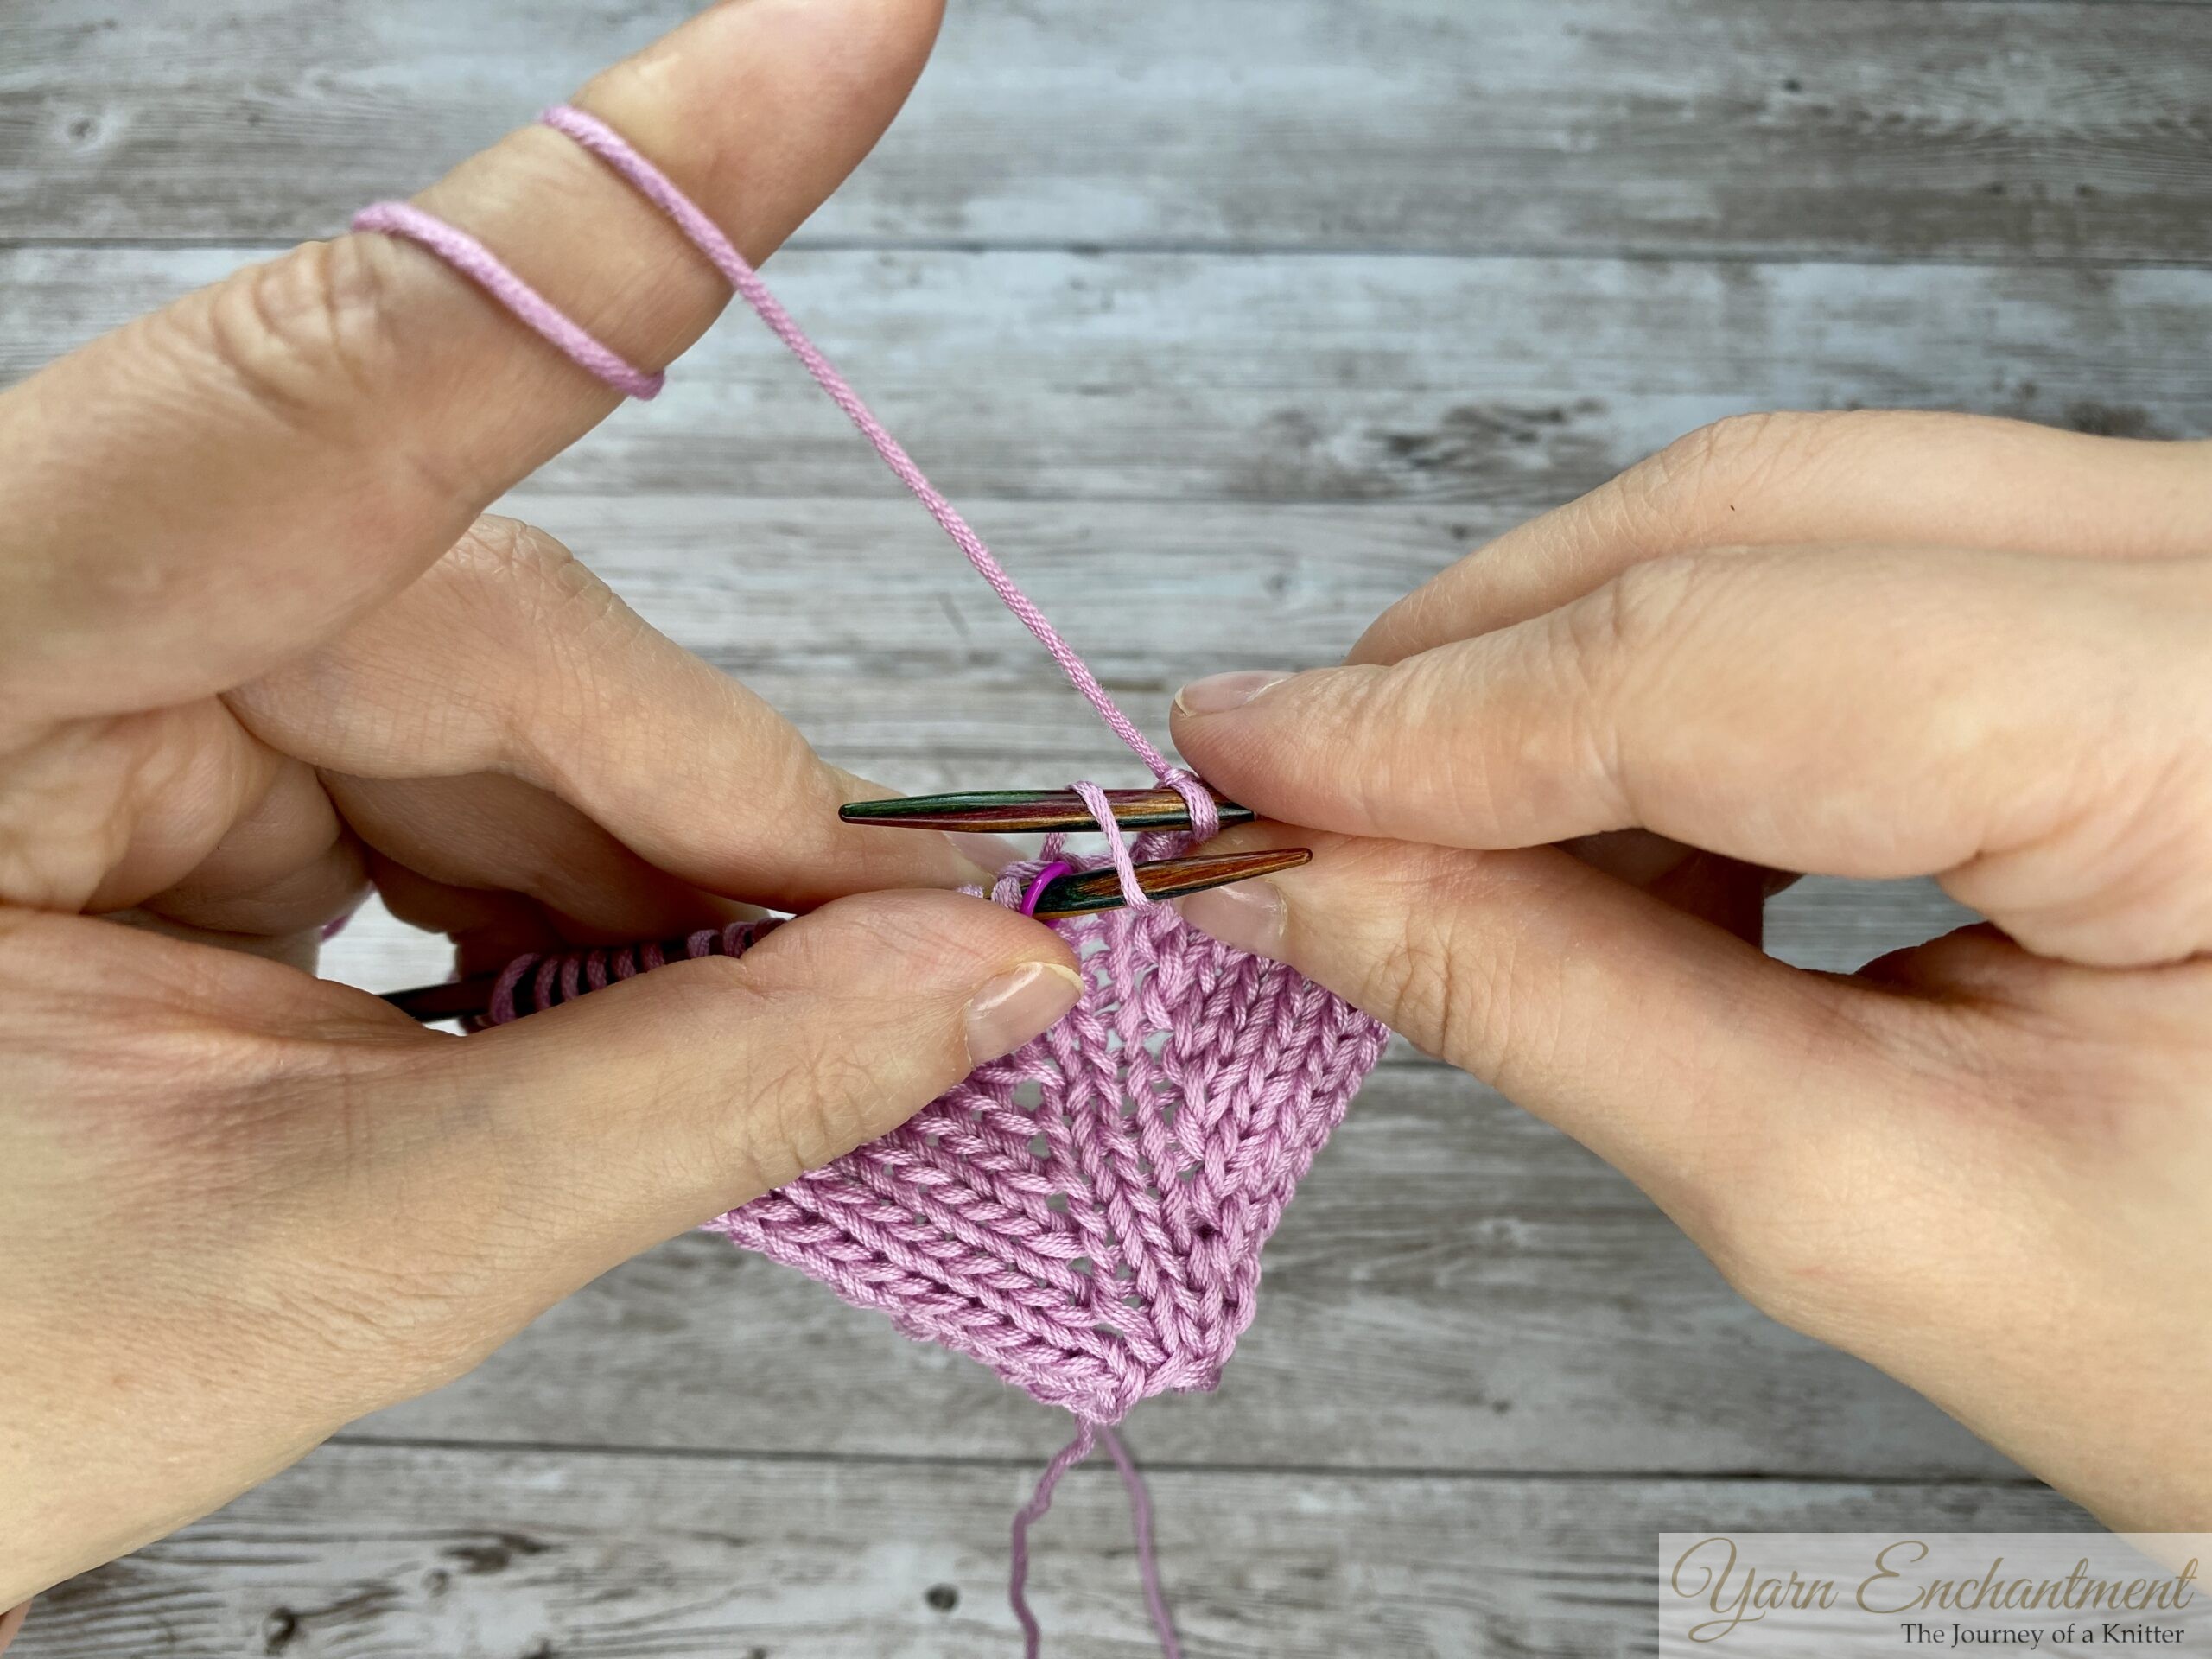  | 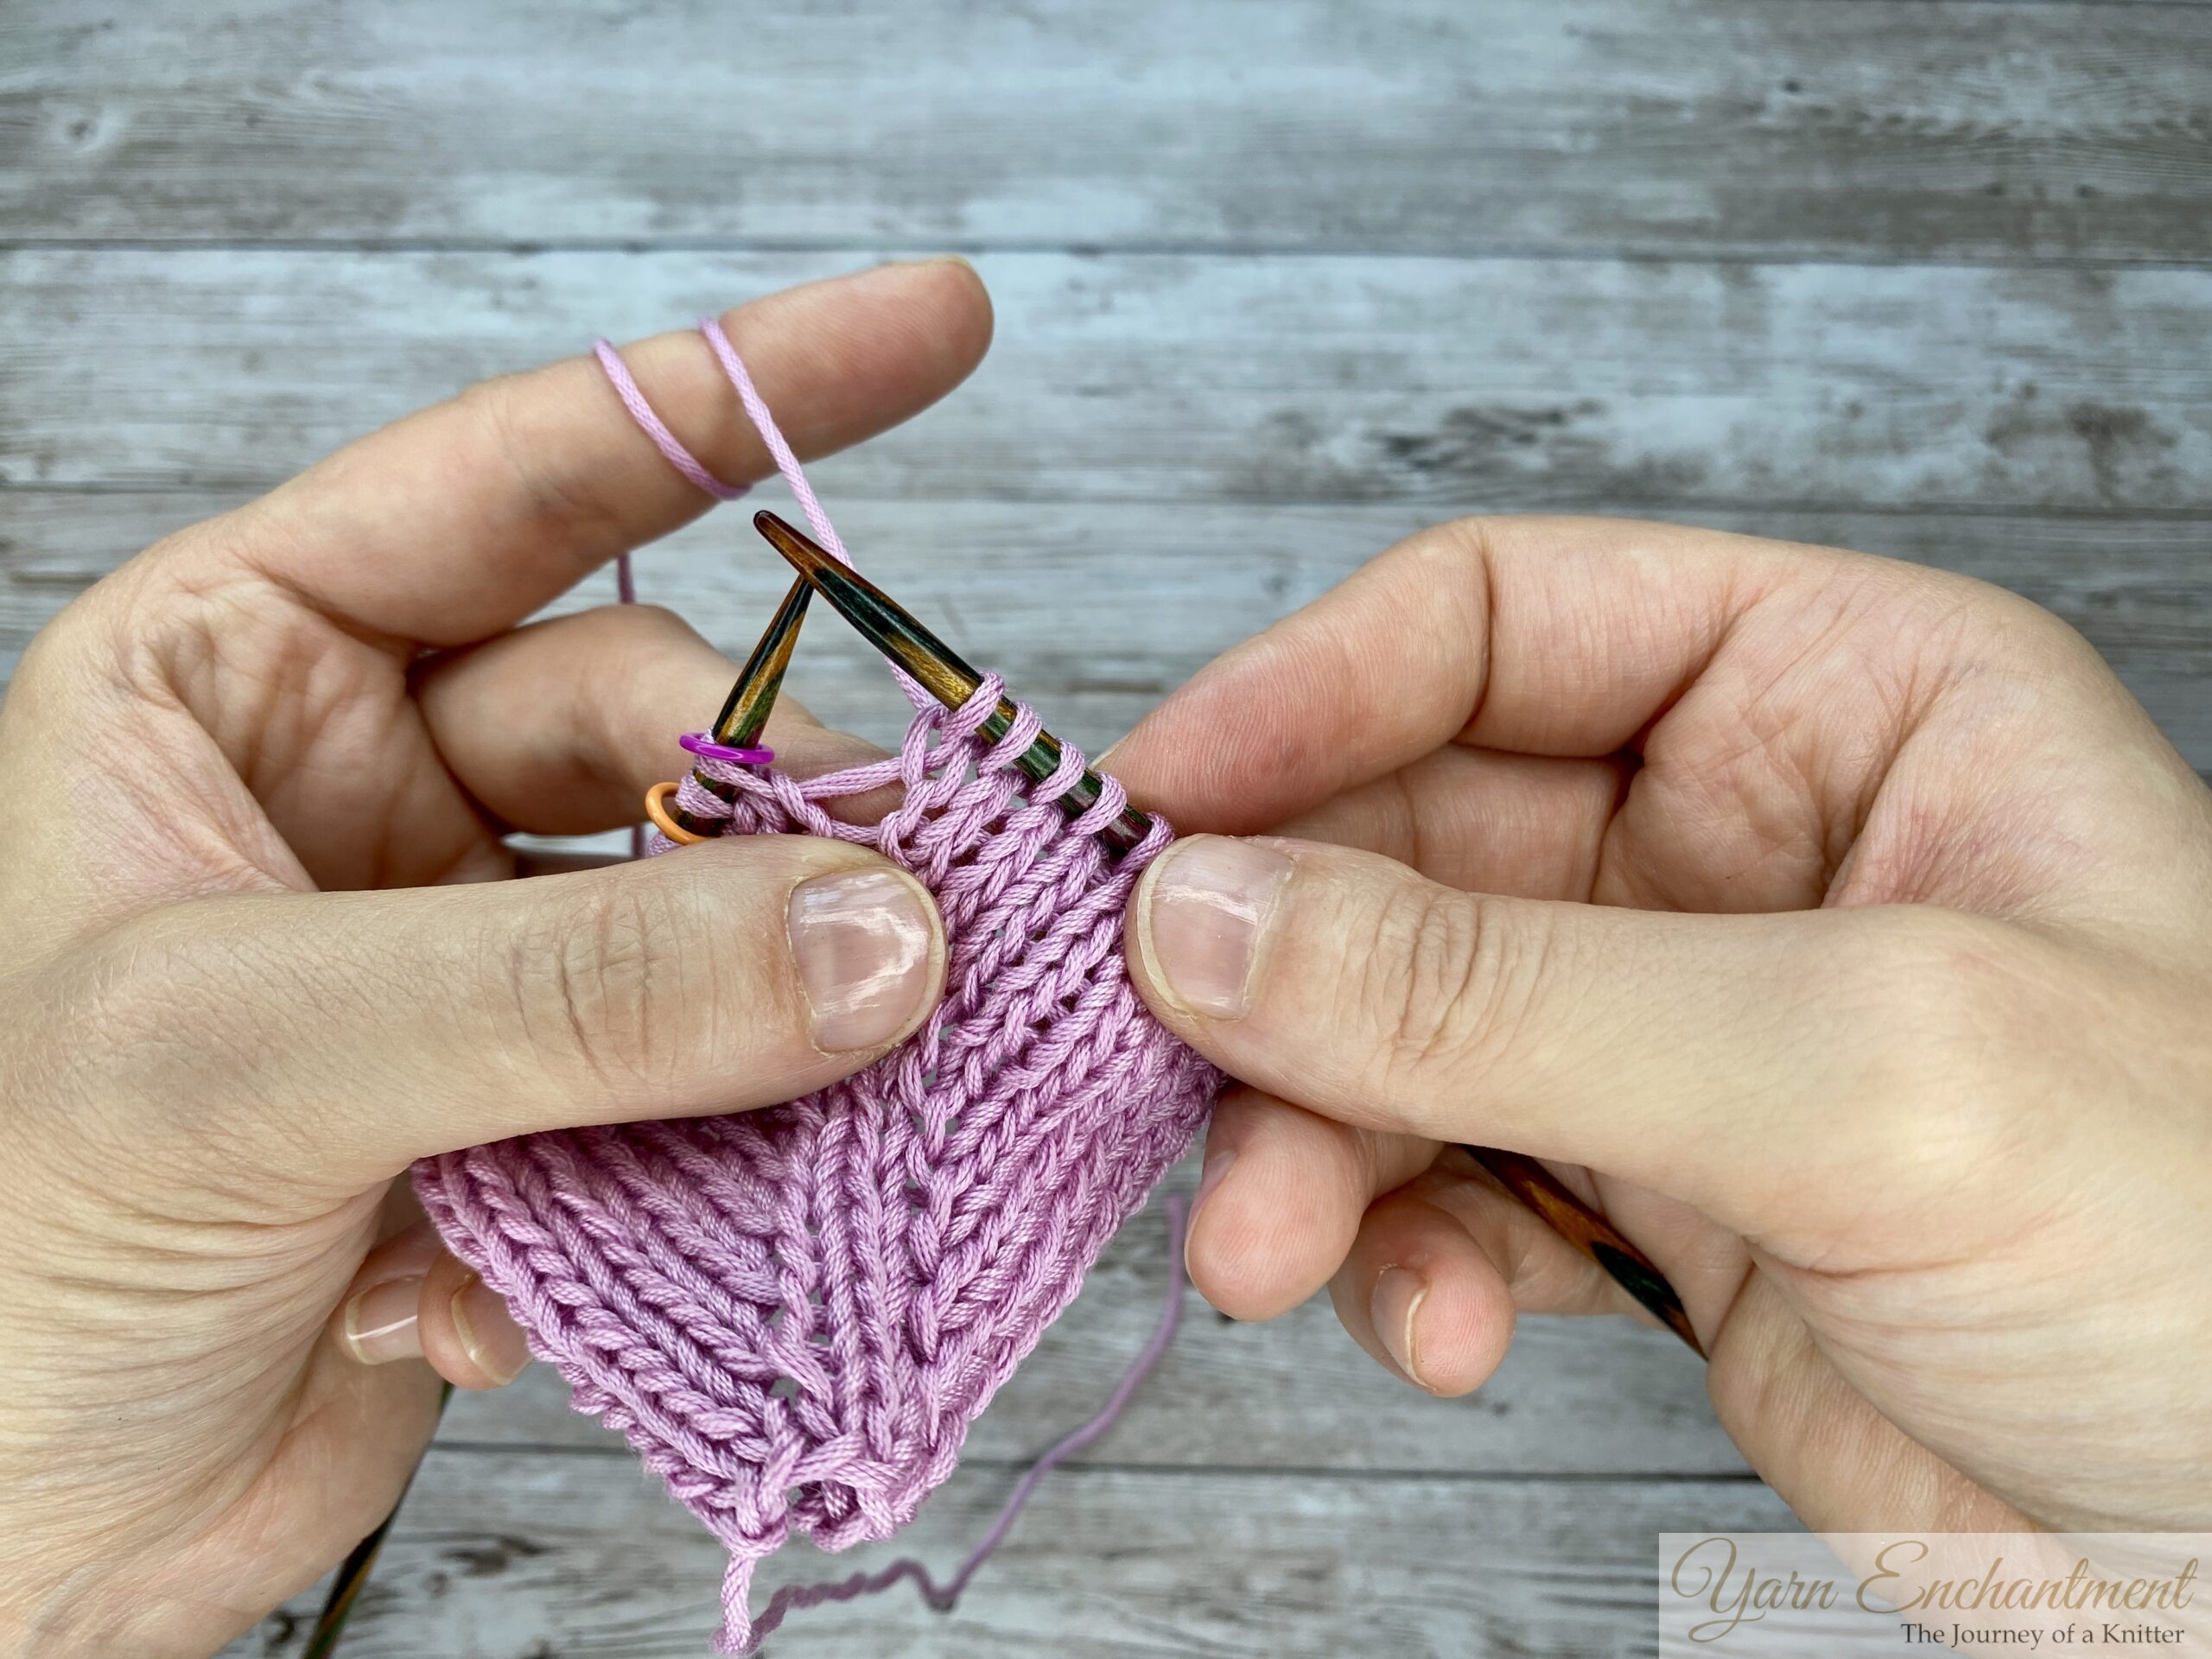  |
...take a moment to identify the back leg of your loop. It's the leg that sits behind your needle, farthest away from you. Insert your right needle into that back leg and knit it through. | This creates a twisted stitch that closes the hole of the yarn over. |
Working in the Round: Open Method (Eyelet)
If you're knitting in the round and you want that beautiful little hole, the process is even simpler.
Here's how to do it:
-
On Round 1 (RS): Make your yarn over as usual. Bring the yarn from back to front, then over the needle to the back.
-
On Round 2: When you reach that yarn over loop, knit it through the front loop just like any other stitch.
When to use this: This is wonderful for lace patterns worked in the round, like circular shawls or lacy cowls. It's also a beautiful choice for decorative raglan increases on top-down sweaters when you want a bit of visual interest along your raglan lines.
| 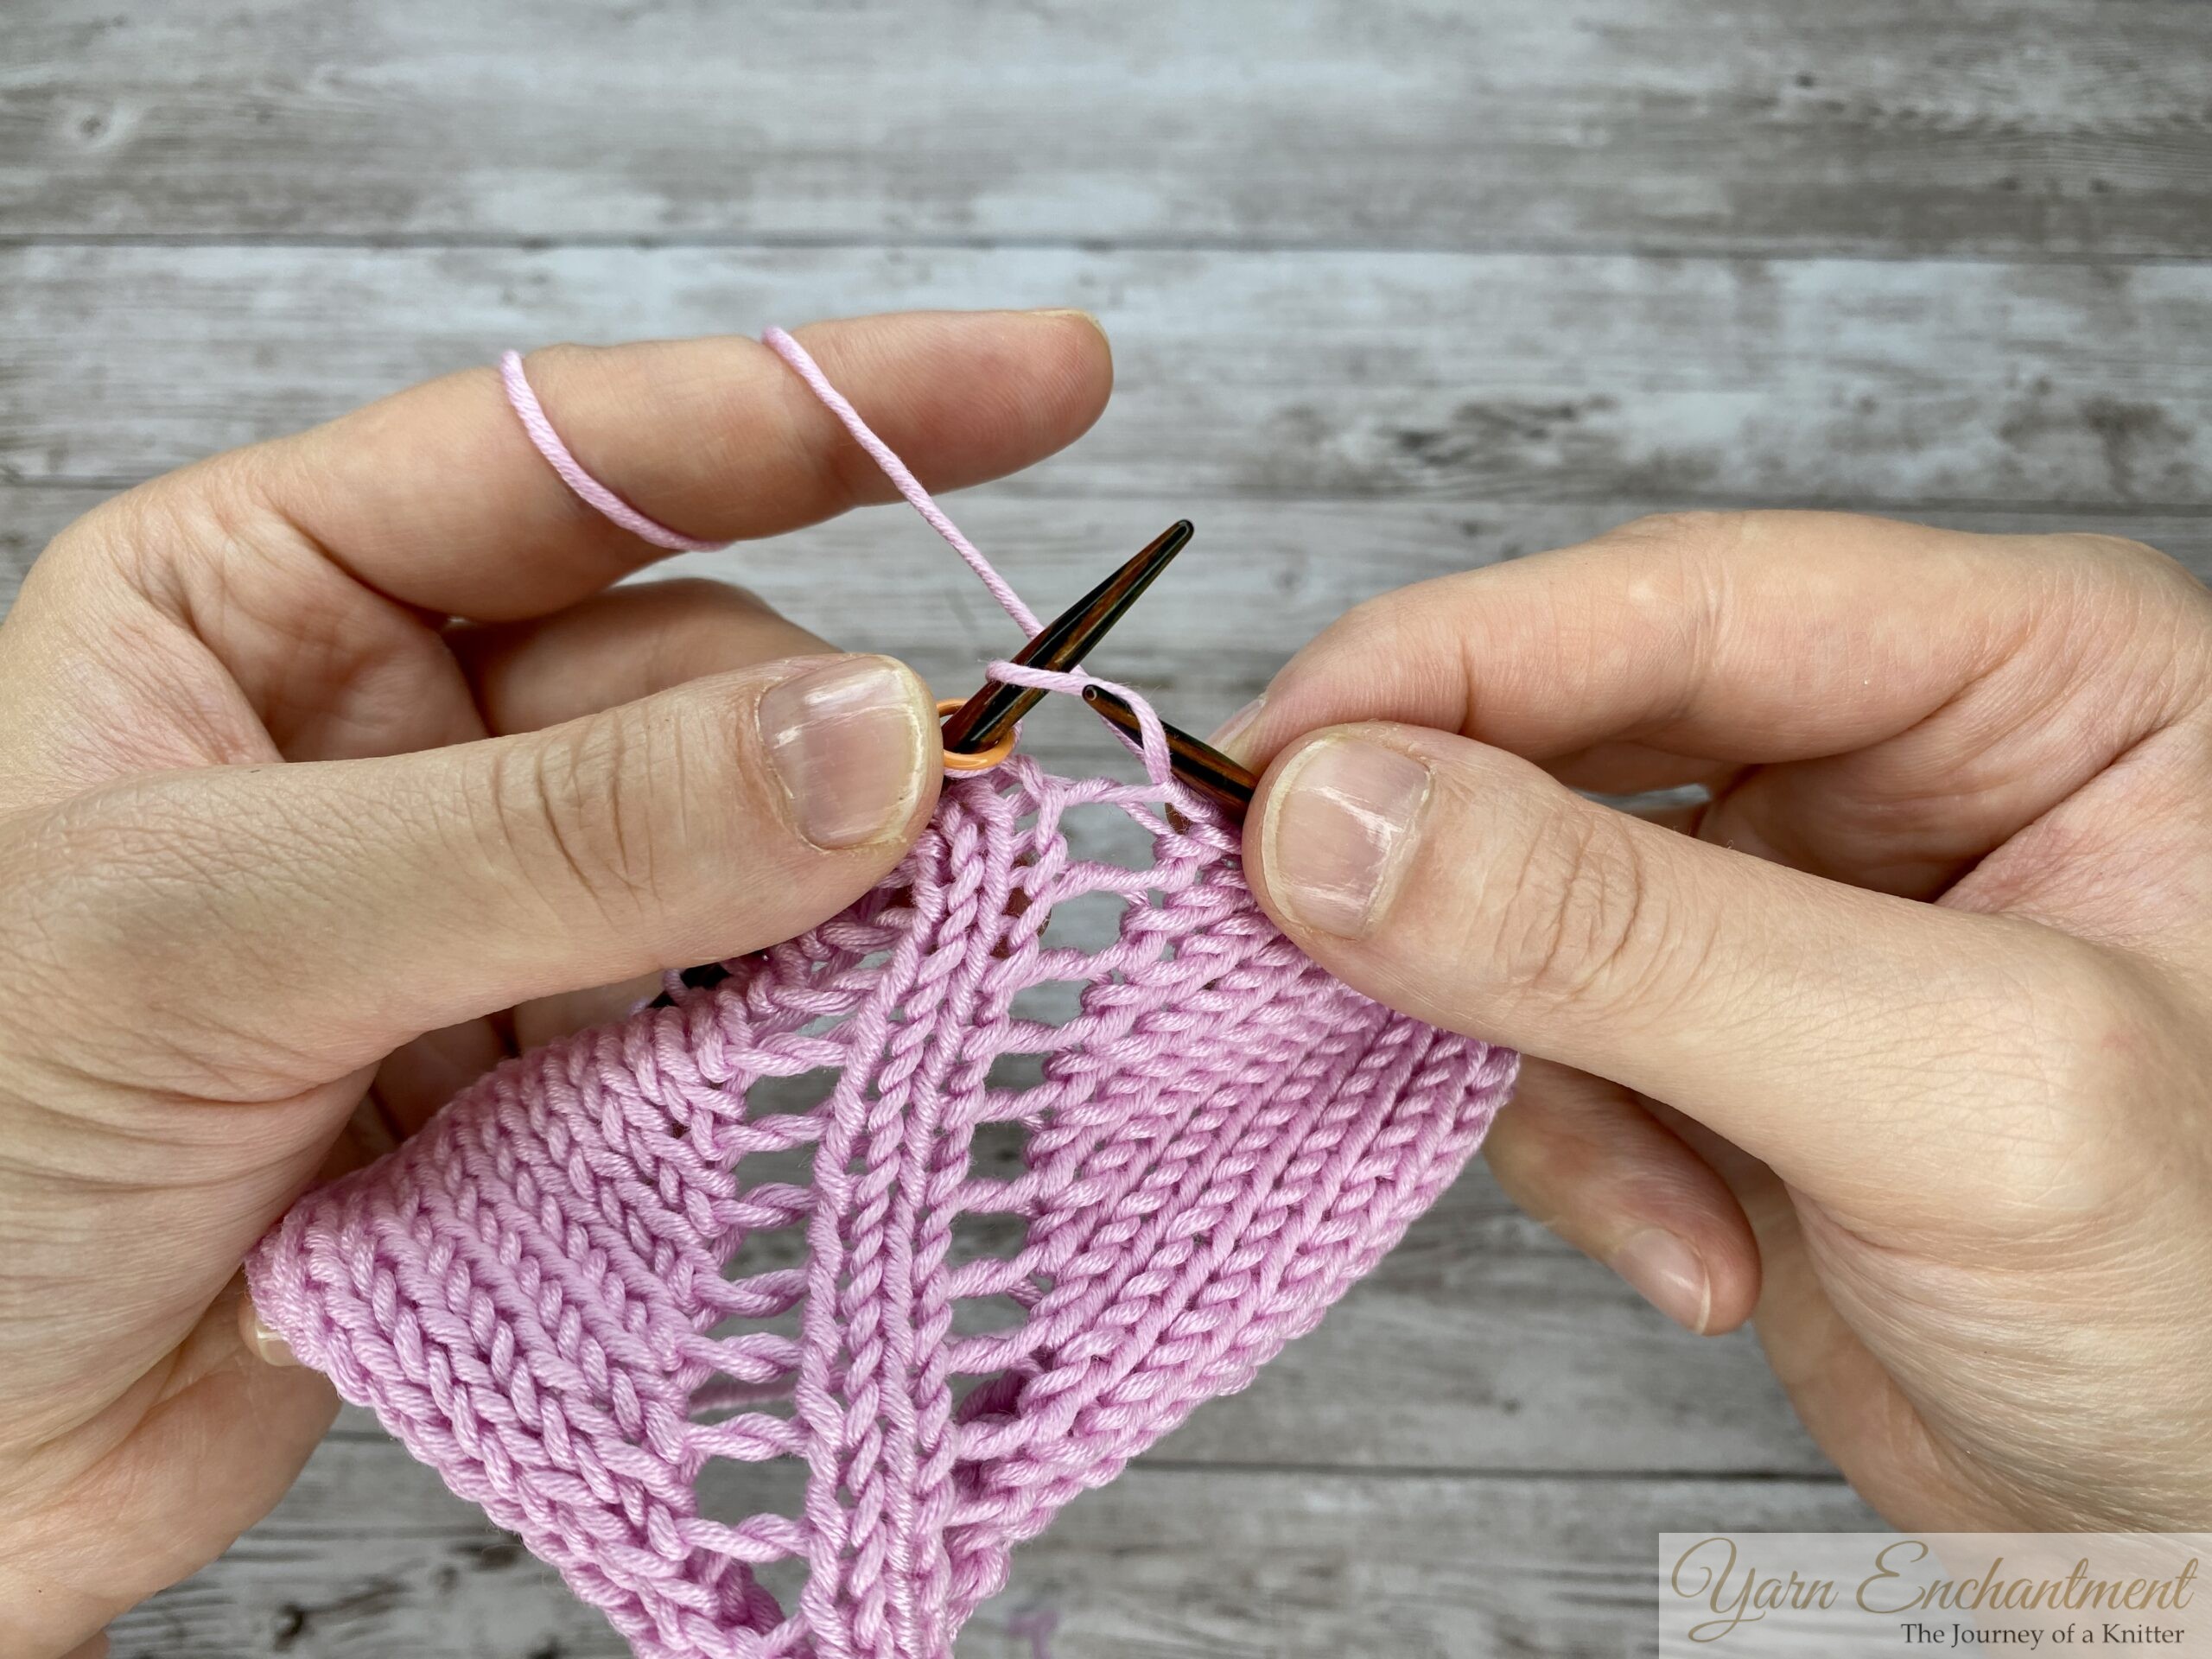  | 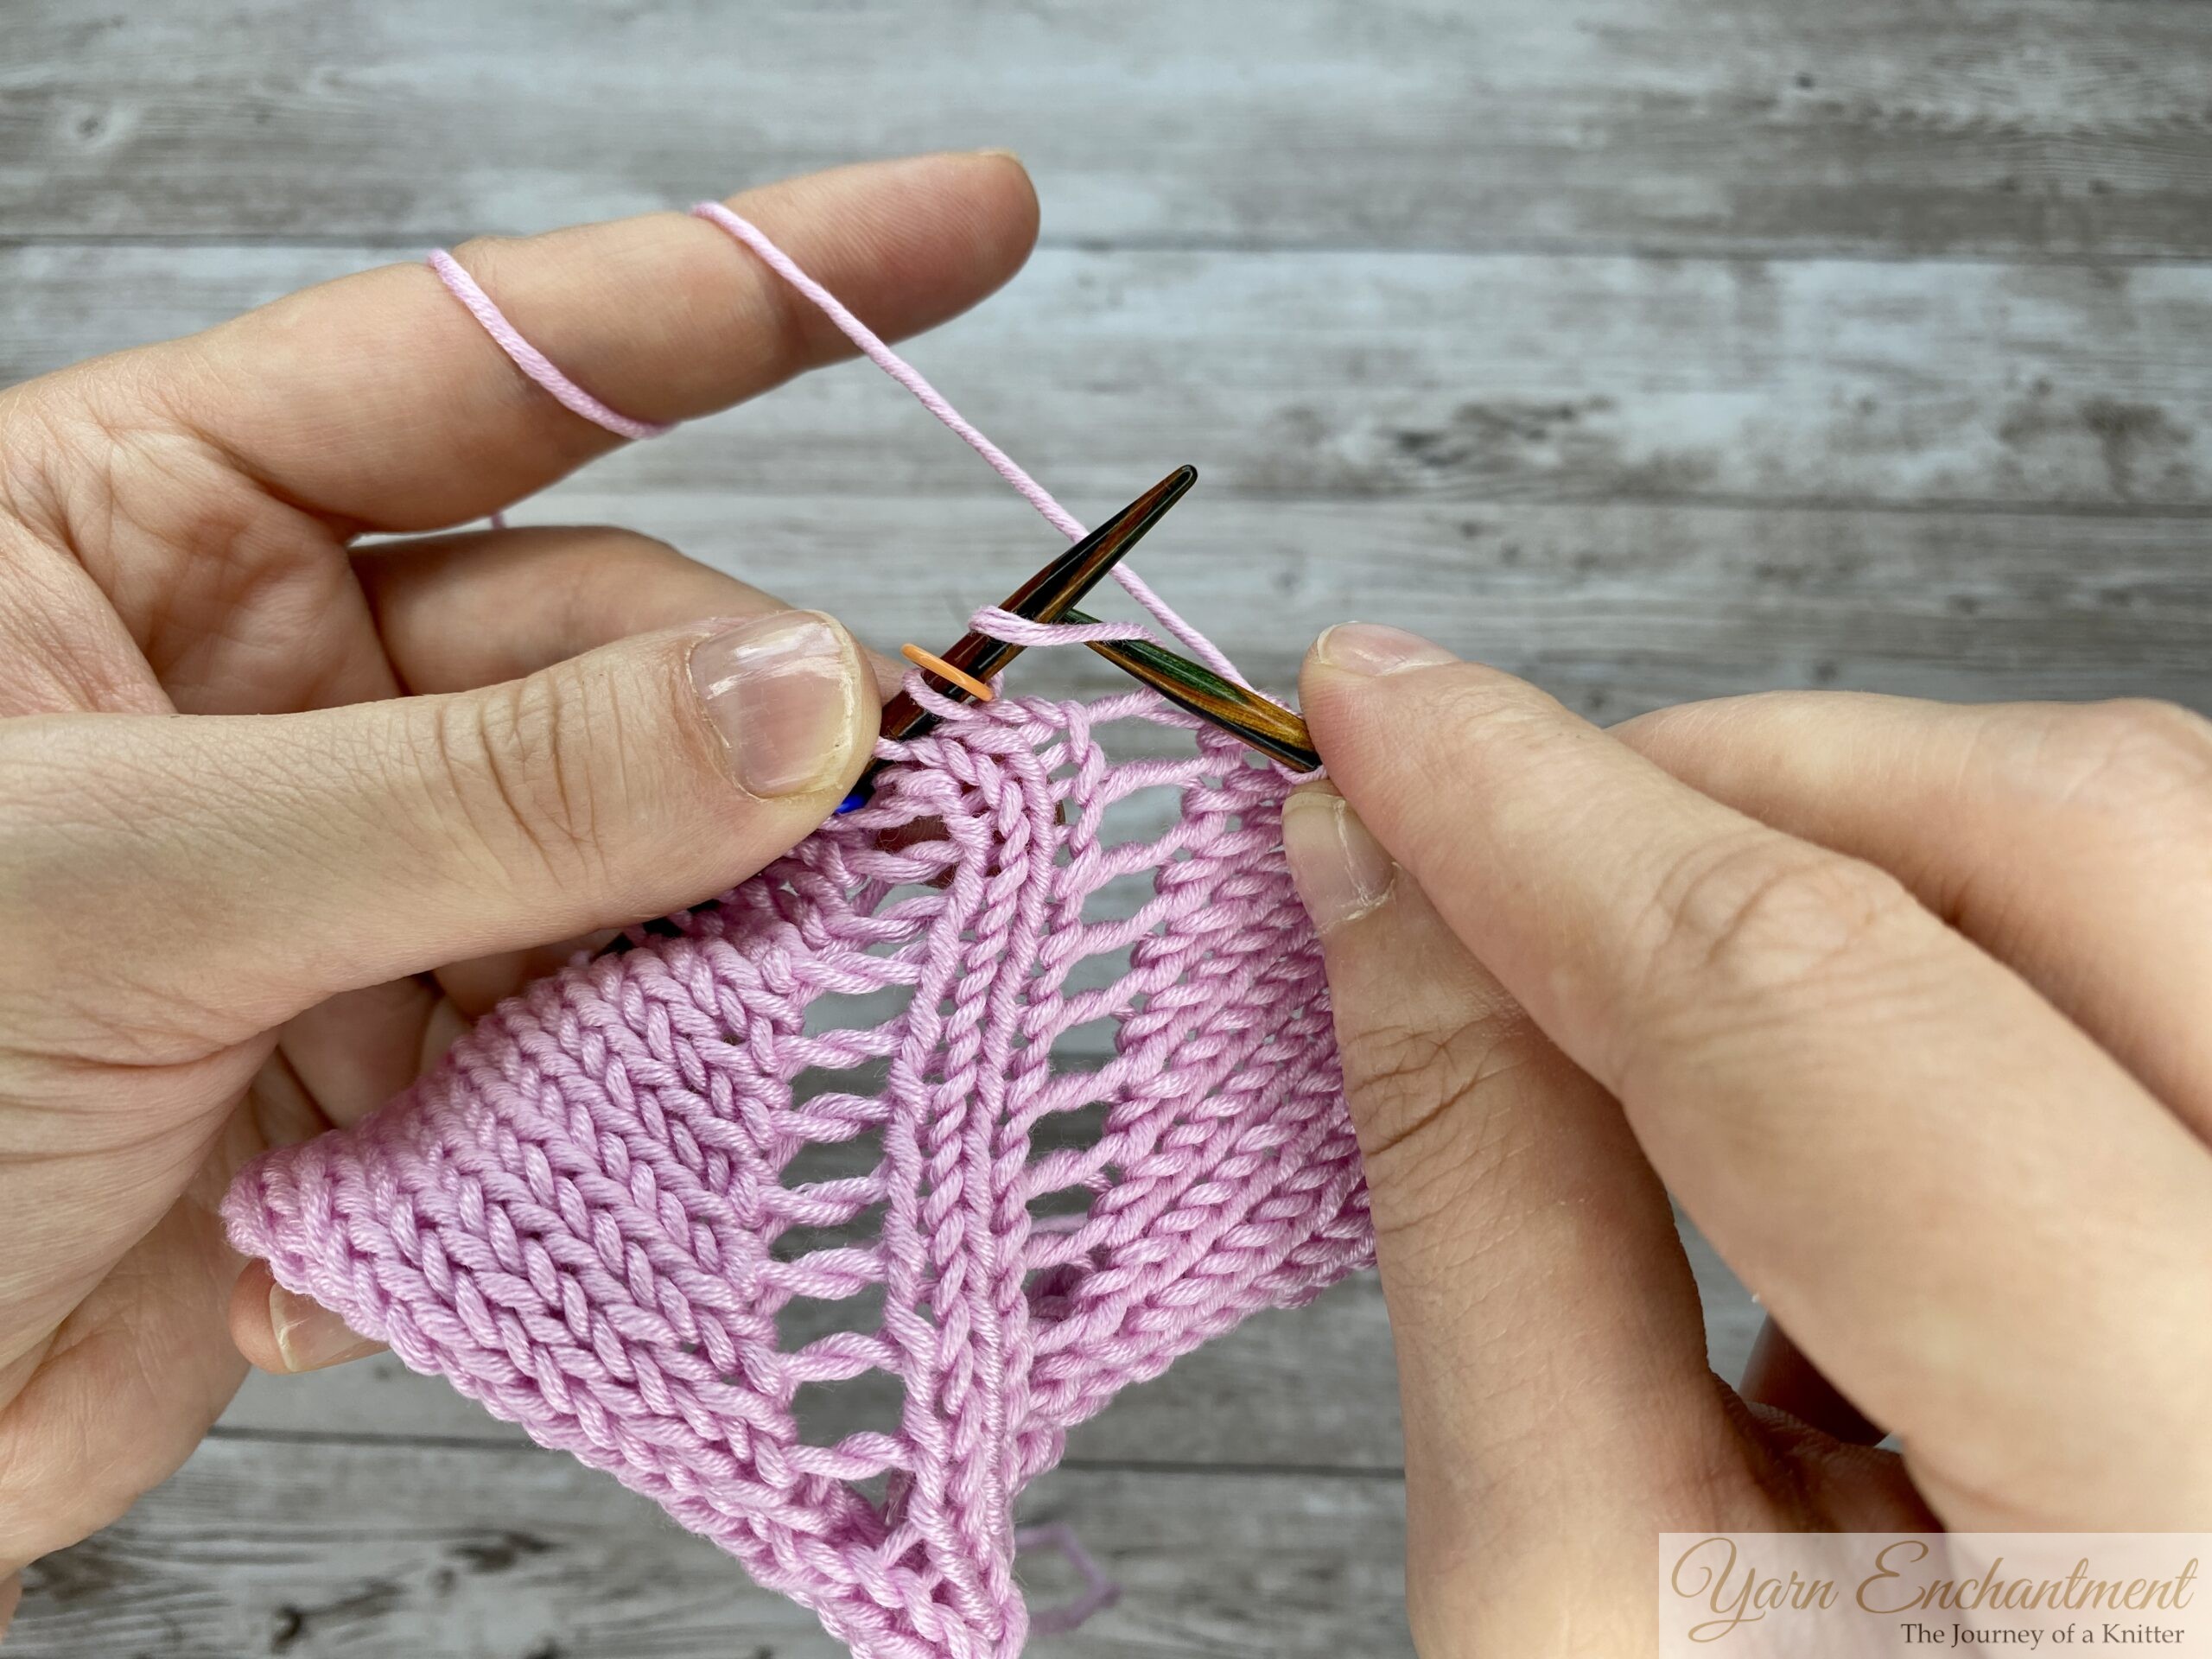  |
On the first round: Work all your yarn over increases. Bring the yarn from back to front, then over the needle to the back, just like you would for any standard yarn over. | On the second round: Knit until you reach that yarn over loop. This time, you want to knit through the front leg of the stitch. | Insert your right needle knitwise into the front loop, wrap your yarn, and pull it through. Then slip the stitch off your left needle as usual. |
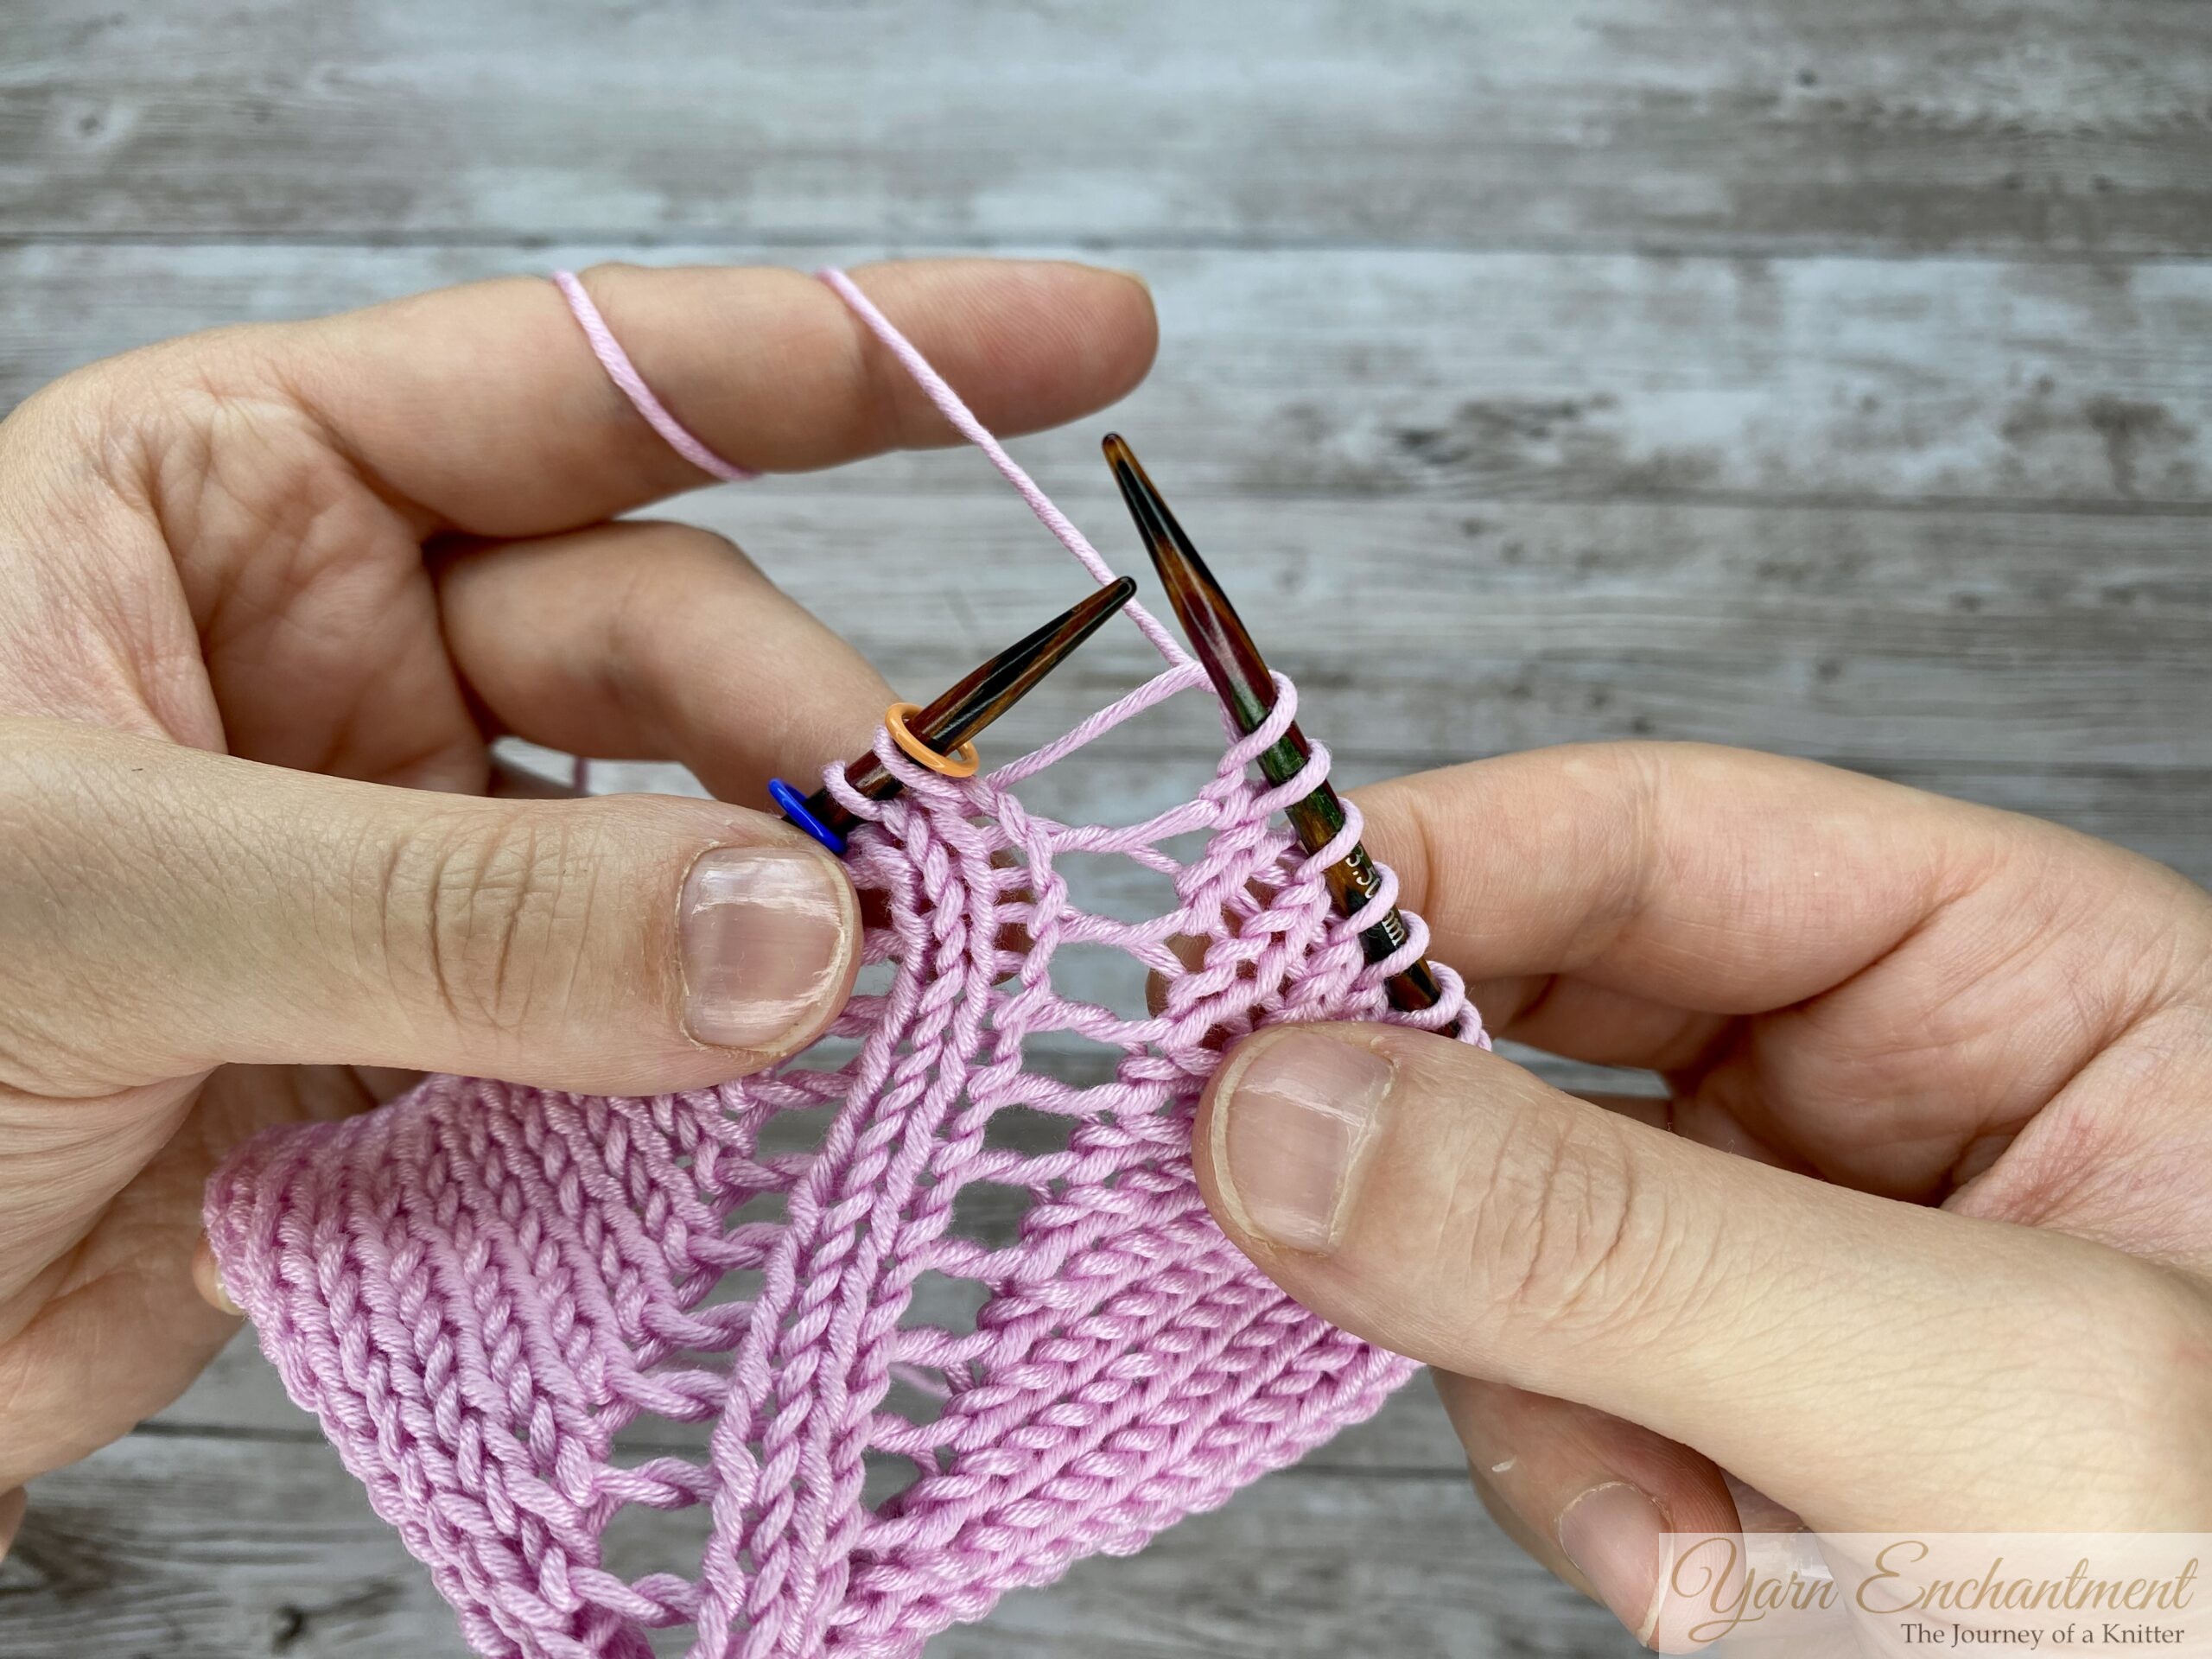  |
You can immediately see that you have created a hole, an open eyelet that adds charm and lightness to your fabric. And that's exactly what we wanted! |
A note on my swatches: You might notice that I used the same swatch throughout this tutorial, both for the flat knitting and in the round sections. For the in the round examples, I used the "fake swatch in the round" method. This is where you pull the working yarn across the back of your work to mimic circular knitting, without actually knitting in the round.
If you're curious about this technique, I have a detailed tutorial in my sock knitting guide. It's a fantastic way to swatch for circular projects without knitting an entire garment, definitely worth checking out!
Directional Increases with Yarn Overs: M1L and M1R (Left & Right Leaning)
Now that you know how to close or open a yarn over, let's take it a step further. What if I told you that the same yarn over could also create a left-leaning or right-leaning increase? This is a game-changer for shaping that looks truly professional.
When you're shaping a raglan sweater, you often want the increases to lean in a specific direction to follow the line of your work. A standard "make one" (M1) usually involves lifting the bar between stitches, but you can achieve the exact same effect with a yarn over, worked correctly on the next row. It's a beautiful alternative that feels more intuitive once you get the hang of it. And if you ever forget an increase, don't panic! You can simply lift the bar between your stitches to make a right-leaning or left-leaning increase (M1R or M1L). It's always good to have both techniques in your knitting toolkit, you never know when one might come in handy!
The technique is simple, and it all comes down to which way you wrap the yarn. Let me show you how both work.
Make One Left (M1L) Using a Yarn Over (Flat Knitting)
An M1L leans to the left. This is the increase you'll want when you need your shaping to slant in that direction, think of it as the left-hand side of a raglan line or the beginning of a row.
Here's how to create it:
-
On the right side: Make a standard yarn over. Bring the yarn from back to front, then over the needle to the back. This creates your extra loop.
-
On the wrong side (or next row): When you reach that yarn over loop, knit it through the back loop (ktbl). Insert your right needle into the back leg of the stitch, the one that sits behind the needle, and knit it normally.
-
The twist you create by knitting through the back loop does two things at once: it closes the hole and causes the increase to lean to the left.
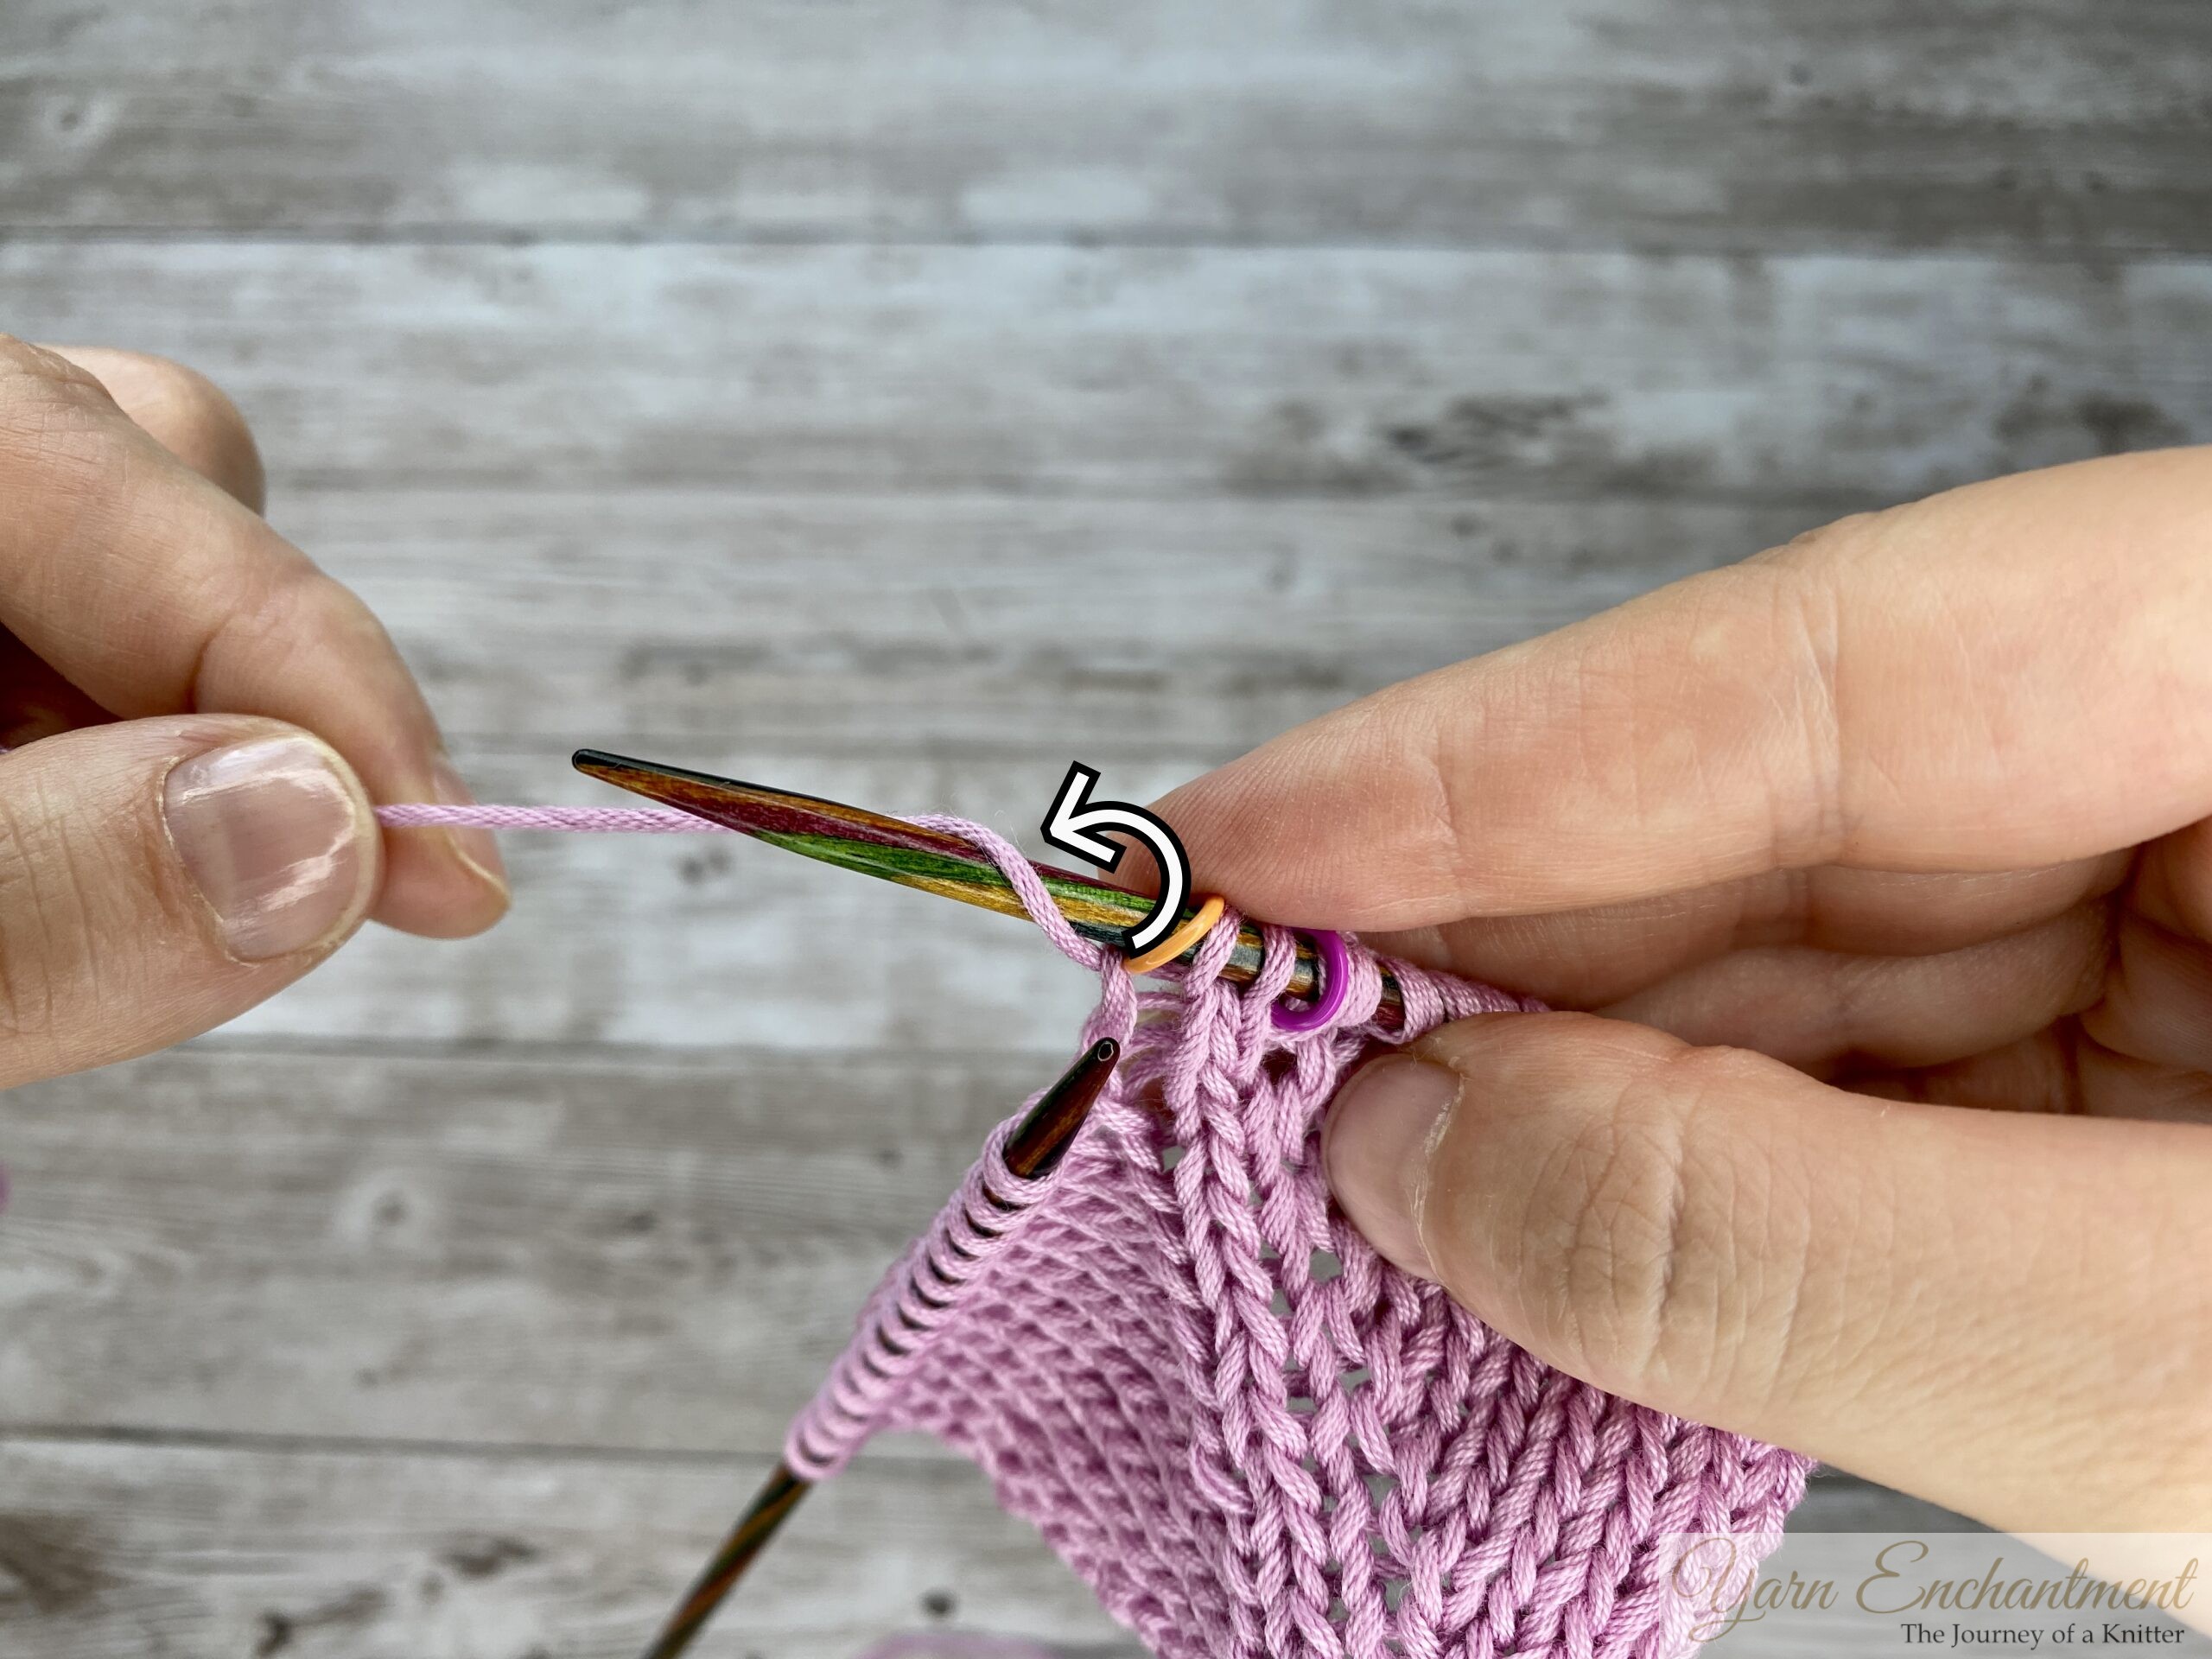  | | |
On the right side: Work your yarn over from back to front, then over the needle to the back. When the yarn strand is pointing to the left side, you know you have worked the yarn over the correct way. | On the wrong side: Purl until you reach the yarn over loop. | Purl it through the back loop to work an M1L. This twist closes the hole and makes the increase lean to the left. |
Make One Left (M1L) Using a Yarn Over – In the Round
If you're knitting in the round instead of flat, the process is almost identical, with one small difference. Since you're always working on the right side of your fabric, there's no wrong-side row to purl through the back loop. Instead, you'll work the twist on the very next round.
Here's how to create an M1L in the round:
-
On Round 1: Bring the yarn from back to front, then over the needle to the back. When the yarn strand is pointing to the left side, you know you've worked it correctly.
-
On Round 2: Knit until you reach the yarn over loop.
-
Close the increase: Knit the yarn over through the back loop (ktbl). Insert your right needle into the back leg of the stitch, the one that sits behind the needle, and knit it normally.
Again, the twist you create by knitting through the back loop does two things at once: it closes the hole and makes your increase lean to the left. That's your M1L, worked entirely in the round!
| 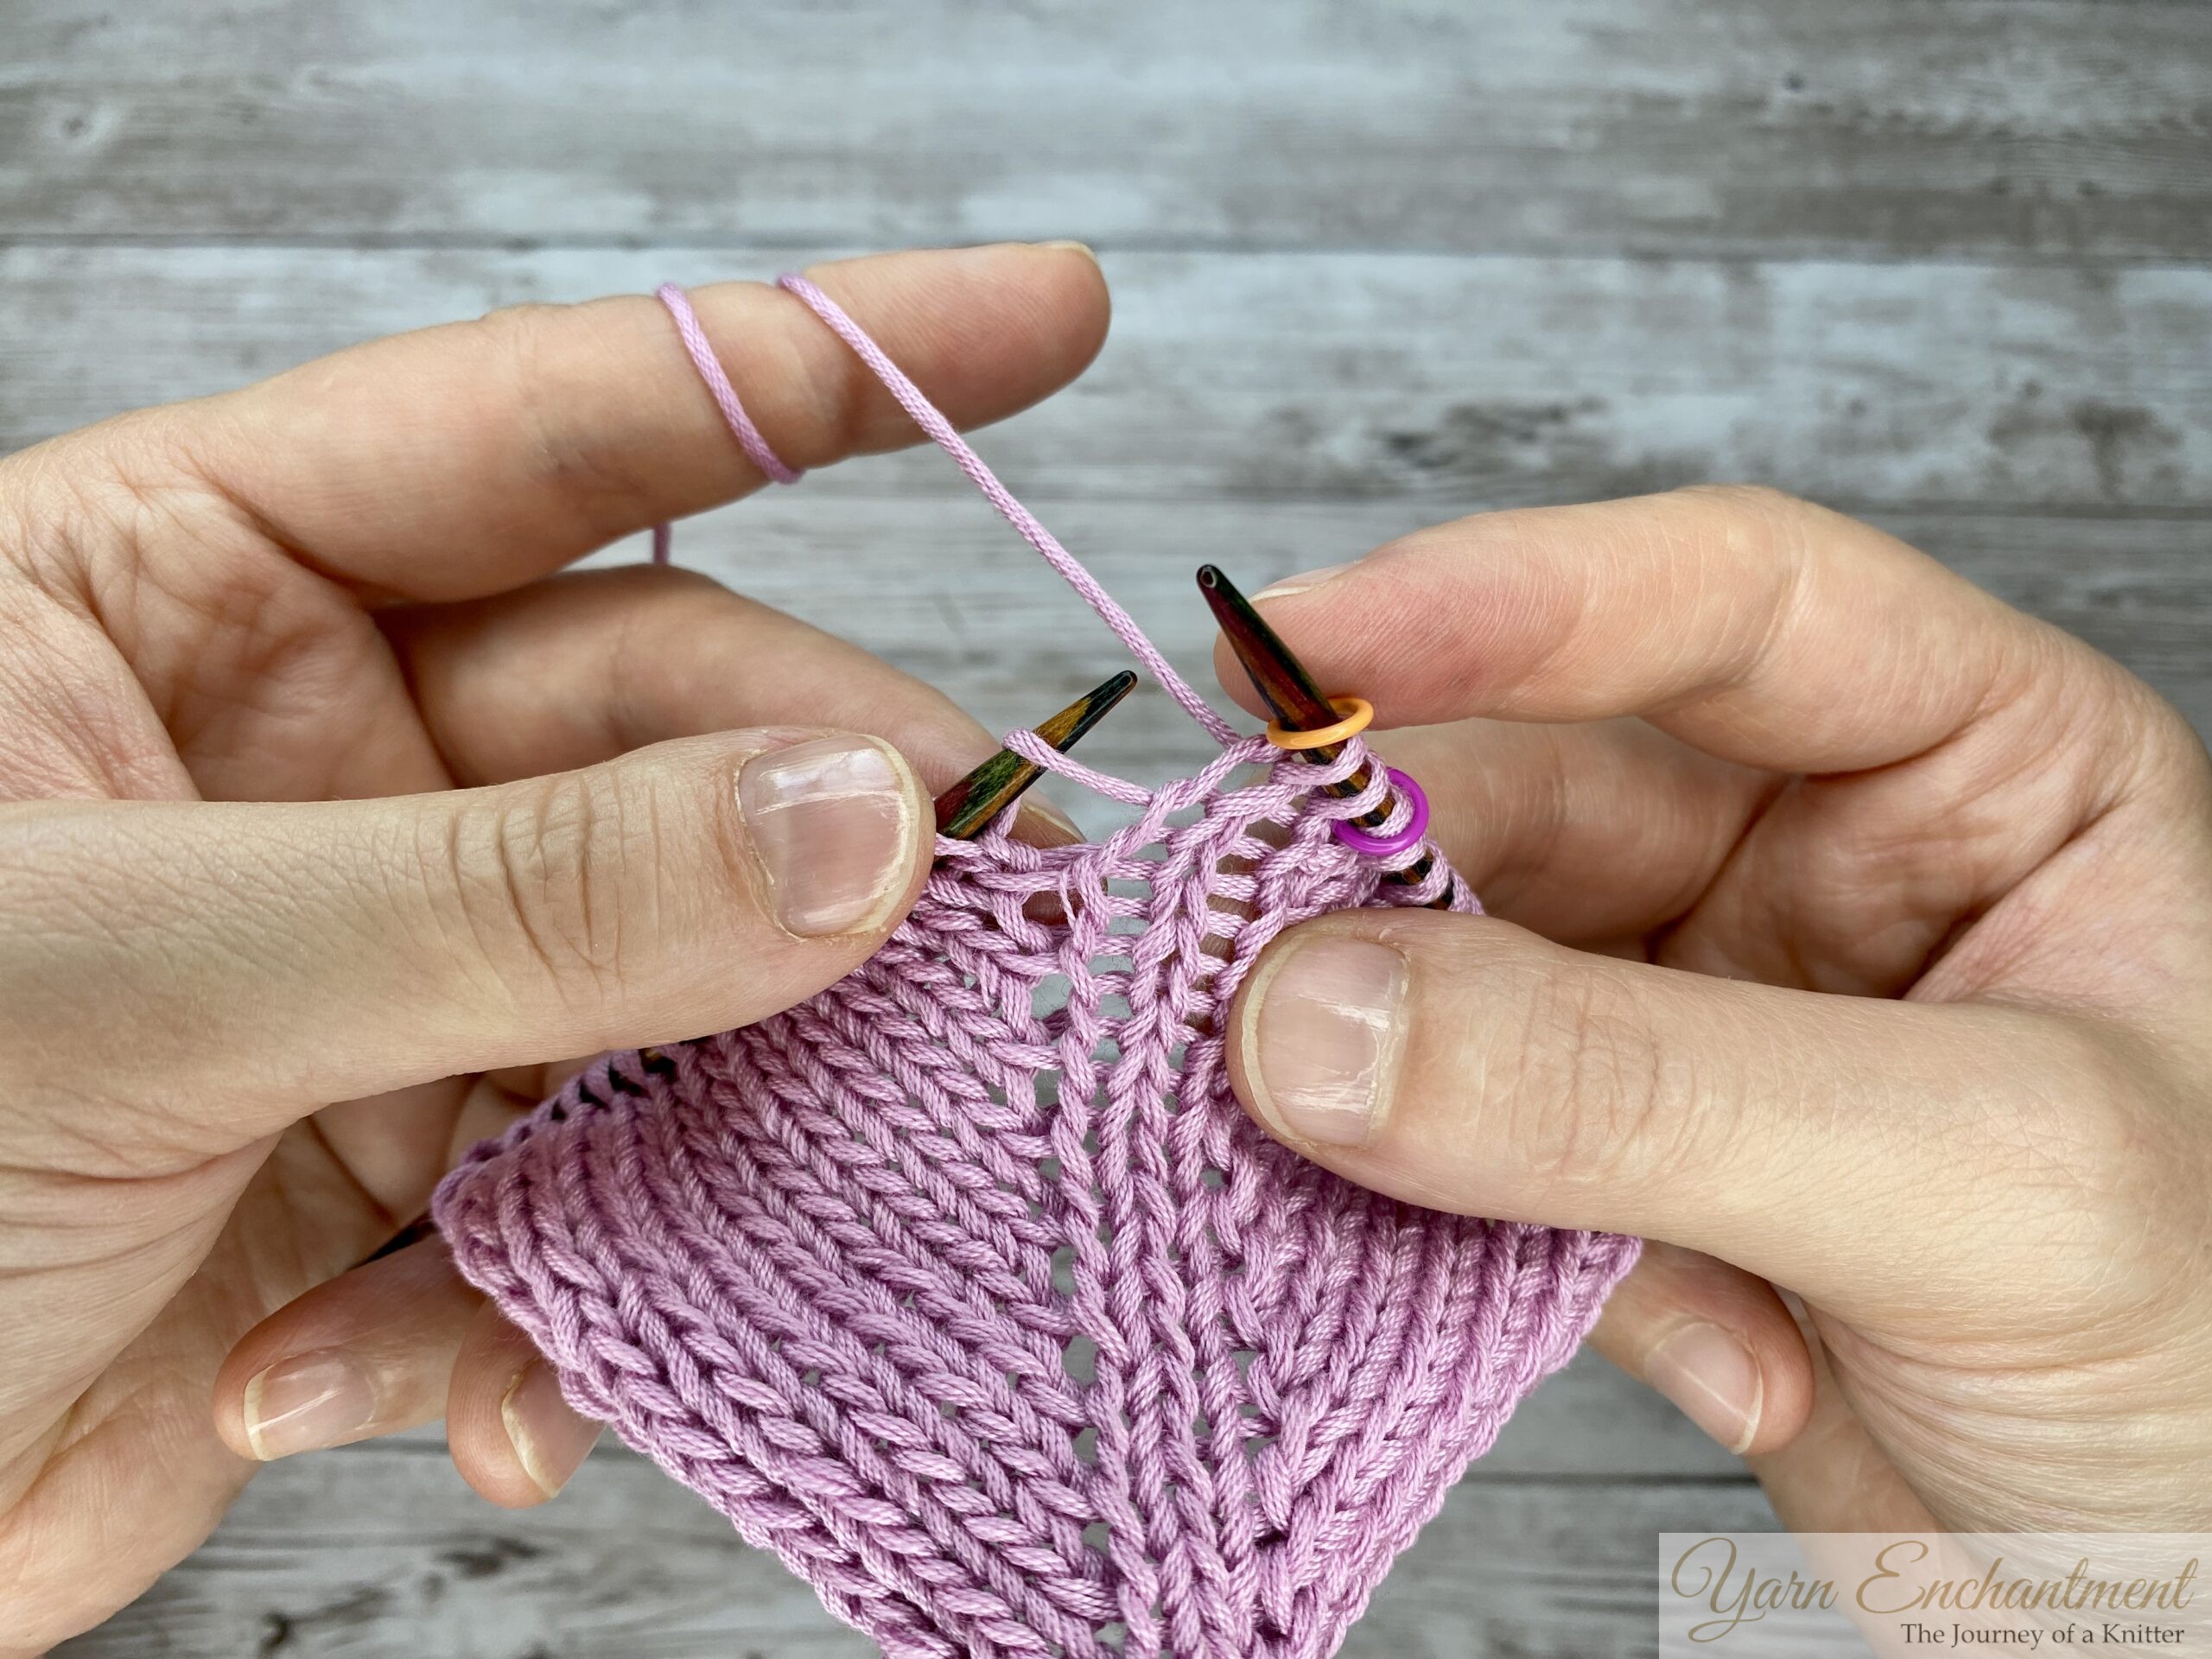  |
Round 1: Wrap your yarn around the needle from front to back to create a left-leaning loop. | Round 2: You can see here really well how the yarn over on the needle leans to the left side. This is your visual cue that you've worked the yarn over correctly! |
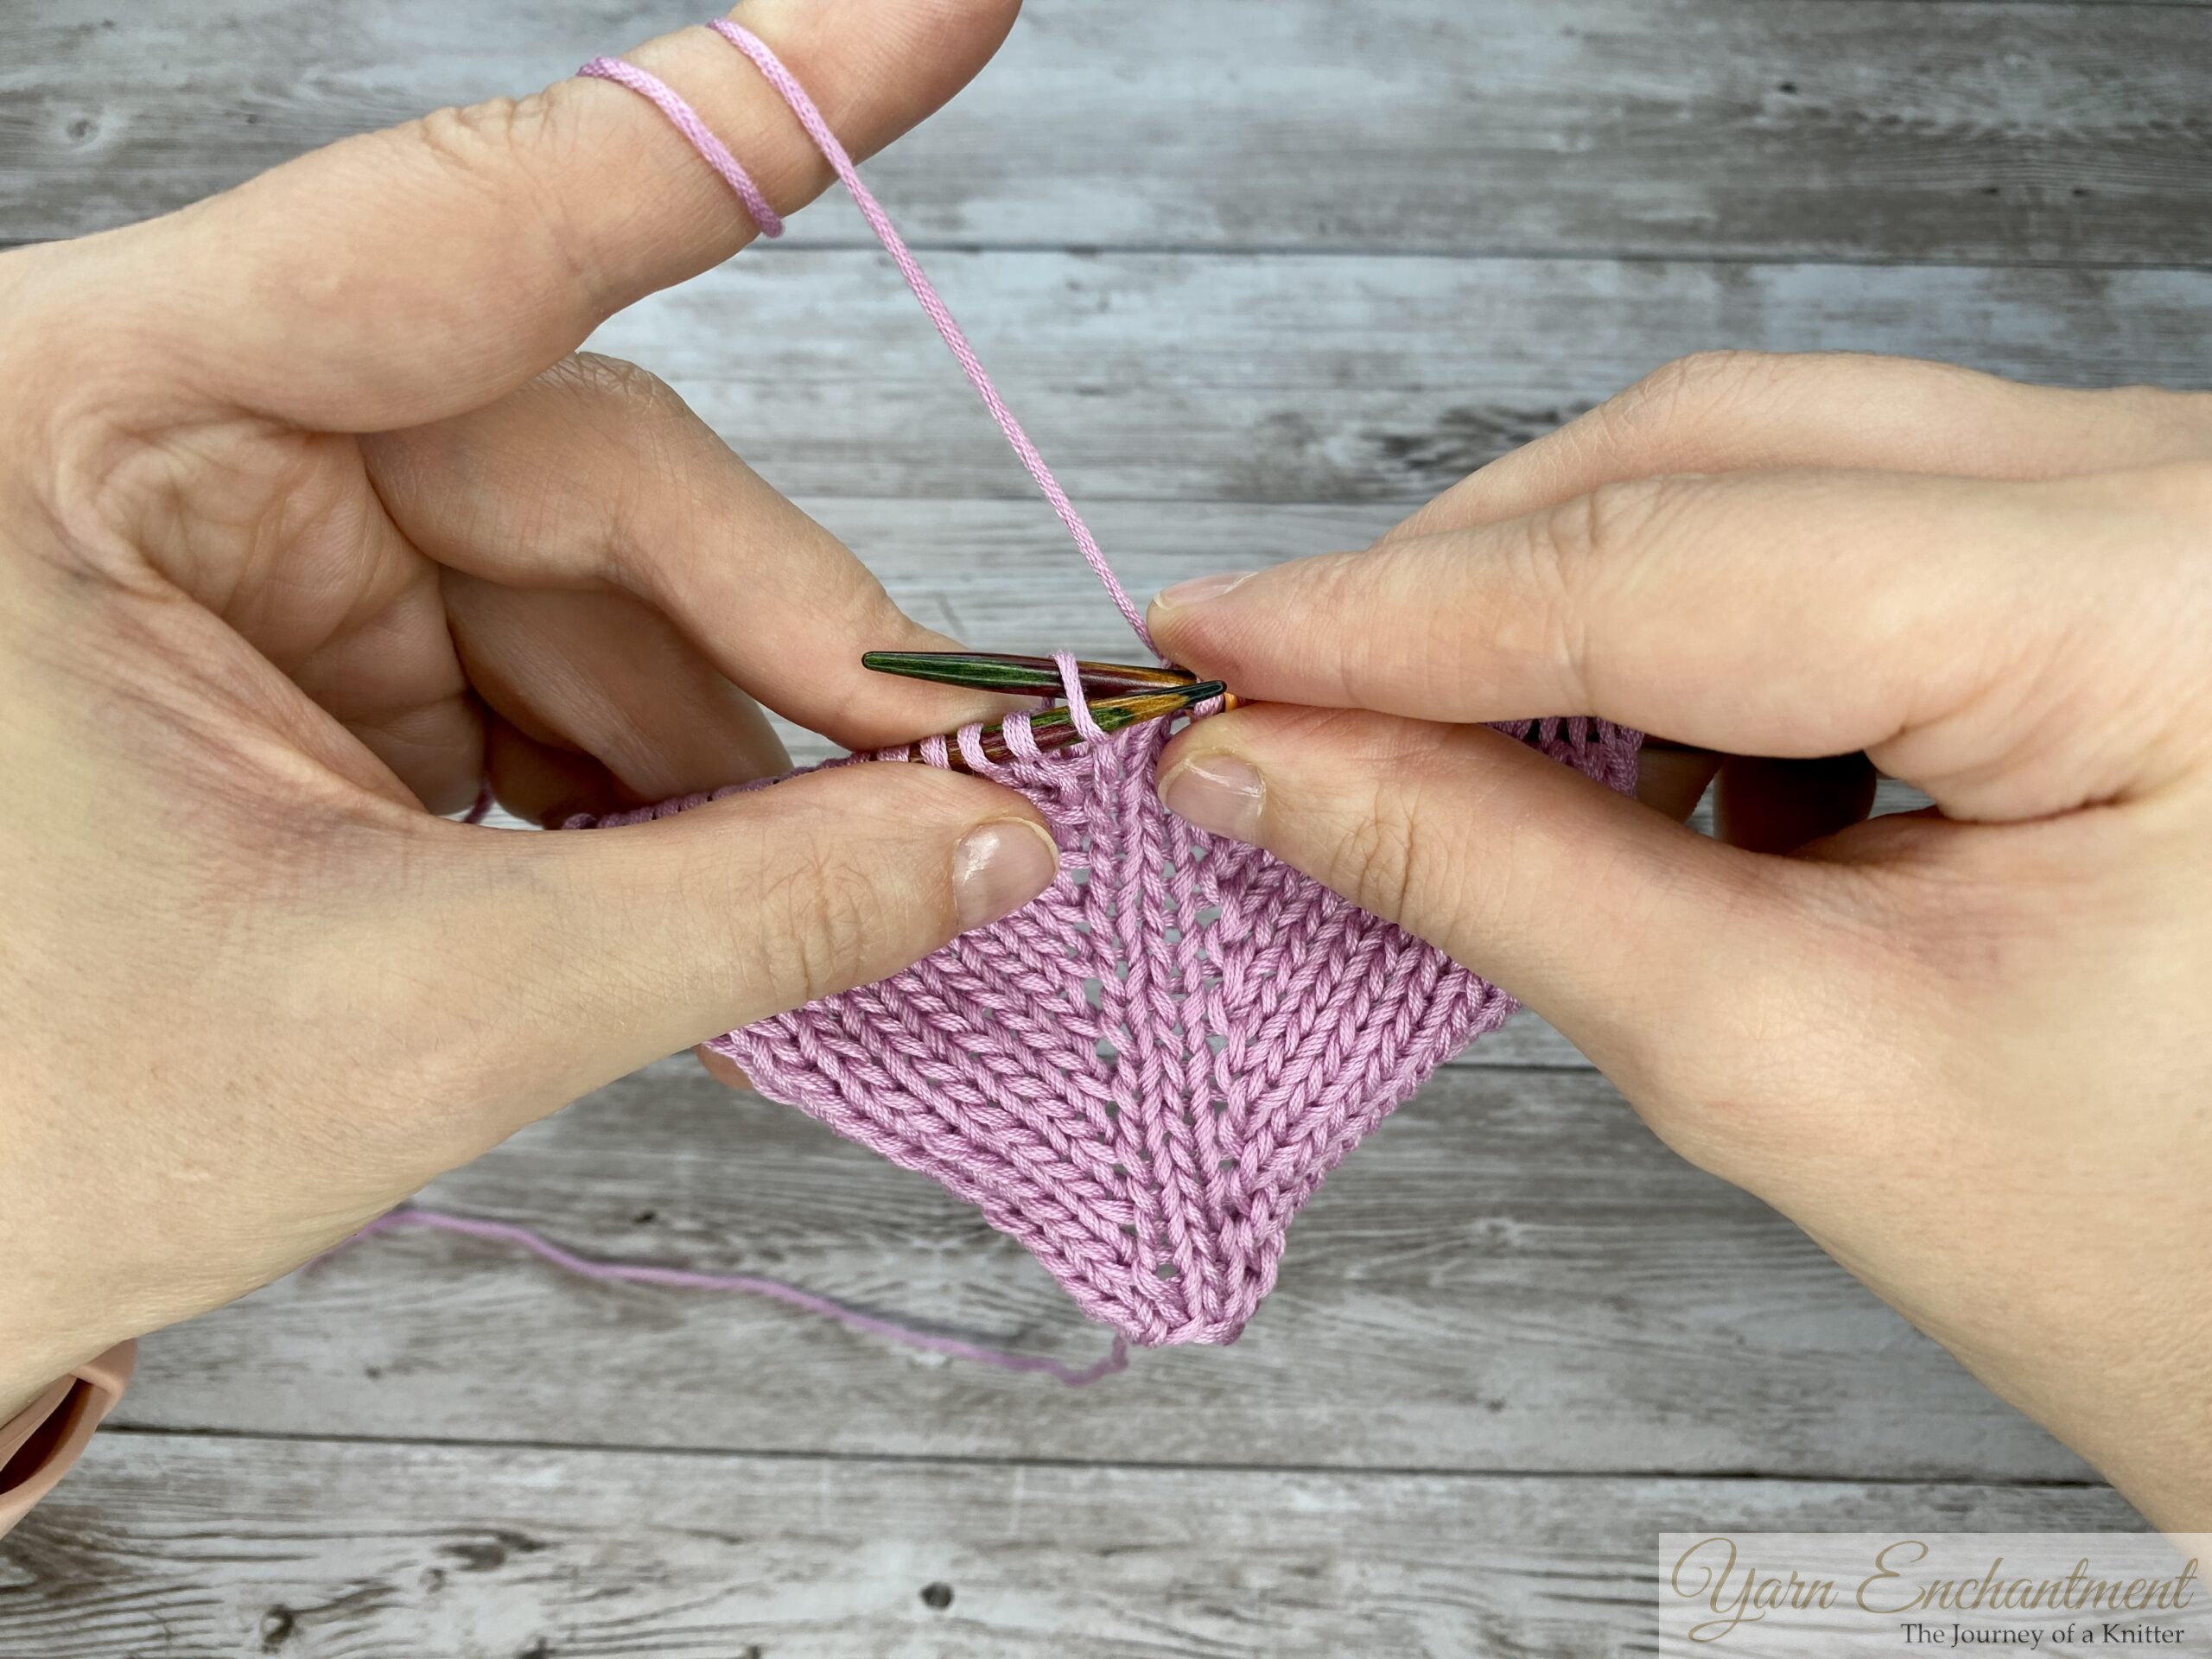  | 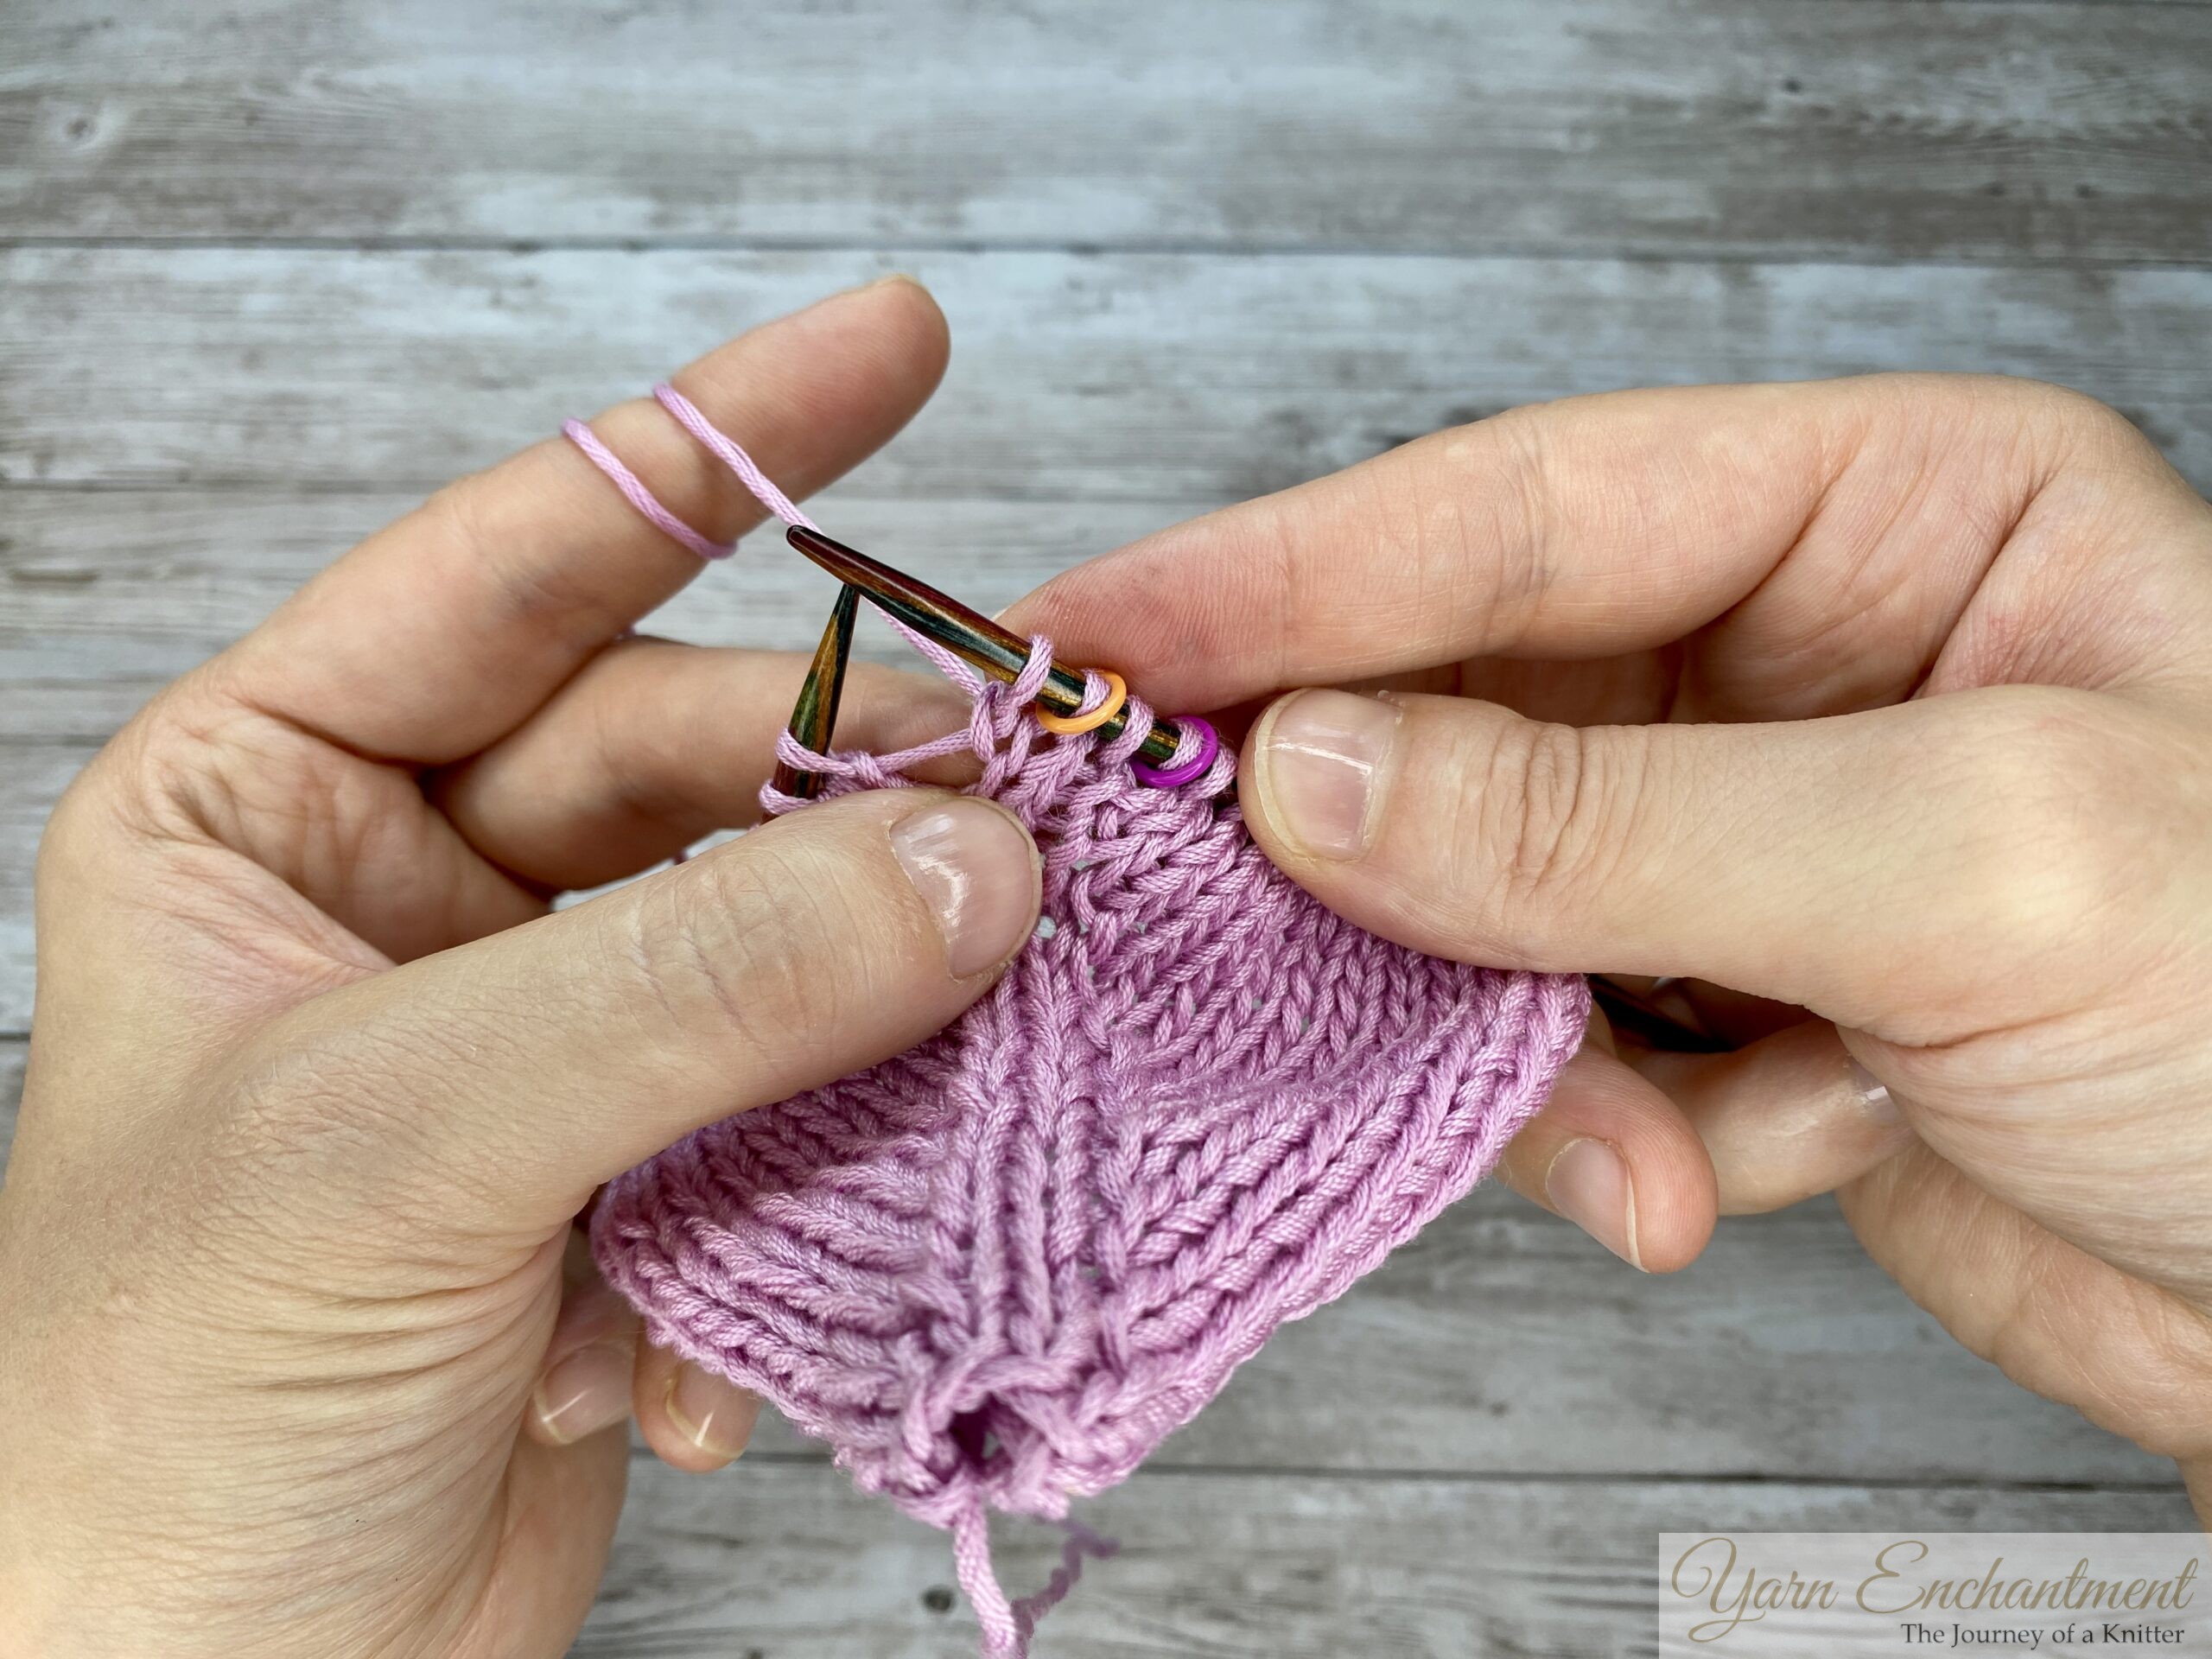  |
Now, insert your needle through the back loop of that yarn over and knit it. | You can see that you have created a twisted stitch that leans to the left. |
Make One Right (M1R) Using a Yarn Over Flat (Back & Forth)
An M1R leans to the right. This is the increase you'll want when your shaping needs to slant in that direction, think of it as the right-hand side of a raglan line or the end of a row.
The technique is similar to M1L, but with one important difference: you'll use a reverse yarn over instead of a standard one.
Here's how to create an M1R when working flat:
-
On the right side: Make a reverse yarn over. Instead of wrapping from front to back, you wrap the yarn from back to front over the right needle. This creates a loop that sits differently on your needle.
-
On the wrong side: Knit until you reach the yarn over loop.
-
Close the increase: Knit that yarn over through the front loop as normal.
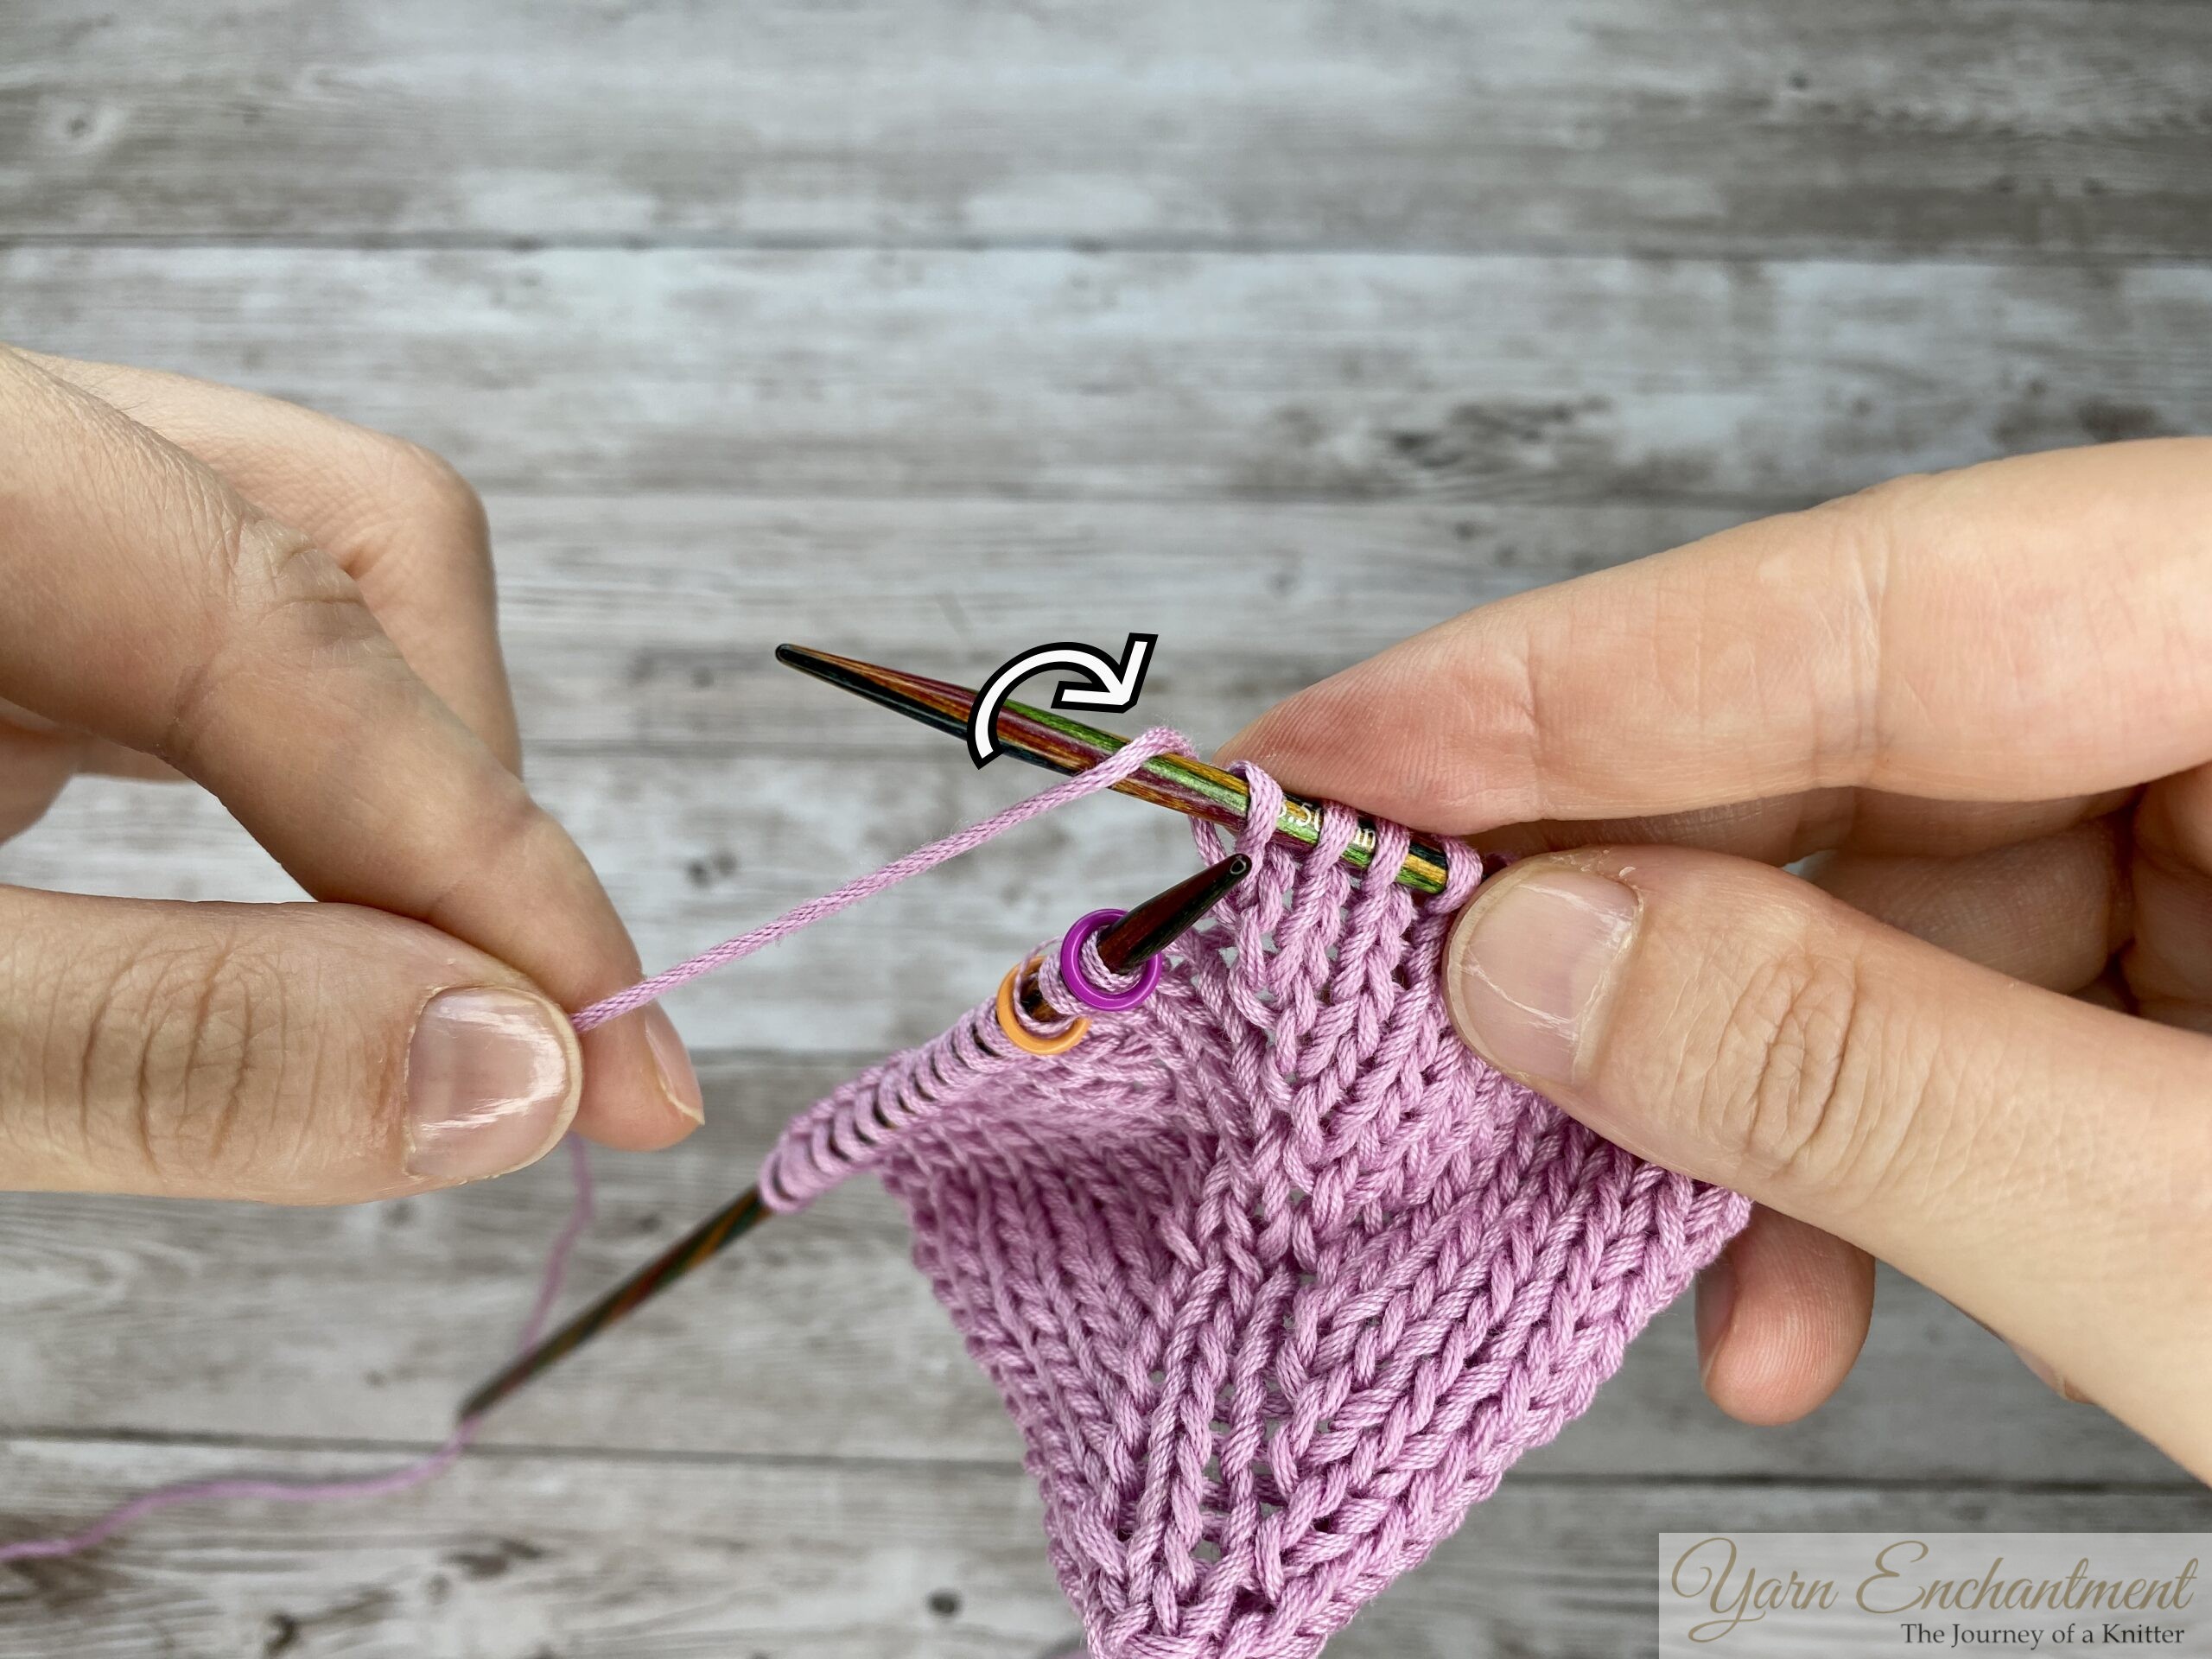  | 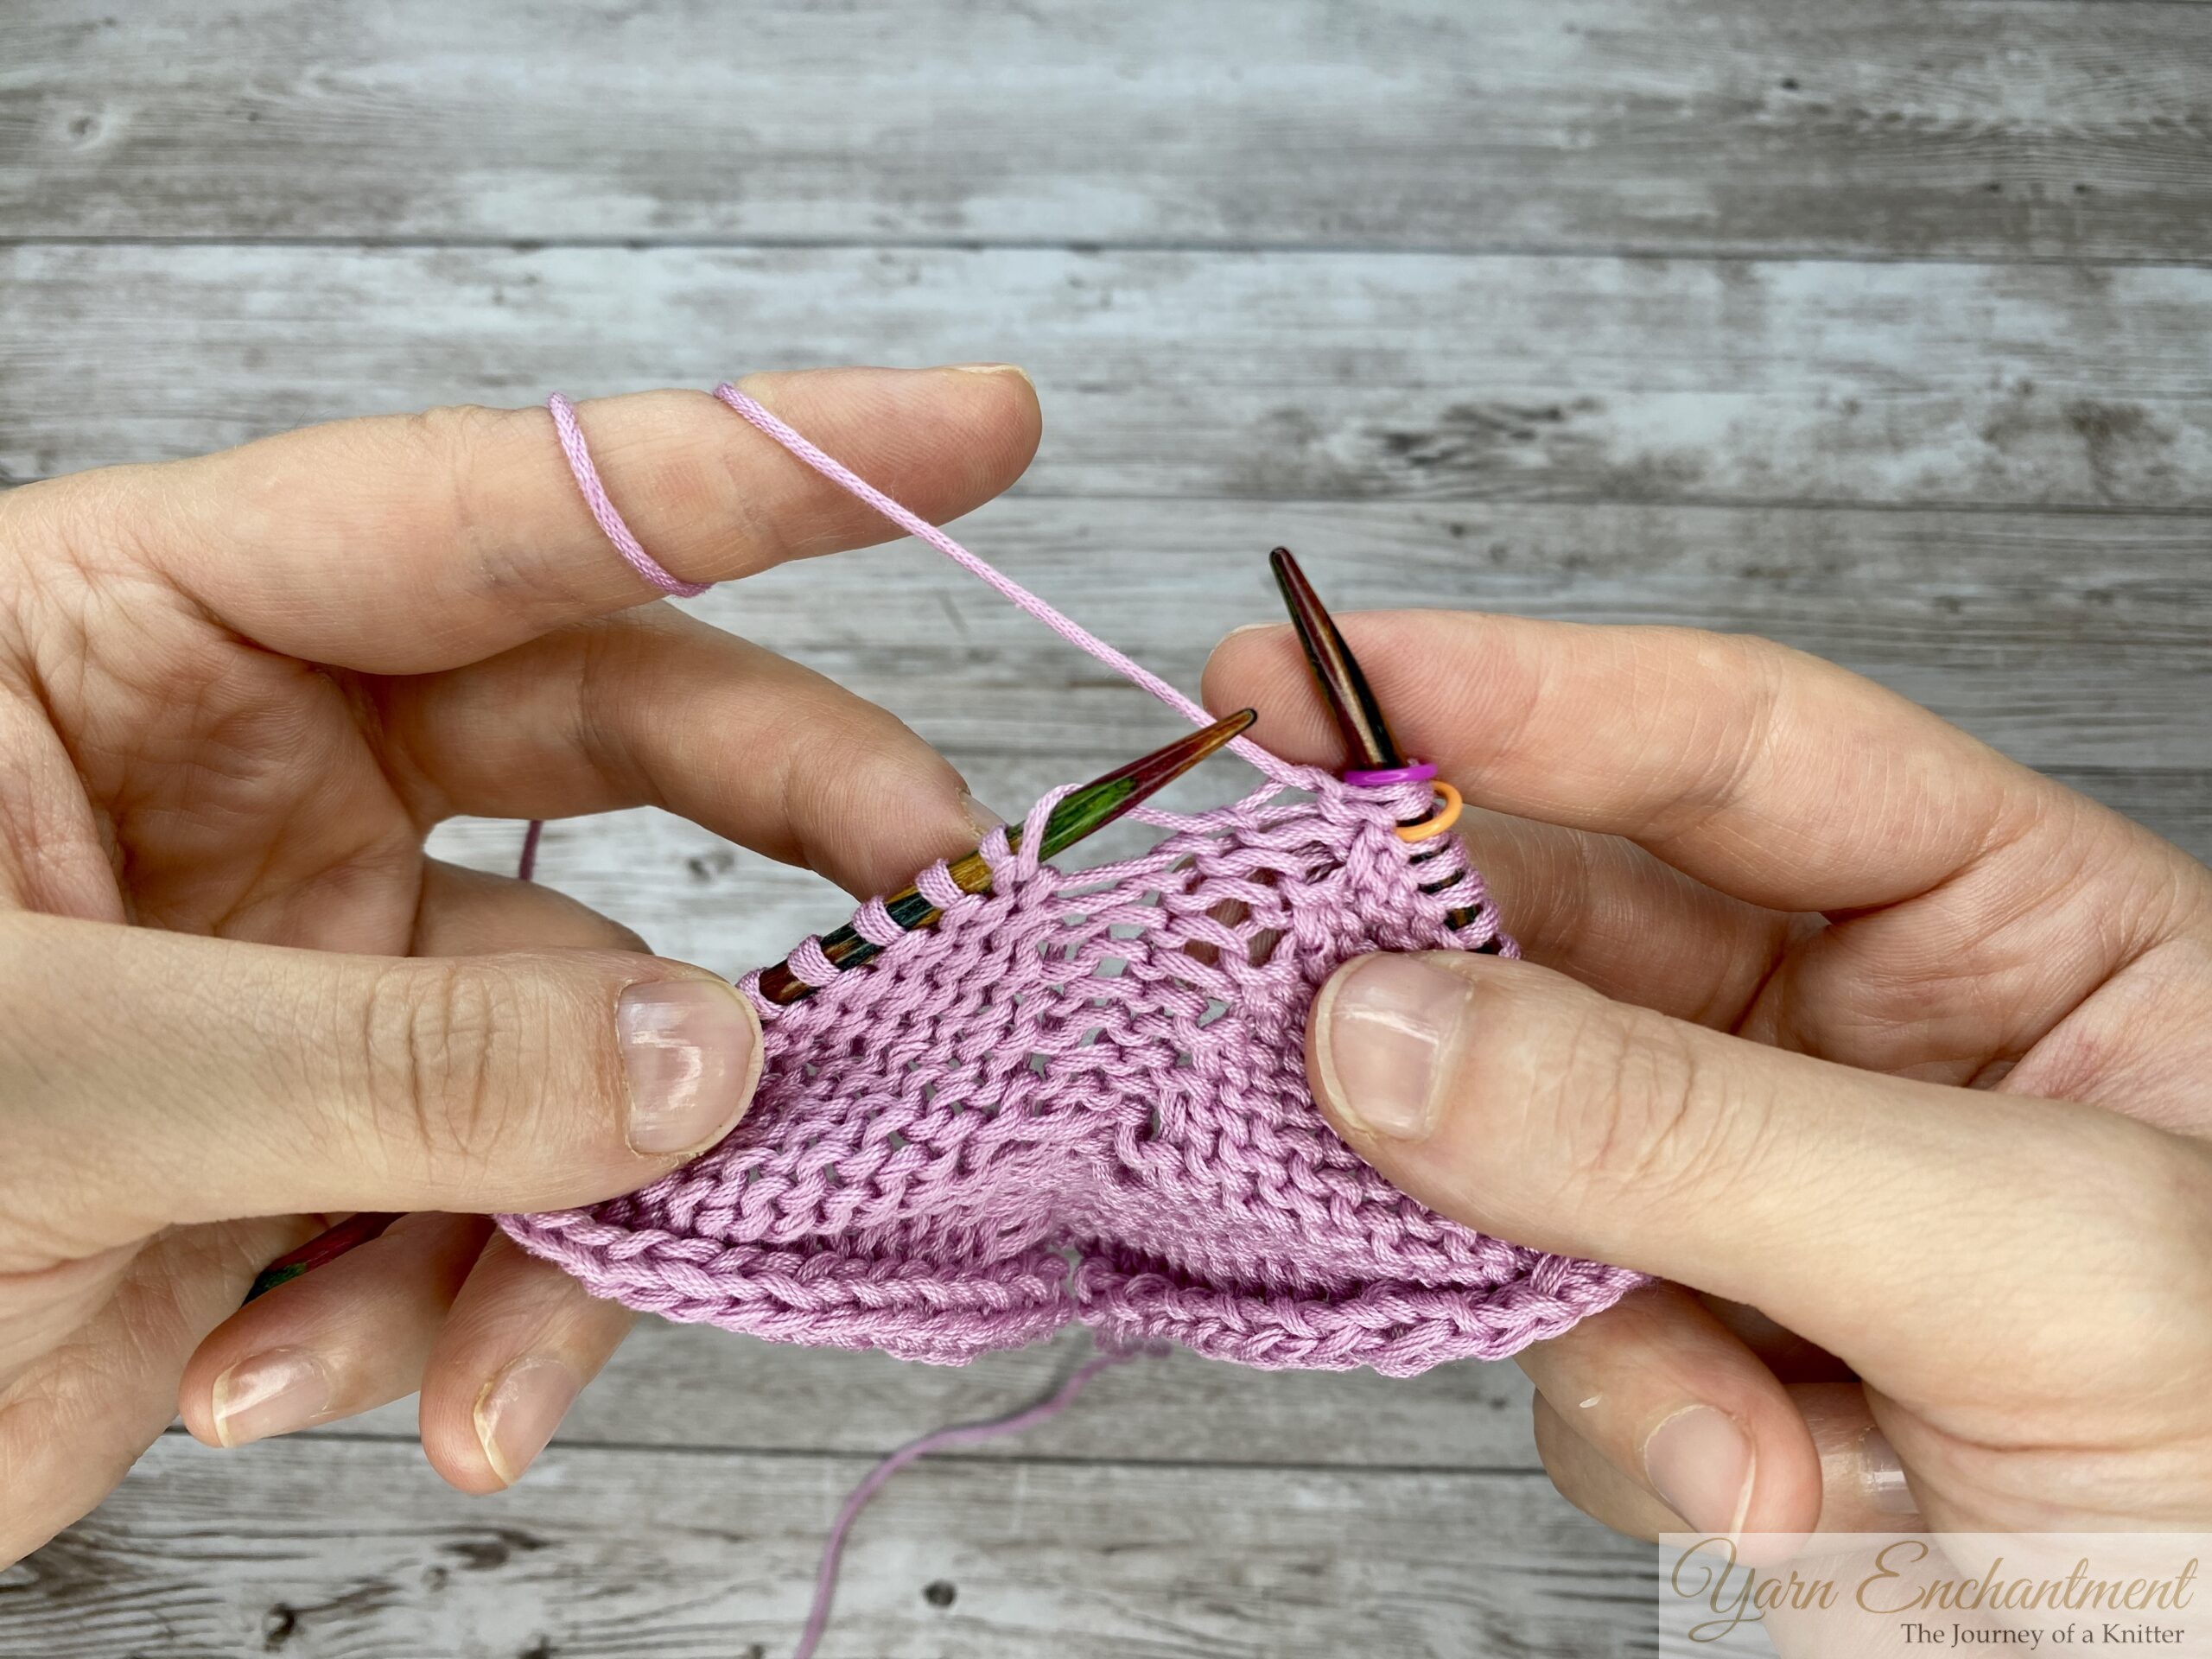  | 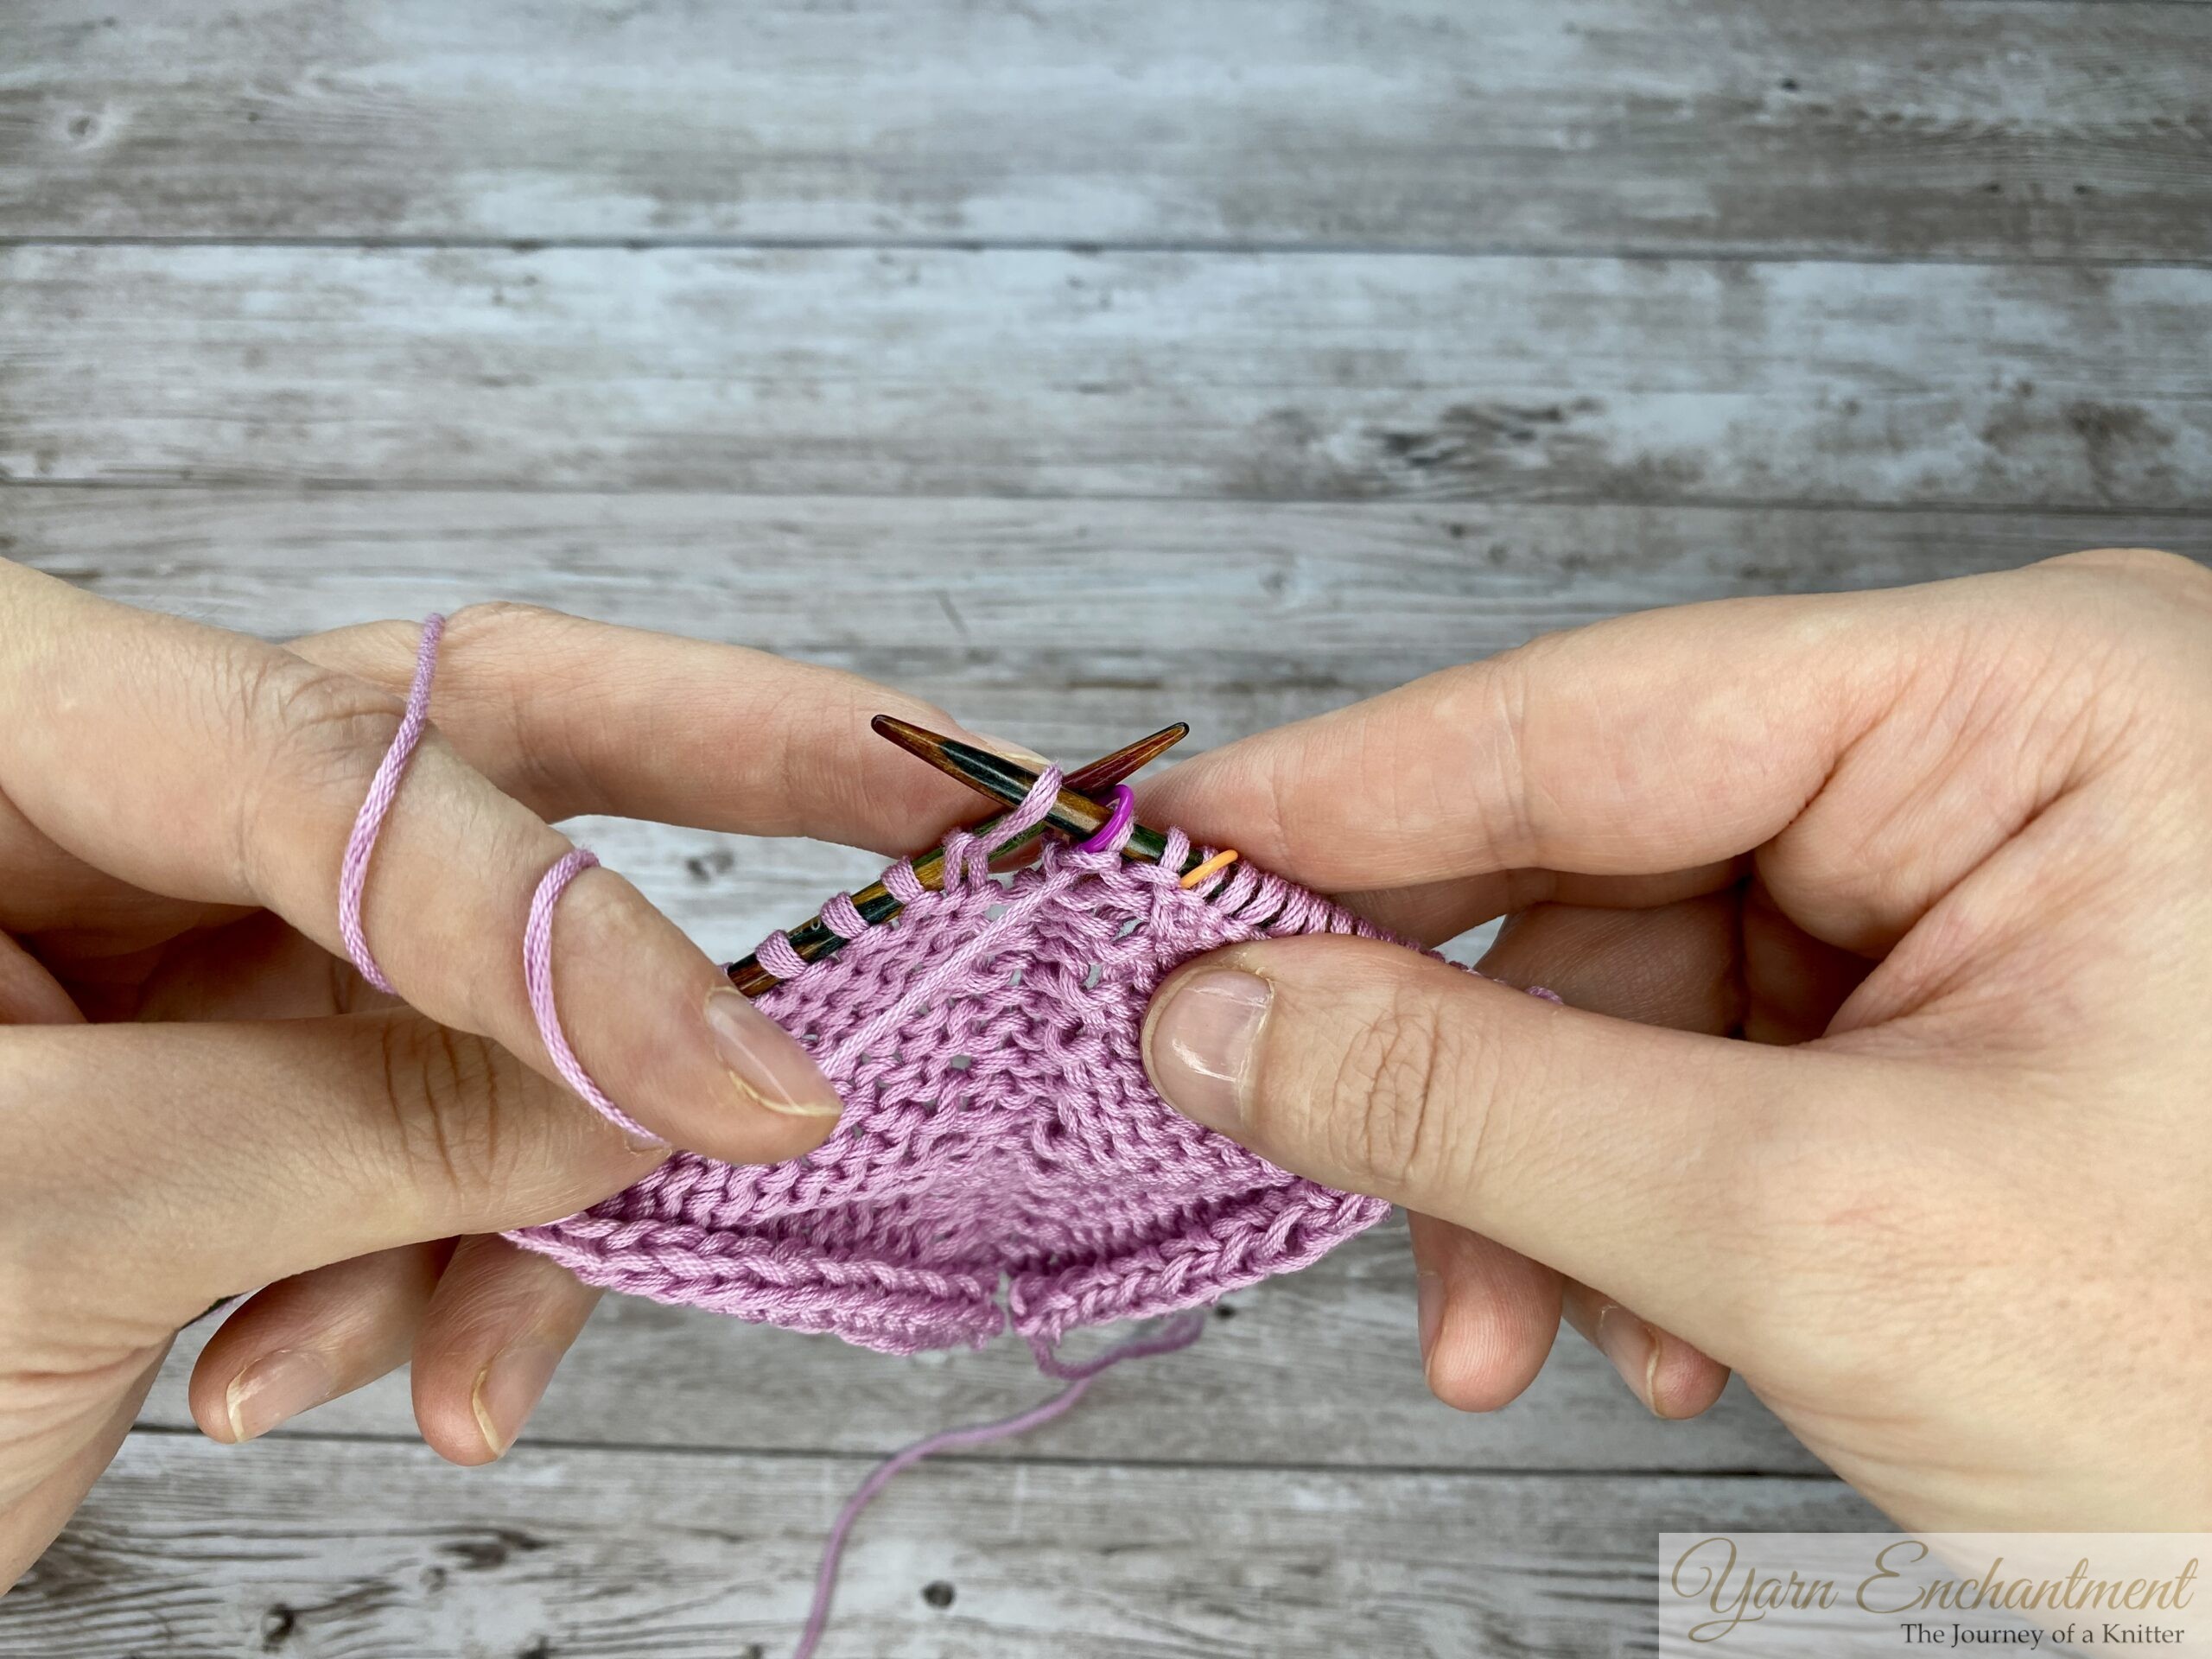  |
On the right side: Work a reverse yarn over by wrapping the yarn around the needle from back to front. | You will notice now that the loop on your needle looks different - this is exactly what we want! That different orientation is what will create the right-leaning increase. | On the wrong side: Purl the stitch through the trailing leg (the front leg) in order to twist it. This twist closes the hole and makes your increase lean neatly to the right. |
Working M1R in the Round
If you're knitting in the round, the process is almost the same - with one small adjustment. Since you're always working on the right side, you'll close the increase on the very next round.
Here's how to create an M1R in the round:
-
On Round 1: Make a reverse yarn over. Wrap the yarn from back to front over the right needle. This creates a right-leaning loop.
-
On Round 2: Knit until you reach the yarn over loop.
-
Close the increase: Knit that yarn over through the front loop as normal, just like any other stitch.
The reverse wrap combined with a standard knit creates the twist that closes the hole and makes your increase lean to the right. That's your M1R, worked entirely in the round!
| 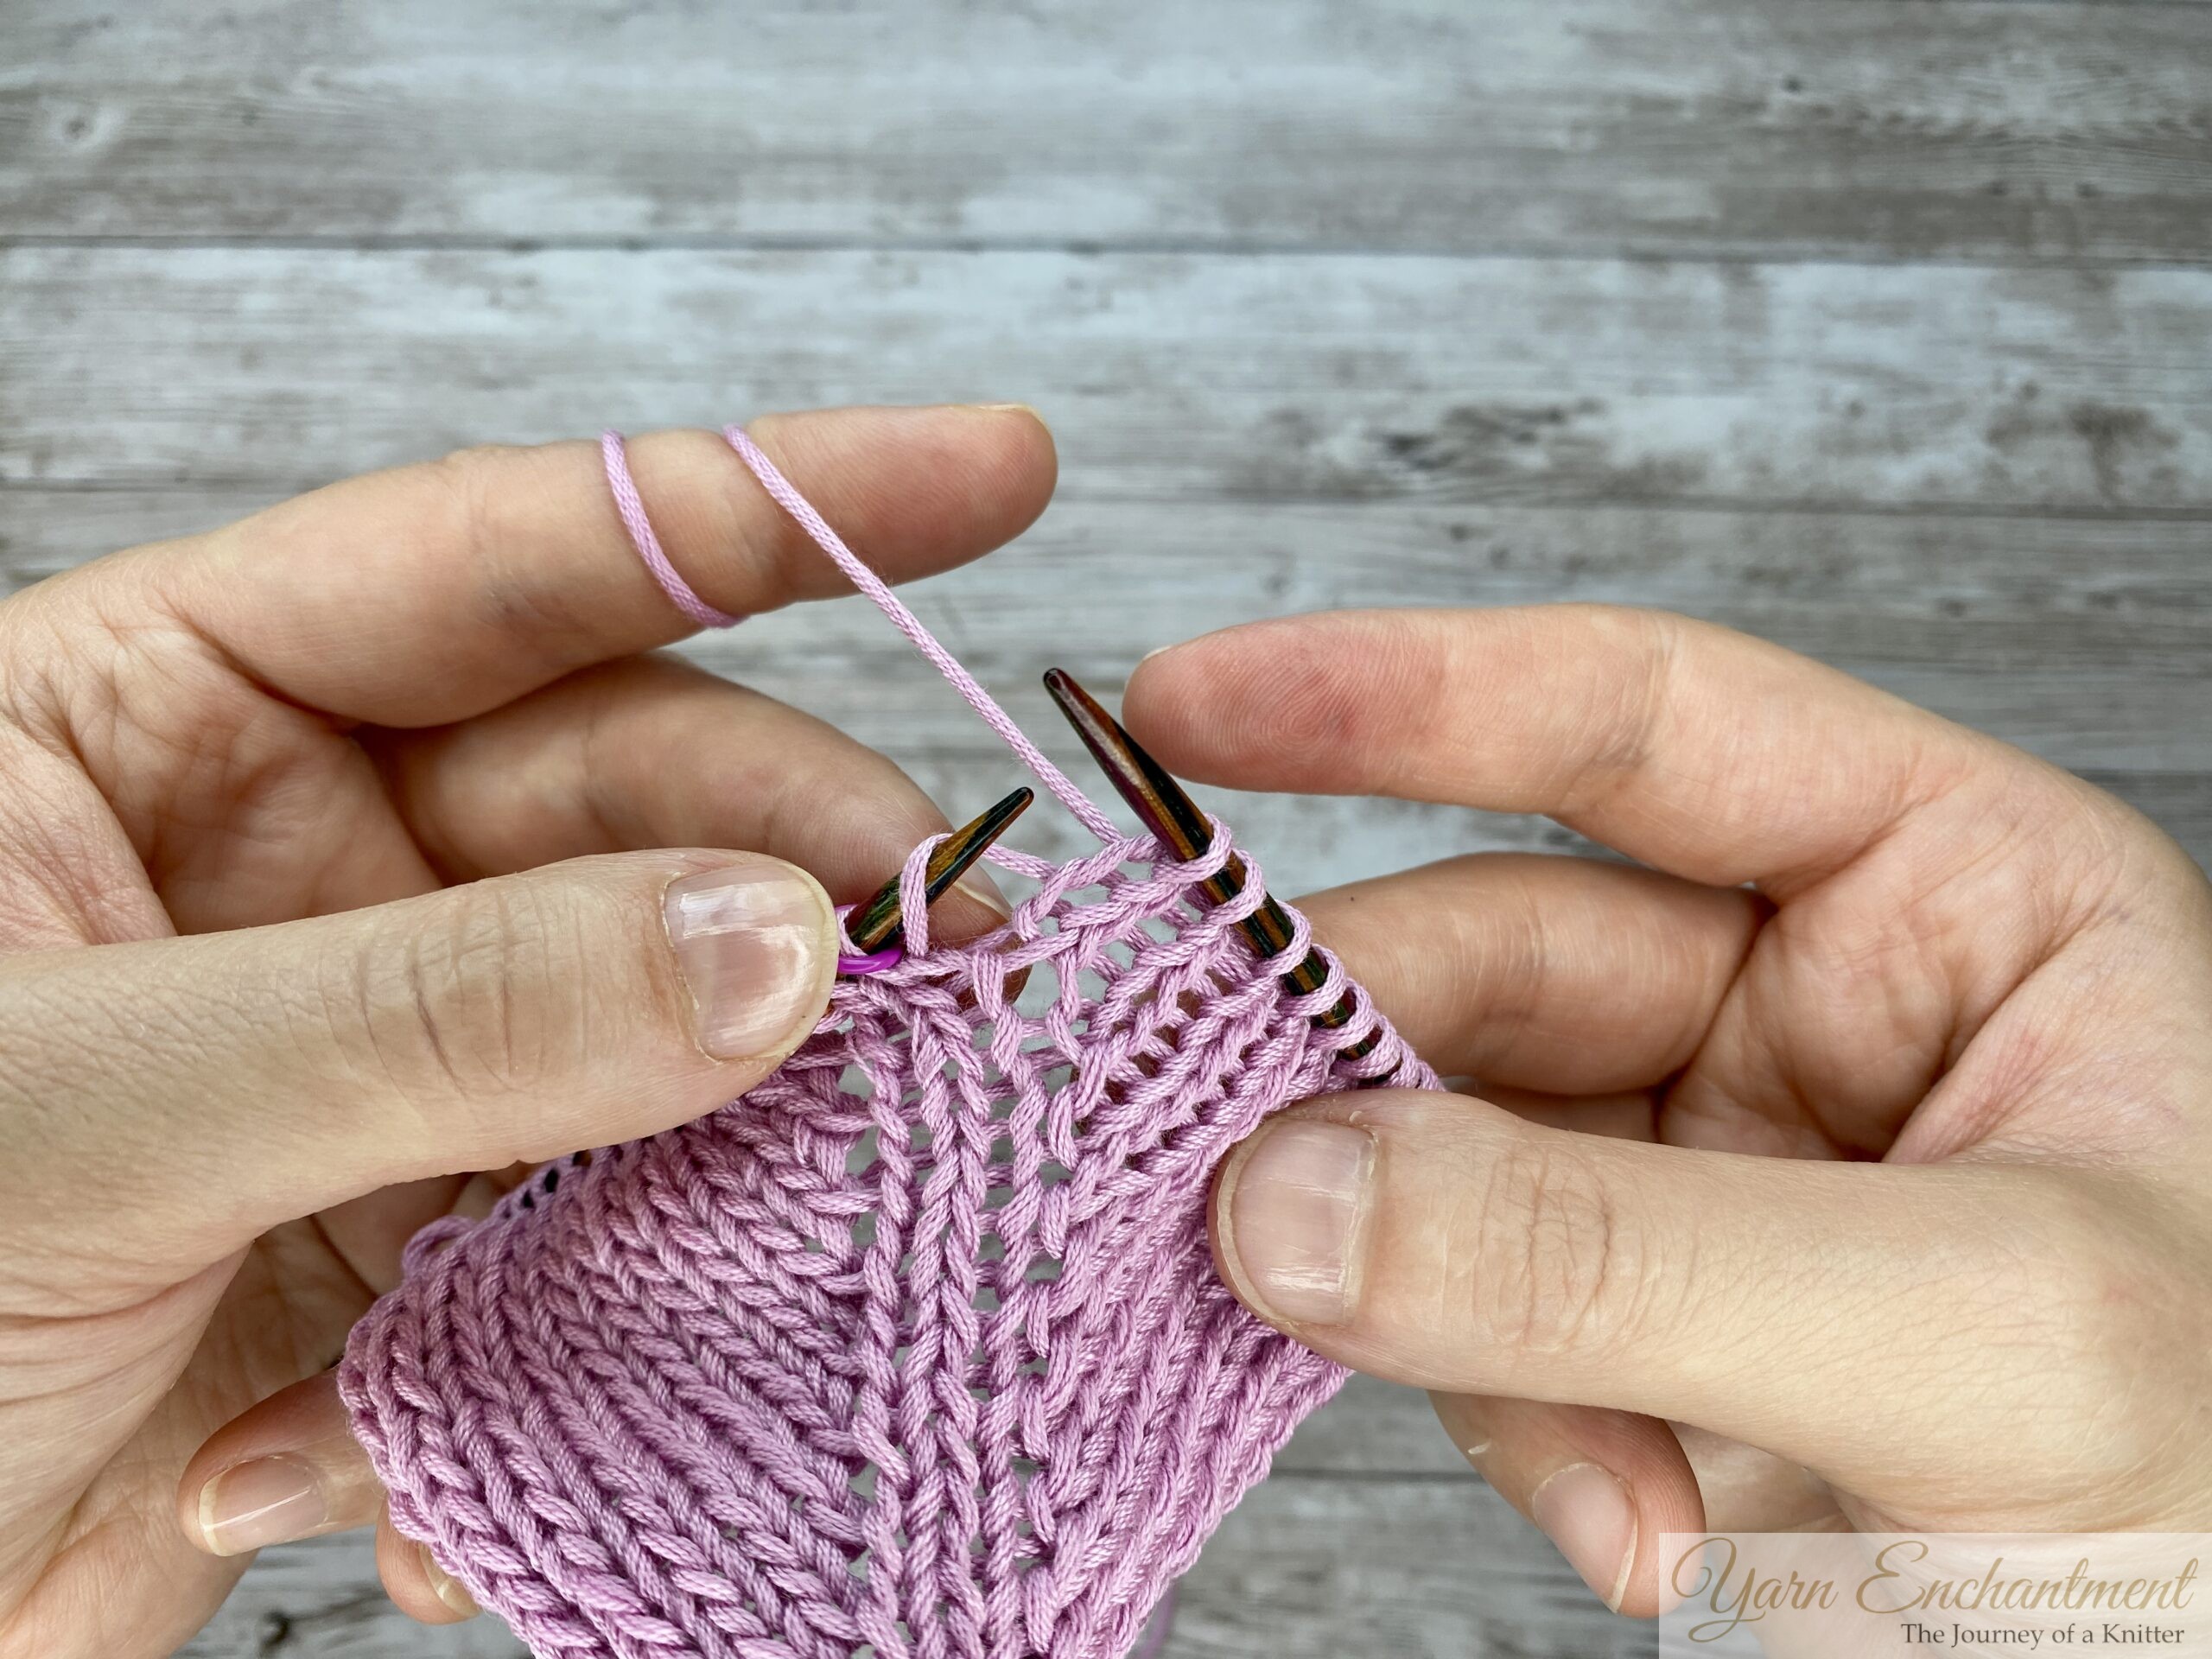  |
Round 1: Create a reverse yarn over by wrapping your yarn from back to front around the needle. | On the right side, you can see that the loop on the needle is pointing to the right side. This is your visual cue that you've worked the reverse yarn over correctly! |
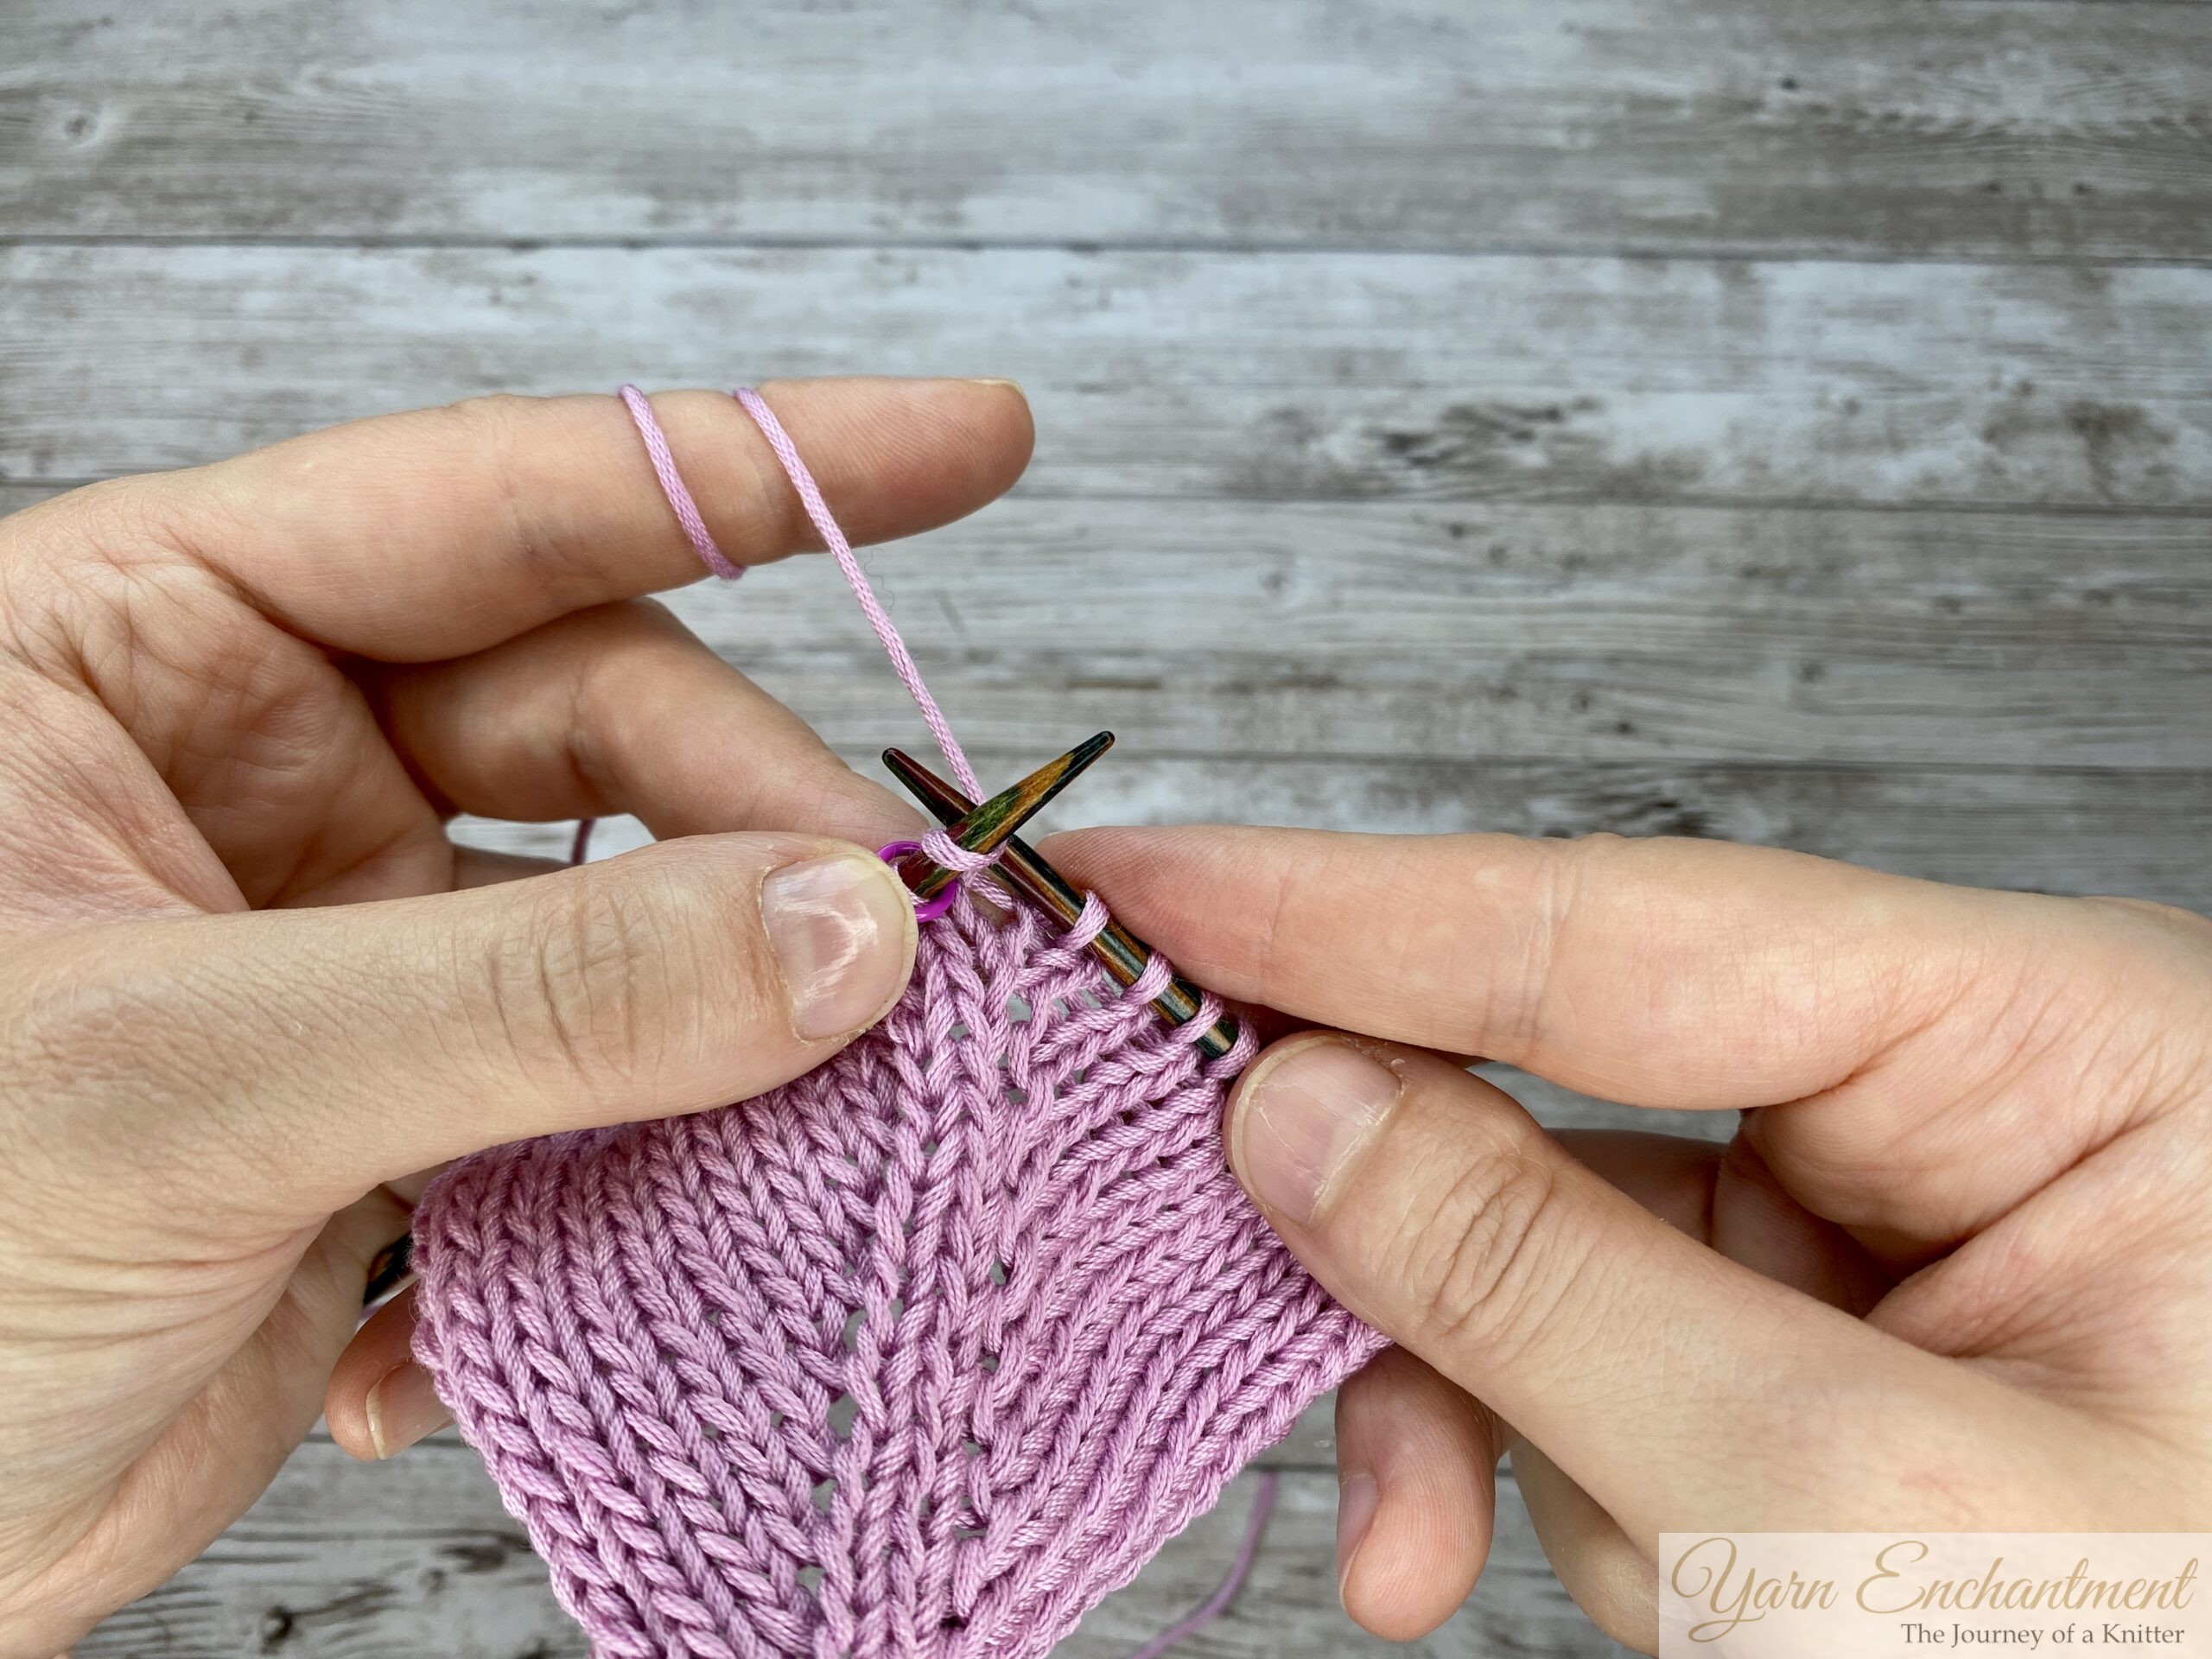  | 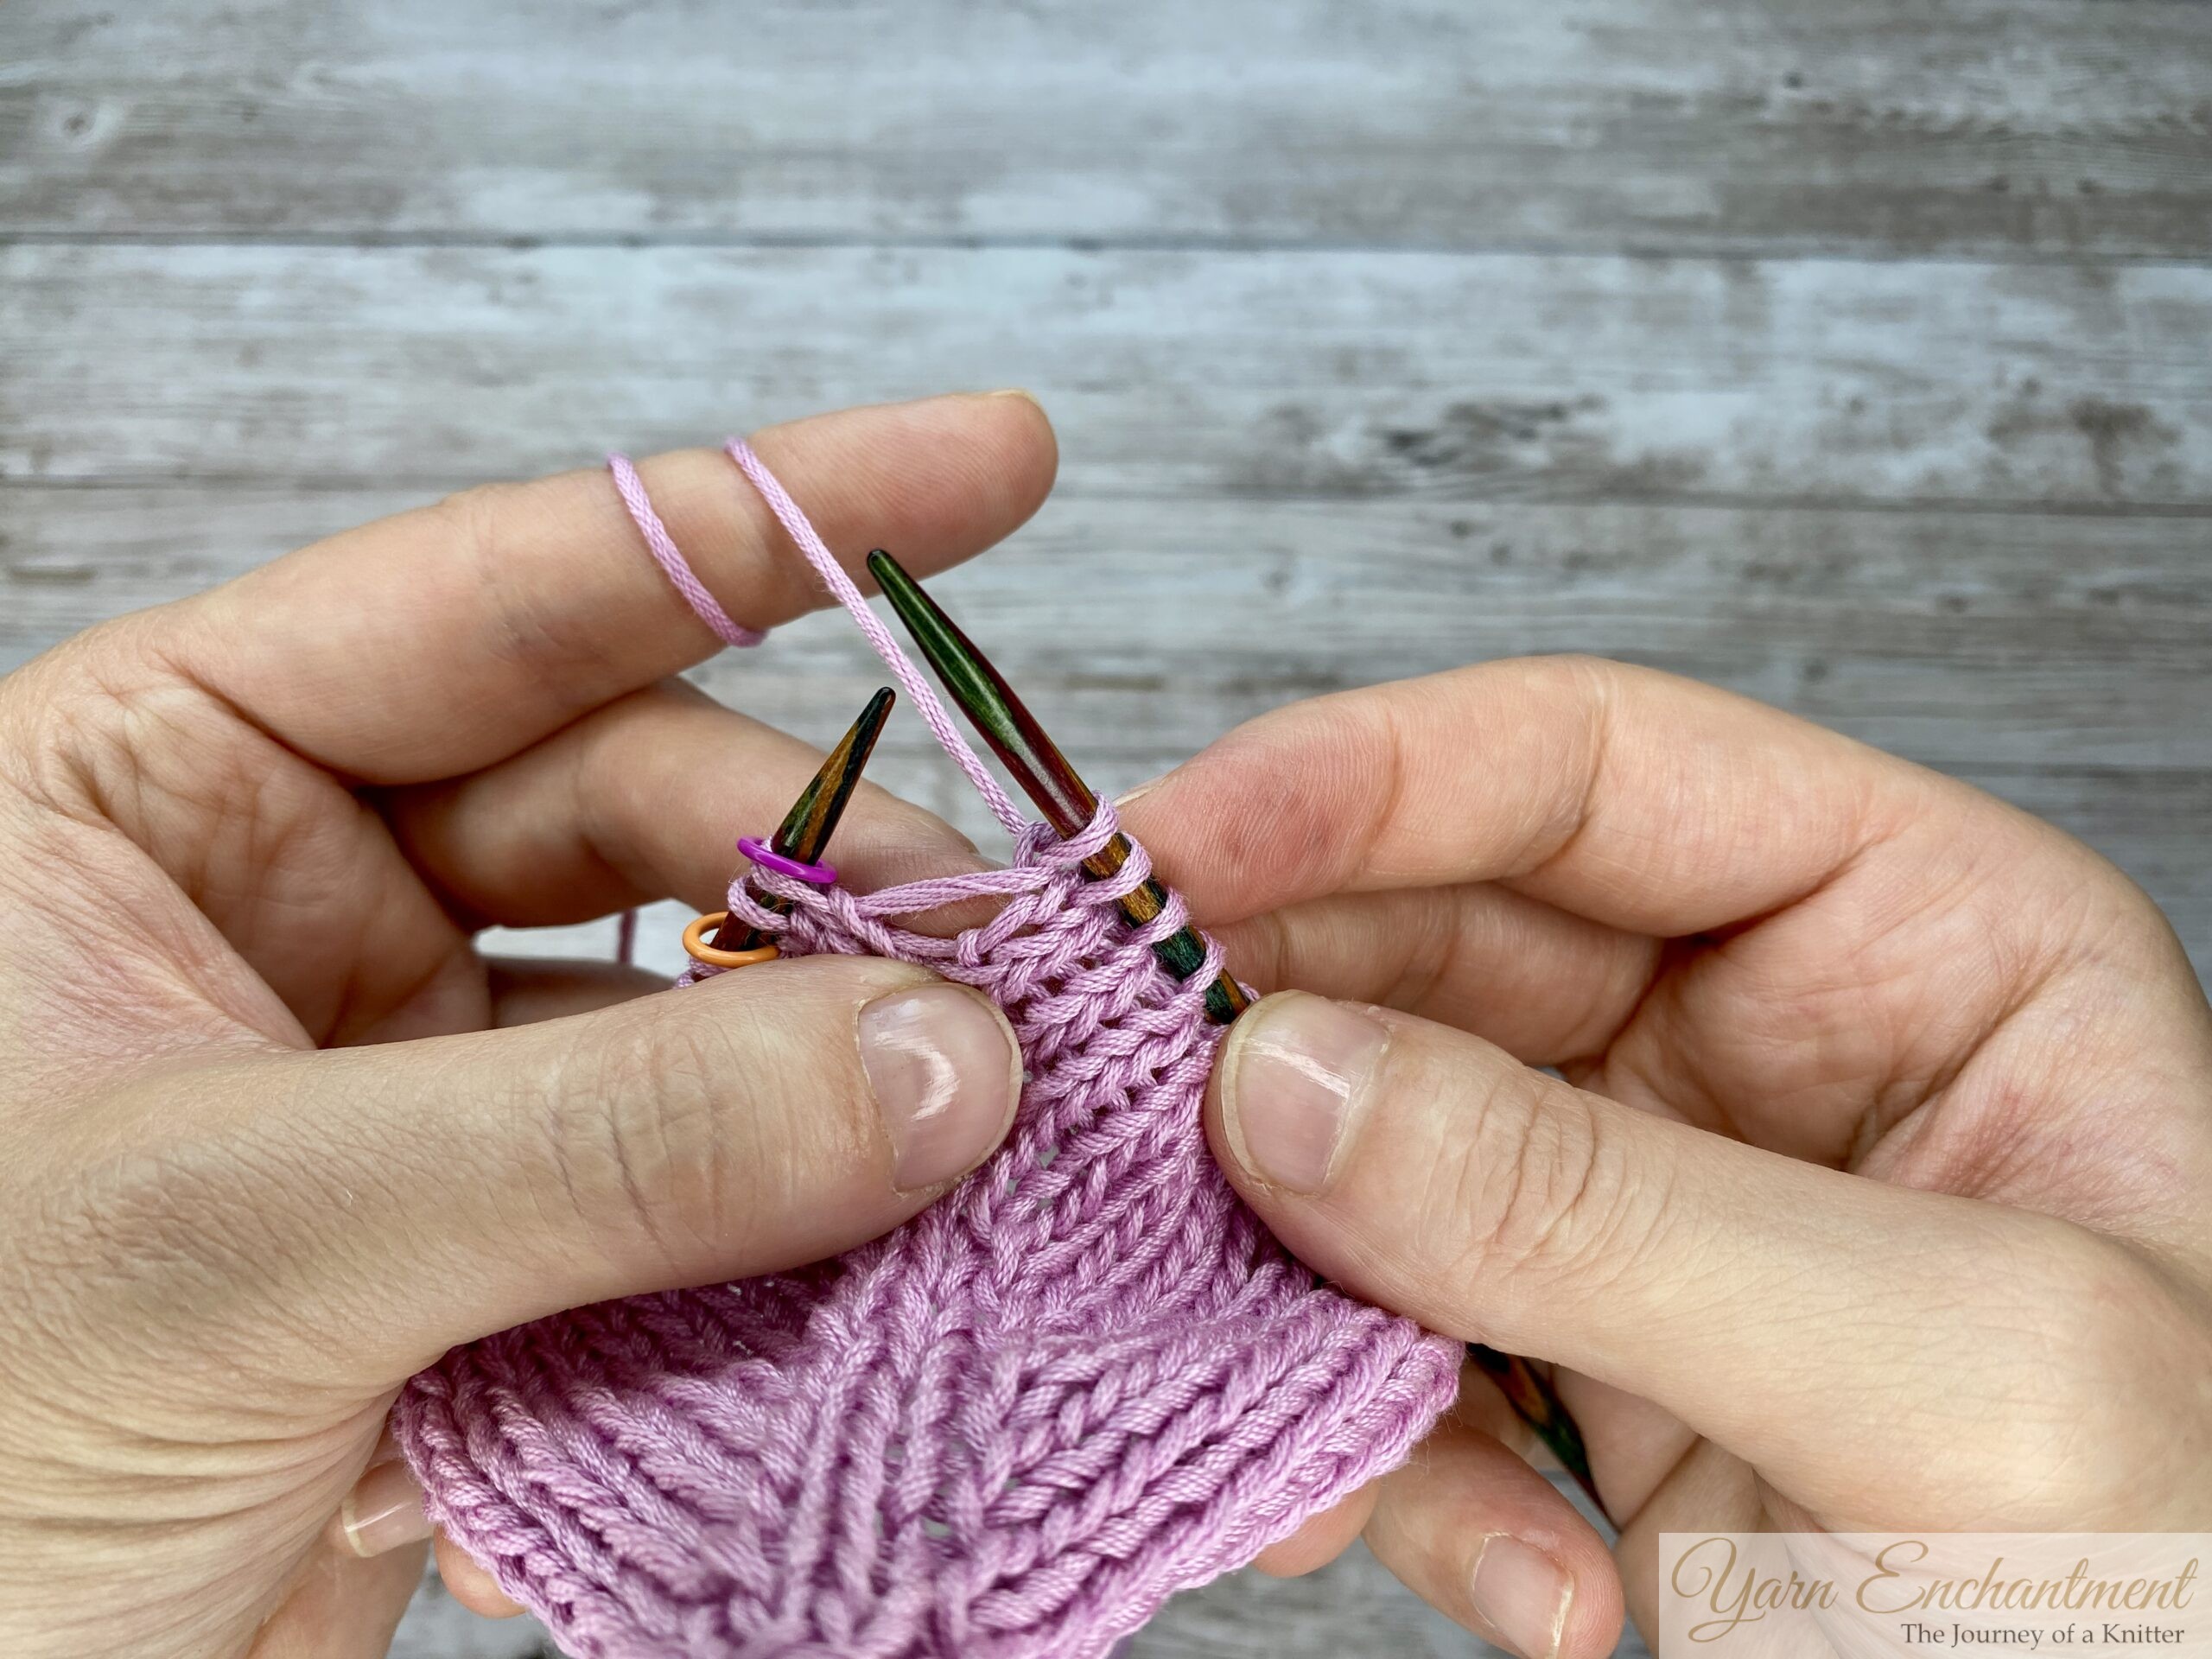  |
On the next round, knit this stitch through the front leg in order to twist it | And there you have it! You have created a right-leaning stitch with a yarn over increase. The hole is closed, and your increase leans to the right. |
Quick Tip: What Is the Trailing Leg? When you're working increases, you might hear the term "trailing leg" and wonder what it means. The trailing leg is the leg of the stitch that sits behind your needle, farthest away from you. It's also sometimes called the "back leg." Think of it this way: every stitch on your needle has two "legs"- one in front and one in back. The leg that trails behind the needle is the trailing leg. When a pattern tells you to knit or purl through the back loop, you're working into that trailing leg. Why does this matter? When you knit or purl through the trailing leg (back loop), you twist the stitch. This is exactly what we do to close the hole when working a yarn over increase. It's also how we create left-leaning increases like M1L. A helpful visual: If you hold your needle horizontally and look at a stitch from above, the front leg is the one closest to you. The trailing leg is the one on the far side of the needle, kind of hiding behind it.
The K-YO-K Increase: Turning One Stitch into Three
The K-YO-K increase is a wonderful double increase that turns one stitch into three. The abbreviation K-YO-K stands for "Knit, Yarn Over, Knit."
How to Work a K-YO-K Increase
Let me walk you through the process step by step. Grab your needles and some yarn, and you can follow along with me. Here is how you work a K-YO-K increase.
Insert your right needle into the first stitch on your left needle just as you would for a regular knit stitch. Wrap your yarn around the needle and pull the new knit stitch through.
Here is the important part. Do not slip the old stitch off your left needle! Keep it right where it is on the needle.
Now, bring your yarn to the front of your work and wrap it over the right needle to create a yarn over. This is just like any other yarn over you have made before.
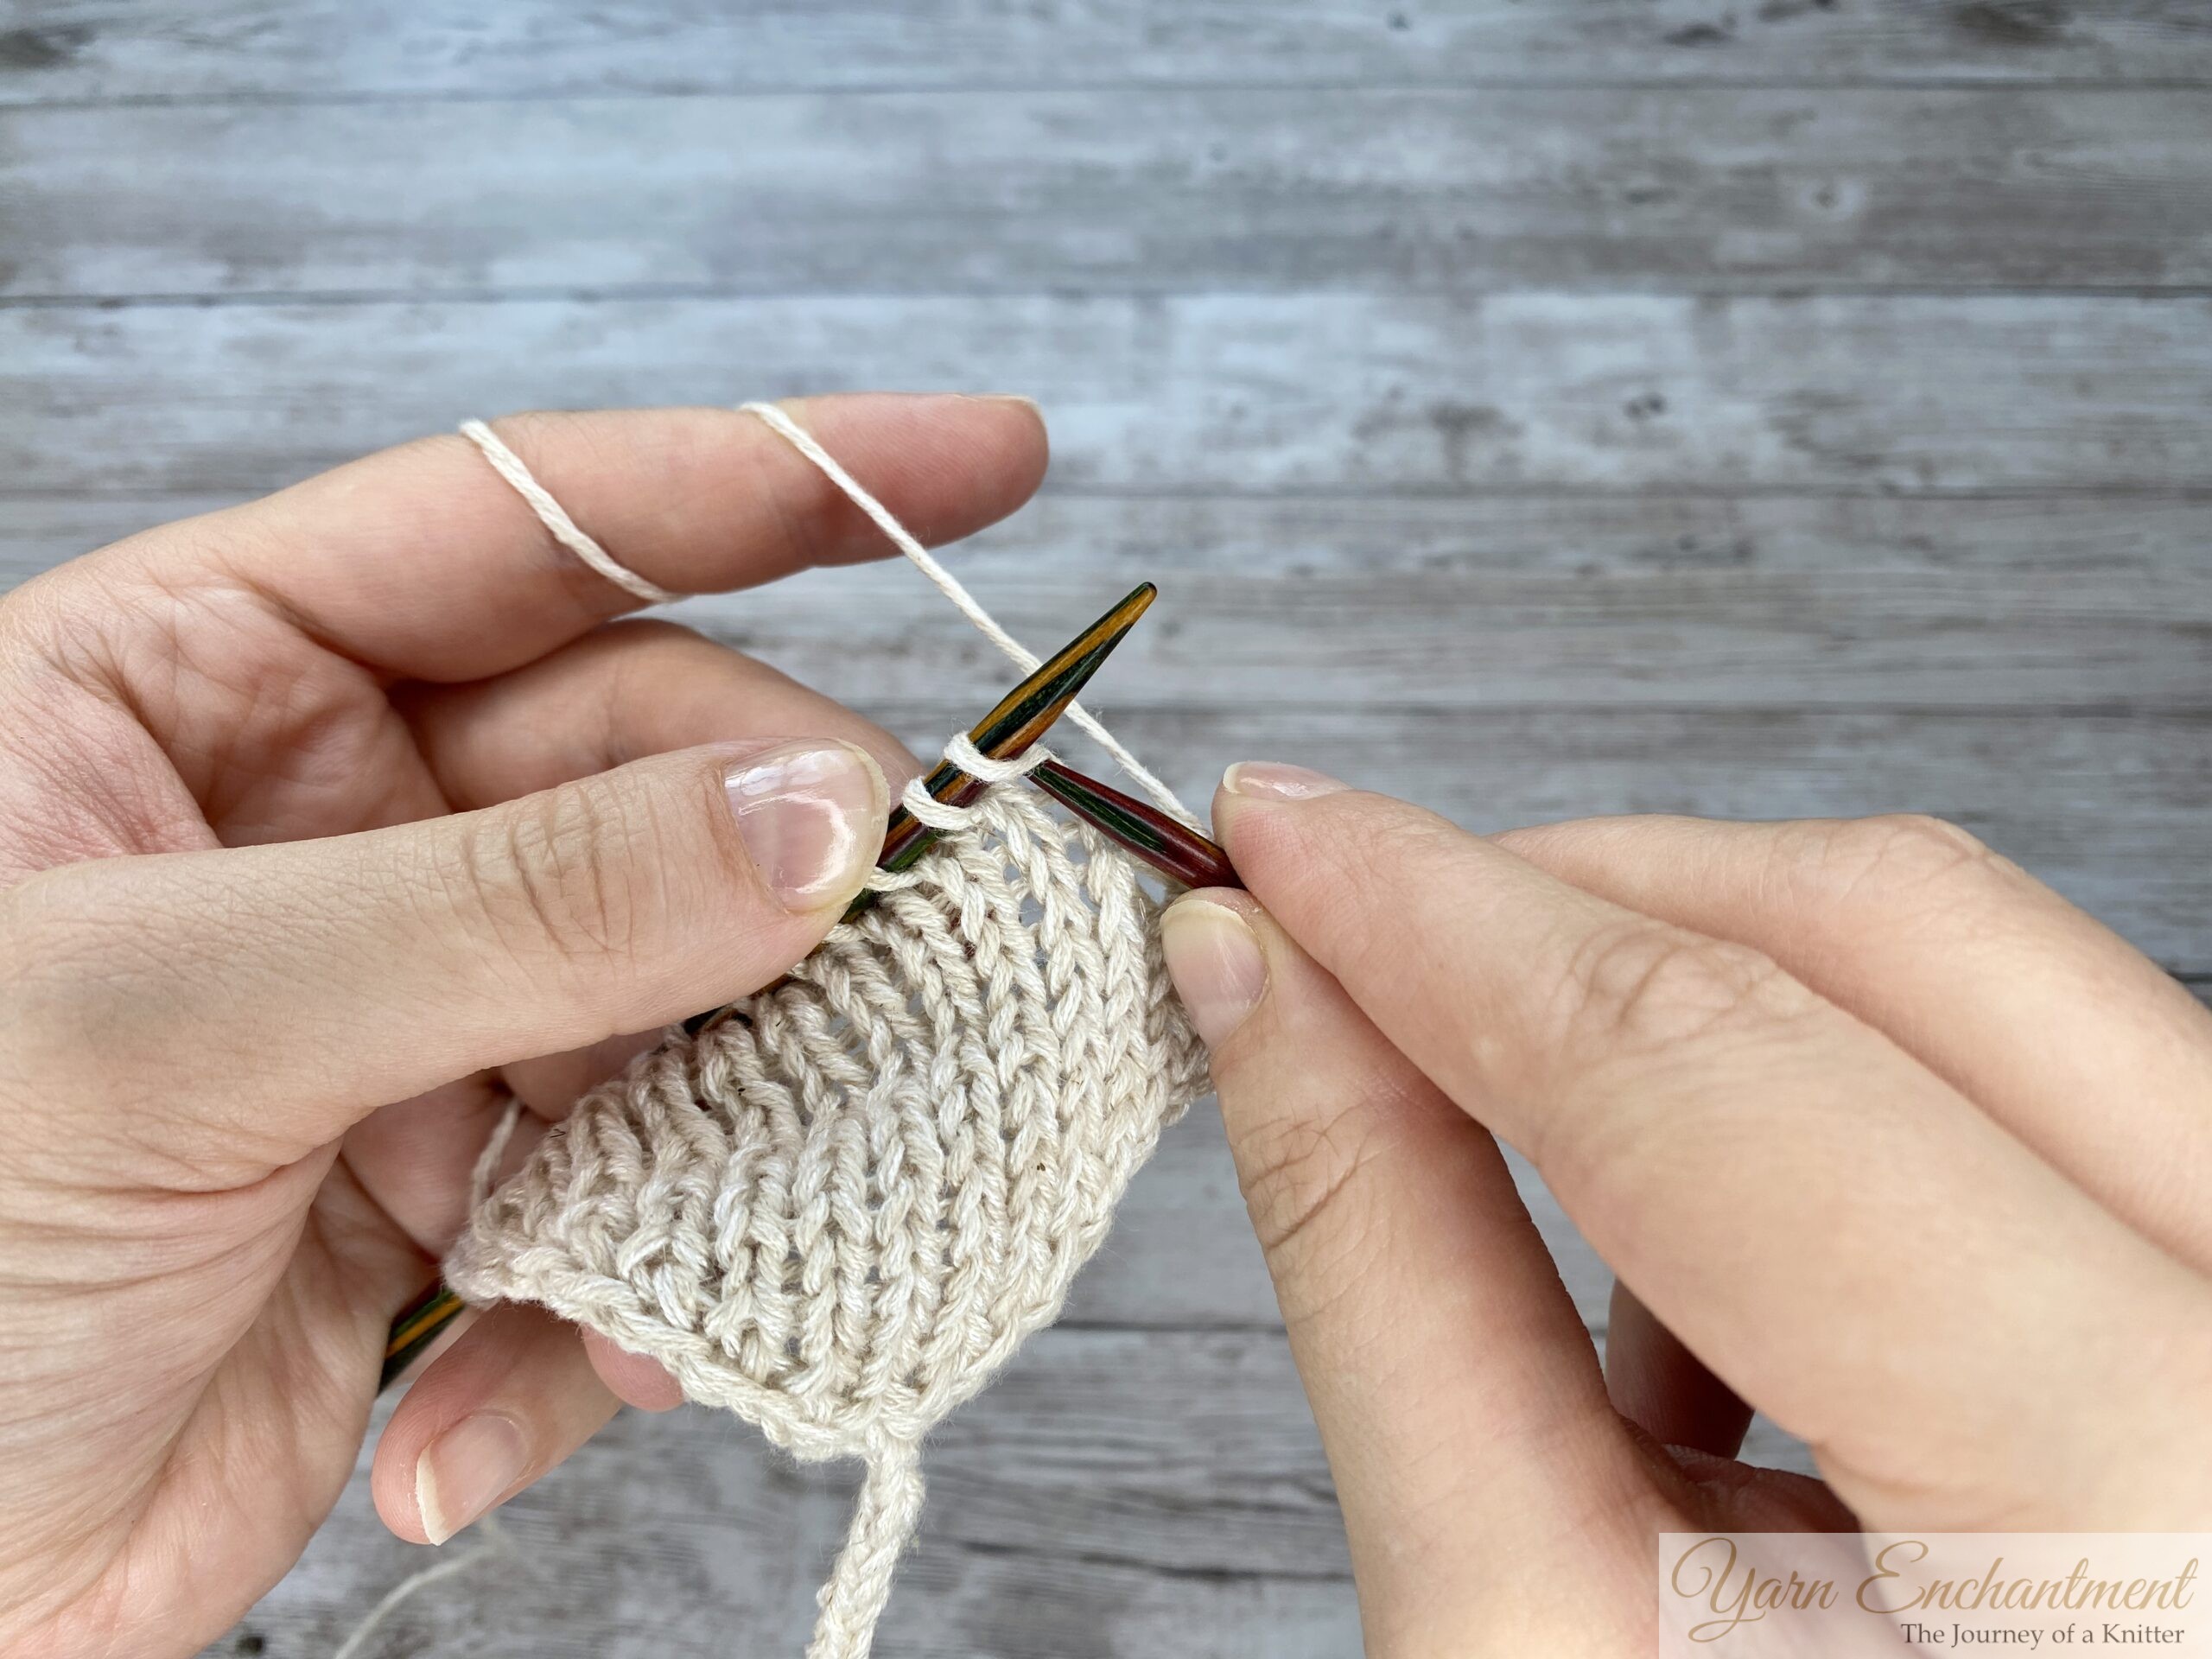


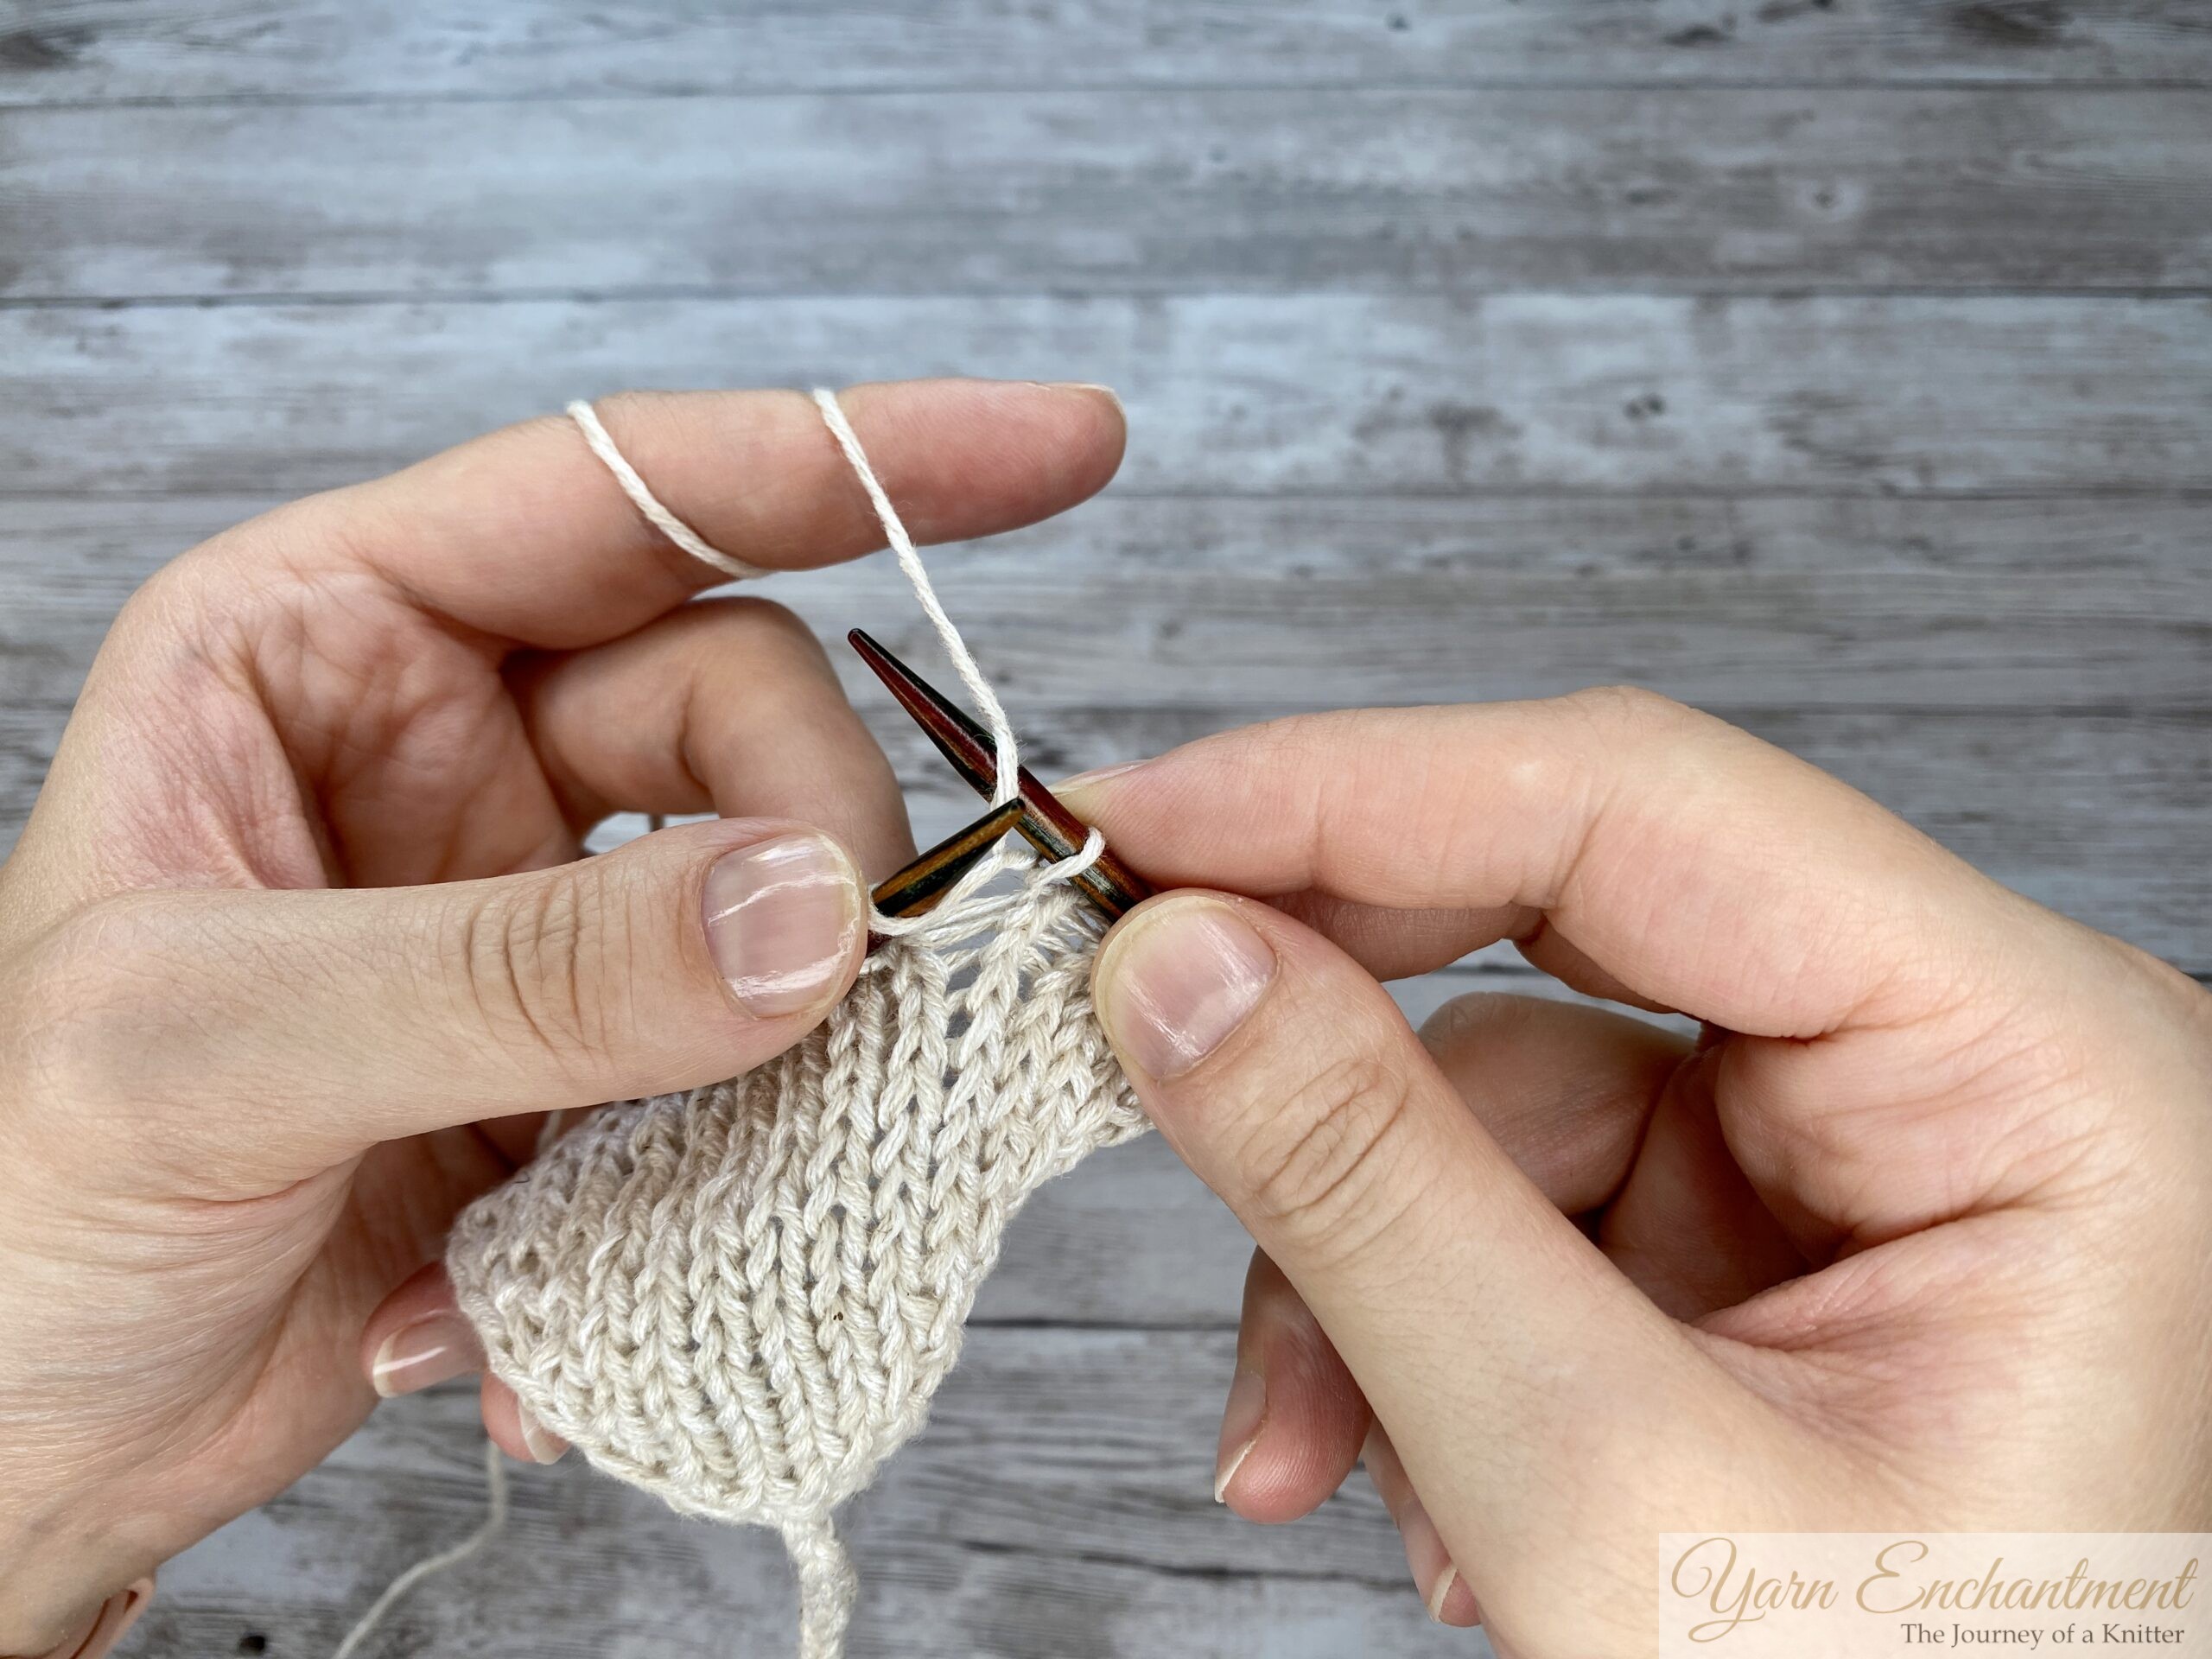

Insert your right needle back into that same stitch on your left needle again, just as you would for another knit stitch.
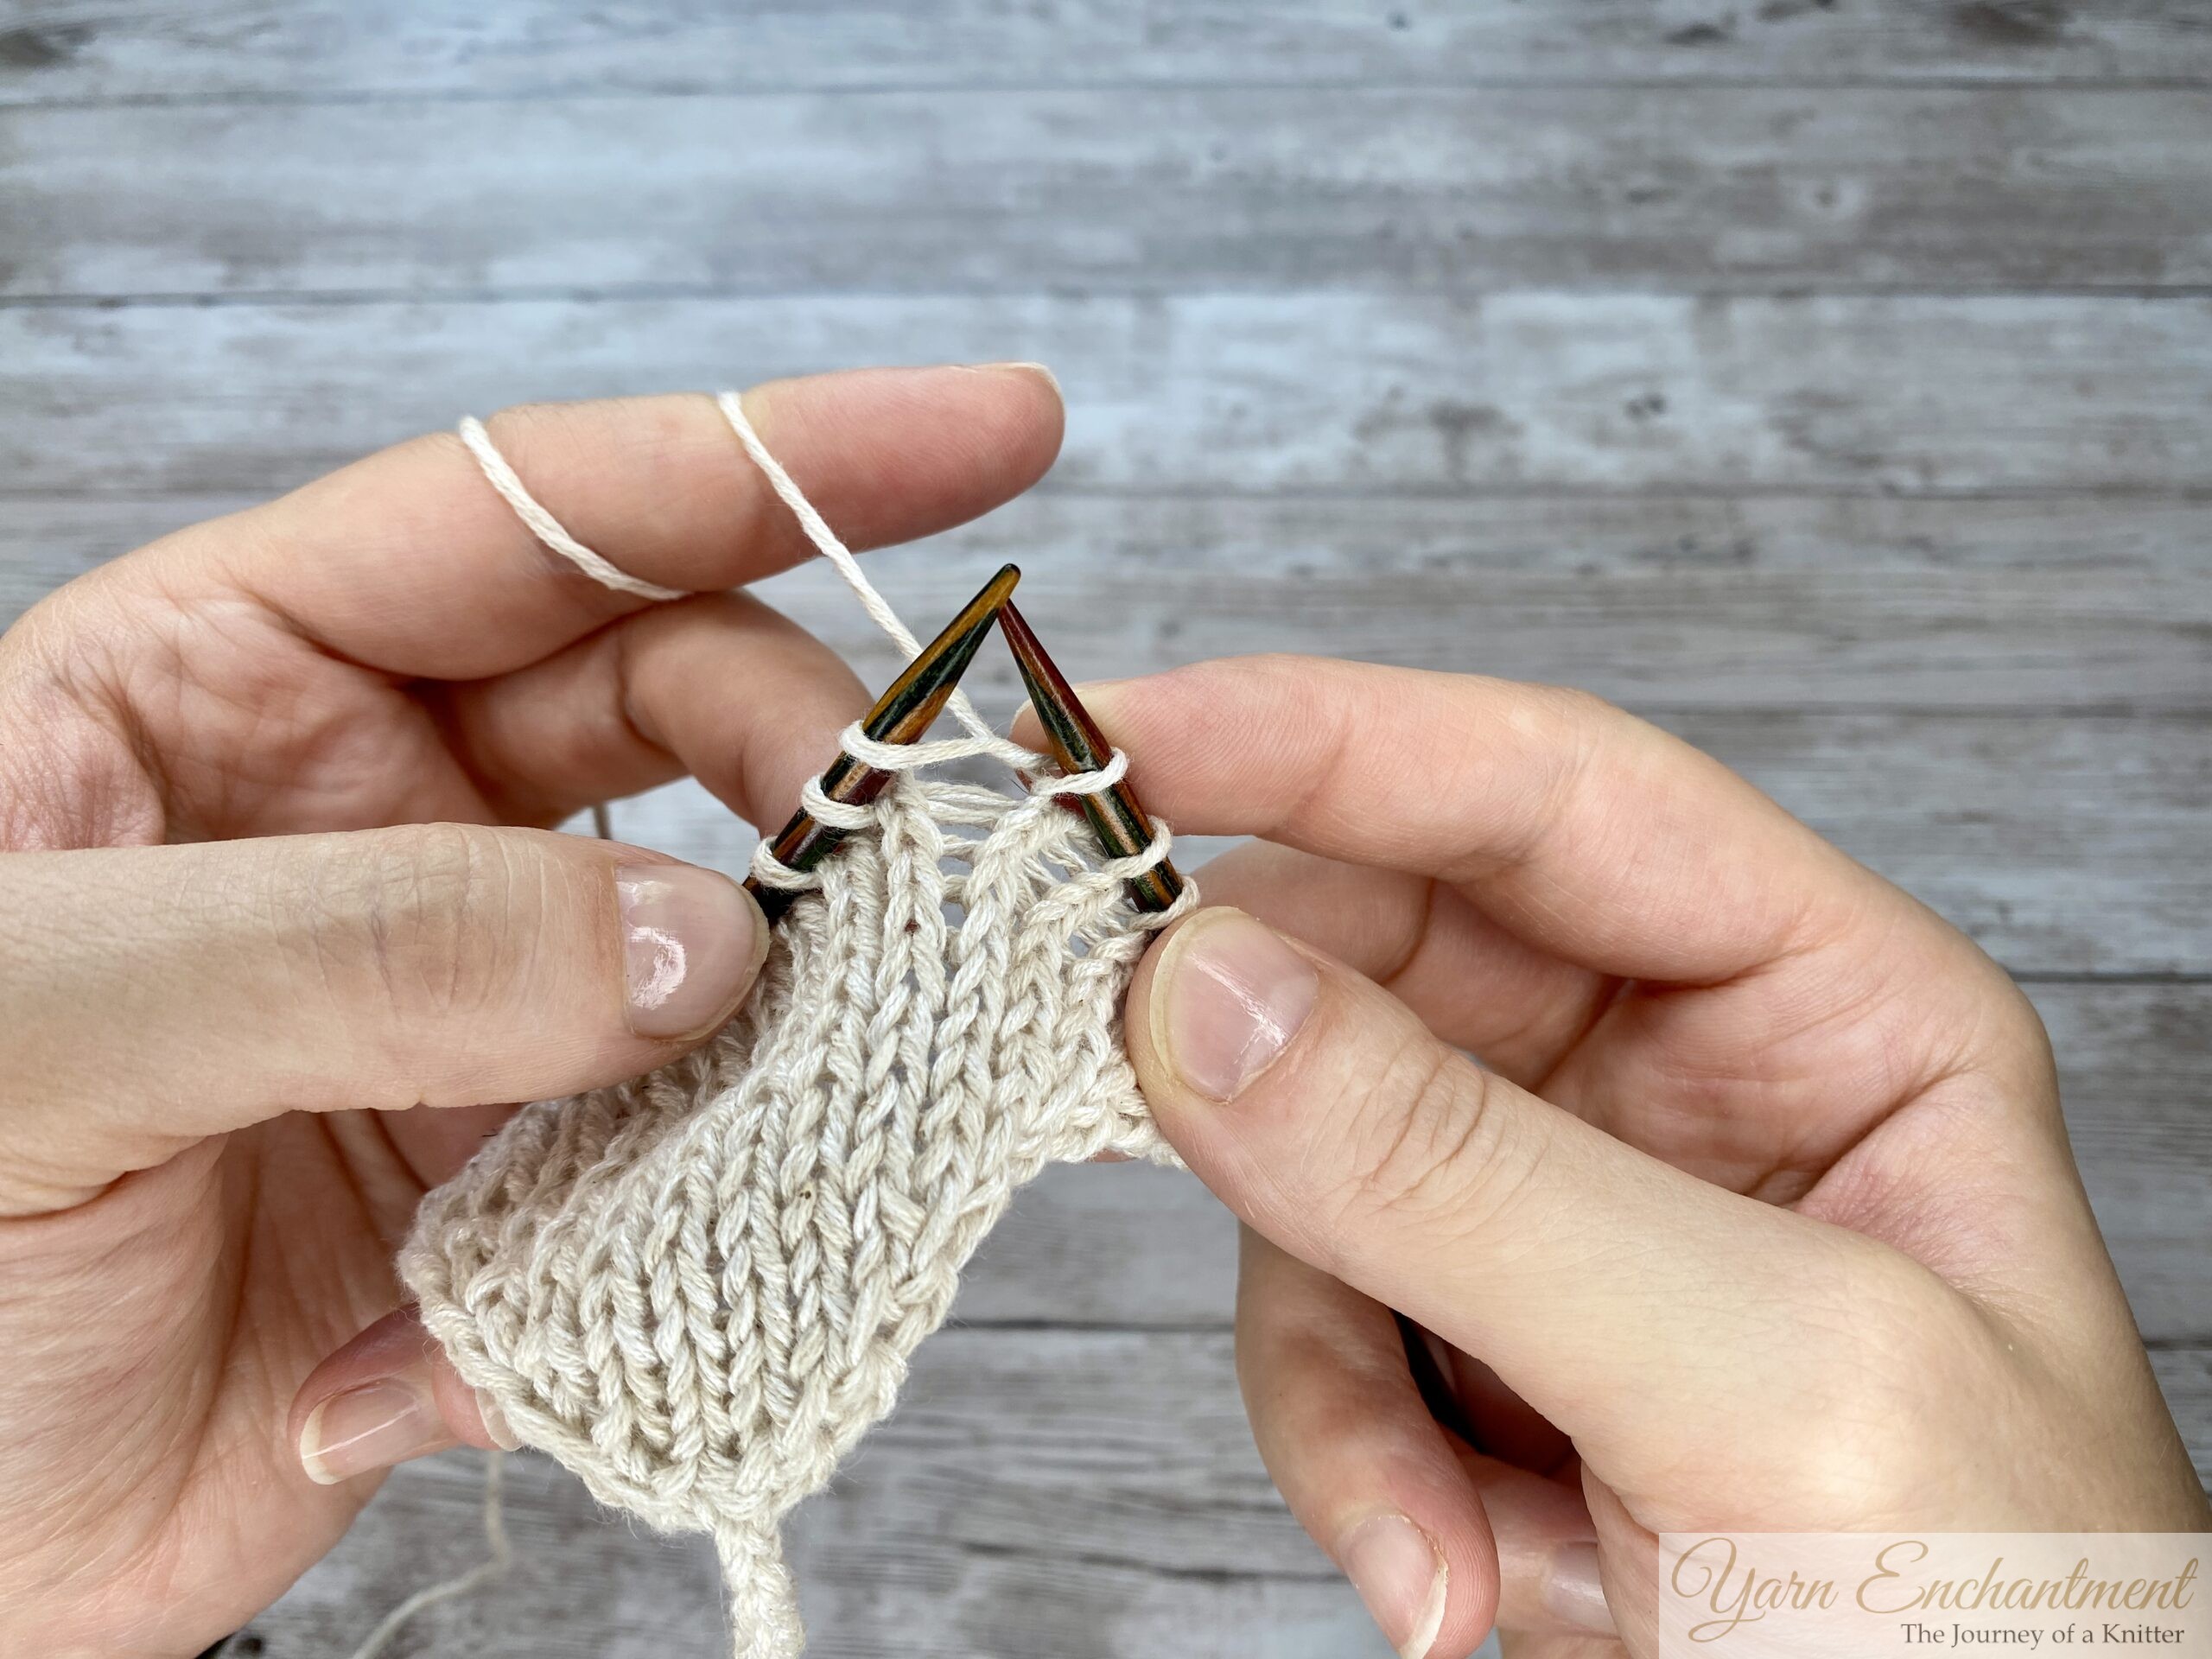
Wrap your yarn and pull another knit stitch through. Now you have created three new stitches on your right needle, and you can finally let that old stitch drop off your left needle.
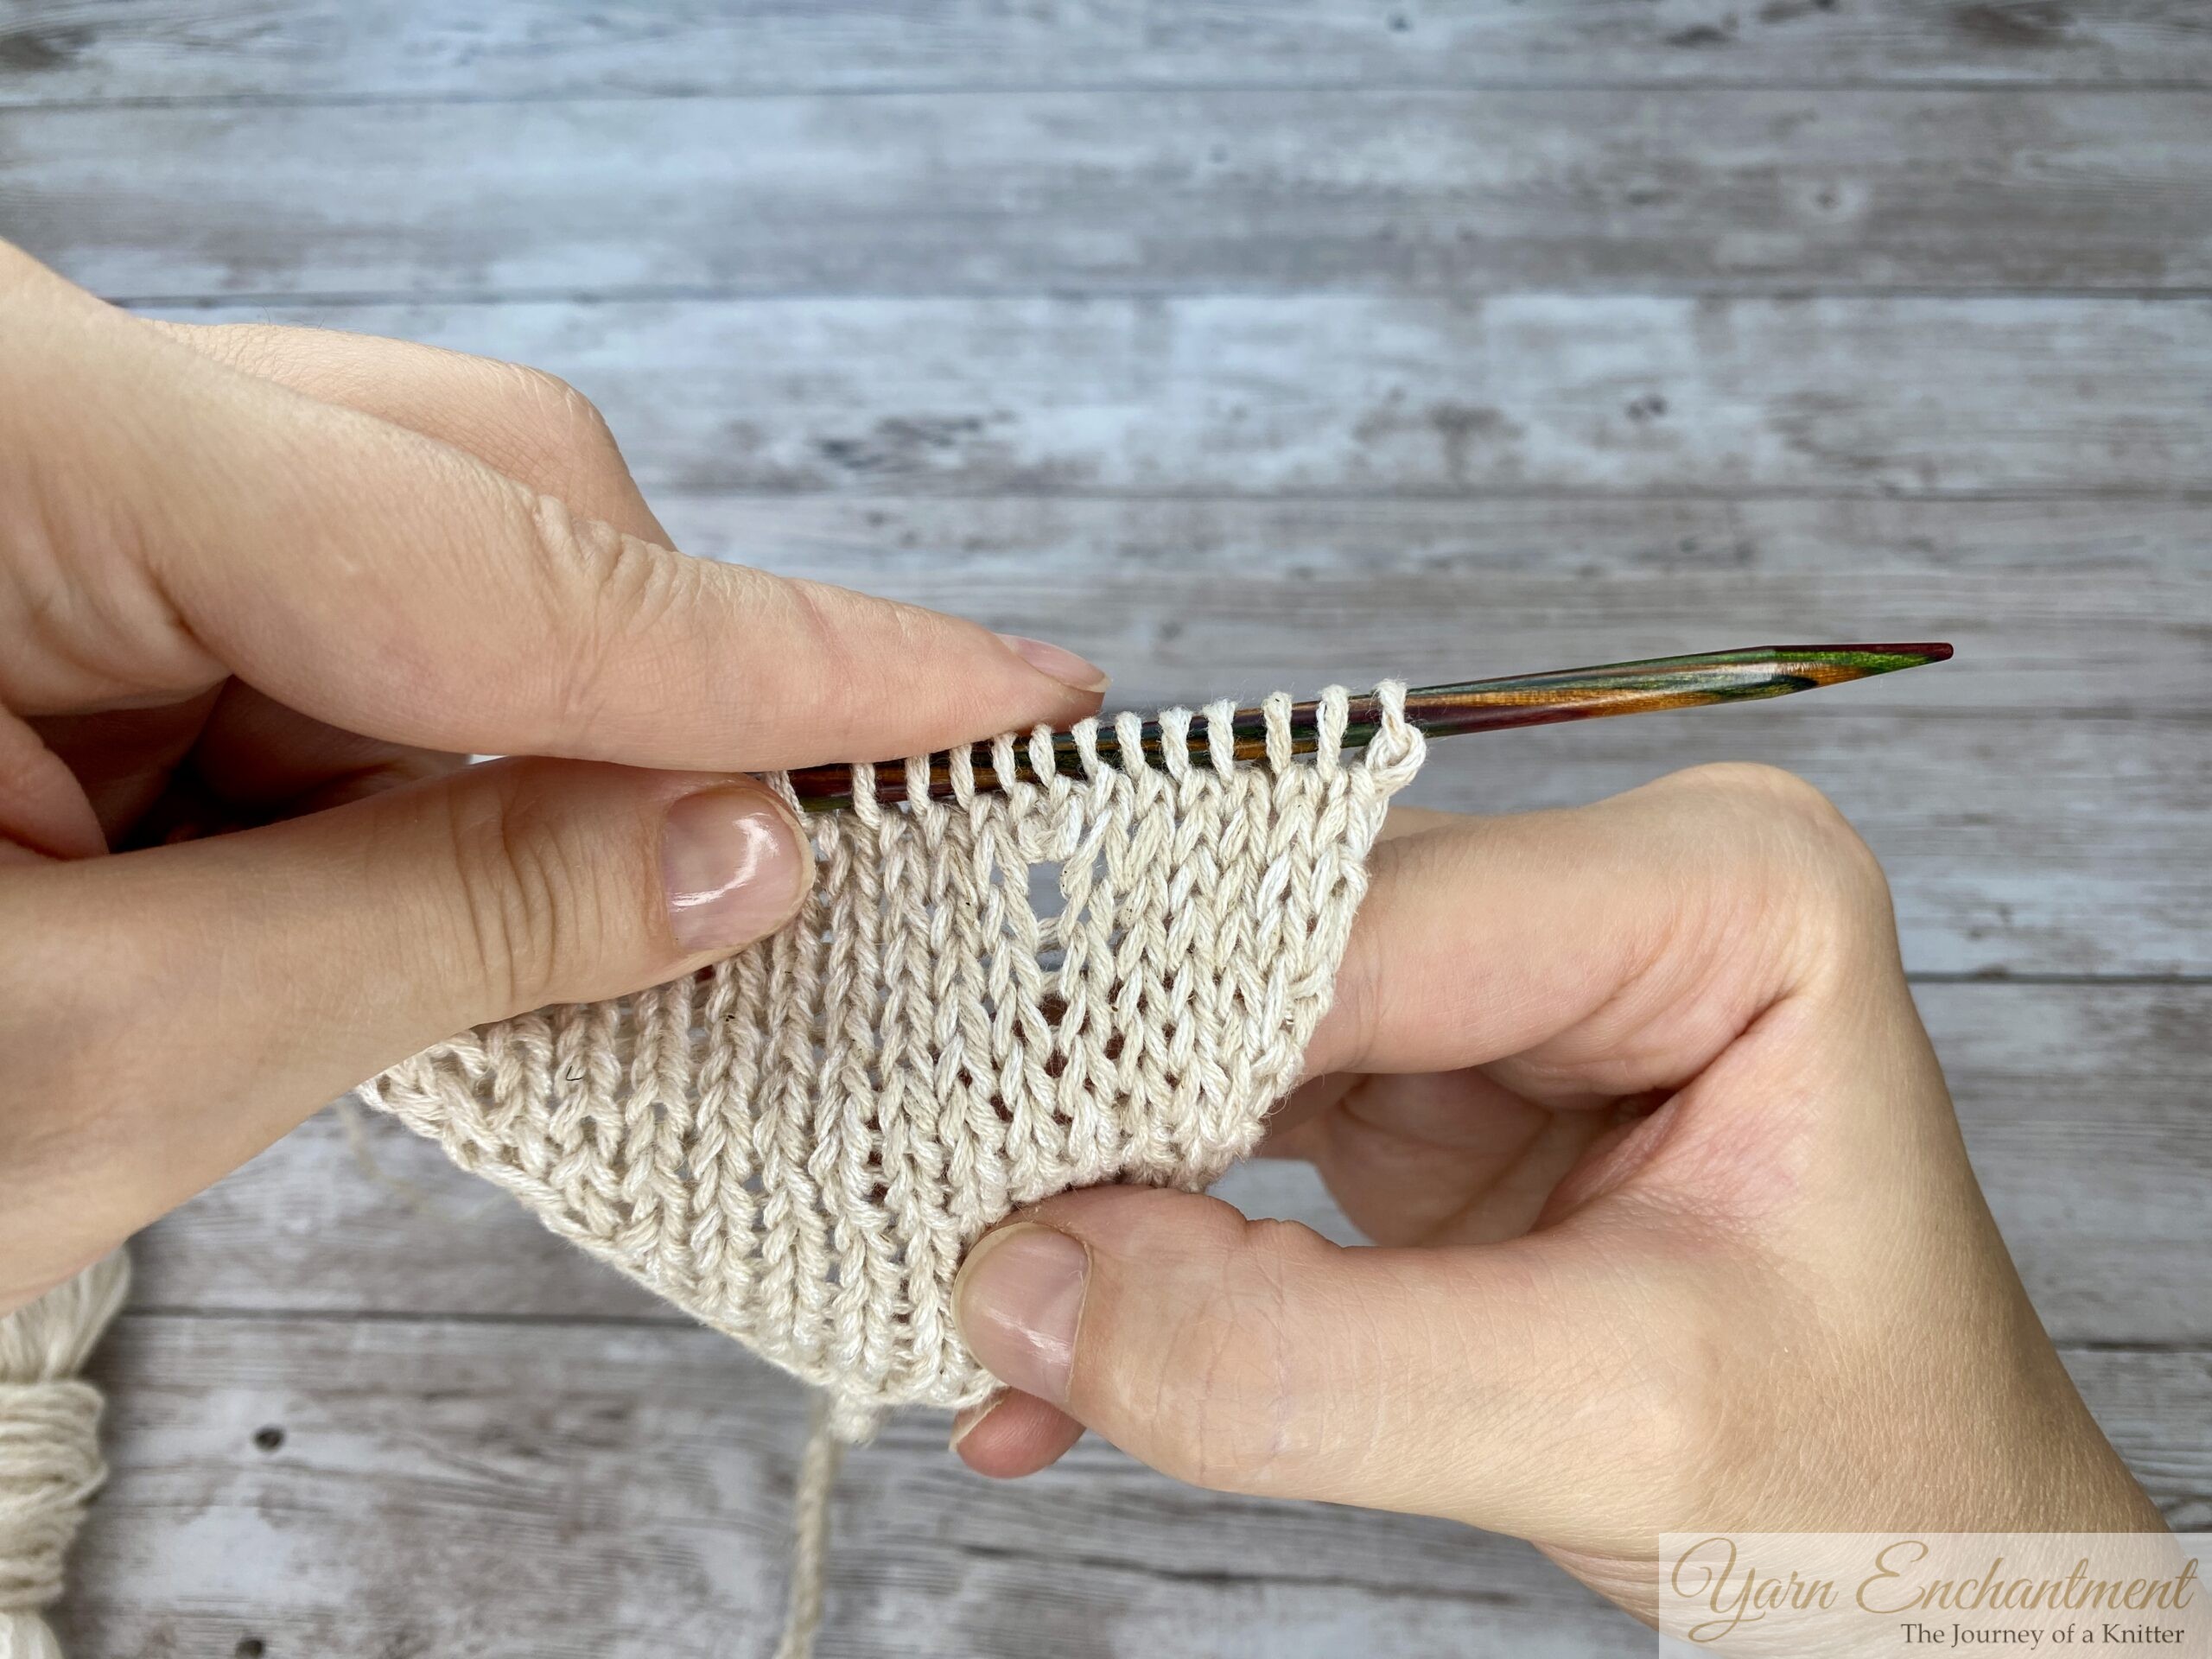
When you look at your right needle, you will see three lovely new stitches all coming out of that single stitch. It looks like a little fan or a blooming flower. It is really quite magical to see!
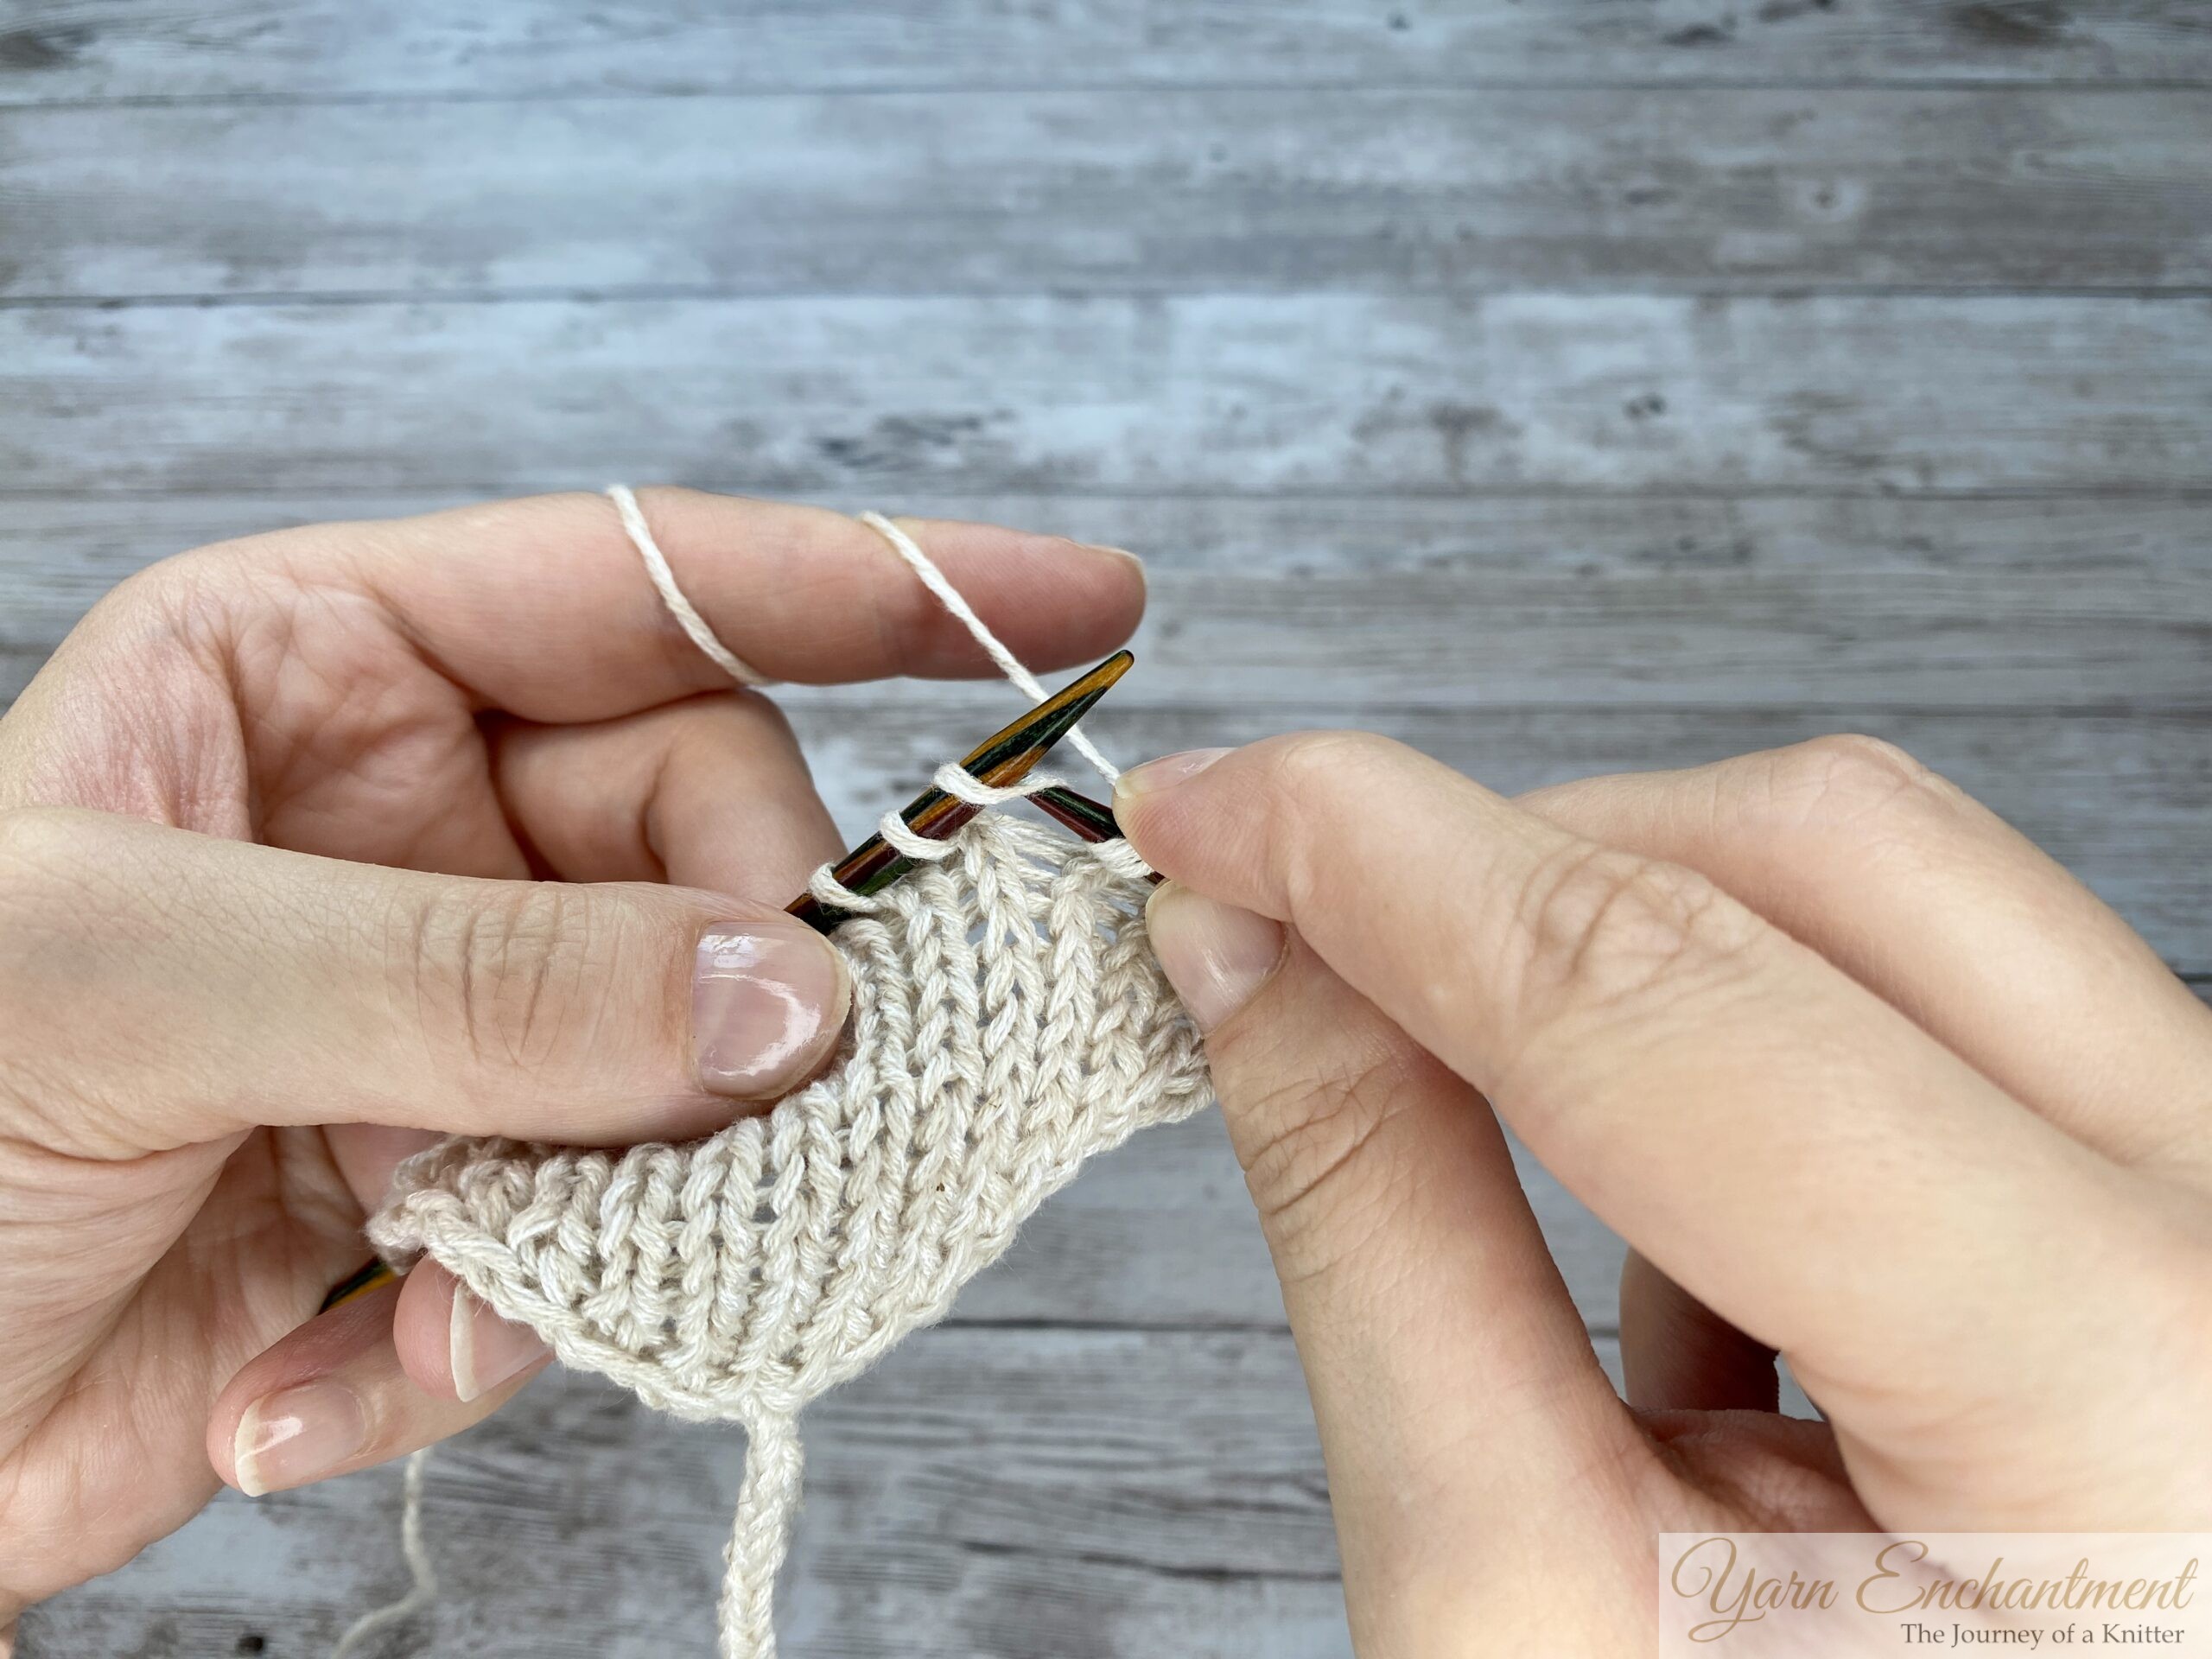

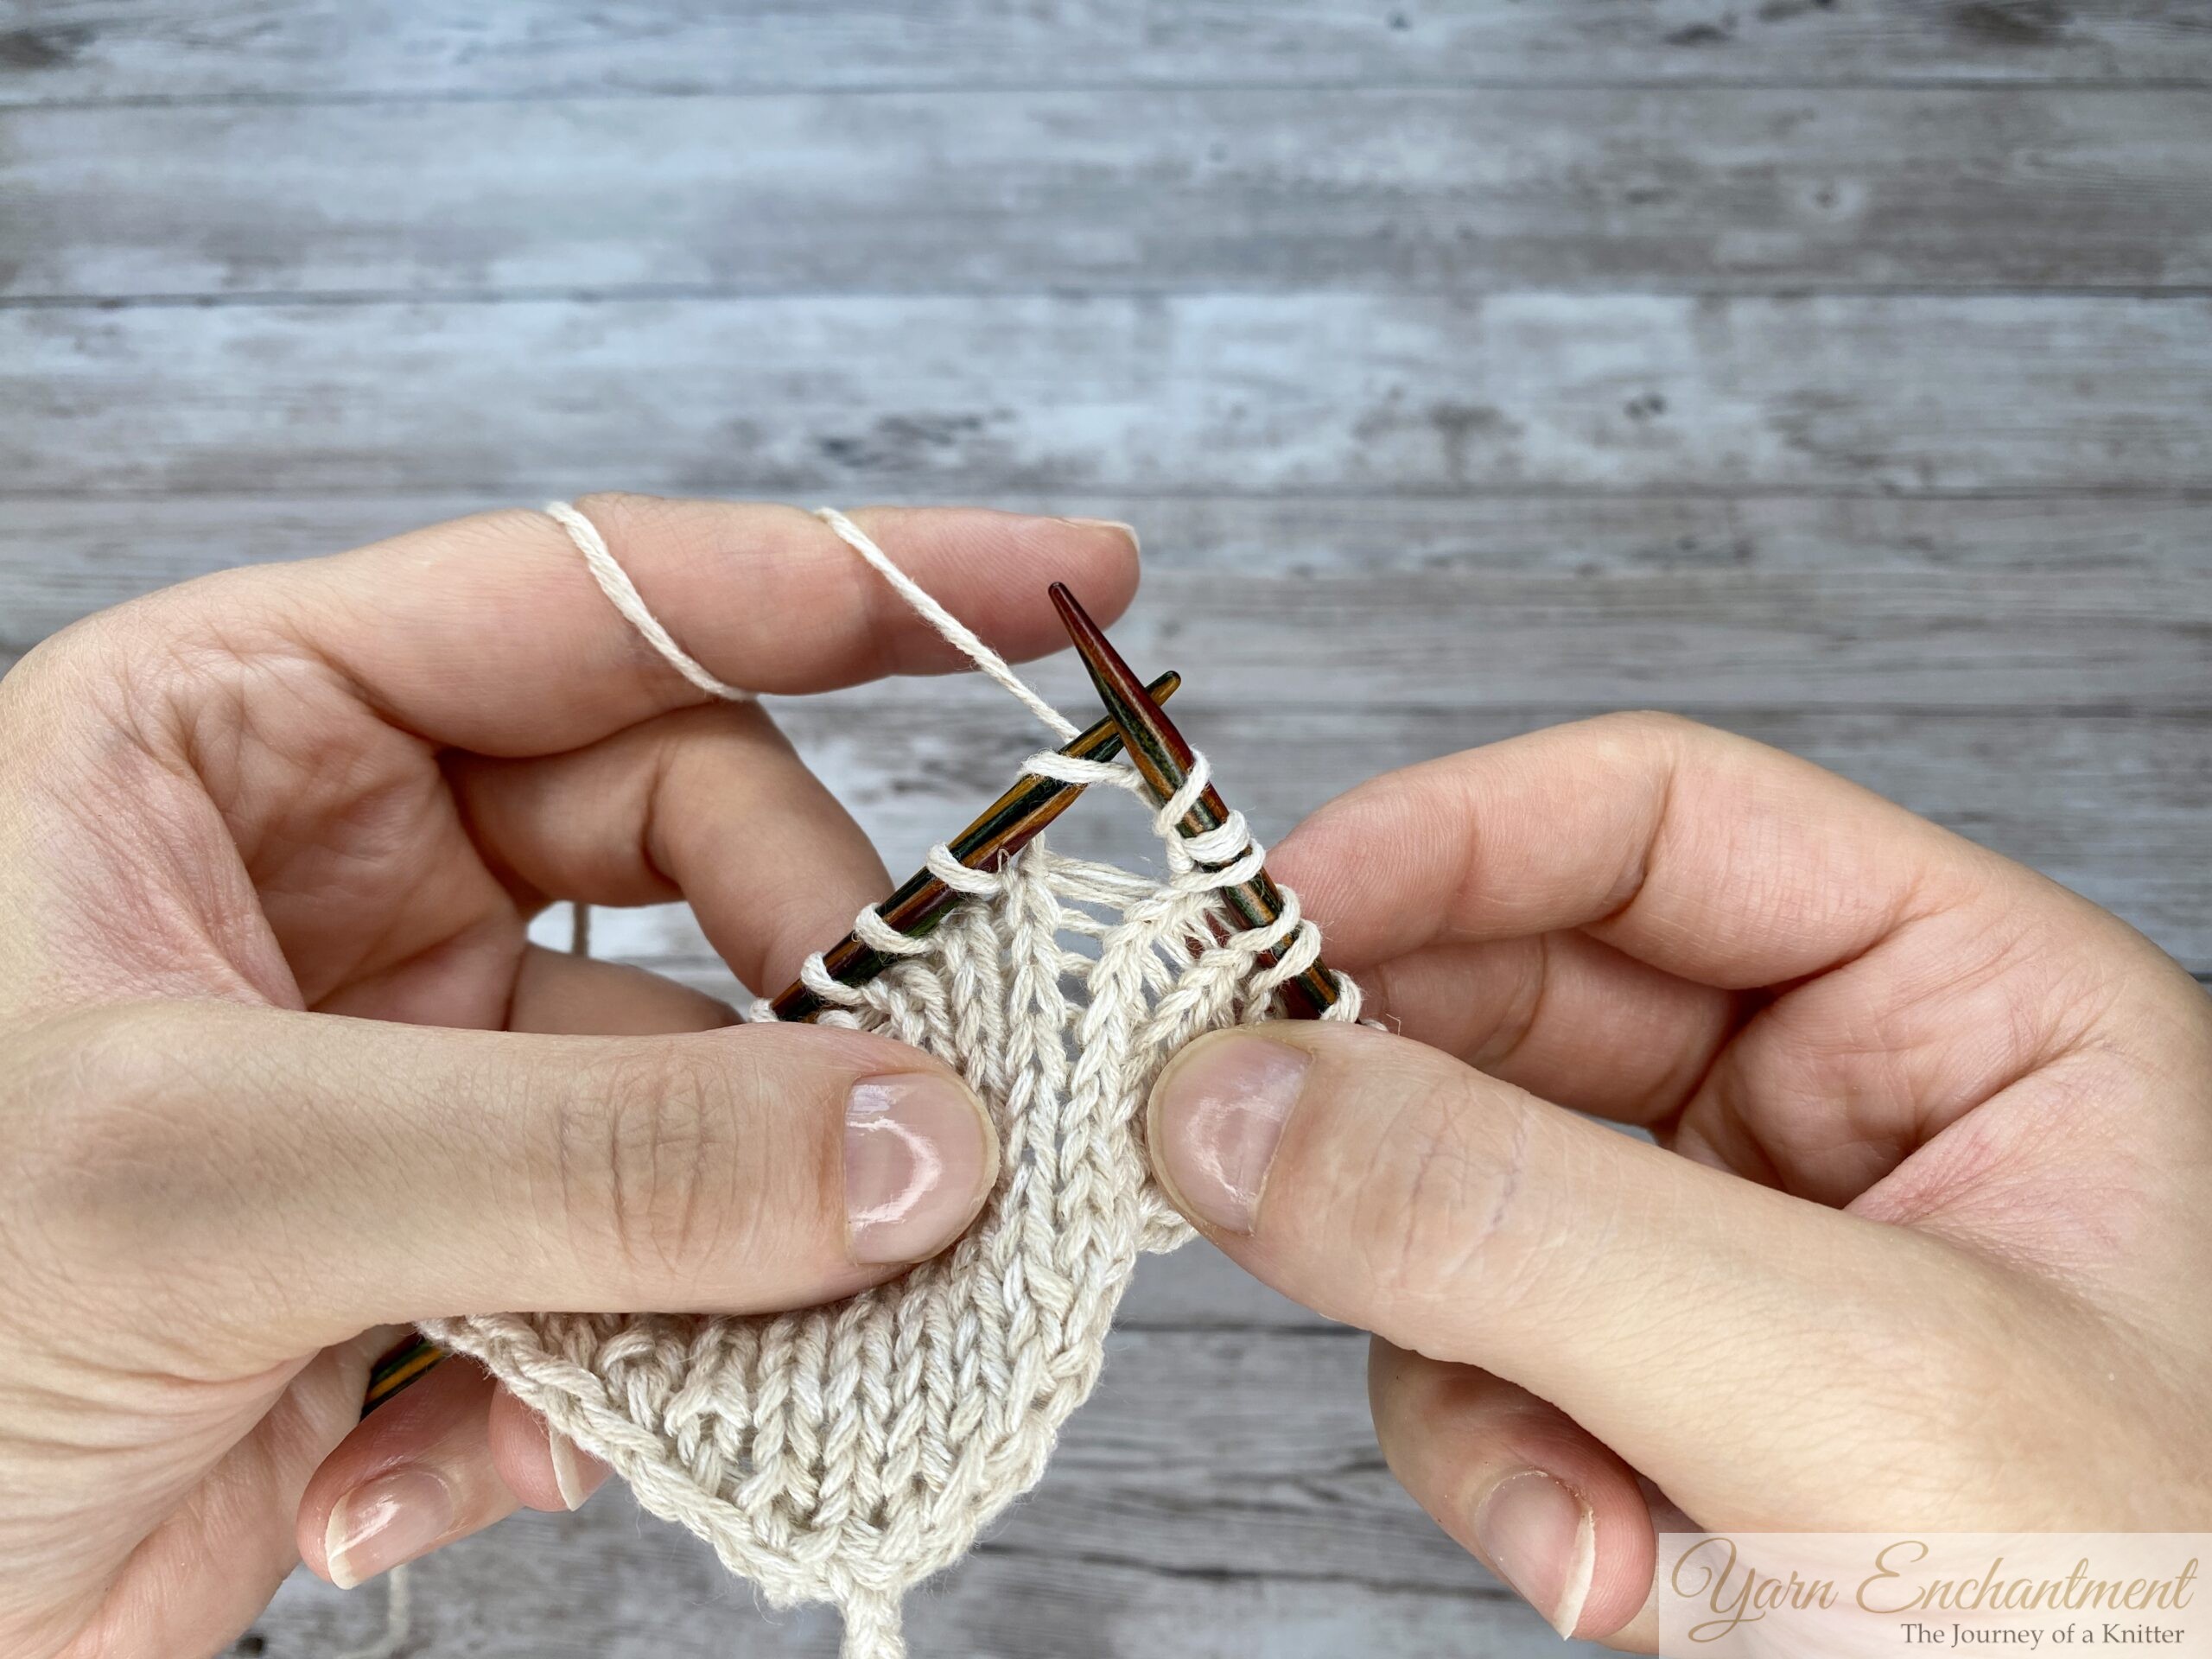

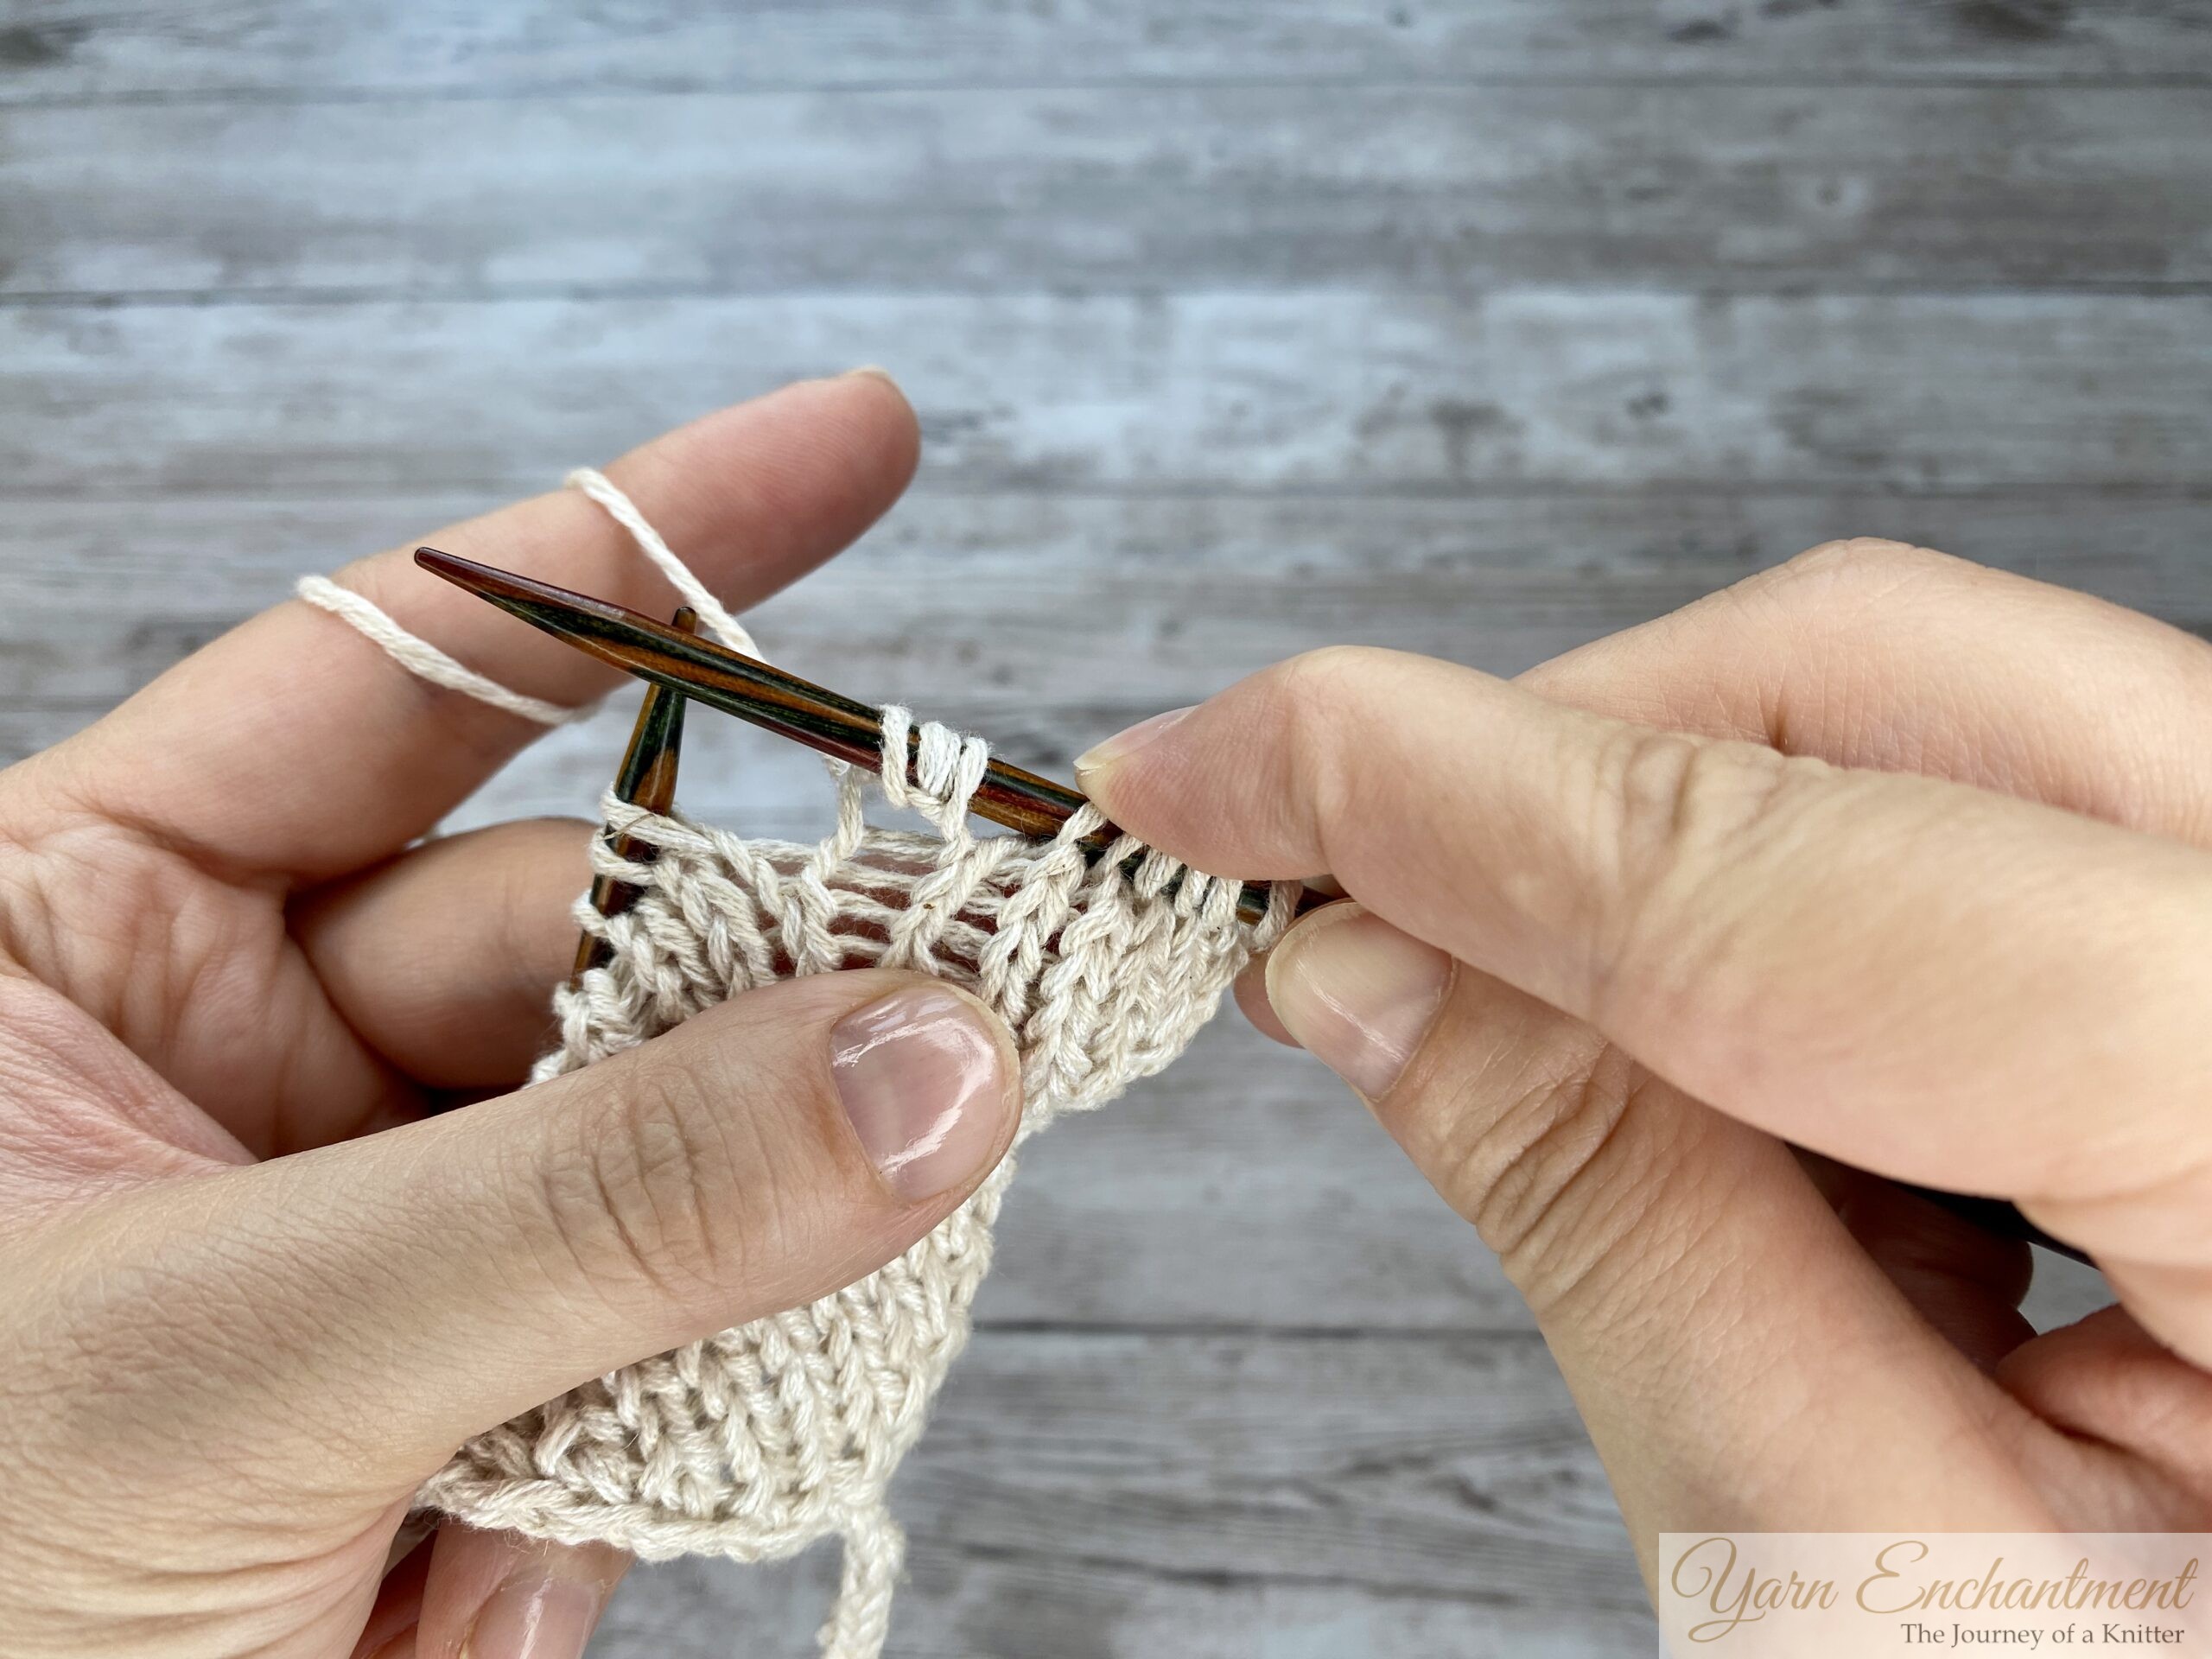

This increase will leave a little hole. I stretched my stitch a bit more for the photos so you could see it more clearly. I am using linen yarn here. With an animal fiber yarn, the hole tends to close up a little bit more, and the new stitch, which is a yarn over, looks like it naturally comes out of the stitch below it.

Multiple Yarn Overs
Now let me tell you about something I absolutely love playing with: Multiple yarn overs! This technique is so much fun, and it opens up all kinds of creative possibilities. Sometimes you will see a pattern that asks you to wrap the yarn around your needle two, three, or even four times instead of just once. The first time I saw that in a pattern, I panicked a little. I thought, "Wait, what am I supposed to do with all these loops?"
There are generally two reasons why a pattern might call for multiple wraps.
Creating Elongated Stitches for Texture
The first reason is to create those gorgeous elongated stitches that stretch across your work. You know the ones I mean. They add such beautiful drama and texture to a piece.
Here is how it works. You wrap your yarn around the needle multiple times, say three times instead of just once. Then on the next row, you only work one of those wraps as an actual stitch. The other wraps just get dropped right off the needle.
When you drop those extra wraps, they unravel and create a long, floating strand of yarn across the front of your work.
Creating Extra Increase Stitches
The second reason for multiple yarn overs is to create extra increase stitches. And this is where things get really interesting!
When your pattern calls for this, you will work each wrap individually as a separate stitch. For example, if you wrap your yarn twice around the needle, you will have two yarn over loops sitting on your needle. On the next row, you might knit the first yarn over and purl the second one. This creates two new stitches from the space between your existing stitches.
But some patterns might call for a K1, P1 into just one yarn over. That means you knit into yarn over loop, and then you purl into the same loop. So from one single yarn over, you get two new stitches. It is a beautiful little increase that creates a bit of texture and a larger eyelet hole.
Let Me Walk You Through It
Okay, grab your needles and follow along with me. I promise this is easier than it sounds.
When you reach the spot where you want to work your multiple yarn over, bring your yarn to the front of your work. Just like you would for a regular yarn over. Wrap the yarn around your right needle once, and then a second time
On the next row, when you reach those wraps you work them according to your pattern instructions.
Knit 1 stitch into the first YO.
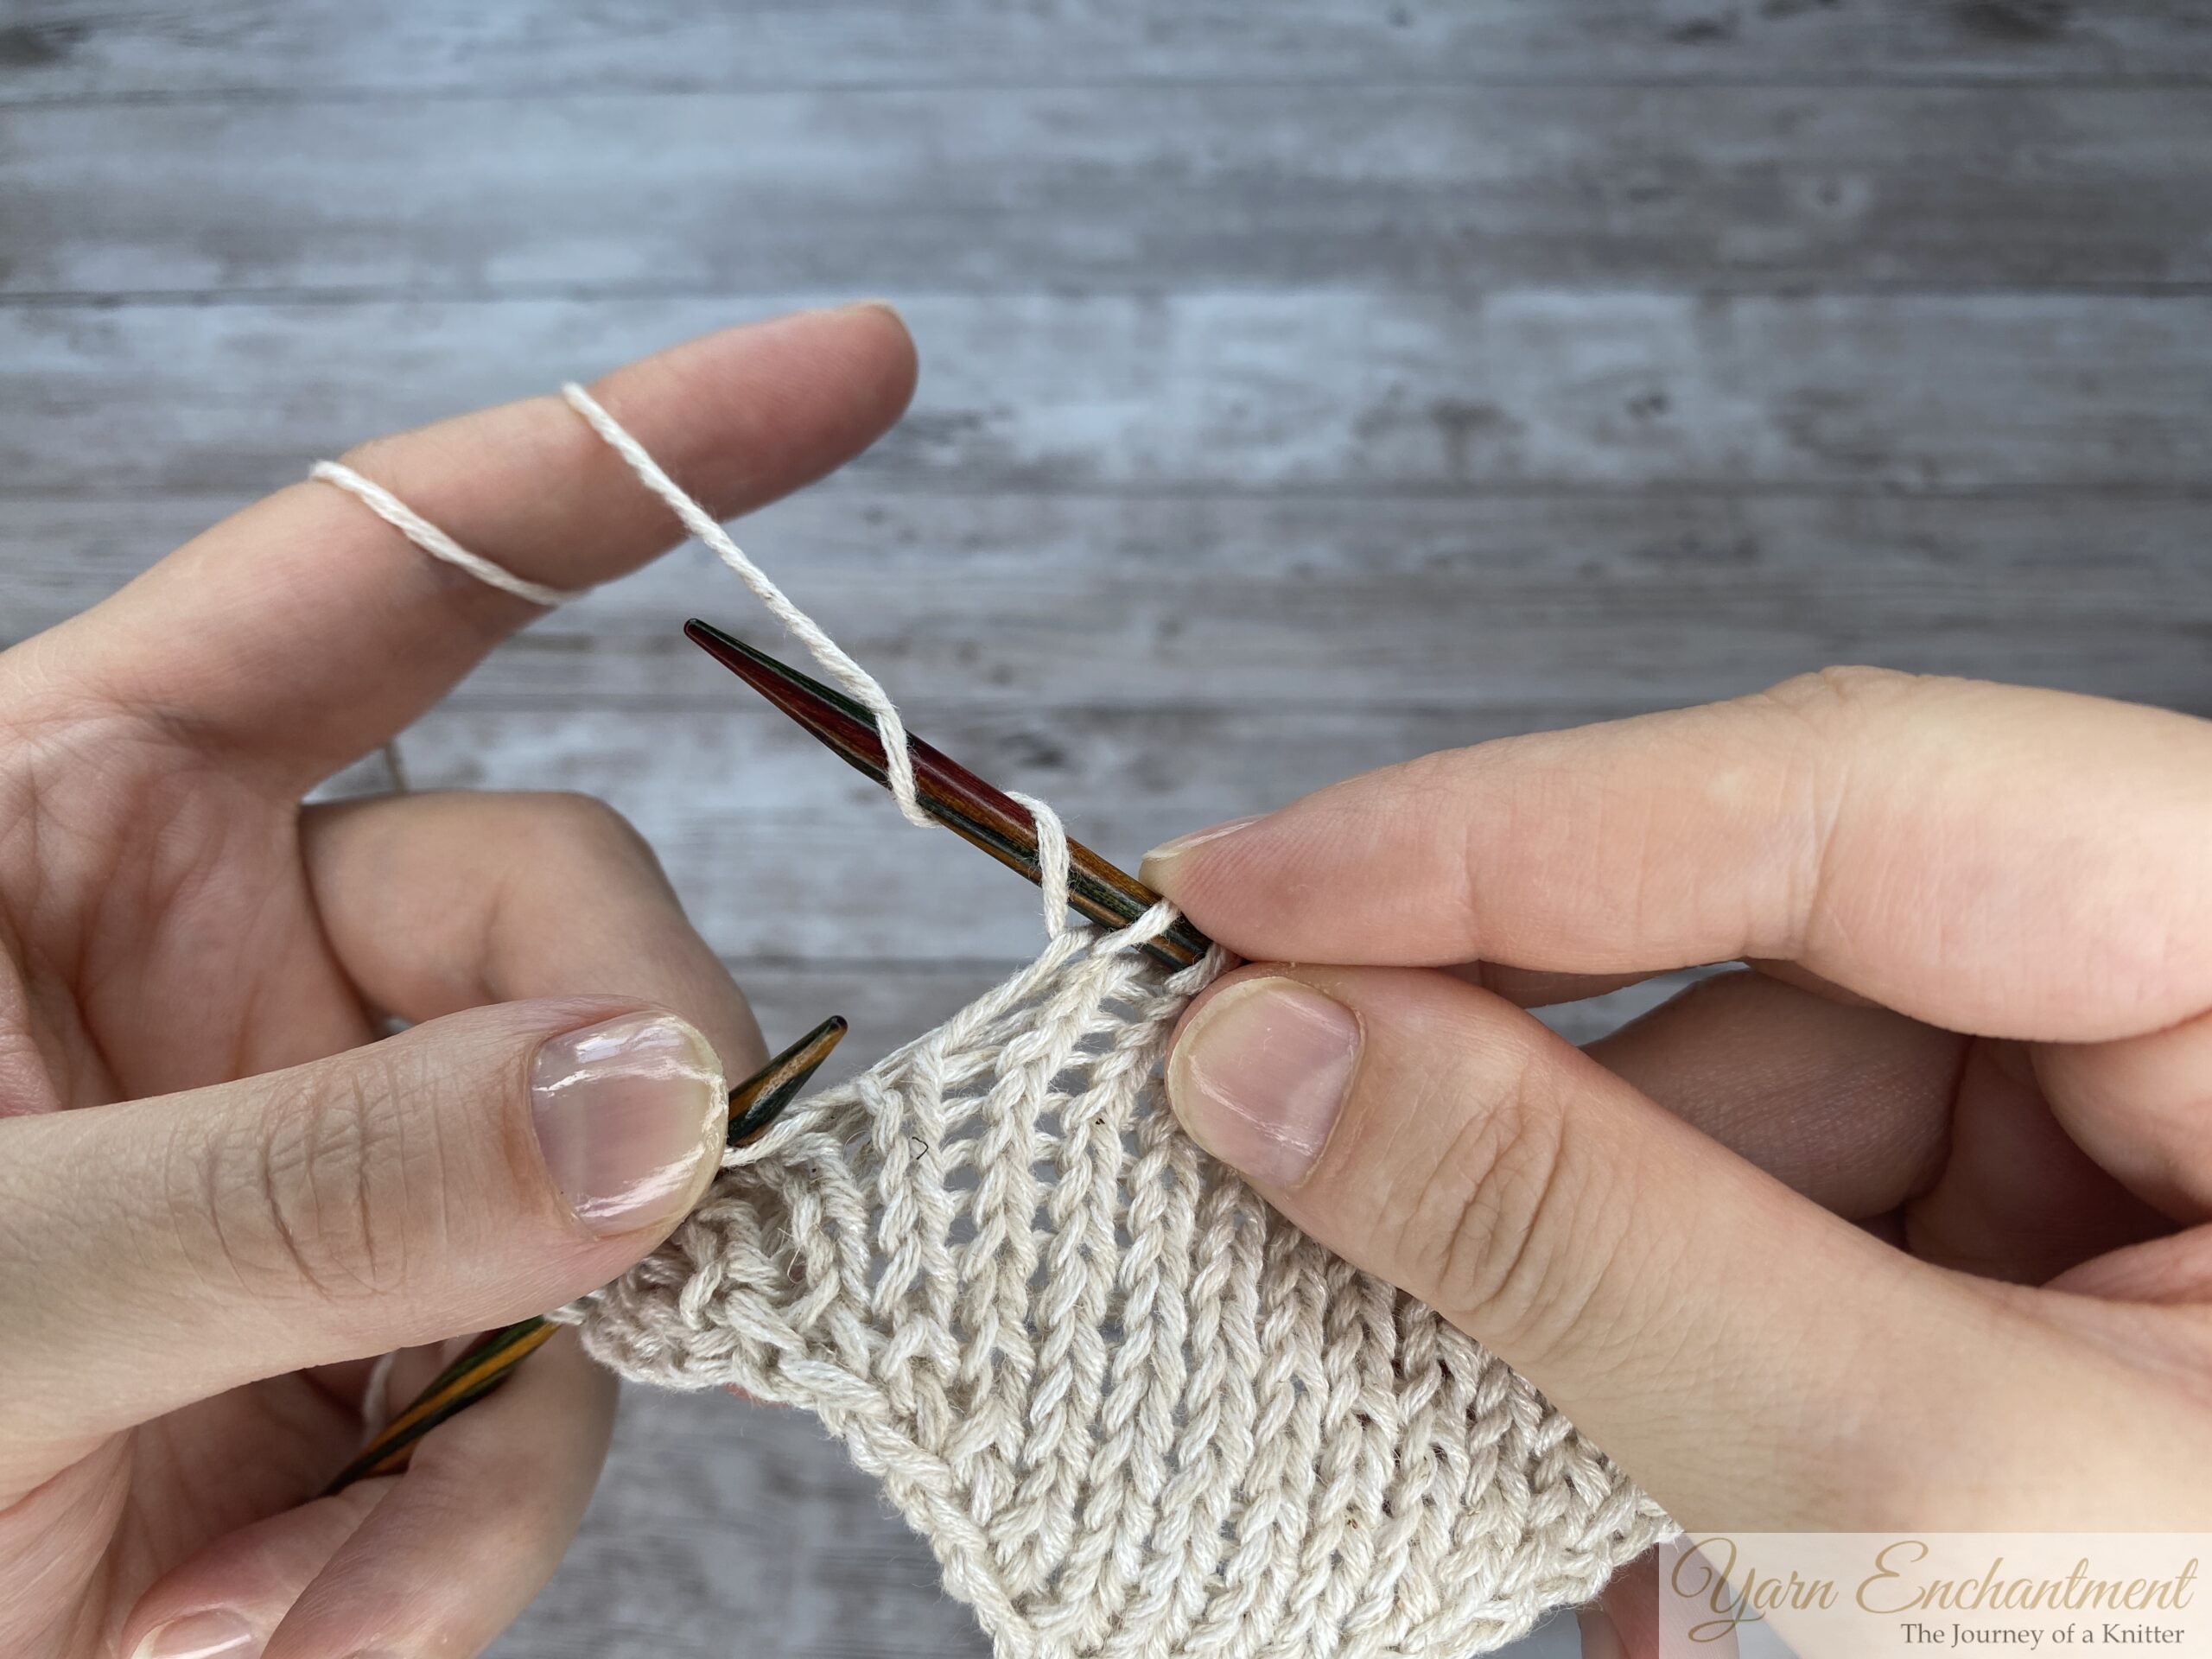

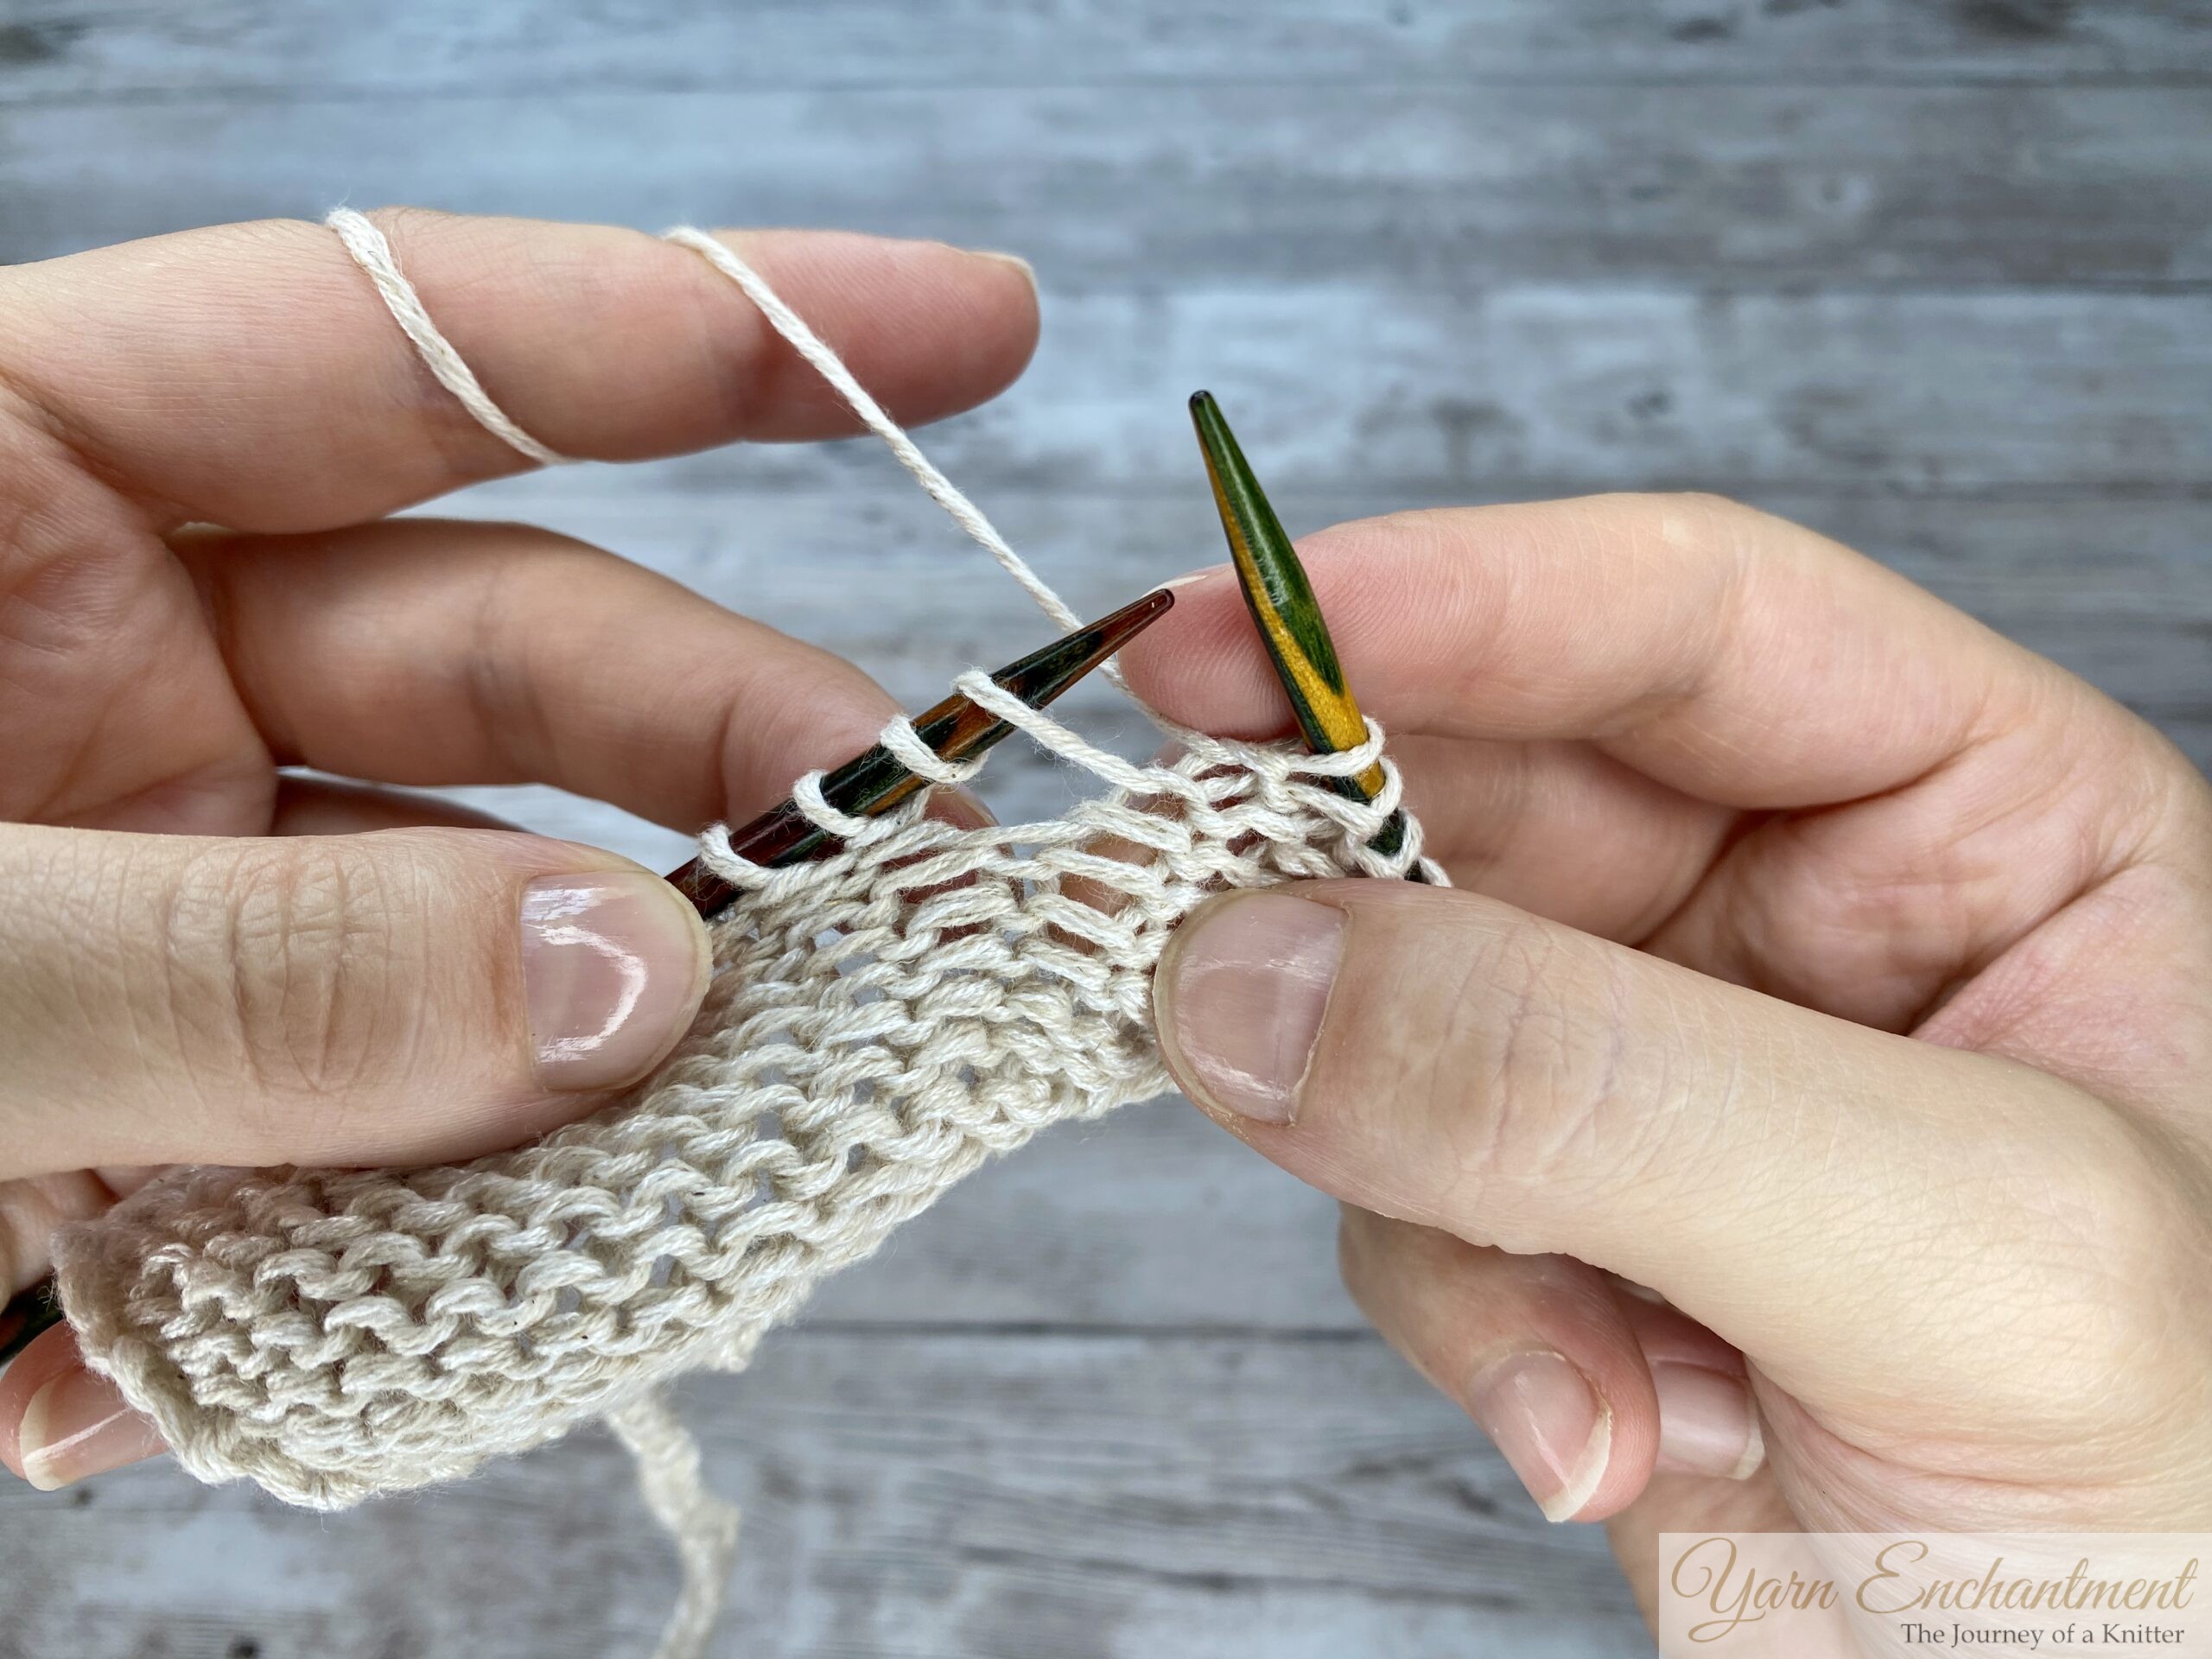

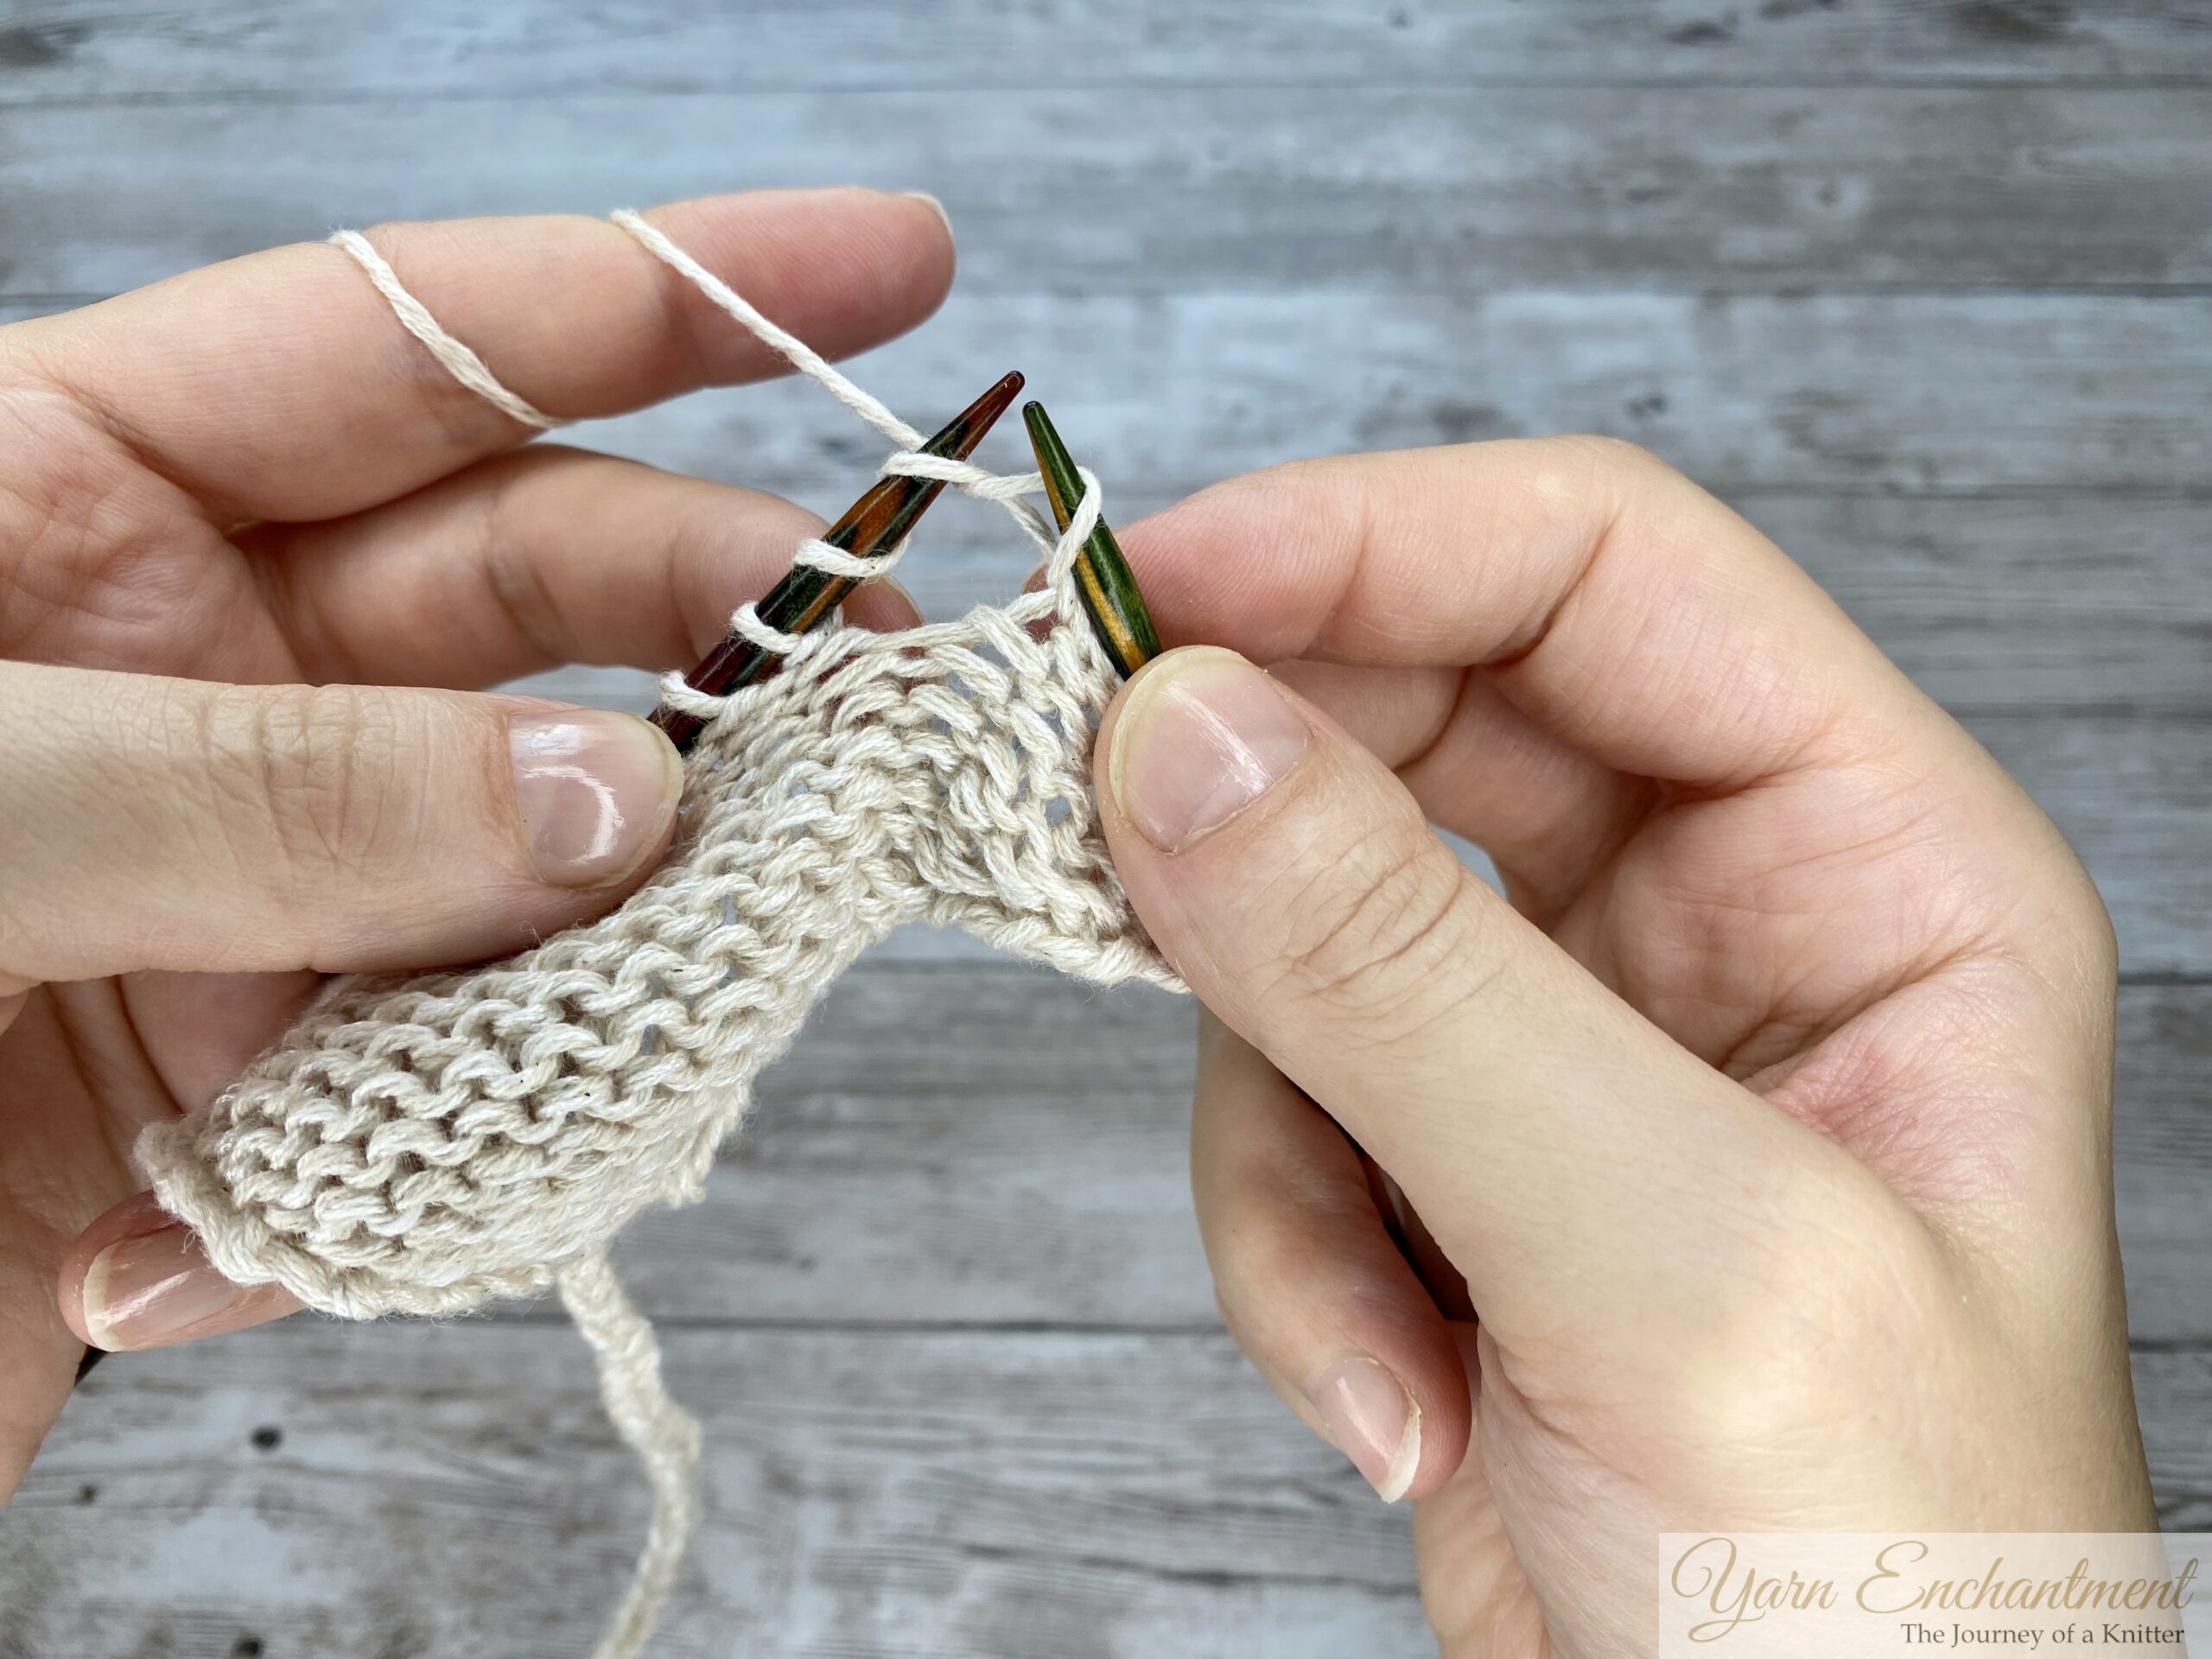

Bring your working yarn to the front and purl into the same YO. You can now slip the first YO off your needle (two stitches increased).
In your second YO, knit 1 stitch and...
...purl one stitch into the same YO.
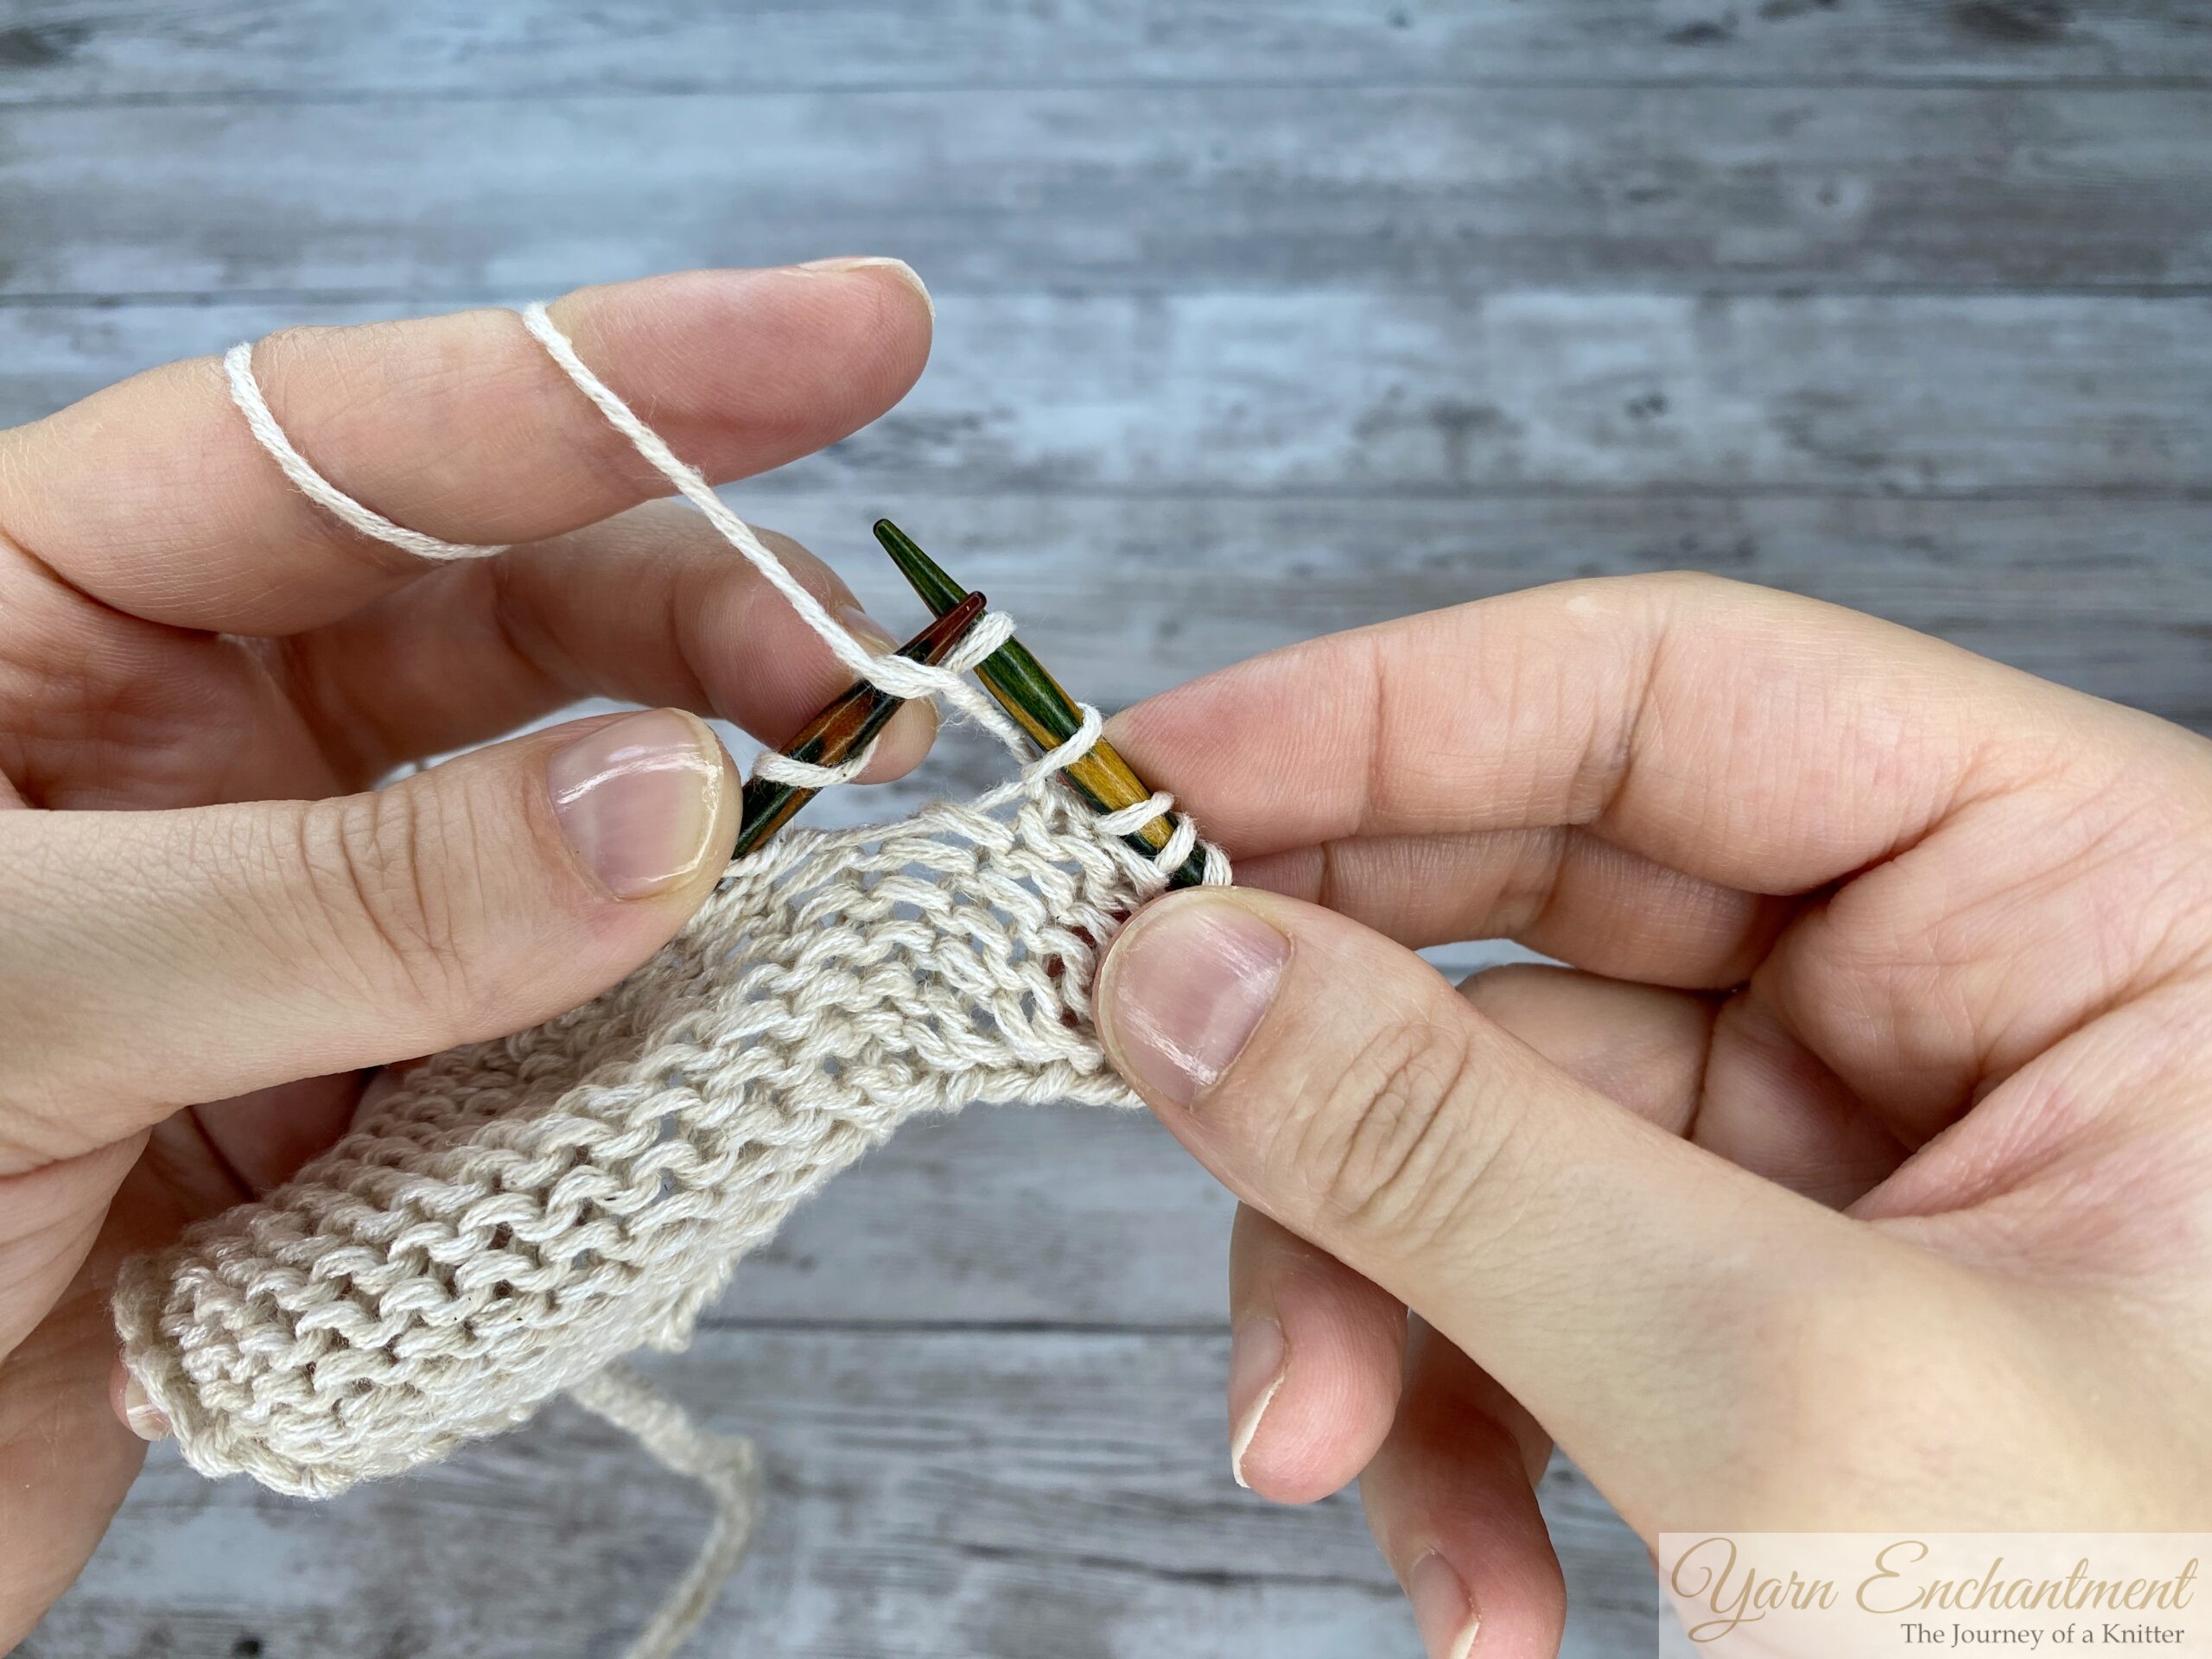

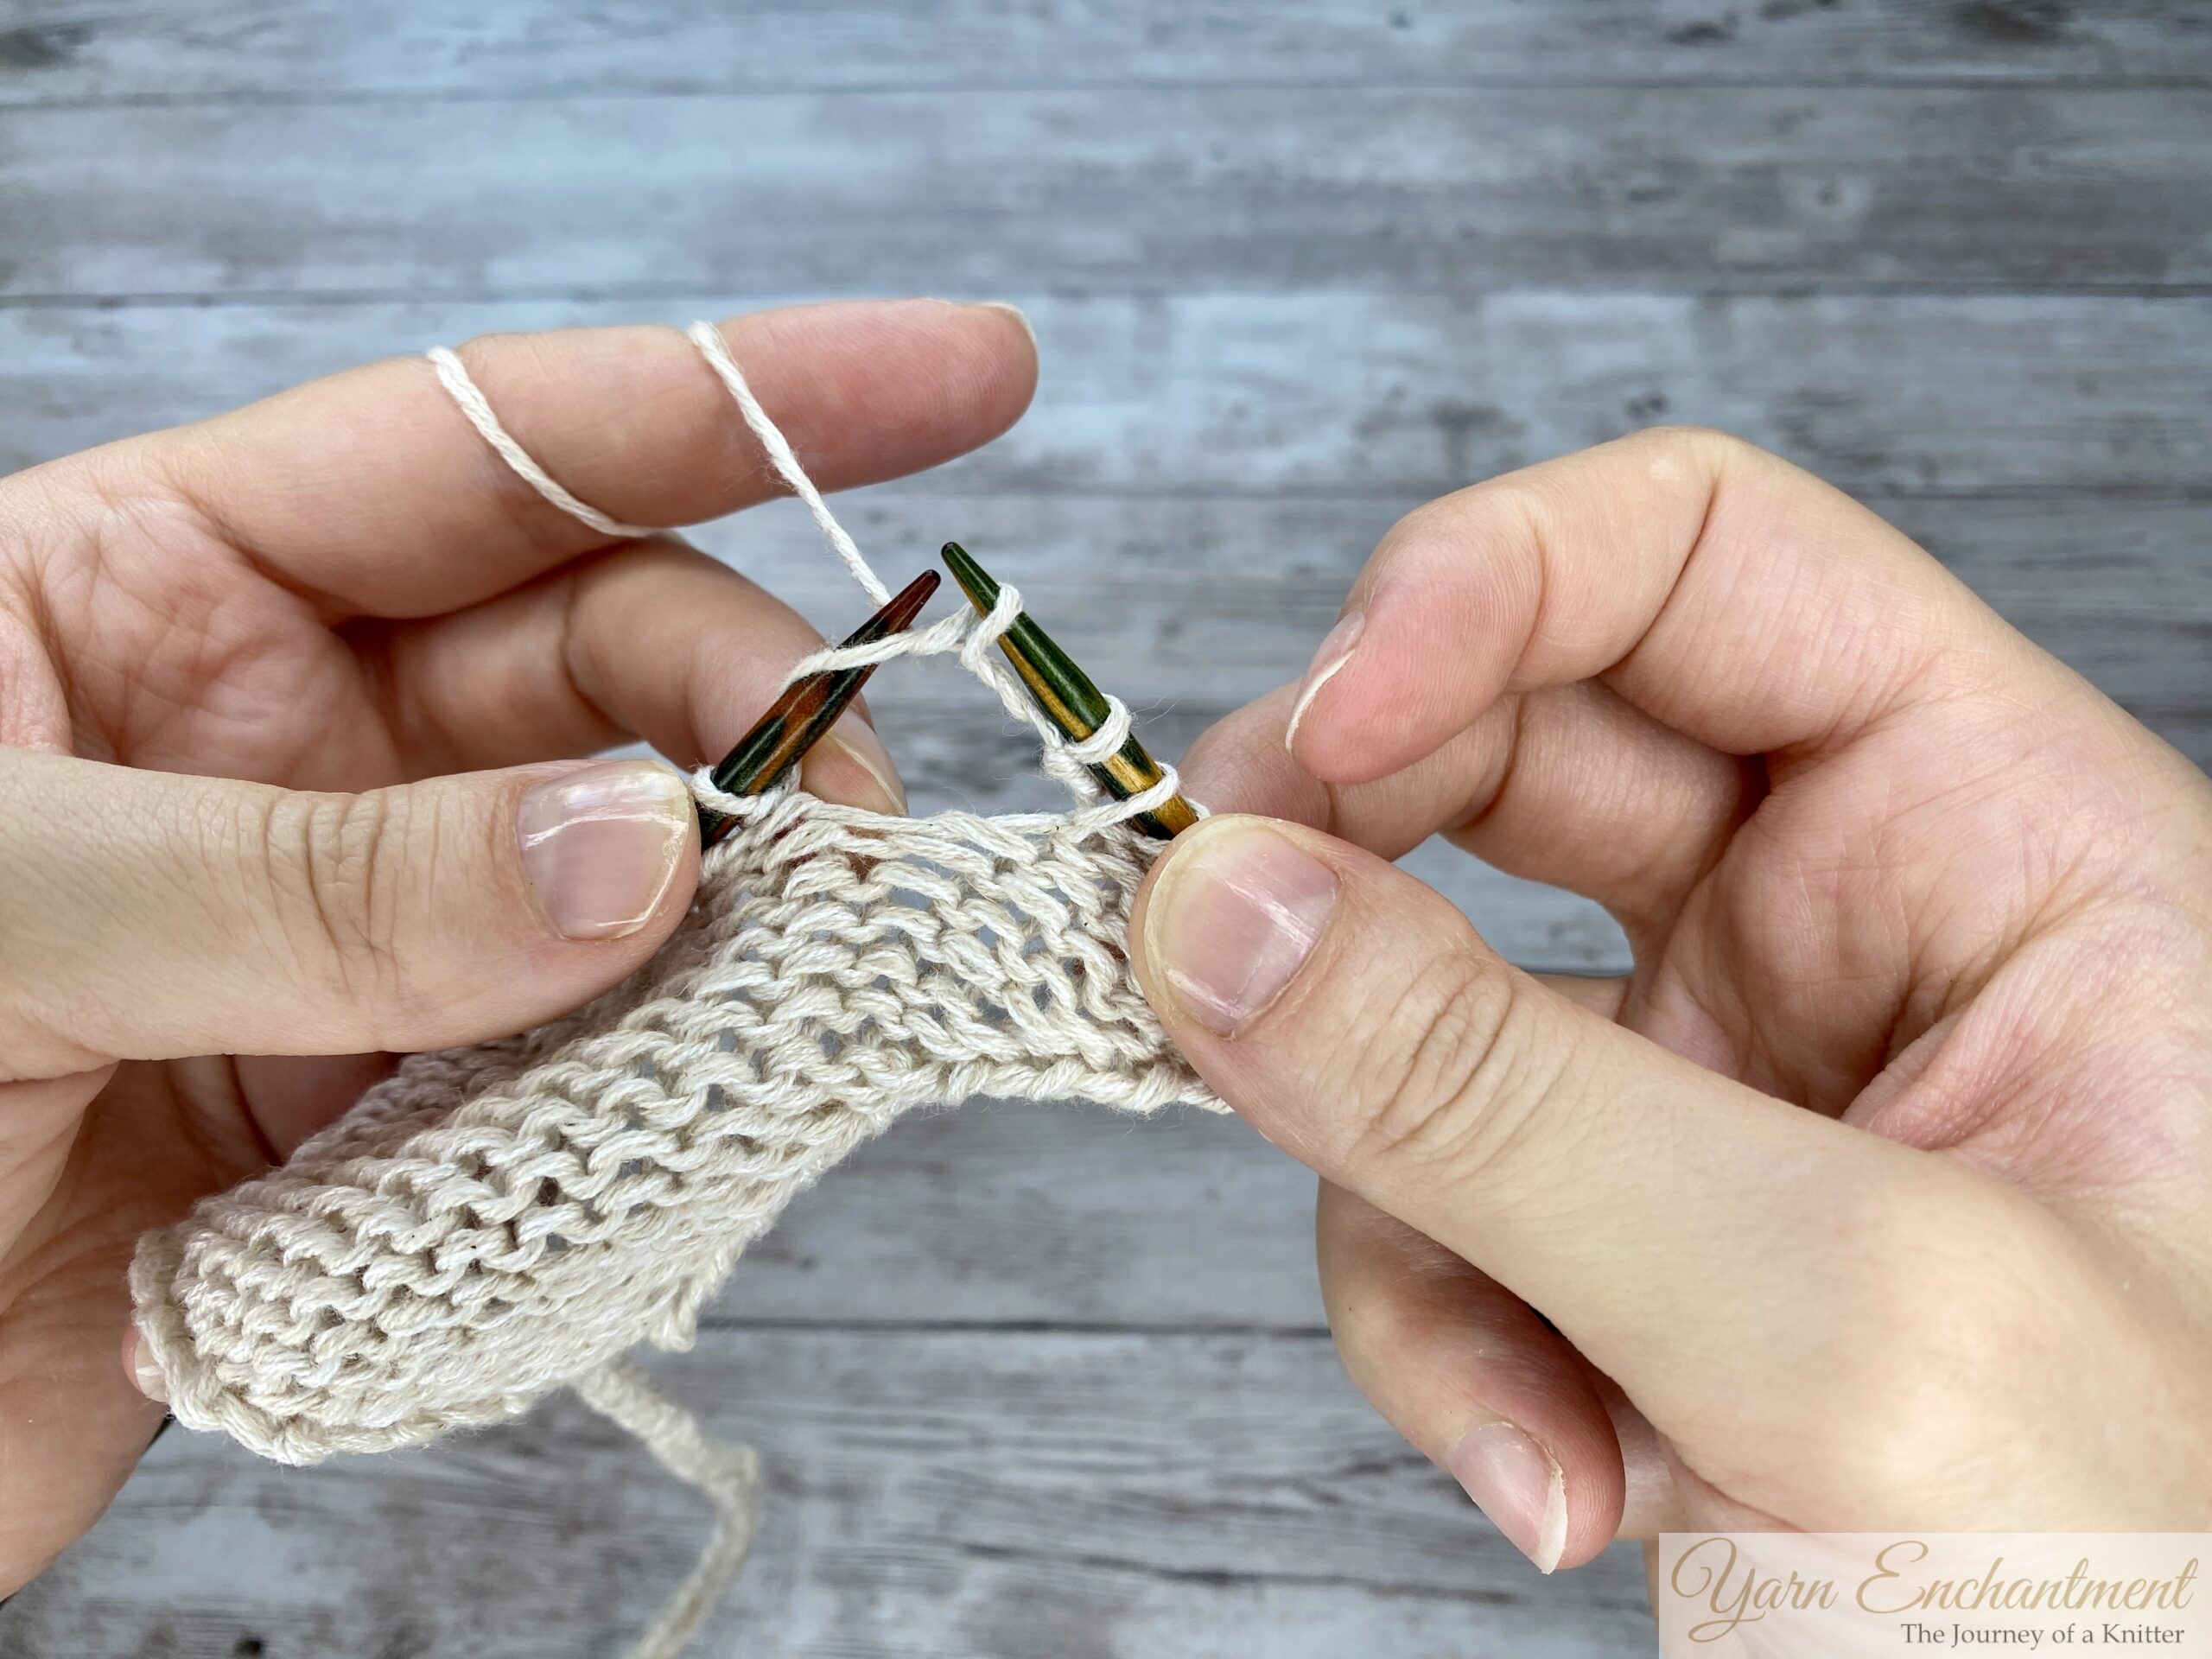

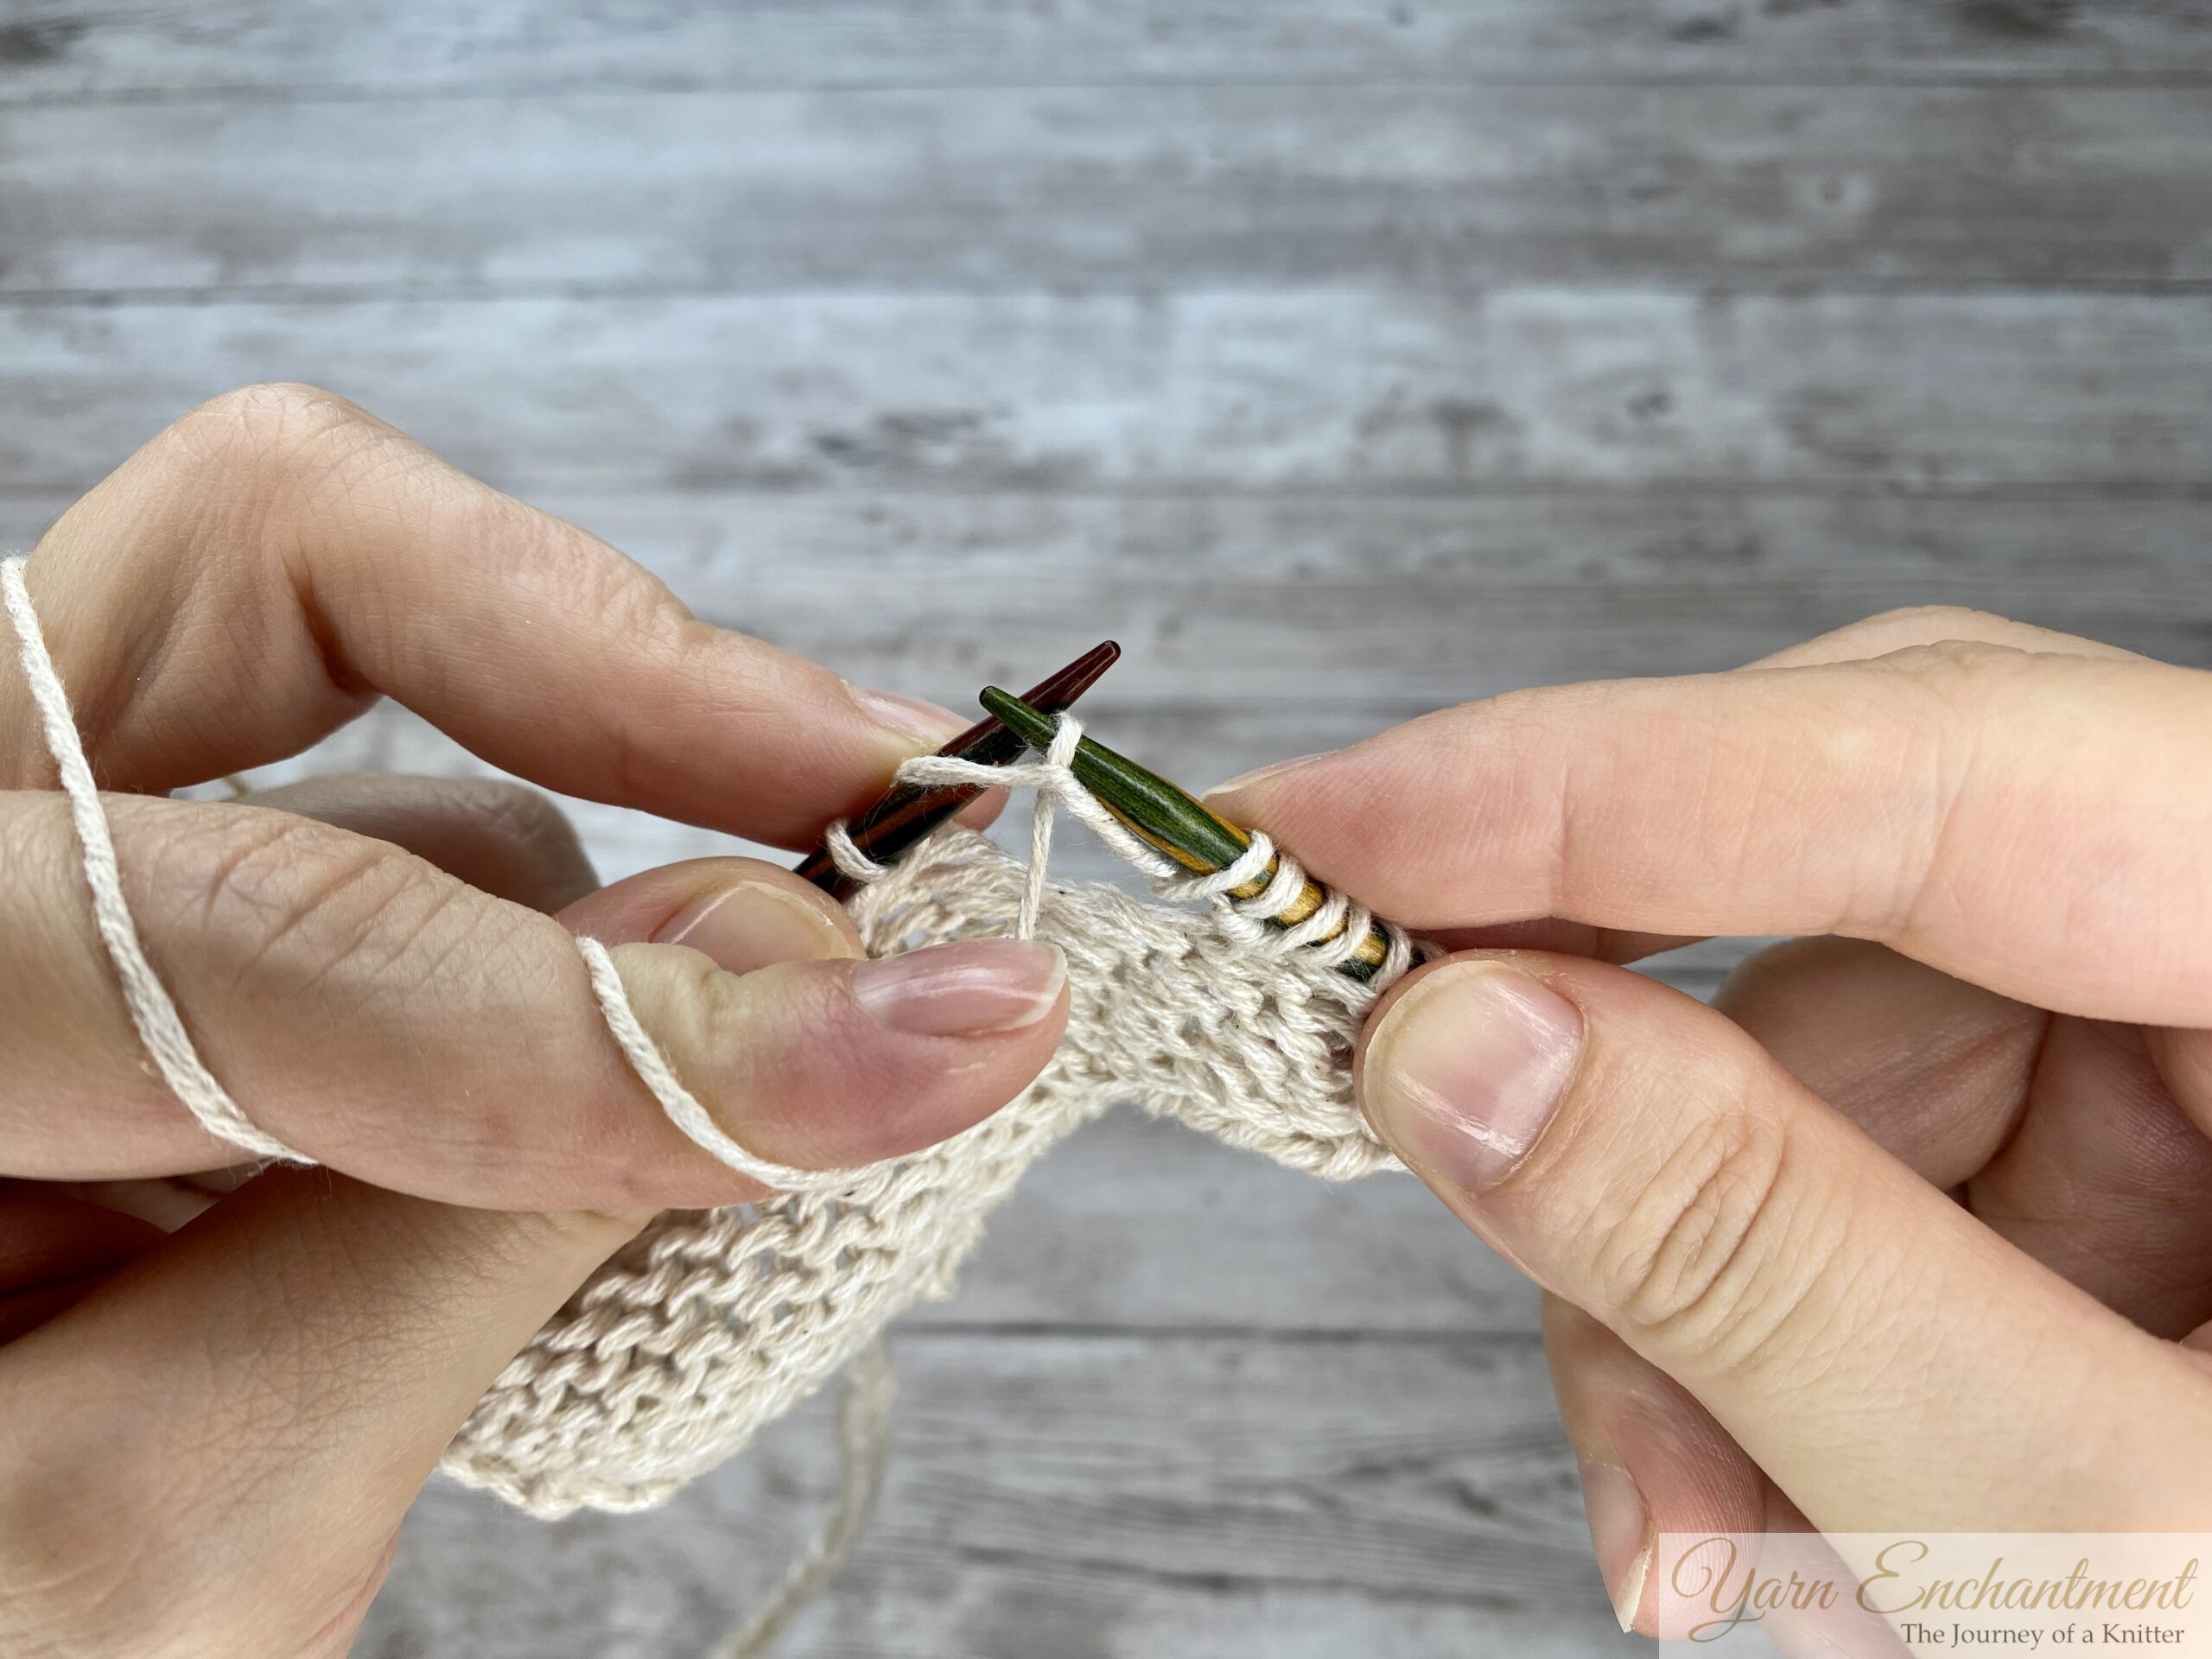

One thing I want to mention. Your tension needs to be consistent when working multiple yarn overs. Those extra loops can feel a bit wobbly on your needle. I find it helpful to place my finger gently on top of the wraps while I work the next stitch to keep everything secure. It feels a little awkward at first, but it becomes second nature really quickly.
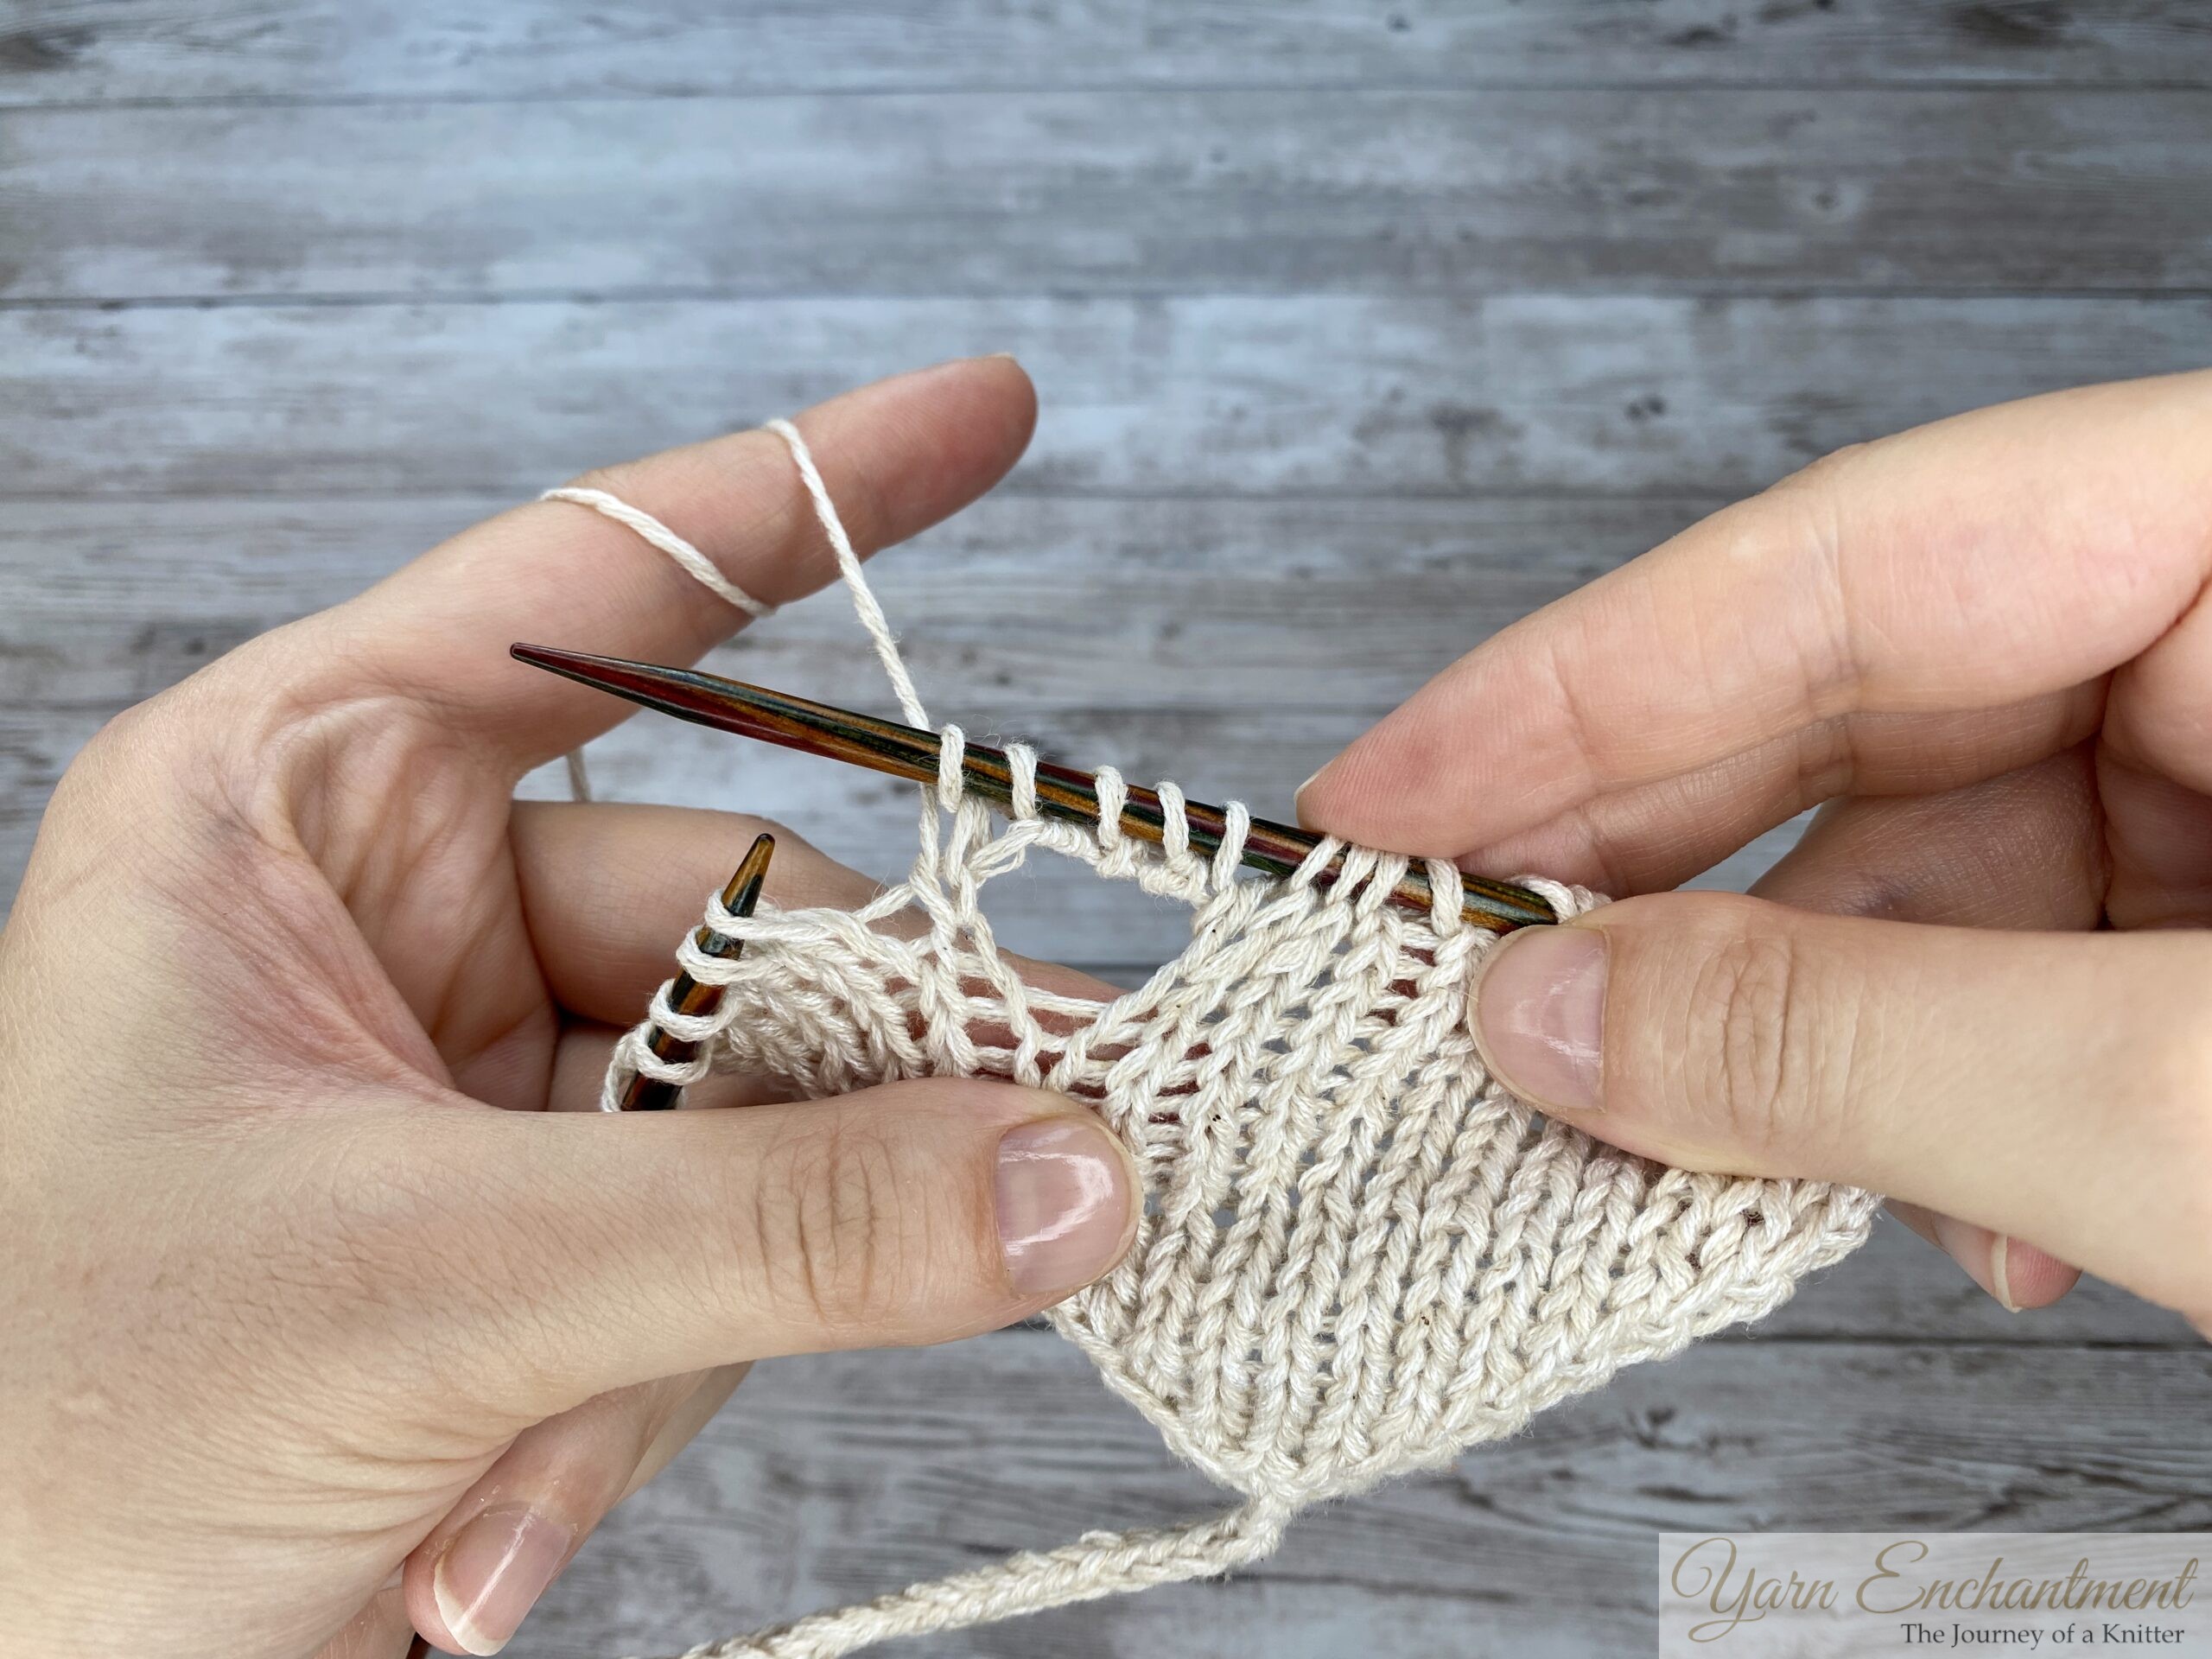
As you can see here, this creates an extra-large eyelet hole, a feature that some designers really love using in their patterns.

Yarn Over Mistakes and How to Fix Them
Even the most experienced knitters run into little issues with yarn overs from time to time. Don't worry - I've made every single one of these mistakes myself! Here are the most common problems and quick fixes for you. I still want to write a separate post about fixing yarn over mistakes in more detail, but this will get you started.
1. The Hole Still Shows (Even After Knitting Through the Back Loop)
Sometimes the hole still shows even after you knit through the back loop. That usually means your twist wasn't tight enough. Try pulling the yarn a bit snugger when you make the yarn over. Or if the stitch feels too tight and puckered, loosen up. It's a balancing act.
It could also be the fiber you are working with. I knitted my swatch with a 100% cotton yarn, and I noticed that the hole in the fabric doesn't close as beautifully as it would with a yarn that has natural elasticity, like wool or wool blends.
Quick fix: On the next row, give the yarn a gentle tug before working the stitch. This can help close the gap.
2. The Yarn Over Disappears or Is Too Loose
If your yarn over seems to vanish or feels overly loose, your tension might be too relaxed. Yarn overs naturally create a bit of slack, but if they're too loose, they can stretch out and look messy.
Quick fix: Try keeping your yarn tension consistent, not too tight, not too loose. And remember, blocking can help even things out!
3. You Wrapped the Yarn the Wrong Way (M1L vs. M1R Confusion)
With the reverse yarn over for M1R, it's easy to accidentally wrap the yarn the wrong way. I've done this more times than I can count!
A good trick: If you're not sure which way you wrapped, look at the stitch on the next row. If the leading leg is at the front, you did a standard YO. If the leading leg is at the back, you did a reverse YO. That tells you how to work it. If you already have the yarn mounted in the wrong direction, take the loop off the needle and insert the needle either from front to back or from back to front for your M1 increases. This will correct the orientation before you work the stitch.
4. You Forgot to Work a Yarn Over
This is one of the most common mistakes! You forgot to create a yarn over, or you dropped it entirely!
Quick fix: Place a stitch marker where you want to work your yarn overs. This will remind you to increase.
To fix a forgotten yarn over, simply place the yarn strand in between your stitches on the needle. A yarn over is this strand, only with a little more slack. Just lift it onto your needle and work it on the next row.
5. You Knit Through the Wrong Leg
When working a closed increase, you need to knit through the back leg. But if you're not paying attention, it's easy to accidentally knit through the front leg instead, leaving that hole wide open!
Quick fix: Take a moment to identify the back leg of the stitch before inserting your needle. If you're unsure, look for the leg that sits behind the needle, farthest away from you. That's the one you want!
6. You Accidentally Added an Extra Yarn Over
This happens to everyone, especially when you're knitting in the round or following a complex pattern. You look down and suddenly you have more stitches than you started with!
Quick fix: Carefully drop the extra yarn over off your needle. It's okay to let it go! Alternatively, if you already worked that YO, knit a knit-two-together (K2tog) to reduce your stitch count back to the correct number.
Frequently Asked Questions
Q: What is the difference between a regular yarn-over and a directional yarn-over?
A: A regular yarn-over simply creates a loop, it's neutral. A directional yarn-over controls whether the increase leans to the left (M1L) or to the right (M1R). This is especially important for lace knitting, like the center spine of a shawl, because it ensures your increases fan out symmetrically and look deliberate rather than sloppy. Once you master this, your lace work will look so much more polished!
Q: Why is my yarn-over making a hole? Is that bad?
A: Not at all! If you're knitting a lace pattern or a decorative shawl, you want that hole. That's called an eyelet, and it's what makes lace so beautiful and airy. The directional yarn-overs (M1L and M1R) shown in this tutorial are designed to create these decorative, open increases. (If you don't want a hole, you would use a standard M1L or M1R using the bar between stitches.)
Q: Does working a yarn-over in the round differ from working it flat?
A: The motion of wrapping the yarn is exactly the same! However, the tension requires a bit more attention when you're knitting in the round. When you work flat, you turn your work, which naturally pulls the yarn-over tight. In the round, you're constantly knitting forward, so you don't get that natural tug. My advice? Pay close attention to the yarn tension on the stitch immediately after your YO to ensure the eyelet stays the same size as the rest of your lace holes.
Q: How do I keep my yarn-over from slipping off the needle when I knit the next stitch?
A: The yarn over can feel a bit loose and wobbly, especially when you're first learning. Simply place your finger gently on top of the yarn over to hold it in place while you knit the next stitch. This keeps it from slipping off the needle before you're ready to work it.
Once you've knit that next stitch, the yarn over will be securely anchored and you can relax. It becomes second nature after a few rounds, I promise!
Q: Can I use this technique with any yarn?
A: Yes, but with one little caveat! I noticed when I knitted my swatch with 100% cotton yarn that the holes didn't close as beautifully as they did with wool or wool blends. Natural elasticity makes a big difference! If you're using cotton or other inelastic fibers, you might need to adjust your tension or accept that the holes will be a bit more visible. It's always a good idea to swatch first!
Conclusion
Well, my friends, we've covered a lot of ground together! From simple yarn overs to invisible increases, open eyelets, and even directional M1L and M1R increases, you now have a whole new set of tools in your knitting toolkit.
I hope you've enjoyed this deep dive into the world of yarn overs. Whether you're shaping a top-down raglan sweater, adding lace details to a shawl, or simply experimenting with a swatch, remember that every stitch holds a tiny decision. And now, you have the knowledge to make that decision with confidence.
We're not done yet! Next time, I want to talk about yarn overs in lace knitting, how to use them to create beautiful, airy fabrics, how to read lace charts, and how to fix mistakes when they happen (because they will!). So stay tuned for that, I promise it will be just as fun as this one!
Which method will you try first? Will you go for the invisible closed increase, the decorative open eyelet, or are you ready to tackle directional M1L and M1R? I'd love to hear from you! Drop a comment below and share your experience, or let me know if you have any questions I didn't cover.
And if you know a knitting friend who might find this post helpful, please share it with them. After all, knitting is better when we learn together!
Until next time, happy knitting!
Ready to keep practicing and build your confidence? This guide is part of a cozy lace series. If you would like to explore eyelets and shaping even further, take a peek at these companion guides:
[How to Knit Yarn Over Increases]: A step-by-step tutorial on creating clean, open eyelets with ease.
[Yarn Overs in Lace Knitting]: Discover how simple yarn overs work together to create airy, delicate textures in your favorite projects.
[How to Read Lace Charts]: Your beginner-friendly guide to learn and understand how to read lace carts.
A Little Way to Say Thanks
Yarn Enchantment is my cozy hobby corner on the internet. If something here made your knitting day easier or you simply enjoy reading my posts and would like to say thank you, you can leave a small Ko-fi tip - but only if you truly want to.
My patterns and tutorials stay free for everyone, always. Every little tip just goes toward new yarn and a cup of tea for my cozy knitting evenings.
☕ Support me on Ko-fi
You Might Also Like


 |
|
Join the Cozy Corner Newsletter
Hello, creative soul. Welcome to the Yarn Enchantment Newsletter, a little space where we celebrate all things cozy, crafty, and full of heart. Think of this as your friendly crafting companion, a soft dose of inspiration delivered straight to your inbox, just for you. Each newsletter brings you: ✨ Notifications about new patterns and tutorials – easy knitting patterns and beginner crochet projects you won’t find anywhere else 🧶 Practical yarn tips for new crafters, plus advice on the best yarn for fall, blankets, and handmade gifts 💌 Small stories and adventures from my own workbench, because crafting is as much about the journey as the finished piece Whether you’re knitting by the fire, looking for your next creative spark, or simply wanting a quiet moment with your hooks and needles, this newsletter is here to cheer you on. Crafting isn’t just about the final project. It’s about the joy, the peace, and the stories we weave along the way. So grab a cup of tea or coffee, settle in, and join me. Together we’ll make a little magic, one stitch and one story at a time. I’m so glad you’re here. Let’s create something beautiful together. Sign up below to receive your first email, and feel free to leave a comment on the blog if there’s a topic you’d love to see covered. Your ideas might just become our next newsletter feature. |


