

Knit an Accurate Gauge Swatch in the Round Every Time
January 28, 2026
The Blushbow Beanie – A Crochet Hat Story About Handmade Gifts
February 7, 2026Do You Need Borders on a Gauge Swatch? How Garter Edges Distort Knitting Gauge

Originally published on February 5, 2026
Several years ago I was sitting in our local craft store, happily knitting a gauge swatch for a new sweater. Suddenly a kind voice behind me asked, “Will you knit a border all the way around the body of your sweater, too?” My answer was of course no, so she gently continued, “Then why add a border to your gauge swatch and trust those numbers for a borderless sweater?” I was stunned and didn’t know what to say, but she kindly took the time to teach me, and today I want to share what I learned about borders on gauge swatches with you.
A border on a gauge swatch is often presented as harmless – just a neat frame to stop the edges from curling. But borders are not neutral, and for sweaters and other fitted garments they can quietly distort both your stitch and row gauge. In this post, I want to walk you through why that happens, when borders are still useful, and why I now prefer larger, borderless gauge swatches for any “serious” knitting gauge work.
 | Bordered vs Borderless Knitting Gauge Swatches |
Table of Contents
- Why Borders Seem So Helpful on Swatches
- How Different Stitch Patterns Change Gauge
- What Borders Really Do to Your Gauge Swatch
- When a Gauge Swatch Border Is Still Useful
- Why I Prefer Larger, Borderless Gauge Swatches
- So… Should You Stop Adding Borders to Gauge Swatches?
Why Borders Seem So Helpful on Swatches
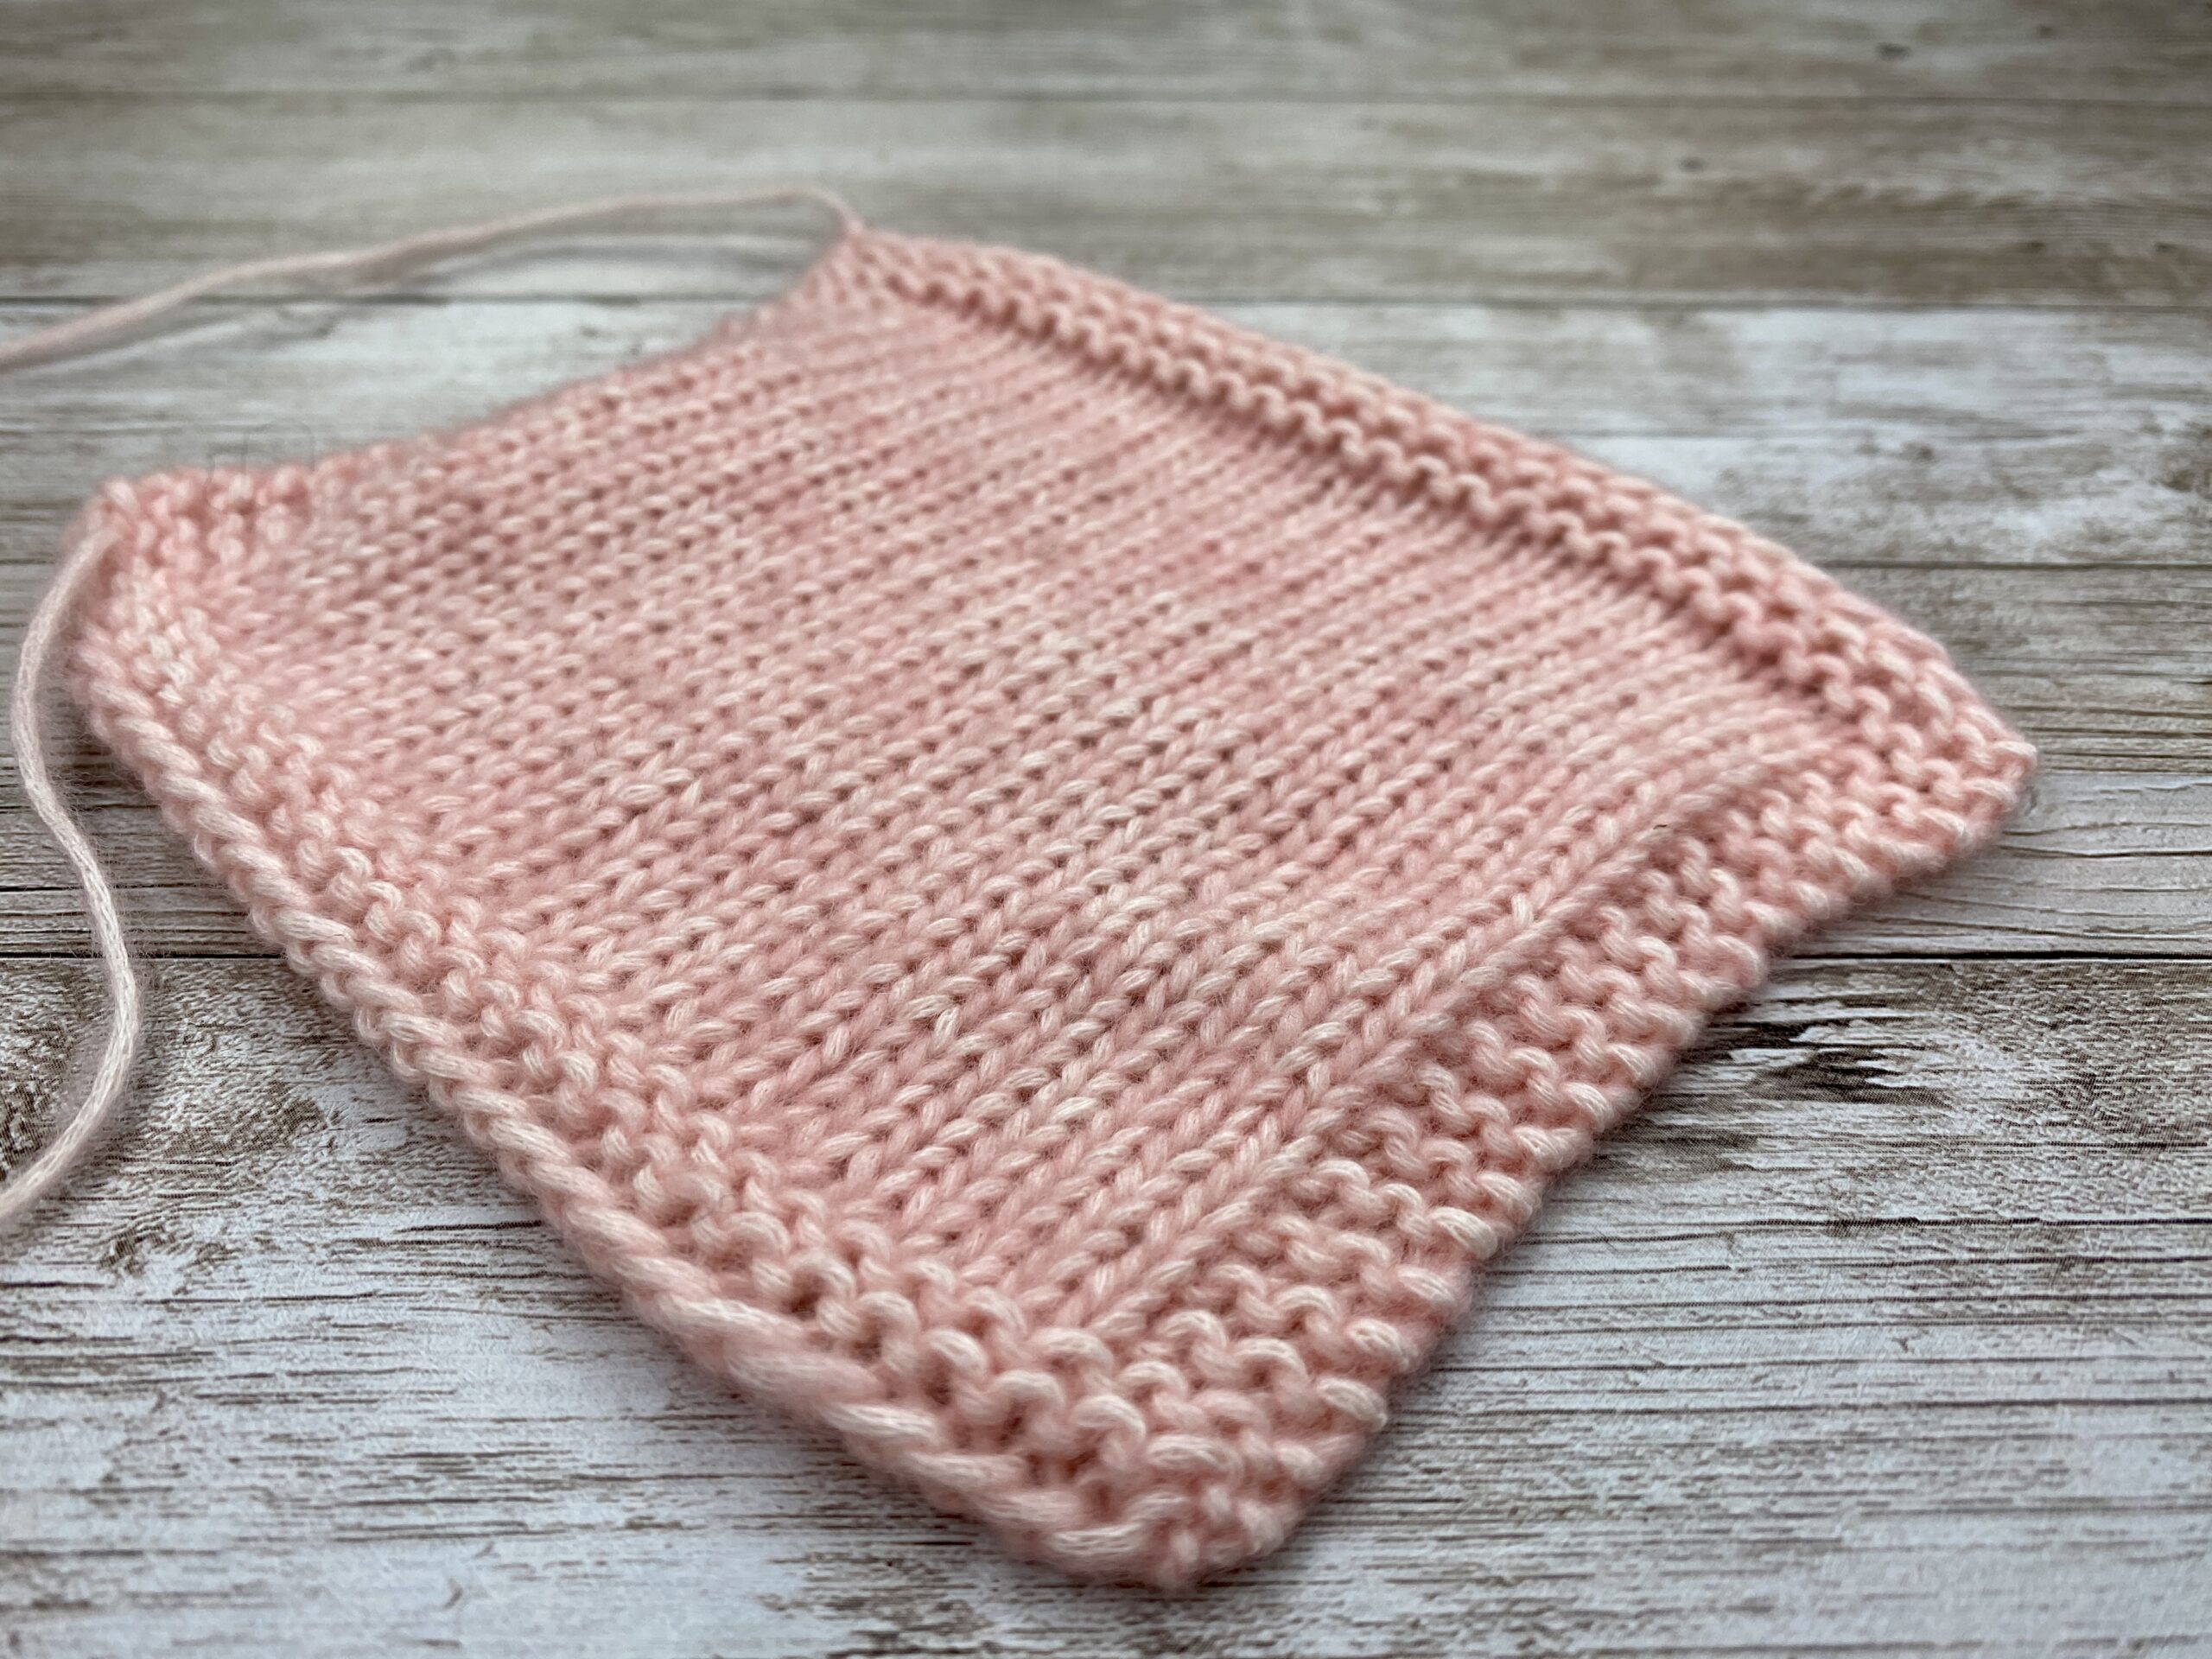
If you flip through most knitting books or tutorials that talk about gauge swatches, you’ll usually see the same picture‑perfect square: stockinette in the center, wrapped in a tidy garter or seed stitch frame.
The idea behind this border is straightforward:
-
It keeps the swatch from curling at the edges.
-
It helps the fabric lie flatter, which makes counting stitches a bit easier.
-
It gives you a nice, photogenic square that feels “finished”.
For pretty photos, that’s all very convenient. In theory, the border is just a frame around the “real” fabric where you measure your knitting gauge. But in practice, that frame is part of the fabric system. It pulls, it pushes, and it can absolutely change the numbers you get from your gauge swatch.
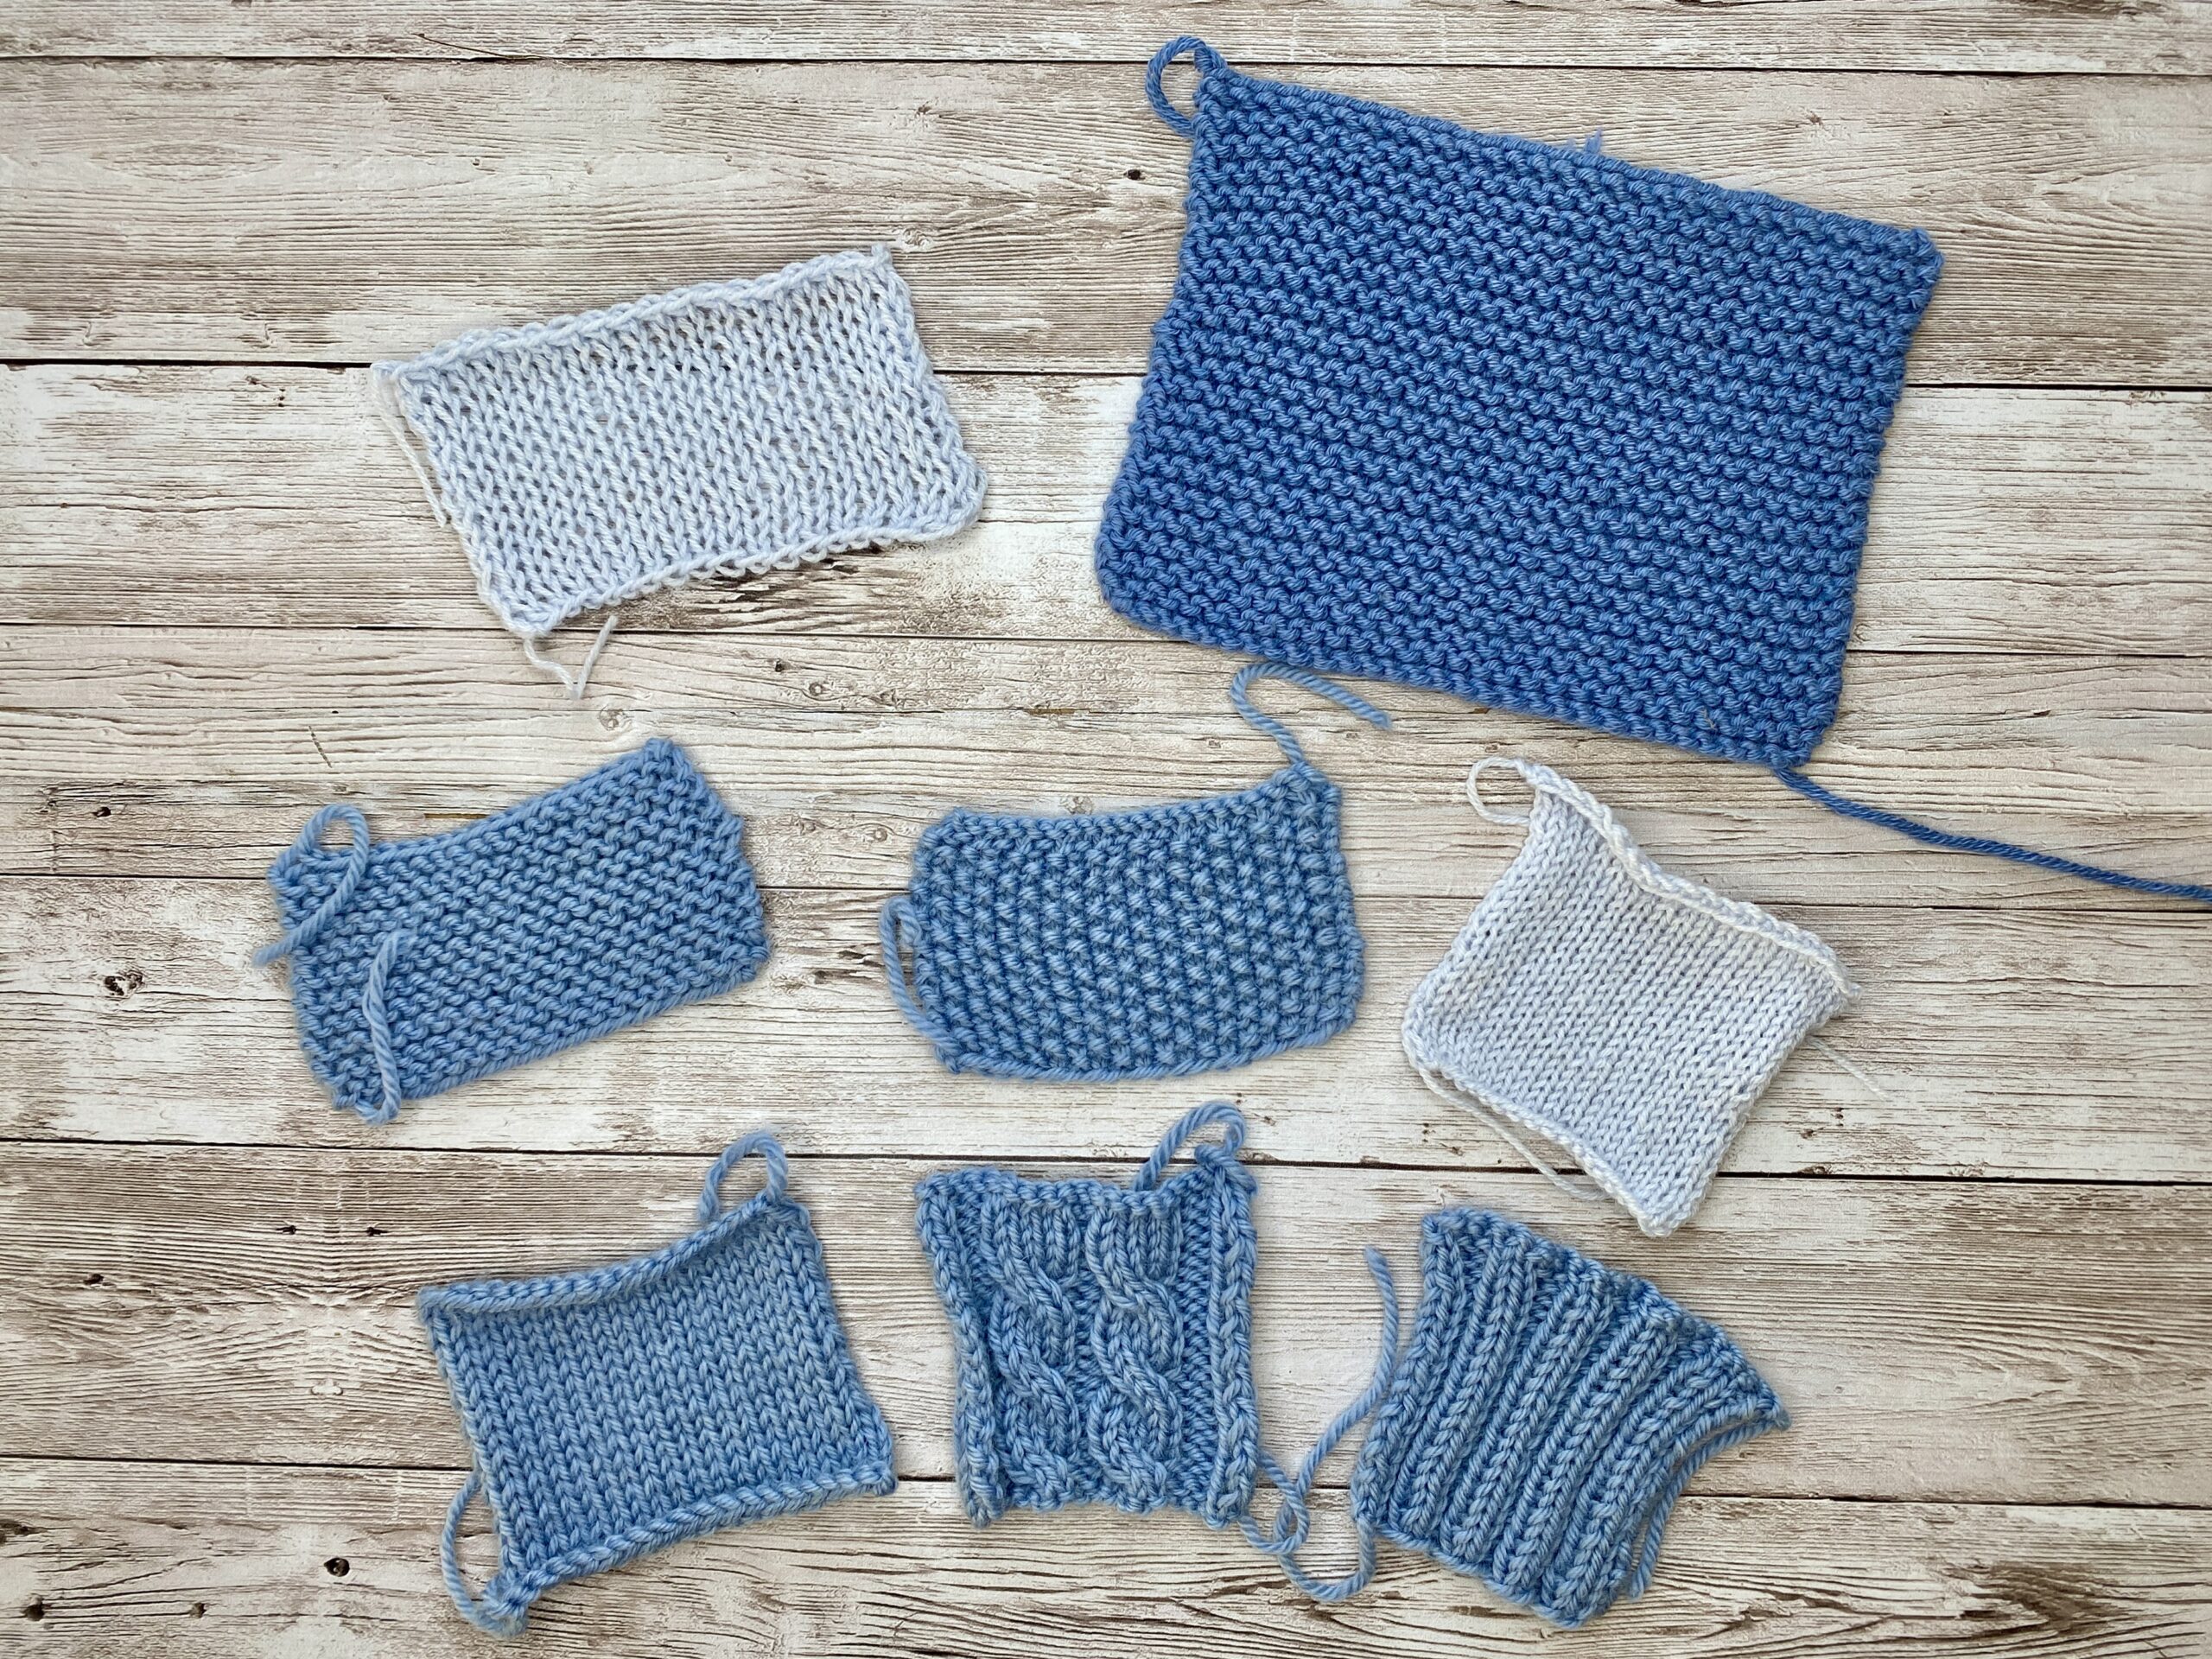 | Different borderless knitting gauge swatches in various stitch patterns, showing how rib, cables, garter, seed stitch, and stockinette all have their own natural gauge. |

How Different Stitch Patterns Change Gauge
When you read the instructions for a gauge swatch, almost every designer will tell you to knit your swatch in pattern.
We do this because every stitch pattern behaves differently on the needles, even if you keep the same yarn and needle size.
Cables, for example, naturally pull the fabric in and make it narrower, while something like garter stitch or seed stitch often spreads out and gives you a different row gauge than stockinette.
So before we even talk about adding a border, it’s important to remember that the stitch pattern itself already changes your gauge and how the fabric will behave in the finished garment.
Now lets take a closer look at a few small swatches, all worked with the exact same number of cast on stitches and rows.
 |  | In the middle I have a plain stockinette stitch gauge swatch, and to the left I placed a seed stitch swatch, while on the right I added a garter stitch swatch. All of them have the same number of stitches and rows, yet you can clearly see how the stitch pattern changes the height of the fabric. | Here I wanted to show you the width: while the seed stitch swatch has about the same width as the stockinette swatch, you can see that the garter stitch swatch is a little bit wider than the stockinette stitch swatch. |


 | 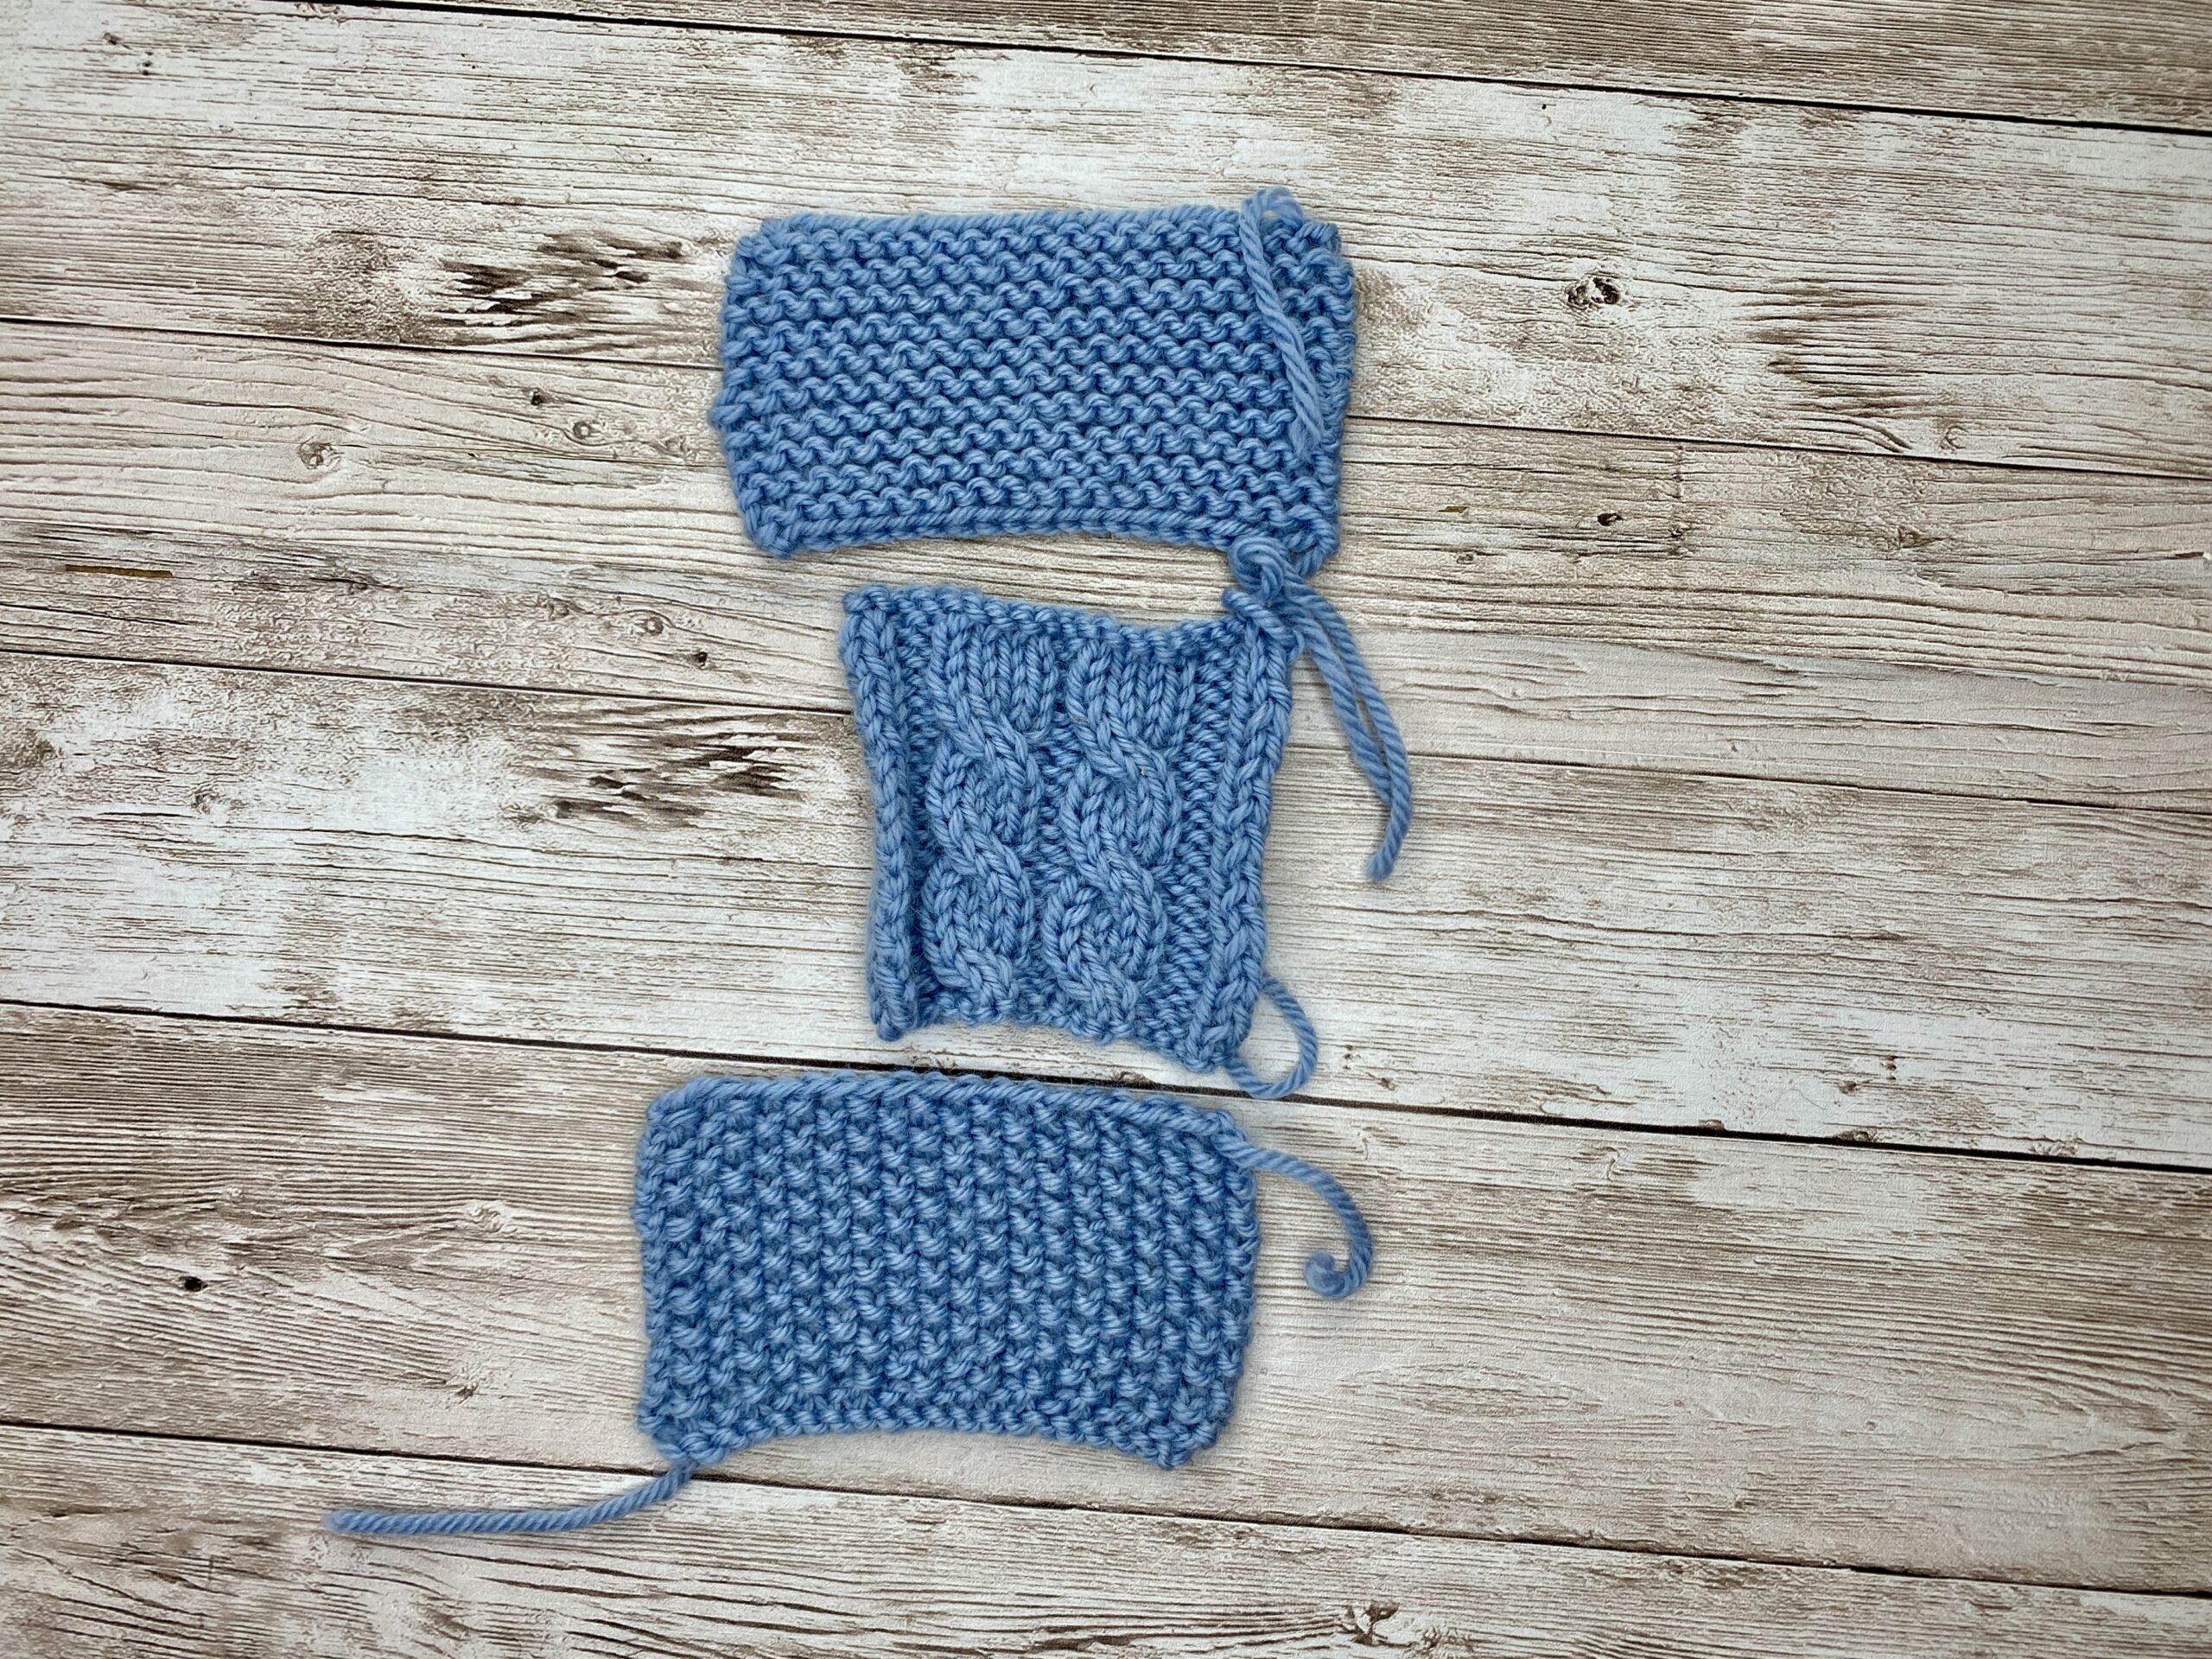 | Now let’s add a little more texture. I worked a cable swatch and placed that in the middle, with the seed stitch swatch on the left and the garter stitch swatch on the right. We have a very noticeable height difference here. | The cable stitch pattern is known for creating a narrower fabric, and you can clearly see how much wider both the seed stitch and garter stitch swatches are compared to the cable swatch. |


If you lay them side by side, you’ll usually see that the garter or seed stitch swatch has a very similar stitch gauge to stockinette – the same number of stitches across the same width – but it’s often noticeably shorter for the same row count.
The dense textured or cable swatch is often narrower than stockinette for the same number of stitches, and its row gauge can be different again, depending on how compressed or three‑dimensional the pattern is.
So even before borders enter the picture, we already have three fabrics with three different personalities.
As soon as you add a border in a different stitch pattern around your main fabric, you’re no longer measuring just one behaviour – you’re measuring a blend of all of them.
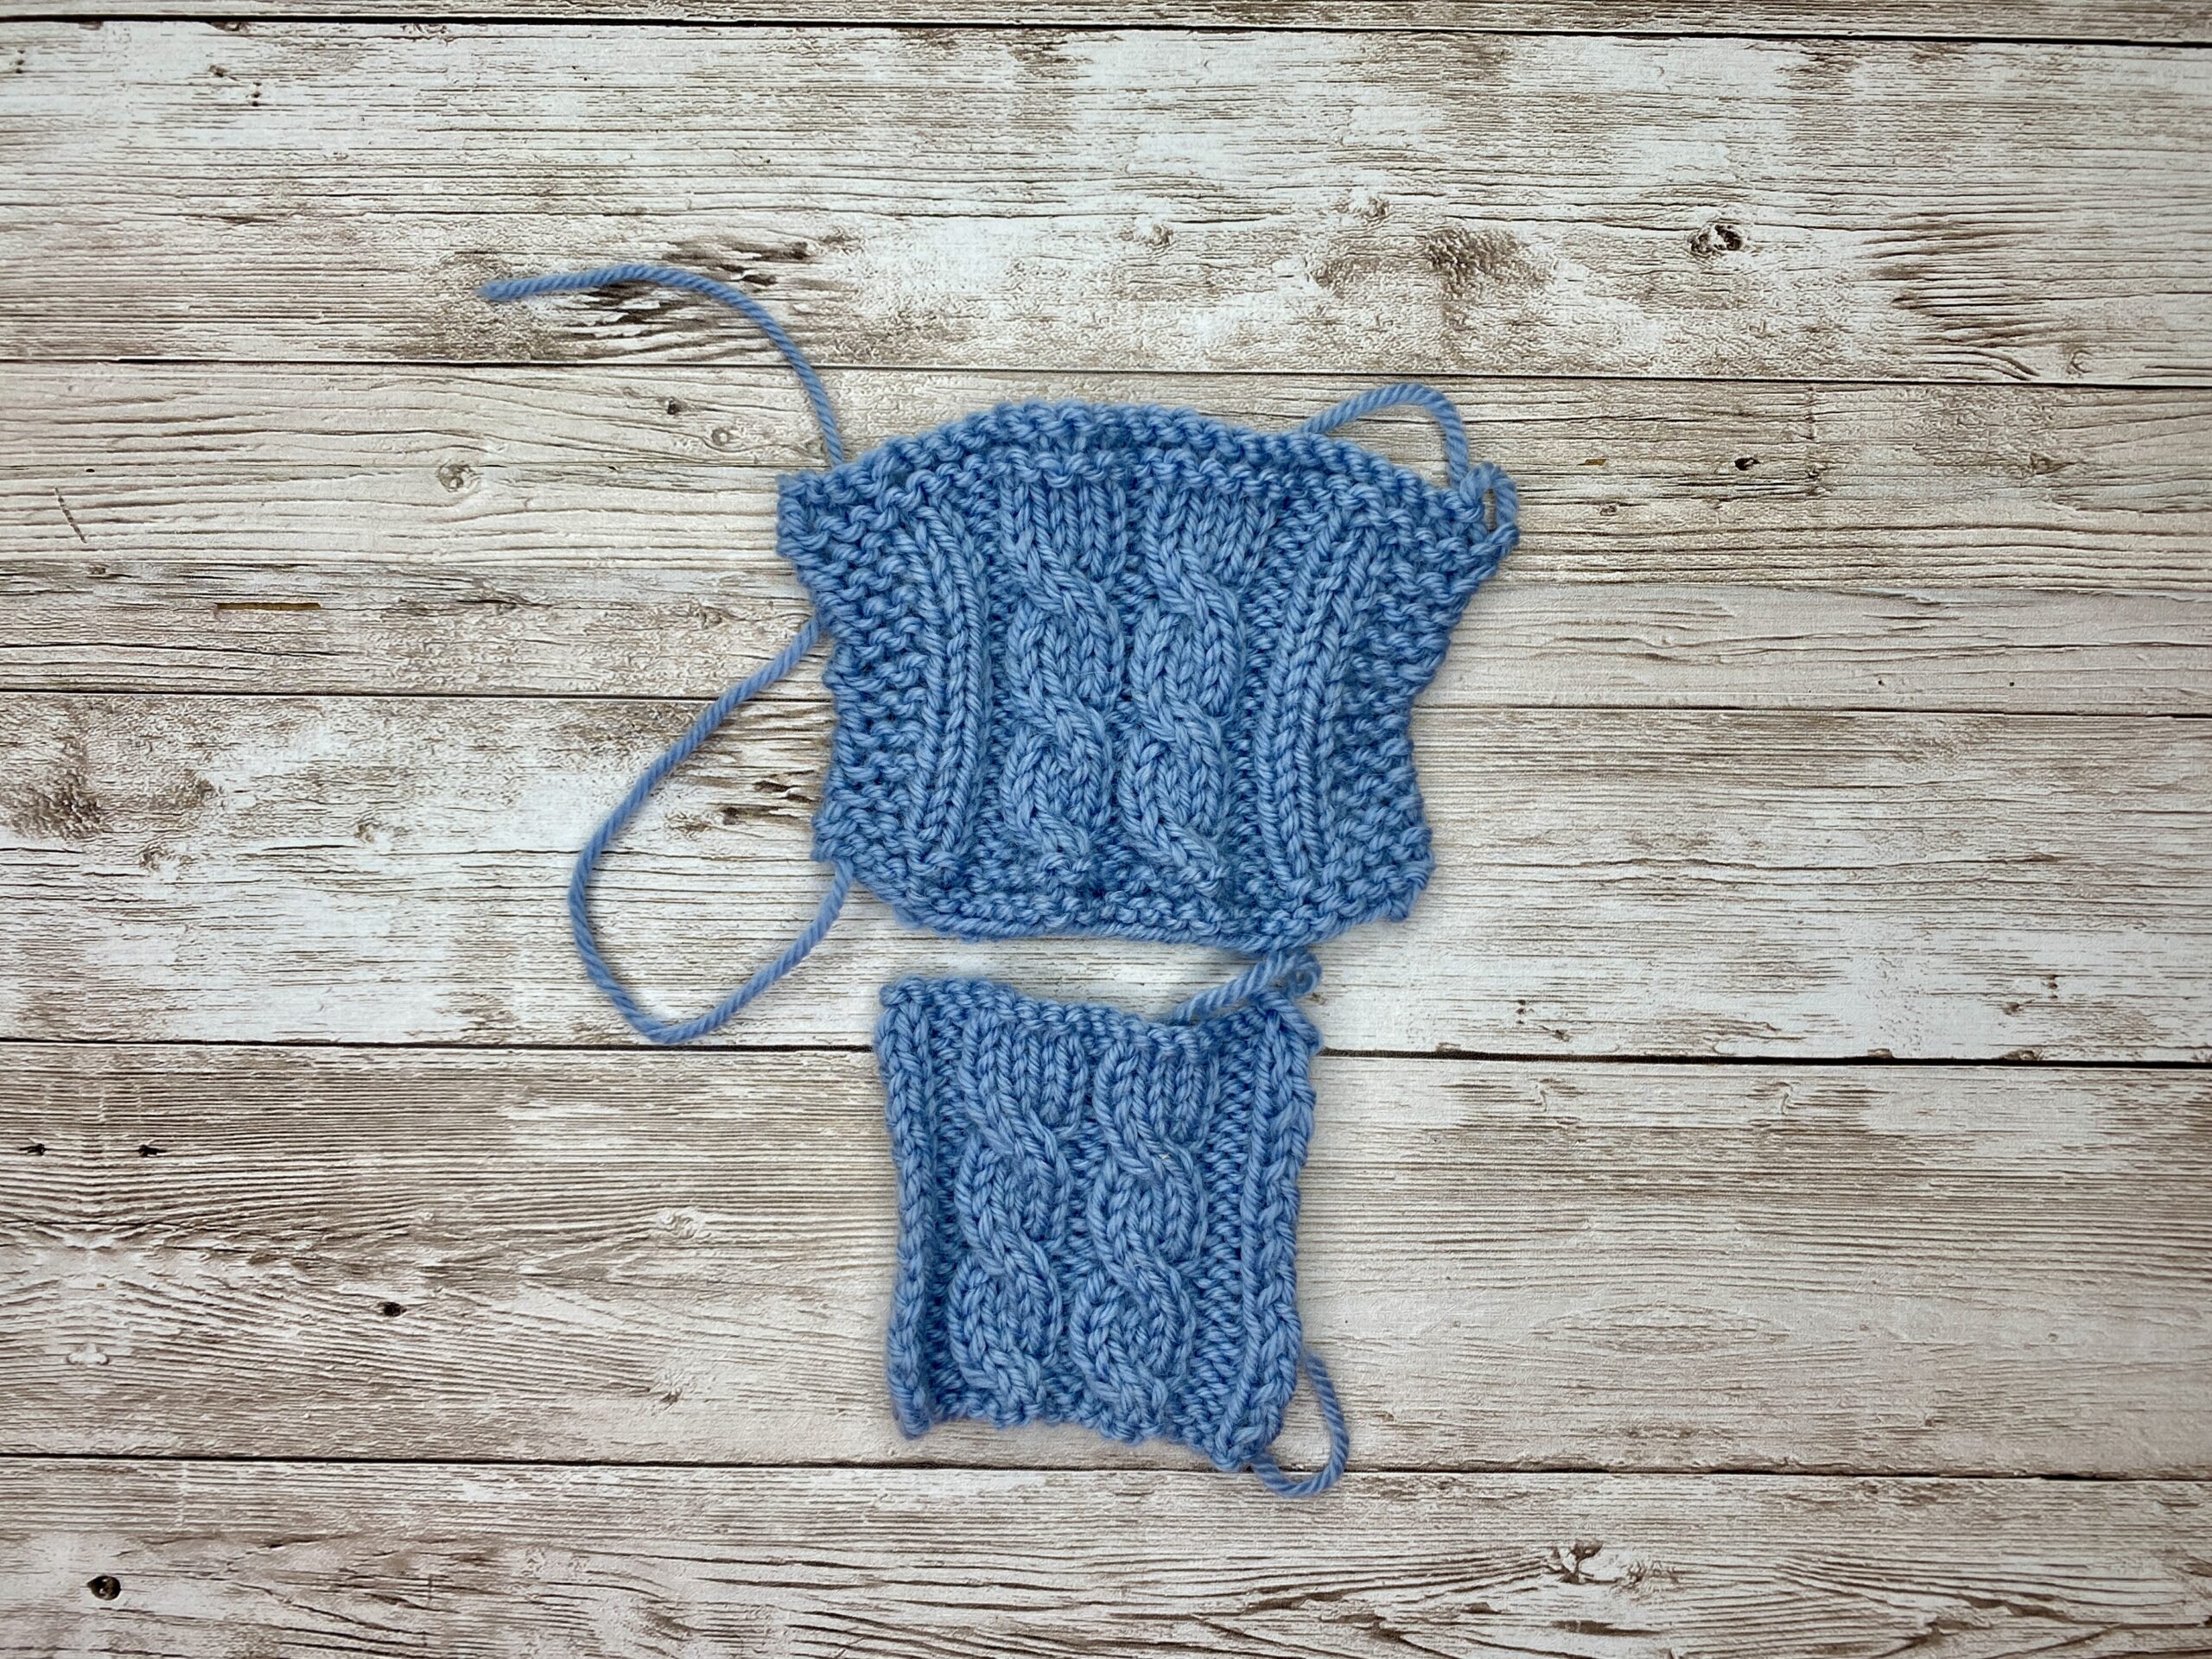 | When we mash everything together in one swatch – a cable panel with a garter stitch border – you can see how the garter stitch tries to pull everything tighter in height while it flares out at the top and bottom. I don’t think this swatch will ever give us an honest measurement. Do you? |

What Borders Really Do to Your Gauge Swatch
Now that we’ve seen how even small changes in stitch patterns alter gauge, let’s see what happens when those contrasting fabrics meet at the swatch edges. In other words, what do knitting gauge swatch borders really do to your fabric - and how does a borderless swatch give a more accurate gauge?
Say you knit two gauge swatches in the same yarn and on the same needles:
Version A: borderless swatch
Just the actual stitch pattern you plan to use in your project (stockinette, cable, texture, etc.), from edge to edge. A simple cast‑on and bind‑off, no decorative border at the sides.
Version B: bordered swatch
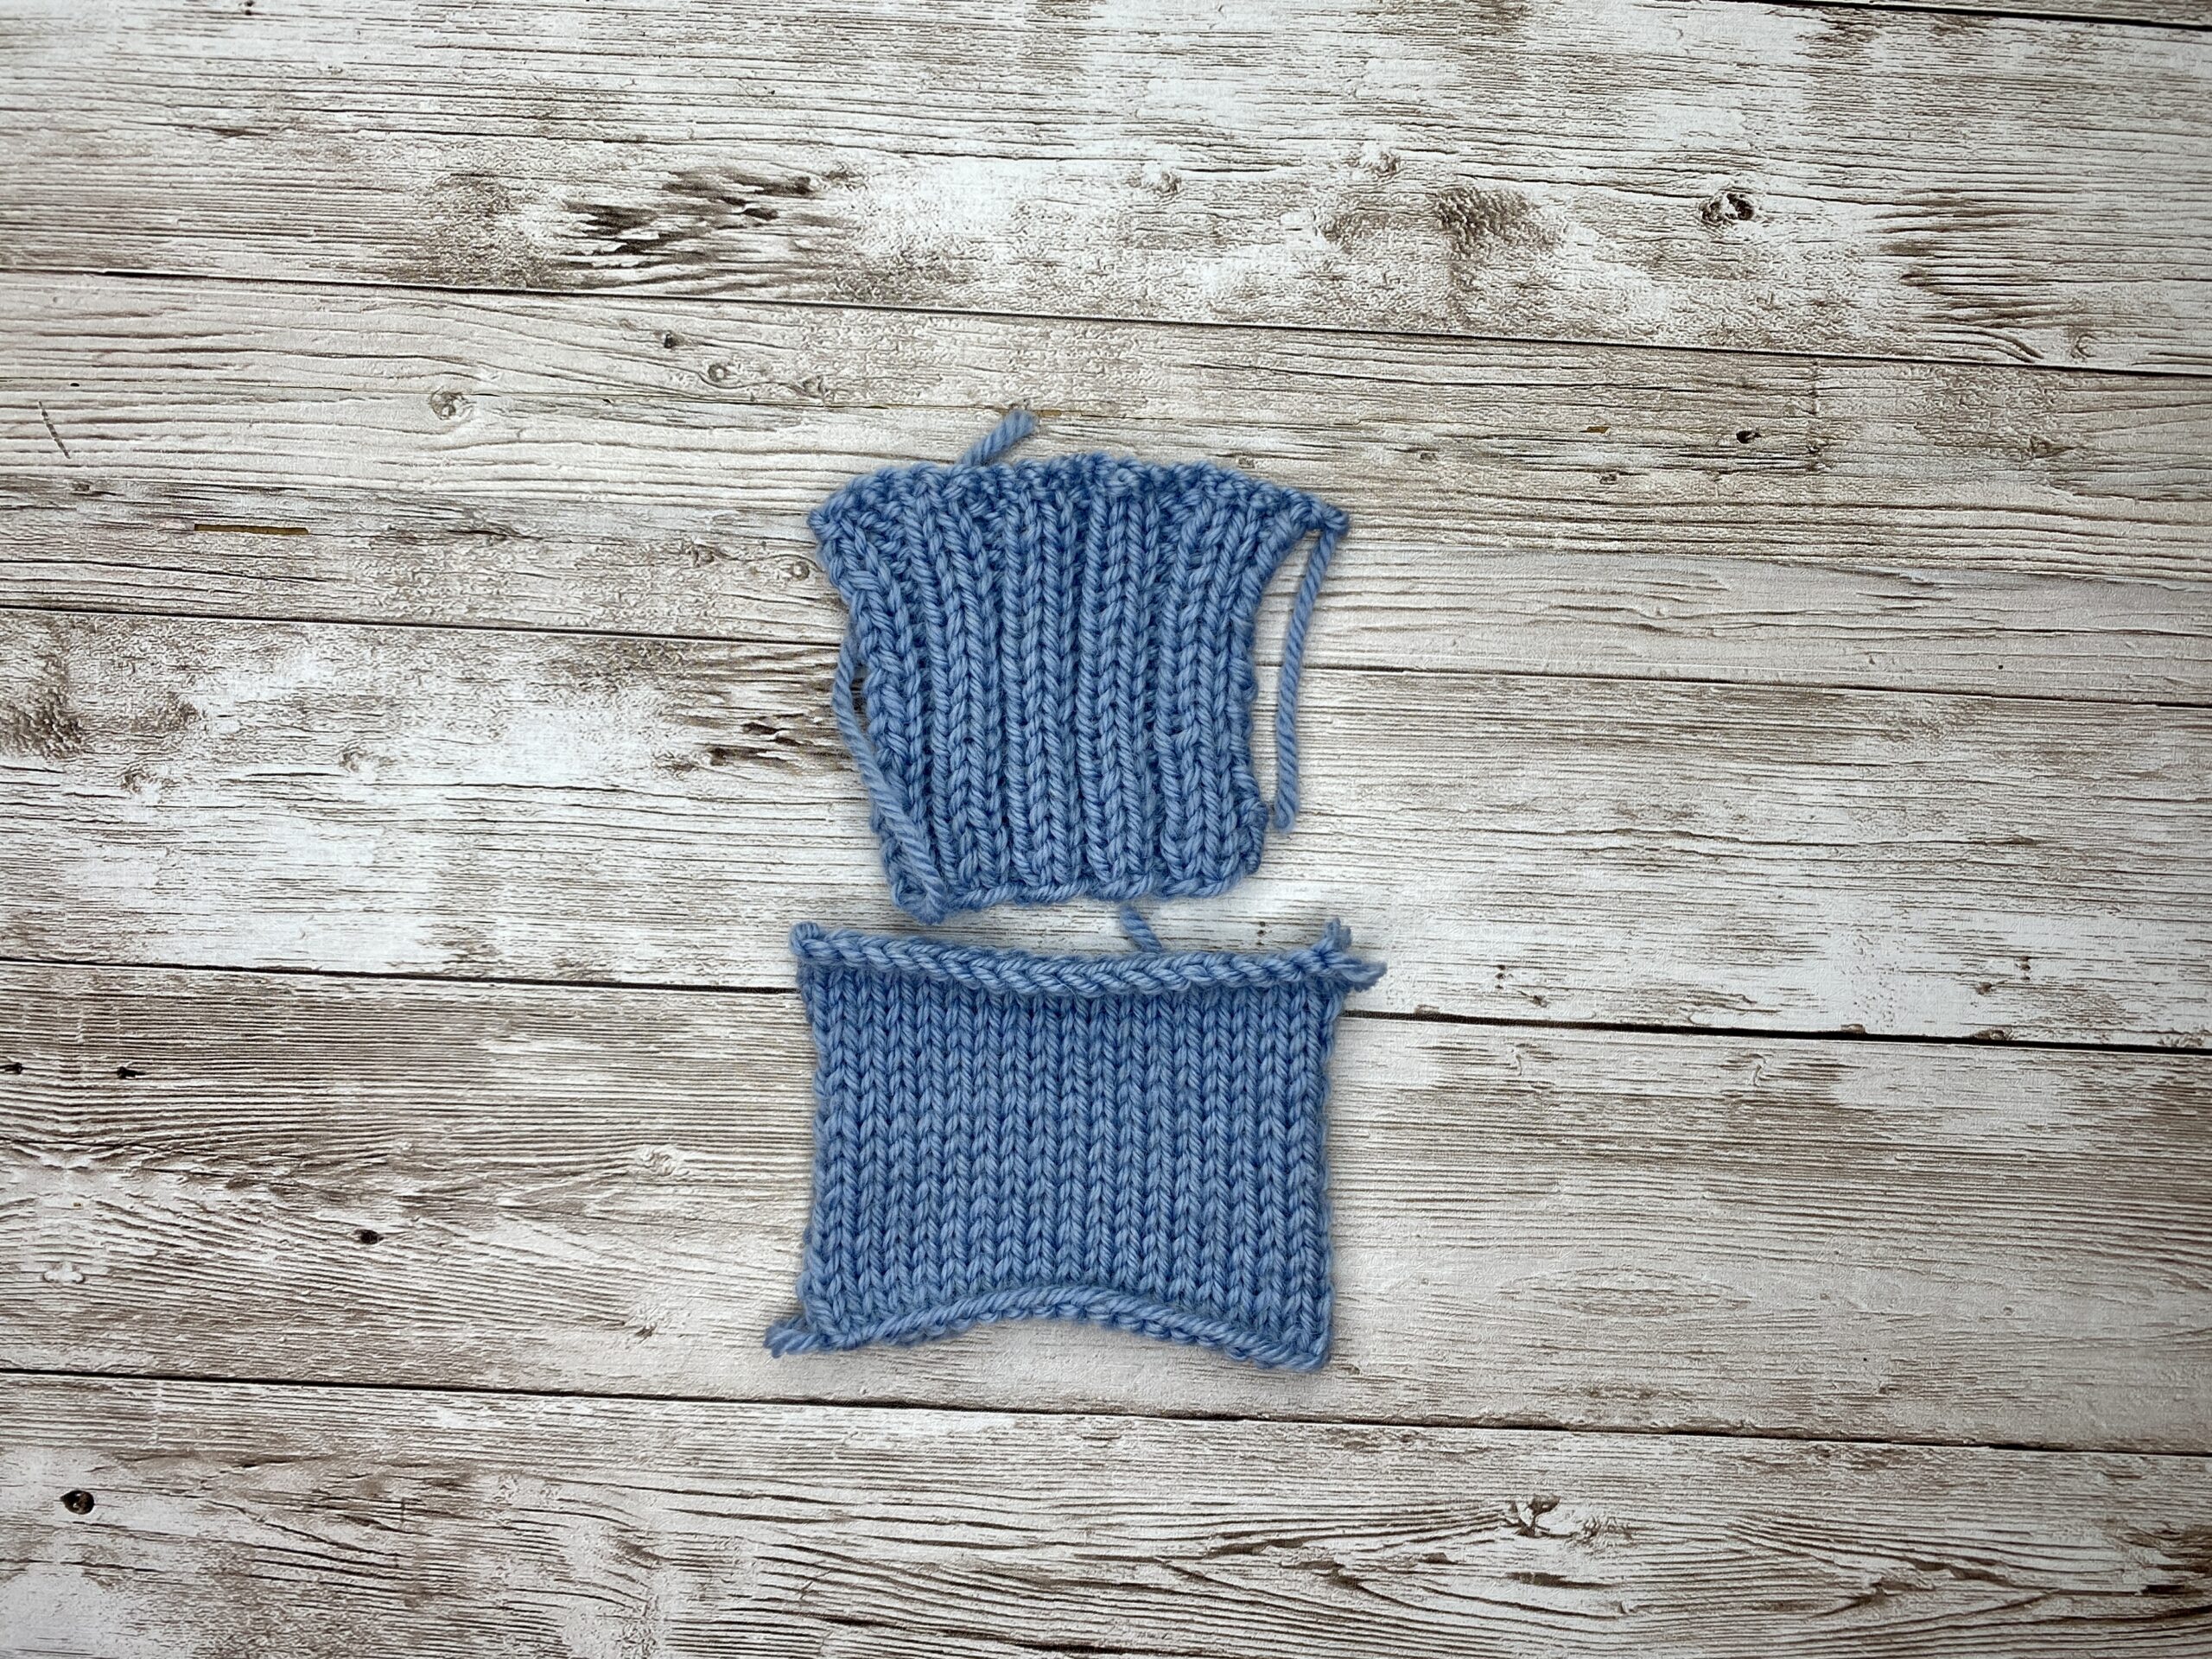
The same stitch pattern in the center, but with a garter stitch or seed stitch border worked along both sides (and often top and bottom as well). You cast on the same number of center stitches, knit the same number of rows, and block them at the same time. Then you compare.
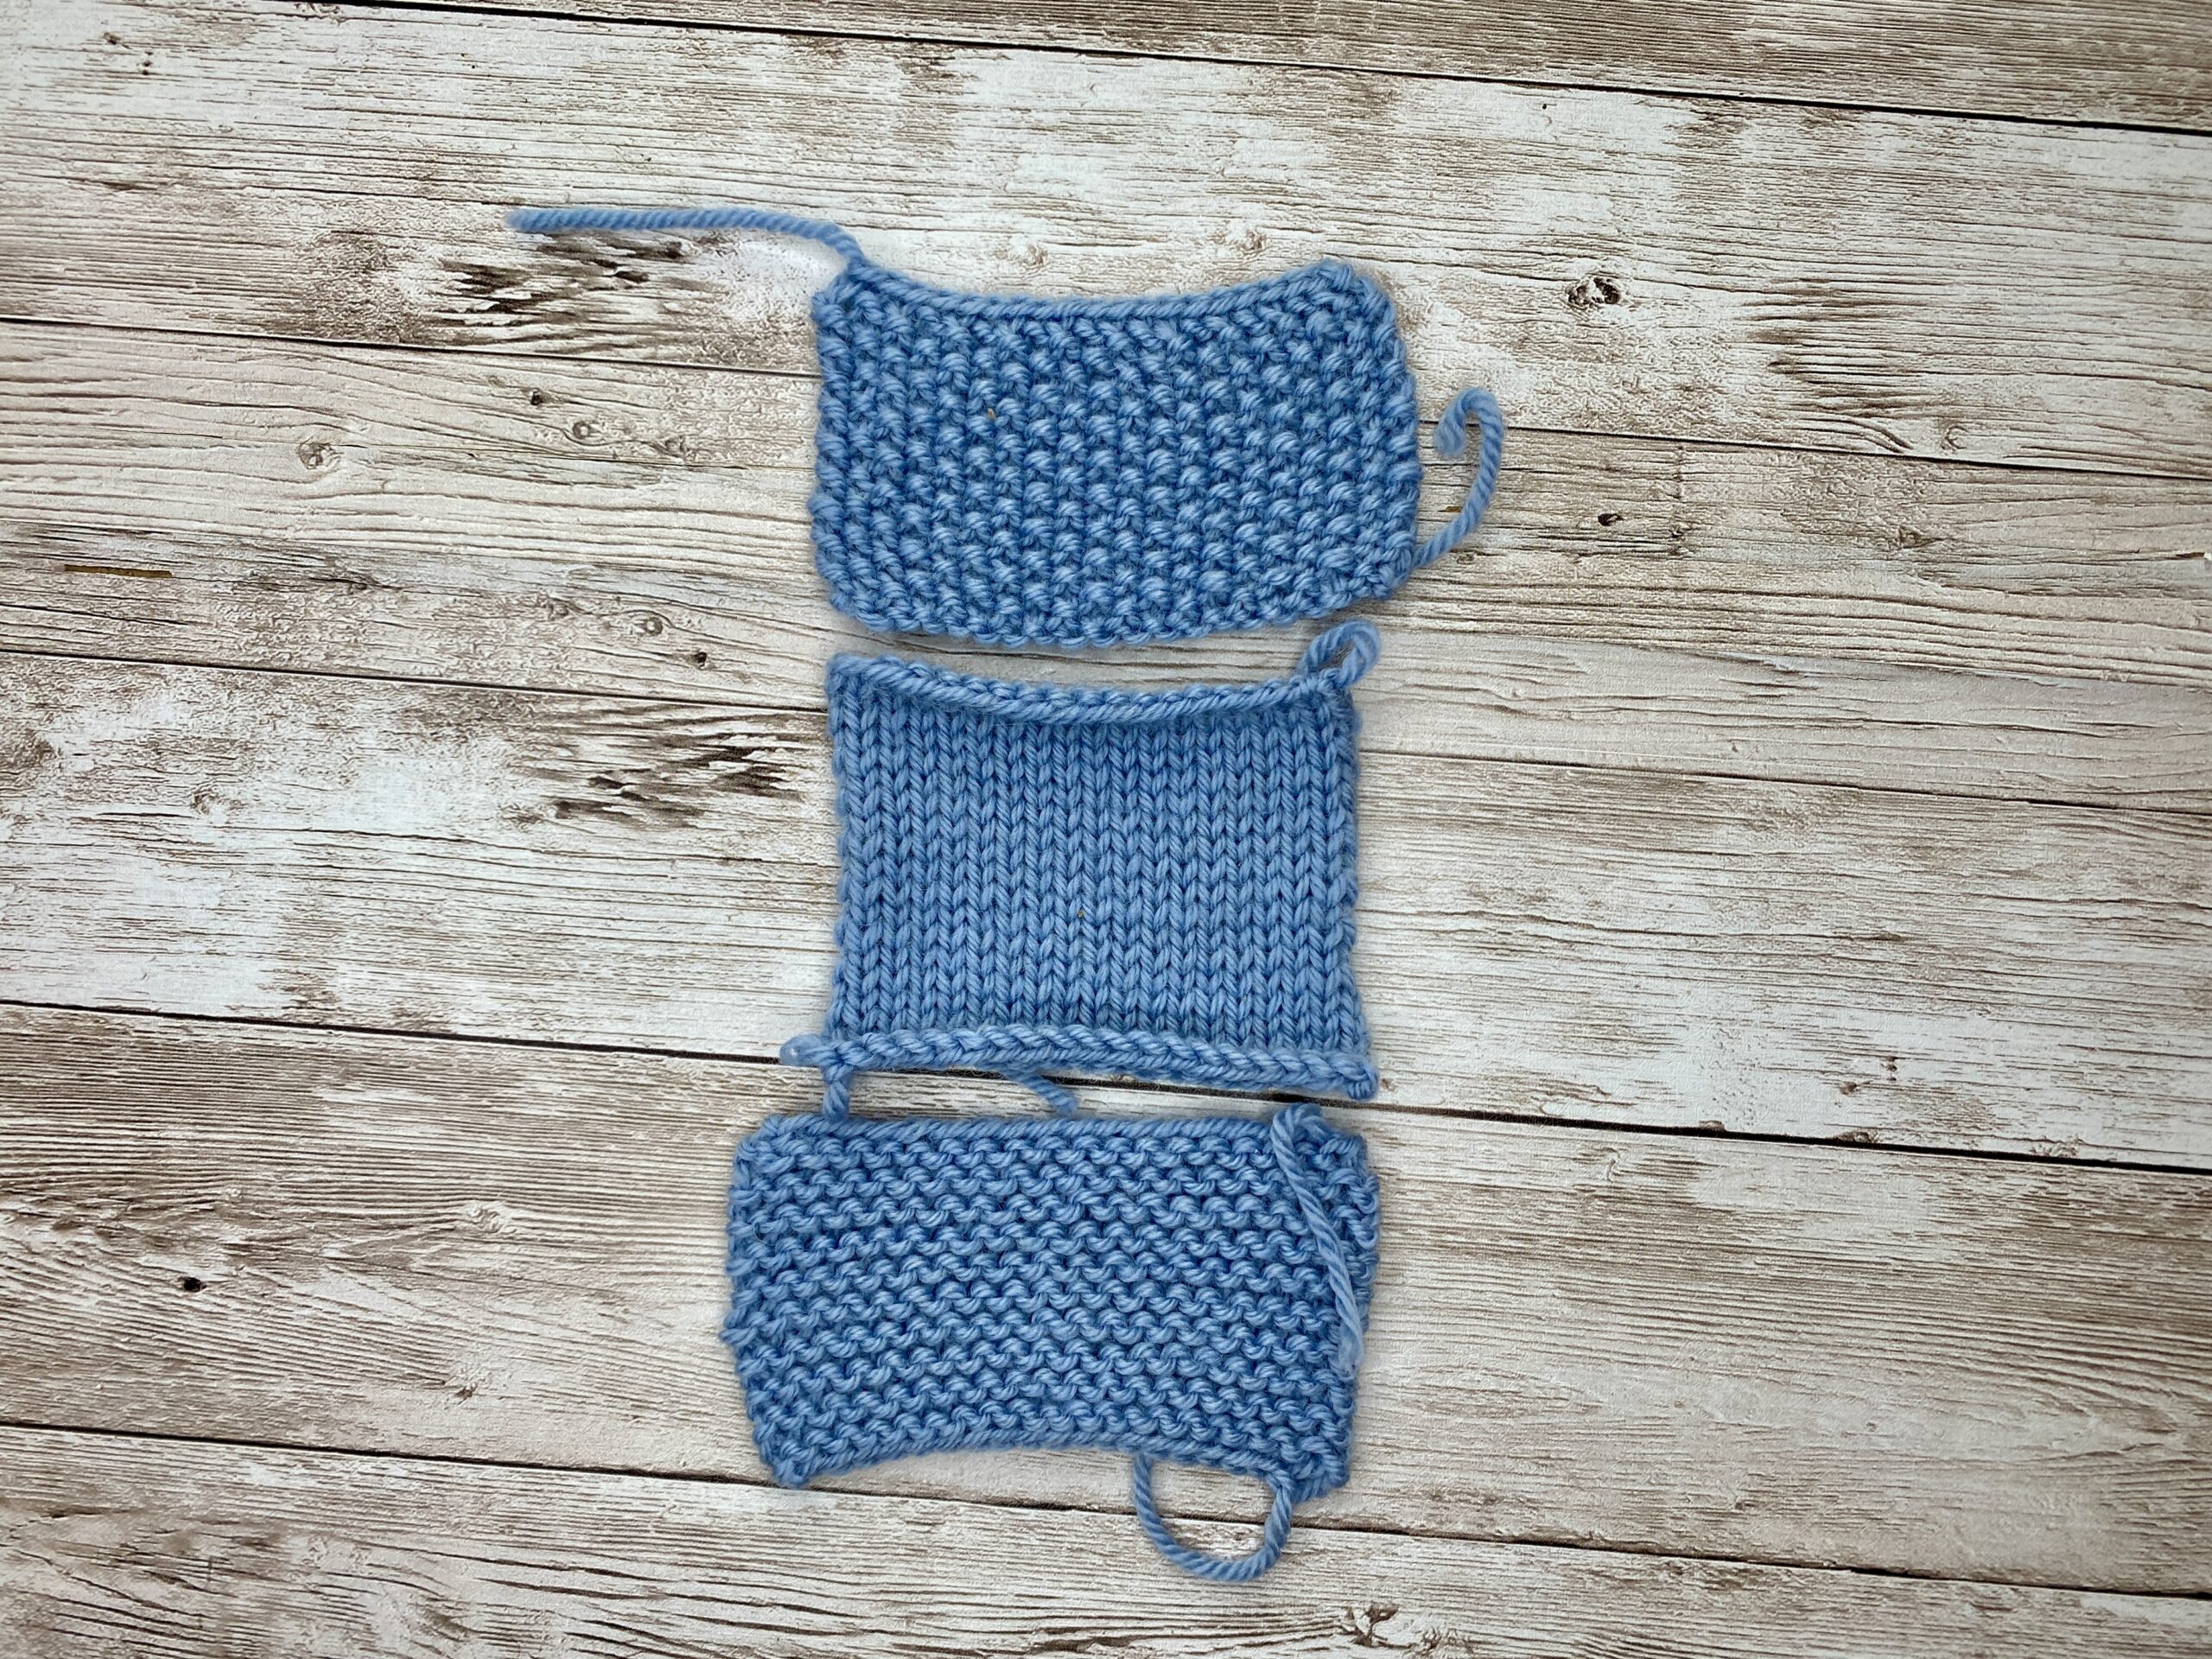
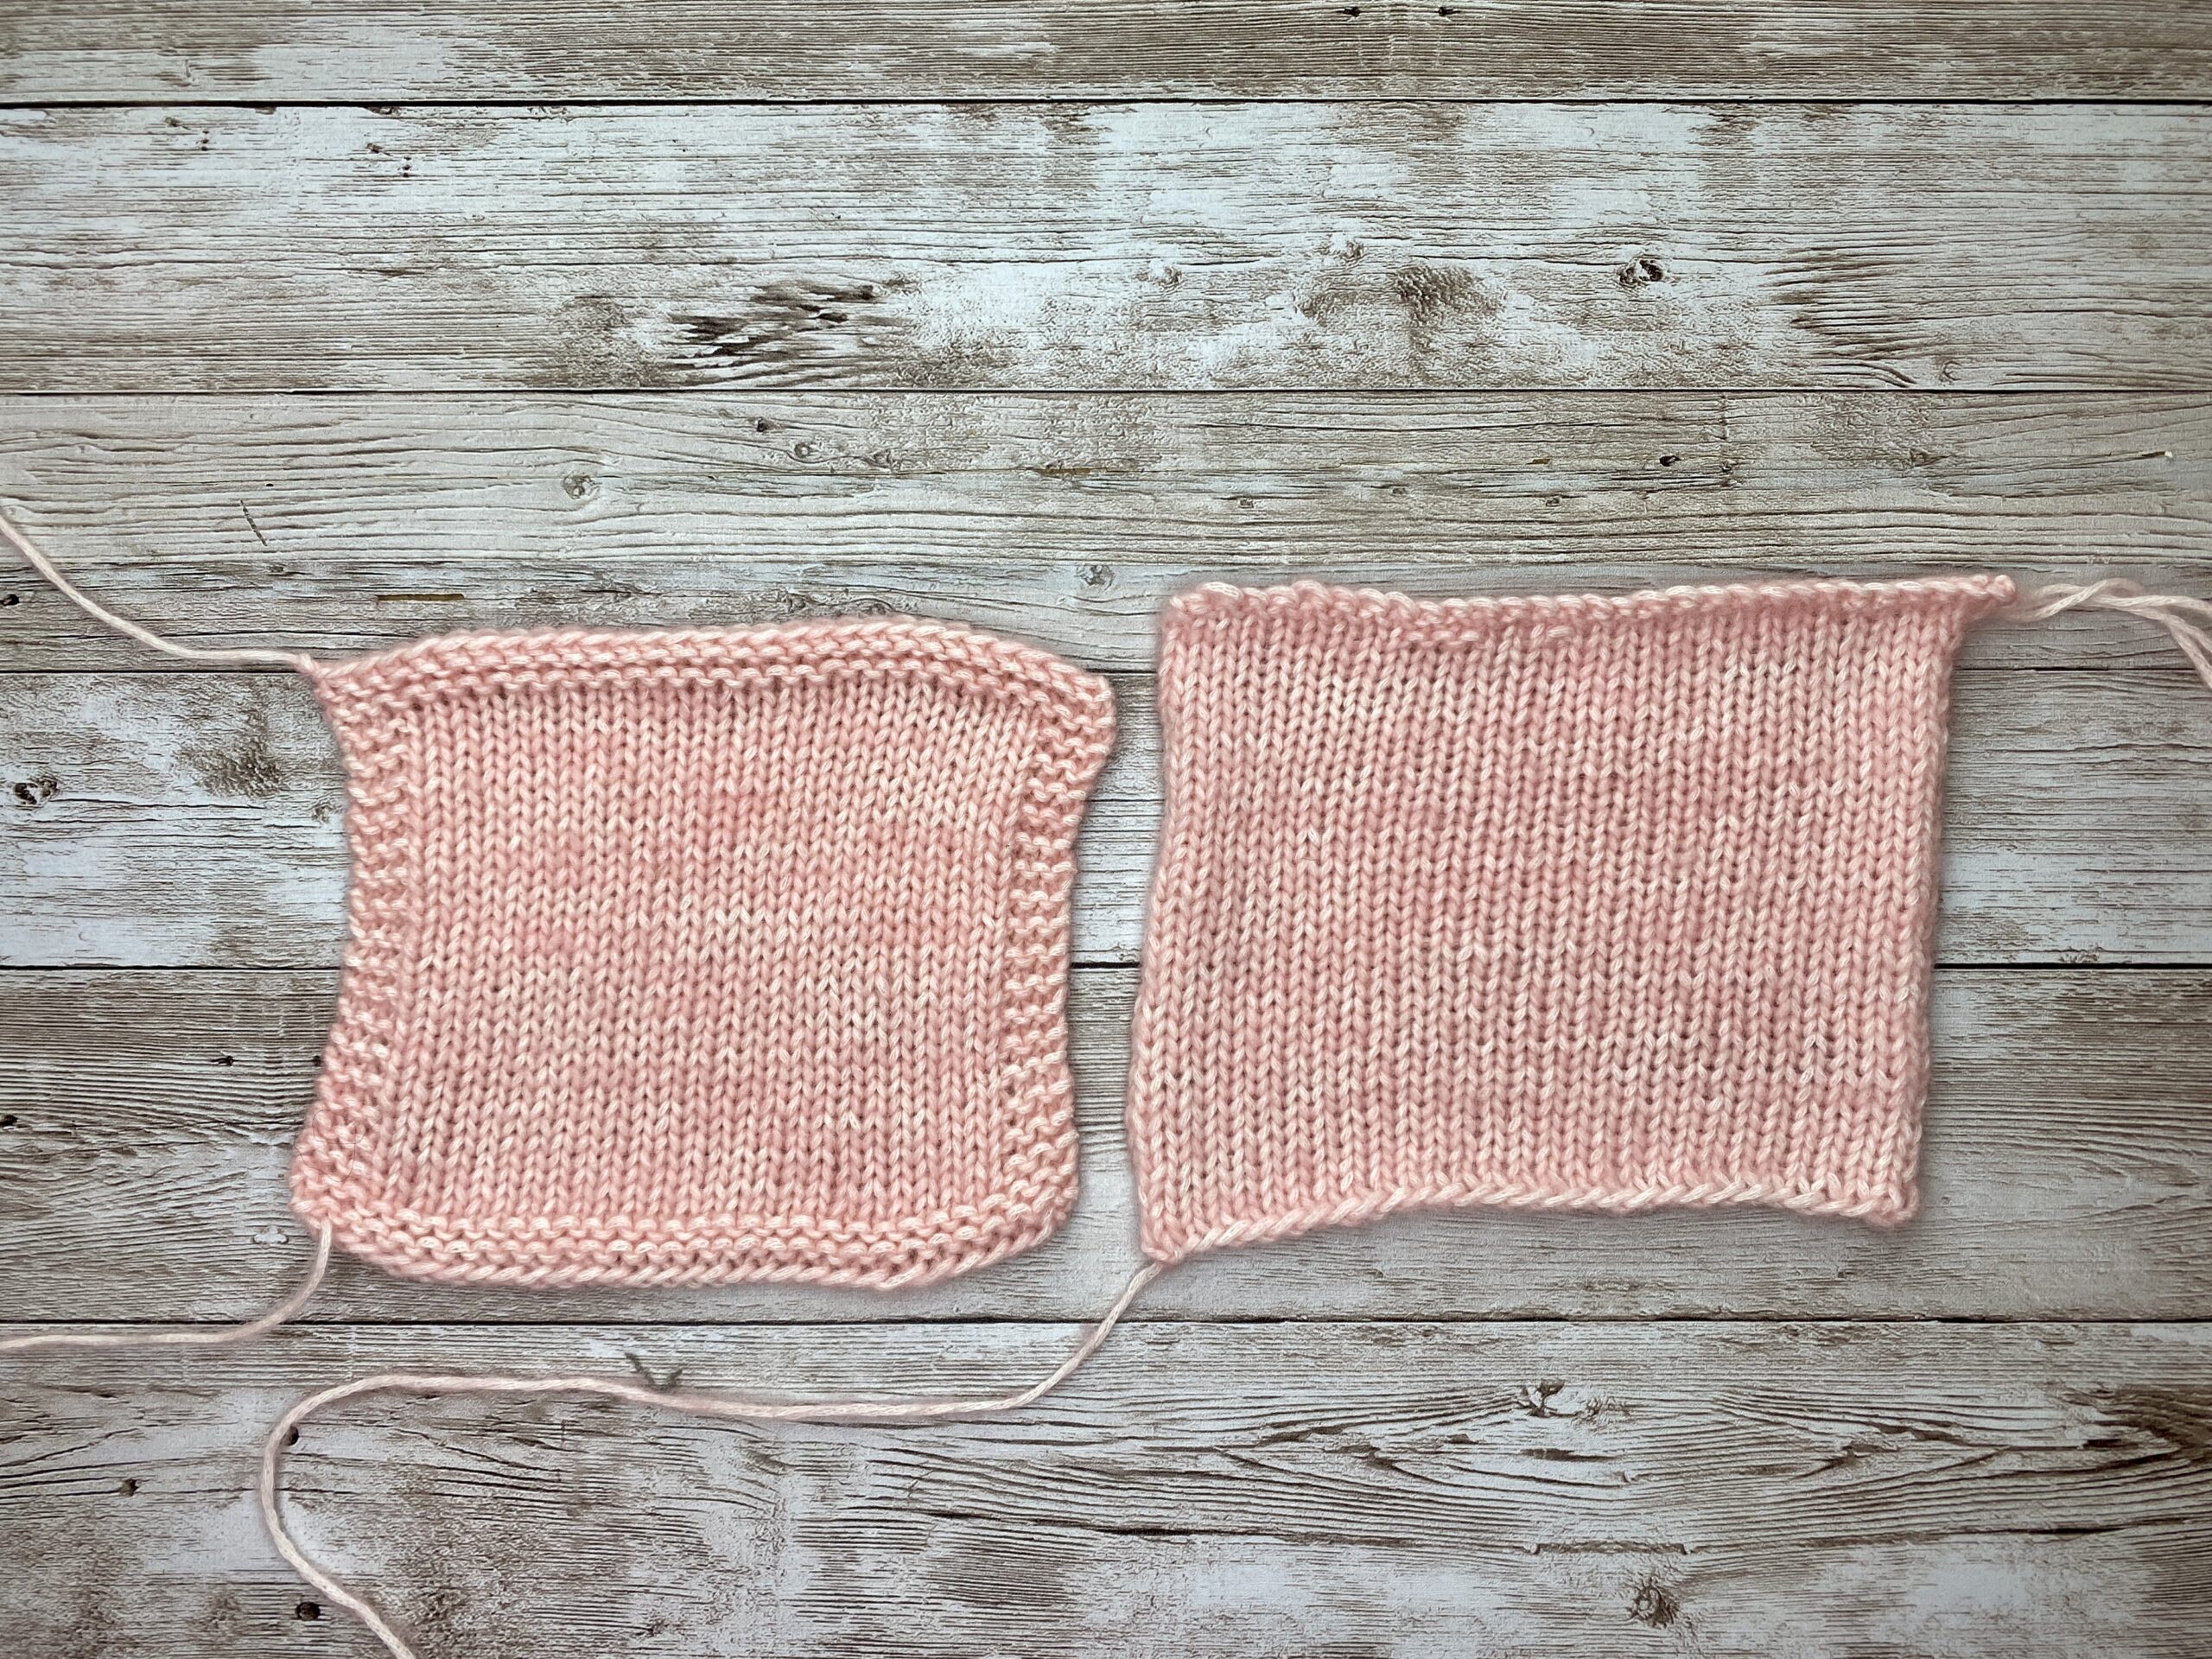 | I knitted the same swatches here with the same yarn, needle size, and number of stitches and rows, and I also blocked them. The only difference is that one has a border and the other does not. |

Here you can see how the swatch with garter borders is a bit shorter and it seems to flare out at the top and bottom than the borderless swatch below, even though they were worked with the same stitch and row count.
What very often happens:
-
The bordered swatch looks shorter than the borderless one, even though they have the same number of rows.
-
The border fabric is firmer and more stable. It wants to stay flat. It pulls down on the middle section and compresses those rows, giving you more rows per 10 cm than the fabric would have on its own.
-
The bordered swatch flares out at the top and bottom because the garter and seed stitch edges have their own, slightly wider stitch and shorter row gauge, and they’re trying to pull the softer stockinette centre into their shape.
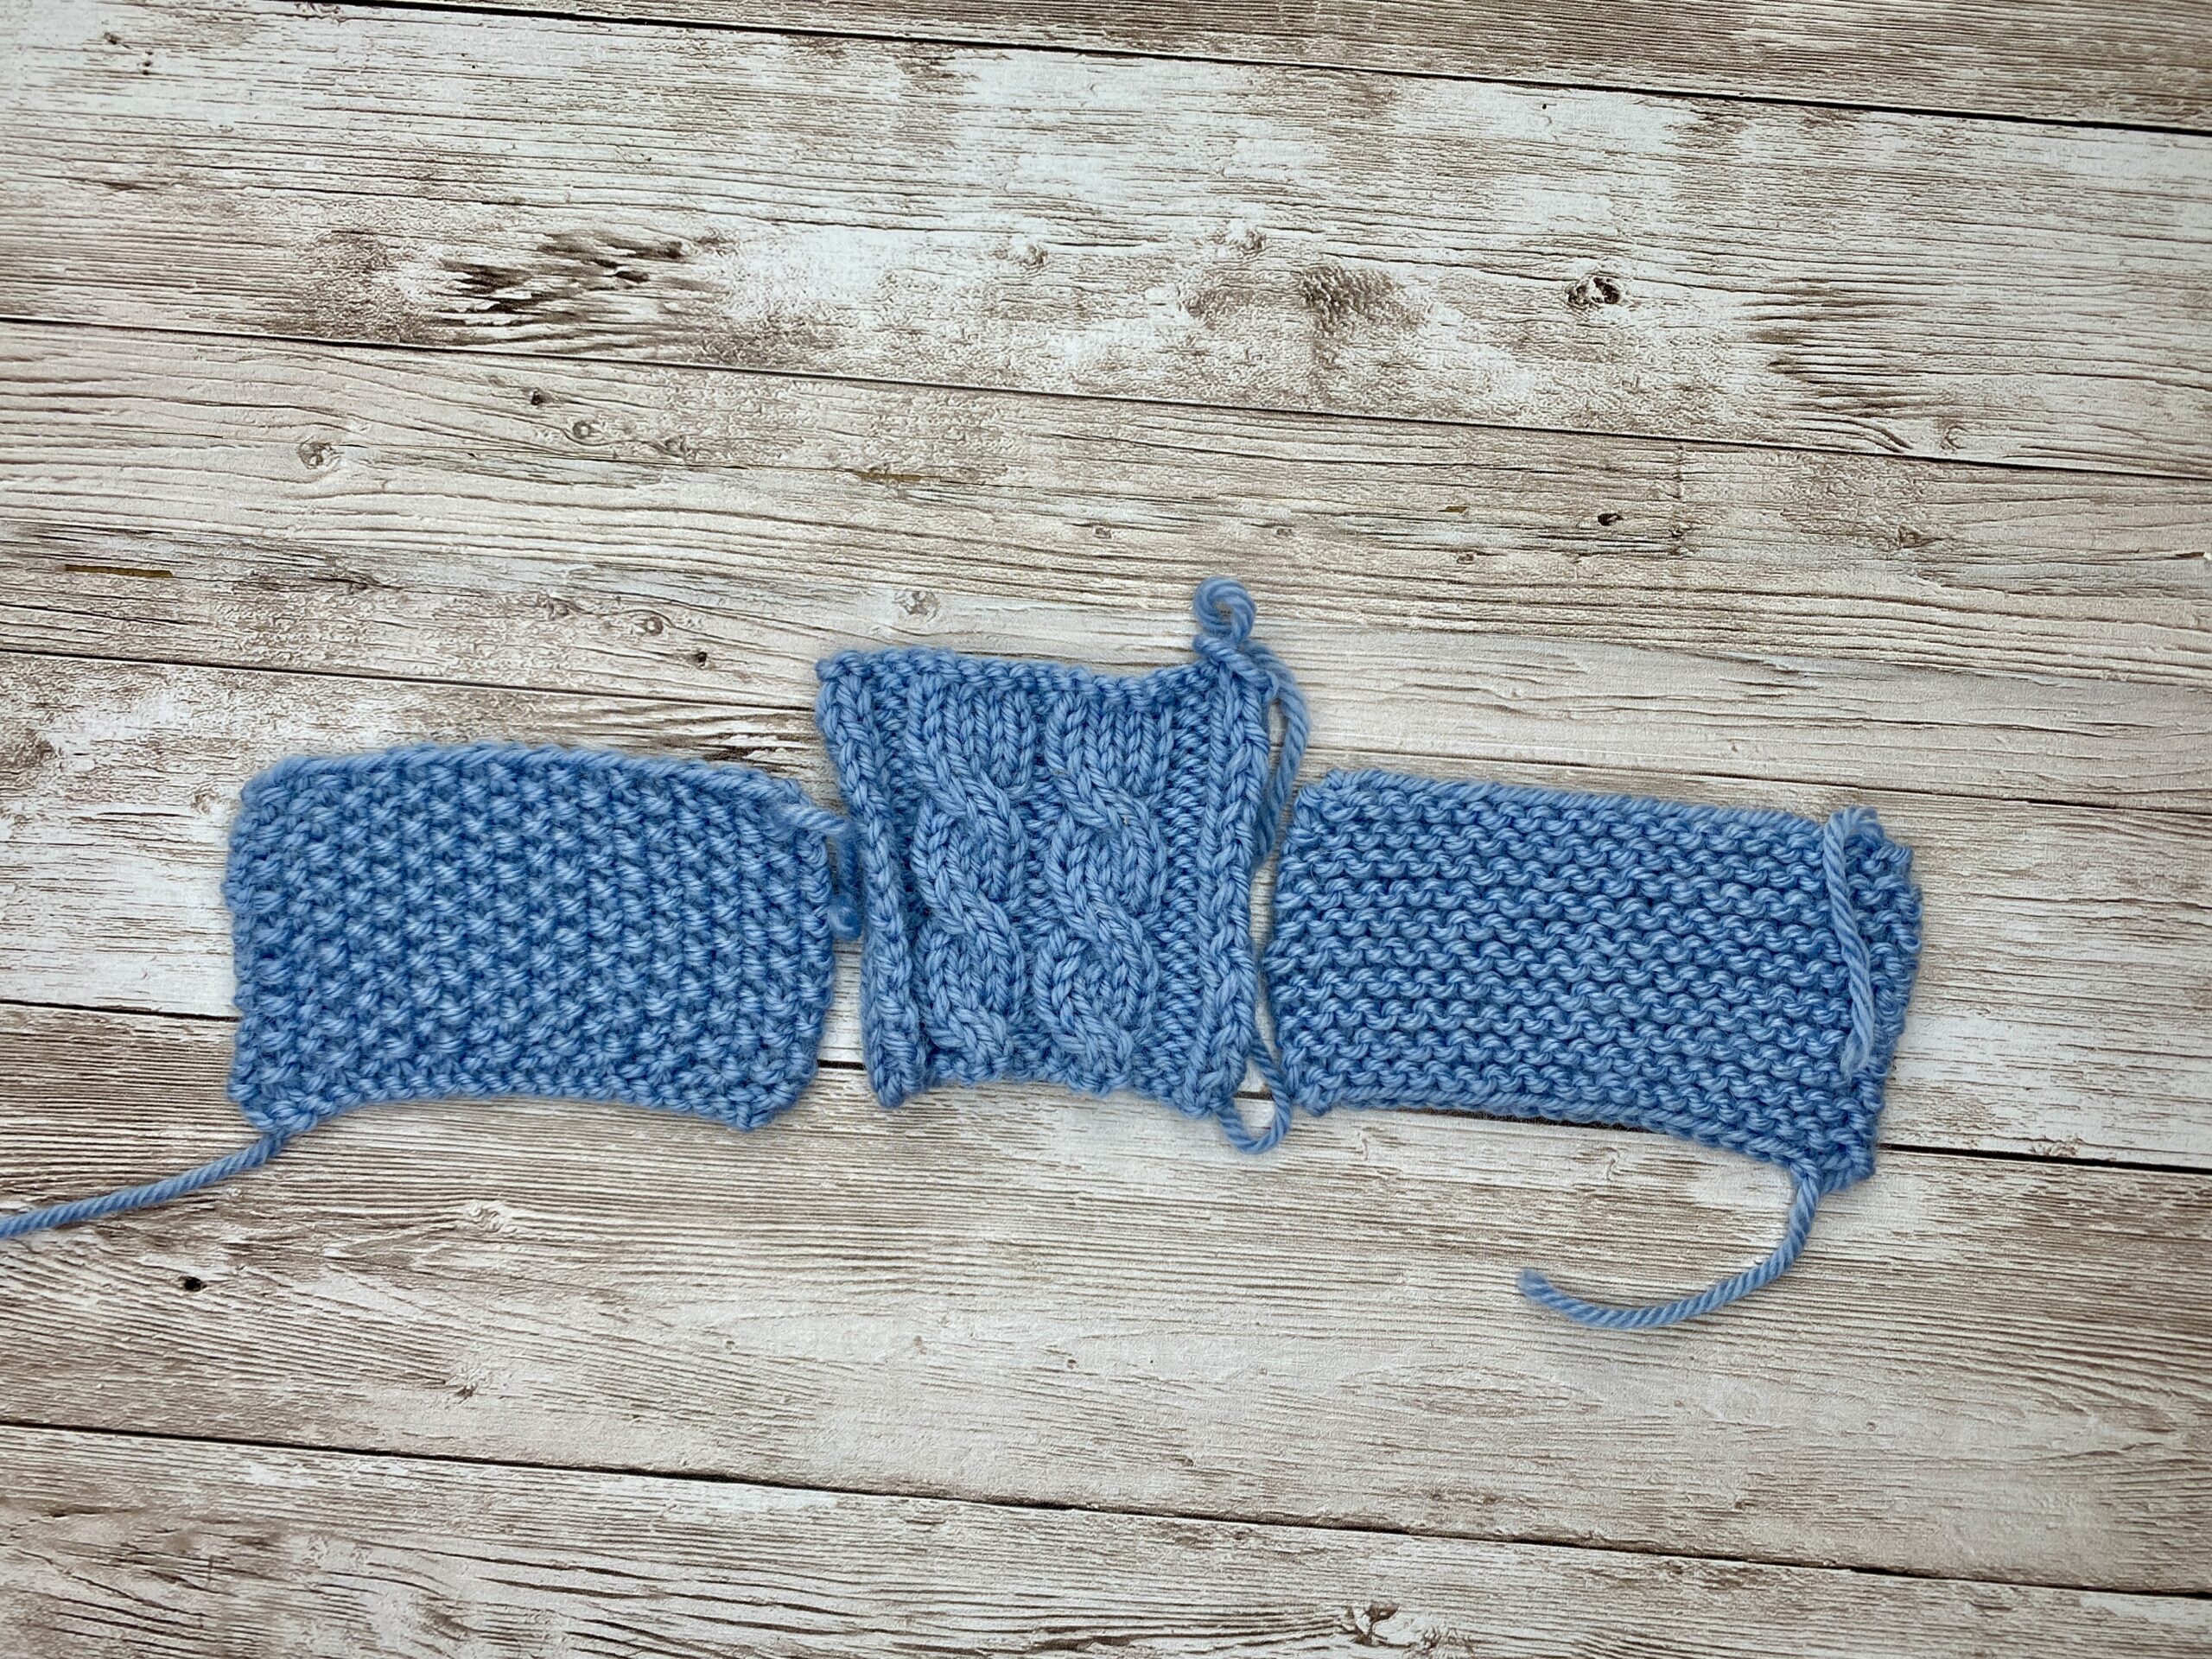
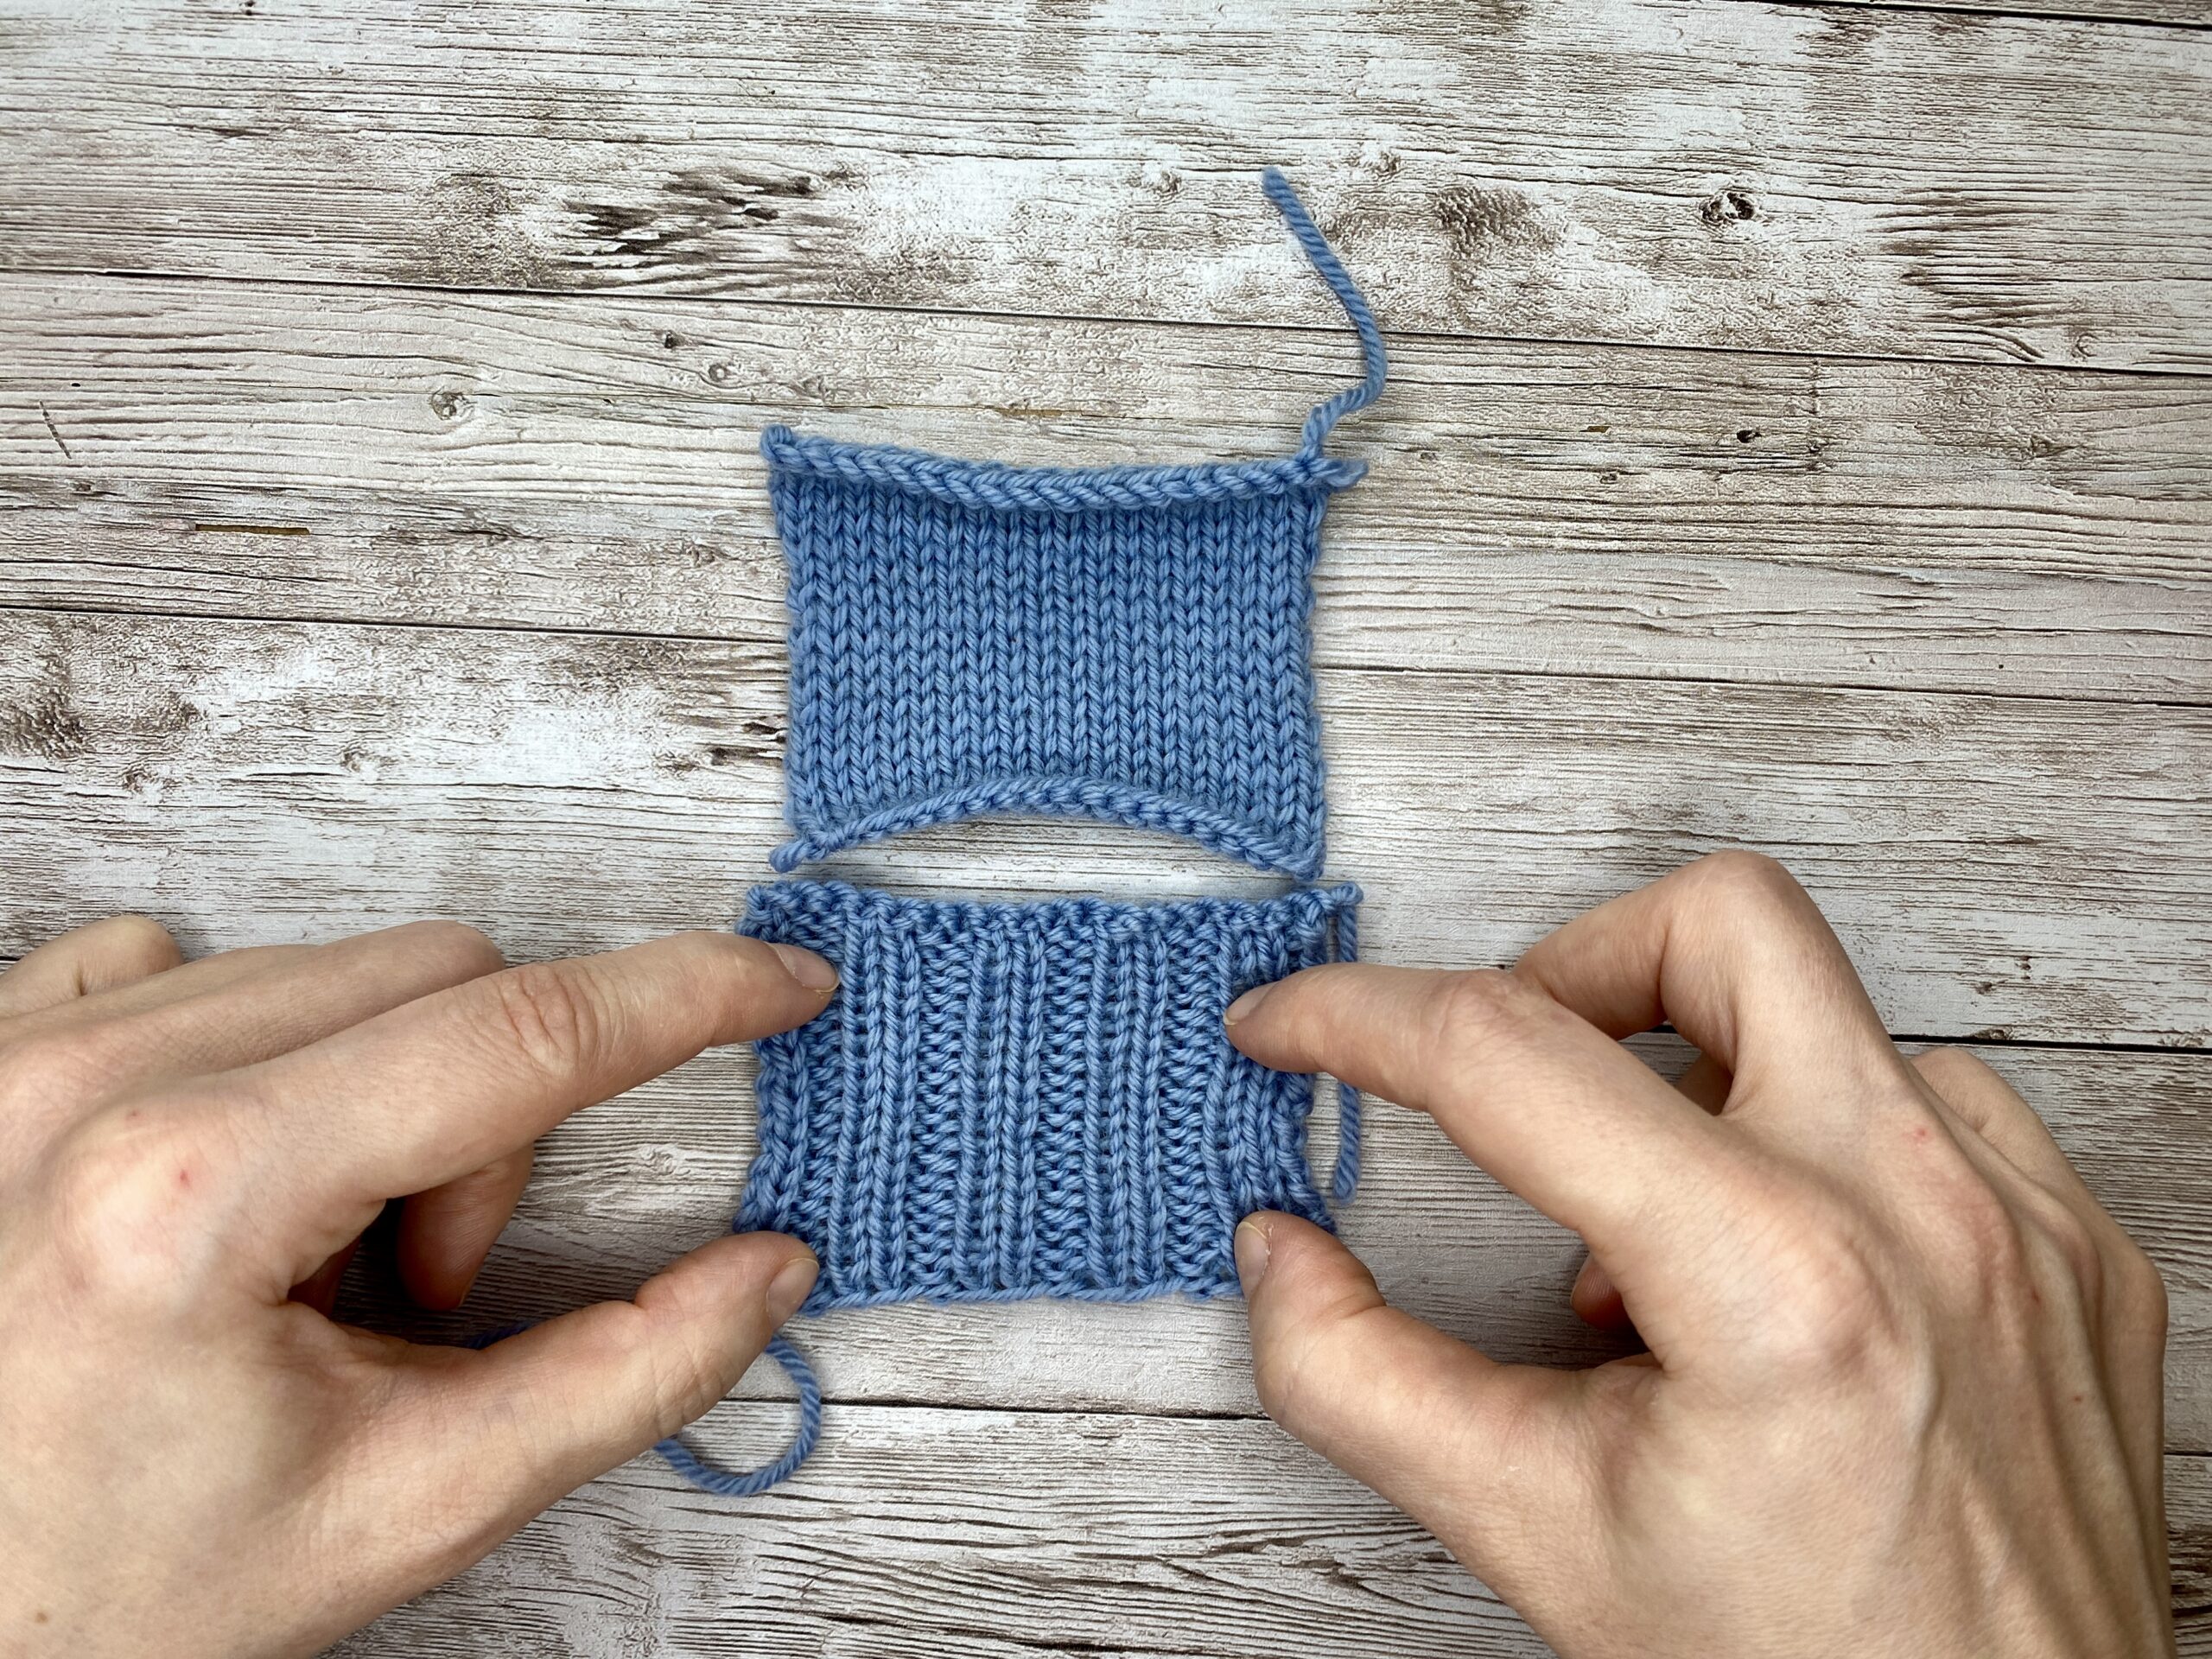
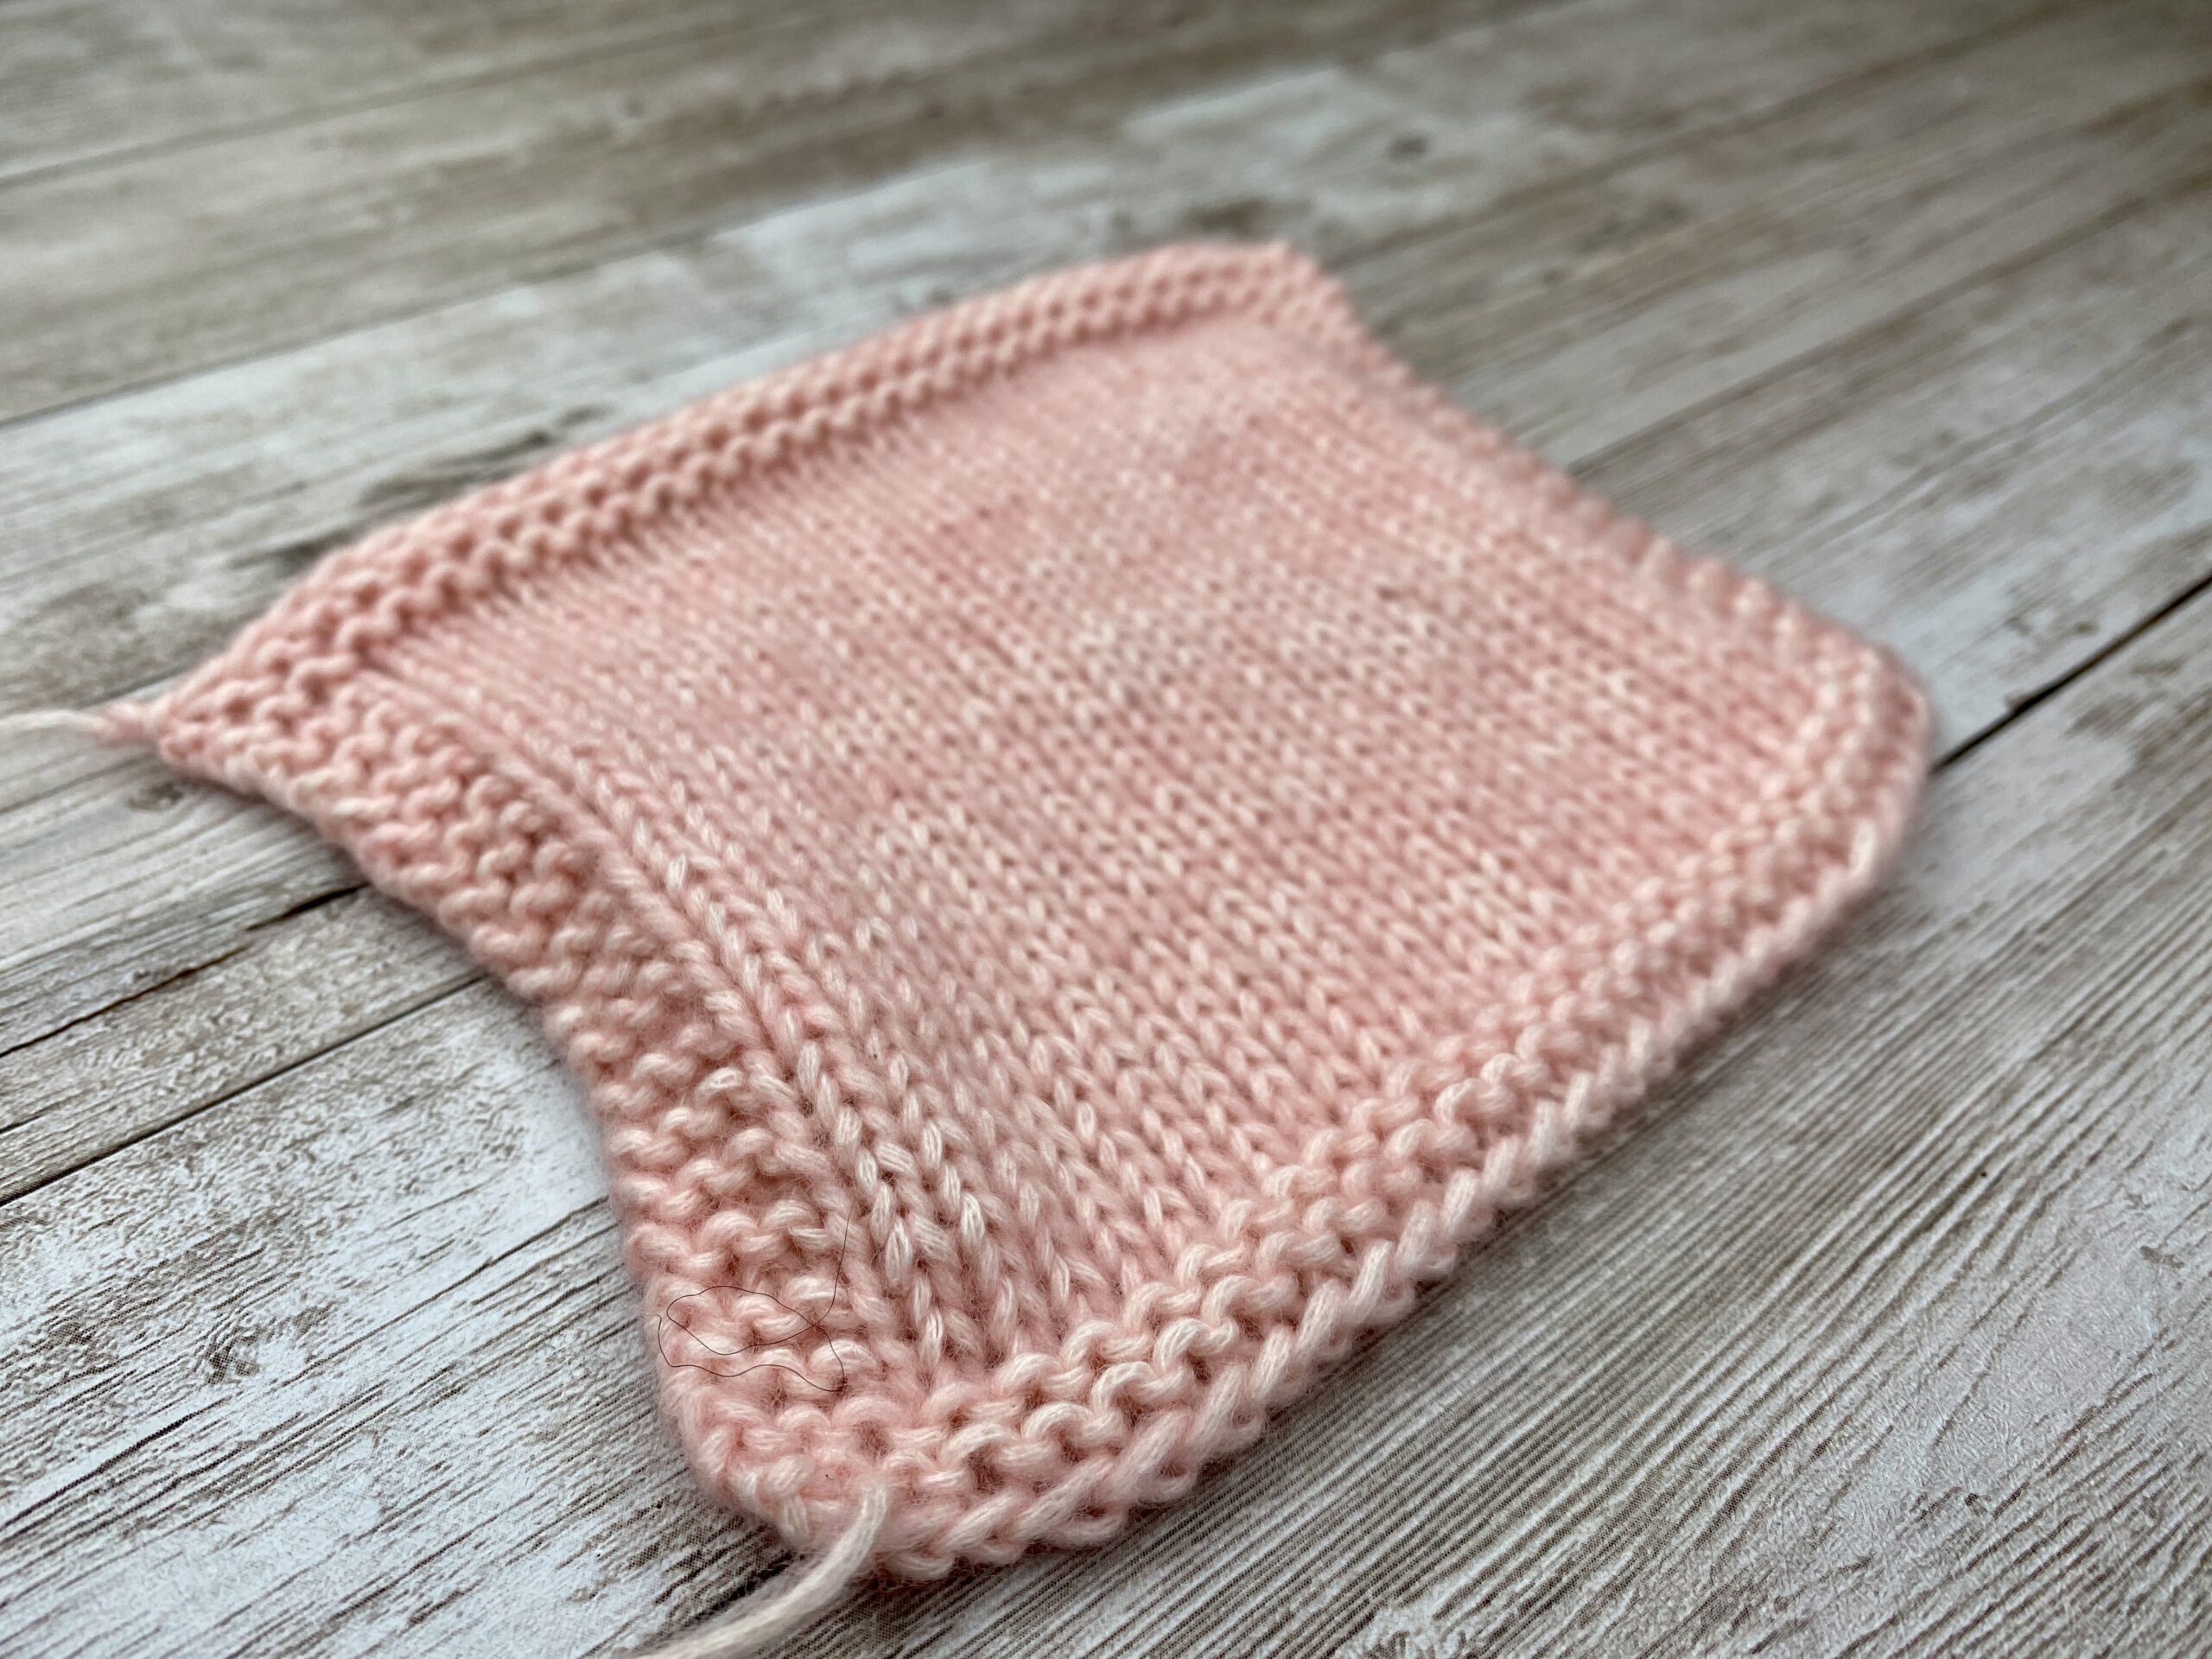 |  | You can see how the garter stitch frame tries to pull the rows down and everything starts to look a bit wavy. | I have very bad lighting at the moment, and I tried to catch the wavy texture from the other side as well. I hope you can still see how the garter stitch border definitely changes our row gauge. |


From the side, you can really see how the firm garter border holds its shape and reshapes the softer stockinette in the middle.
If you then measure your knitting gauge only inside that framed area, you can easily end up with:
-
Too many rows per 10 cm, so your finished sweater or cardigan comes out shorter than you planned.
-
Too few stitches per 10 cm, so your garment ends up wider than a borderless gauge swatch would suggest.
In other words, the border is not just a pretty frame – it is actively changing both stitch gauge and row gauge in the exact part of the swatch you care about.
When a Gauge Swatch Border Is Still Useful
After all that, it might sound like I’m completely against borders on gauge swatches. I’m really not – I just don’t trust them for anything that involves real sweater math.
Here are the few situations where I still find a small border acceptable:
Quick “ballpark” tests
When I’m just trying out a new yarn or needle size and I only care if I’m roughly in the same range as the pattern gauge for example a scarf, a tiny framed swatch is fine. It’s not data I would base a sweater on, just a first orientation.
Teaching beginners
As a beginner I knit plenty of little practice swatches just to get a feeling for yarn, needles, and tension, and there it doesn’t really matter whether you frame it or not. The goal is comfort and confidence, not exact measurements.
The key is to treat these bordered swatches as approximate. If you suspect the border is affecting the center at all, don’t rely on that swatch for precise knitting gauge, especially not for a fitted pullover or cardigan.
Why I Prefer Larger, Borderless Gauge Swatches
For anything that needs to fit – sweaters, cardigans, yokes, sleeves, even well‑fitting hats – I want my swatch to behave as closely as possible to the fabric in the actual garment. That’s why my default now is a borderless gauge swatch for serious projects.
What that looks like in practice:
-
I knit a larger swatch than you often see in demo photos – at least 15 cm by 15 cm (around 6 by 6 inches) of usable area. That gives me enough space to measure away from the edges.
-
I work only in the stitch pattern the garment uses in that area: stockinette, textured stitch, cables, whatever it is. No decorative “helper” border at the sides.
-
I wash and block the swatch exactly the way I’ll treat the finished piece, and let it dry completely.
-
I take my measurements only in the true center of the fabric, at least a couple of stitches and rows away from any cast‑on, bind‑off, or edge stitches.
This is the kind of swatch that gives me numbers I can plug straight into sweater math: how many stitches to cast on, how wide the body will be, how long to make the yoke or sleeves. Without a border tugging on the center, my stitch count and row count match the real fabric that will sit on my body – not a fabric that has been quietly reshaped by a garter or seed stitch frame.
If you’d like to dive deeper into knitting and accurately measuring gauge, I have a full post on how to knit a flat gauge swatch, block it, and measure it correctly, as well as a separate tutorial on knitting an accurate gauge swatch in the round
 |  | How to Knit a Gauge Swatch: Cast On, Block, and Measure Knitting Gauge Accurately (FLAT) |


Note: For ribbing, I always knit a stockinette stitch gauge swatch, because ribbing stretches to about the same width as stockinette worked in the same yarn and on the same needles.
 |  | Ribbing is meant to sit snugly against the body – it keeps hat brims, cuffs, and hems nicely in place, and a dress worked all in ribbing will hug your shape. For gauge, though, most designers still ask you to knit a stockinette stitch swatch, ... | ...because ribbing stretches so easily that it will usually relax to about the same width as the stockinette fabric; |


Frequently Asked Questions about Borders on Gauge Swatches
Do I always have to knit my gauge swatch in pattern?
Yes, if the pattern gives a gauge “in pattern,” you should swatch in that exact stitch pattern. The fabric’s behaviour (how much it narrows, stretches, or grows) depends on the stitch pattern, not just yarn and needle size.
Can a garter or seed stitch border really change my stitch gauge?
It can. Even if the stitch gauge of garter or seed is similar to stockinette on its own, adding it as a border can stretch or compress the centre of the swatch, so your measured stitches per 10 cm no longer match the borderless fabric.
Do borders affect row gauge too, or only stitch gauge?
Borders often change row gauge quite noticeably. A firm border can pull the centre fabric shorter and give you more rows per 10 cm than you’ll see in the actual garment.
When is it okay to use a bordered gauge swatch?
A bordered swatch is fine for quick, rough checks: testing a new yarn, trying out needle sizes, or teaching beginners. For fitted garments and sweater math, it’s safer to use a larger, borderless swatch and measure only the centre.
How big should a borderless gauge swatch be for a sweater?
Aim for at least 10–15 cm (4–6 inches) of usable area in both directions. That usually means casting on extra stitches so you can measure well away from the cast‑on, bind‑off, and edge stitches.
Where exactly should I measure on a borderless gauge swatch?
Measure in the true centre of the swatch: avoid the first and last few stitches on each side, and stay a few rows away from cast‑on and bind‑off. This is the fabric that behaves most like the middle of your sweater.
Do I need to block my gauge swatch before measuring?
Yes, if you plan to block or wash your finished project, you should block your gauge swatch the same way first. Otherwise, your gauge will change after the first wash and your measurements won’t match the garment.
What if my pattern photo shows a cute framed swatch-should I copy it?
Treat those photos as styling, not strict instructions. Follow the written gauge information: knit in the specified stitch pattern, make a generous swatch, and prioritise accurate measurements over decorative borders.
So…should you stop adding borders to gauge swatches?
Here’s my personal rule of thumb:
For quick tests, little experiments, and teaching, a small gauge swatch with a neat border is perfectly fine – as long as you treat the numbers as approximate and don’t hang a whole sweater on them.
For projects where fit really matters and you’re doing proper sweater math, I’d skip the decorative border. Knit a larger, borderless gauge swatch in the actual stitch pattern, block it, and measure only in the center.
If you’ve always heard that “borders don’t change the stitch count,” I hope this deep dive has helped you see them in a more curious light. Borders can definitely be helpful, but they aren’t neutral. If you’ve ever felt like your gauge might be lying to you, this could be the reason why – borders can subtly change both stitch and row gauge in your swatch.
From here, we can move into sweater math and turn those honest, borderless swatch numbers into garments that actually fit the way you imagined.
Thank you so much for reading.
Until next time, happy knitting!
This article is Part 4 of the “Gauge Swatch Confidence” series:
- Knitting Gauge 101
- How to Knit and Measure a Swatch (Flat)
- How to Knit and Measure a Swatch (Round)
- Borderless Gauge Swatches
- Adjusting Patterns to Your Gauge.
A Little Way to Say Thanks
You Might Also Like


 |
|
Join the Cozy Corner Newsletter!
Hey there, creative soul! Welcome to the Yarn Enchantment Newsletter, where we celebrate all things cozy, crafty, and full of heart. Think of this as your friendly crafting companion - a little dose of inspiration delivered straight to your inbox, just for you. Inside, you’ll find: ✨ Exclusive patterns & tutorials - ideas you won’t find anywhere else (just for us!) 📚 Bookish crafts that bring your favorite stories to life 🧶 Tips and tricks to make your crafting journey smoother (and more fun!) 💌 Heartfelt musings on life, creativity, and the magic of making something with your own two hands Whether you’re knitting by the fire, brainstorming your next DIY project, or just looking for a little creative pick-me-up, this newsletter is here to cheer you on. Because let’s be honest - crafting isn’t just about the finished project; it’s about the joy, peace, and stories we create along the way. So grab a cup of tea, cozy up, and join me. Together, we’ll weave a little magic into everyday life - one stitch, one story, and one email at a time. P.S. I’m so glad you’re here. Let’s make something beautiful together! (Note: If you're using an ad blocker, you may encounter issues subscribing to the newsletter. To subscribe, please consider disabling your ad blocker.)
|
