

Current WIP Situation
May 24, 2024
Garden Light Cozy Pattern
August 4, 2024How to Knit M1LP and M1RP (Make 1 Purl Increases)
 and M1RP (Make 1 Right Purl) )
Originally published on May 26, 2024
When it comes to knitting, seamlessly increasing stitches is a skill every knitter loves to have. You’ve probably tried the classic Make 1 Left (M1L) and Make 1 Right (M1R) increases, or maybe even the KFB (Knit Front and Back) increase, it’s quick, but it does leave a little bar behind. But what about purl-side increases? That’s where M1LP (Make 1 Left Purl) and M1RP (Make 1 Right Purl) come in. These techniques are perfect for creating increases on the purl side of your work, and they’re much easier than they sound! In this blog post, I’ll walk you through how to increase on the purl side with a step-by-step picture guide, and at the end, you’ll find a video tutorial to make it even easier.
Table of Contens
What Are M1LP and M1RP Increases?
M1LP and M1RP are techniques used to increase the number of stitches on the purl side of your knitting. These methods create a new stitch from the strand of yarn between two existing stitches without leaving a visible hole, ensuring your fabric remains smooth and uniform. You can also view these stitches as mirror images of the M1L and M1R increases because when you turn your work, you've worked the same increases.
When to Use M1LP and M1RP
These increases are particularly useful in patterns that call for shaping on the purl side of the fabric, such as:
-
Reverse Stockinette Stitch: When the purl side is the right side of your work.
-
Textured Patterns: For creating balanced and symmetrical designs in purl-heavy textures.
-
Garment Shaping: Perfect for areas that require discrete increases, like side seams or sleeve caps.
But there are also cases where you have to use these increases on the front side of your work as well. For example, in designs that alternate between knit and purl sections on the right side, incorporating M1LP and M1RP ensures that the increases blend seamlessly into the fabric. You can see this often in cable knitting.
 |
| Make 1 increases on the purl side |
How to Make 1 Right Purl (M1RP)
-
Work your pattern until you reach the point where you need to make an increase.
-
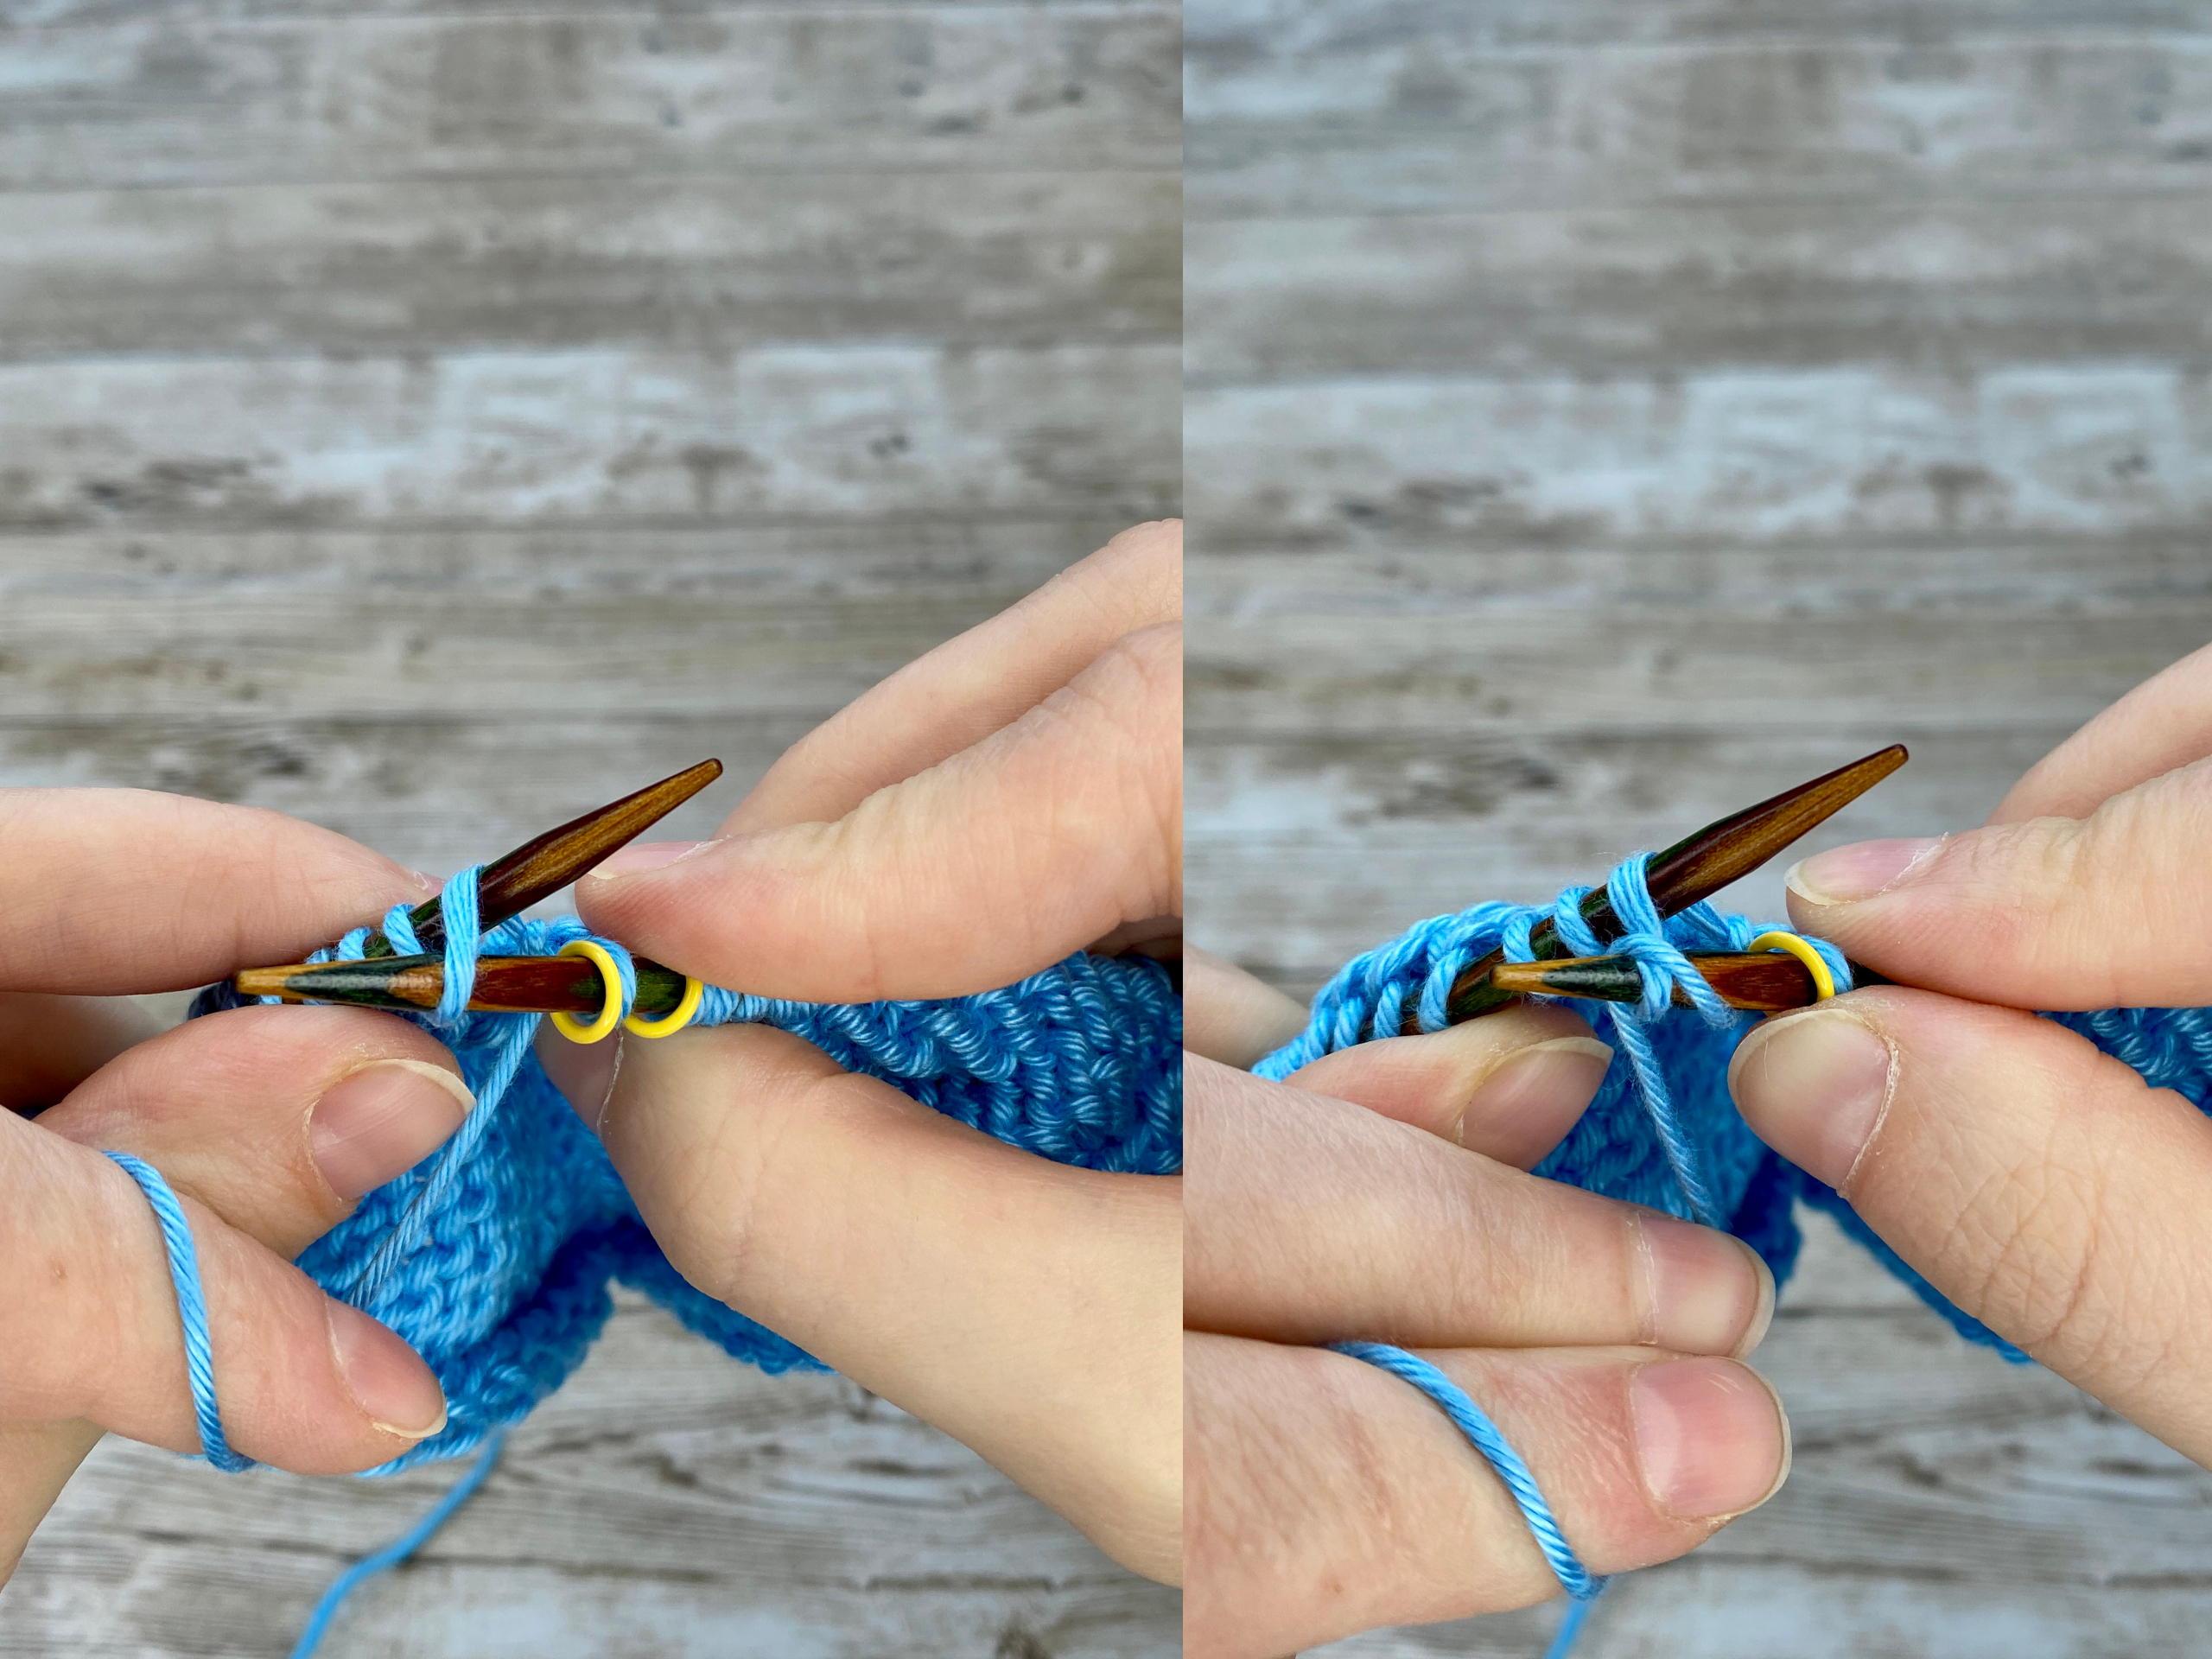
Locate the horizontal strand of yarn between the stitch you just purled and the next stitch on the left needle.
-
Using the left needle, pick up the strand from back to front. To ensure that you have picked up the stitch the right way, you can examine the loop on the needle. It should lean towards the right side.
-
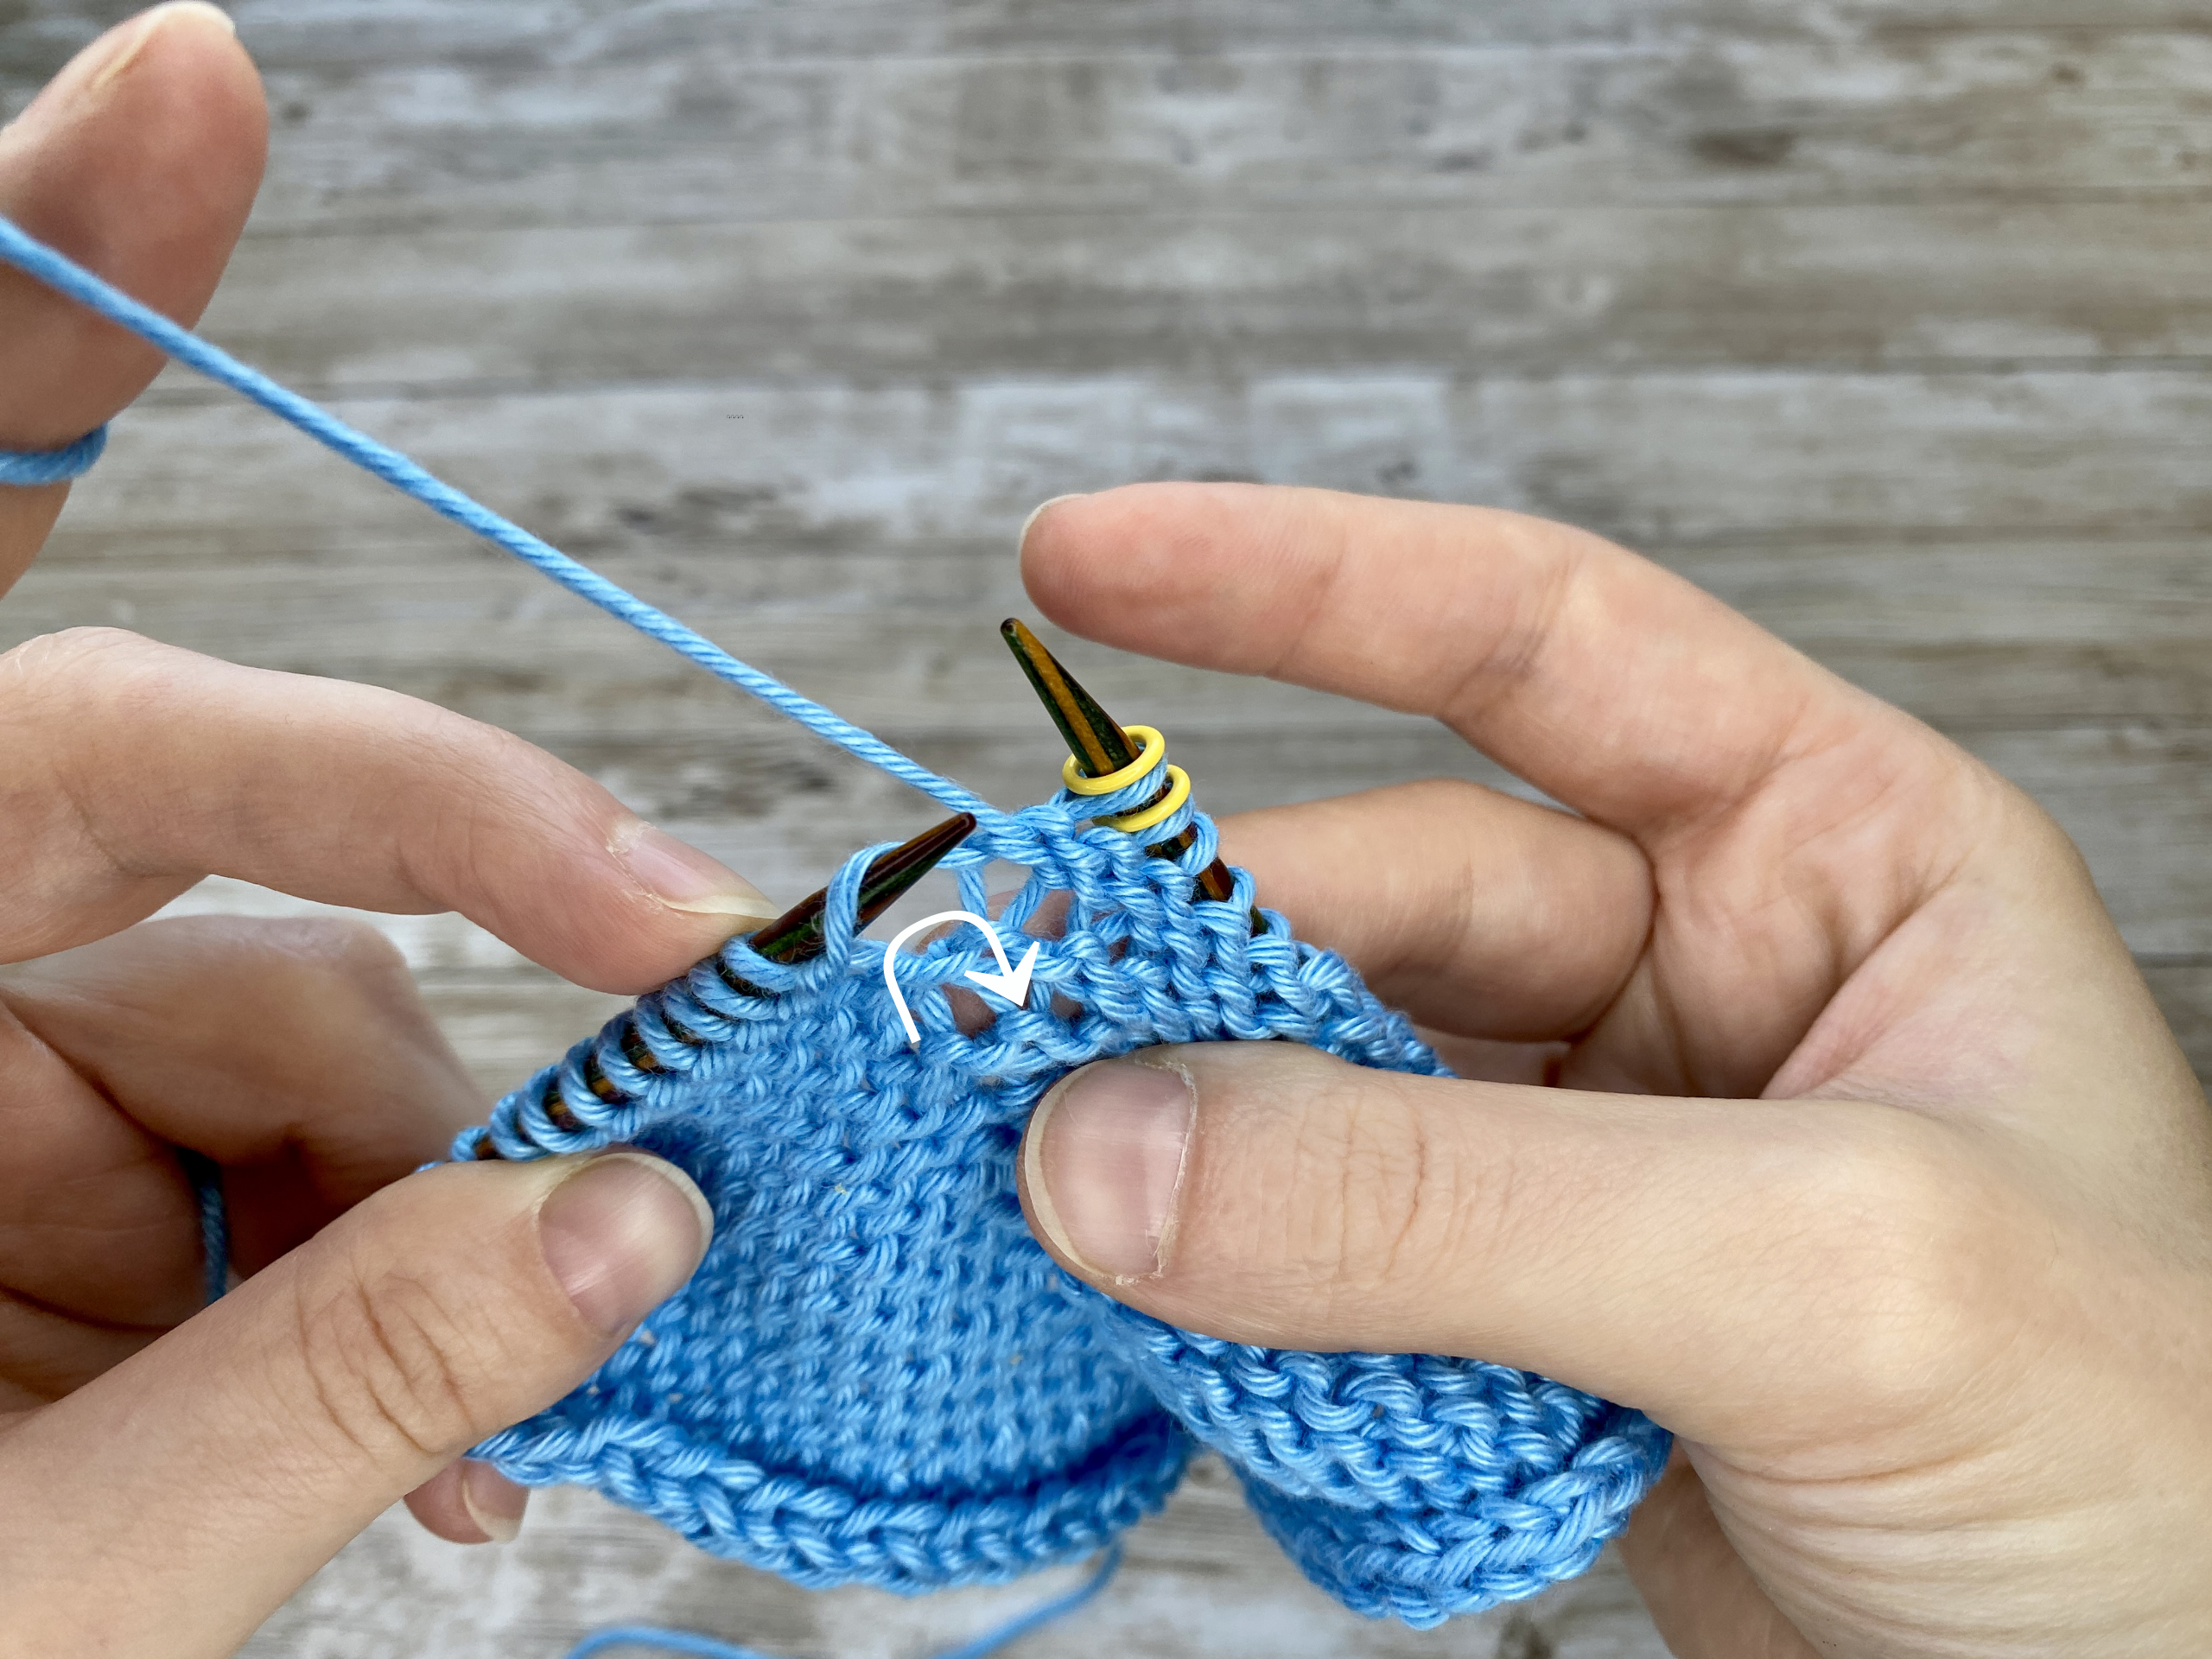
Purl into the front of the loop. This action twists the stitch, closing any potential hole.
 |
 |
 |
|
Locate the horizontal strand of yarn between the stitch. |
Pick up the strand from back to front. |
The loop on the needle should lean towards the right side. |
 |
 |
 |
|
Insert the needle through the front leg, yarn over... |
...and purl this stitch. |
This action twists the stitch, closing any potential holes. |
How to Make 1 Left Purl (M1LP)
-
Work your pattern until you reach the point where you need to make an increase.
-
Locate the horizontal strand of yarn between the stitch you just purled and the next stitch on the left needle.
-
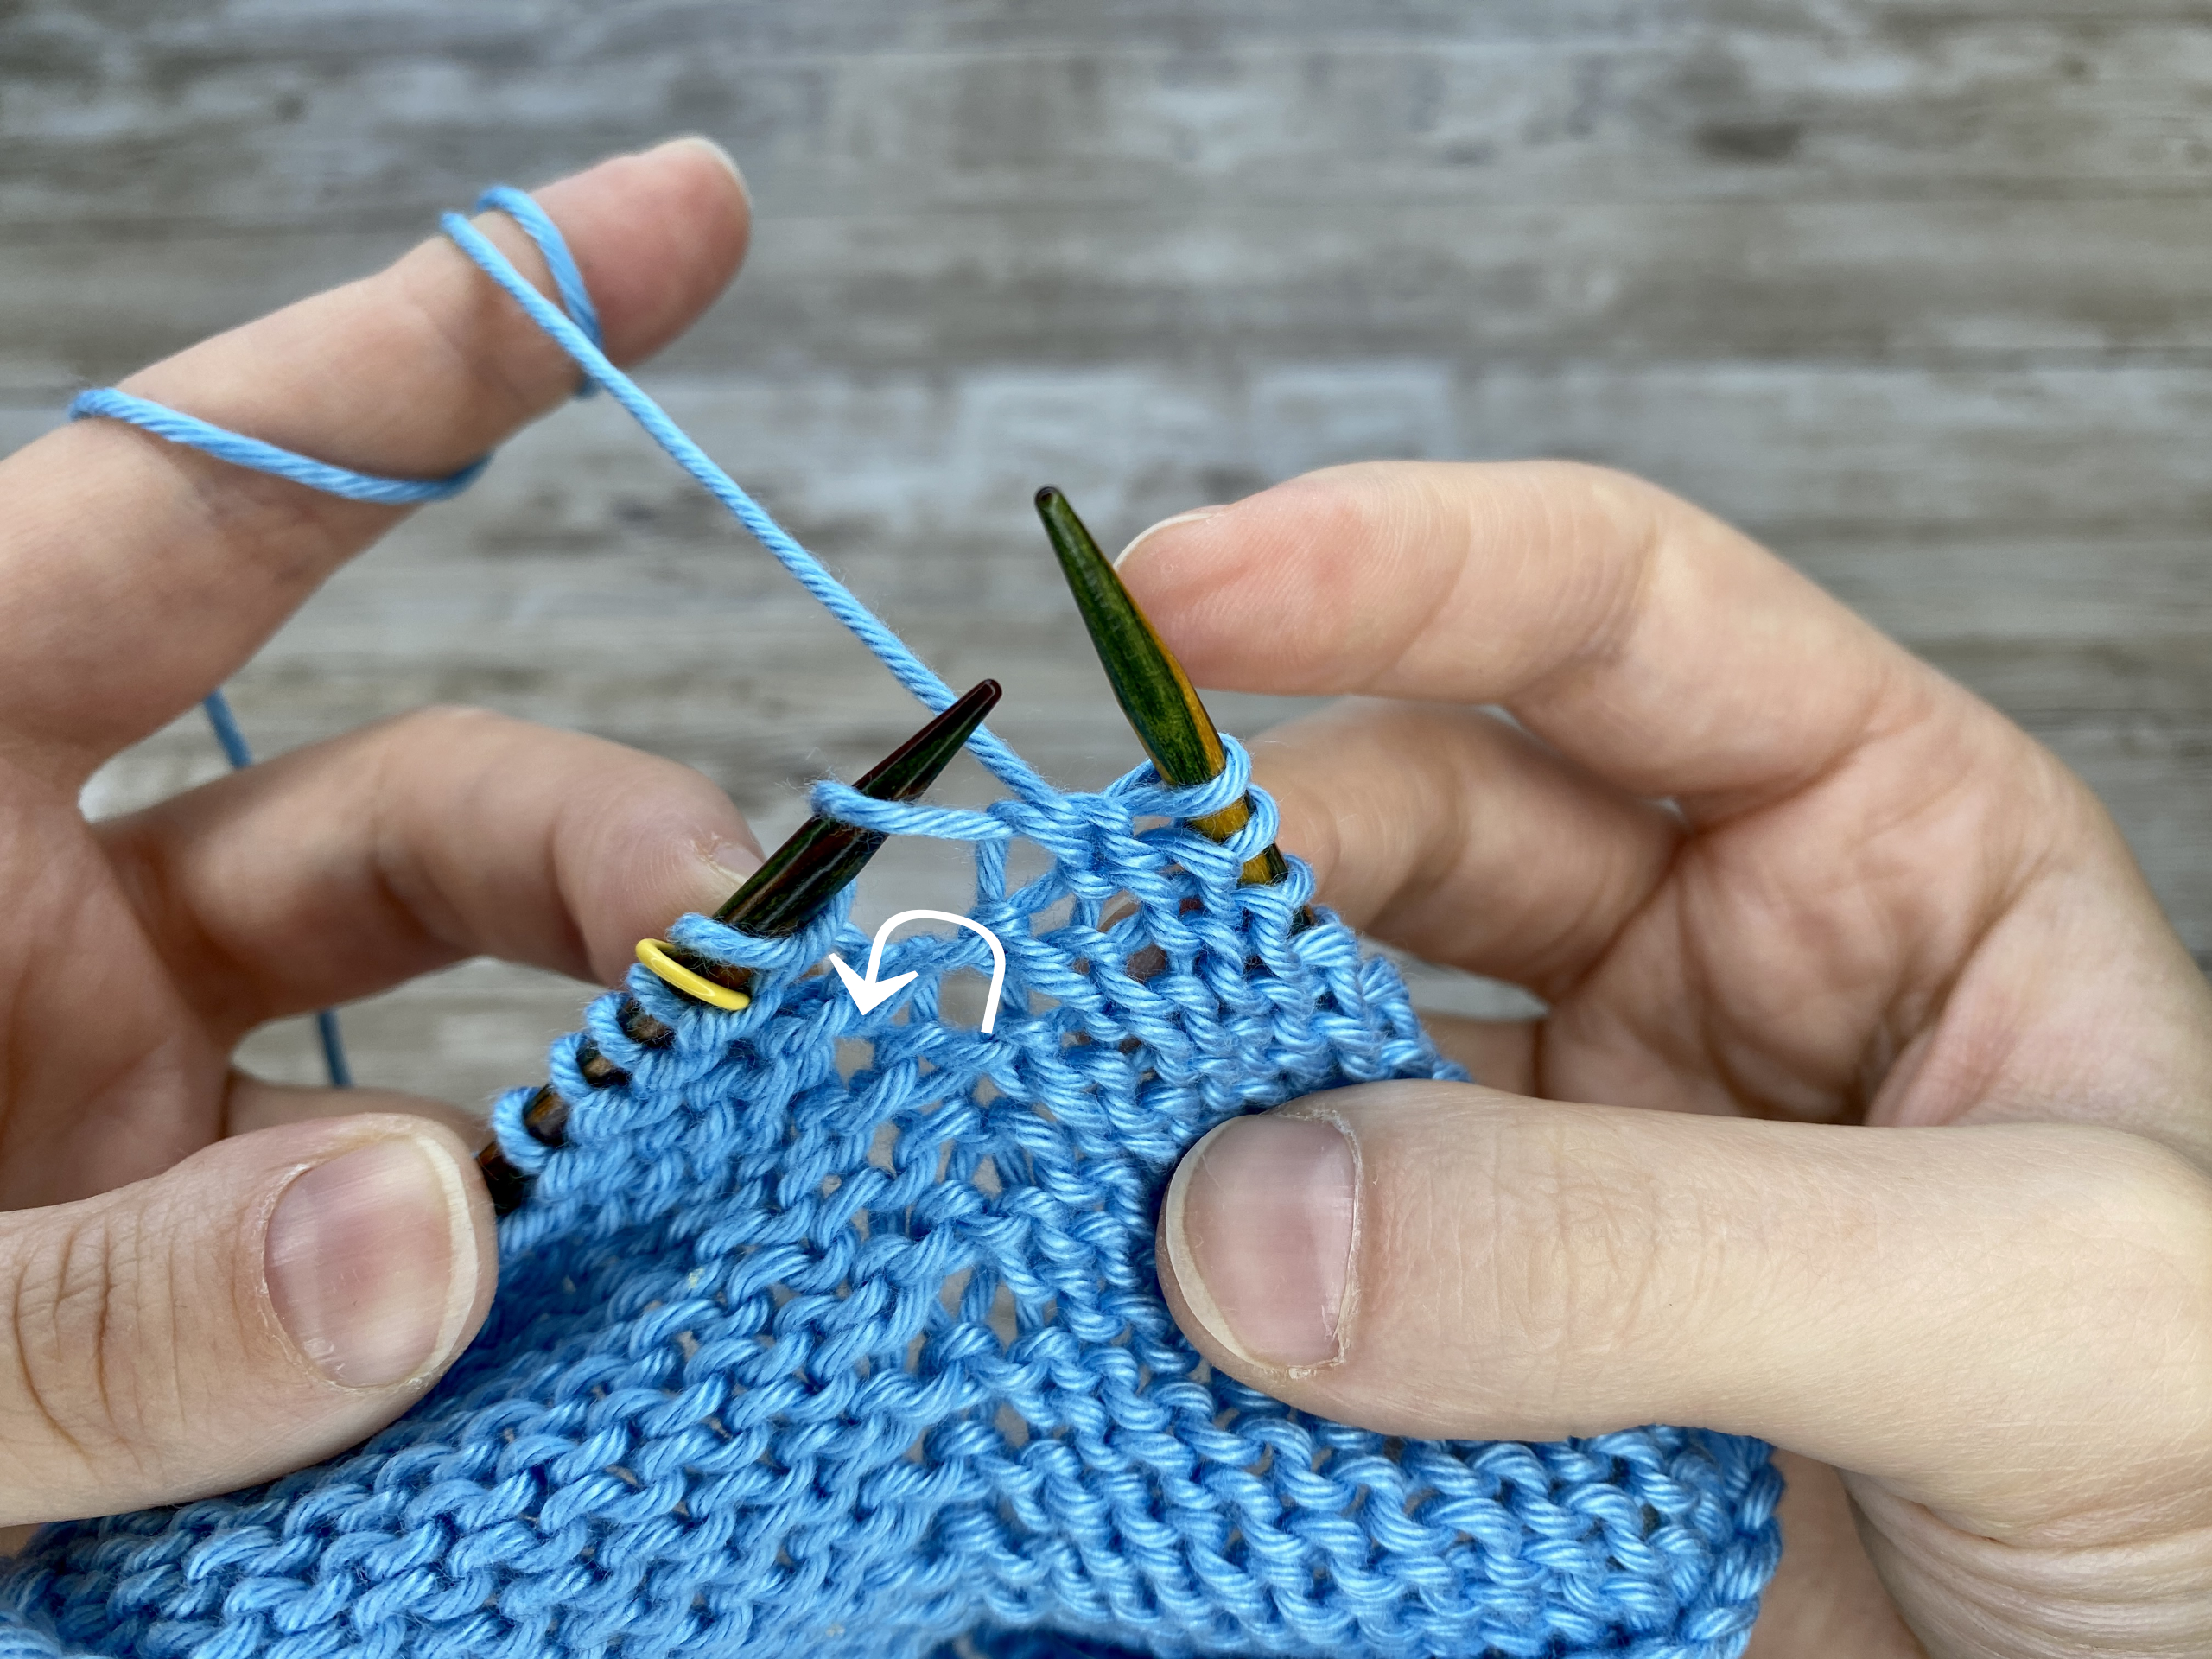
Using the left needle, pick up the strand from front to back. To ensure that you have picked up the stitch the right way, you can examine the loop on the needle. It should lean towards the left side.
-
Purl into the back of the loop. This action twists the stitch, closing any potential hole.
 |
 |
 |
| Locate the horizontal strand of yarn between the stitches. | Pick up the strand from front to back. |
The loop on the needle should lean towards the left side. |
 |
 |
 |
| Insert your needle through the back loop of the stitch. | Purl this stitch. |
This action twists the stitch, closing any potential holes. |
How to Determine the Direction of the Increase
This is actually very easy to see and uses the same technique as the M1 increases on the knit side. Simply look at the direction your loop is pointing: if it points to the right, it’s an M1R increase; if it points to the left, it’s an M1L increase.
 |
 |
|
The loop on your needle points to the right side |
The loop on your needle points to the left side |
Common Mistakes and Pro Tips
Common Mistakes When Working M1LP and M1RP
-
Picking up the strand in the wrong direction
One of the most frequent mistakes when working purl-side increases is grabbing the horizontal strand incorrectly.
For M1LP (Make 1 Left Purl), pick up the strand from front to back.
For M1RP (Make 1 Right Purl), pick it up from back to front.
Mixing them up changes the lean direction, causing the increase to appear reversed. -
Forgetting to twist the stitch
If your new stitch leaves a hole, it means it wasn’t twisted when purled. Purling through the untwisted loop opens up the fabric. Always twist the picked-up strand, this keeps the increase invisible and firm. -
Losing track of directionality
It’s easy to forget which way your increase should lean. A simple rule of thumb:
If your loop leans left, it’s M1LP.
If your loop leans right, it’s M1RP.
This visual cue keeps shaping symmetrical when increasing on both sides of your work.
Pro Tips for Perfect Purl-Side Increases
-
Mark your increase spots.
Use small stitch markers to flag increase points, especially when shaping sleeves or sweater sides. It ensures your M1LP and M1RP increases stay aligned row after row. -
Practice on a small swatch.
Before adding purl-side increases to your project, practice them a few times on a swatch. This helps you feel the difference between front-to-back and back-to-front pickup directions. -
Combine with knit-side increases for balance.
For projects involving shaping on both sides (like raglan sweaters), use M1L/M1R on the knit side and M1LP/M1RP on the purl side for perfectly mirrored results. -
Lightly block your finished piece.
A quick steam or wet block relaxes the stitches and helps the increases blend smoothly into the fabric.
Frequently Asked Questions About M1LP and M1RP
What is the difference between M1LP and M1RP?
M1LP (Make 1 Left Purl) and M1RP (Make 1 Right Purl) are mirror‑image increases worked on the purl side of your knitting.
M1LP leans to the left, and M1RP leans to the right. Both create new stitches using the strand between stitches, producing clean, invisible shaping without holes.
Can I use M1LP or M1RP on the knit side?
Yes! While they’re designed for the purl side, these increases can also be used on the knit side when your pattern alternates between knit and purl sections, like in cable knitting or textured stitch patterns. They help the fabric stay balanced and symmetrical on both sides.
Are M1LP and M1RP the same as M1L and M1R?
They’re similar but done from opposite sides.
-
M1L / M1R: worked on the knit side.
-
M1LP / M1RP: worked on the purl side.
If you turn your work, you’ll see that M1LP and M1RP form the same directional increases as their knit‑side versions.
When should I use M1LP and M1RP in a pattern?
These increases are perfect for shaping in reverse stockinette stitch, purl‑heavy designs, or any project where the purl side is visible, such as certain garments, cuffs, or neckline edges. They’re also useful when mirroring increases on both sides of your work for a polished, professional finish.
Why do my M1LP or M1RP stitches twist or look uneven?
This usually happens if the lifted strand is picked up in the wrong direction.
-
For M1LP: pick up the strand front to back and purl through the back loop.
-
For M1RP: pick up the strand back to front and purl through the front loop.
Always double‑check the direction your loop leans—left for M1LP, right for M1RP—to ensure symmetry.
Are M1LP and M1RP beginner‑friendly?
Yes! They look more advanced than they really are. Once you understand which way to lift the strand, both increases become quick and intuitive. Practice on a small swatch, and you’ll master them in minutes.
Can I substitute M1LP/M1RP for other increases?
You can, but outcomes differ slightly. KFB (Knit Front and Back) creates a visible bar, while yarn overs add decorative holes when not worked through the back loop. You can also try using lifted increases on the purlside.
Conclusion
Try out your newfound skills by knitting a small swatch for yourself. Experiment with increasing on both the purl and knit sides of your project. Remember, the best way to grow as a knitter, just like in any craft, is through practice and experimentation.
Until then, happy knitting
A Little Way to Say Thanks
You Might Also Like


 |
|
Join the Cozy Corner Newsletter!
Hey there, creative soul! Welcome to the Yarn Enchantment Newsletter, where we celebrate all things cozy, crafty, and full of heart. Think of this as your friendly crafting companion - a little dose of inspiration delivered straight to your inbox, just for you. Inside, you’ll find: ✨ Exclusive patterns & tutorials - ideas you won’t find anywhere else (just for us!) 📚 Bookish crafts that bring your favorite stories to life 🧶 Tips and tricks to make your crafting journey smoother (and more fun!) 💌 Heartfelt musings on life, creativity, and the magic of making something with your own two hands Whether you’re knitting by the fire, brainstorming your next DIY project, or just looking for a little creative pick-me-up, this newsletter is here to cheer you on. Because let’s be honest - crafting isn’t just about the finished project; it’s about the joy, peace, and stories we create along the way. So grab a cup of tea, cozy up, and join me. Together, we’ll weave a little magic into everyday life - one stitch, one story, and one email at a time. P.S. I’m so glad you’re here. Let’s make something beautiful together! (Note: If you're using an ad blocker, you may encounter issues subscribing to the newsletter. To subscribe, please consider disabling your ad blocker.)
|
