
Jade Serenity Spa Set | Facial Scrubbies
January 8, 2025
Jade Serenity Spa Set | Soap Saver
January 13, 2025KFB Increase Tutorial: Knit Front and Back (Step-by-Step Guide)

Originally published on January 10, 2025
The knit front and back (KFB) increase is one of the oldest and most enduring knitting techniques. It’s been used for centuries in garments like sweaters, shawls, and hats - a quiet little workhorse in the knitting world that’s just as useful today as it was hundreds of years ago. Because it’s simple, reliable, and easy to learn, it’s often one of the very first increases beginner knitters master.
Knitting itself dates back over a thousand years, with its origins traced to the Middle East before spreading throughout Europe during the Middle Ages. Early knitters needed practical ways to shape sleeves, socks, and caps, and the KFB - which adds a stitch by knitting into both the front and back of the same loop - offered a neat, efficient solution. While we can’t pinpoint who first invented it, the technique likely evolved naturally alongside the development of knitting itself, passed down through generations of skilled hands.
Over time, knitters developed a few variations of the KFB to suit different textures and styles. The Mirror KFB gives a more symmetrical look for balanced shaping, the KFSB (knit front, slip back) offers a nearly invisible alternative, and the KBF (knit back and front) reverses the order for a subtler bar. Together, these variations make the KFB family of increases both versatile and beginner-friendly - perfect for adding character and structure to any knitted piece.
In today’s post, we’ll take a closer look at the classic KFB, its mirrored and “invisible” counterparts, and when to use each version so you can master all of them in one go - no need to hop between tutorials.
If you’re interested in exploring other types of increases, such as lifted increases or M1 increases , don’t miss this comprehensive guide to knitting increases. It’s the perfect resource to broaden your knitting techniques and take your projects to the next level!
 |
Table of Contents
- What Is a KFB Increase?
- How to Work a KFB Step-by-Step
- Mirror KFB: The Right-Leaning Version
- KBF Increase: Knit Back and Front Variation
- KBF (Version 2) - Twisted Stitch Variation
- KFSB: A Smooth, Nearly Invisible Alternative
- When to Use KFB vs. Lifted Increases
- FAQs About KFB and Its Variations
- Conclusion & Video Tutorial
What Is a KFB Increase?
The Knit Front and Back (KFB) increase is one of the most popular knitting techniques for adding stitches. This beginner-friendly method creates one extra stitch by knitting into both the front and back loops of the same stitch, making it easy to master even for new knitters.
Also known as the Bar Increase, the KFB creates a small, visible purl bump - or “bar” - at the base of the stitch. This texture can be decorative in some patterns but noticeable in others. If you prefer a smoother or more invisible effect, try using a lifted increase, which blends flawlessly into the fabric of your knitting.
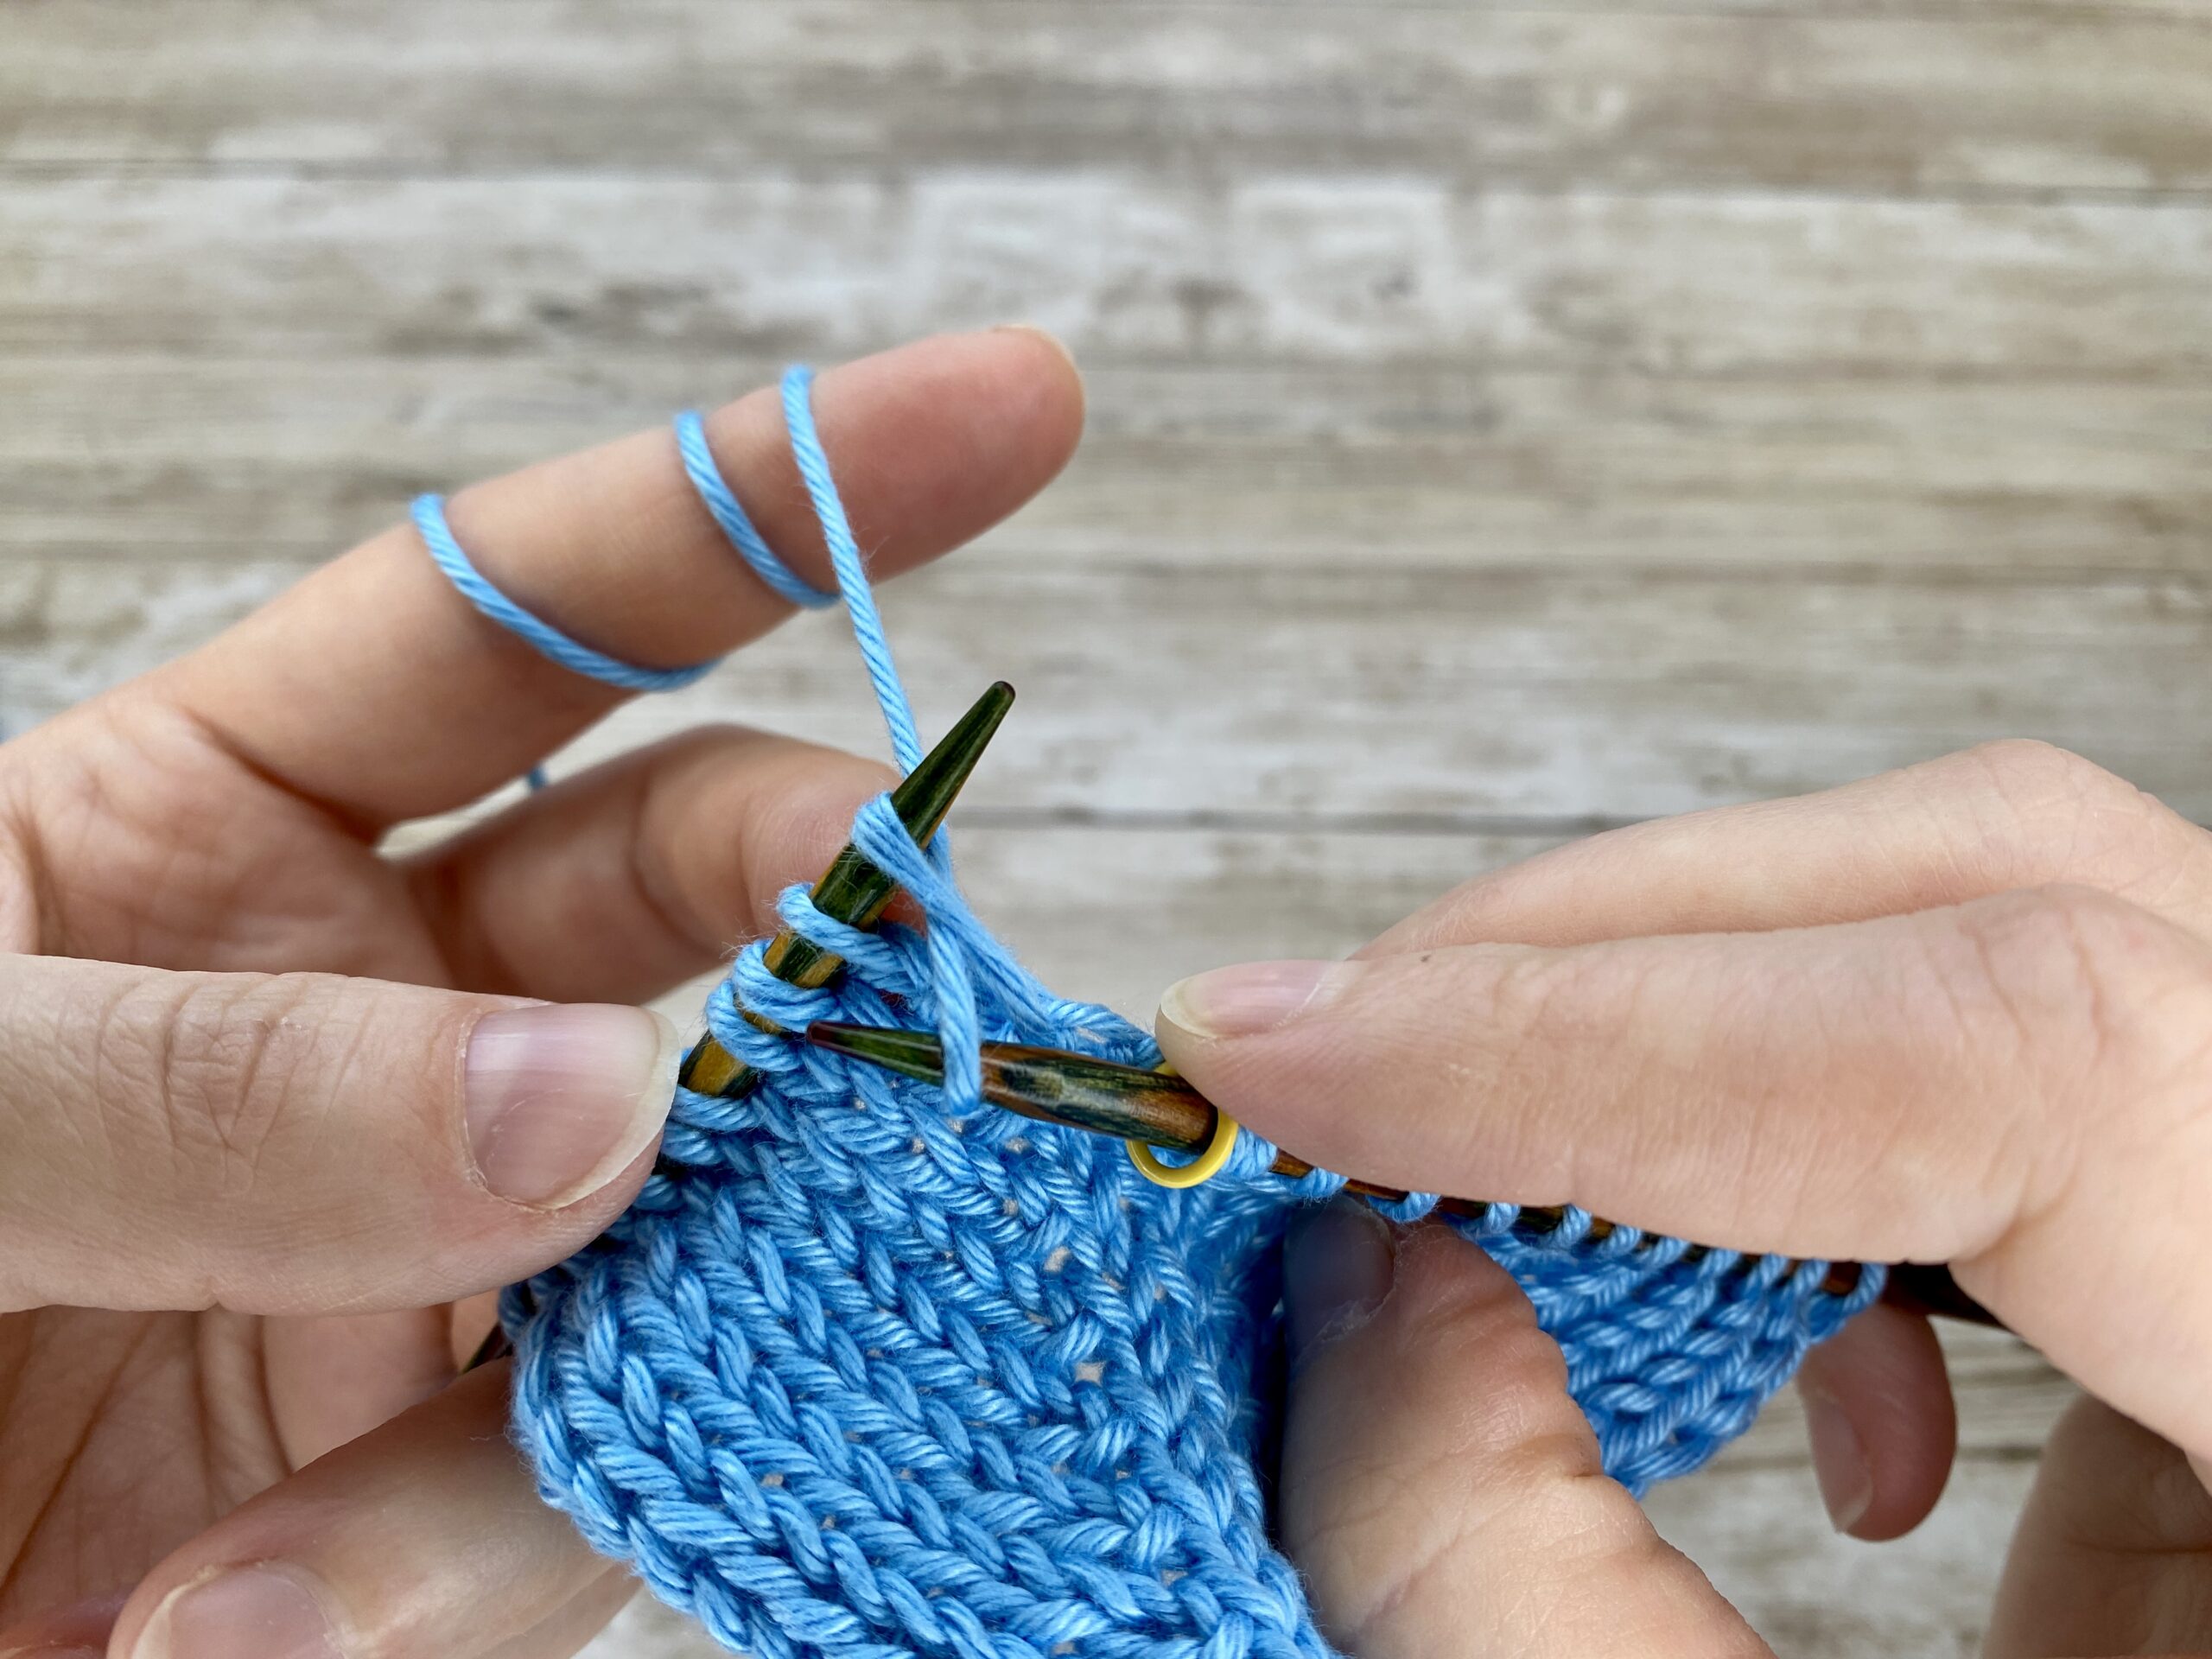
How to Knit Front and Back (KFB)
-
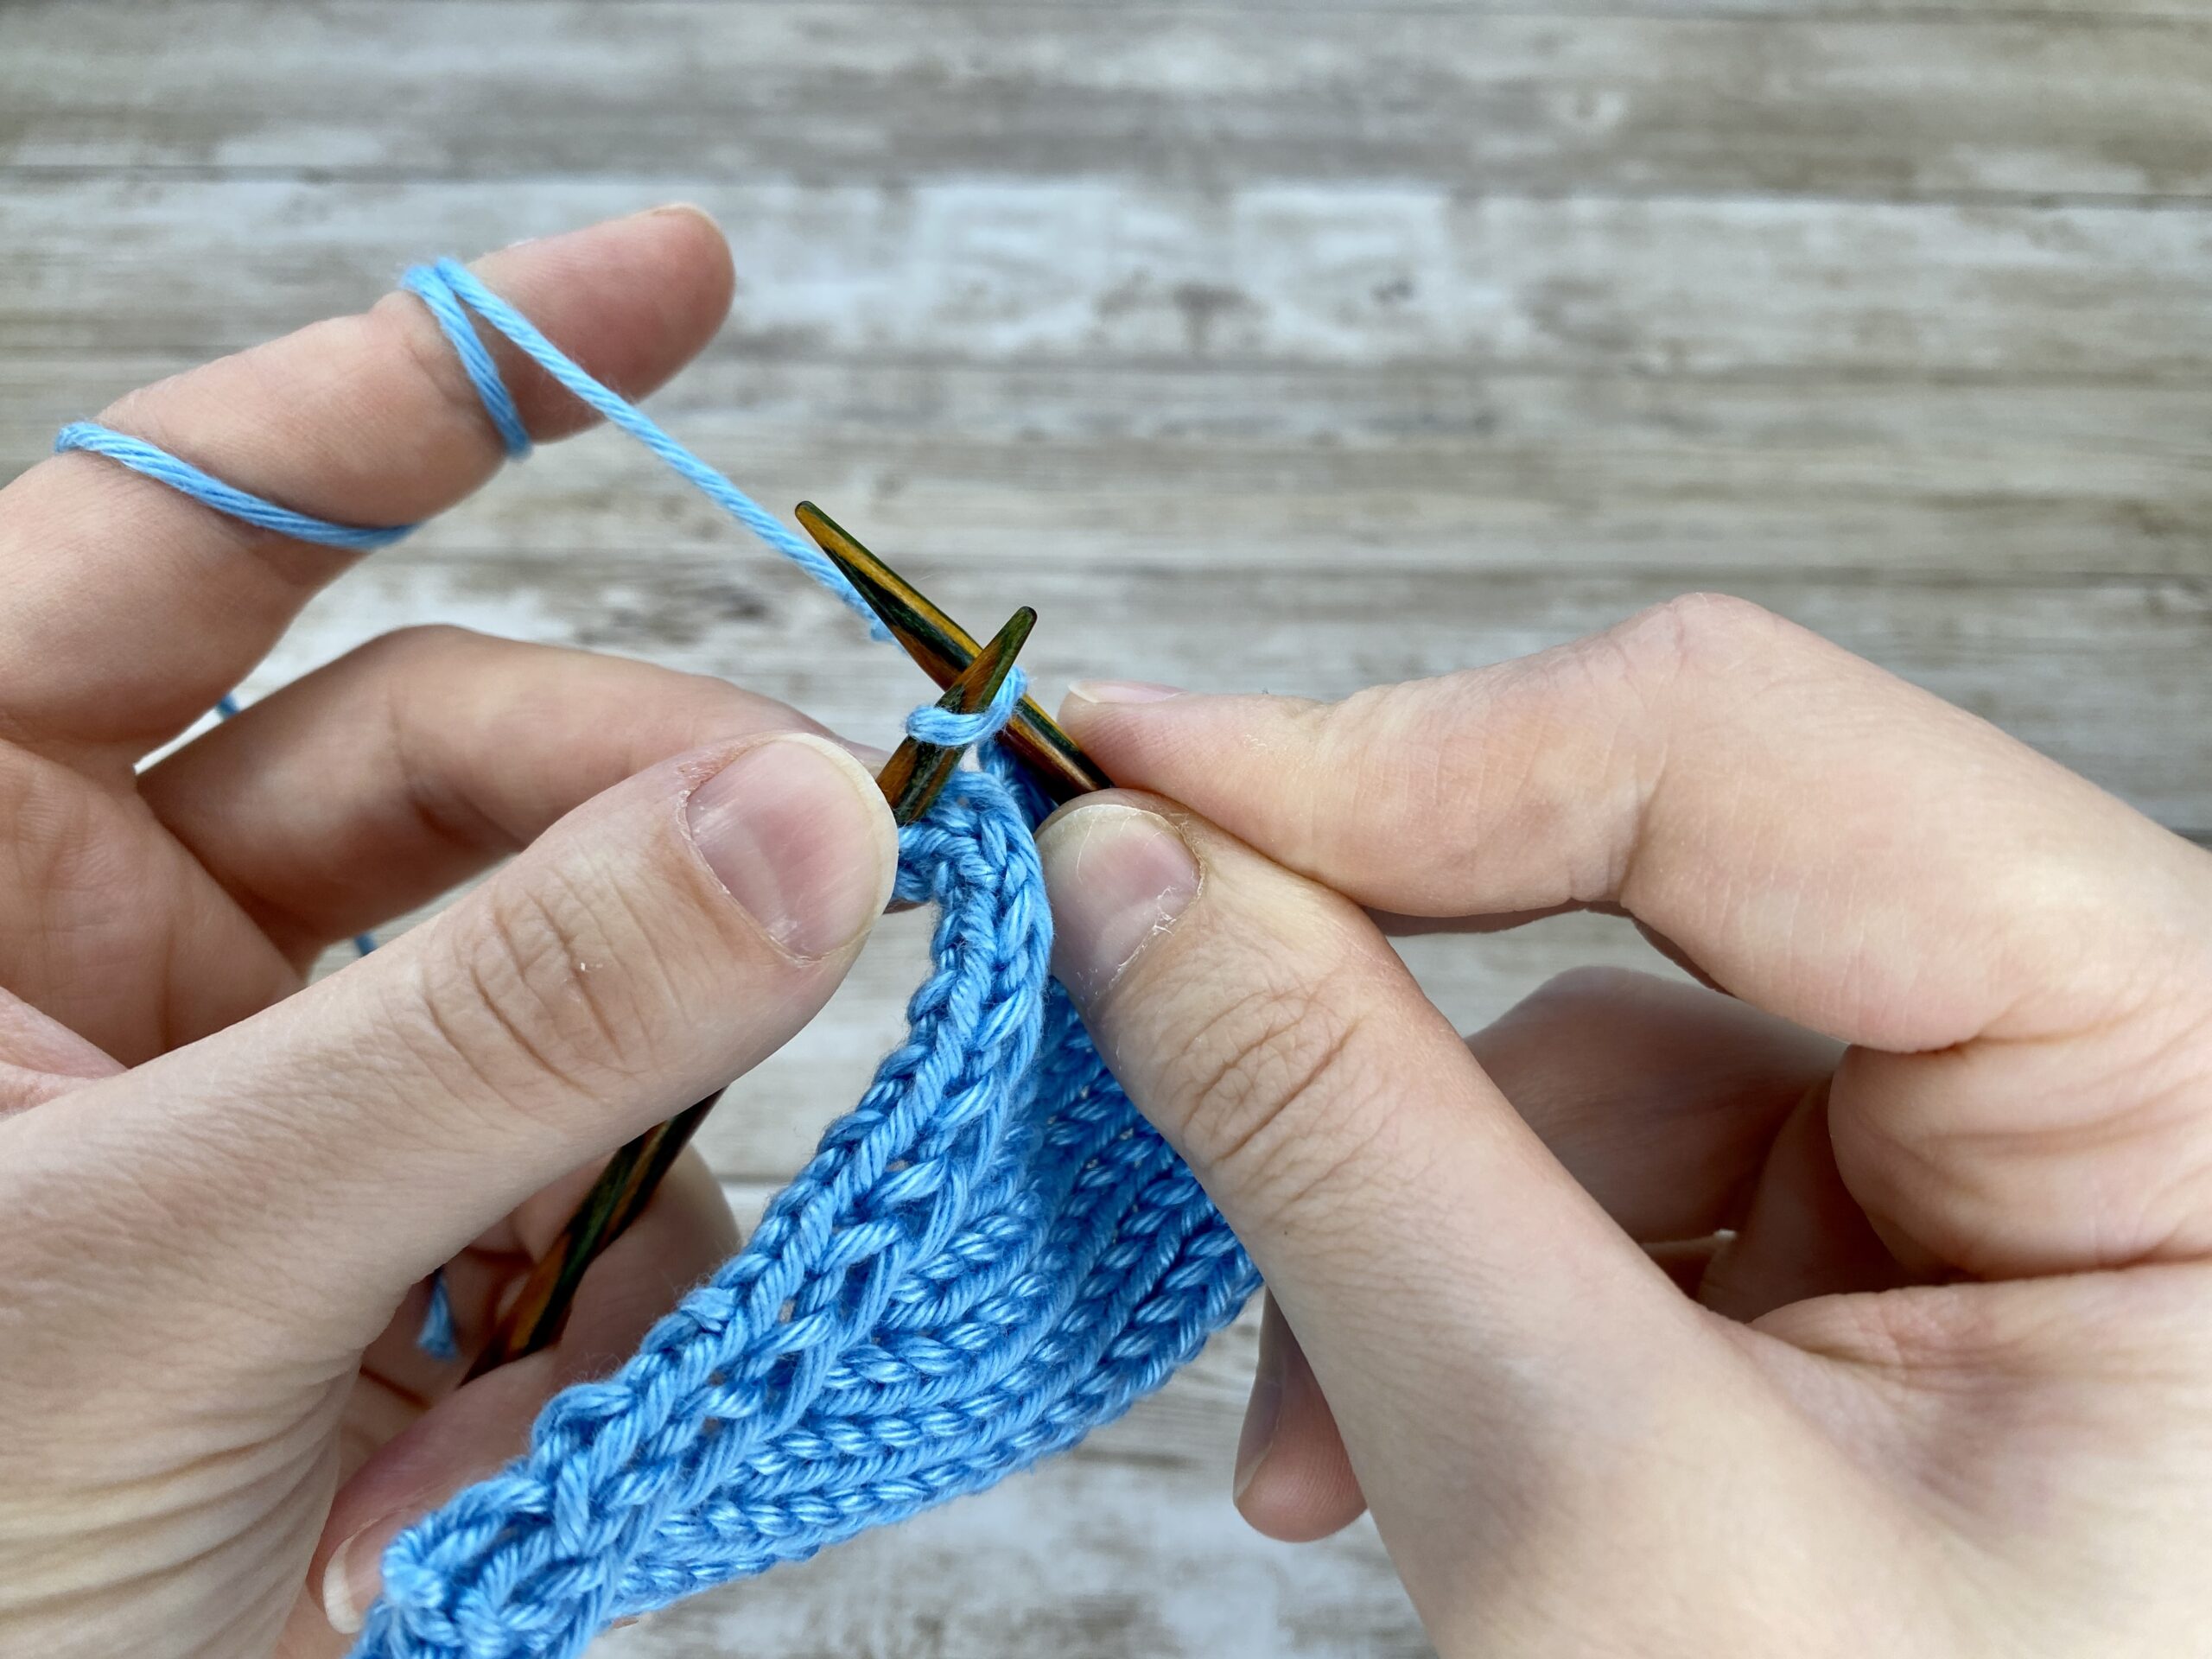
Knit into the front loop of the stitch as you normally would, but do not slide the stitch off the left needle.
-
Knit into the back loop of the same stitch (insert the needle into the back leg of the stitch from right to left).
-
Slide the stitch off the left needle. You now have two stitches where there was one.
 |  |  | Insert your needle into the front loop of your stitch | Yarn over | Pull it through the stitch, do not slip the stitch from your needle |


 |  |  | Bring your right needle to the back, and insert your needle into the back leg of your stitch | Knit this stitch through the back loop and slide it off the needle | You increased by one stitch |


Helpful Tips for Working the KFB Increase
-
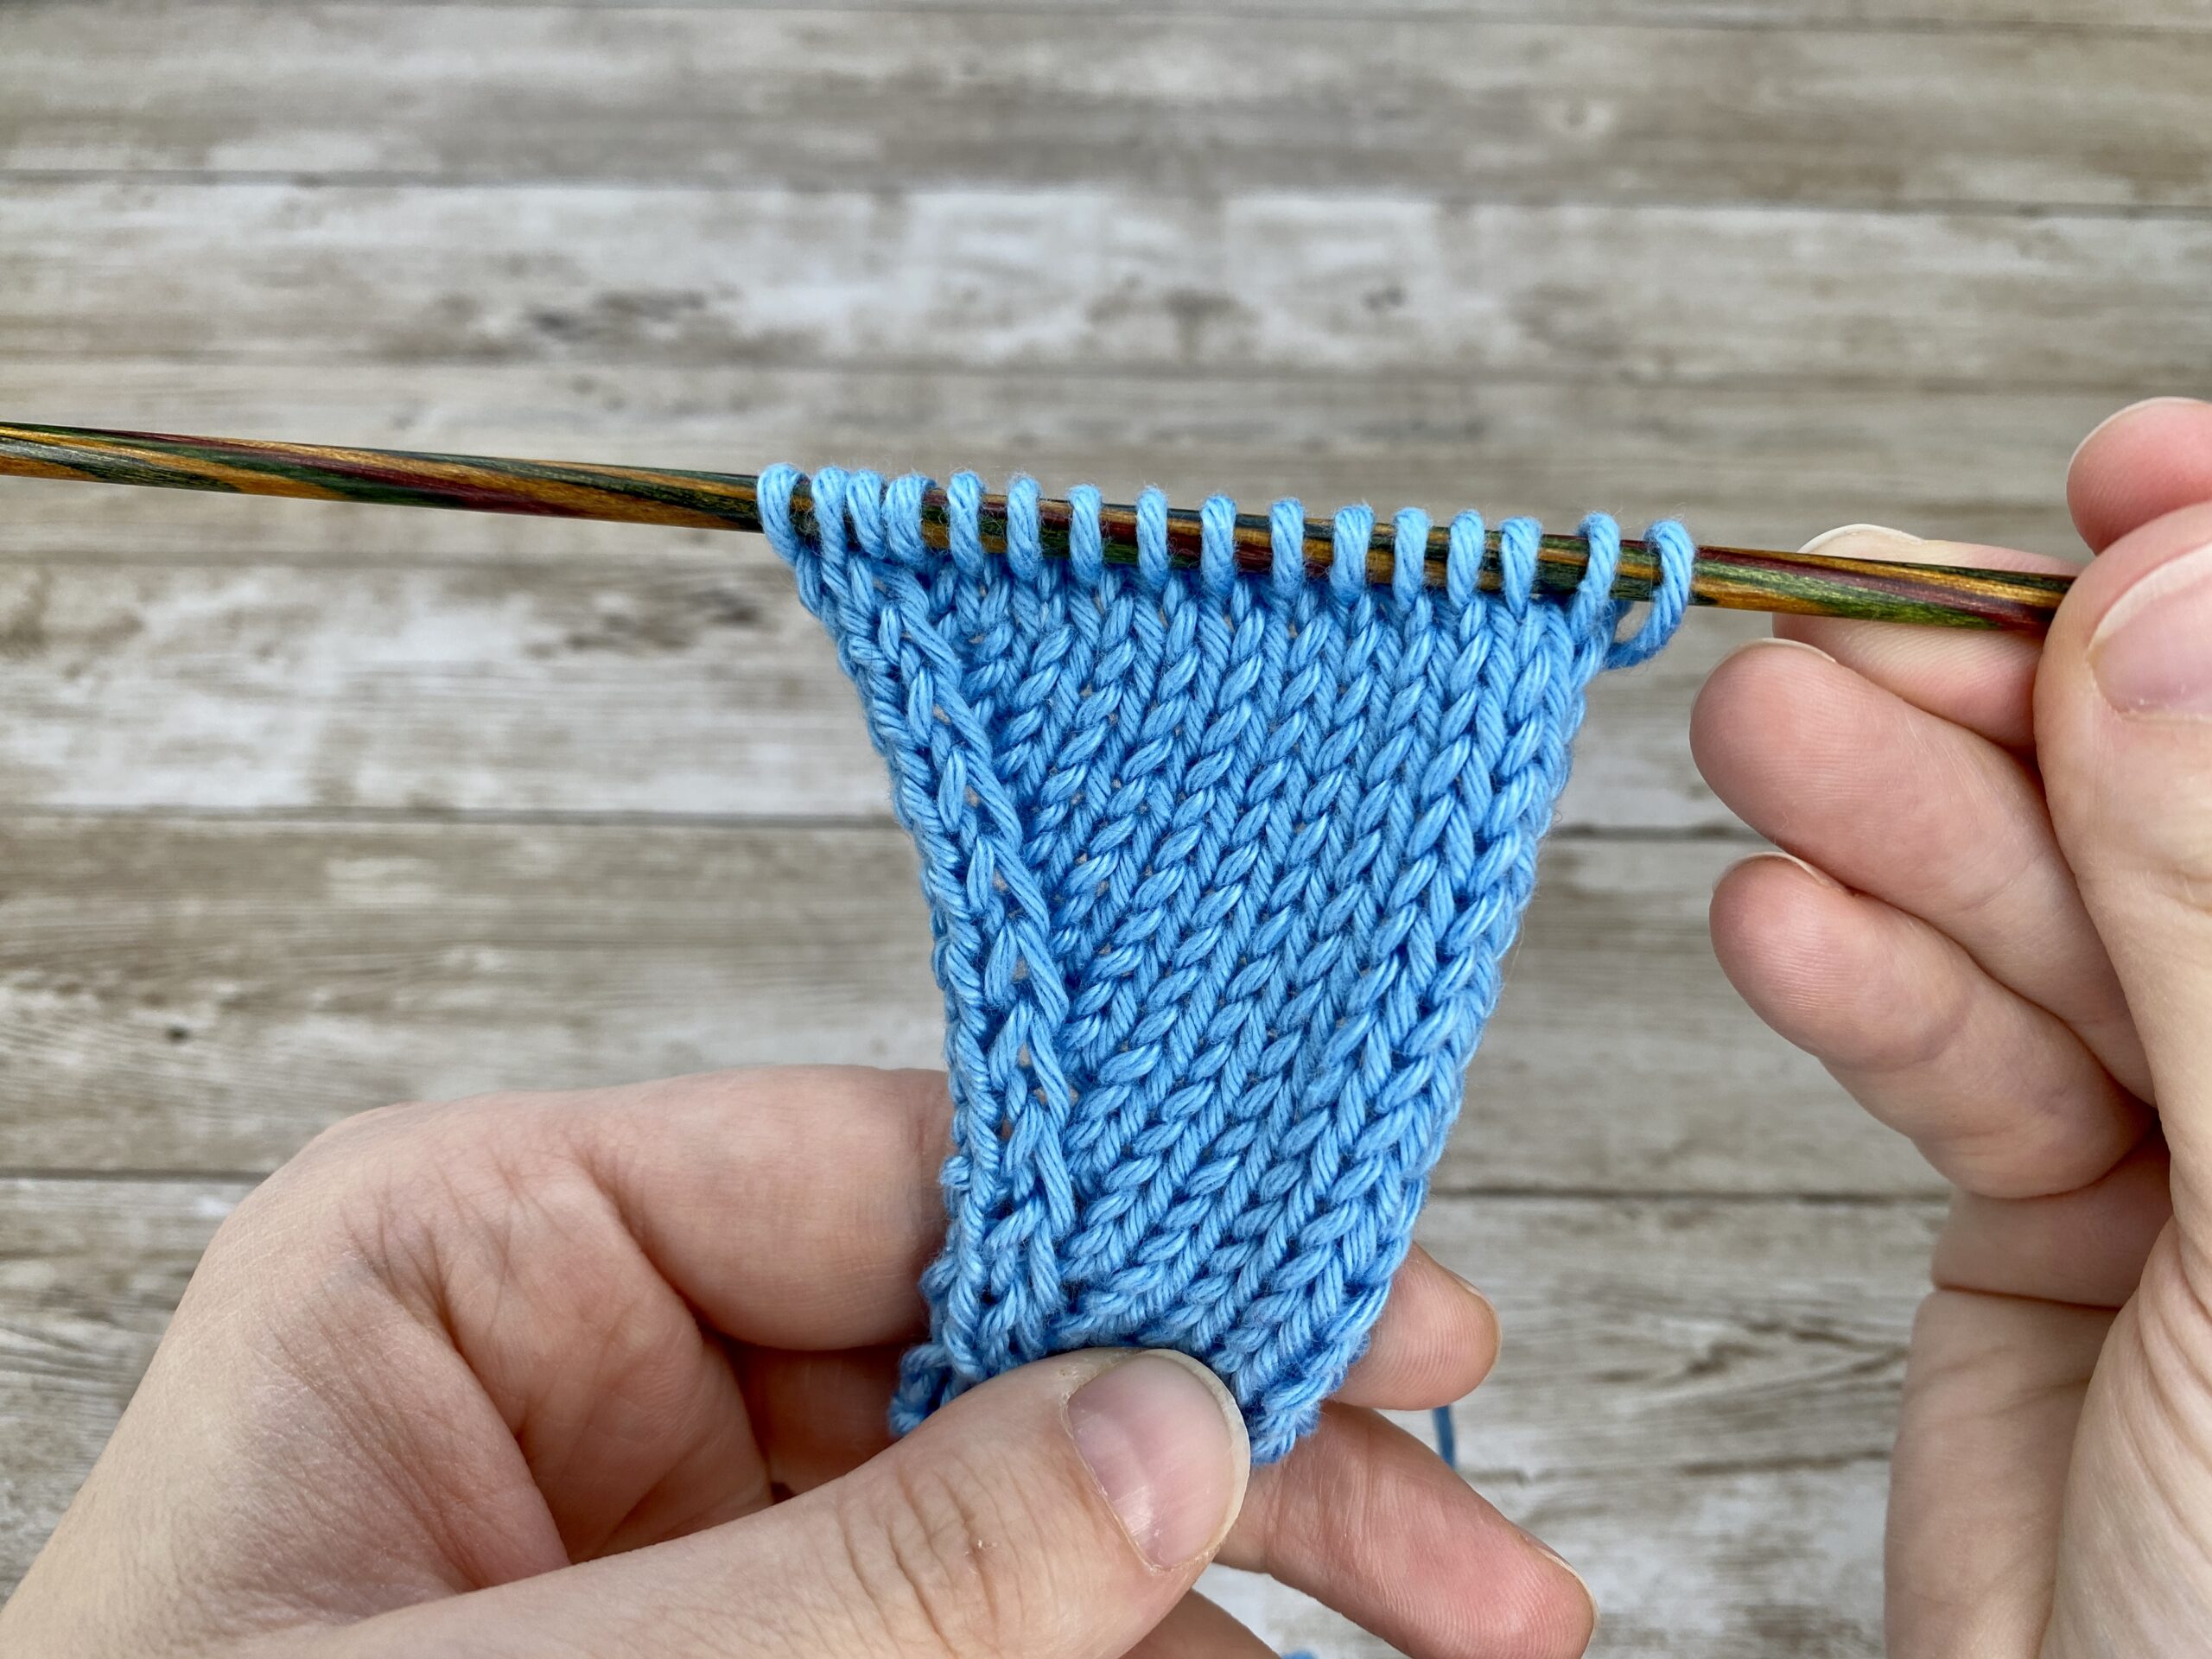
Appearance: The increase creates a small purl bump on the fabric, making it visible in stockinette stitch but less noticeable in garter stitch or ribbing.
-
Leaning: KFB is a left-leaning increase because the new stitch appears to the left of the original stitch.
-
Usage: You can use it anywhere you need to work an increase, but keep in mind that this type of increase is more visible. The alternative KFSB is similar to the KFB but without the purl bump. More about these increases below.
-
Blending: It works well in garter stitch, or seed stitch, where the bump blends into the pattern.
-
Easy to learn: KFB is beginner-friendly and one of the first increases many knitters learn.
Common KFB Mistakes and Fixes
-
Forgetting to Knit the Back Loop:
If you only knit the front loop and slide the stitch off, you won’t create an increase.
Fix: Identify the missed stitch and pick it up with your left needle to knit into the back loop. -
Twisting the Stitch:
If you accidentally twist the stitch while knitting into the back loop, it can create an uneven look.
Fix: Ensure the back loop is properly oriented before knitting into it. -
Visible Holes:
If the tension is too loose, KFB can leave small holes in the fabric.
Fix: Maintain even tension and practice to avoid gaps.
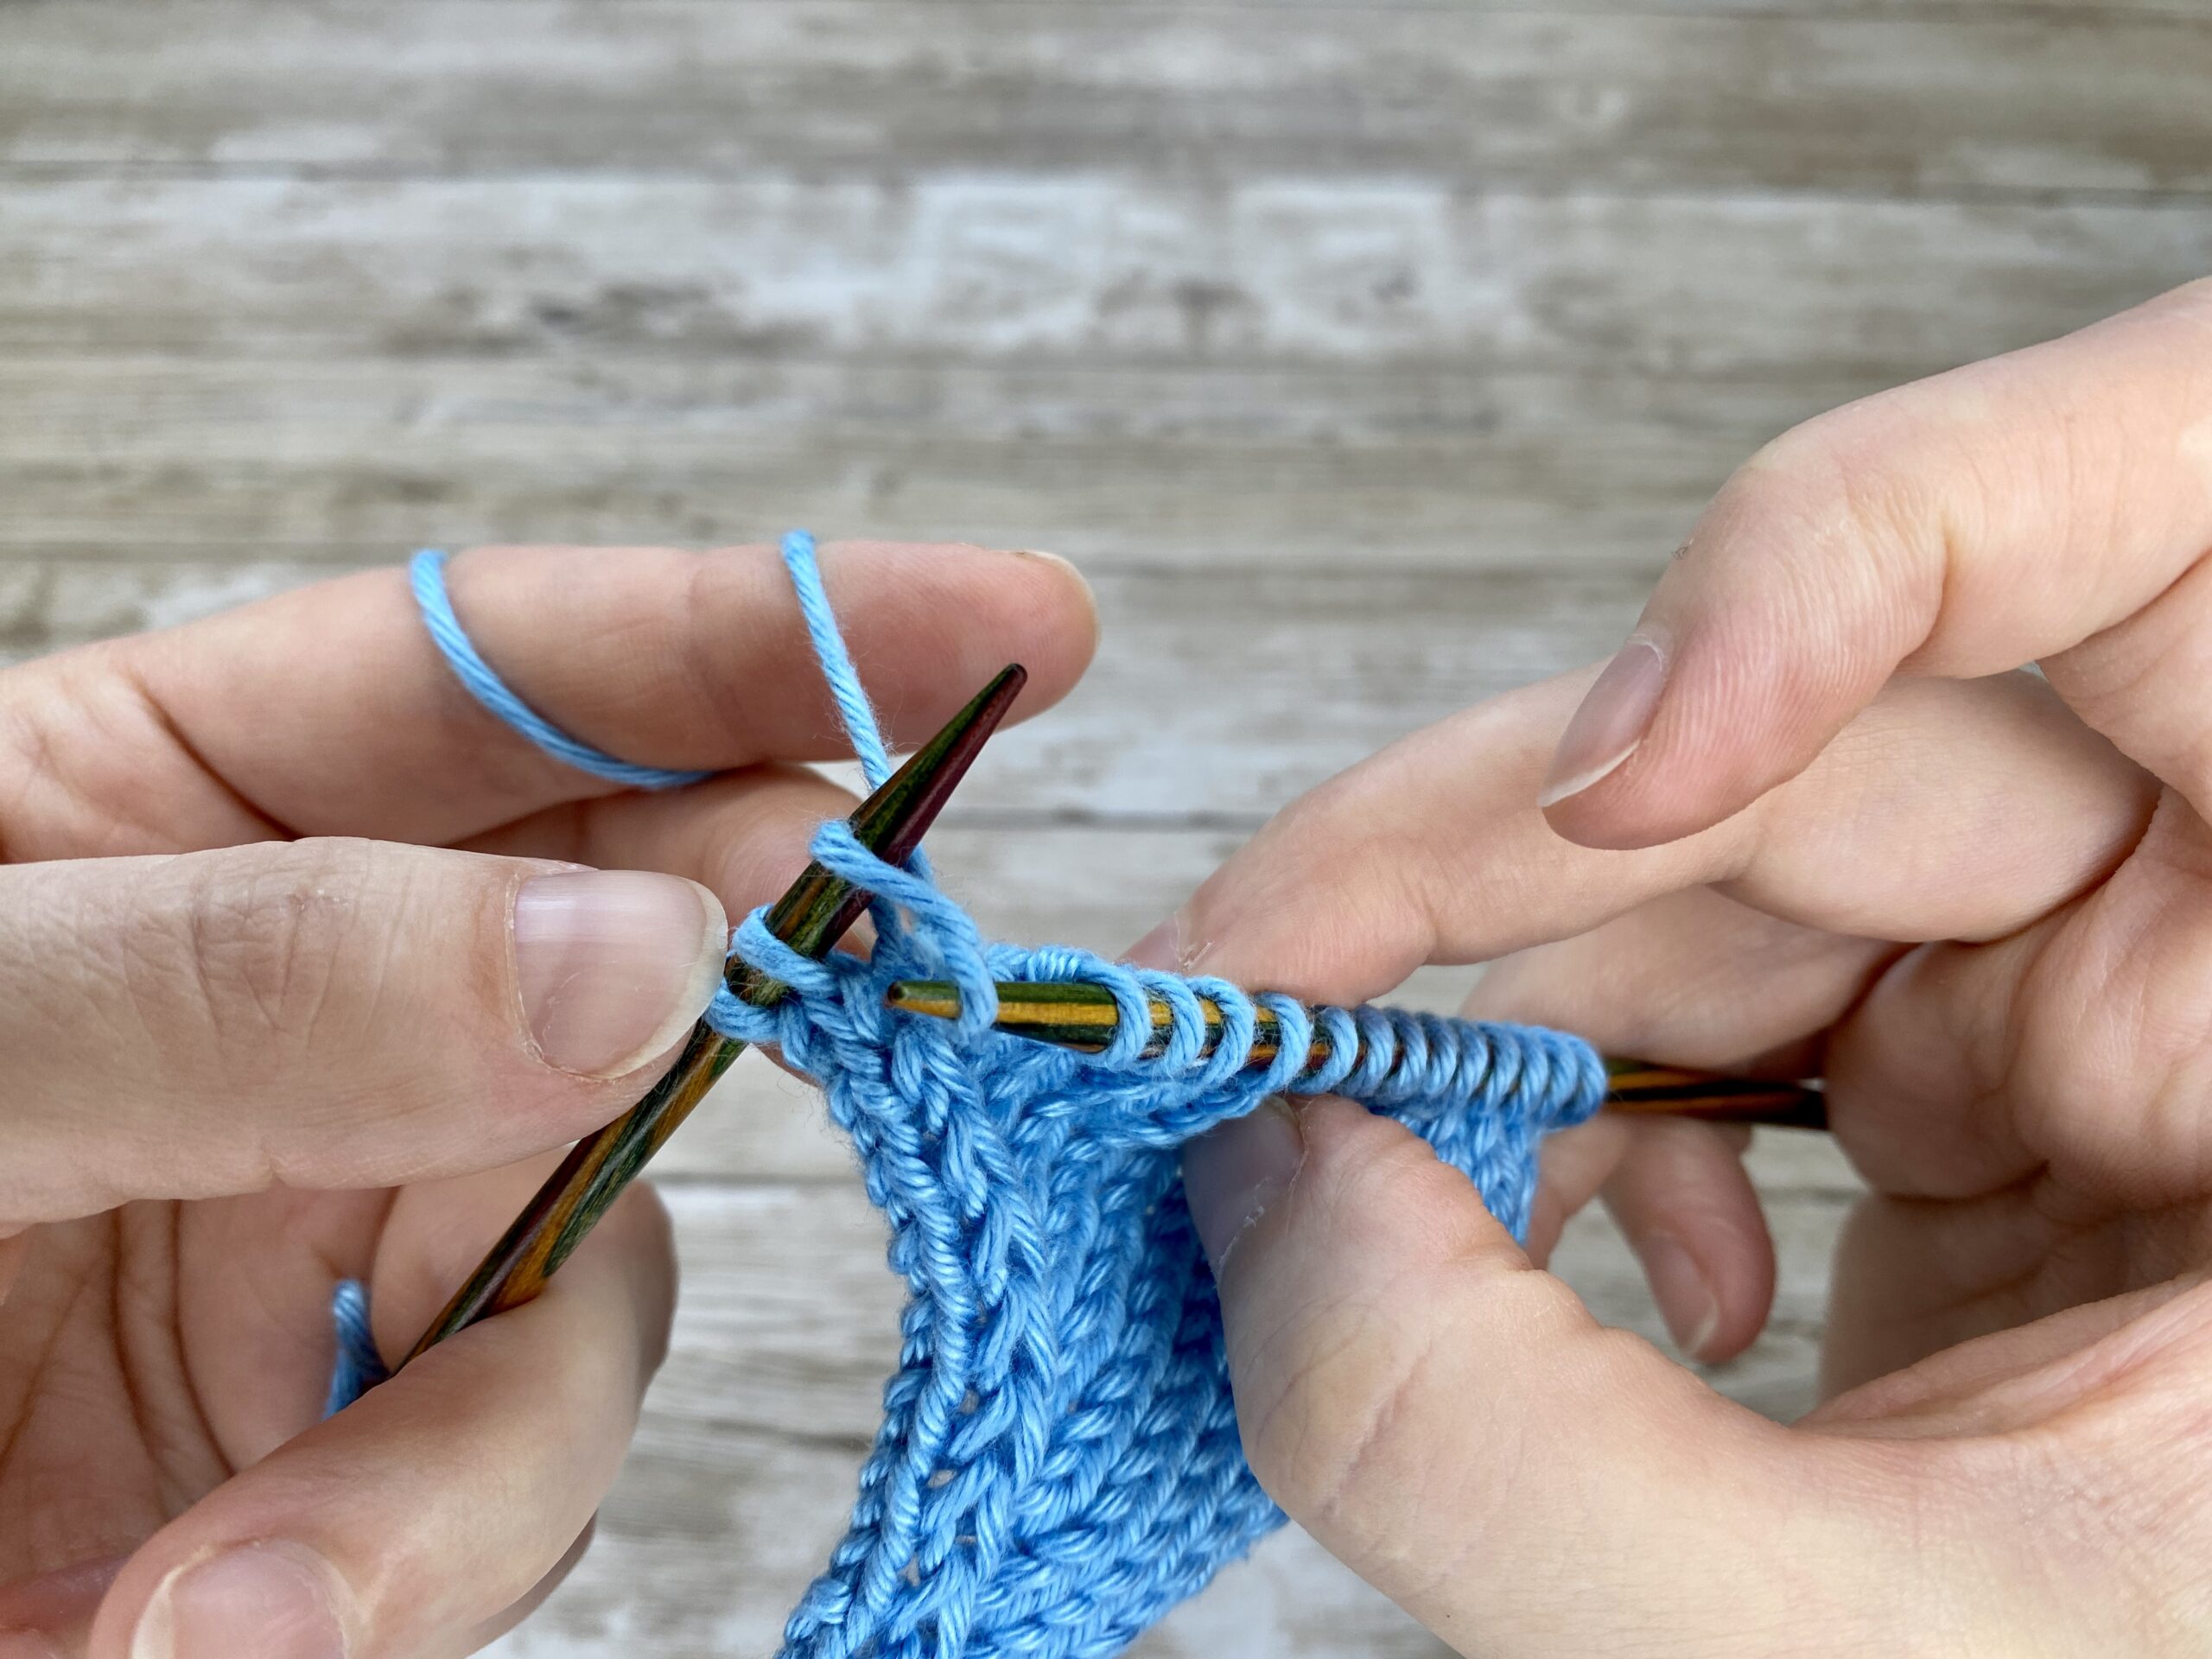
 | On the left side you can see the KFB increases with the little bars |

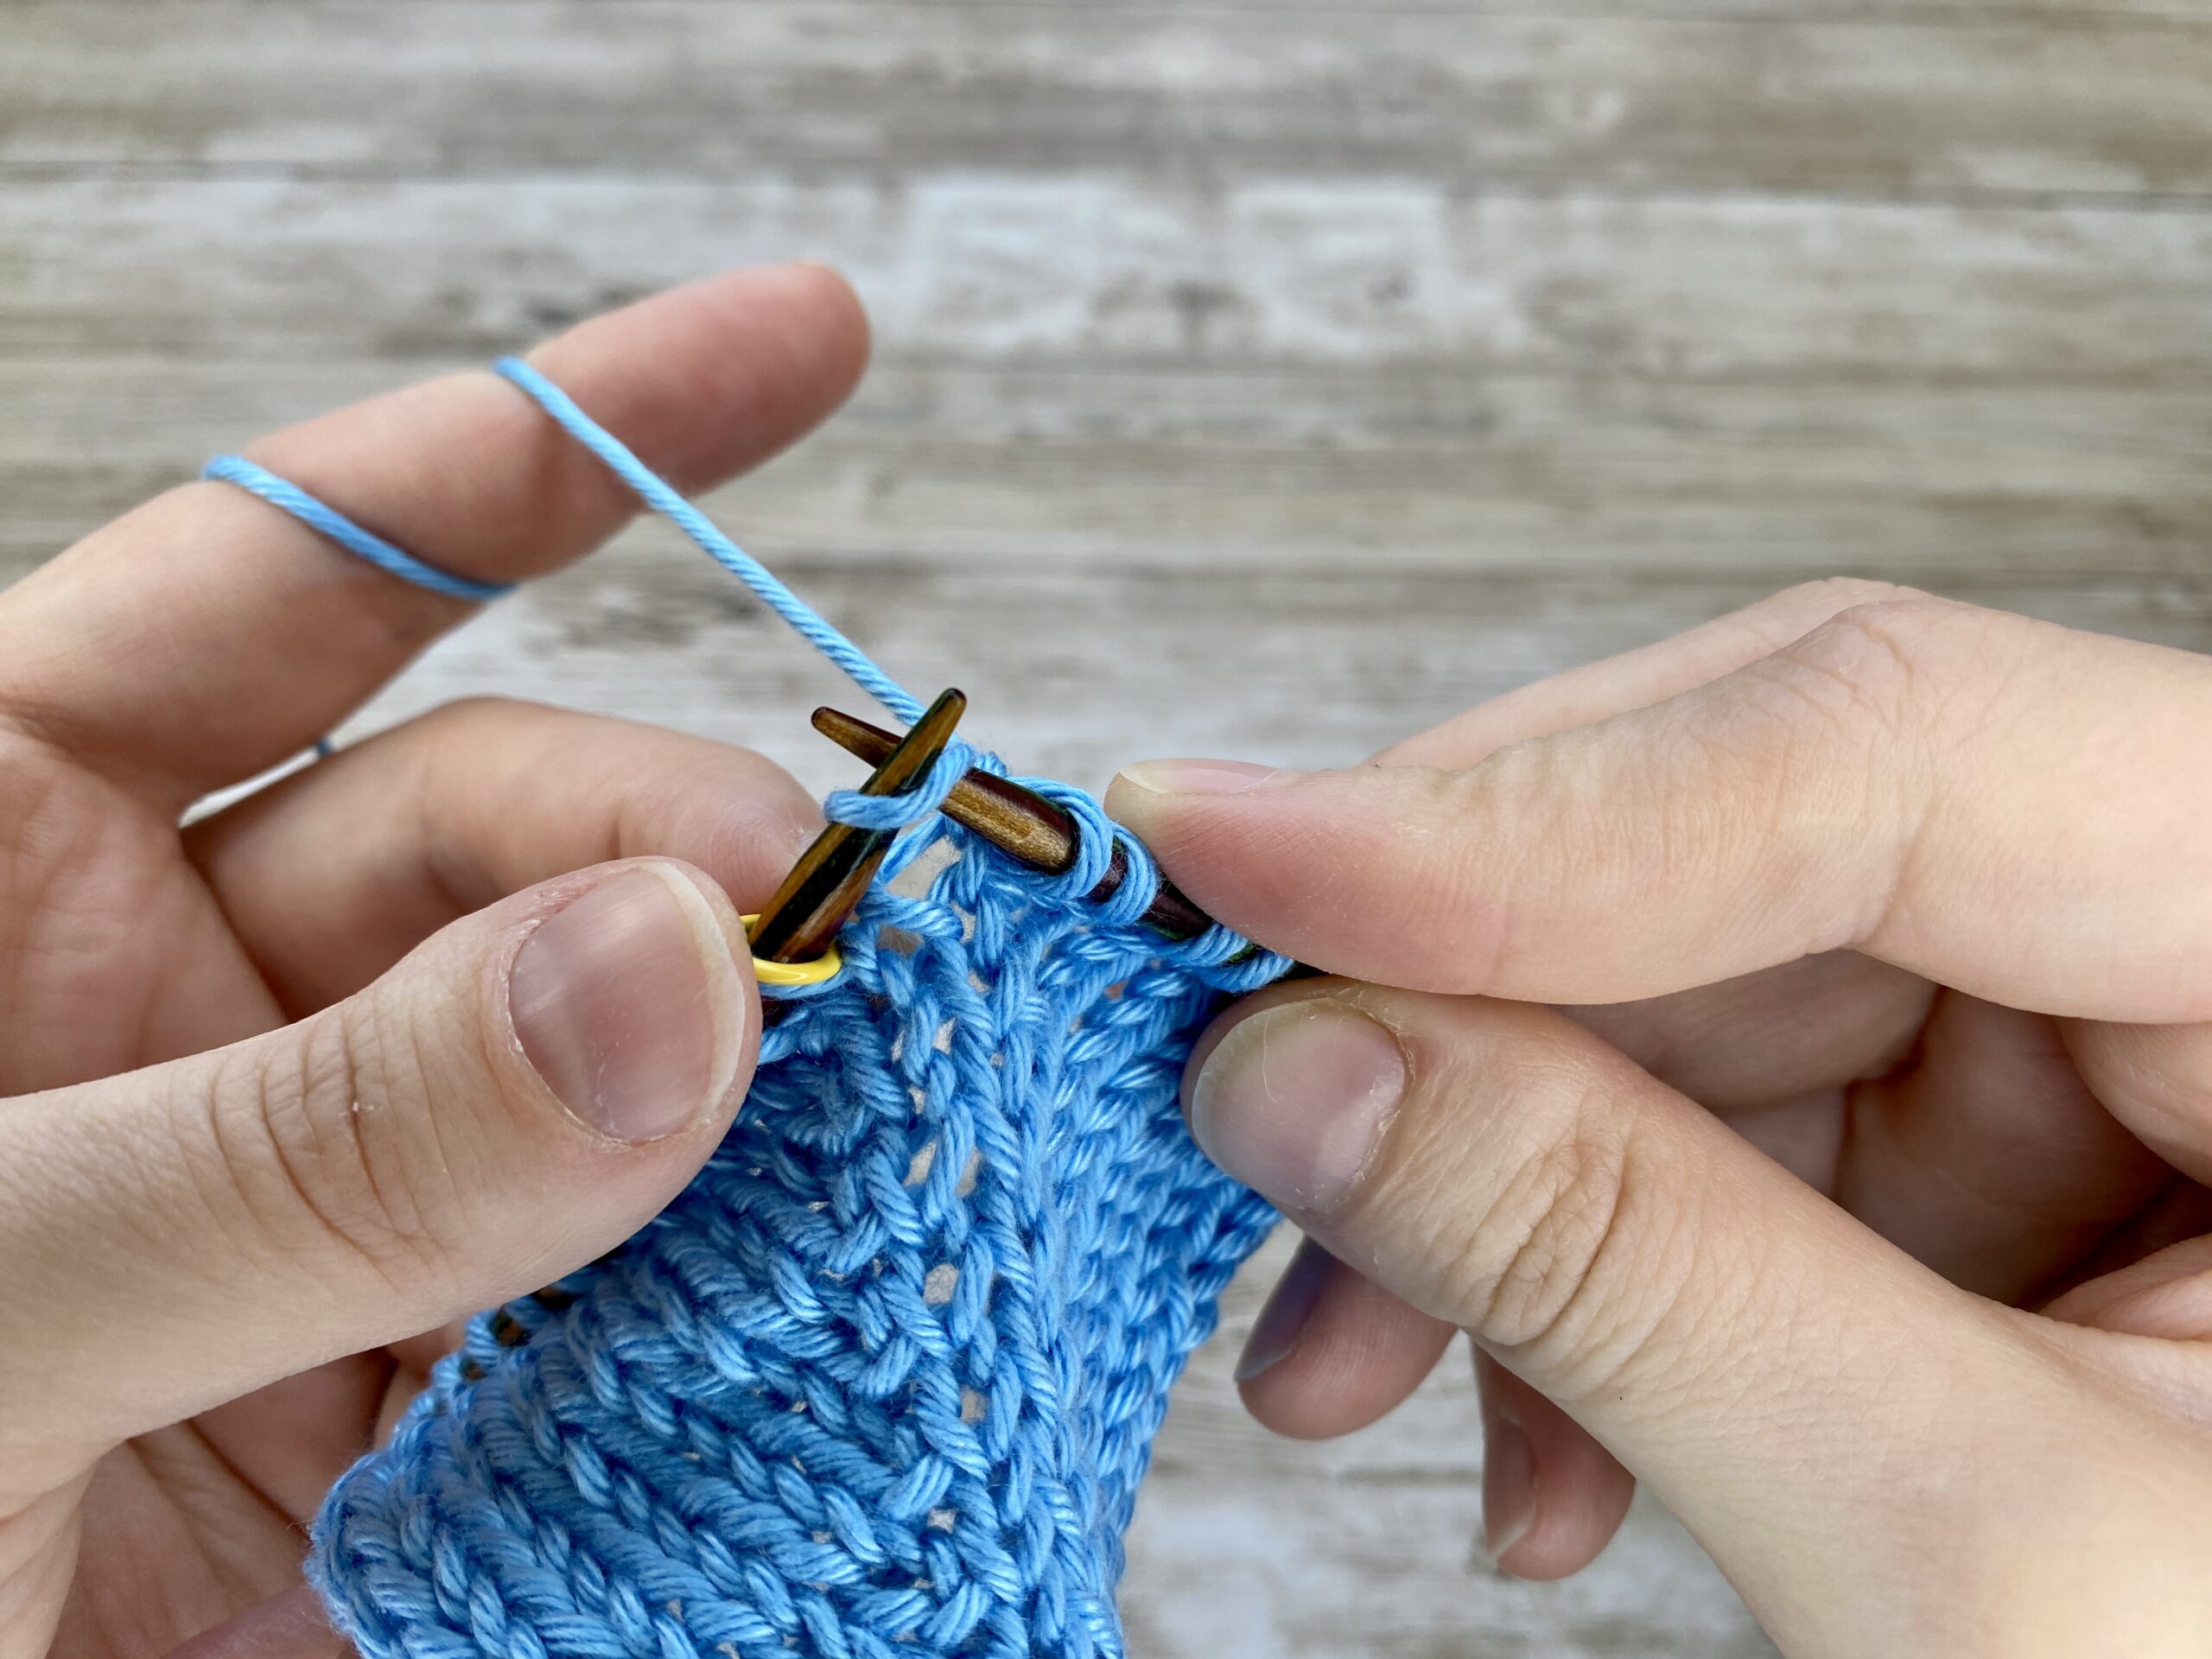
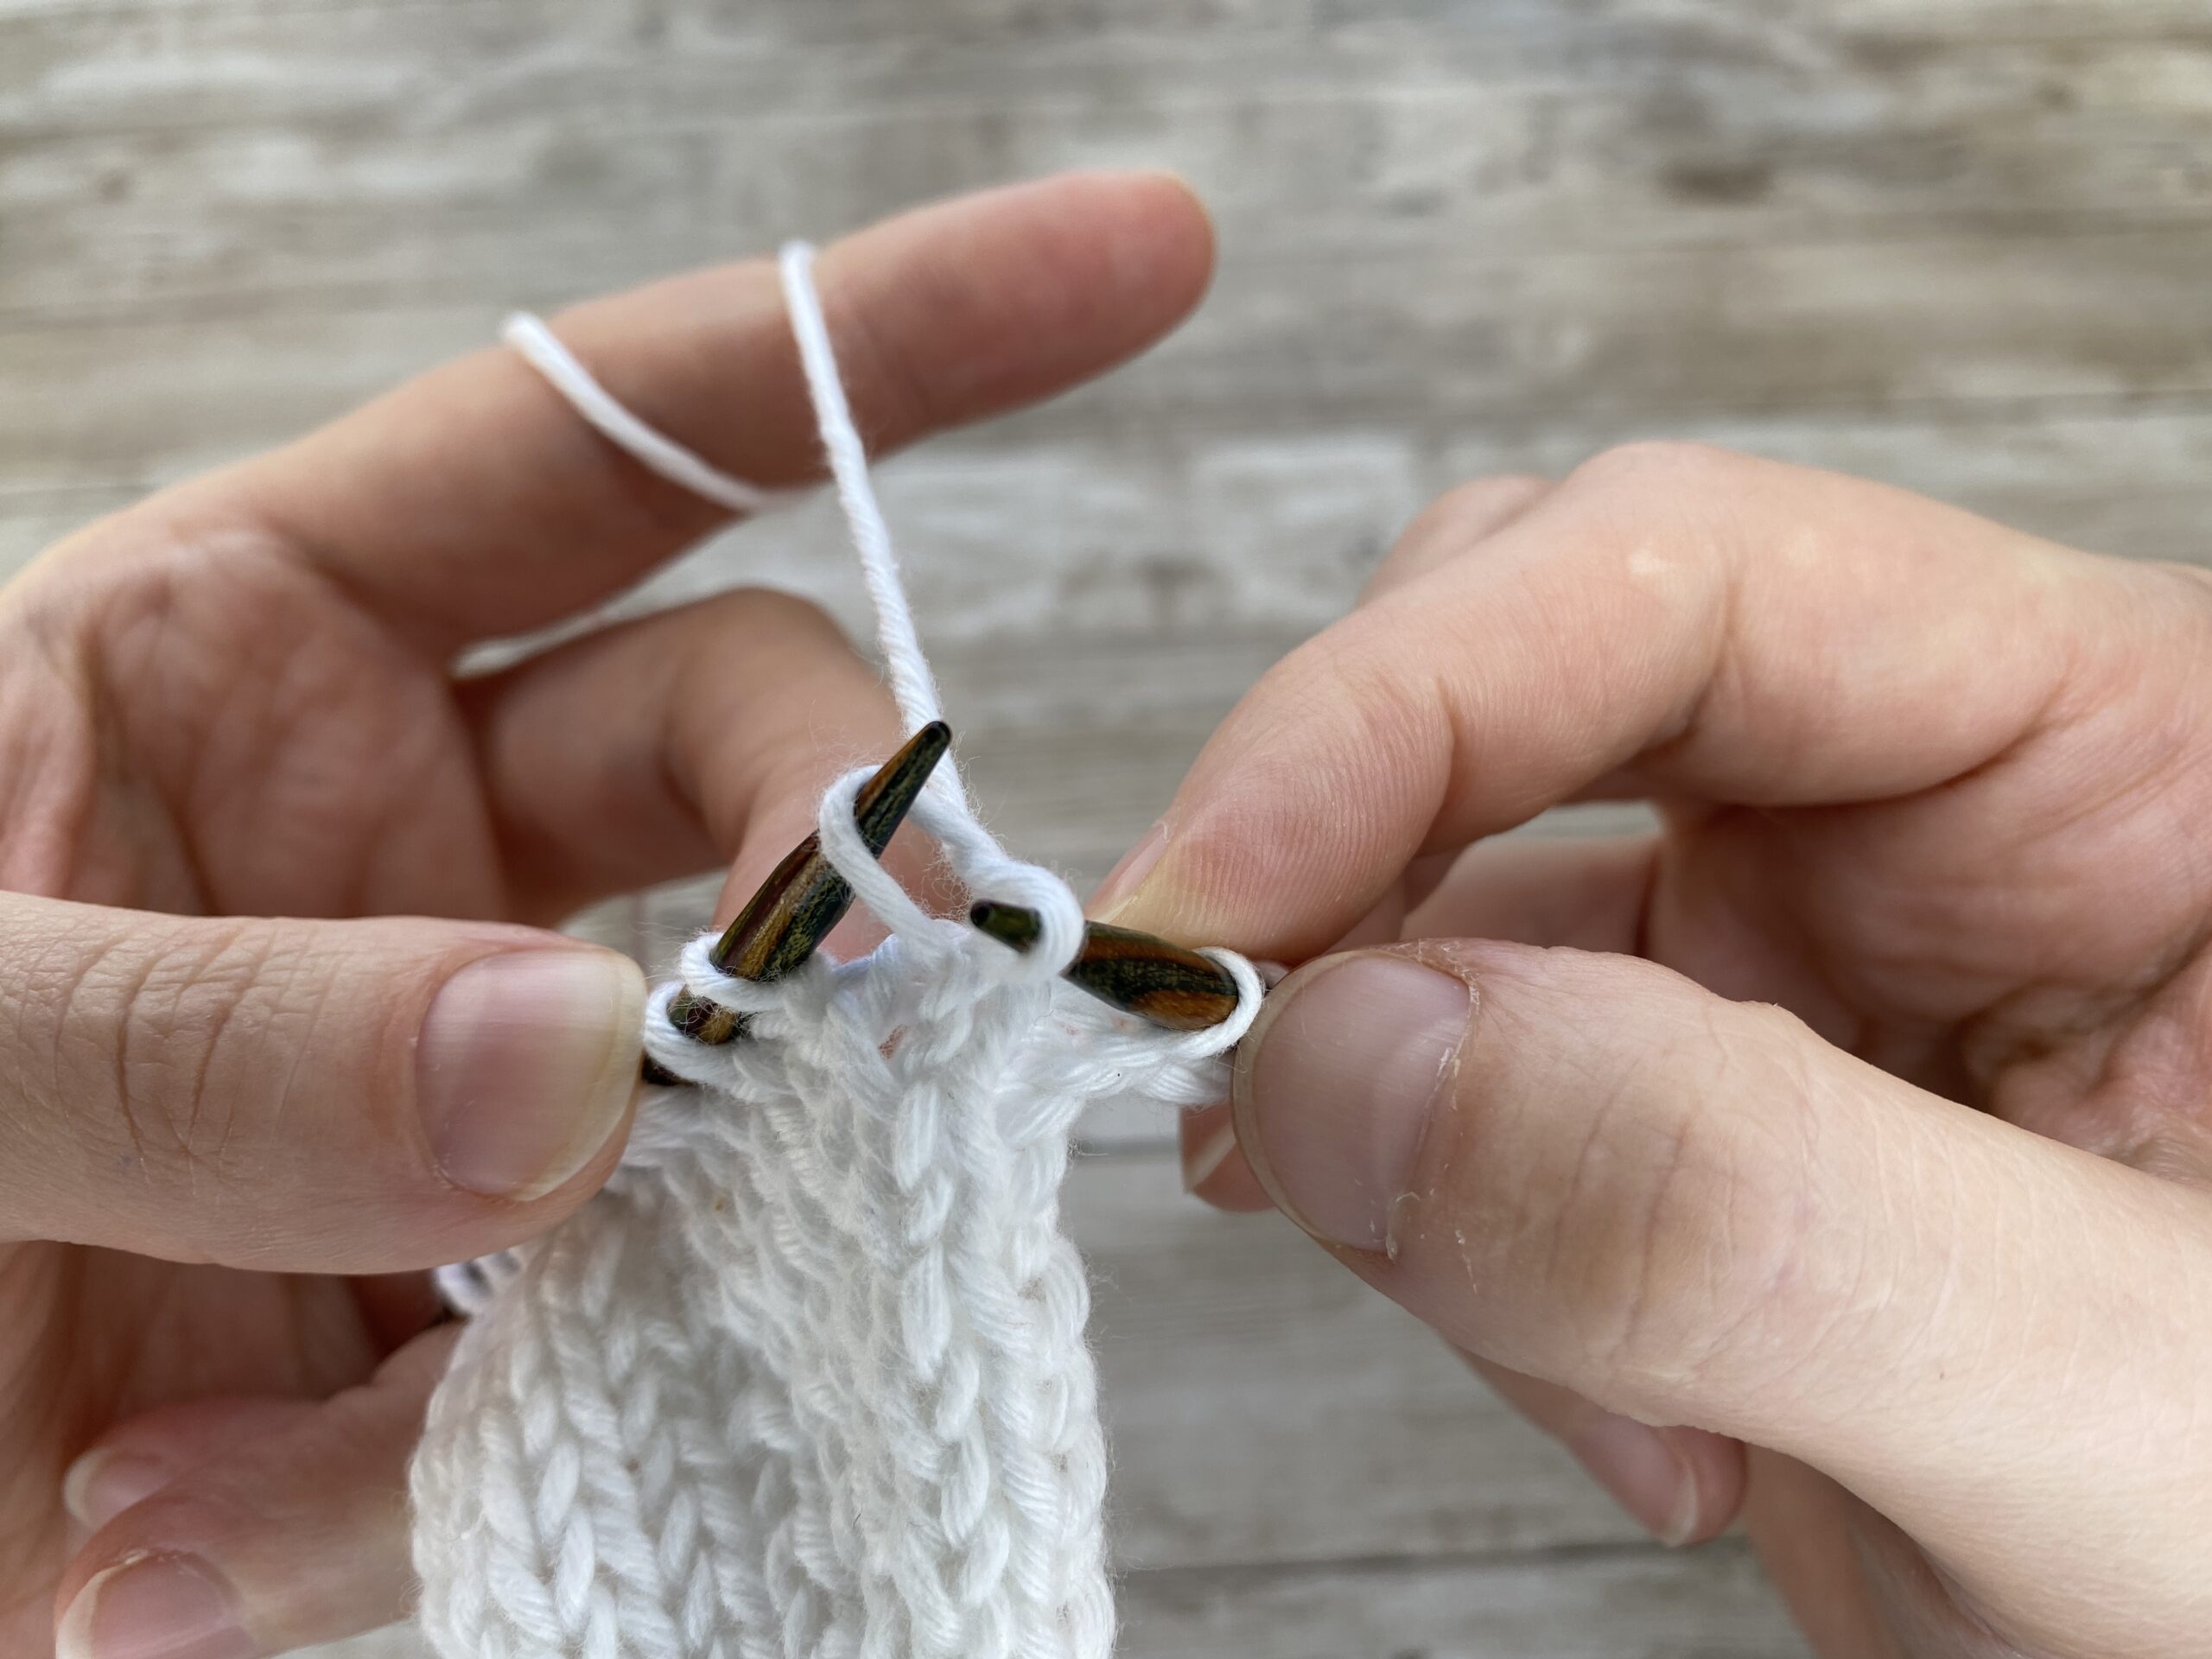
Mirror KFB - a right-leaning Variation
The mirrored KFB is a variation of the standard KFB that creates a right-leaning increase. It is designed to mirror the left-leaning KFB, making it useful for symmetrical increases on either side of a central stitch or pattern. To be honest, I’ve never come across a pattern that specifically requires the mirrored KFB, but when designing your own garment, these two increases work really well together. In a garter stitch garment, they can blend in almost invisibly.
How to Work the Mirror KFB (Right-Leaning Increase)
-
Slip the stitch knitwise from the left needle to the right needle.
-
Remount the stitch by slipping it back to the left needle purlwise. This changes the orientation of the stitch so the leading leg is at the back.
-
Knit into the front loop of the stitch, creating a twisted stitch.
-
Identify the stitch below the one you just worked (the original stitch).
-
Insert the left needle into the right leg of the stitch below (from left to right).
-
Knit into the back loop of this picked-up stitch and slide it off the needle.
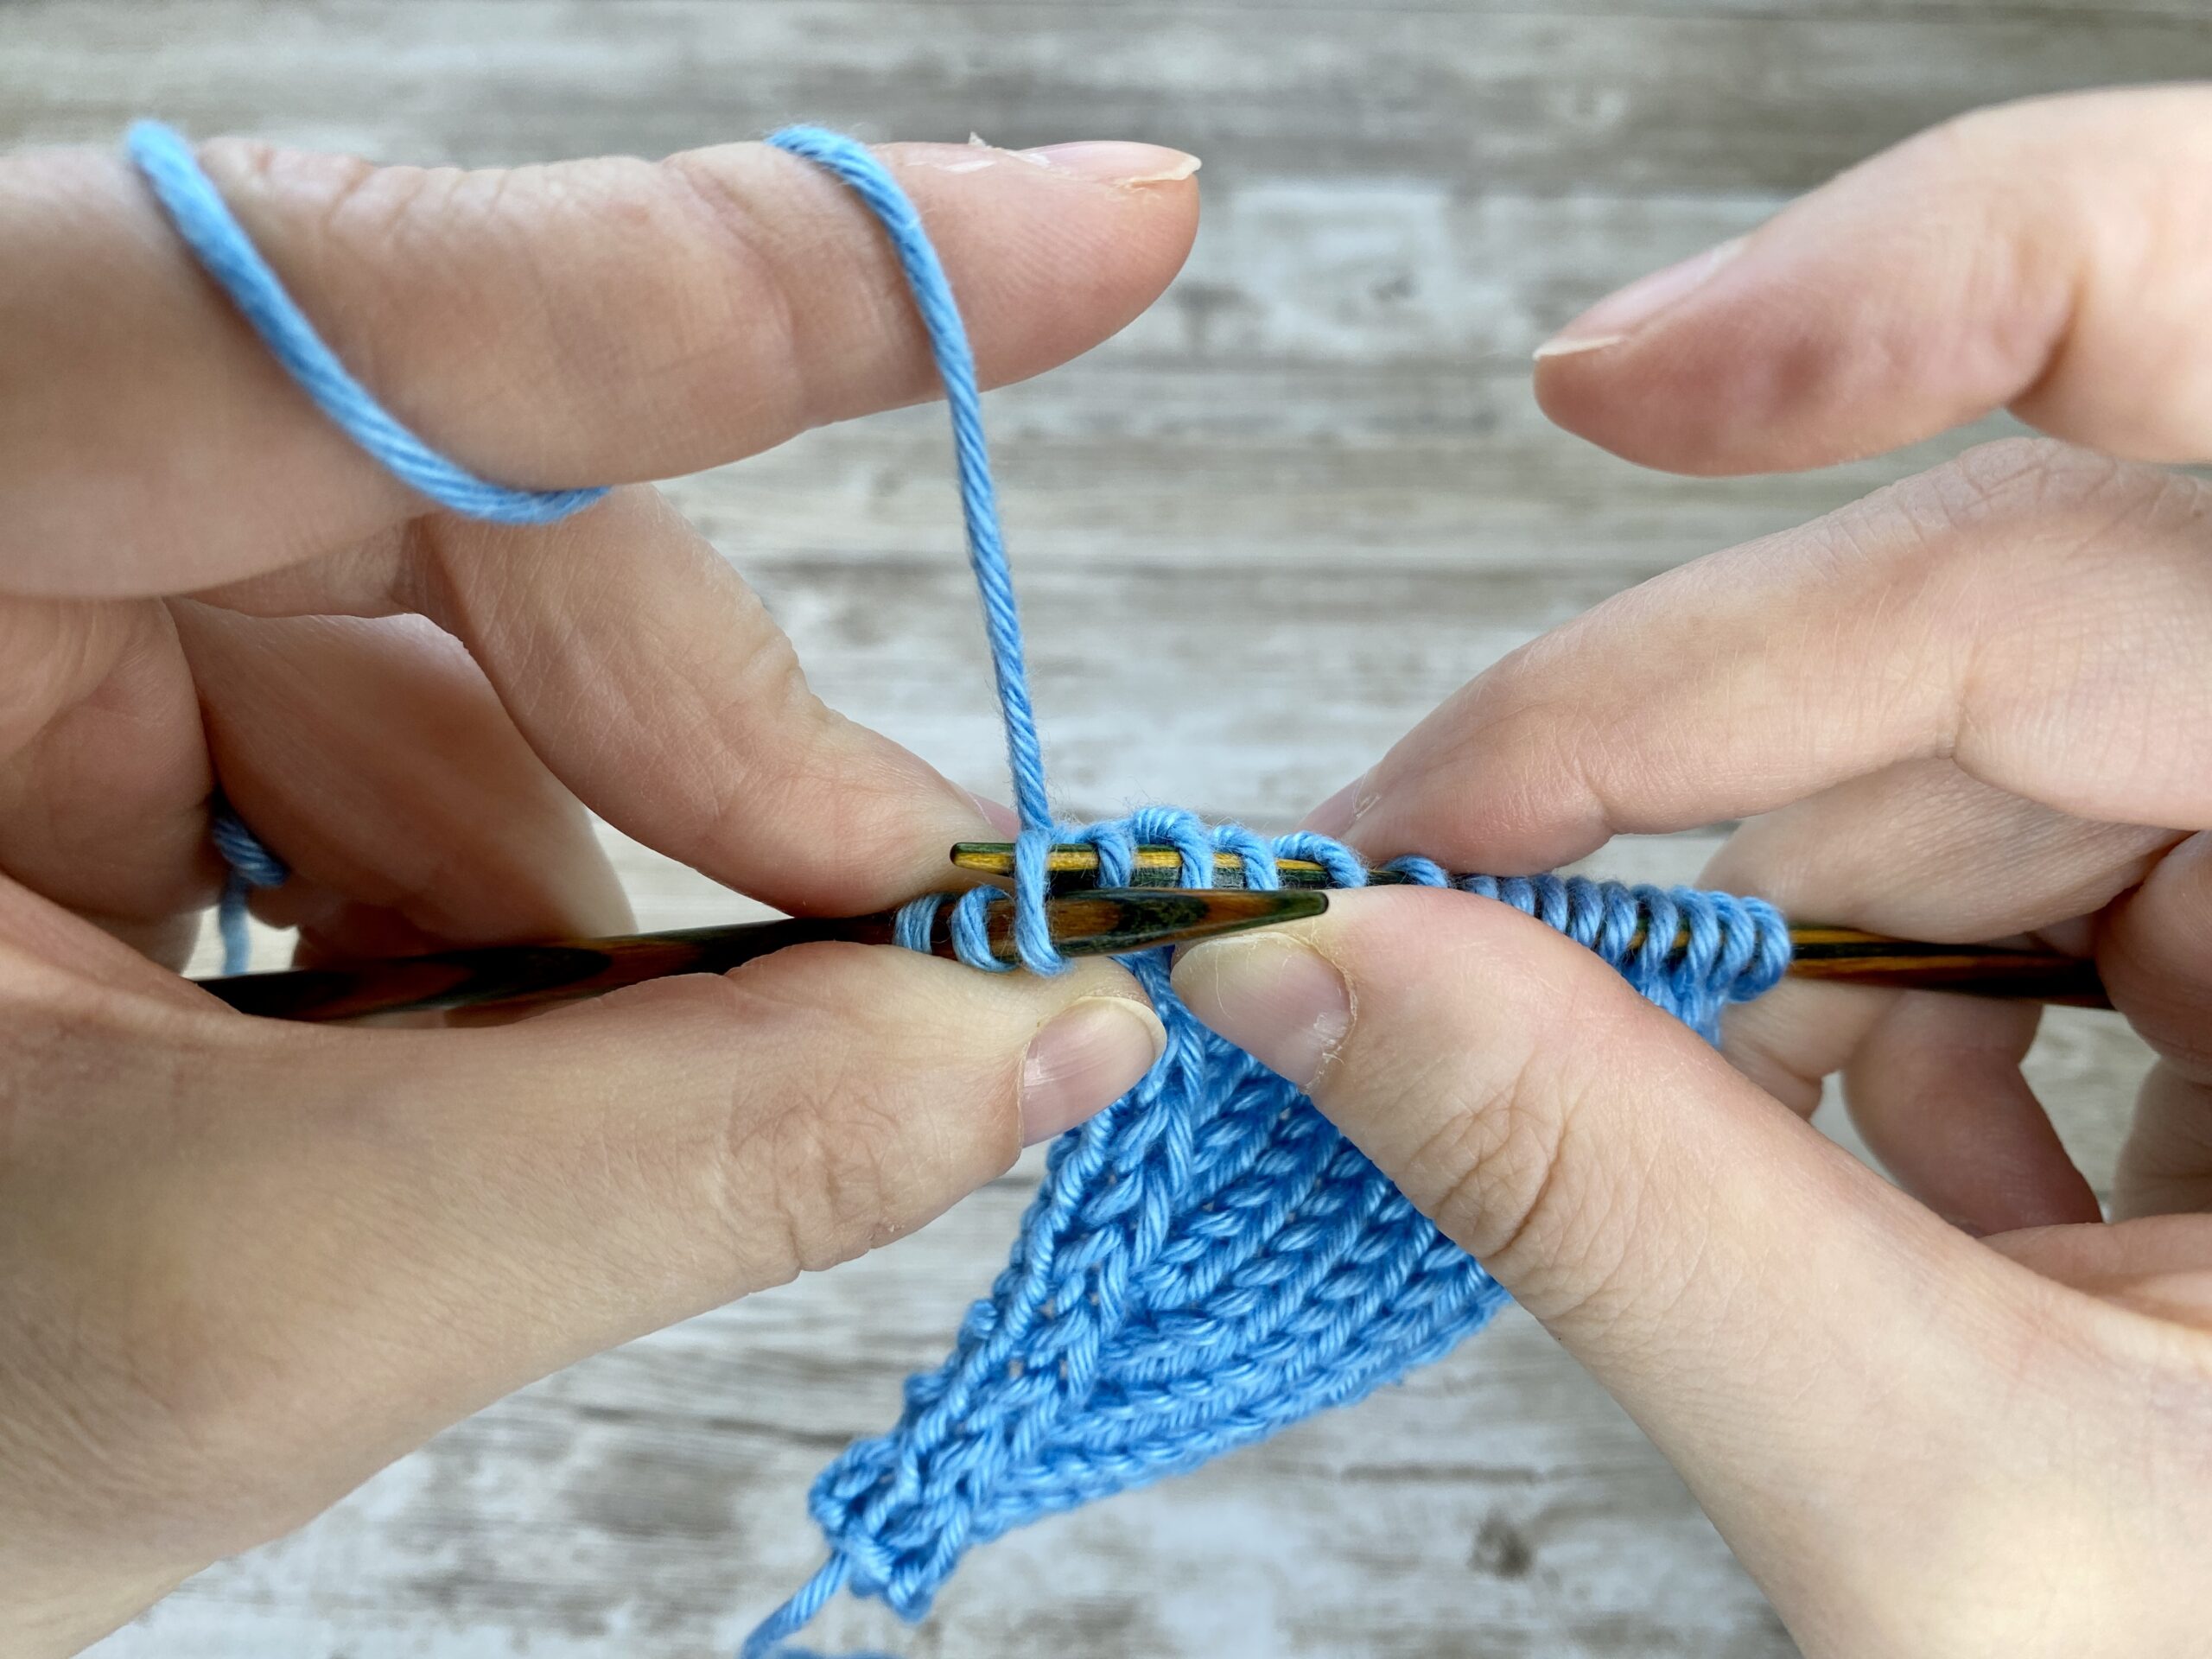
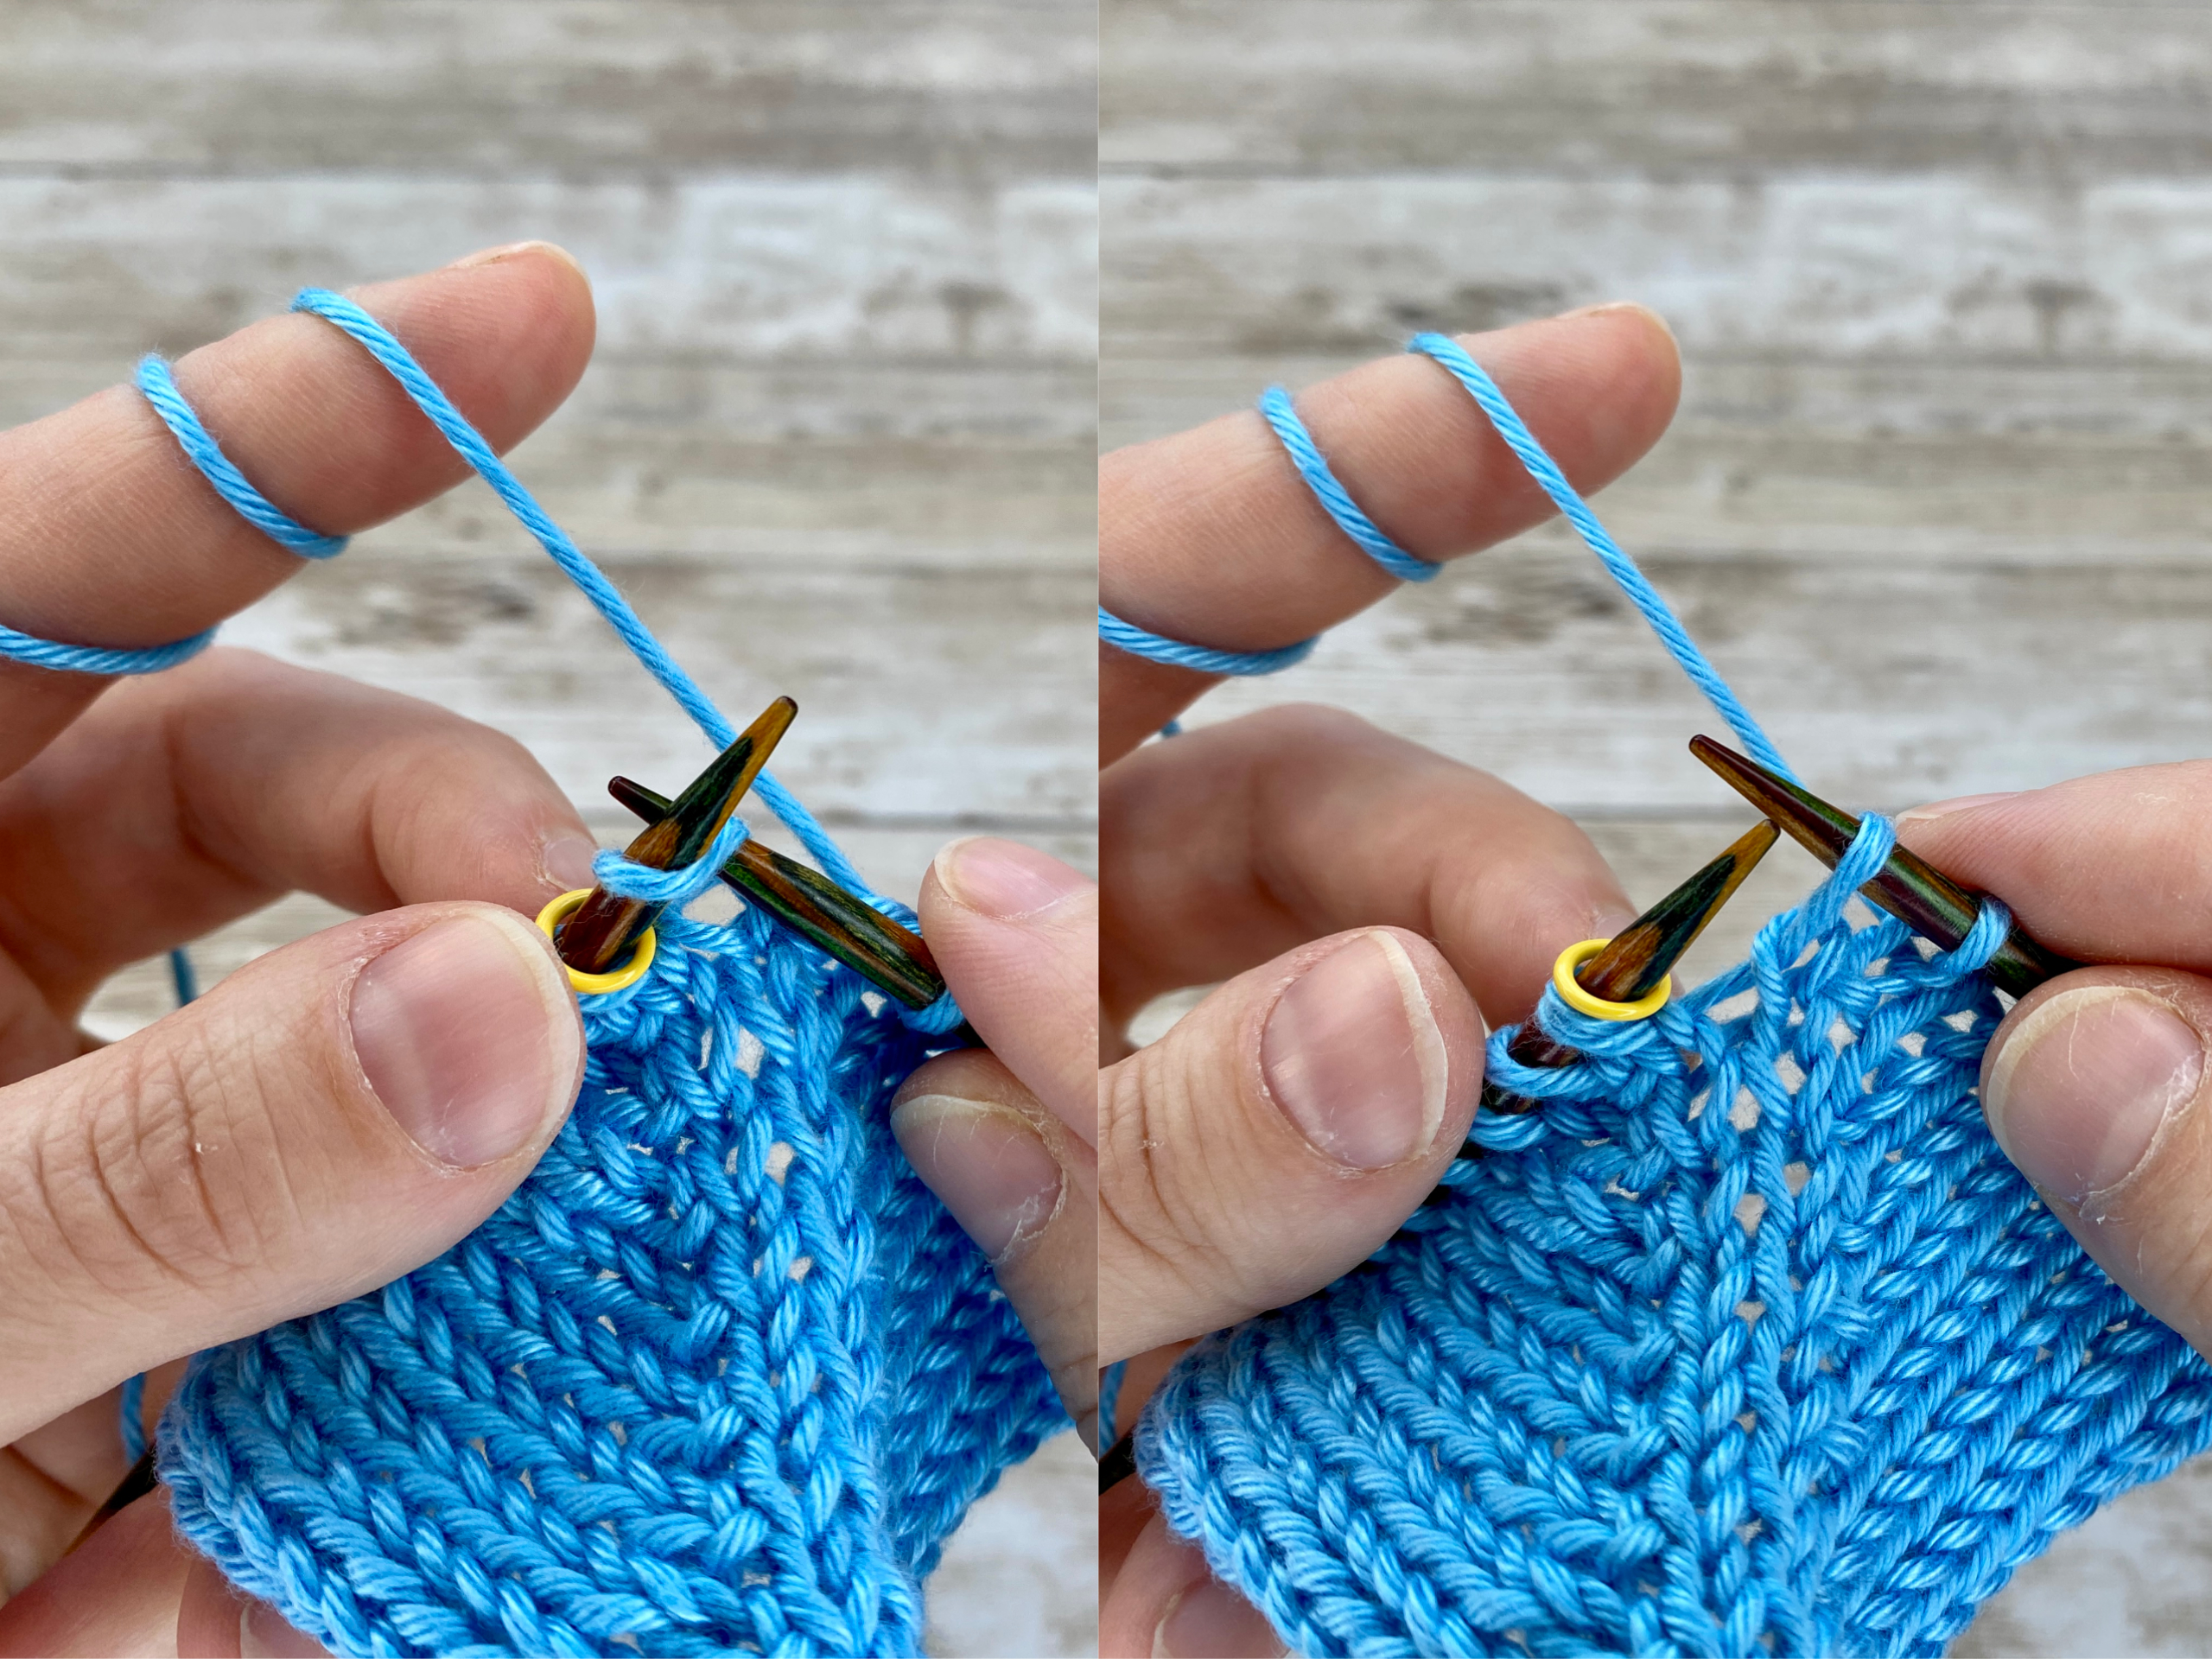 |  |  | Slip your stitch knitwise from the left to the right needle | Slip the stitch purlwise back from the right to the left needle, your leading leg is now at the back | Knit this stitch through the front loop and slide it off the needle |


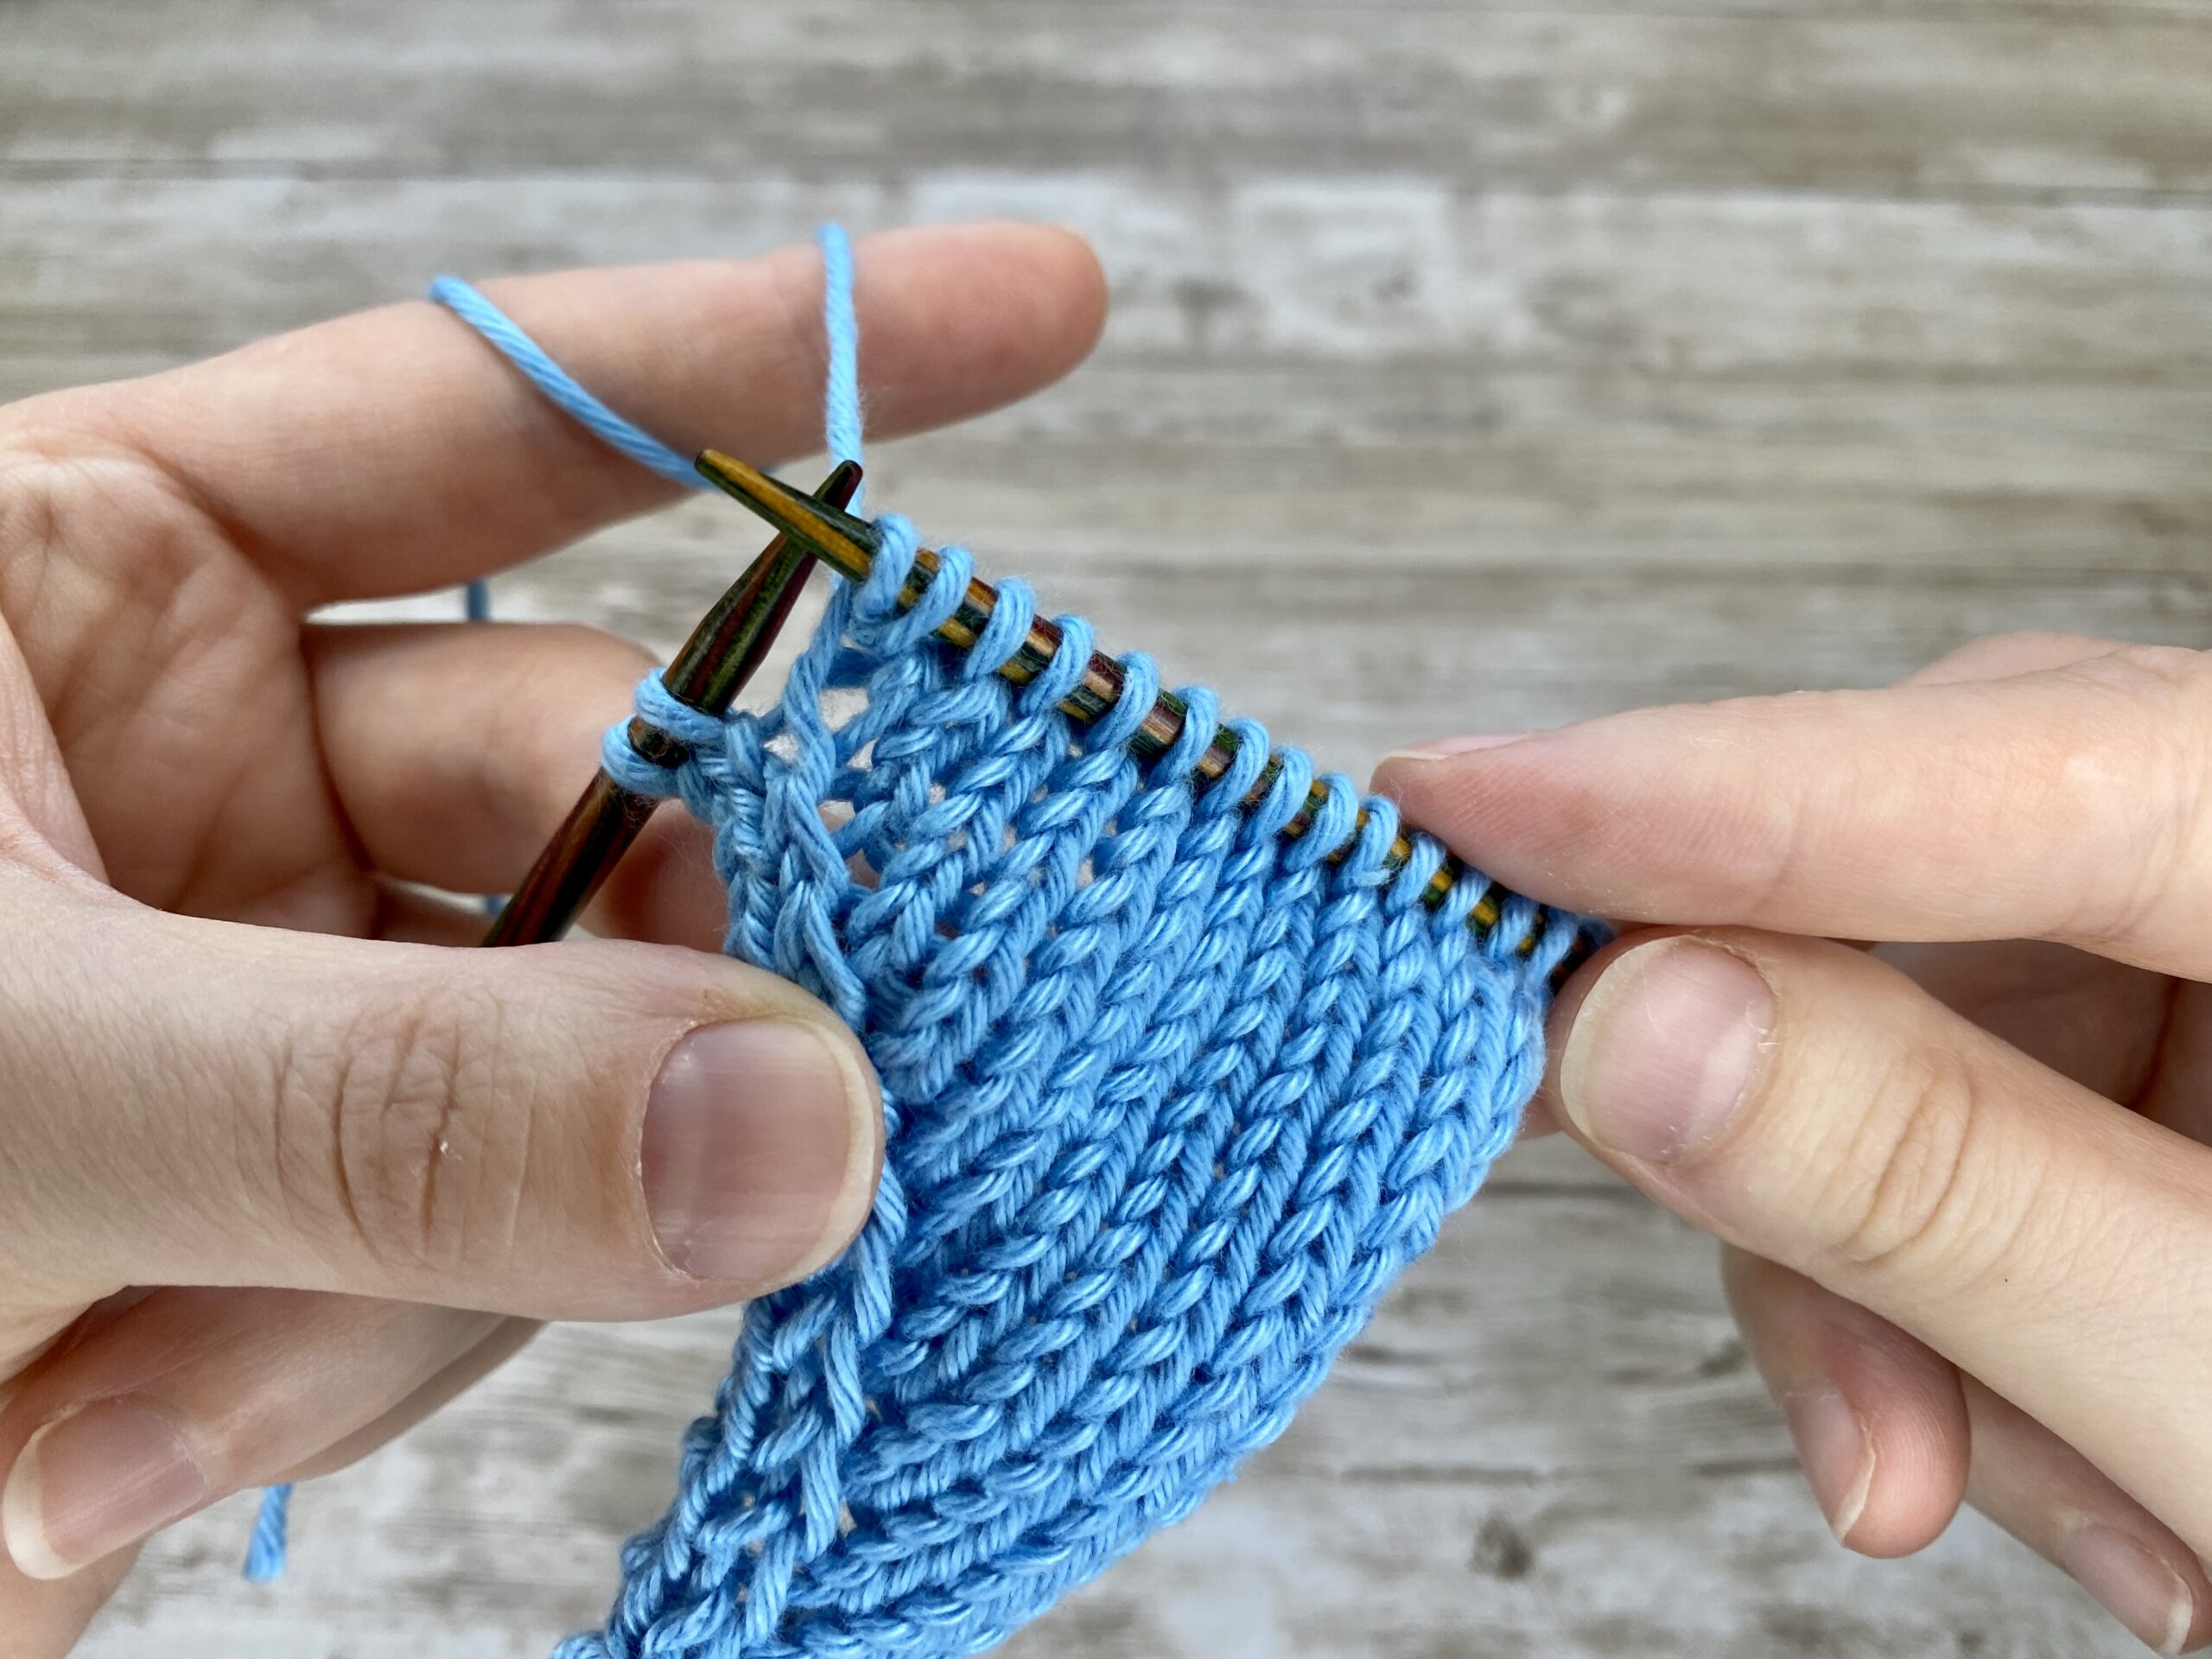
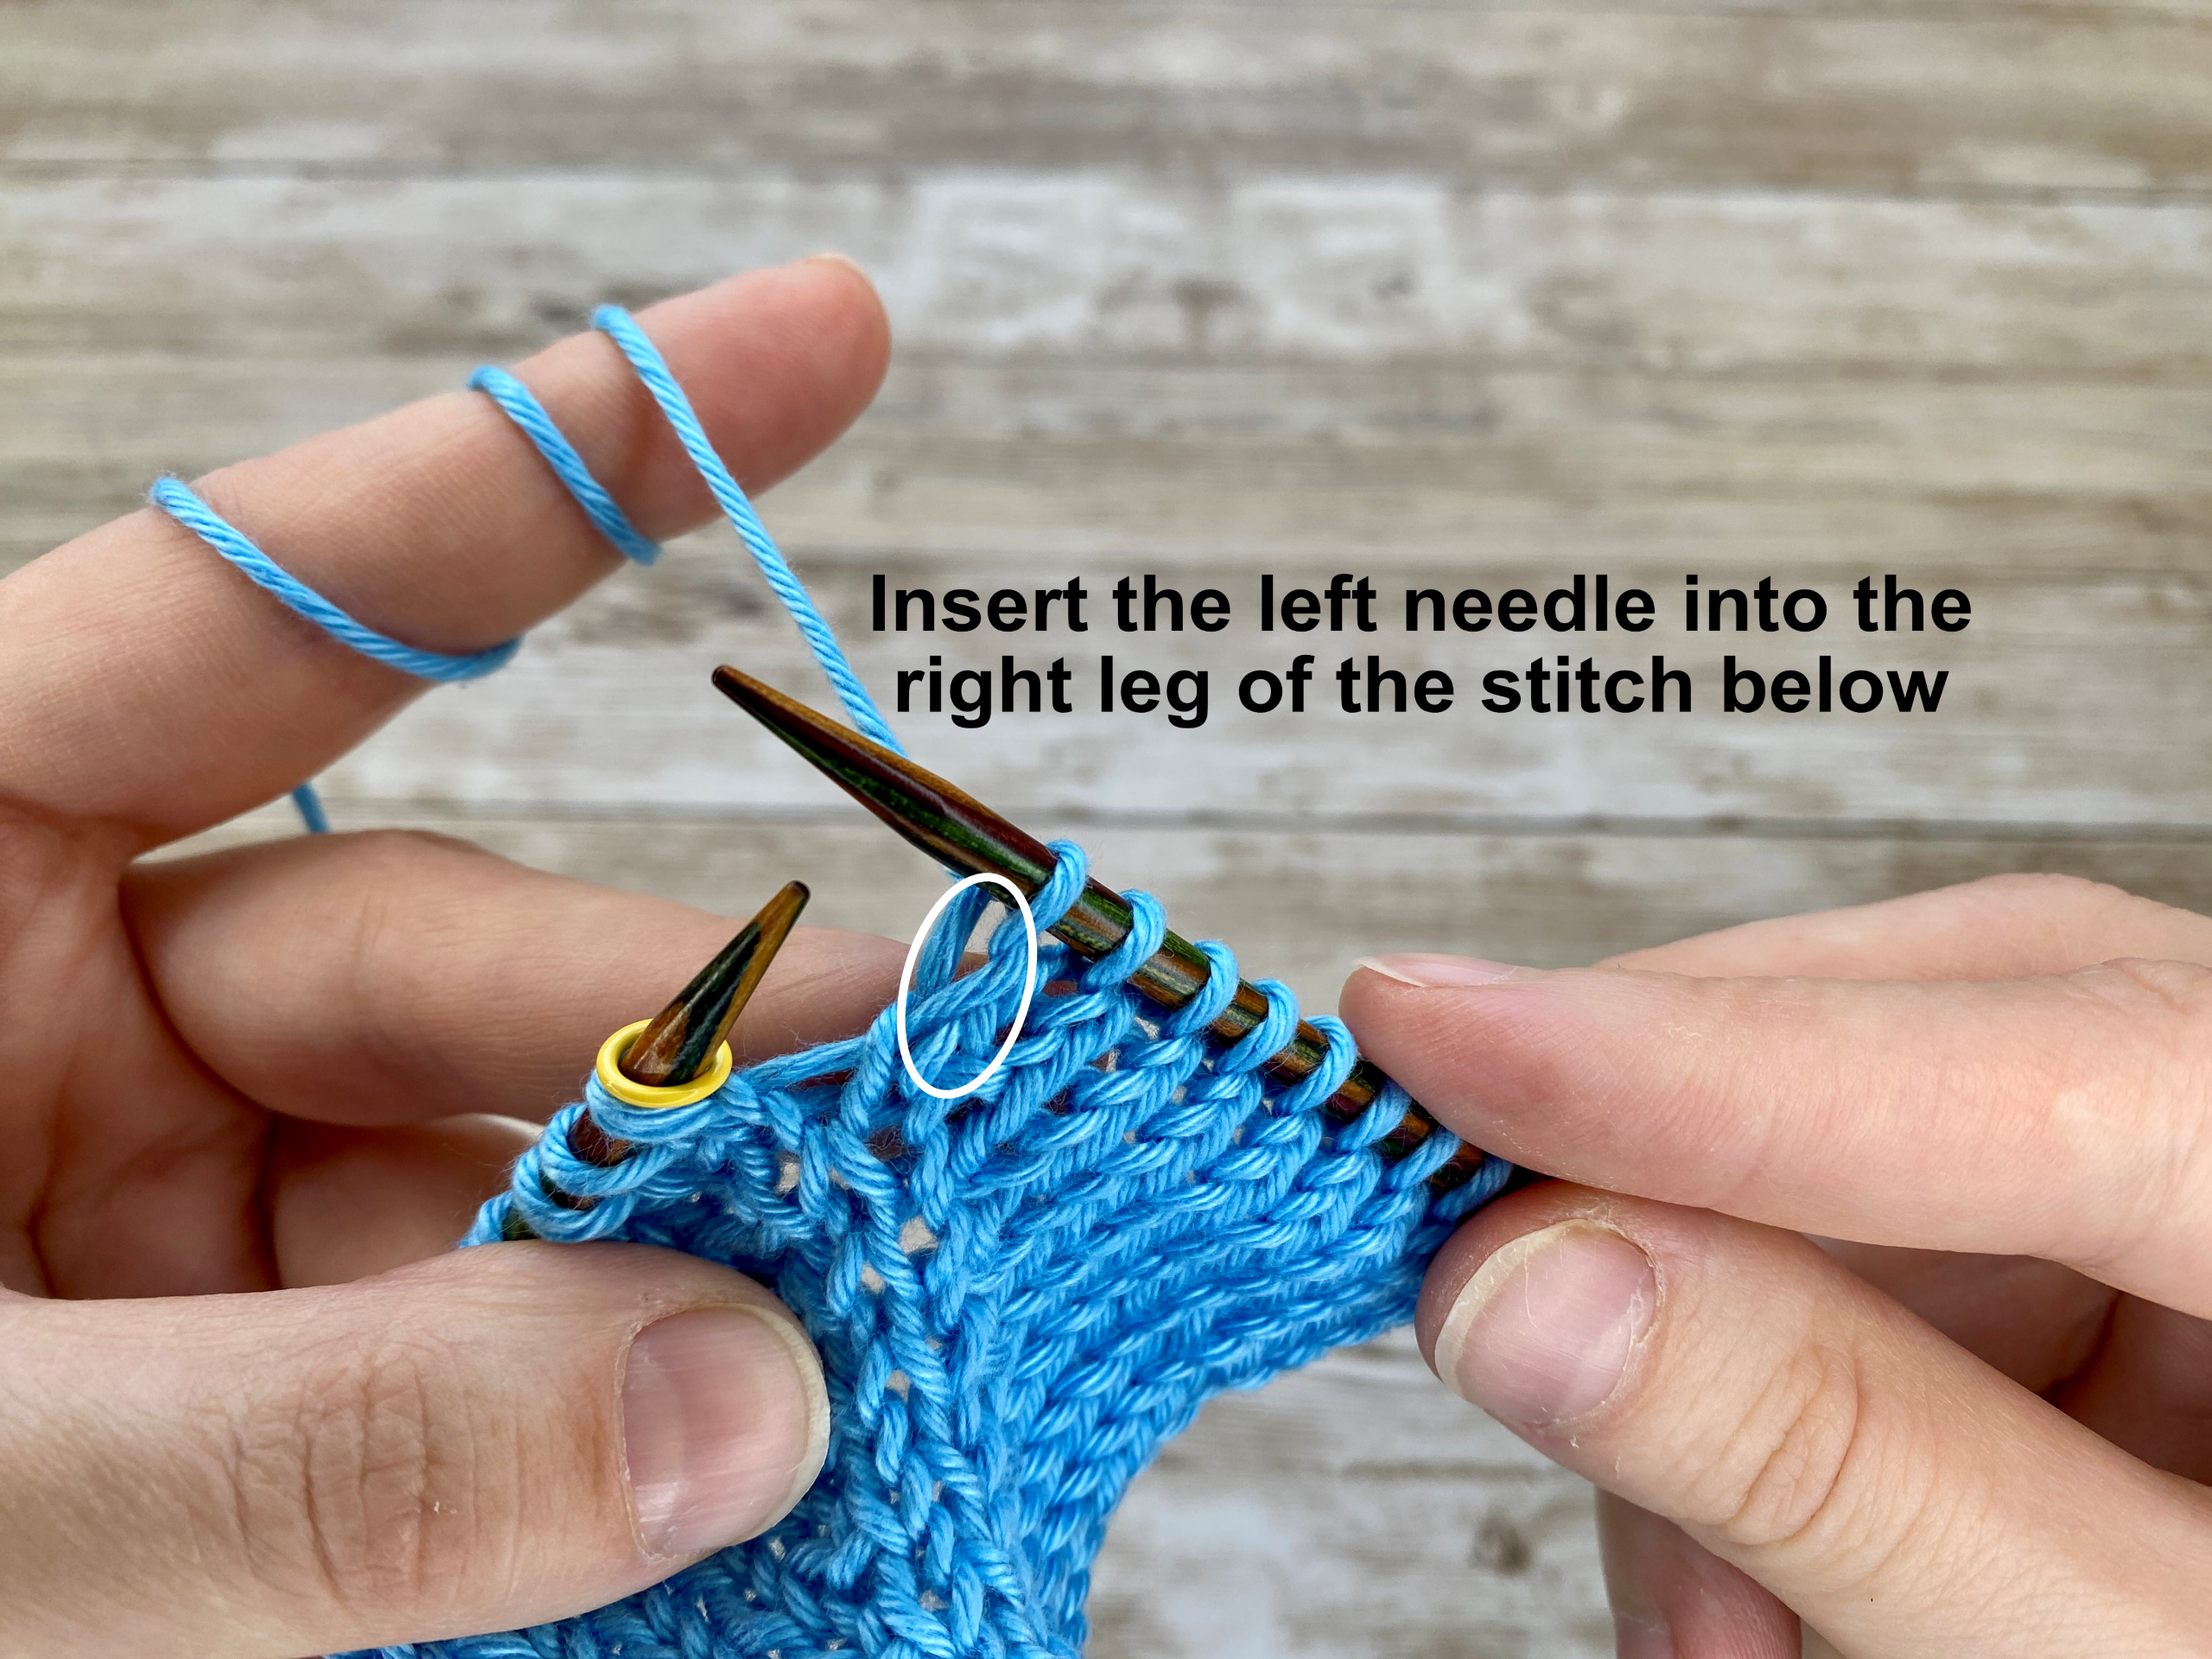 | 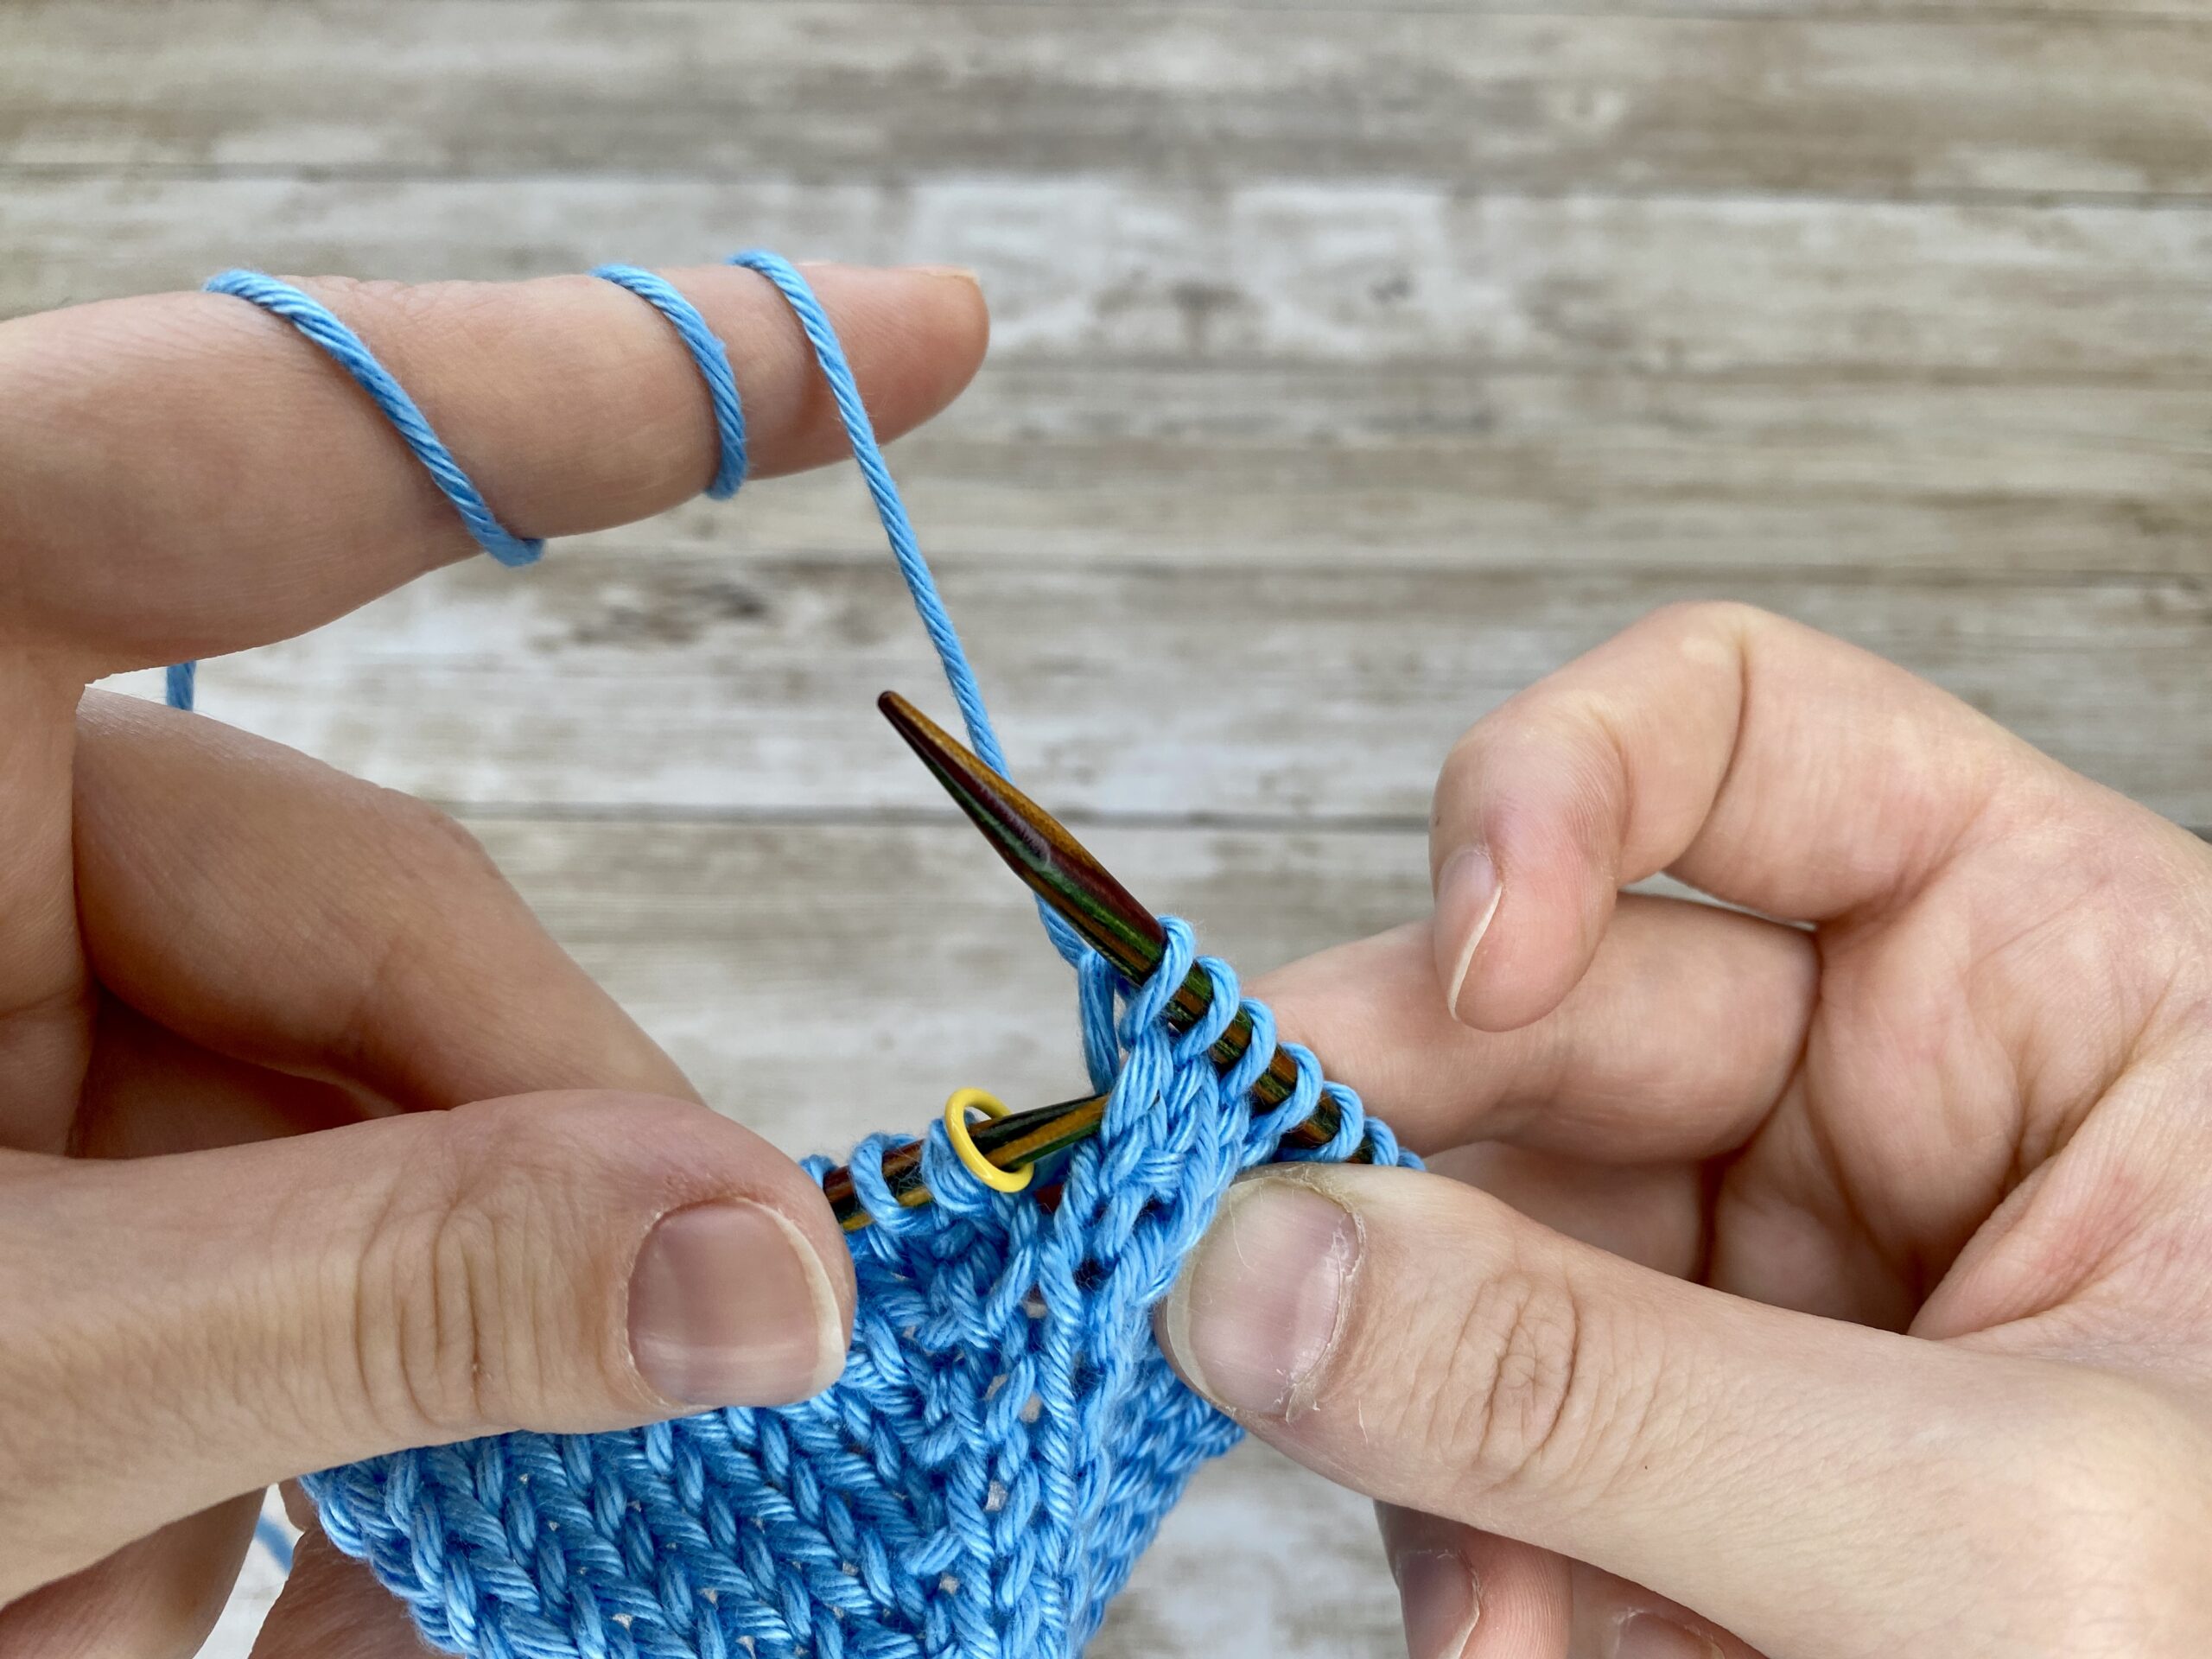 |  | Identify the stitch below the one you just worked | Insert the left needle into the right leg of the stitch below (from left to right) | Lift this stitch up |


 |  | Knit it through the back loop | Slide it off the needle, your worked one increase |


Mirrored KFB Explained
-
Appearance: The bar (purl bump) appears on the right side of the stitch, opposite to the KFB.
-
Leaning: It is a right-leaning increase, making it visually symmetrical to the left-leaning KFB.
-
Usage: Ideal for creating symmetrical increases on both sides of a central stitch, such as in raglan shaping.
-
Blending: It works well in garter stitch, or seed stitch, where the bump blends into the pattern.
Common Mirror KFB Mistakes and Fixes
-
Misidentifying the Stitch Below:
The most common mistake is picking up the wrong stitch below, which can distort the fabric.
Fix: Double-check that you’re inserting the needle into the correct leg of the stitch below. -
Skipping the Remounting Step:
If you don’t remount the stitch before knitting into the front loop, the increase won’t lean correctly.
Fix: Always remount the stitch to ensure proper orientation.
| On the right side, I worked some Mirror KFBs and KBFs, can you spot the difference? |
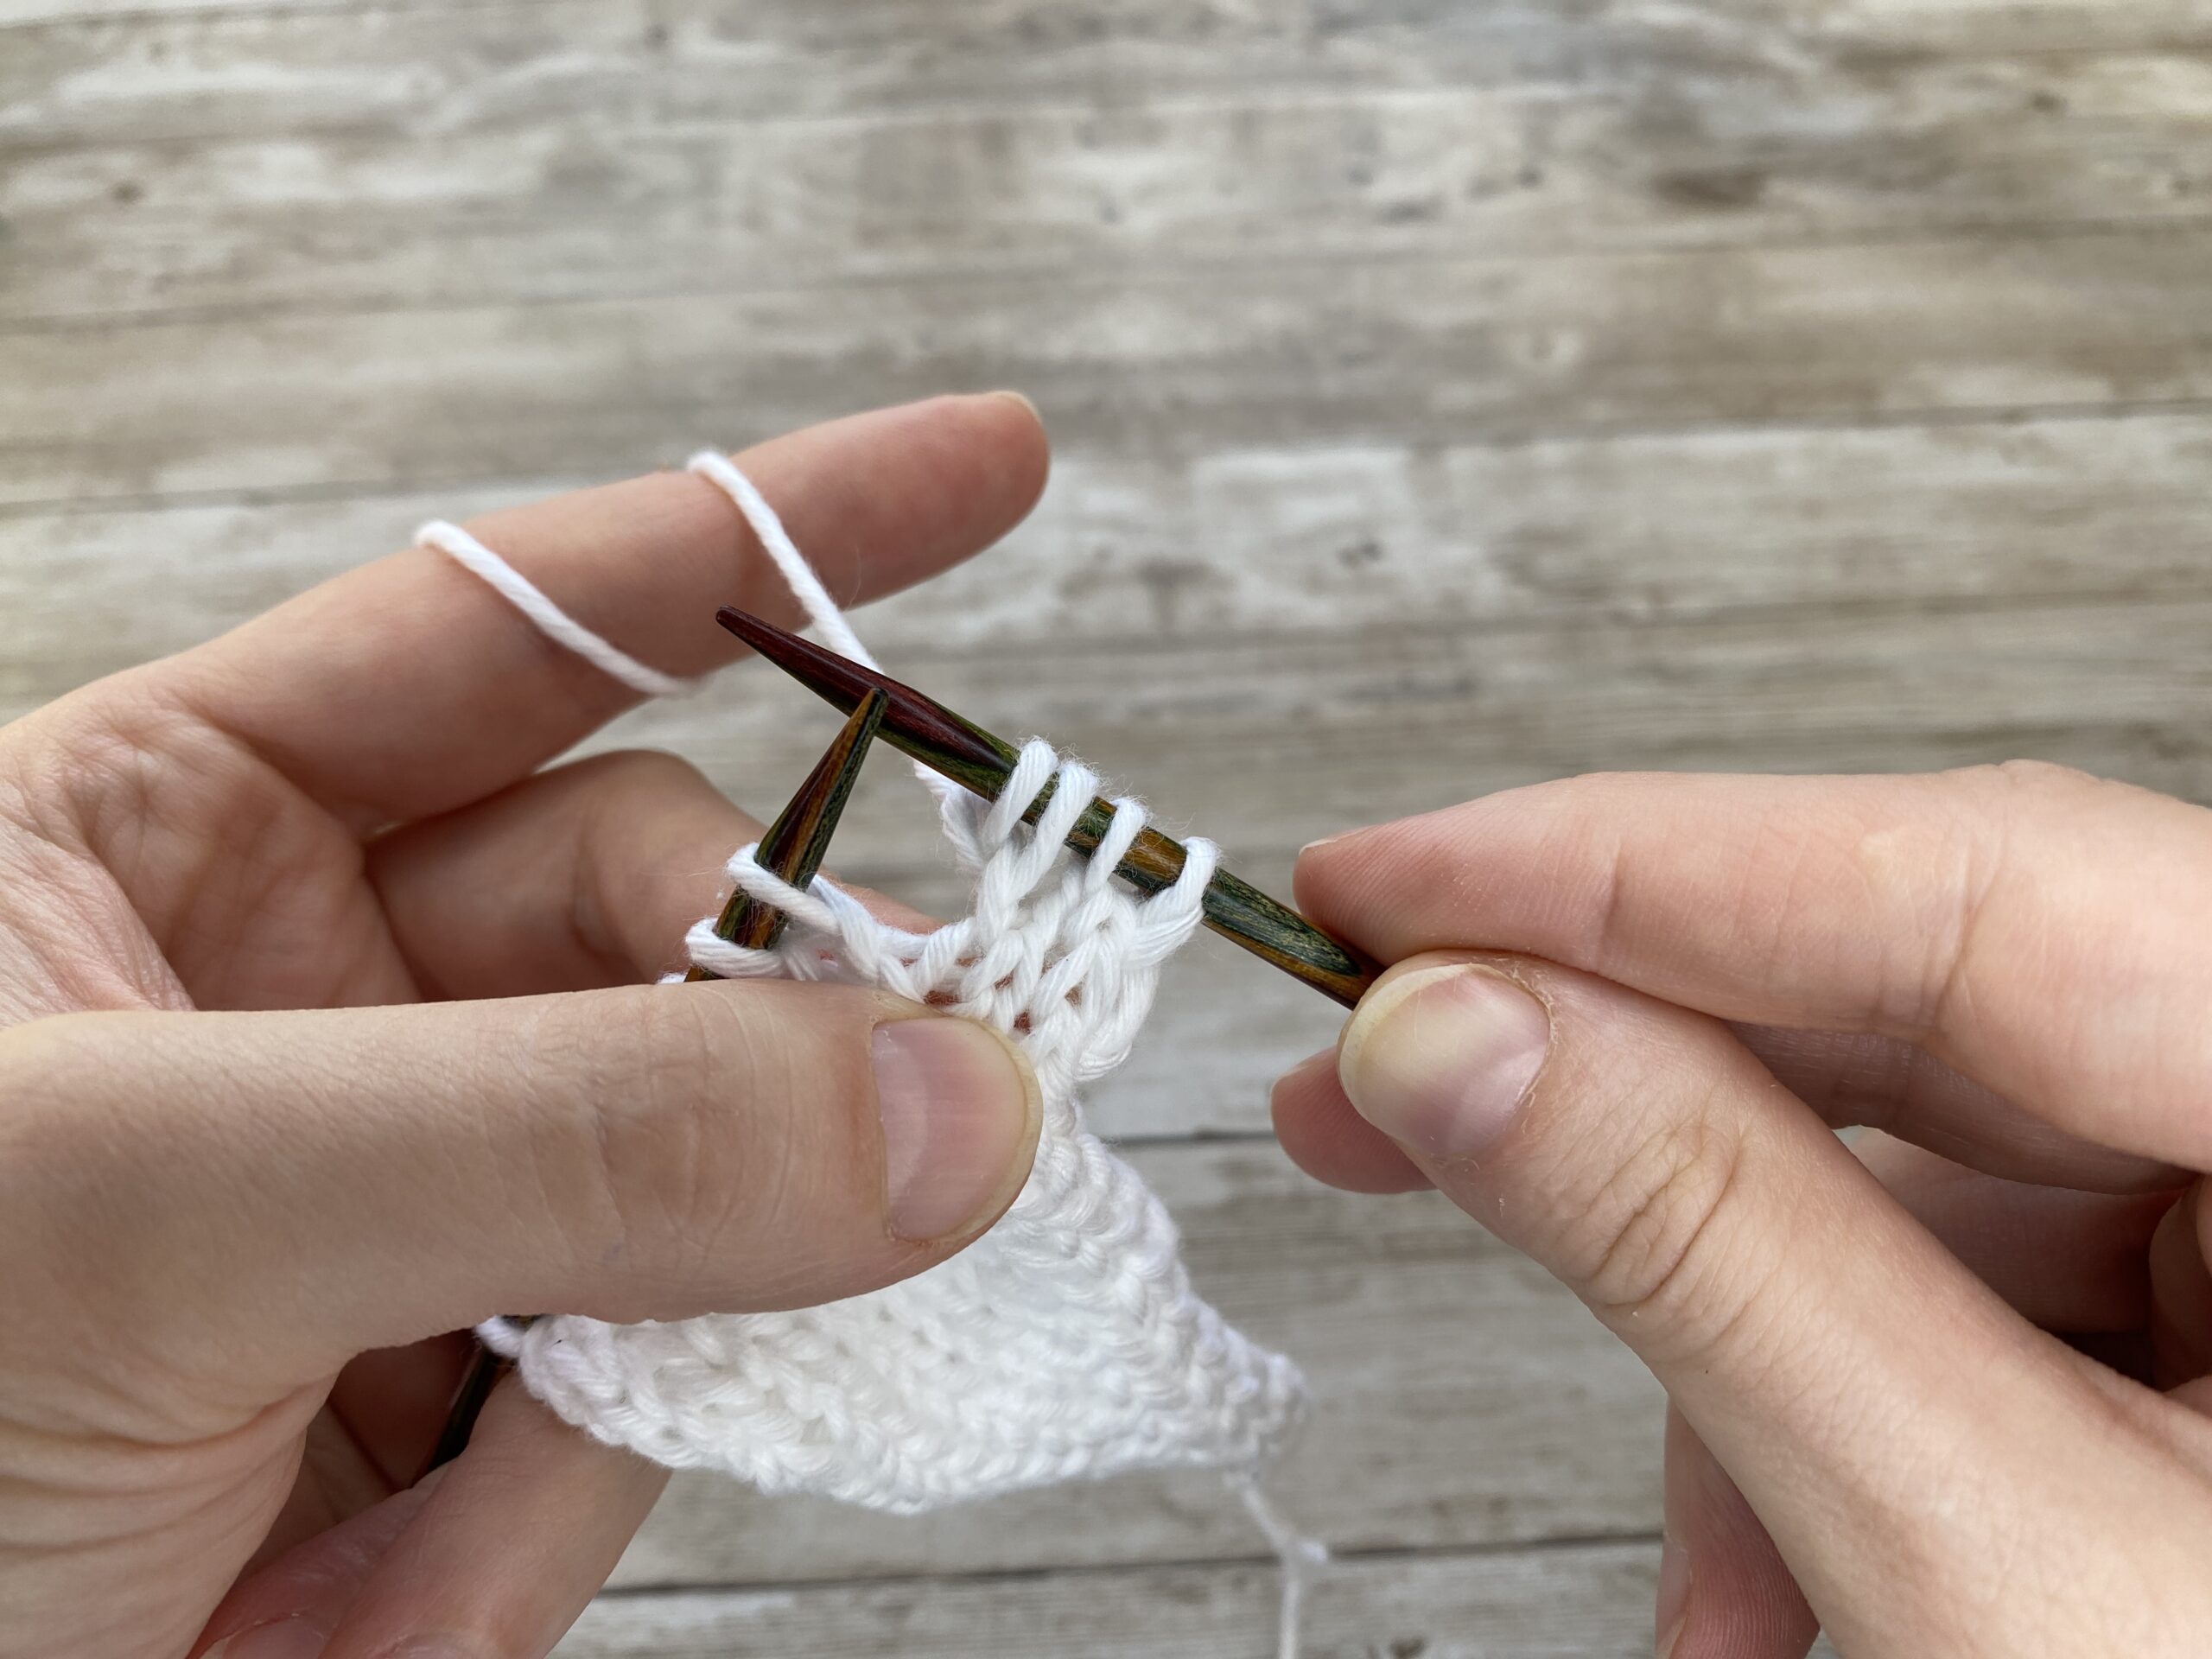
KBF Increase: Knit Back and Front Variation
The Knit Back and Front (KBF) increase works similarly to the Mirror KFB. This increase creates a right-leaning stitch, but in my opinion, the purl bump is less prominent in this option.
How to Work a KBF (Knit Back and Front) Increase
-
Knit into the back leg of the stitch on the left needle and slip it off.
-
Identify the right leg of the stitch below the right needle. With your needle, come from the back, in between the stitch and the leg, and pull it back out.
-
Knit this stitch through the front loop.
 | 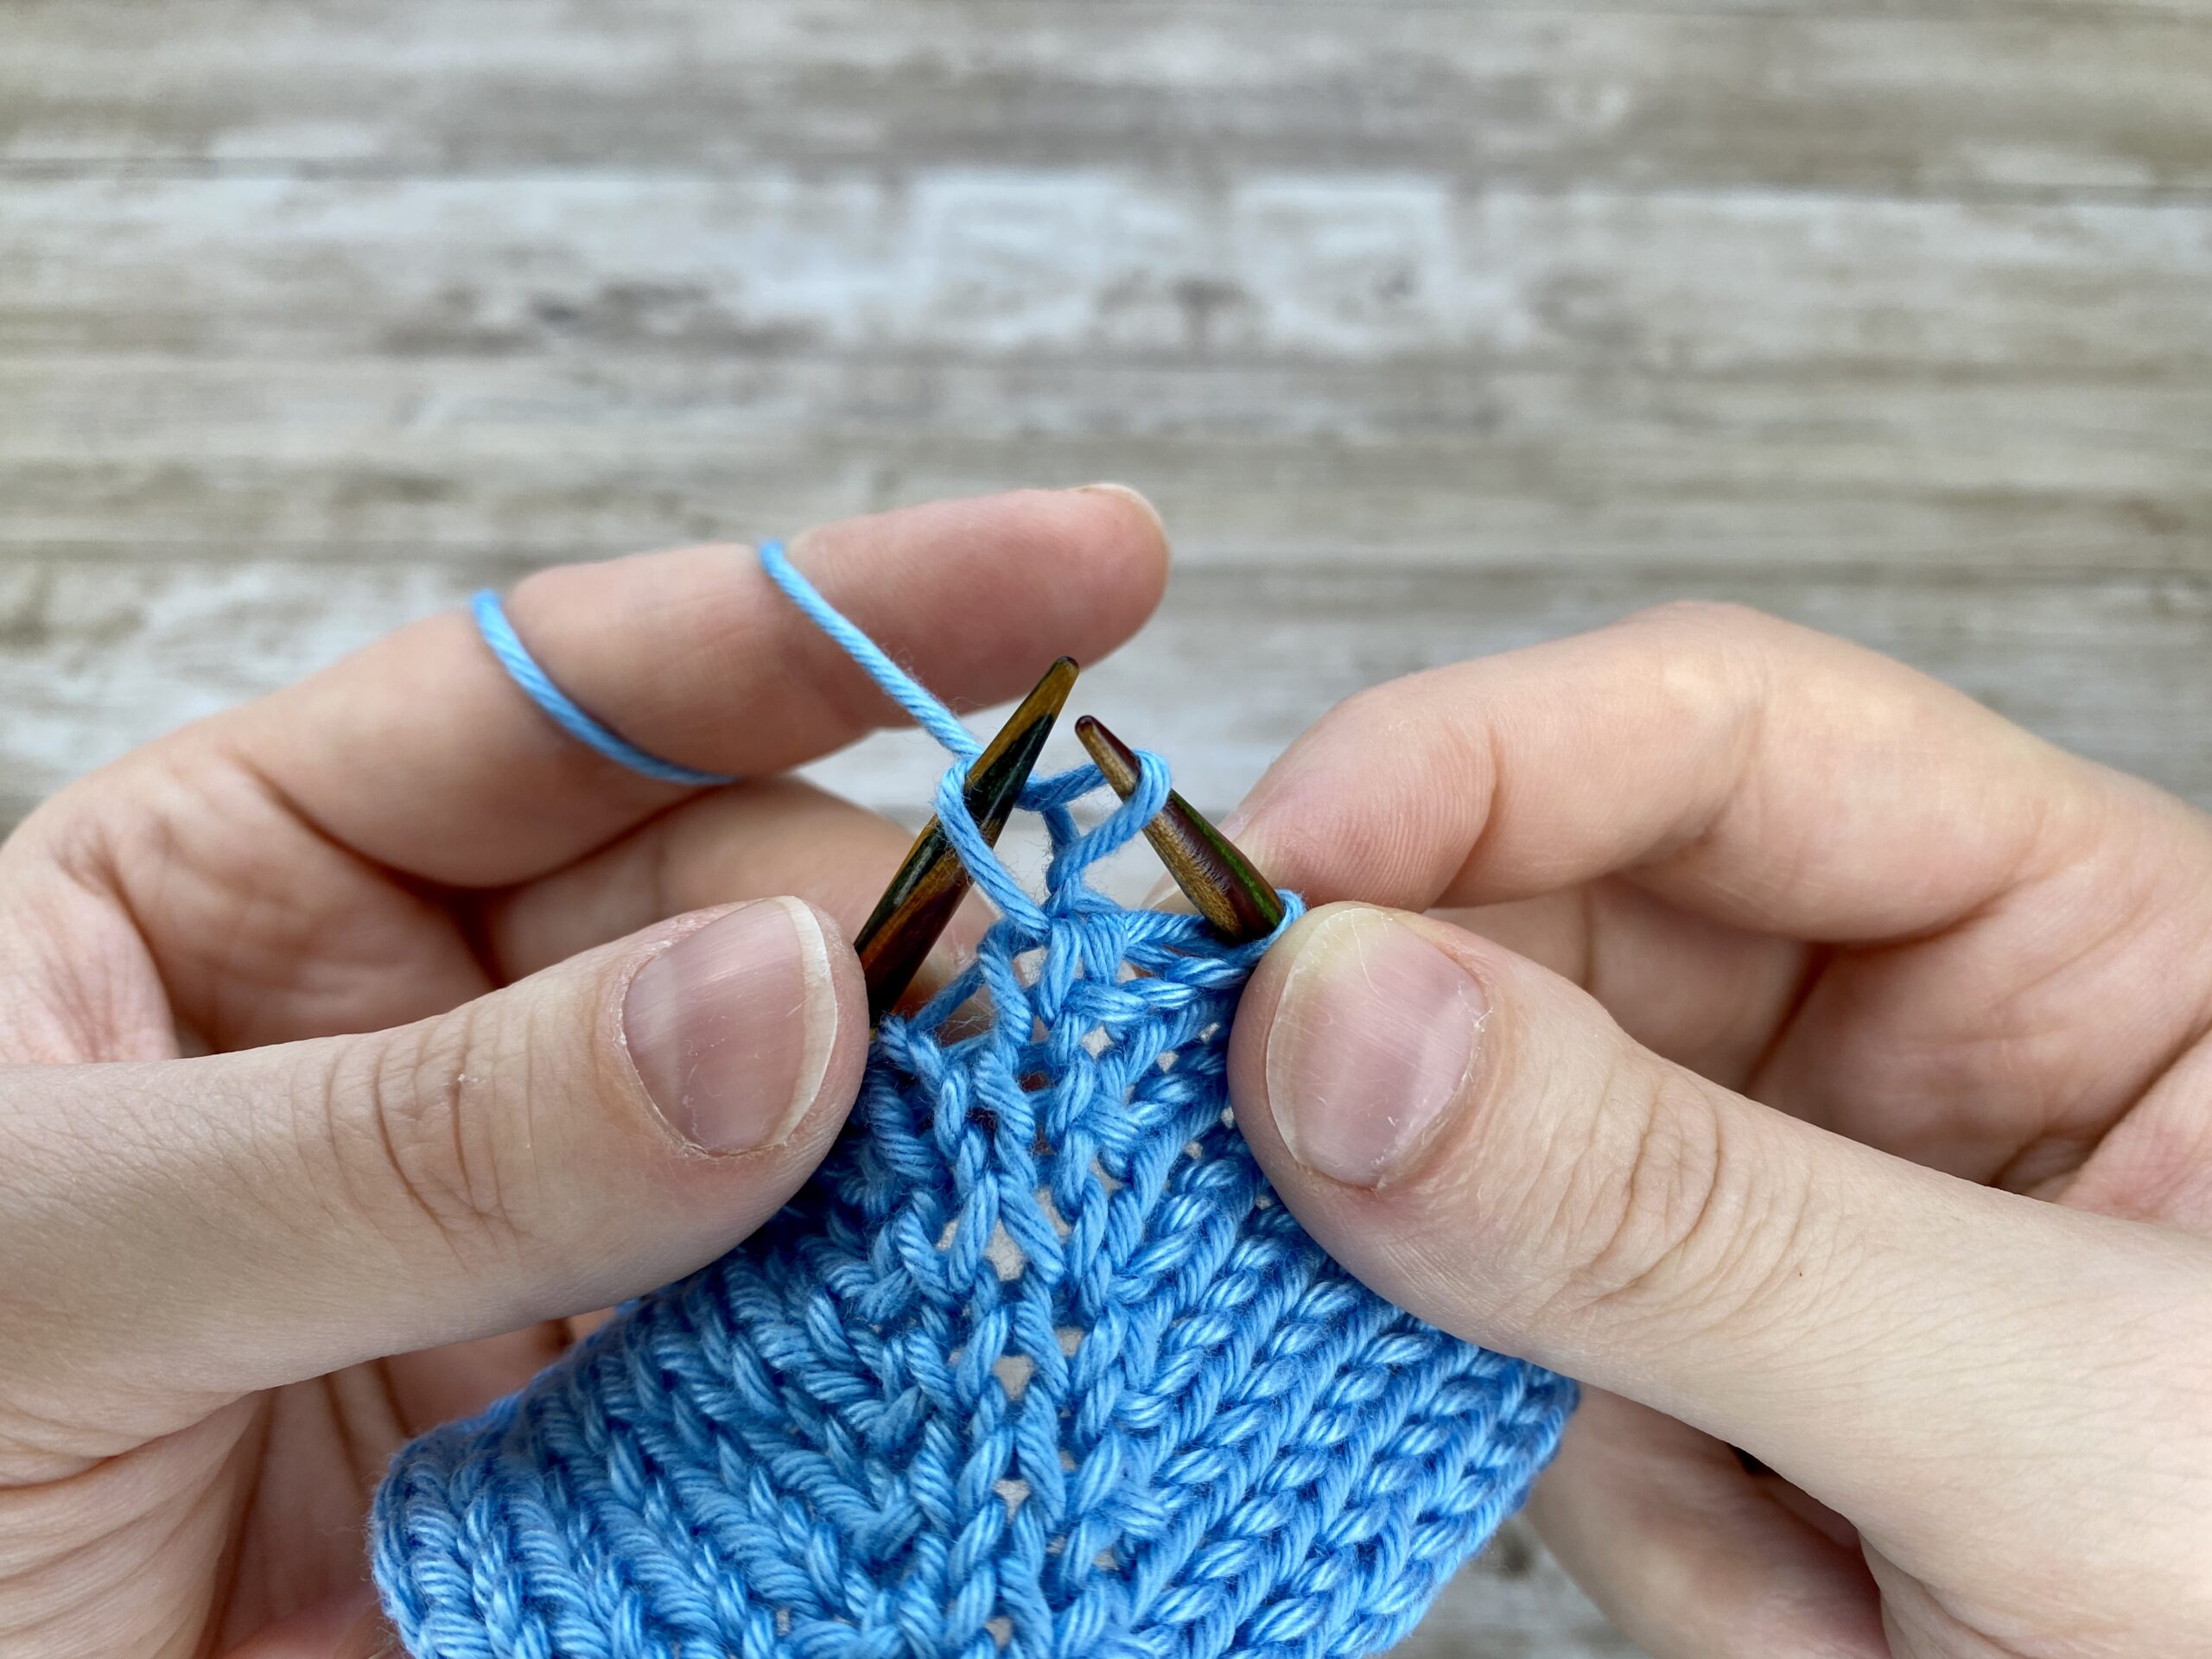 |  | Identify the back leg of your stitch | Knit this stitch through the back loop | Slide it off the needle |


 |  |  | Identify the right leg of the stitch below the right needle | With your needle, come from the back, in between the stitch and the leg, and pull it back out | Knit this stitch through the front loop |


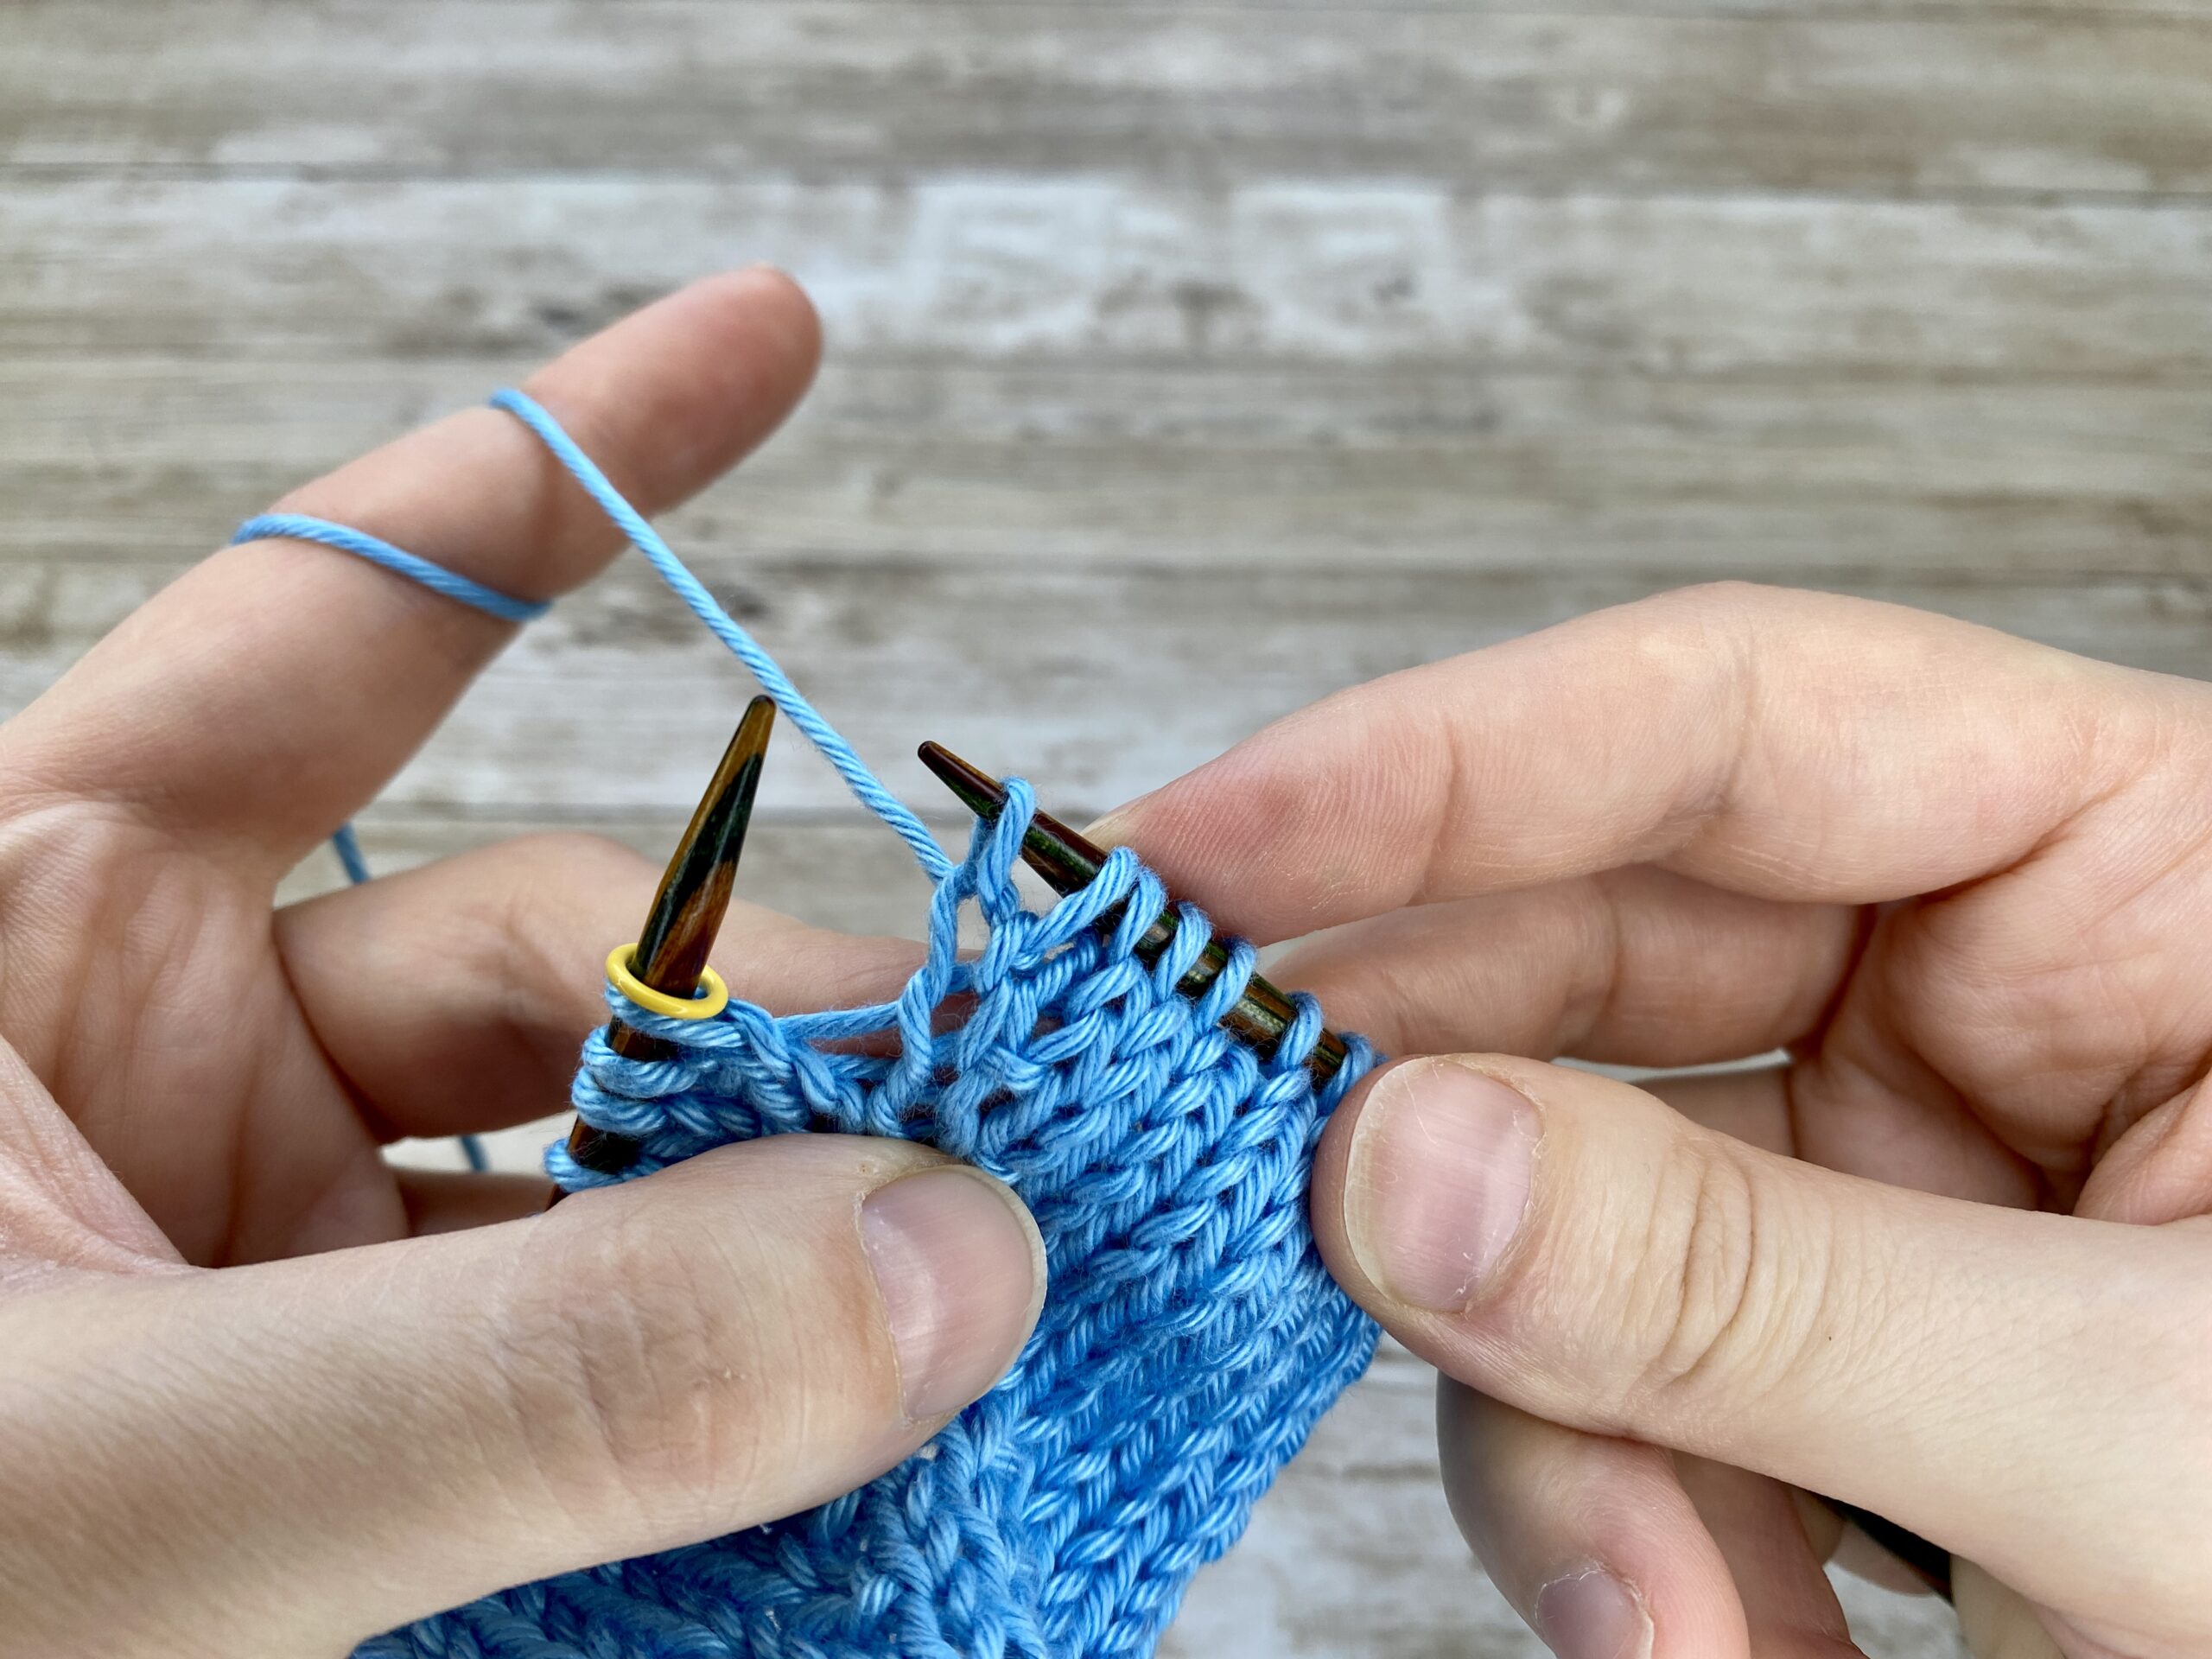 | This increase has no visible purl bump and leans to the right |

Helpful Tips for Working the KBF Increase
-
Appearance: The bar (purl bump) is not as visible as in the Mirror KFB.
-
Leaning: It is a right-leaning increase, making it visually symmetrical to the left-leaning KFB.
-
Usage: Ideal for creating symmetrical increases on both sides of a central stitch, such as in raglan shaping.
Common KBF Mistakes and Fixes
-
Misidentifying the Stitch Below:
The most common mistake is picking up the wrong stitch below, which can distort the fabric.
Fix: Double-check that you’re inserting the needle into the correct leg of the stitch below.
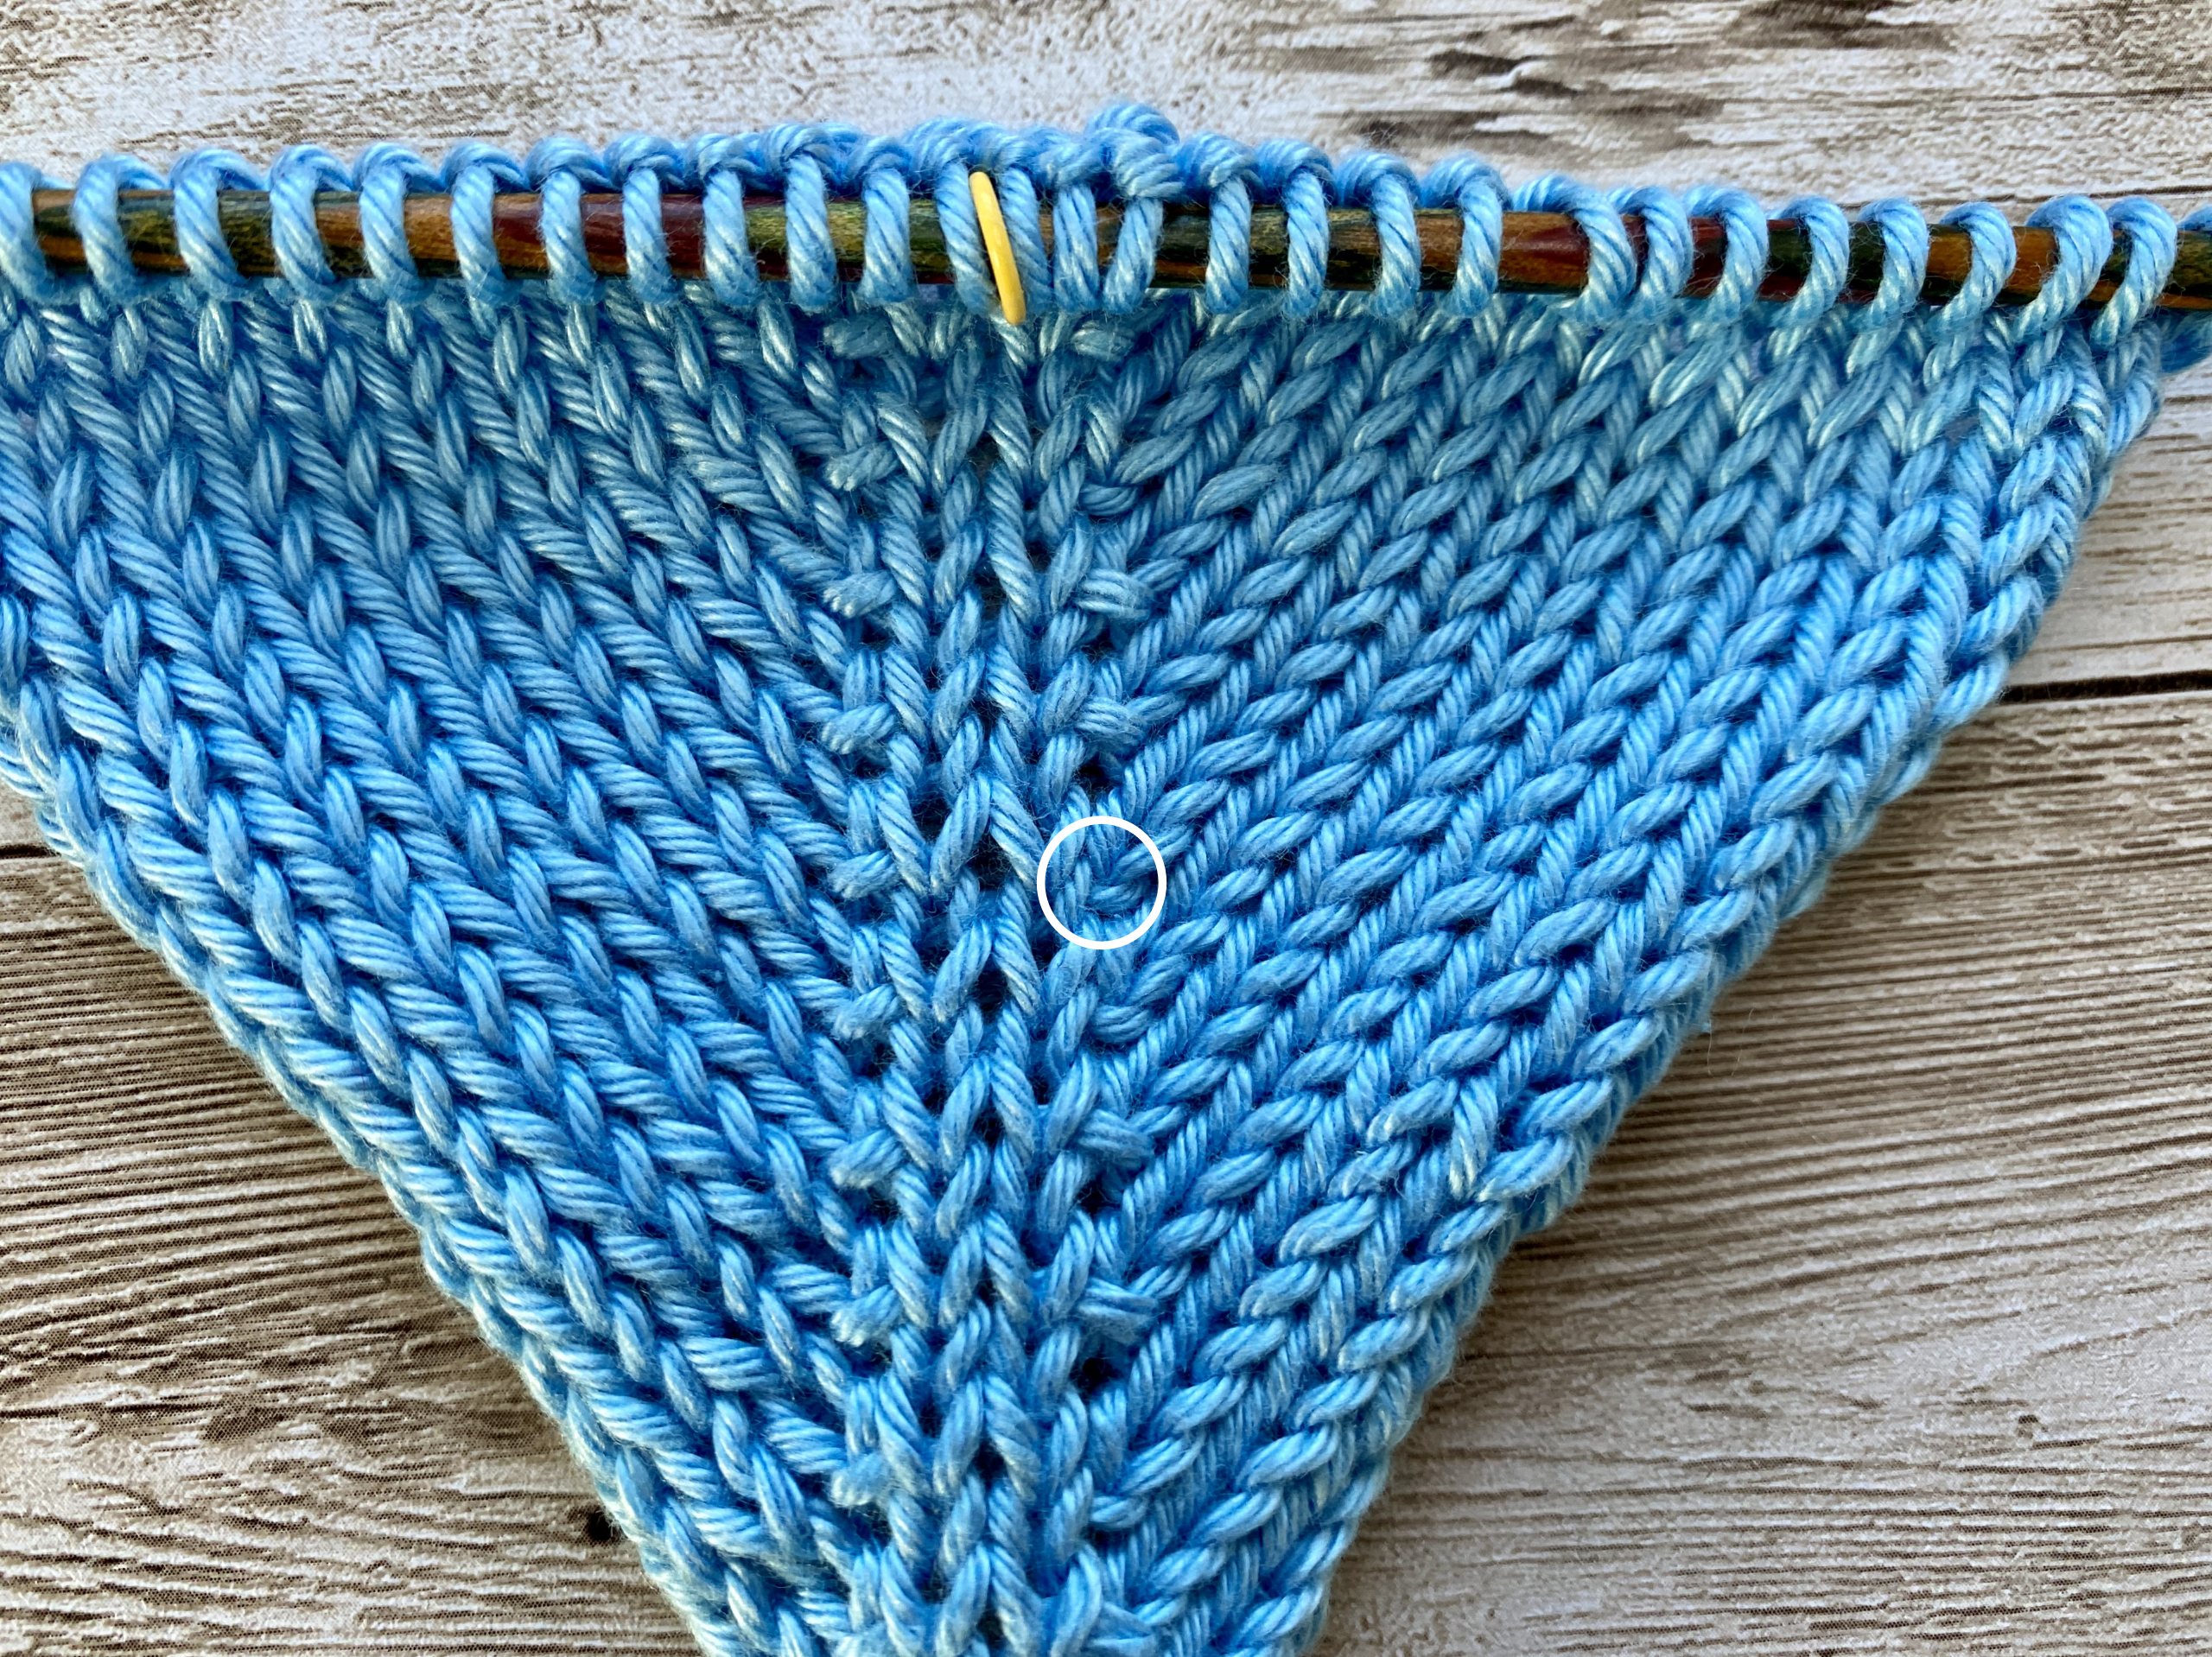 | In this swatch I tried out KBF and the Mirror KFB. I circled the KBF with a white ring. As you can see, the bar isn't as visible as in the normal KFB |

KBF (Version 2) - Twisted Stitch Variation
There is also a version of the KBF were you first knit into the back loop of your stitch and then into your front loop. We could also say this is the reversed version of the KFB. This creates an increase with a slightly twisted appearance because the stitch is twisted when you knit into the back loop first.
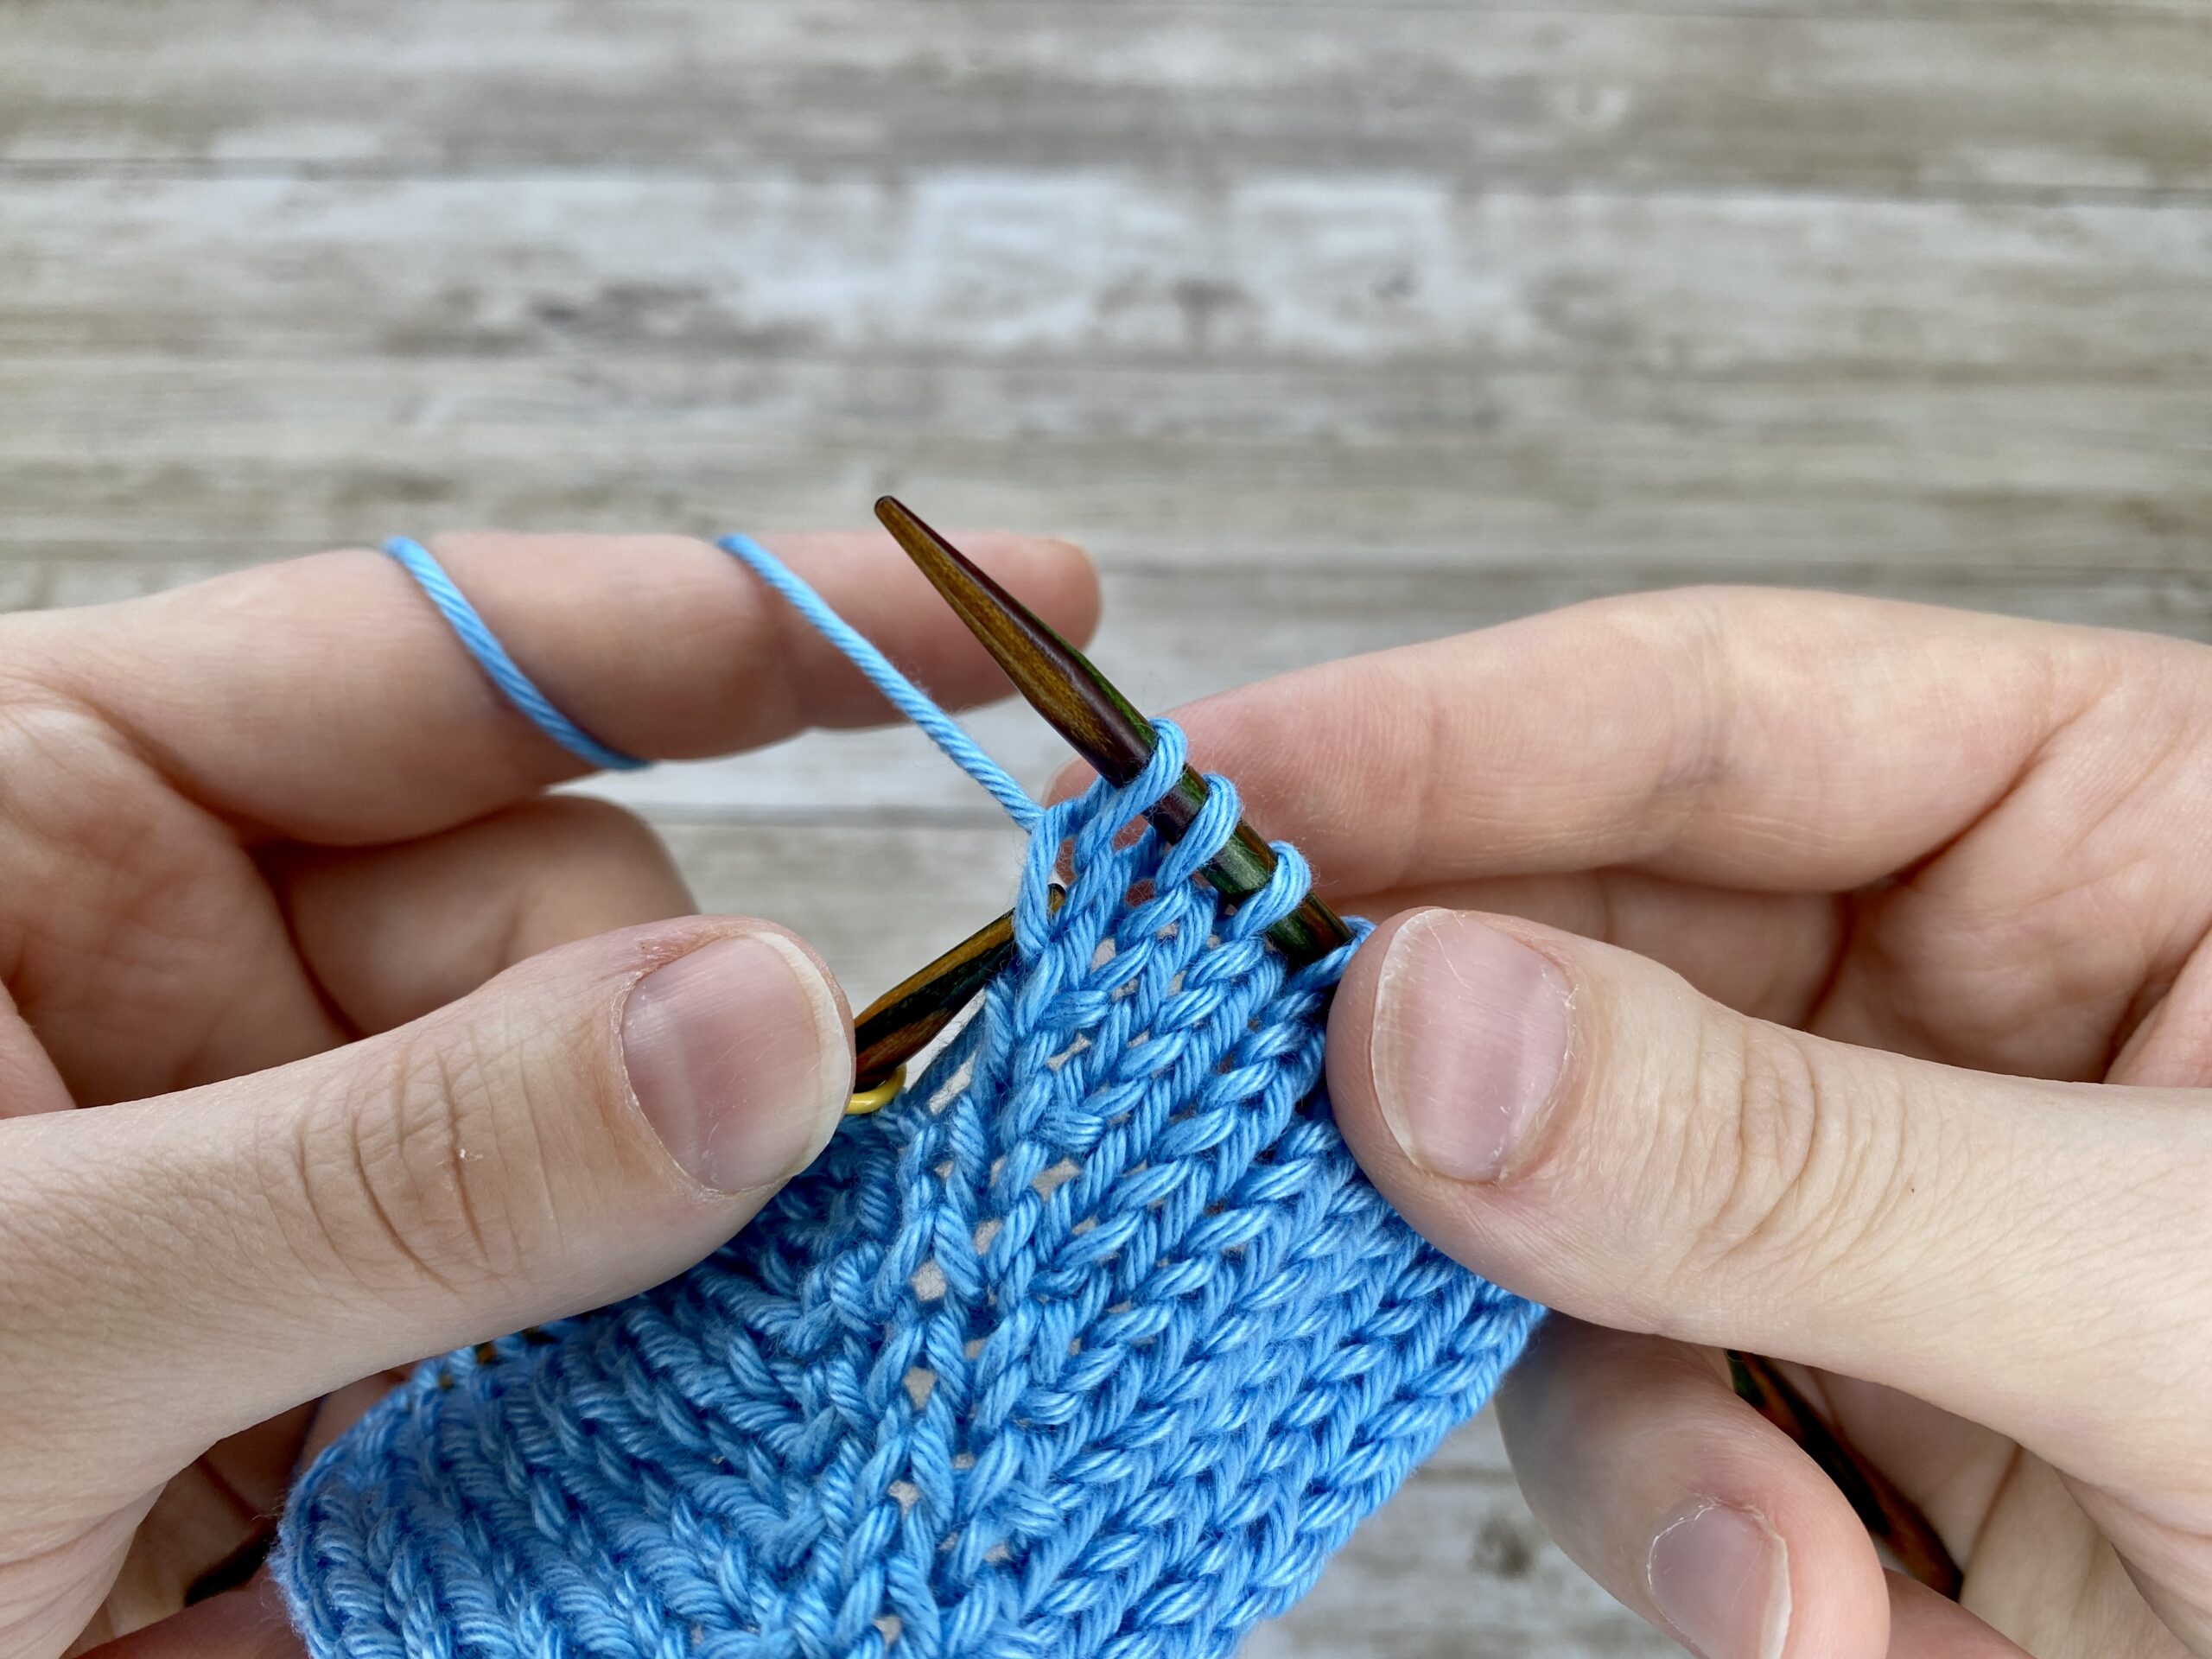
How to Work the KBF (Version 2)
-
Insert your right needle into the back loop of the stitch and knit it, but do not drop the stitch off the left needle.
-
Insert your right needle into the front loop of the same stitch and knit it.
-
Now drop the stitch off the left needle. You have created one new stitch.
 |  |  | Insert your needle into the back loop | Knit it, but do not drop the stitch off the left needle | Insert your right needle into the front loop of the same stitch and knit it |


 |  | Drop the stitch off the left needle. | This creates an increase with a slightly twisted appearance at the base of the stitch. |


Result:
-
The increase creates a twisted stitch, which can add texture to your knitting.
-
The "bump" created by the increase is slightly different from KFB, and the twist can make it stand out more.
 | In comparison to the normal KFB (left side of the blue swatch) |

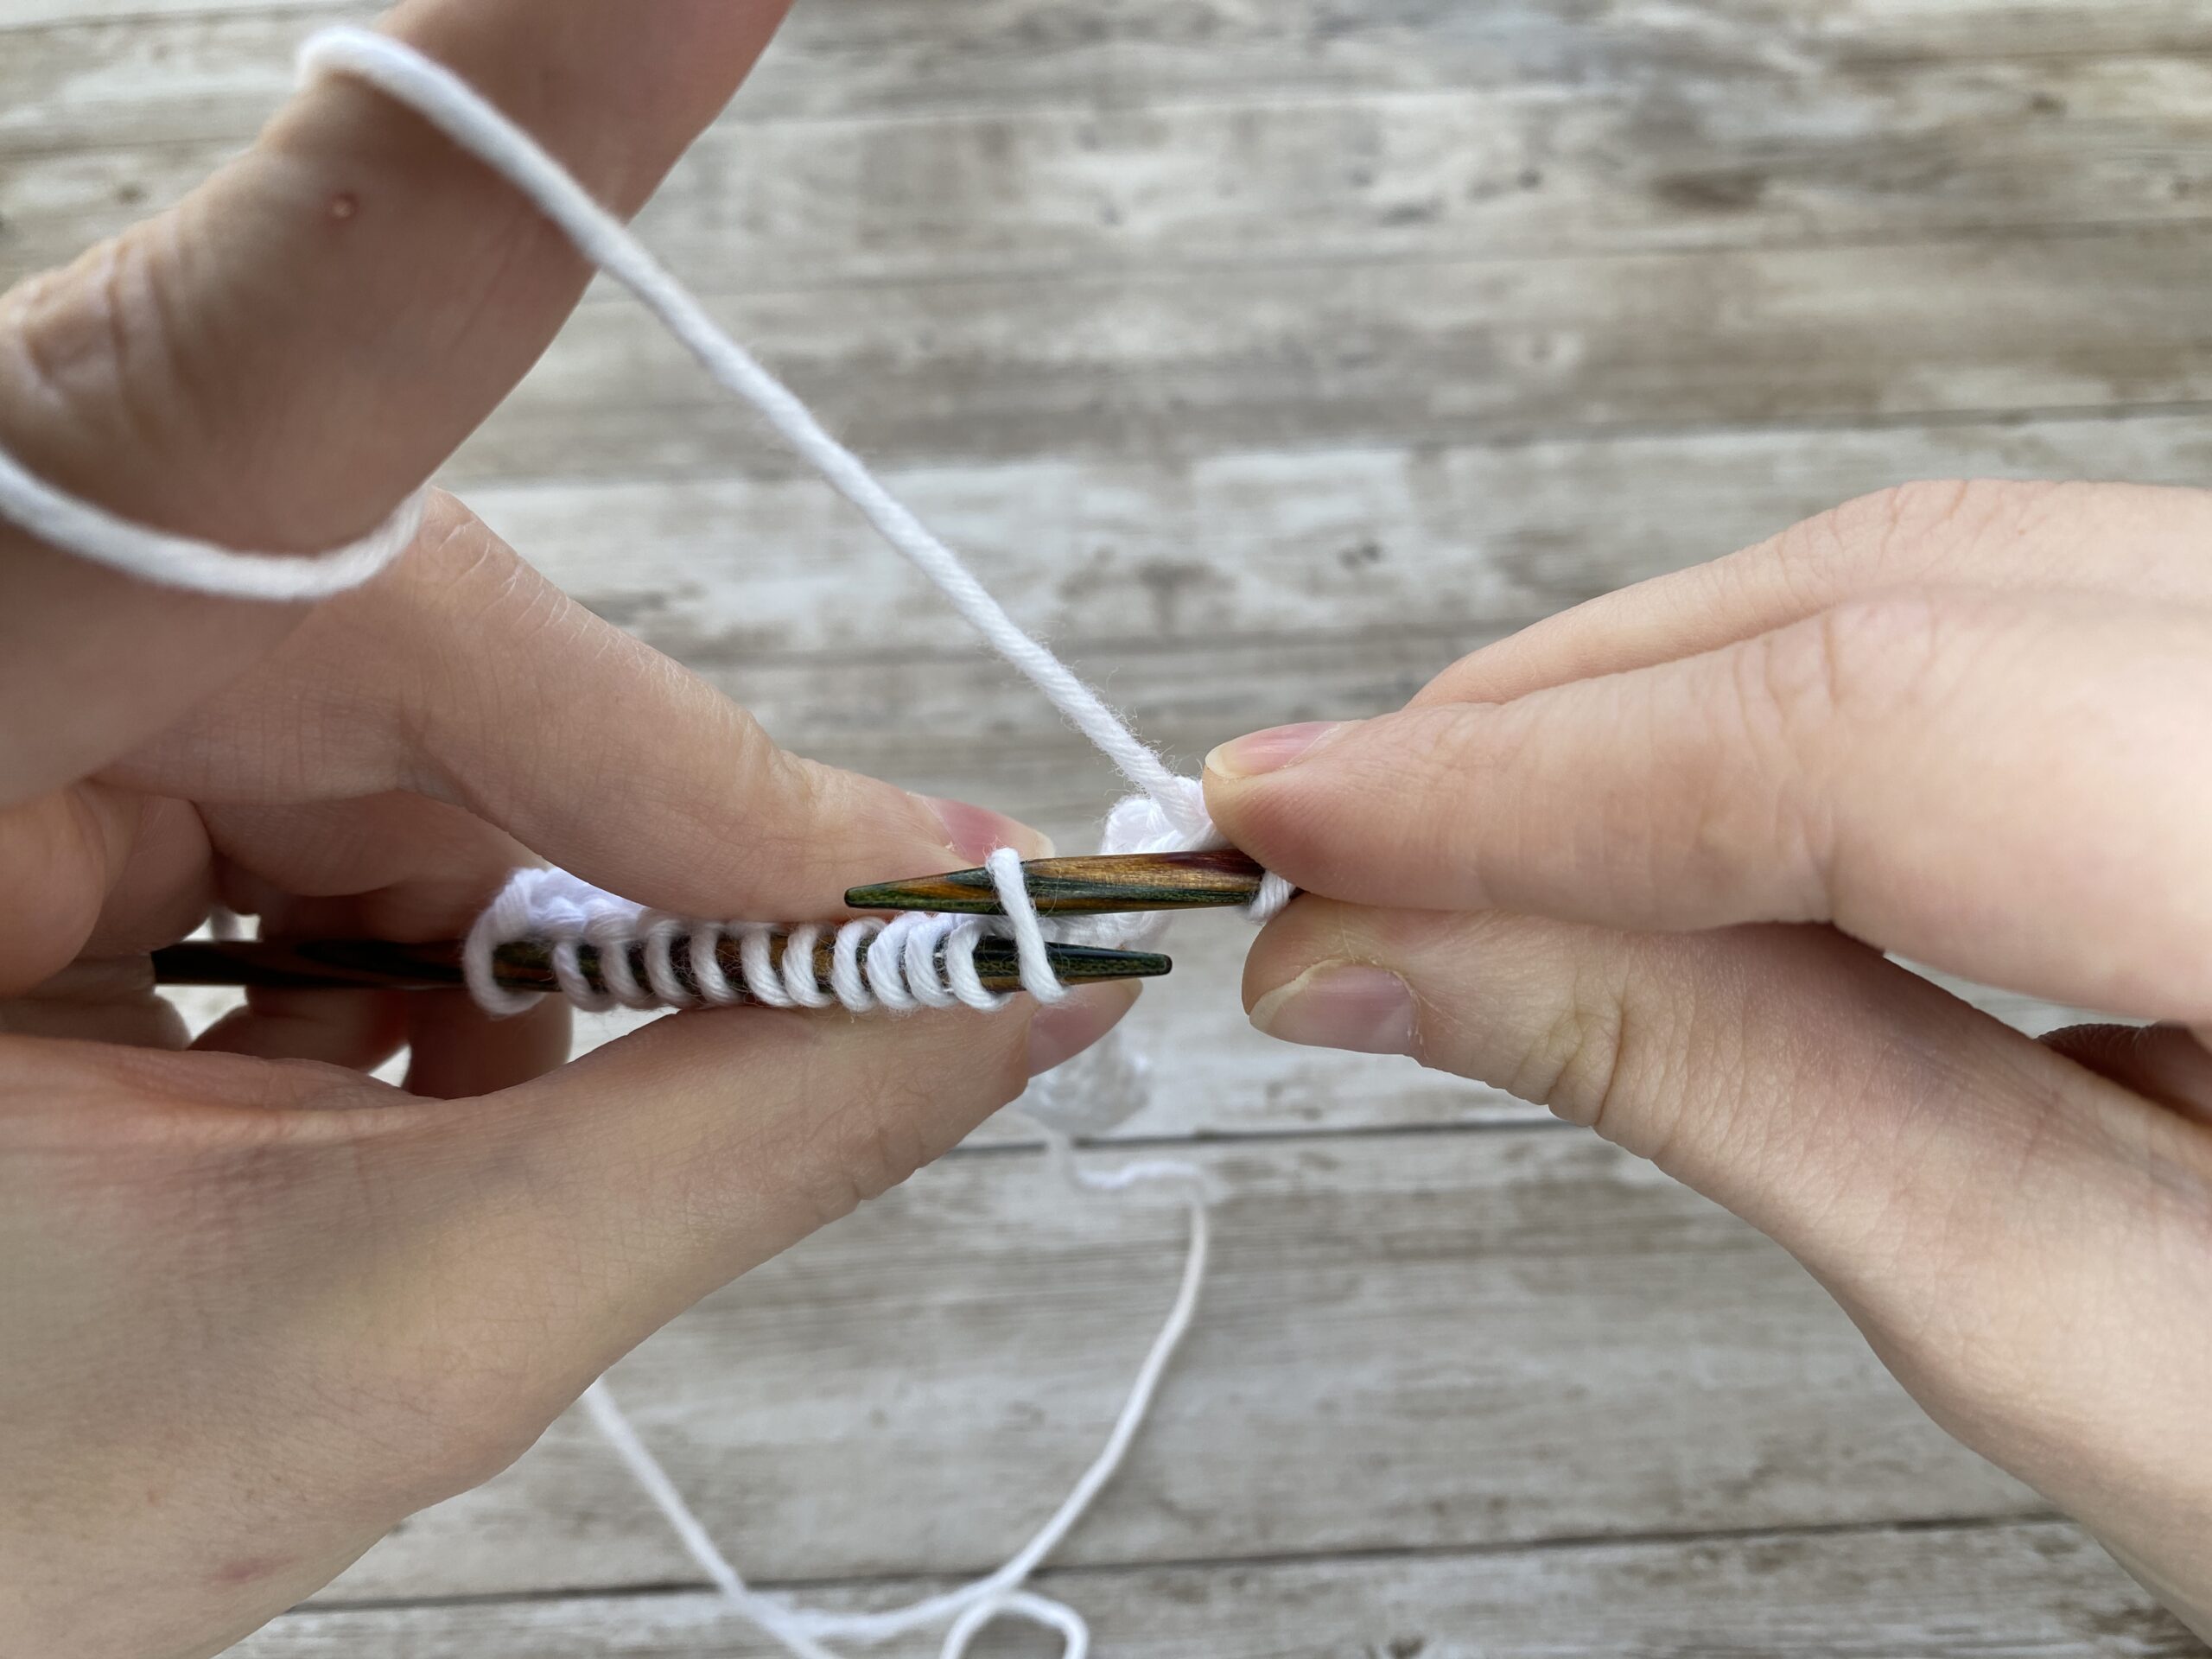
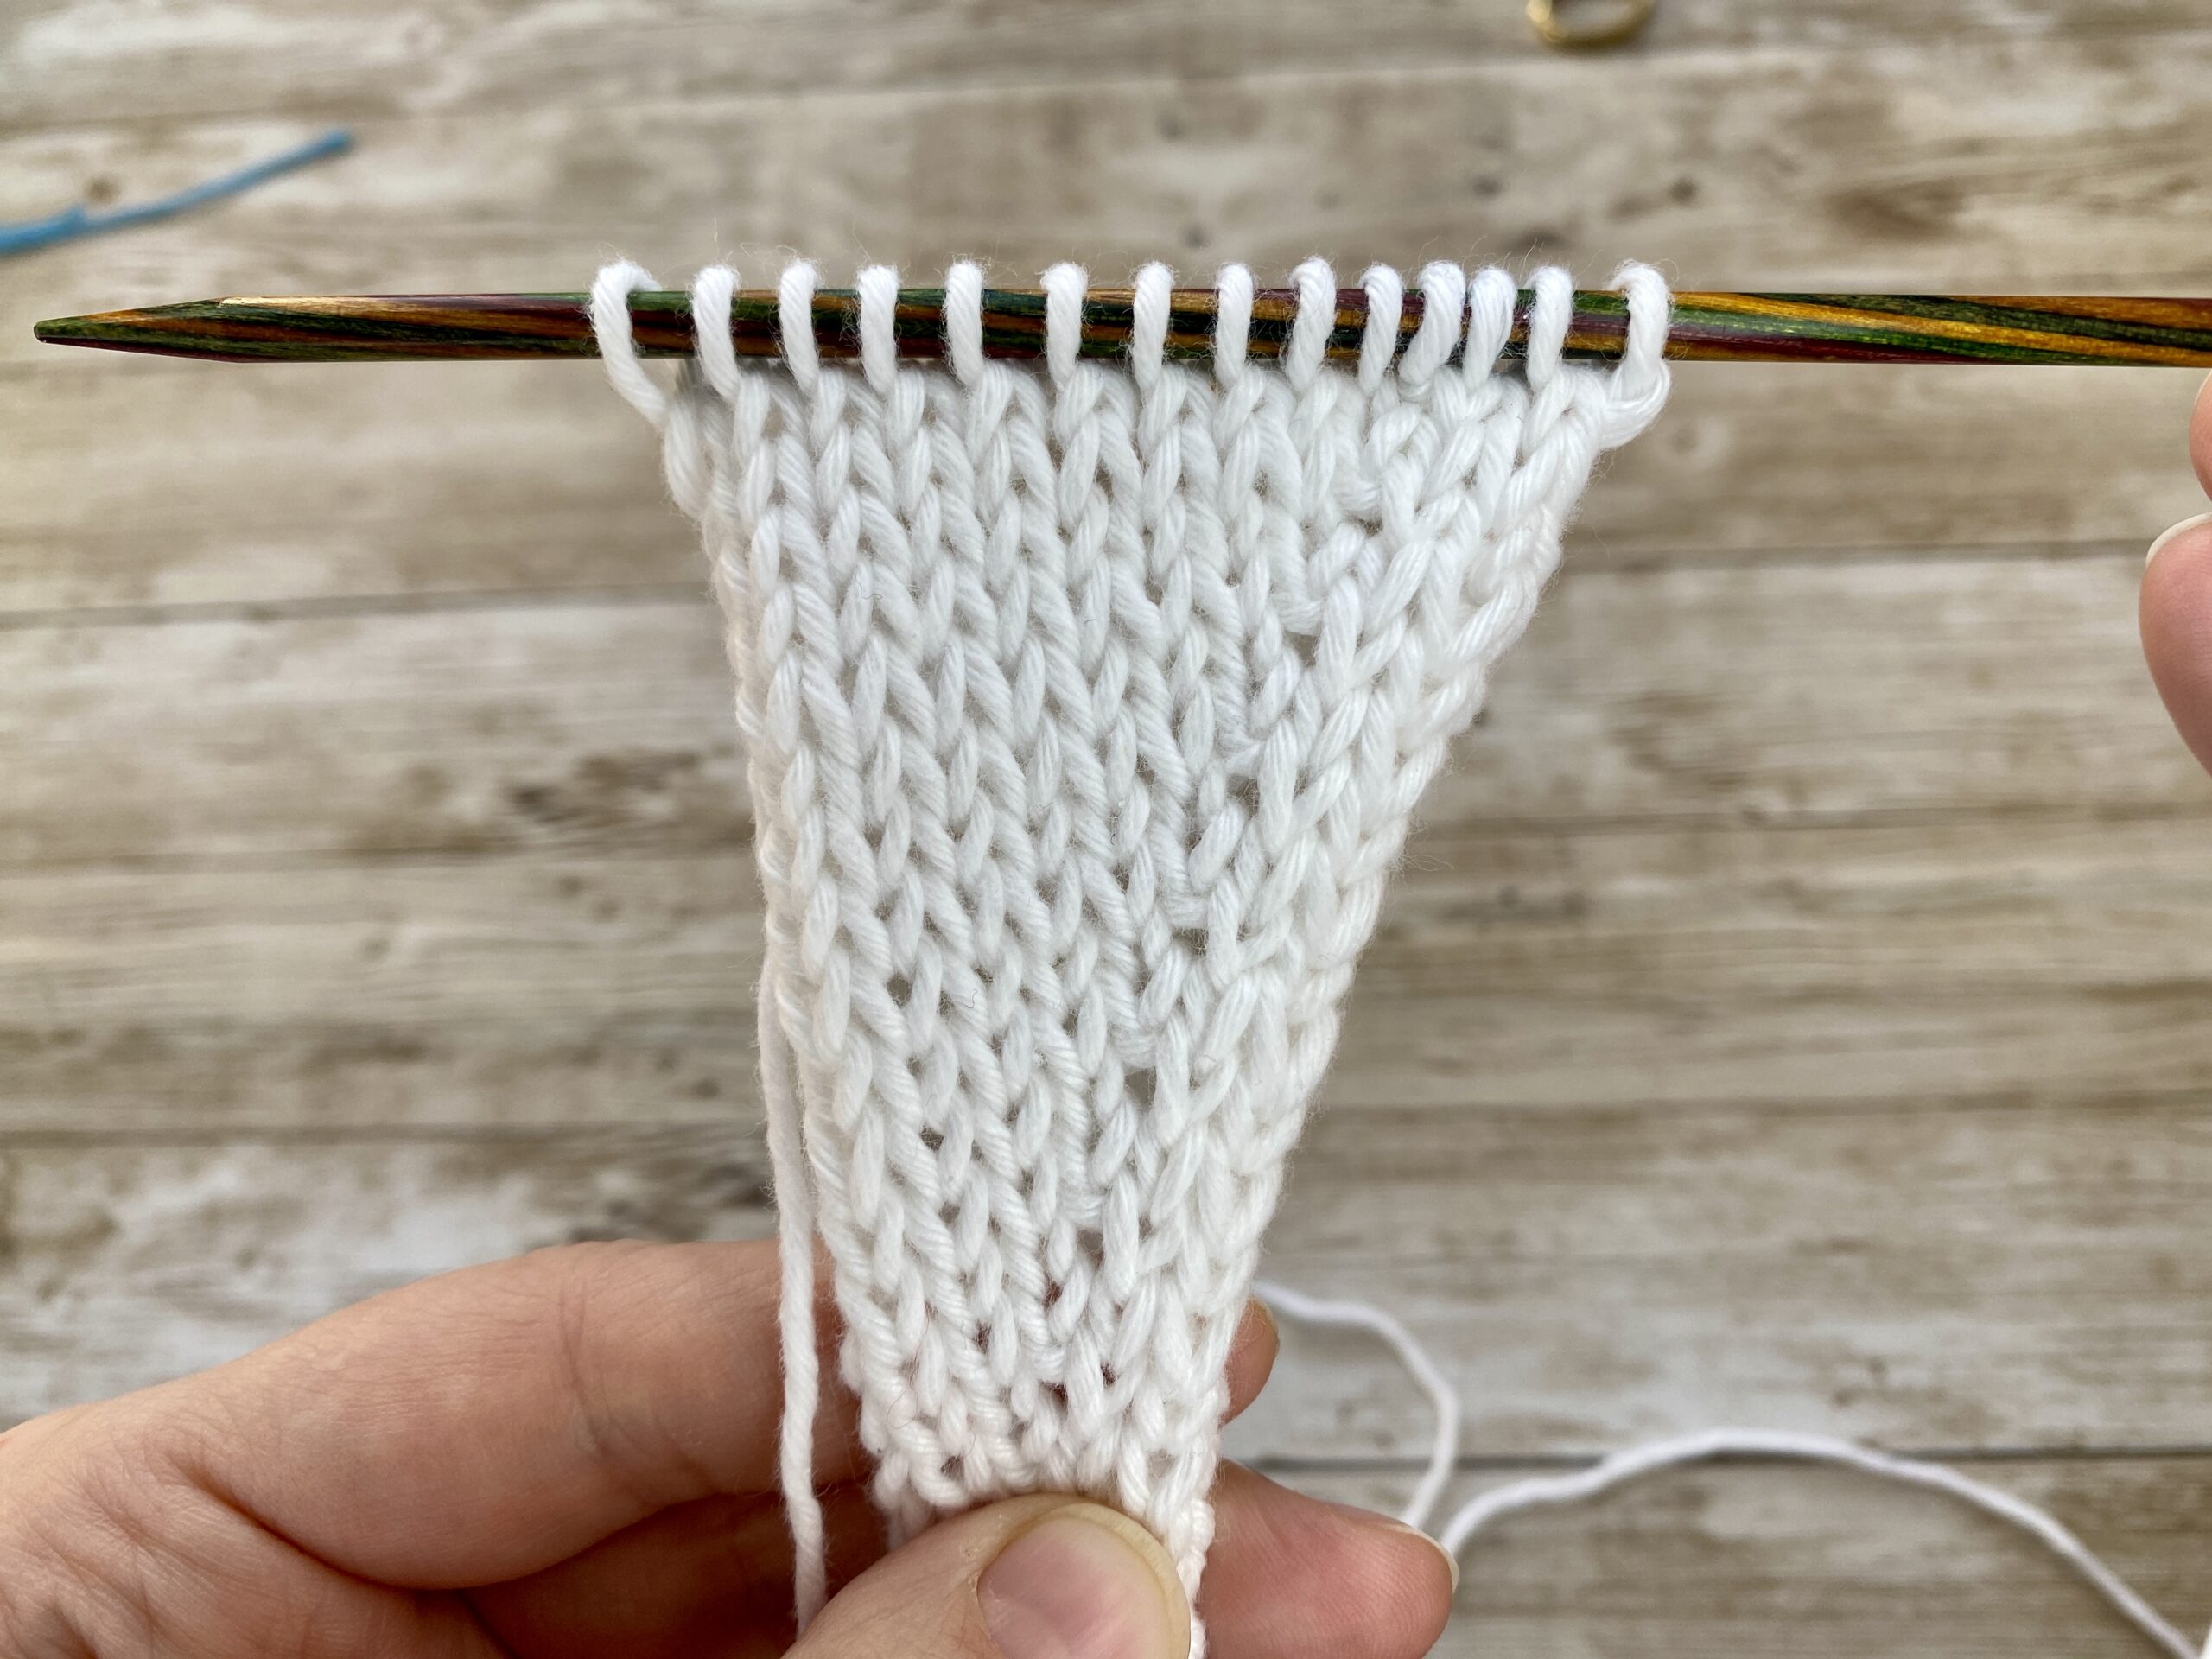
Invisible Increases: The KFSB Technique
The KFSB is a variation of the KFB increase. In KFB, you knit into the front and back of the same stitch, creating an extra stitch and leaving a small "bump" on the fabric. In KFSB, instead of knitting into the back loop, you slip the back loop purlwise. This results in a smoother, less noticeable increase because the "bump" created by the second part of the KFB is avoided.
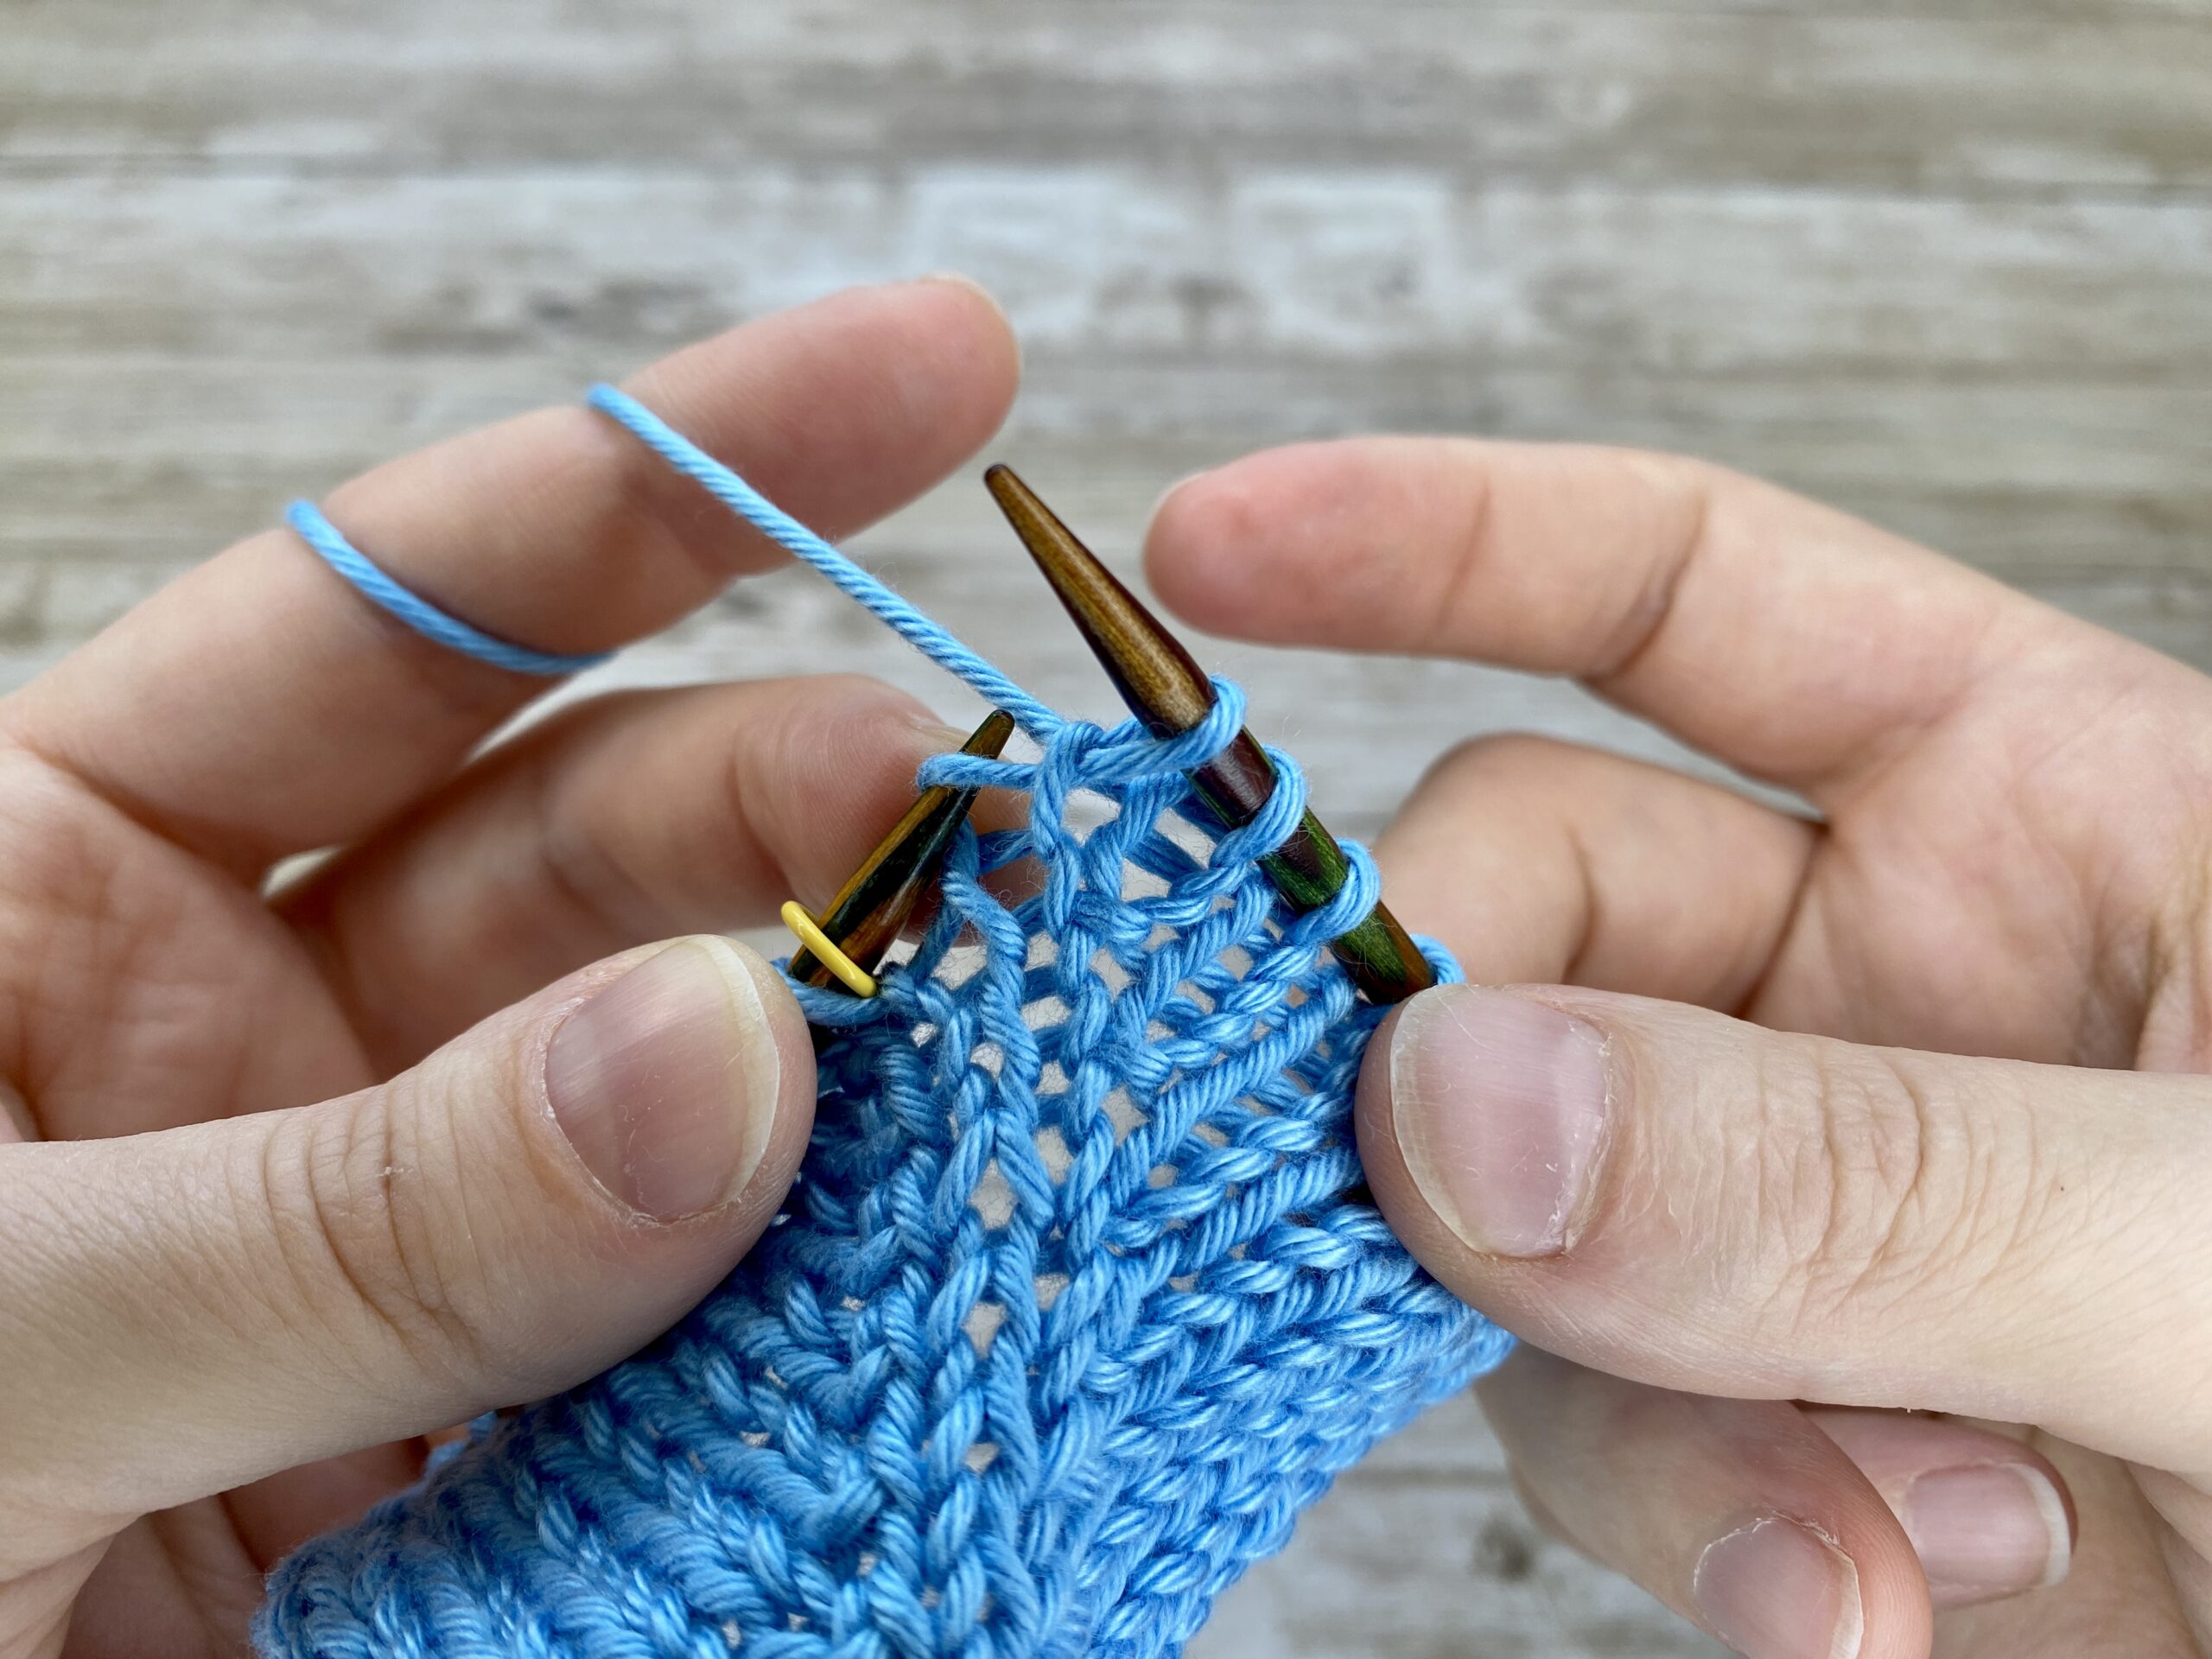
How to Work a KFSB:
-
Knit into the front loop of the stitch as usual, but do not drop the stitch off the left needle.
-
Insert your right needle into the back loop of the same stitch as if to purl, and slip it off the left needle without knitting it.
-
You now have one new stitch on your right needle, and the increase is complete.
 |  | Insert your right needle through the front leg of your stitch | Knit into the front loop of the stitch as usual, but do not drop the stitch off the left needle |


 |  | Insert your right needle into the back loop of the same stitch as if to purl | Slip it off the left needle without knitting it |


 | This swatch is knitted without any edge stiches, you can see a little rigde before the last 2 stitches |

Result:
The increase is more subtle than KFB because the slipped back loop does not create a visible bump.
-
This technique is great if you want a nearly invisible increase.
-
In my opinion, this increase is really underrated because is really beautiful.
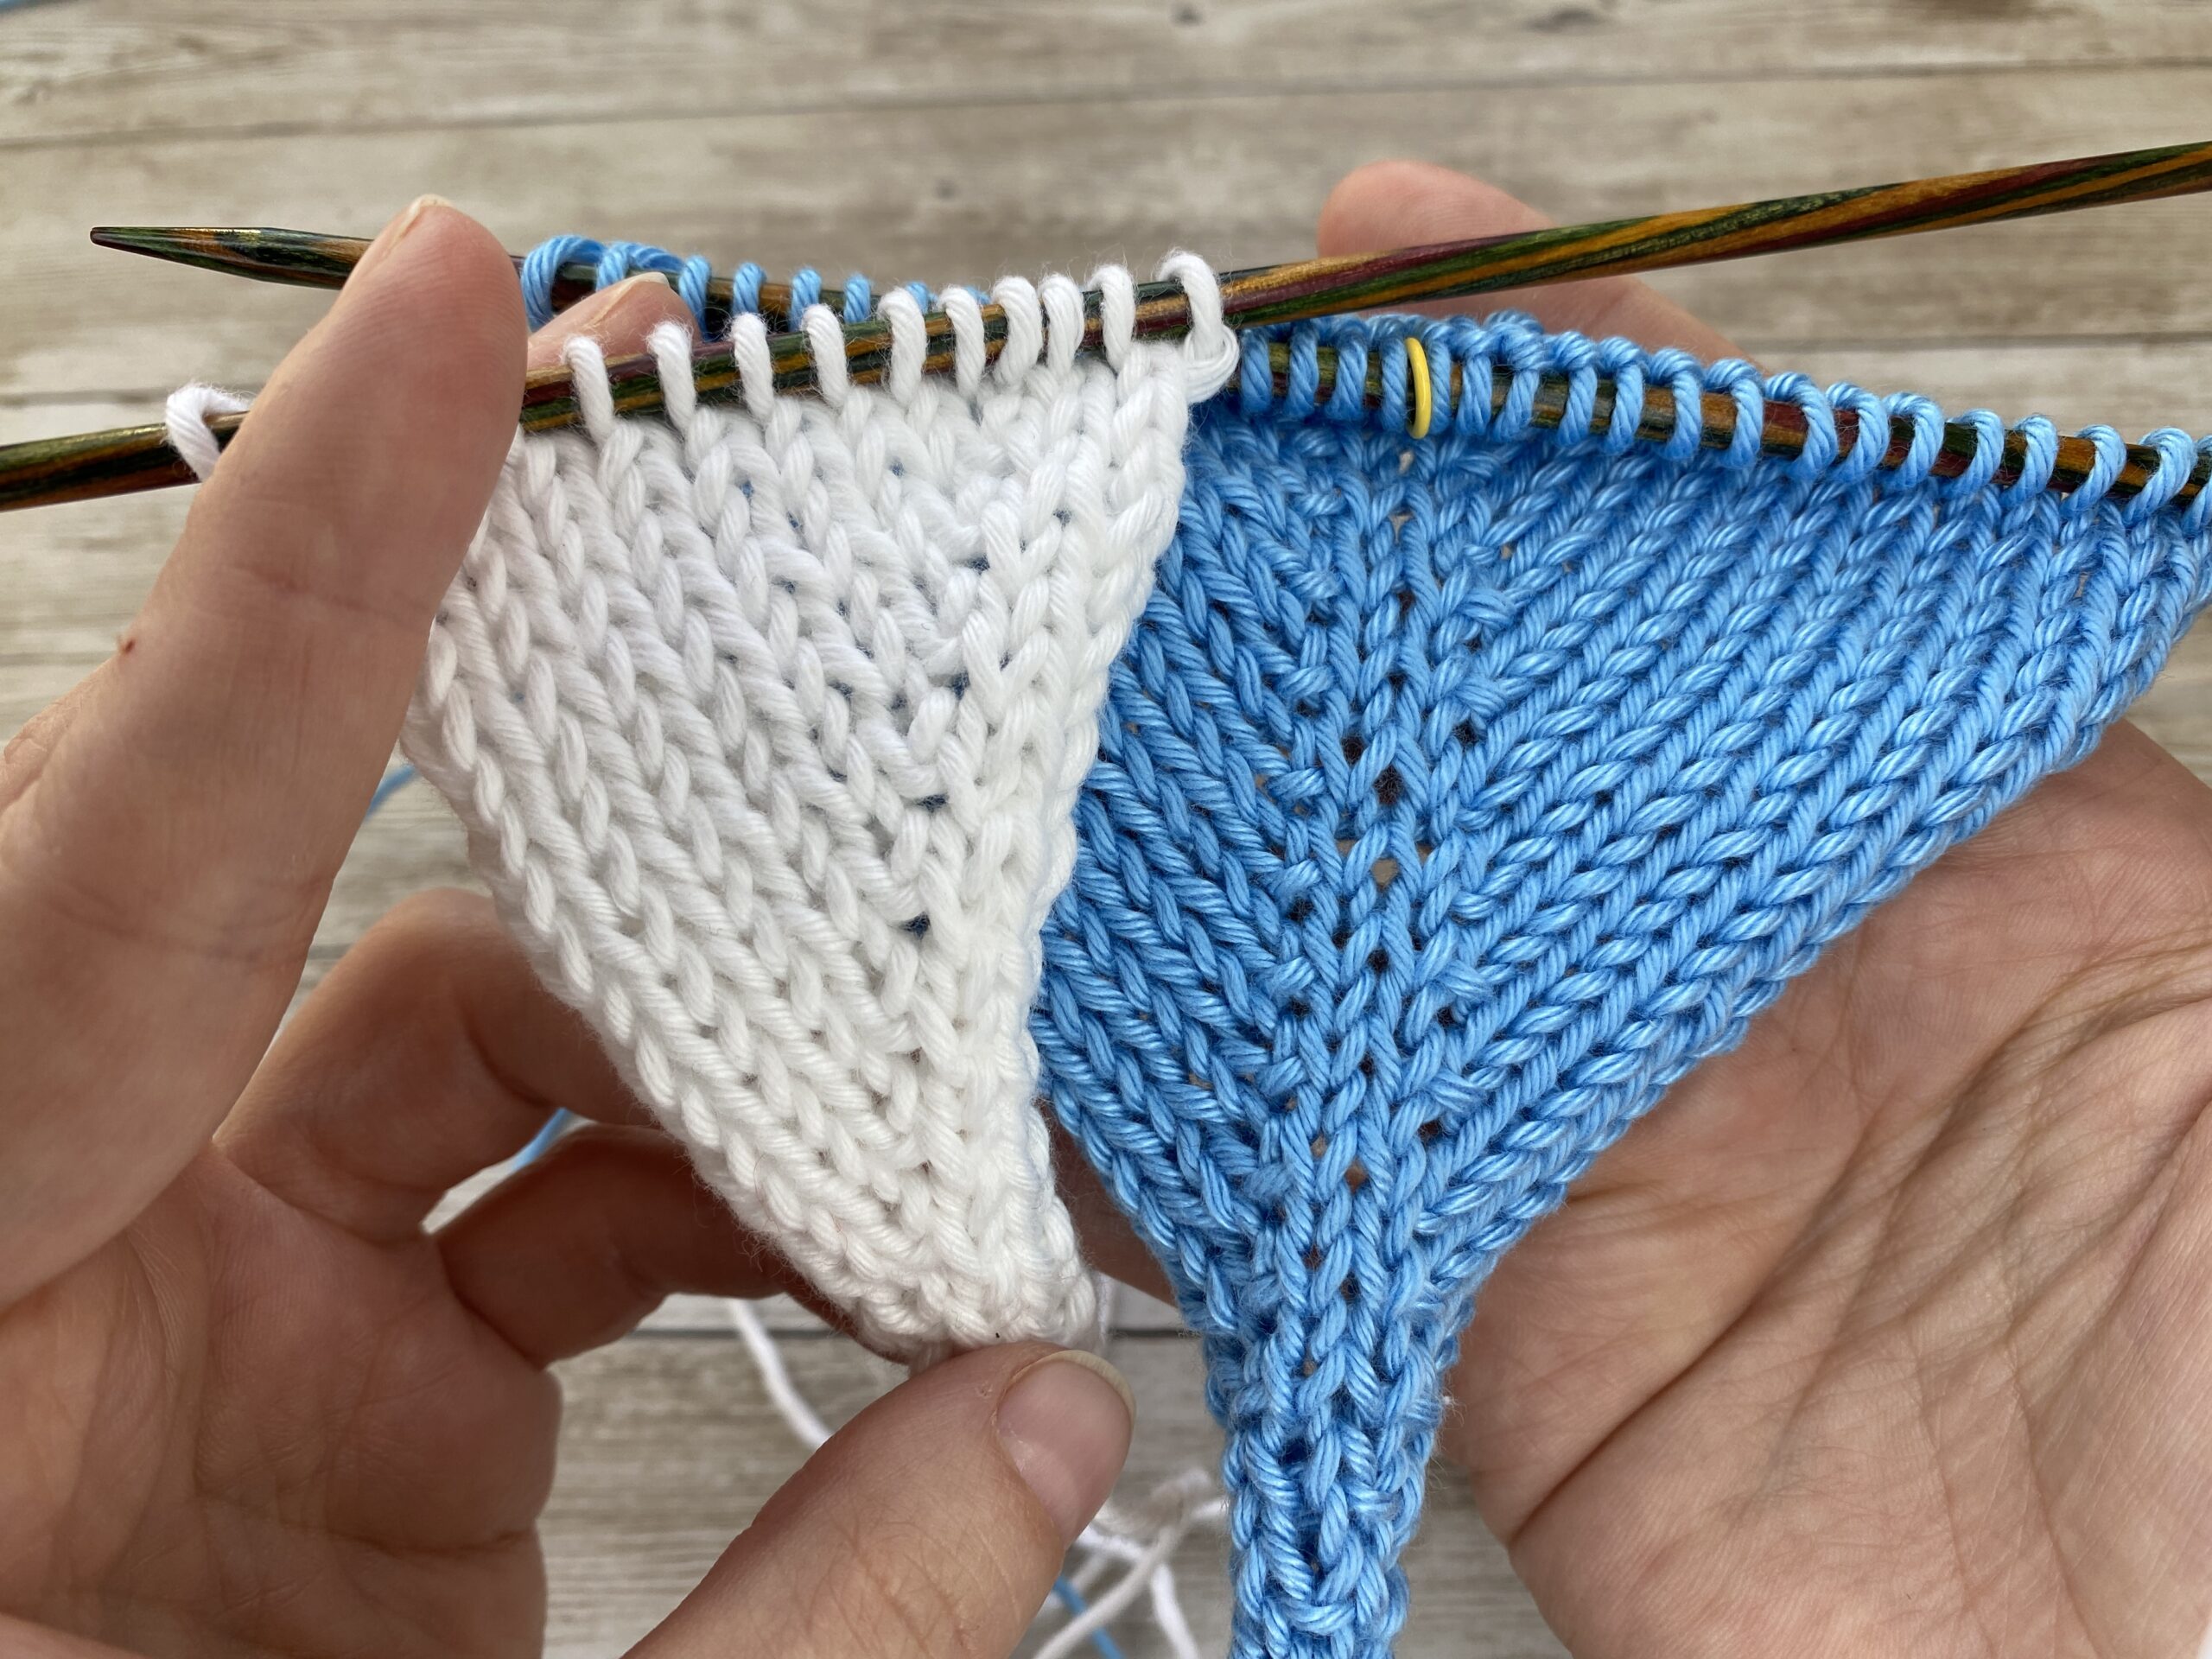
When to Use KFB vs. Lifted Increases
When working a garter stitch pattern, the KFB (knit front and back) increase is one of the best methods to add stitches. It blends smoothly into the fabric, making the increase nearly invisible while maintaining the natural texture of your knitting. For nearly invisible shaping in your knitting, use a lifted increase instead of KFB. These increases blend beautifully into stockinette stitch fabric, creating a really, clean results without visible bumps.
The picture below shows a section of the Sophie Scarf pattern. On the right edge, I worked a three-stitch i-cord border, and right after those three stitches, I added a KFB (knit front and back) increase. The KFB blends beautifully into the fabric, which shows how this simple technique can add stitches almost invisibly.
A small note: the original pattern suggests working the increases into the third i-cord stitch, but I found that made my edges a little uneven. So I decided to experiment and adjust the placement slightly - this version gave me a neater, more stable edge without losing that elegant, seamless look.
On the right edge, I worked a three-stitch i-cord border, and right after those three stitches, I added a KFB (knit front and back) increase. The KFB blends beautifully into the fabric, which shows how this simple technique can add stitches almost invisibly. Or is it invisible :)
In contrast, lifted increases really shine in stockinette stitch. They’re almost invisible, flowing right out of the fabric without leaving a bar or hole. Side by side, you can really see how each increase has its perfect place: KFB for clean curves in garter, and lifted increases for seamless shaping in smooth, modern stockinette projects.


Frequently Asked Questions About KFB Increases
Q: What does KFB mean in knitting?
KFB stands for “knit front and back.” It’s a beginner-friendly increase that adds one stitch by knitting into both the front and back loops of the same stitch.
Q: Is KFB a left-leaning or right-leaning increase?
The traditional KFB is a left-leaning increase because the new stitch appears to the left of the original one. For a mirrored effect, use a Mirror KFB or KBF to create a right-leaning increase.
Q: Why does KFB leave a bump on my knitting?
The visible “bar” or purl bump appears because the second part of the KFB increase twists the stitch. If you want a smoother finish, try the KFSB variation to avoid that bump.
Q: What’s the difference between KFB and KBF in knitting?
KFB means “knit front and back,” while KBF means “knit back and front.” Both create one additional stitch, but KBF leans to the right and tends to look more symmetrical when paired with KFB increases.
Q: Where is the best place to use a KFB increase?
KFB works beautifully along garment edges, in raglan shaping, and in textured stitches like garter or seed stitch where its bar blends into the fabric.
Q: How do I avoid holes when working a KFB?
Maintain even tension. Practice on a swatch first to perfect your motion and control.
Q: What’s the most invisible alternative to KFB?
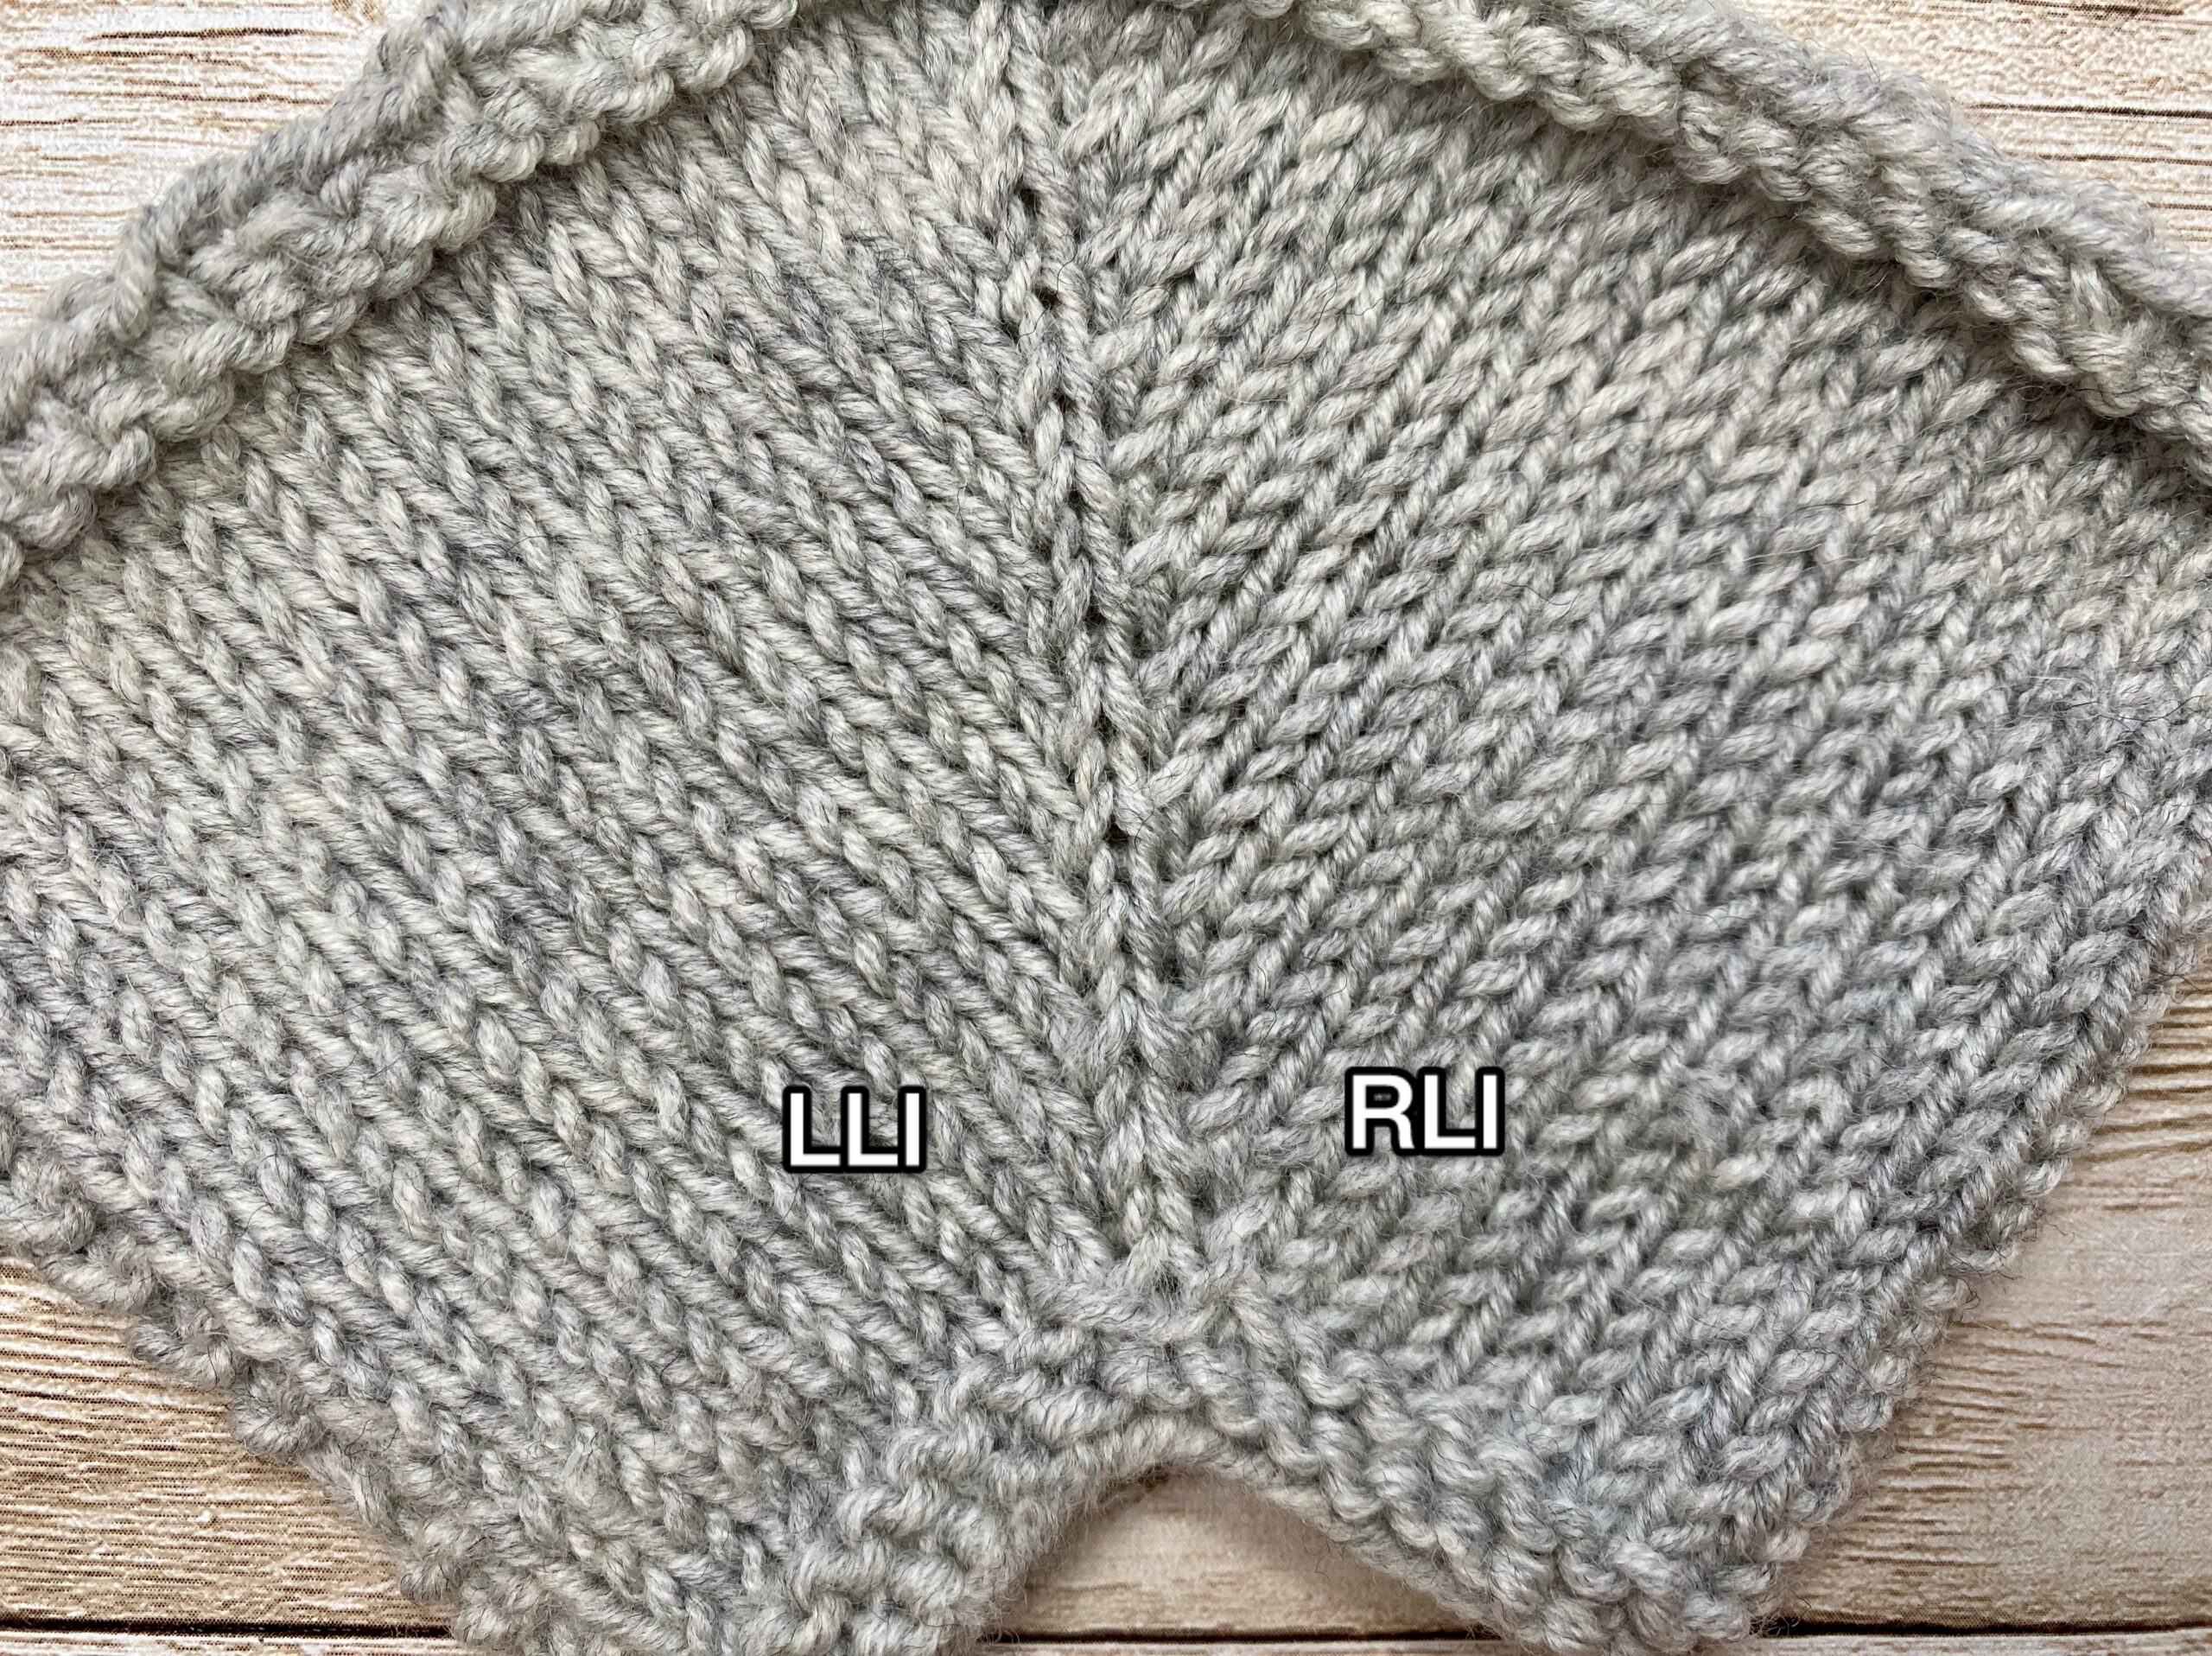
If you prefer invisible increases, switch to a “lifted increase” (LLI/RLI) or try the KFSB, which skips knitting the back loop to remove the visible bump.
Q: Can I substitute KFB for M1 in patterns?
Yes, but note that KFB adds a visible texture. M1 increases (make-one) are designed to be more like "invisible", so choose based on the aesthetic and structure of your project.
Conclusion & Video Tutorial
The KFB increase was one of the first increases I learned in knitting, and every time I didn’t feel comfortable with other increases, like the M1 ones, I switched it up. I know that designers use these types of increases for a reason, but sometimes you just need a little more time to feel confident enough to try a new technique.
I hope this guide has helped you feel more confident about working the KFB and Mirror KFB increases.
Until next time, happy knitting!
A Little Way to Say Thanks
You Might Also Like


 |
|
Join the Cozy Corner Newsletter!
Hey there, creative soul! Welcome to the Yarn Enchantment Newsletter, where we celebrate all things cozy, crafty, and full of heart. Think of this as your friendly crafting companion - a little dose of inspiration delivered straight to your inbox, just for you. Inside, you’ll find: ✨ Exclusive patterns & tutorials - ideas you won’t find anywhere else (just for us!) 📚 Bookish crafts that bring your favorite stories to life 🧶 Tips and tricks to make your crafting journey smoother (and more fun!) 💌 Heartfelt musings on life, creativity, and the magic of making something with your own two hands Whether you’re knitting by the fire, brainstorming your next DIY project, or just looking for a little creative pick-me-up, this newsletter is here to cheer you on. Because let’s be honest - crafting isn’t just about the finished project; it’s about the joy, peace, and stories we create along the way. So grab a cup of tea, cozy up, and join me. Together, we’ll weave a little magic into everyday life - one stitch, one story, and one email at a time. P.S. I’m so glad you’re here. Let’s make something beautiful together! (Note: If you're using an ad blocker, you may encounter issues subscribing to the newsletter. To subscribe, please consider disabling your ad blocker.)
|
