

How to Knit k2tog tbl: Easy Left-Leaning Decrease Guide
February 8, 2025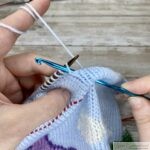
Double Folded Edge with Crochet Hook
February 13, 2025Weaving Memories: My First Intarsia Knitting Project

Originally published on February 11, 2025
Turning a Childhood Drawing into a Knitted Treasure
You know how I always say that every stitch we knit is a memory? Well, this time, I created a memory from a memory.
My son is turning 18 this month (how did that happen so fast?!), and I’ve been feeling a little nostalgic. I spent some time going through a box full of keepsakes I’ve saved over the years - his childhood drawings, little craft projects he made in school and kindergarten, and even the letters he wrote to Santa (Santa always wrote back, so he has a lot of letters as well). There are so many hidden gems in this box, but one drawing in particular caught my eye. It was the drawing he made together with his great grandma. My son is autistic and he didn’t open up to many people, but his granny always made him laugh and feel special.
That’s the moment when I thought: what if I turned this drawing into a knitted pattern? What if I could bring his childhood art to life in a way that would last forever?
Now, I’ll admit, I had no idea what I was getting myself into. Intarsia knitting was completely new to me. I admired it from afar - those beautiful and complex designs - but the thought of managing all those yarn ends really scared me. Still, the idea of transforming my son’s art into something tangible kept me going.
Remember: Even if it isn't perfect the first time, trying it out and embracing the imperfection is really important. It's often in these imperfections that we discover the key to growth and creativity.
 | Apple Trees |
Because this was supposed to be a wall hanger that should be hanged, I thought about creating a folded edge for a clean and polished look. A few weeks ago, I came across a short that showed how to create a folded edge using a crochet hook. Naturally, I wanted to give it a try, and the results were amazing!
No running out of yarn, no frustrating knots while working the Kitchener stitch, and what surprised me the most, it’s still very stretchy. I’ll definitely be using it again in future projects.
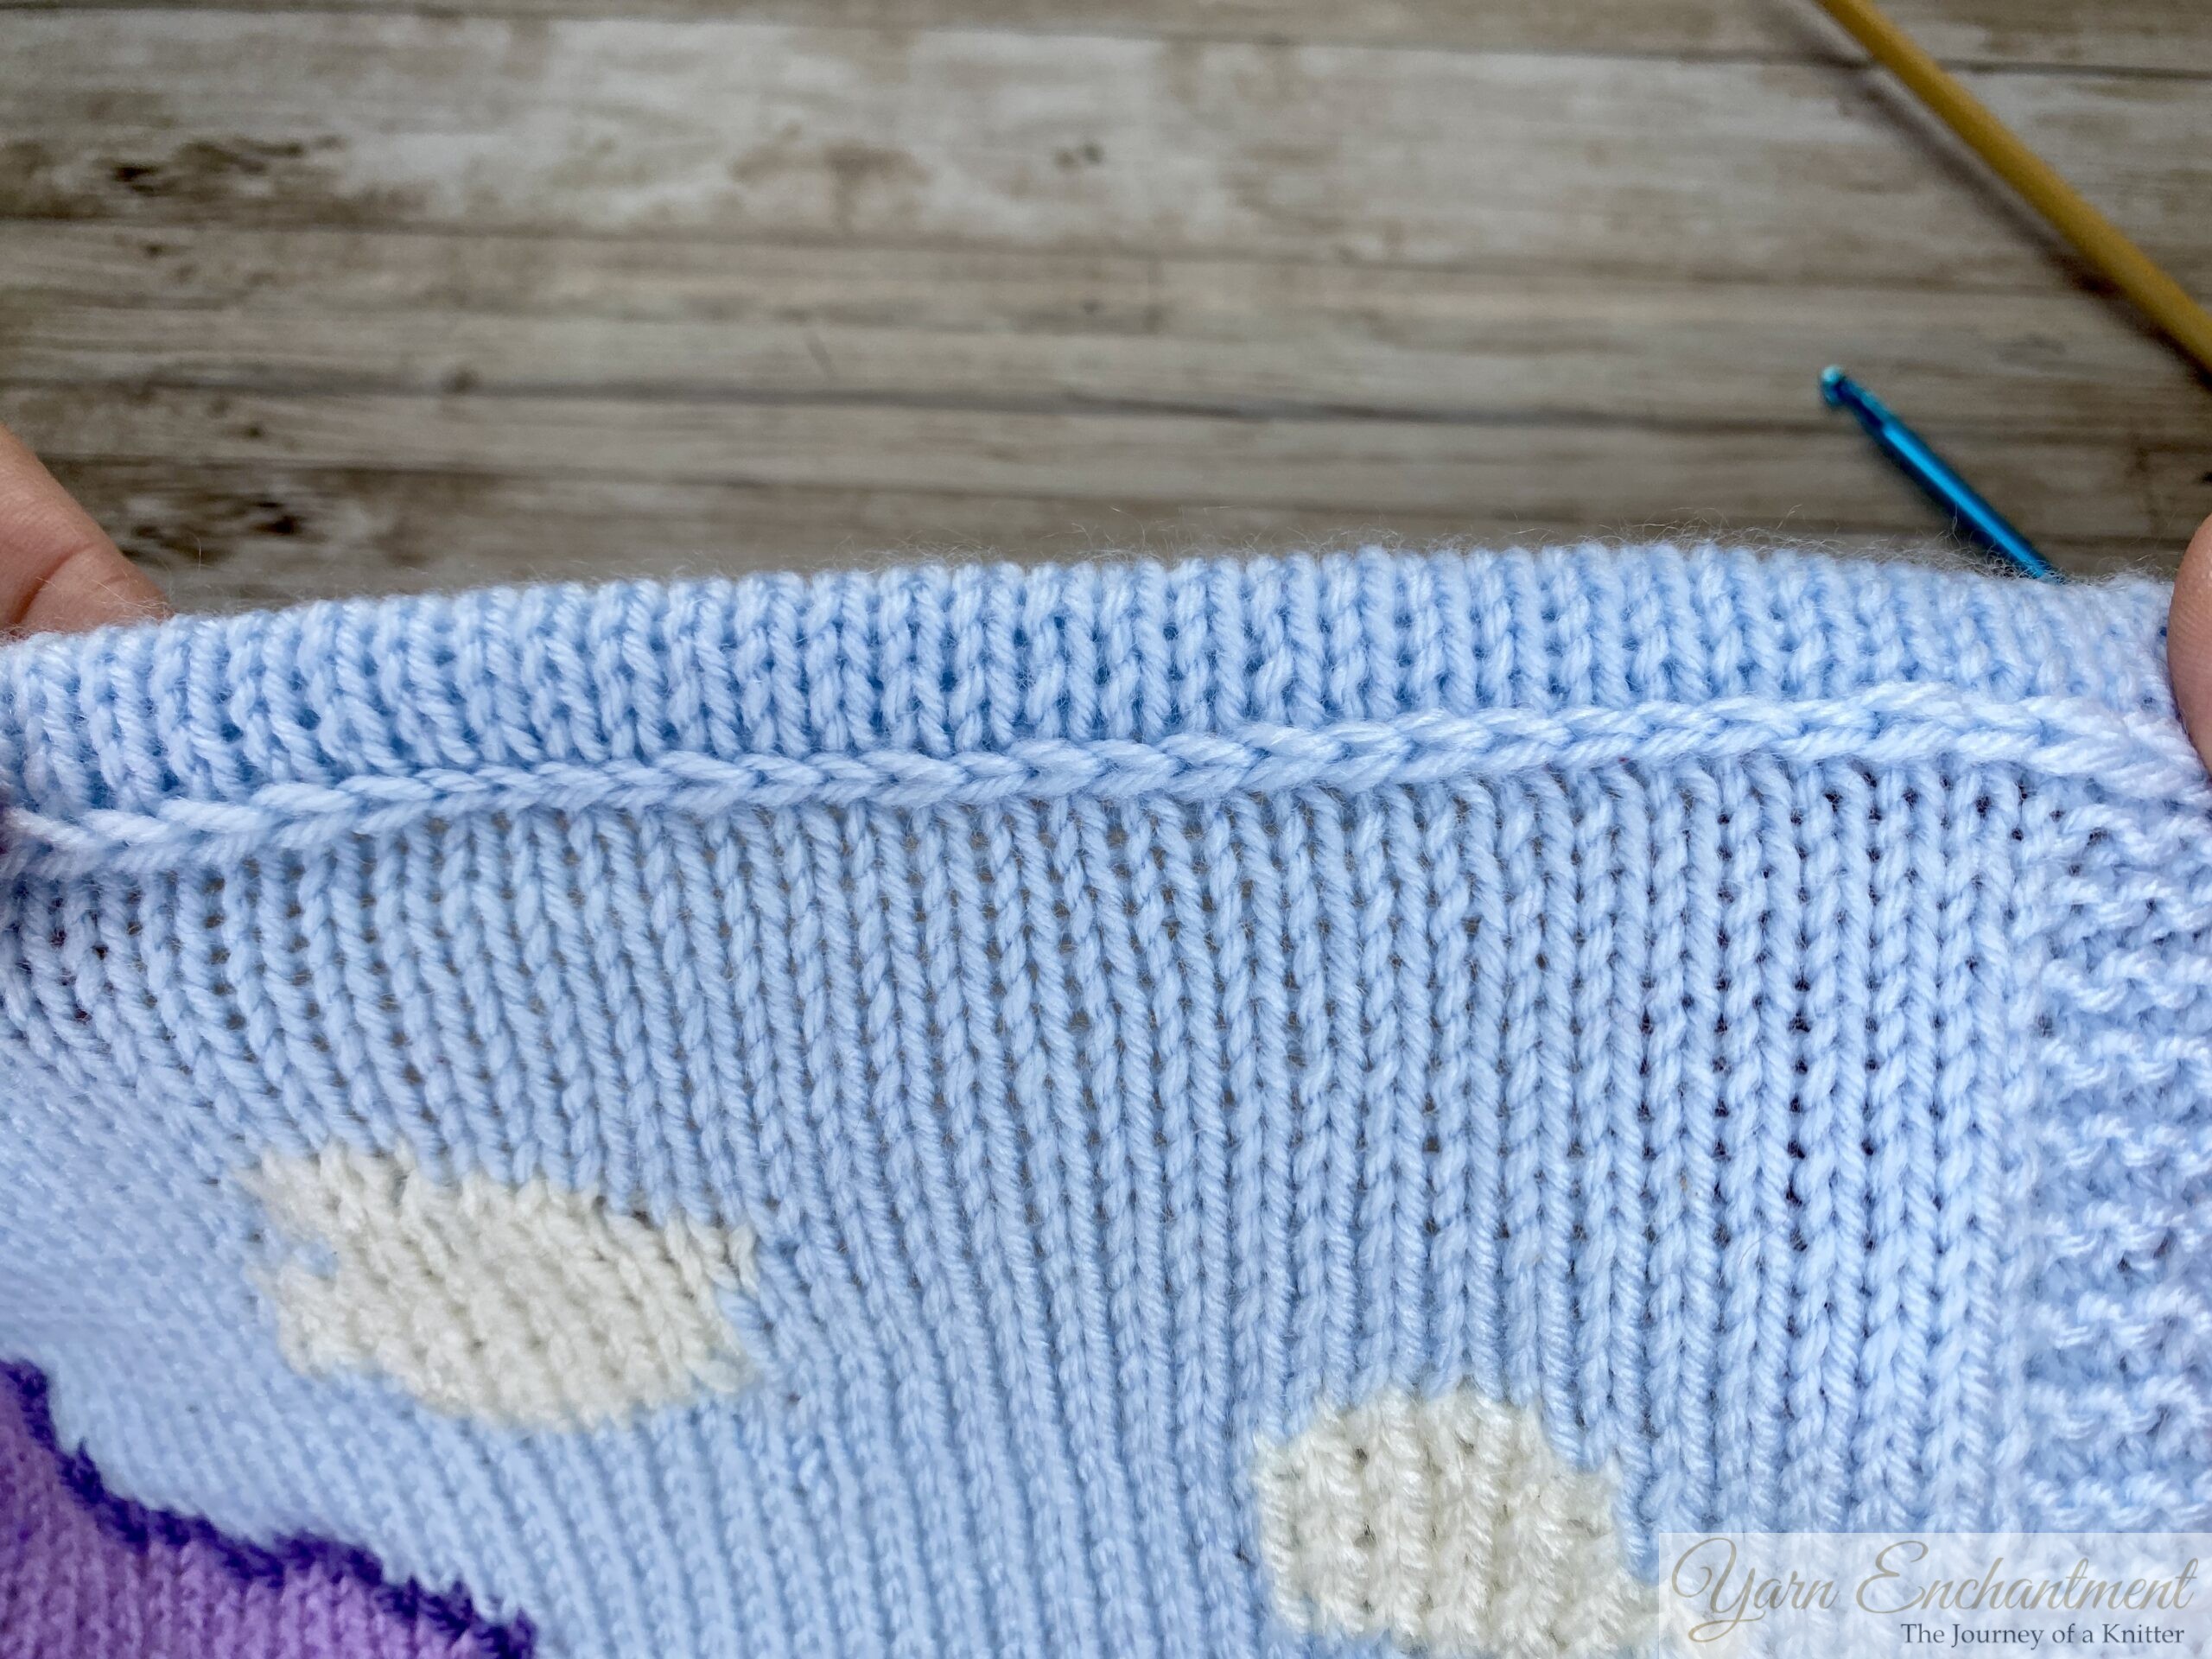 | 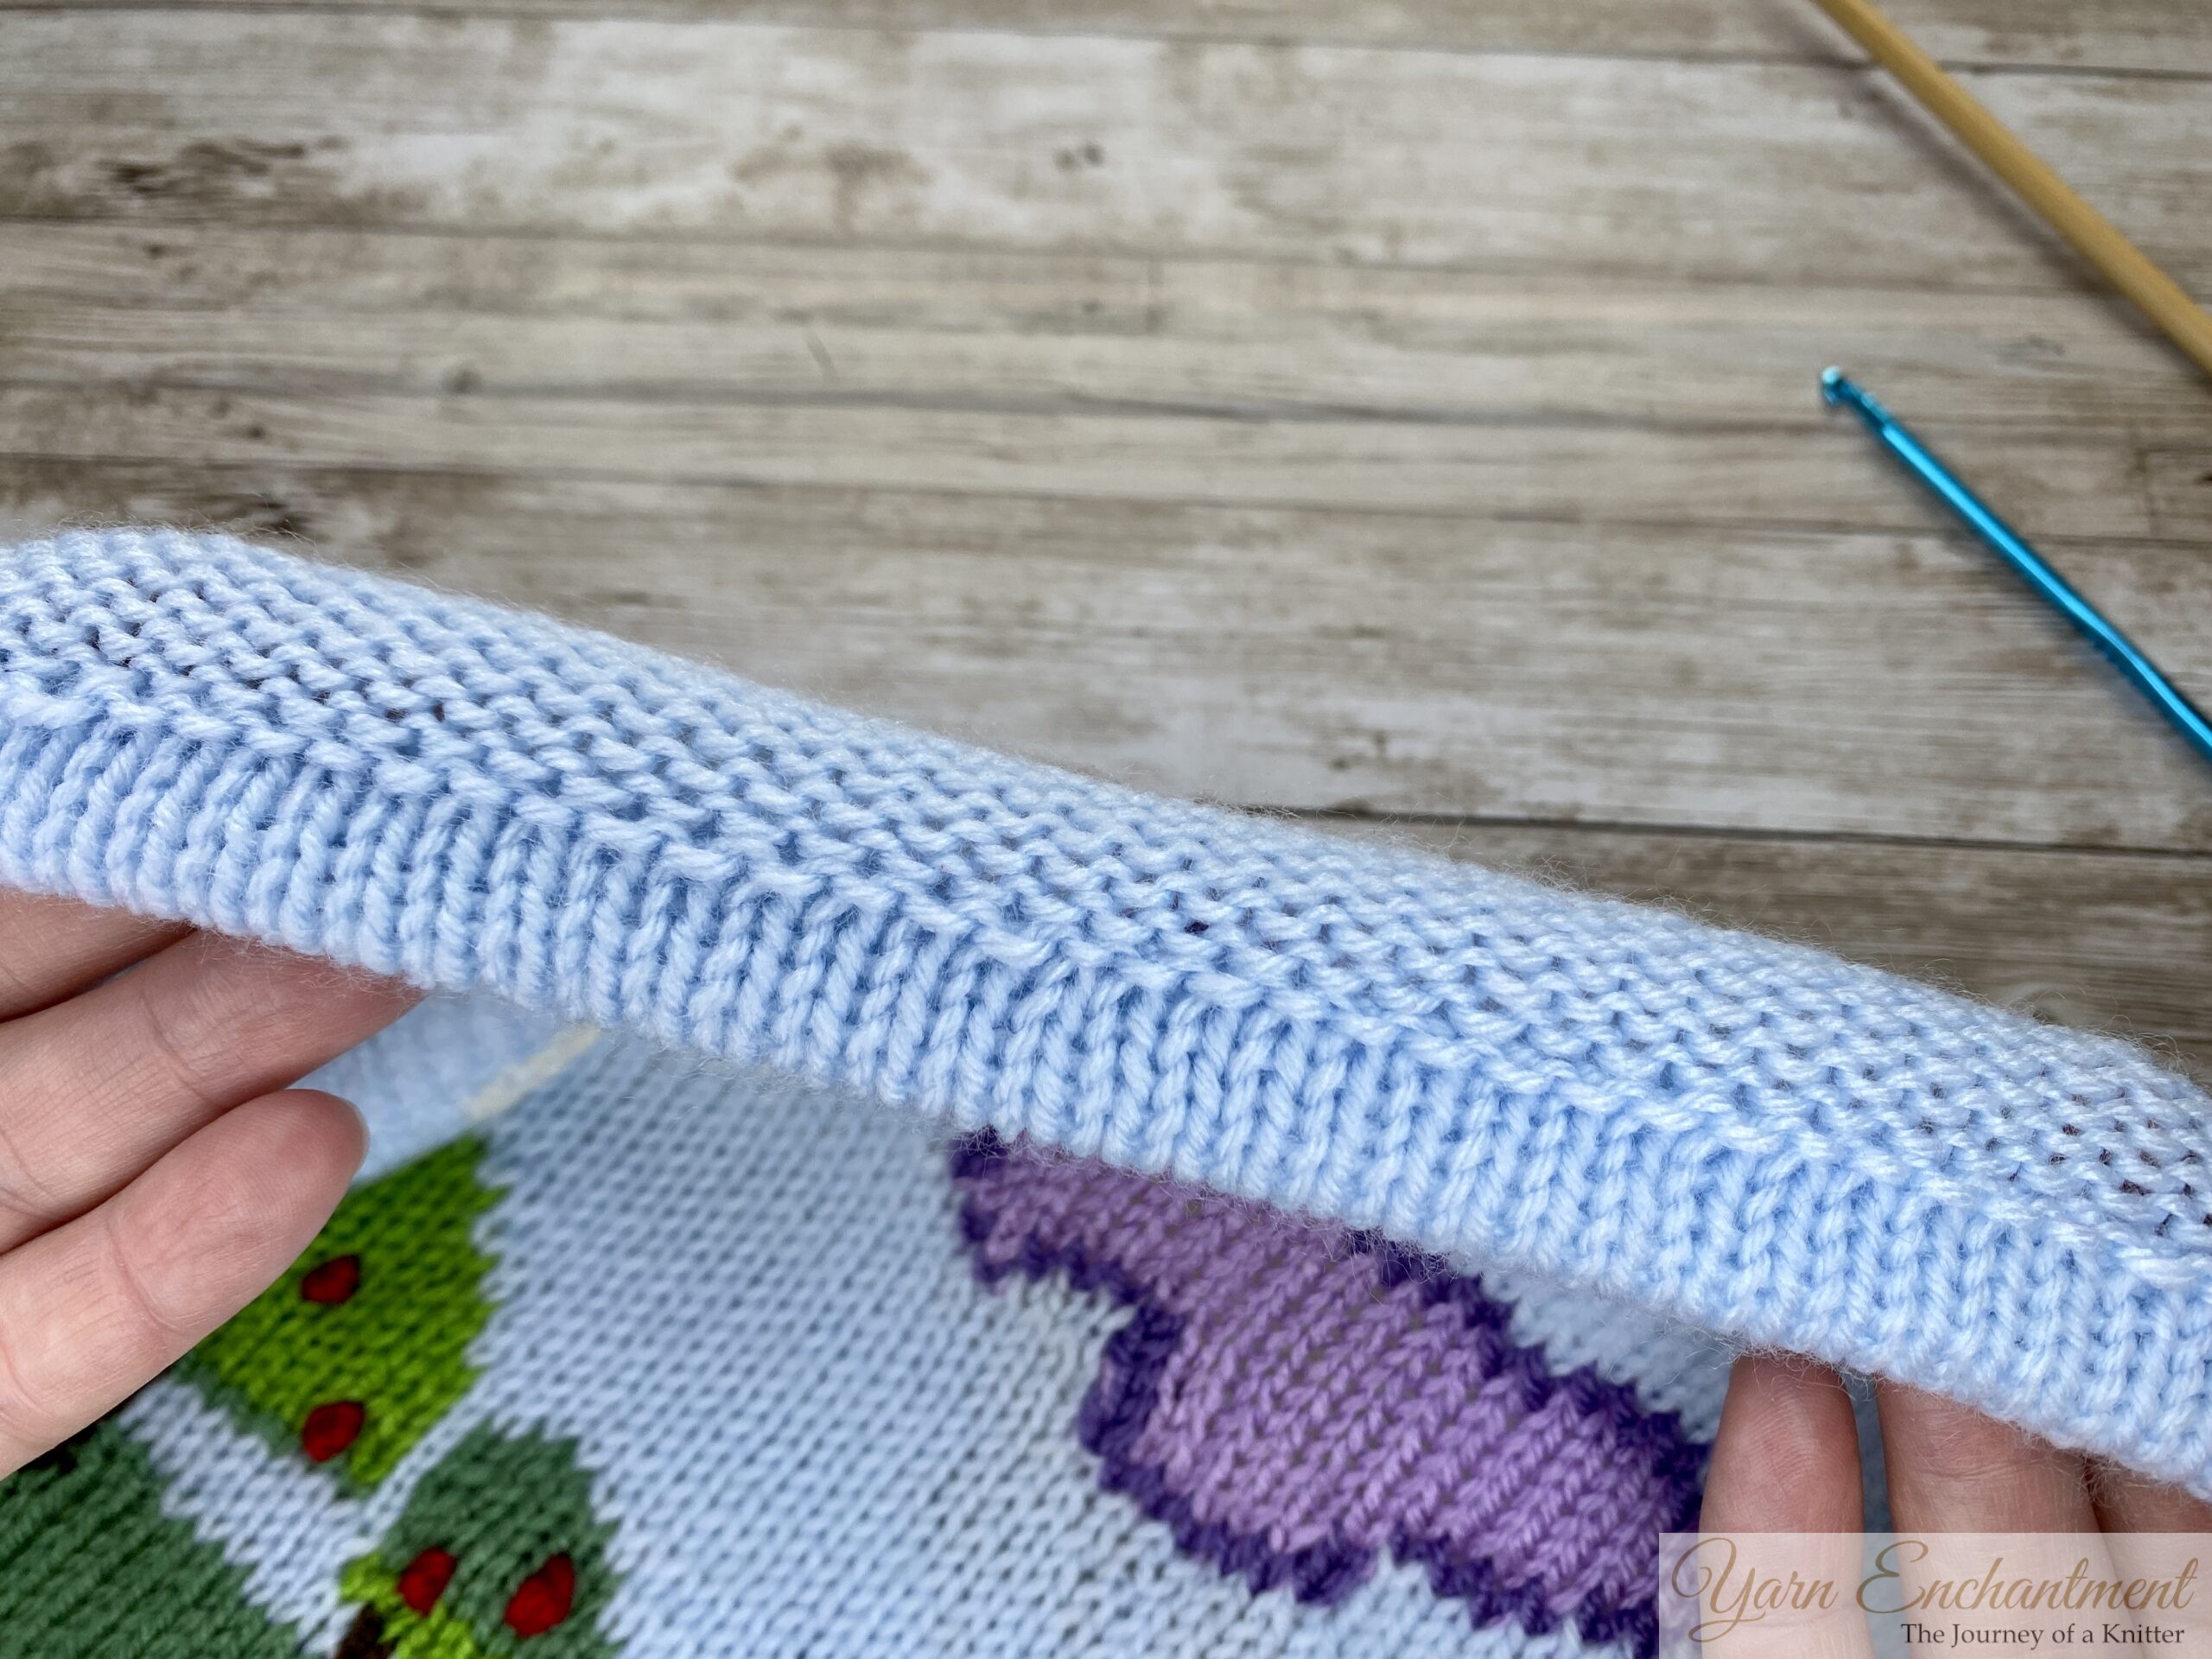 | The folded edge from the front | The folded edge from behind |


Turning a Drawing into a Knitting Pattern
The first step was figuring out how to turn a drawing into a knitting pattern. So, I spent hours sketching and erasing the design until it felt just right. It wasn’t perfect, but that was part of the charm - it was personal, and it was ours.
I used Stitch Fiddle to create the pattern, which made things a bit easier. I even tried uploading the drawing directly, but the results weren’t quite what I wanted. I realized there’s no “right” way to create an intarsia pattern. So, I decided to just go for it and figure things out as I went along.
What do you think? Did I catch the essence of the drawing?
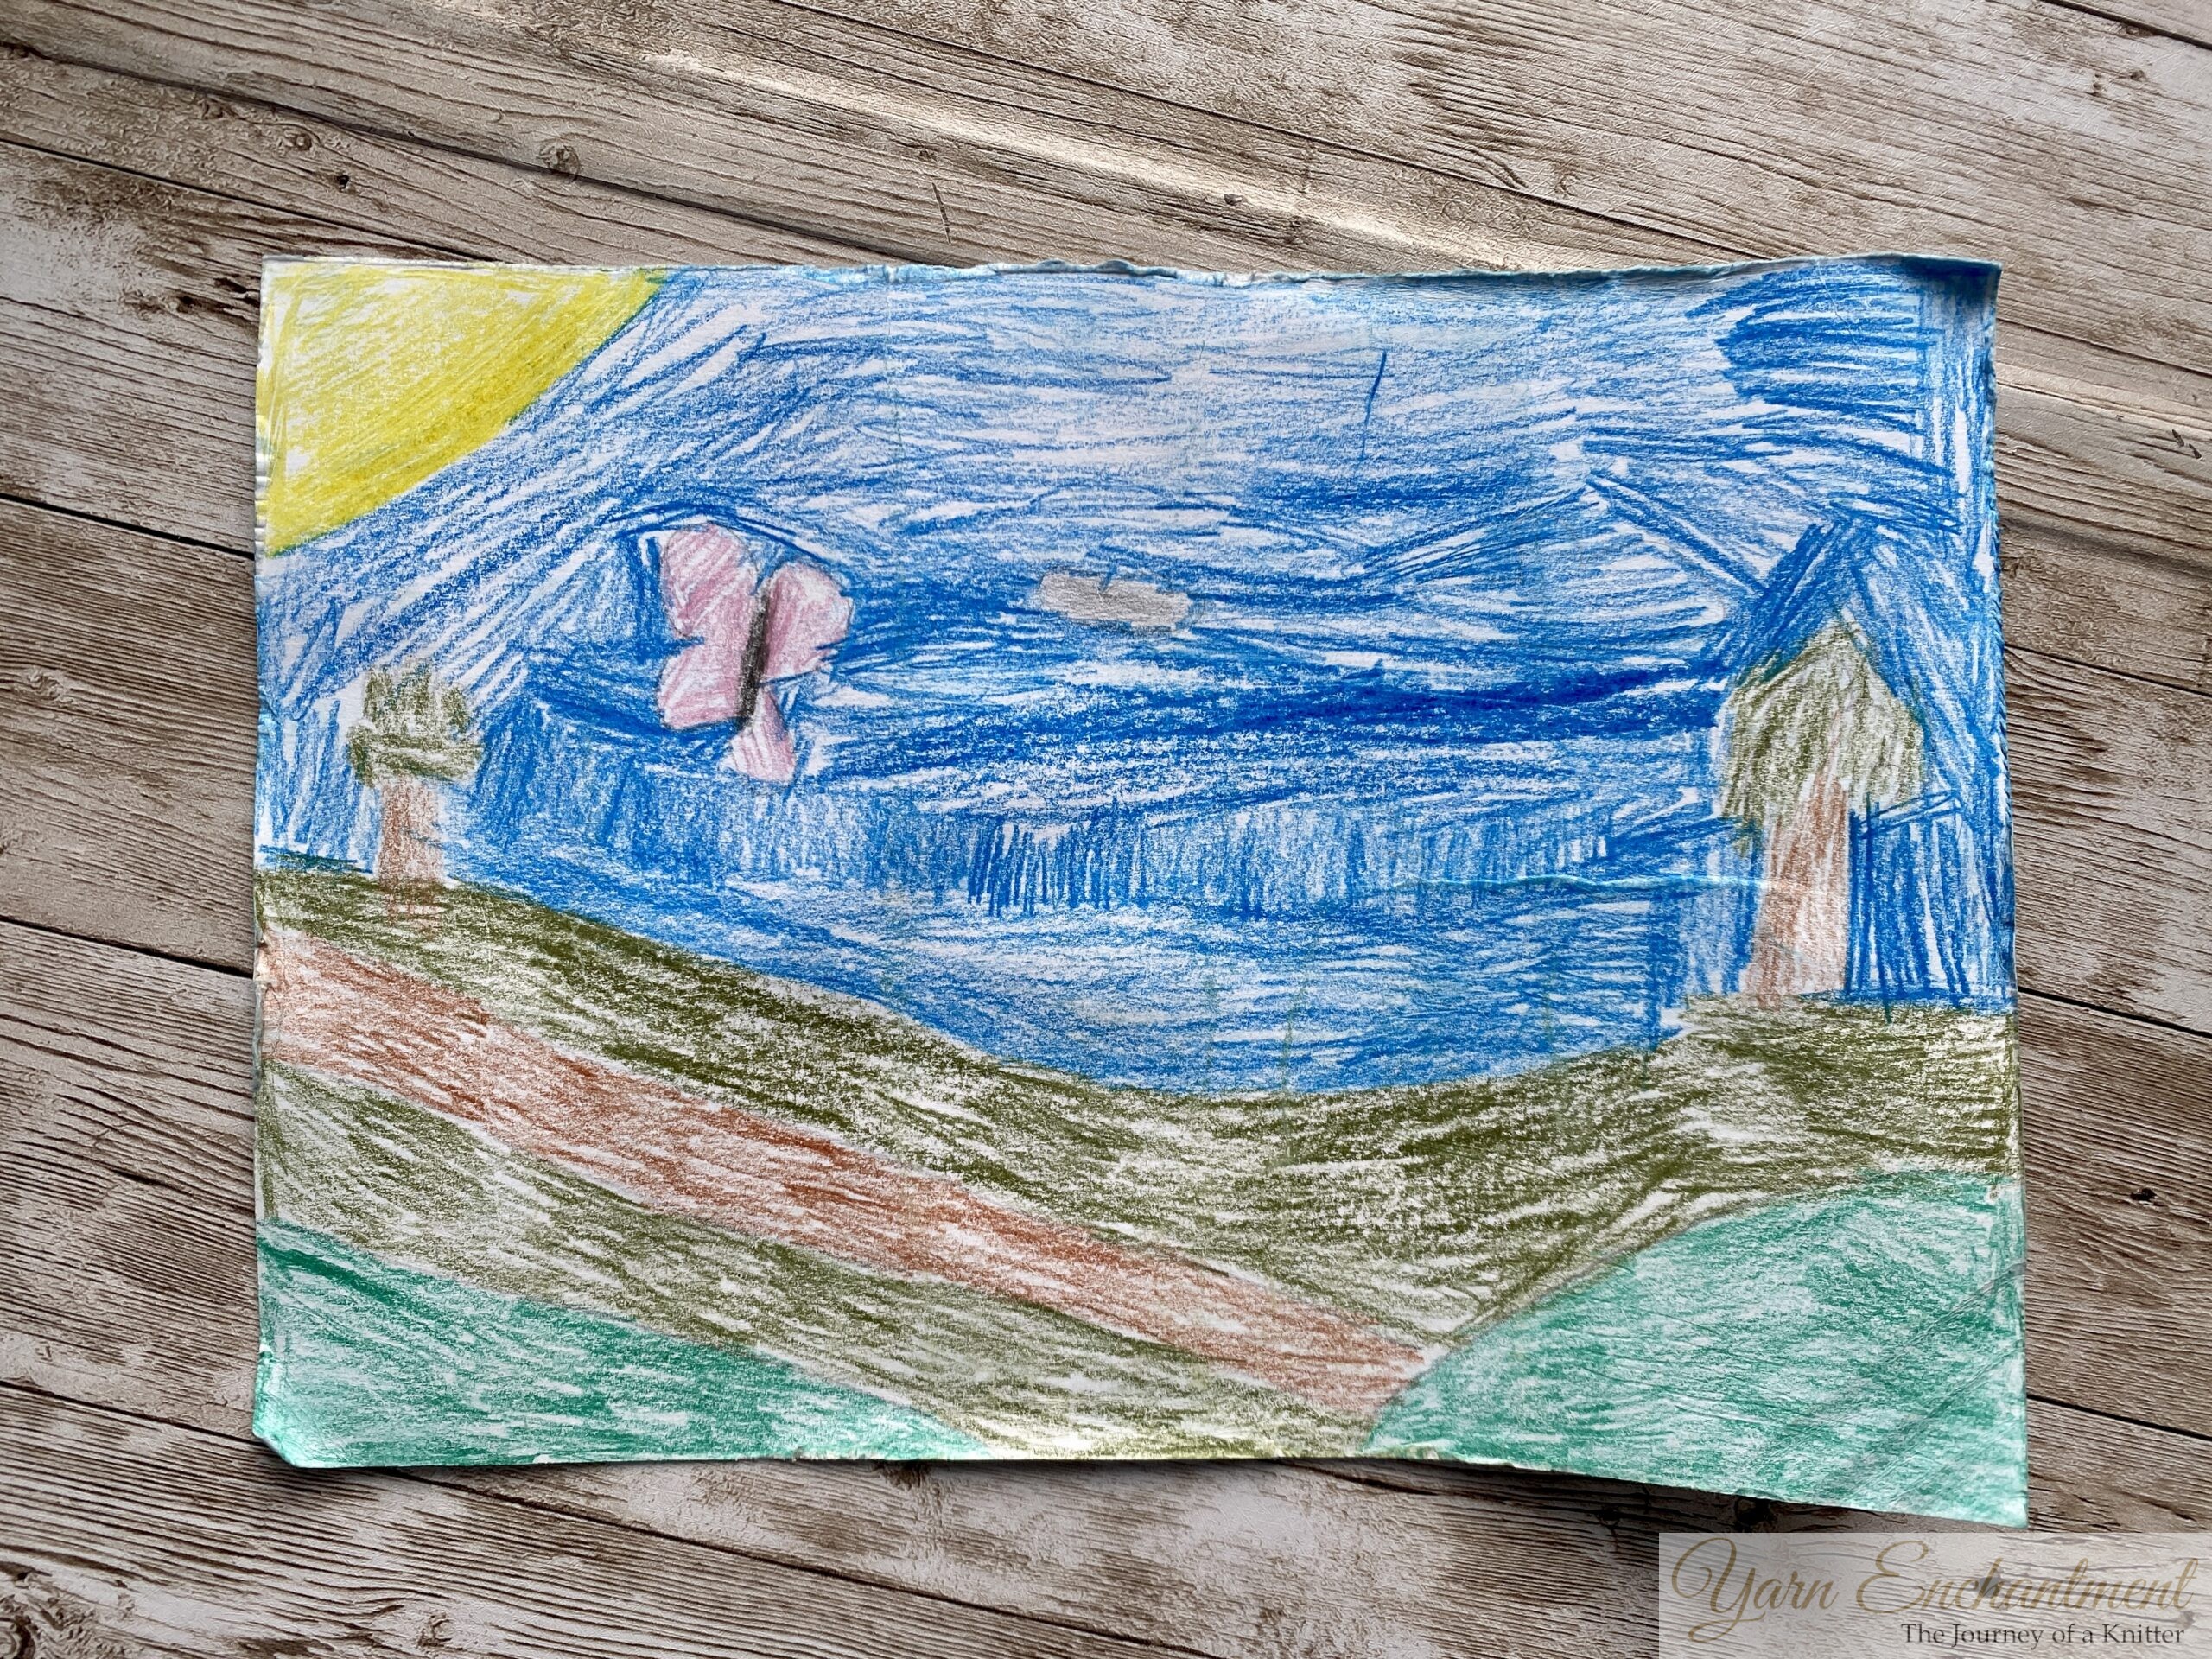 | 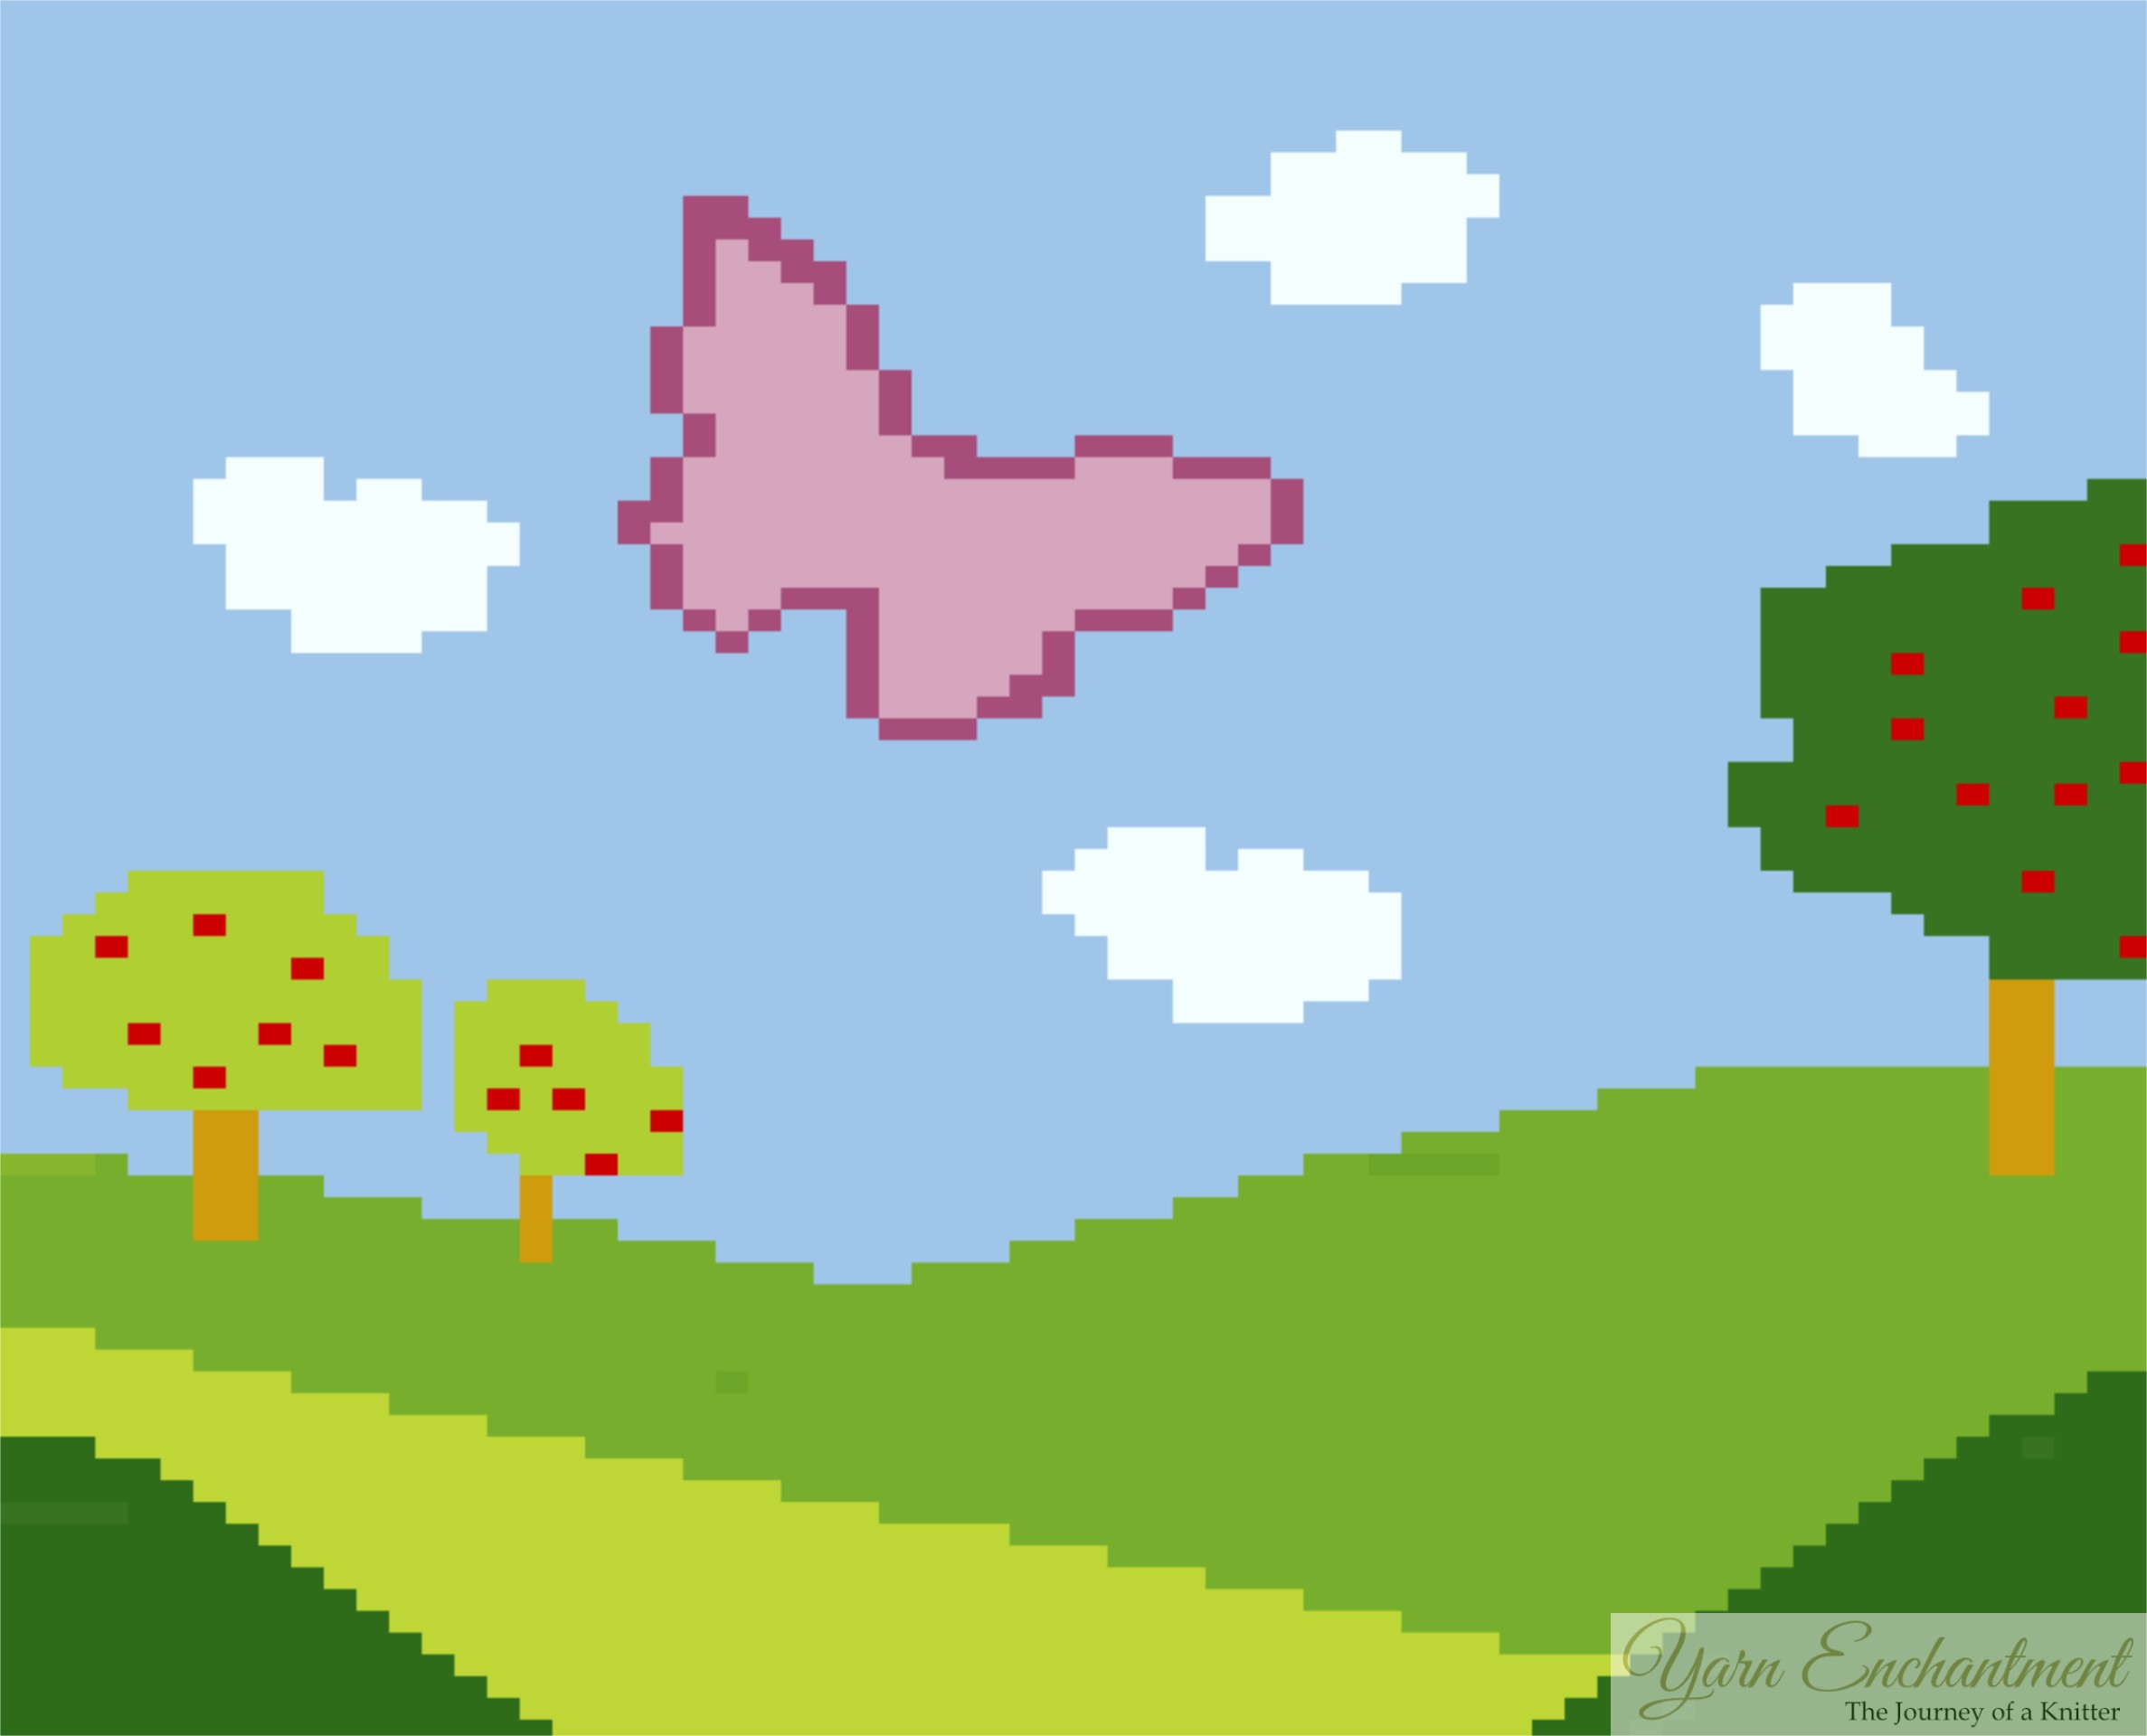 | My sons drawing | The pattern |


The Yarn
I had a lot of leftover yarn from Scheepjes Colour Crafter. I had originally purchased the entire palette for a crochet-along (CAL) project, but I wasn’t happy with the color choices for my blanket. At first, I thought about donating the yarn to a local church, but they didn’t want it. I even asked at the school, but surprisingly, they didn’t want it either. Shocking, I know! So, I decided to keep it and use it myself. After all, it’s perfect for experimenting with projects like this one.
I had the pattern and the yarn, now the real challenge began: learning intarsia. For those of you who haven’t tried it yet, intarsia is a knitting technique that lets you create blocks of color without carrying the yarn across the back of your work. Unlike Fair Isle, where you carry floats, intarsia uses separate yarn bobbins or butterflies for each color section. It’s like painting with yarn - beautiful, but definitely a bit tricky for a beginner like me.
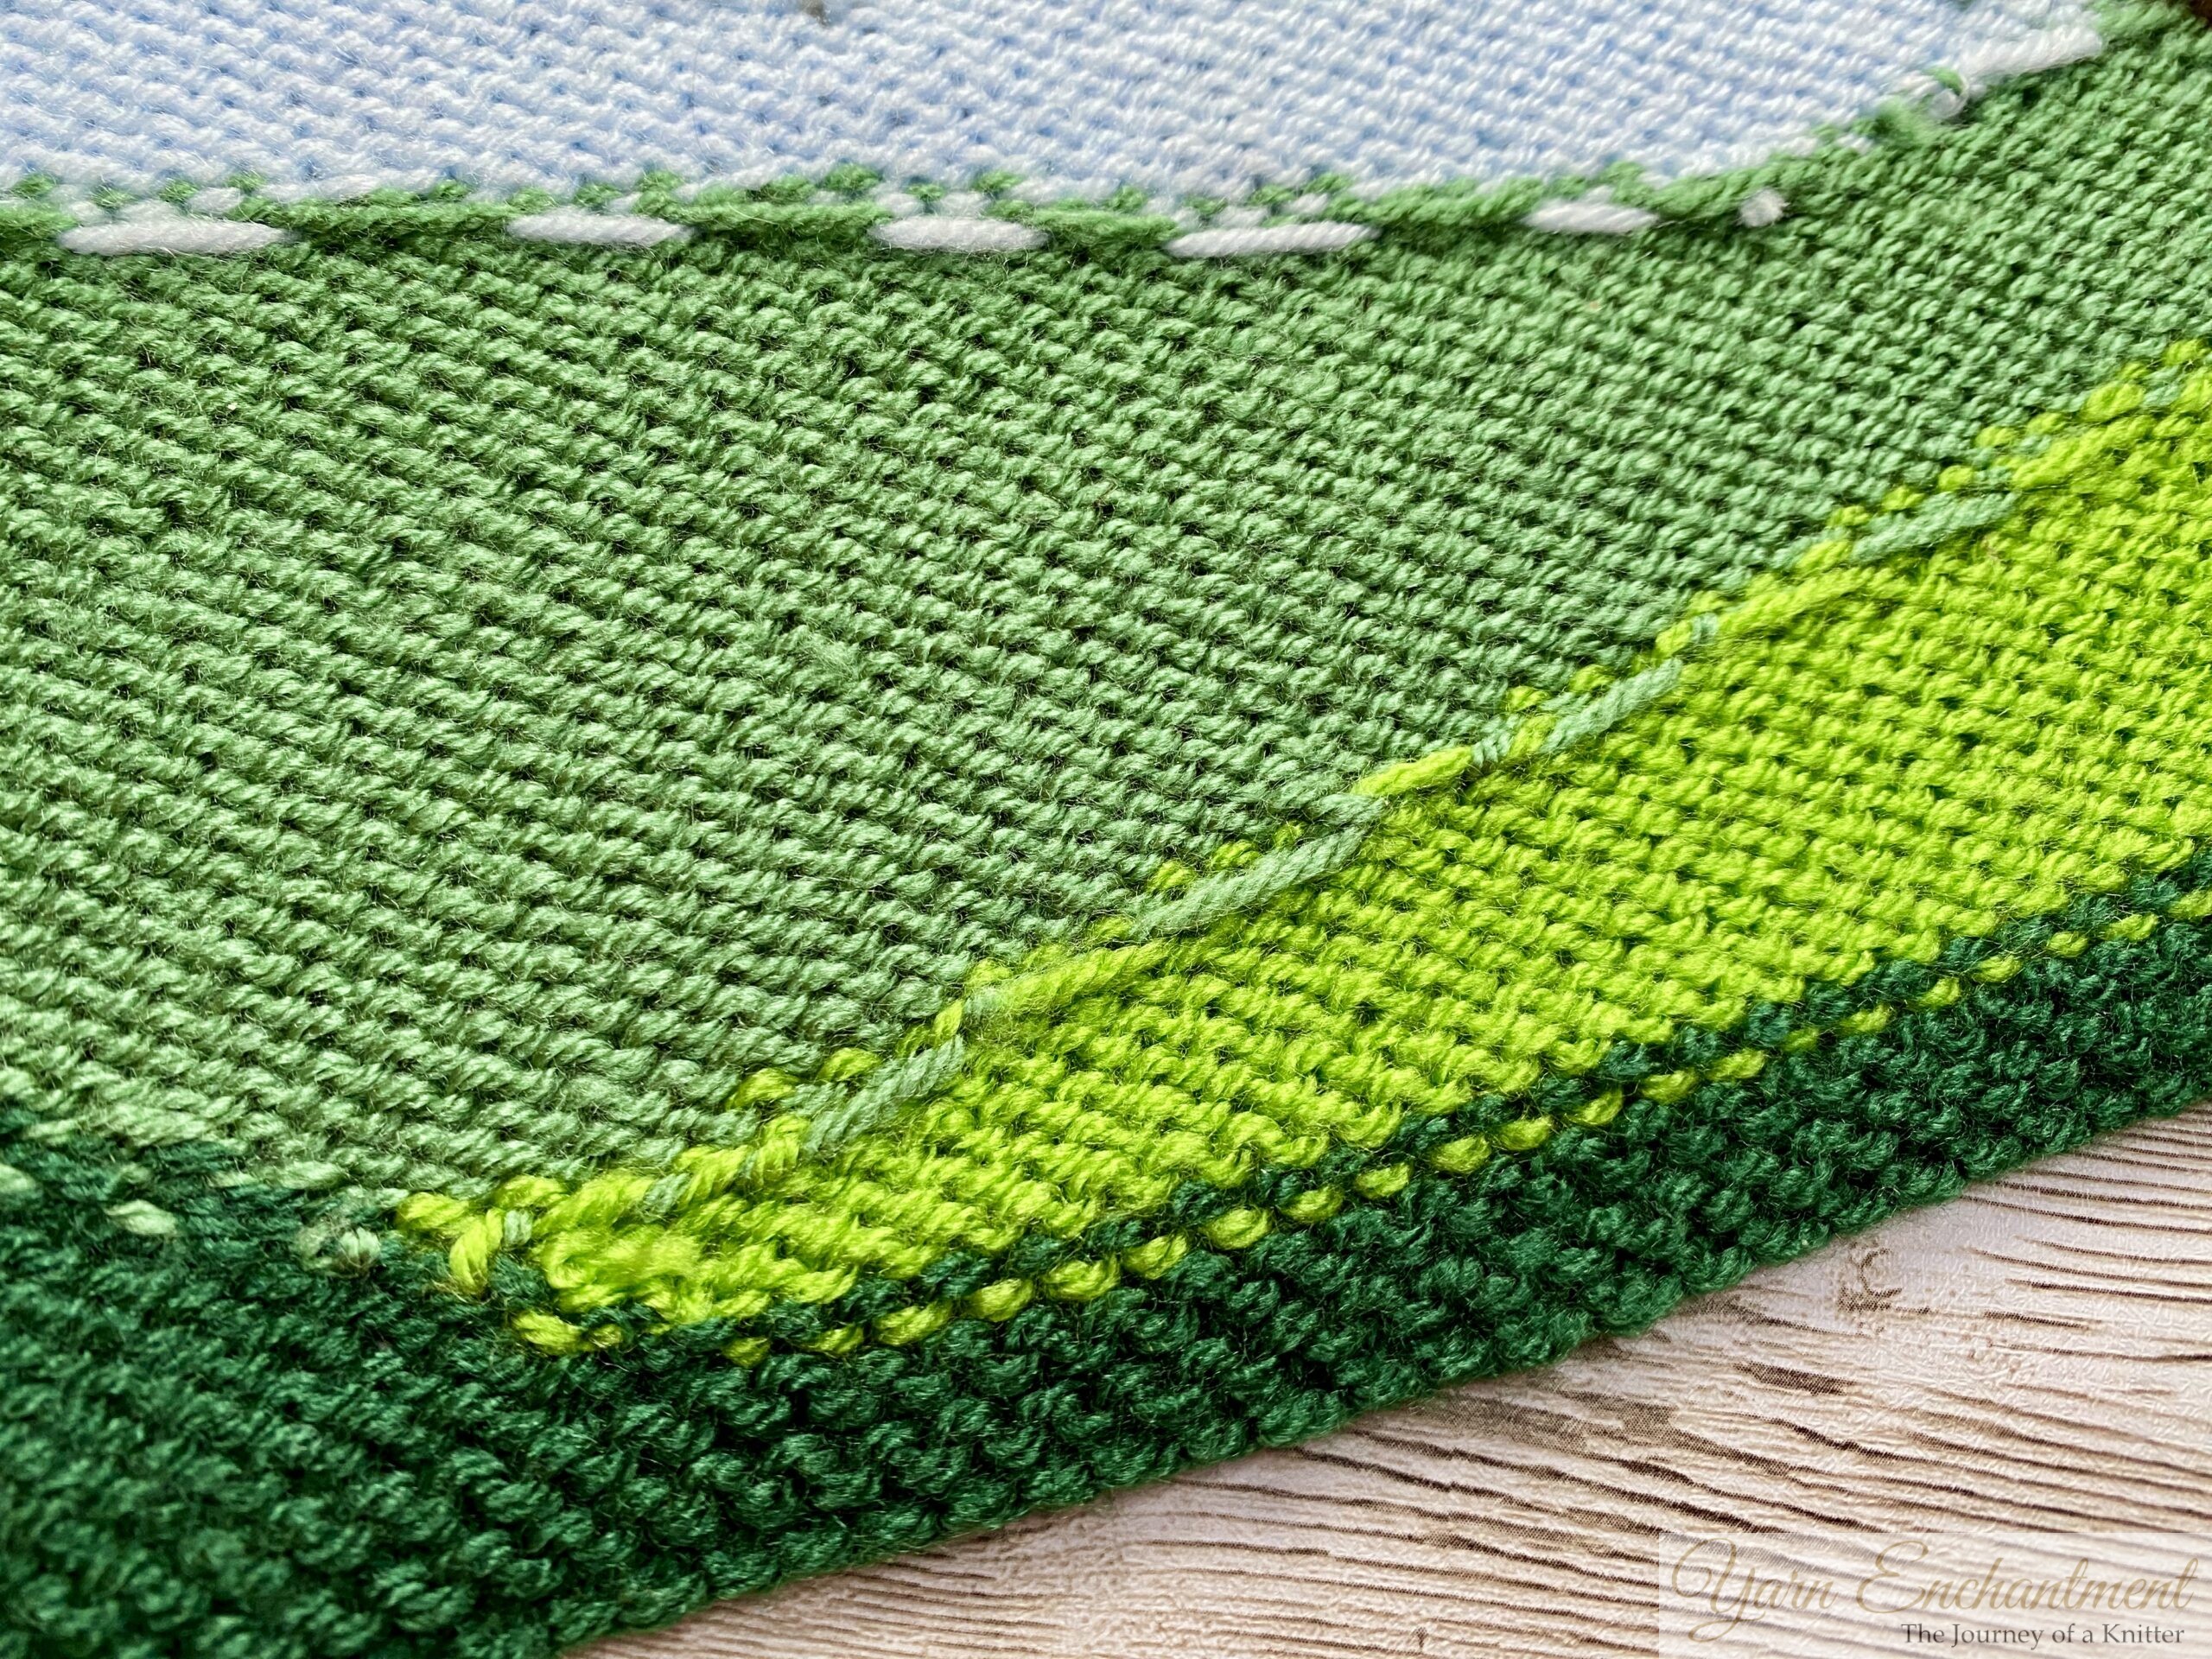 |  | Intarisa from behind | Colorwork from behind (Forest of Arda Cowl) |


Learning Intarsia Knitting as a Beginner
As a first-timer, I had so many questions that beginner tutorials didn’t seem to answer. I searched blogs and videos in both English and German, but some things I just had to figure out on my own. Here are a few lessons I learned along the way:
-
- What is the best way to manage your yarn in intarsia?
Believe me when I say it’s not a good idea to leave the whole yarn skein attached while working. Your yarn will get tangled because you need to twist it along the way. Untangling all those knots with a 100g yarn skein still attached can get a little tricky (and frustrating). For me, the best solution was to use little yarn butterflies. They hung neatly behind my work, and even with 10 pieces in use, it never got heavy or unmanageable. This method made the whole process so much easier and stress-free!
- How many stitches can you knit before starting a new bobbin or butterfly?
This was one of my biggest questions! For me, having no more than 5 stitches between color changes helped maintain "even tension". - What to do if you make a mistake.
Mistakes are inevitable, especially when you’re learning something new. I forgot to twist the yarn when changing colors a few times, which left small holes in the fabric. At first, I wanted to rip out rows every time I spotted an error. But then I realized that some mistakes didn’t ruin the overall design - they added to the handmade charm. So, I learned to let go of perfection and embrace the process. I will get better with practice. - How do I fix mistakes in Intarsia knitting?
It's easy: Duplicate stitches fix everything. For example, I forgot to start my tree trunk, so I just added some duplicate stitches to fix that. - How to create curves in intarsia.
I discovered that you can create steeper curves by making only one stitch difference between color sections, or gentler curves by leaving 3 or more stitches between changes. This little trick made shaping the design so much easier. That’s also the reason why I needed to know how many stitches I can have in between color sections. -
Twisting the Yarn
After finishing my wall hanger, I did some research on twisting the yarn. When you look closely, you can see that it sometimes looks uneven, especially around the clouds. I learned that you always twist your yarn to the left, and the new color is picked up from underneath. In my Vogue knitting book, they write that we twist our yarn every other row when knitting curves, but that can't be right. There’s so much more to explore about this technique, and I really want to dive deeper into it in another post. Stay tuned!
- What is the best way to manage your yarn in intarsia?
 | 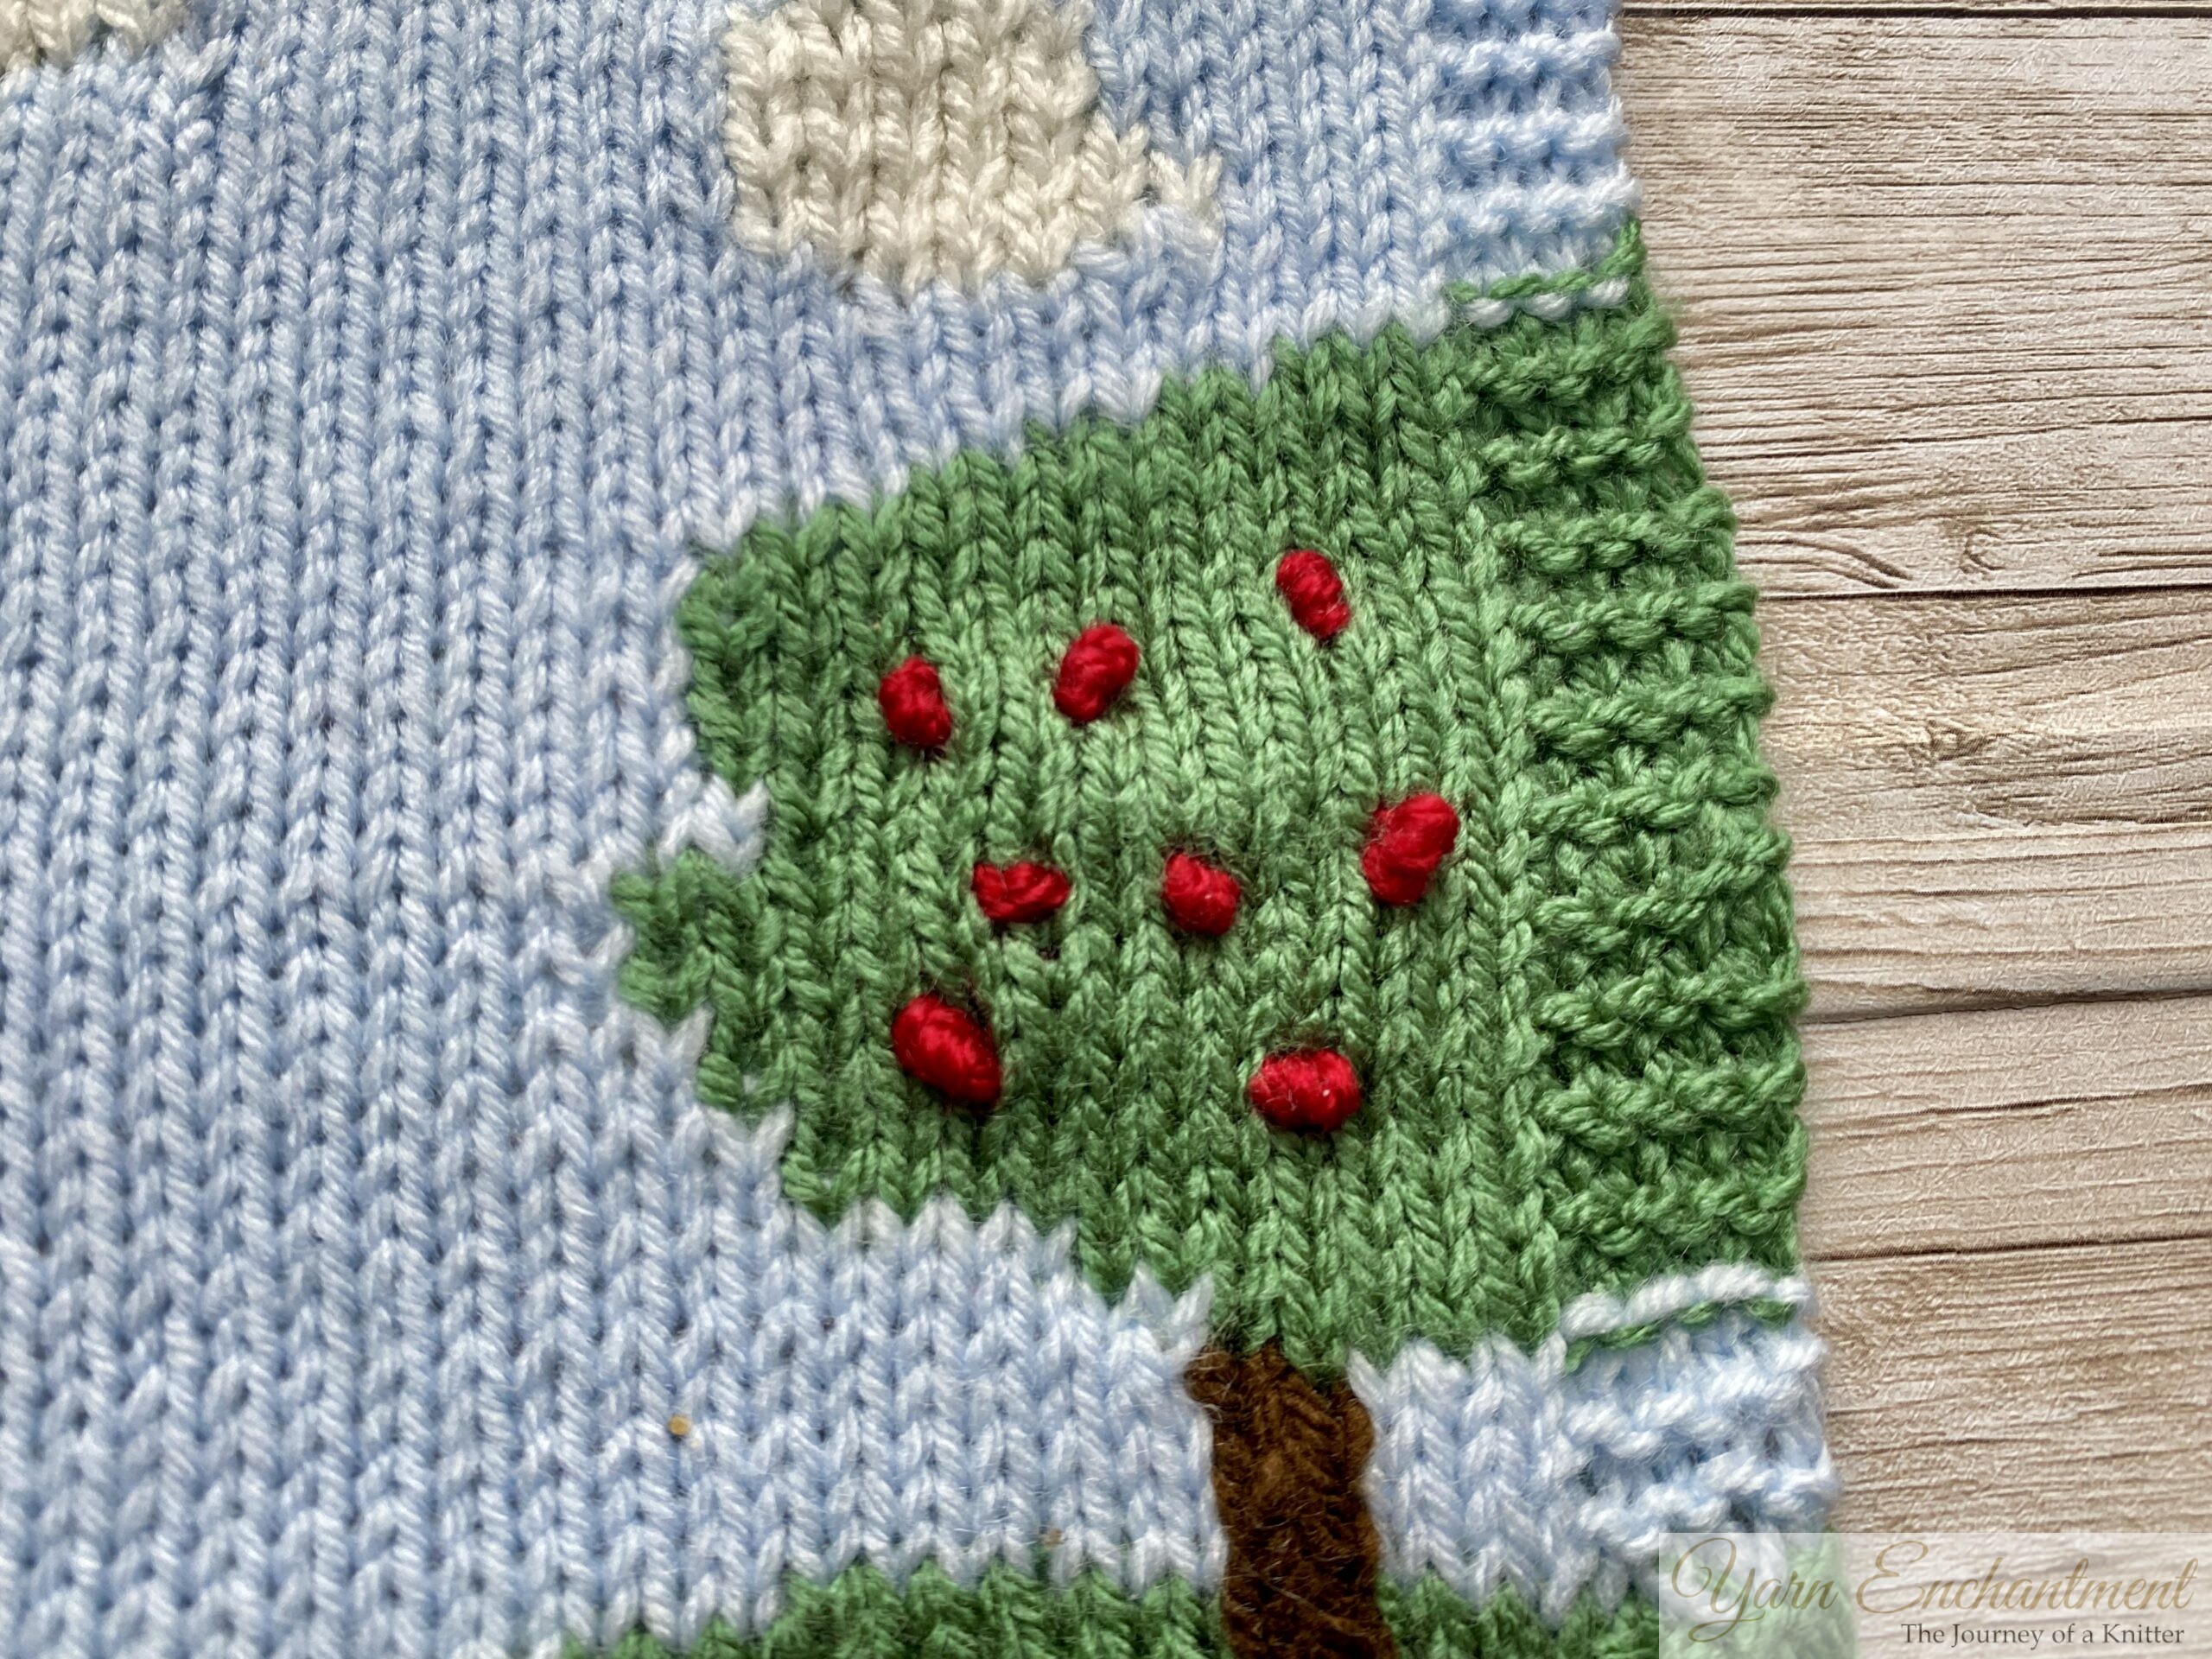 | The hills and Curves | Edges arround the tree |


Why Intarsia is Worth Trying
If you’ve been thinking about trying intarsia, I say go for it! It’s a technique that opens up endless creative possibilities. Yes, it takes patience, and yes, you’ll probably end up with a tangled mess of yarn at some point. But it is absolutely worth it.
If you’re new to intarsia, I’d recommend starting with a simple pattern - unlike me, who decided to tackle a whole landscape for my first project! Later in you can create your own design. There’s something very special about knitting something truly personal.
 | All the loose yarn strands |

A Memory Woven into Fabric
As I finished the last stitch, I couldn’t help but reflect on the memories tied up in this project. The drawing my son made when he was little. The hours I spent knitting, untangling yarn, and figuring out the pattern. The proud feeling I had when seeing the design come to life.
This intarsia piece is a memory woven into fabric, a celebration of the past and the present. Every time I look at it, I’m reminded of the love and care that went into every stitch.
So, if you’re looking for a way to turn your own memories into something tangible, why not give intarsia a try? You might just find, as I did, that it’s not just about the finished project - it’s about the journey, the learning, and the love that goes into every stitch.
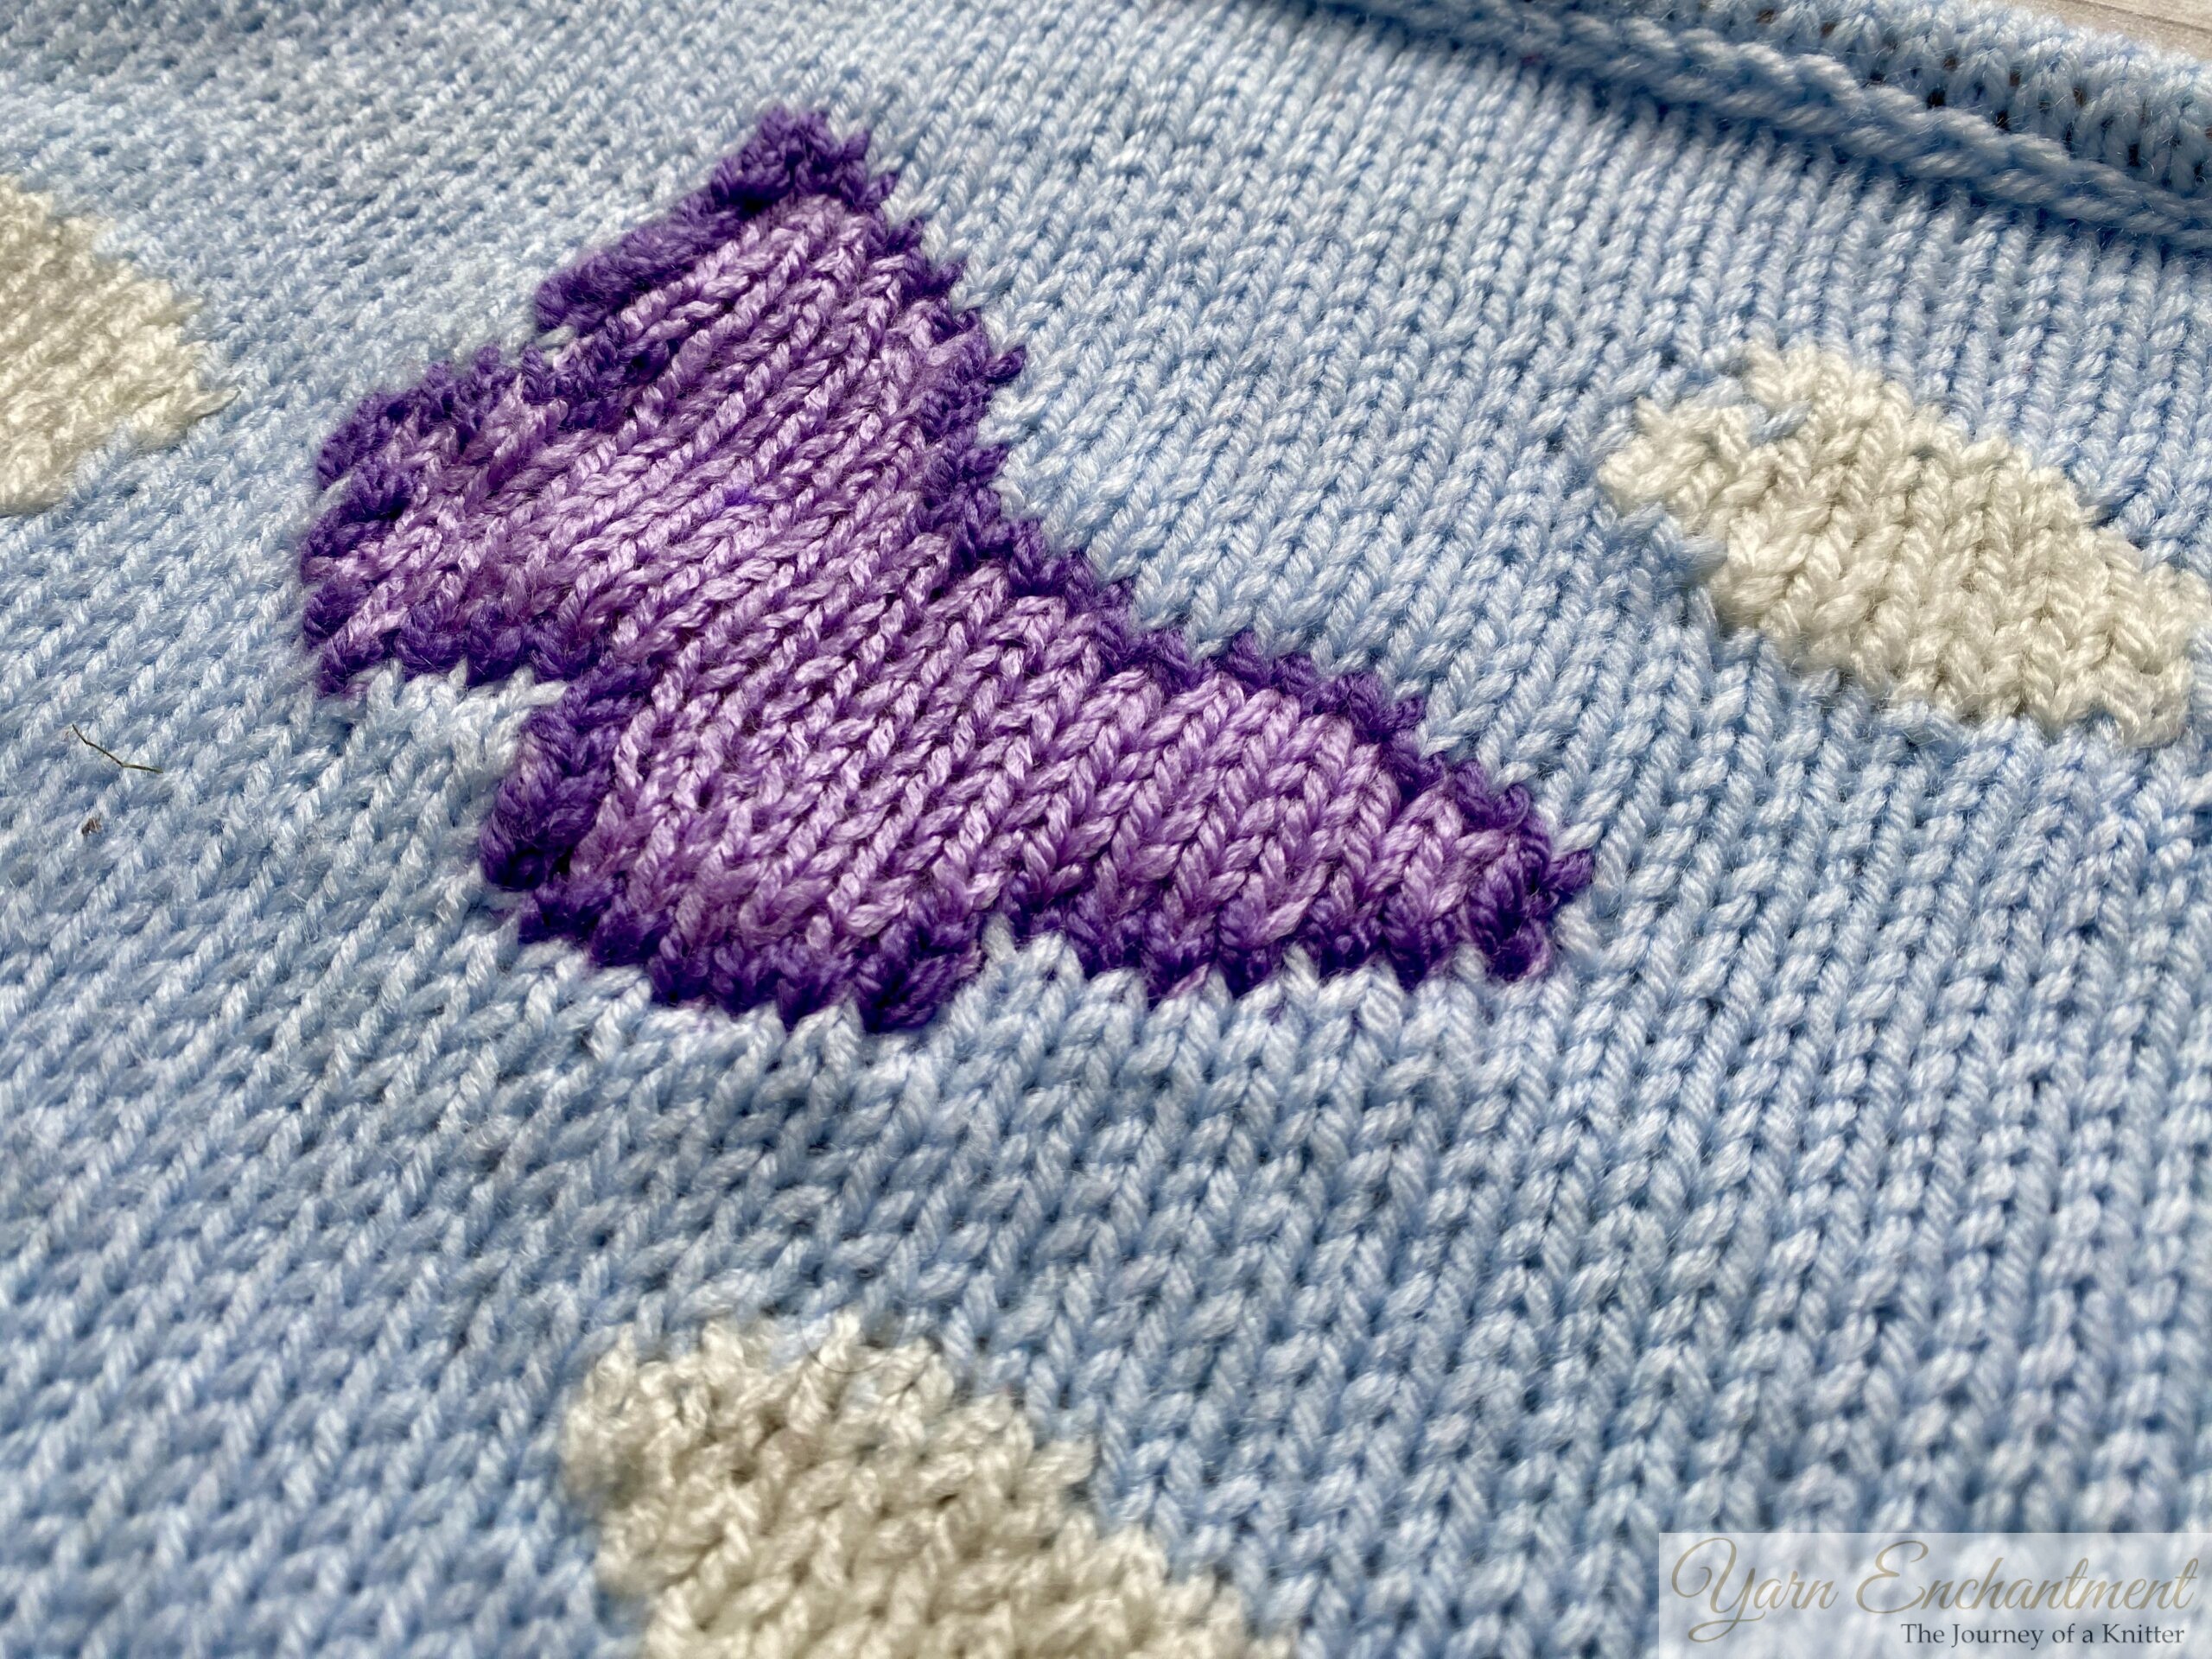 | The little Butterfly |

Final Thoughts
Knitting has always been more than just yarn and needles for me. It’s about connection, creativity, and storytelling. And with this project, I discovered a whole new way to tell a story - one that’s as unique and personal as the memories it’s based on.
If you’ve tried intarsia before, I’d love to hear about your experience! And if you’re a beginner like I was, don’t be afraid to dive in. The results might just surprise you.
I’ll also be sharing everything I’ve learned about this technique in a separate tutorial soon - this time with an easier shape, like a heart or a square! 😄
Until next time, happy knitting!
 | The finished picture with all its little flaws |

A Little Way to Say Thanks
You Might Also Like


 |
|
Join the Cozy Corner Newsletter!
Hey there, creative soul! Welcome to the Yarn Enchantment Newsletter, where we celebrate all things cozy, crafty, and full of heart. Think of this as your friendly crafting companion - a little dose of inspiration delivered straight to your inbox, just for you. Inside, you’ll find: ✨ Exclusive patterns & tutorials - ideas you won’t find anywhere else (just for us!) 📚 Bookish crafts that bring your favorite stories to life 🧶 Tips and tricks to make your crafting journey smoother (and more fun!) 💌 Heartfelt musings on life, creativity, and the magic of making something with your own two hands Whether you’re knitting by the fire, brainstorming your next DIY project, or just looking for a little creative pick-me-up, this newsletter is here to cheer you on. Because let’s be honest - crafting isn’t just about the finished project; it’s about the joy, peace, and stories we create along the way. So grab a cup of tea, cozy up, and join me. Together, we’ll weave a little magic into everyday life - one stitch, one story, and one email at a time. P.S. I’m so glad you’re here. Let’s make something beautiful together! (Note: If you're using an ad blocker, you may encounter issues subscribing to the newsletter. To subscribe, please consider disabling your ad blocker.)
|
