

The Magic within us
May 8, 2024
Another William’s Hat
May 15, 2024Seamless Join
Originally published on May 12, 2024
The seamless join technique in knitting has been a total game-changer for me. It’s such a simple trick, but it makes a huge difference if you want your projects to look polished and professional. With this technique, you can join your knitting in the round without that annoying gap or visible join; it’s like magic! The result is a smooth, clean finish that instantly elevates the look of your work.
 |
|
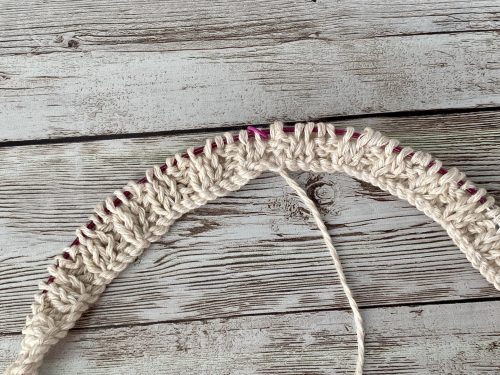
In this photo, I used a cable cast-on. |
What’s great is that you can use this technique with both circular needles and double-pointed needles (DPNs). All it takes is slipping the last cast-on stitch from your left needle onto the right one, then passing the second stitch over the slipped stitch. It’s such a small step, but it really smooths out the join and makes everything look flawless.
I’ve experimented with a few different cast-ons to see how they work with this technique. In the video, I used a traditional long-tail cast-on, while in the pictures, I tried a cable cast-on. Both worked beautifully, and it’s fun to see how the results vary depending on the method. If you haven’t tried this yet, I highly recommend giving it a go—it’s a game-changer!
As you can observe from both cast-on edges, the join is seamless and neat without a gap.
When using double-pointed needles, simply slip the first stitch from needle one onto needle four. Next, pass the following stitch from needle four over the just-slipped stitch. Gently tighten the stitch.
Seamless Join in the Round - Step-by-Step Pictures + Video Tutorial
 |
 |
|
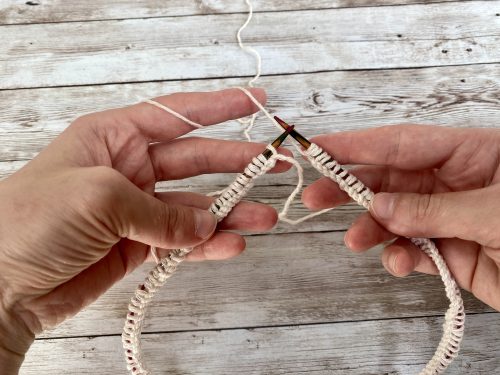
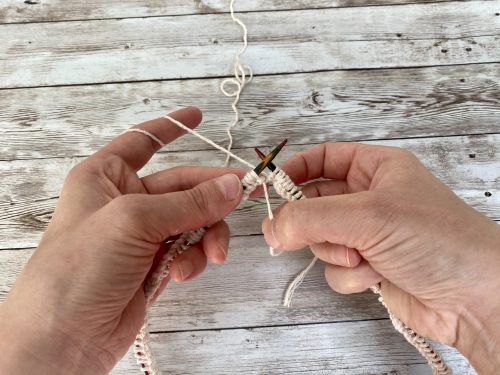
Cast on the required amount of stitches, ensuring that none of them are twisted. |
Slip the first stitch from the left needle onto the right-hand needle. |
 |
 |
|
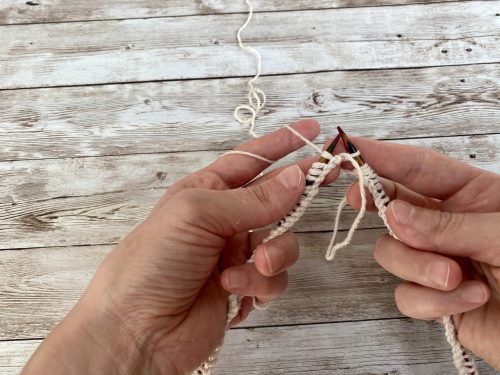
Pass the second stitch on the right-hand needle over the slipped stitch and drop it off the needle. |
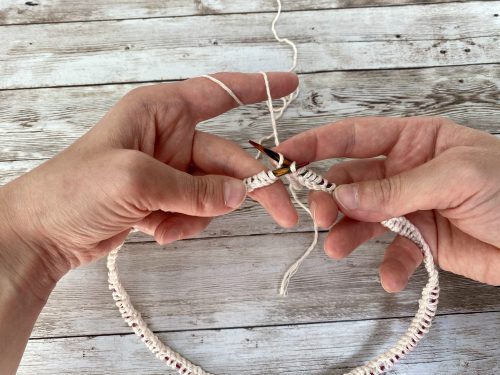
Tighten up the remaining stitch by gently tugging on the tail. |
Whether you’re using circular needles or double-pointed needles, this method is a game-changer for getting that clean, seamless look—no gaps, no visible joins, just a smooth finish. The steps are super simple, and with the help of the video and picture tutorial, you’ll be able to pick it up in no time.
With a bit of practice and patience, you’ll be able to pick up this technique in no time. It’s so rewarding to learn, and I hope you have a lot of fun giving it a try!
Until then, happy knitting!
A Little Way to Say Thanks
You Might Also Like


 |
|
Join the Cozy Corner Newsletter!
Hey there, creative soul! Welcome to the Yarn Enchantment Newsletter, where we celebrate all things cozy, crafty, and full of heart. Think of this as your friendly crafting companion - a little dose of inspiration delivered straight to your inbox, just for you. Inside, you’ll find: ✨ Exclusive patterns & tutorials - ideas you won’t find anywhere else (just for us!) 📚 Bookish crafts that bring your favorite stories to life 🧶 Tips and tricks to make your crafting journey smoother (and more fun!) 💌 Heartfelt musings on life, creativity, and the magic of making something with your own two hands Whether you’re knitting by the fire, brainstorming your next DIY project, or just looking for a little creative pick-me-up, this newsletter is here to cheer you on. Because let’s be honest - crafting isn’t just about the finished project; it’s about the joy, peace, and stories we create along the way. So grab a cup of tea, cozy up, and join me. Together, we’ll weave a little magic into everyday life - one stitch, one story, and one email at a time. P.S. I’m so glad you’re here. Let’s make something beautiful together! (Note: If you're using an ad blocker, you may encounter issues subscribing to the newsletter. To subscribe, please consider disabling your ad blocker.)
|
